MS在linux的安装过程
- 格式:doc
- 大小:76.00 KB
- 文档页数:14
如何安装和使用Linux操作系统第一章:引言和背景知识Linux操作系统是一种免费开源的操作系统,以其稳定性和安全性而闻名。
本章将介绍Linux操作系统的背景知识,包括其起源、发展和主要特点。
第二章:选择适合您的Linux发行版Linux操作系统有许多不同的发行版本,每个版本都具有自己的特点和用途。
本章将指导您选择适合您需求的Linux发行版,并对常见发行版进行介绍。
第三章:准备安装所需材料在安装Linux操作系统之前,您需要准备一些必要的材料和设备。
本章将介绍您需要准备的硬件设备、安装介质和其他必要的准备步骤。
第四章:安装Linux操作系统本章将详细介绍如何安装Linux操作系统。
涵盖的内容包括从镜像文件创建安装介质、启动计算机并进入安装程序、分区和格式化磁盘、选择安装选项、设置用户账户和密码等。
第五章:初次启动和基本配置当安装完成后,您需要进行一些初次启动和基本设置,以确保Linux操作系统正常运行。
本章将介绍如何进行初次启动、配置网络连接、更新软件包、设置系统时区等。
第六章:使用Linux命令行界面Linux操作系统以其强大的命令行界面而著名,熟练使用命令行界面是运维人员的必备技能。
本章将介绍基本的Linux命令,包括文件和目录操作、用户和权限管理、进程管理等。
第七章:安装和配置常用应用程序本章将介绍如何安装和配置常用的Linux应用程序,例如Web 服务器、数据库、邮件服务器等。
同时,还将介绍如何使用包管理器进行软件的安装和更新。
第八章:远程访问和文件传输远程登录和文件传输是管理Linux系统的常见任务之一。
本章将介绍如何通过SSH协议远程登录Linux系统,并使用SCP或SFTP实现文件的传输和管理。
第九章:系统监控和故障排除在运维过程中,系统监控和故障排除是非常重要的。
本章将介绍常用的系统监控工具和技术,以及处理常见故障的方法。
第十章:安全性和更新Linux操作系统以其高度的安全性而闻名,但仍然需要采取一些额外的措施来确保系统的安全。

说明linux操作系统的安装步骤和简单配置
方法。
Linux操作系统是一种非常流行的操作系统,包括基于Linux内核的Ubuntu、 Fedora和CentOS等操作系统。
下面就介绍一下Linux 操作系统安装和简单配置方法。
一、安装Linux
1、首先下载Linux系统,通常有ISO文件和USB启动盘安装,要根据个人情况来选择。
2、在BIOS中设置开机方式,一般有光驱可开机、硬盘可开机和启动盘可开机三种,找到与自己电脑相匹配的模式,设置后使之可以正常进入安装界面。
3、根据安装引导界面的提示,一步步配置系统的语言、时区、磁盘分区等,将参数设置完毕后系统即可正常安装完毕。
二、简单配置
1、给系统设置一个开机密码以保护系统,以免被恶意攻击,常见的系统有root、admin、administrator等,可以根据自己的情况设置。
2、添加新用户,可以给不同的用户设置不同的权限和登录环境,有助于管理用户和资源,使用useradd命令就可以添加新用户。
3、Linux支持常见的网络服务,但为了确保网络安全,可以使用iptables工具对防火墙进行策略设置,当未知IP发起连接时,可以让iptables来作出判断,阻止一些恶意攻击。
总之,以上就是安装和简单配置Linux操作系统的方法,具体的操作可以根据实际情况进行调整,以保证系统的安全性和高效性。
MaterialsStudioforLinux安装教程Materials Studio for Linux安装教程软件版本:Materials Studio 8.0 操作系统:CentOS 7 x86_64 1161 普通账户:zwz红字字体为敲入的代码或修改的内容,蓝色字体为注意事项,紫色字体为补充说明1. 安装前的准备将MS软件、证书和库文件拷贝或上传至普通用户的根目录[zwz@zifeng ~]$ lsglibc-2.17-157.el7.i686.rpm libgcc-4.8.5-11.el7.i686.rpm libstdc++-4.8.5-11.el7.i686.rpm Materials Studio80.tgz msi.lic Music perl5 Pictures Public Templates Videos切换至root用户[zwz@zifeng ~]$ suPassword:检查主机名[root@zifeng zwz]# hostnamezifeng修改hosts文件[root@zifeng zwz]# vi /etc/hosts127.0.0.1 zifeng localhost localhost.localdomain localhost4 localhost4.localdomain4::1 localhost localhost.localdomain localhost6 localhost6.localdomain6关闭防护墙[root@zifeng zwz]# systemctl stop firewalld.service[root@zifeng zwz]# systemctl disable firewalld.serviceRemoved symlink /etc/systemd/system/dbus-org.fedoraproject.FirewallD1.service.Removed symlink /etc/systemd/system/basic.target.wants/firewalld.service.当操作系统为CentOS 6等时,如下执行:[root@zifeng zwz]# service iptables stop[root@zifeng zwz]# chkconfig iptables off更改SELiunx为disabled[root@zifeng zwz]# vi /etc/selinux/config# This file controls the state of SELinux on the system.# SELINUX= can take one of these three values:# enforcing - SELinux security policy is enforced.# permissive - SELinux prints warnings instead of enforcing.# disabled - No SELinux policy is loaded.SELINUX=disabled# SELINUXTYPE= can take one of three two values:# targeted - Targeted processes are protected,# minimum - Modification of targeted policy. Only selected processes are protected.# mls - Multi Level Security protection.SELINUXTYPE=targeted检查库文件是否齐全[root@zifeng zwz]# rpm -qa|grep libgcclibgcc-4.8.5-11.el7.x86_64[root@zifeng zwz]# rpm -qa|grep glibccompat-glibc-2.12-4.el7.centos.x86_64glibc-devel-2.17-157.el7.x86_64glibc-common-2.17-157.el7.x86_64compat-glibc-headers-2.12-4.el7.centos.x86_64glibc-headers-2.17-157.el7.x86_64glibc-2.17-157.el7.x86_64[root@zifeng zwz]# rpm -qa|grep libstdc++libstdc++-4.8.5-11.el7.x86_64libstdc++-devel-4.8.5-11.el7.x86_64要求这三个库文件的32位、64为位程序都安装,发现缺少32位libgcc-4.8.5-11.el7.i686、glibc-2.17-157.el7.i686和libstdc++-4.8.5-11.el7.i686程序。
Materials Studio Linux集群安装手册一、安装Linux操作系统,进行系统配置一般都建议最小化安装,不用安装图形界面。
下面我以red hat enterprise linux 6.0 x86-64在AMD Athlon(tm)64 X2 Dual Core Processor 4400+ 电脑上的安装为例。
rhel6.0的安装过程和windows差不多,一路下一步(或Next)基本就ok了,在您要进行哪种类型的安装?你如果是第一次安装,是新硬盘的话可以选使用所有空间,并勾选下边的查看并修改分区布局,然后下一步,你可以看下大概的分区情况,在Red Hat Enterprise Linux 的默认安装是基本服务器安装。
如果对Linux不太熟的话,最好选择软件开发工作站(或Software Development Workstation),这样基本上把要用的软件都安装上了,然后再选上下边的现在自定义(或 Customize now),再下一步,然后把所有能选上的软件都选上,再一路下一步。
安装完以后,创建一个非root用户,比如创建一个msi用户,root和msi用户密码设的简单一些比较好,别一会儿你自己都忘了,我是root和msi用的一个密码,当然将来你自己真正组建集群用于计算的时候再设置复杂一些,这样课题提高系统的安全性。
gccglibc-2.3.4-2.43 (32-bit and 64-bit)libgcc-3.4.6-11 (32-bit and 64-bit)libstdc++-33-3.4.6-11 (32-bit and 64-bit)compat-libstdc++-33-3.2.3-47.3 (32-bit)hpmpi-2.03.01.00-20090402r.x86_64这几个补丁,好像除了hpmpi-2.03.01.00-20090402r.x86_64和libstdc++-33-3.4.6-11 (32-bit)没有装上之外,别的都给你装好了。

Linux系统重装的步骤和注意事项在使用Linux系统的过程中,有时我们需要对系统进行重装。
不管是因为系统出现问题,还是需要清除系统中的杂乱文件以提高性能,重装Linux系统都是一个有效的解决方法。
本文将介绍Linux系统重装的步骤和一些需要注意的事项。
步骤一:备份重要数据在进行系统重装之前,首先务必备份重要的个人数据。
这包括个人文件、照片、文档、音乐等。
重装系统将会清除所有数据并格式化磁盘,因此备份是至关重要的,以免数据丢失。
步骤二:准备安装介质在进行Linux系统重装之前,你需要准备好安装介质。
通常可以选择使用光盘、USB驱动器或者网络下载的ISO镜像文件作为安装介质。
确保你有一个可靠的安装介质,以便于完成系统重装。
步骤三:启动系统并进入安装界面将准备好的安装介质插入计算机之后,重新启动系统。
确保在计算机启动时选择从安装介质启动。
这可以通过更改计算机的启动顺序或通过按下特定的启动功能键来实现。
根据计算机的不同,启动方式可能各不相同,因此请参考计算机的用户手册或者相关教程。
一旦成功启动,你将进入安装程序的界面。
步骤四:选择安装选项在进入安装界面后,你需要选择适合你的系统的一些选项。
这包括语言、键盘布局、时区等设置。
根据你的实际需求进行选择,并按照向导的指示进行下一步。
步骤五:分区和格式化磁盘在进行Linux系统重装时,你需要重新分区和格式化磁盘。
这一步骤非常重要,因为它将删除磁盘上的所有数据。
你可以选择手动分区或者使用默认分区设置。
手动分区允许你自定义磁盘分区,包括根分区、交换分区和其他挂载点。
如果你对磁盘分区有特定的需求或者想要更好地管理磁盘空间,建议选择手动分区。
无论选择哪种分区方法,都需要格式化磁盘。
格式化过程将删除磁盘上的数据,并为系统安装创建必要的文件系统。
步骤六:安装系统在完成分区和格式化磁盘后,你现在可以开始安装Linux系统。
安装过程可能需要一些时间,具体时间取决于你的硬件配置和系统镜像的大小。
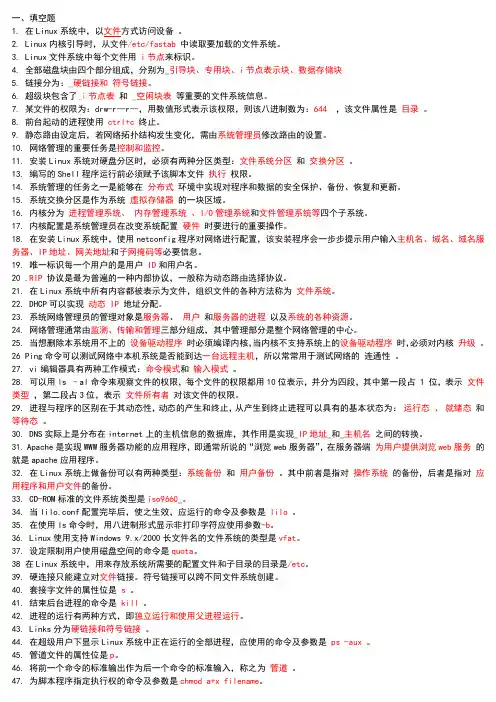
一、填空题1. 在Linux系统中,以文件方式访问设备。
2. Linux内核引导时,从文件/etc/fastab中读取要加载的文件系统。
3. Linux文件系统中每个文件用i节点来标识。
4. 全部磁盘块由四个部分组成,分别为_引导块、专用块、i节点表示块、数据存储块5. 链接分为:_硬链接和符号链接。
6. 超级块包含了_i节点表和_空闲块表等重要的文件系统信息。
7. 某文件的权限为:drw-r--r--,用数值形式表示该权限,则该八进制数为:644 ,该文件属性是目录。
8. 前台起动的进程使用ctrl+c终止。
9. 静态路由设定后,若网络拓扑结构发生变化,需由系统管理员修改路由的设置。
10. 网络管理的重要任务是控制和监控。
11. 安装Linux系统对硬盘分区时,必须有两种分区类型:文件系统分区和交换分区。
13. 编写的Shell程序运行前必须赋予该脚本文件执行权限。
14. 系统管理的任务之一是能够在分布式环境中实现对程序和数据的安全保护、备份、恢复和更新。
15. 系统交换分区是作为系统虚拟存储器的一块区域。
16. 内核分为进程管理系统、内存管理系统、I/O管理系统和文件管理系统等四个子系统。
17. 内核配置是系统管理员在改变系统配置硬件时要进行的重要操作。
18. 在安装Linux系统中,使用netconfig程序对网络进行配置,该安装程序会一步步提示用户输入主机名、域名、域名服务器、IP地址、网关地址和子网掩码等必要信息。
19. 唯一标识每一个用户的是用户 ID和用户名。
20 .RIP协议是最为普遍的一种内部协议,一般称为动态路由选择协议。
21. 在Linux系统中所有内容都被表示为文件,组织文件的各种方法称为文件系统。
22. DHCP可以实现动态 IP地址分配。
23. 系统网络管理员的管理对象是服务器、用户和服务器的进程以及系统的各种资源。
24. 网络管理通常由监测、传输和管理三部分组成,其中管理部分是整个网络管理的中心。
如何在Linux终端中安装更新系统Linux终端是操作Linux系统的主要界面,通过终端用户可以执行各种命令和操作,包括安装和更新系统。
本文将介绍在Linux终端中如何安装和更新系统的方法。
一、安装系统安装Linux系统的方法因发行版而异,一般来说,用户可以通过以下步骤在Linux终端中安装系统:1. 下载系统镜像:在官方网站或镜像站点下载适用于自己计算机架构的系统镜像;2. 创建启动盘:将下载的镜像写入USB闪存驱动器或DVD,并将计算机从该启动盘启动;3. 进入安装界面:按照屏幕上的提示选择语言、时区、键盘布局等选项;4. 硬盘分区:根据个人需求,选择分区方式和分区大小;5. 安装系统:将系统文件复制到硬盘中,并安装引导程序;6. 设置用户名和密码:为系统设置管理员账号和密码;7. 等待安装完成:等待系统安装完成,重启计算机;8. 登录系统:使用之前设置的管理员账号和密码登录系统。
二、更新系统Linux系统通过定期的更新来修复漏洞、增强安全性,并提供新功能和性能优化。
在Linux终端中,可以通过以下方法更新系统:1. 打开终端:使用快捷键组合Ctrl+Alt+T或者在应用程序菜单中找到终端并打开;2. 更新软件包列表:输入以下命令更新软件包列表,这是一个遵循系统发行版的通用命令,用于下载包含最新软件包信息的列表。
```sudo apt update```3. 更新软件包:输入以下命令更新系统上已安装的软件包,这将下载并安装最新的软件包版本。
```sudo apt upgrade```4. 完成更新:等待命令执行完成,系统将下载并更新软件包;5. 重启系统:在更新完成后,可以选择重启计算机以应用新的更新;6. 验证更新:验证更新是否成功安装,可以再次运行命令进行验证。
```sudo apt list --upgradable```三、常见问题1. 更新速度慢:由于网络连接或软件源的问题,更新可能较慢。

如何在Windows系统上安装Linux 第一章:准备工作在Windows系统上安装Linux之前,我们需要做一些准备工作。
首先,确保你使用的计算机符合Linux系统的最低硬件要求。
通常来说,Linux对于处理器、内存和硬盘空间的需求都比较低。
接下来,你需要选择一款适合你的Linux发行版。
目前,最受欢迎的Linux发行版有Ubuntu、Debian、Fedora等等。
你可以根据自己的需求和偏好选择一个适合的发行版。
最后,你需要准备一个空白的USB闪存驱动器或者光盘,用于将Linux安装文件烧录到其中。
第二章:下载和准备Linux安装文件在安装Linux之前,你需要下载正确的Linux发行版的镜像文件。
这个文件通常是一个ISO文件,你可以从Linux官方网站或者其他第三方网站上下载。
确保下载的文件与你选择的Linux发行版和版本相对应。
下载完成后,你需要使用一个专门的工具或者软件将ISO文件写入你准备好的USB闪存驱动器或者光盘中。
这个工具可以是Rufus、UNetbootin等。
使用这些工具,你只需选择正确的ISO文件和目标设备,然后点击写入按钮即可。
第三章:安装Linux完成了准备工作后,我们就可以开始安装Linux了。
首先,将准备好的USB闪存驱动器或光盘插入计算机,并重启计算机。
在计算机重新启动的过程中,按下适合你计算机型号的热键,进入BIOS设置。
在BIOS设置中,将启动顺序更改为从USB或光盘启动。
保存设置后,计算机将会从准备好的媒介中启动,并进入Linux安装界面。
按照安装界面的提示,选择适合你的语言、地区和键盘布局等信息。
接下来,选择安装类型,通常有类似于“完整安装”、“自定义安装”、“双系统安装”等选项。
根据你的需求选择适合的安装类型,并按照界面指示完成剩余安装步骤。
第四章:配置Linux系统安装完成后,我们需要对Linux系统进行一些配置。
首先,根据提示创建一个管理员账户和密码。
如何安装电脑操作系统Windows和Linux的安装步骤如何安装电脑操作系统 Windows 和 Linux 的安装步骤操作系统是计算机的关键组成部分,它使得计算机能够正常运行并执行各种任务。
在选择操作系统之后,我们需要将其安装到计算机中。
本文将分别介绍 Windows 和 Linux 操作系统的安装步骤。
一、Windows 操作系统的安装步骤1. 准备安装媒介和许可证在安装 Windows 操作系统之前,我们需要准备一个安装光盘或者一个可启动的 USB 设备,并确保拥有有效的 Windows 许可证。
2. 进入 BIOS 设置将安装媒介插入计算机,并重启电脑。
在启动过程中,按下计算机品牌对应的 BIOS 设置按键(比如 F2、F12、Del 等)进入 BIOS 设置界面。
3. 更改启动顺序在 BIOS 设置界面中,找到 "Boot" 或 "Boot Priority" 选项,并将启动顺序调整为先从光盘或 USB 设备启动。
4. 保存设置并重启保存 BIOS 设置,并重启计算机。
此时计算机将从安装媒介启动。
5. 开始安装计算机重启后,系统将加载安装媒介中的文件。
根据提示选择语言、时区和键盘布局等选项,然后点击 "下一步"。
6. 接受许可协议阅读并接受 Windows 许可协议后,点击 "下一步"。
7. 选择安装类型根据个人需求,选择 "自定义" 或 "快速" 安装类型。
自定义安装允许您选择安装目标磁盘和进行其他高级设置。
8. 选择安装目标磁盘如果您选择了自定义安装,将会显示计算机中的磁盘和分区。
选择一个目标磁盘后,点击 "下一步"。
9. 等待安装完成系统将开始安装 Windows,在此过程中,计算机可能会多次重启。
请耐心等待安装完成。
10. 完成设置按照系统提示设置用户名和密码等信息,然后等待安装过程的最后一步。
【分享】linux下ms的安装这是我第一次在linux下安装ms时通过论坛搜索的所有资料,并根据自己安装后的体会进行了部分修改,希望能给大家的安装带来方便。
同时也感谢以下我所引用原帖的作者。
为了节省大家时间,我为以下内容做一个简单介绍:1、linux下ms4.4的安装(其它版本的也适用)2、有关远程连接的问题3、各版本的lic1、以root登陆,删除曾经安装过MS的用户及对应的目录;# userdel -r xxxx 删除用户及其文件# rm -rf xxxx2、新建用户(以accelrys用户名为例)# useradd -m -s /bin/bash accelrys# passwd accelrys输入密码确认密码这样,在/home下自然生成了accelrys目录3、退出根用户,然后以accelrys登陆;启动图形界面,在slackware里用startx命令将MS的安装文件包"Linux"整个copy到/home/accelrys$cd /home/accelrys$chmod +x -R Linux 付Linux文件以执行权$cd /Linux/UNIX$./Installcd进入安装过程,根据提示,一路向前,在选择安装模块时,选择29即everything过程中需要指定MS和LicensePack的安装目录,直接回车,按默认即可;后需指定/temp 时,我输入/home/accelrys/Accelrys/temp,然后回车;安装过程中,将msi.lic复制到/LicensePack/Licenses目录里(备注:按照前辈的指点,一定要修改其中的第一行,与你的主机名一致,我的就改为slackware,其它不动)。
4、等到出现是否安装临时License等选项时,进入/home/accelrys/Accelrys/LicensePack/linux/bin,执行lp_admin,出现类似windows下安装license 的界面,选择刚复制过去的msi.lic,选择install,显示成功,可以测试一下,确认成功了;5、启动gateway$ ./home/accelrys/Accelrys/MateriasStudio44/etc/Gateway/gateway_control_18888 start可以看到启动各种模块的gateway,最后一行会提示xxx is processing之类的,这就证明确实启动了gateway6、打开网络浏览器,输入http://本机的ip:18888可以看到remote server gateway_18888等和安装的所有模块。
Linux下MS安装步骤及出错解决方法1安装好系统(本人使用centos)2把ms的镜像文件拷贝到要安装的目录下3镜像文件mount –o loop Accelry*.iso source/(source是用户下新建的文件夹)4cd sourcelscd Linux_x86_64(这个需要根据你的机器安装的系统来选择,我的64位)cd hpmpirpm –ivh hpmpi*.rpm(需要root用户)5接下来安装MS,切换到普通用户cd sourcecd UNIX./Install然后开始安装,一般采用默认安装,回车就可以了,然后就是26选择所有的模块一步一步做碰到是否要激活hpmpi,Y/N,选择Y就行,其他的都是直接回车就行了(安装过程中间有点小卡)最后选择99,退出然后就是将lisence安装上,就是把msi42.lic拷贝到licenses目录下cp /home/accelrys/msi42.lic /home/accelrys/Accelrys/LicensePack/Licenses/msi.lic cp /home/accelrys/msi42.lic /home/accelrys/Accelrys/LicensePack/Licenses/msi.dat 然后设置ms开机启动启动,这个地方需要root权限。
su -输入密码cd /home/accelrys/Accelrys/MaterialsStudio50/etc/Gateway cp msgateway_control_18888 /etc/rc.d/init.dchkconfig --add msmsgateway_control_188886安装完成,在设置好网络,就可以通过局域网从另外一台电脑(windows系统)提交任务到装好的linux版本MS上进行计算了。
7如果能连接上且能提交作业,但是程序不运行,出现这样的错误:libibverbs:Fatal:couldn’t read uverbs ABI version需要做以下处理:Vi .bashrcExport MPIRUN_OPTIONS=-TCPExport MPI_IC_ORDER= “TCP”wq!Source .bashrc重新安装MS,覆盖就可以了,重启系统,一切OK!。
一、在msi用户下安装[msi@node1 MS6]$ ./install (此处与ms5.5 不同)注意: 要用非root用户安装, 过程中均默认即可。
装完后, 先选99 enter, 接下来装License。
五、若没有图形界面的话,用命令行方式导入licenses:(1.先将msi70.lic文件第一行中的机器名改为你的主节点的机器名,. 到/home/msi/Accelrys/LicensePack/Licenses里(2.c./home/msi/Accelrys/MaterialsStudio7.0/bin(3../license_admi.-c.输出信息:1.Ente.temporar.licens.password2.Se.connectio.t.licens.serverman.lin.licens.administratio.tools99.Finishe.wit.licens.configuration选3.输出Accelry.Licens.AdministrationSe.u.th.licens.administratio.environment============================================= csh.sourc.$ACCELRYS_LIC_PACK_DIR/etc/lp_cshrcORsh..$ACCELRYS_LIC_PACK_DIR/etc/lp_profileStar.GU.Licens.Administrato.(Linu.Only)============================================= .lp_adminComman.lin.tool.(Al.UNI.platforms)Comman.Nam.Description-----------.-----------lp_reques.Reques..licens.filelp_instal.Instal.licens.filelp_serve.Manage.licens.serve.ORSe.remot.serve.connectionlp_statu.Licens.configuratio.statuslp_teste.Tes.licens.configuration(rmation)============================================= Documentation============================================= Complet.onlin.documentatio.i.availabl.viath.Licens.Administrato.Hel.o.Windows/Linux.ing:/LicensePack.htmlPres.t.continue:1.Ente.temporar.licens.password2.Se.connectio.t.licens.serverman.lin.licens.administratio.tools99.Finishe.wit.licens.configurationChoos.on.o.th.abov.options:选99)(4.执.sourc./home/msi/Accelrys/LicensePack/etc/lp_profile 或c./home/msi/Accelrys/LicensePack/etc.再执.lp_set_env(5.c./home/msi/Accelrys/LicensePack/Licenses/执行.lp_instal.msi70.li.输出信息[*****************].lp_instal.ms60.licBackin.u.existin.licens.t.Licenses/backu.directory.Th.licens.fil.ha.bee.successfull.installe.unde./home/msi/Accelrys/LicensePack/Licenses/msi.lic. Attemptin.t.star.th.server...Th.licens.serve.coul.no.b.started.Refe.t.th.Licens.Pac.documentatio.o.contac.Accelry.Scientifi.an.Technica.Suppor.f o.assistance.Attemptin.checkout...Checke.ou.licens.feature.License_Holde.[fo.msi.(.copy)Checkou.succeeded...Ru.lp_set_envORcsh.sourc./home/msi/Accelrys/LicensePack/etc/lp_cshrcsh../home/msi/Accelrys/LicensePack/etc/lp_profilet.refres.shel.licens.administratio.environmen.setup.(6)完成(8)修改/home/msi/Accelrys/MaterialsStudio7.0/etc/Gateway/root_default/dsd/conf文件夹里面两个文件里的CPU数为各节点CPU总数。
详细安装过程CentOS5.5镜像迅雷种子:/download?fid=LJhiAd34HV8SqWG+wQnU+3wH8soA2HP5AA AAAMGo04BvEjyZZDHqlqYYwk5Ok+pJ&mid=666&threshold=150&tid=21C5D2B1AAA970 B3D1CB9D8AB4B3612A&srcid=4&verno=1&g=C1A8D3806F123C996431EA96A618C24E4E 93EA49&scn=t6&i=A1CE64B6D36D945F562CB1250D8D665F&t=4&ui=32812954&ti=828447 905614849&s=4185118720&m=0&n=013A90521C656E744F321FD171352EA1B752038636745 BB9E2A4FD5AEACFF15D5D4F728131744F532D541FD172693338364C538D312D4456443A E04390B0BFE2771646CA27756578695000D571636F6D5D4F58973000000000&ff=0&co=99A 1A2BA59EA57135D95047F68AE8CD4&cm=1&pk=lixian&ak=1:0:1:3&e=2000000000&ms=10 485760&ck=CF2C3AB2426D4C496541068E6568E61D&at=113D65430DB08BC20B3E1E8FF4 3C7BF4完成后会进入自动安装模式,我们要将其断电,并设置引导,使用ISO启动安装直接回车进入图形安装Linux text:在文件方式下安装询问你是否要选择安装介质,是否进行校验:只要确定你下载的安装包是“完全”的,可以直接SKIP(跳过)CTRL+ALT:切换出虚拟机界面下一步:我们接下来选择SKIP进行安装系统语言的选择:只在安装过程中提示的信息的语种,不代表系统也是你现在所选的语种下一步然后再创建其它文件,便于管理-其它的根据个人喜好创建不同大小我这边保留了4G左右的硬盘,供后期实验使用本步骤为引导设定,无引导的话,在后期可以选择其它的引导方式这边密码设置成rootuser/root/install.log文件中找到包含本次安装选择的所有选项的klckstart文件(可以用于无人职守的系统安装中)重新引导下就OK了!之后断电将引导改变,不然默认又进入IOS引导启动就OK了!。
linux下提交MS任务楼主可以为服务器设置远程登录的用户名和密码。
任务提交步骤:1.通过ftp,在服务器上建立文件夹,以存放计算数据。
2.在windows界面下,建好模型,设置好参数,点击calculation对话框下的run旁边的Files,然后选择save files。
这是在MS左边的目录文件夹里就会出现刚刚保存的计算文件。
将文件夹里的.cell和.param文件上传到服务器的目标文件夹中。
3.在MS的安装目录下,找到模型中出现的院子的.usp文件,例如C:\program files\Accelrys\Materials Studio4.3\shares\Resoures\Quantum\Castep\Potentia会看到Si_p.将要用的.usp文件上传到服务器的目标文件夹中。
4.根据服务器使用的具体调度程序,会有一个subCASTEP文件和一个RunCASTEP文件。
将subCASTEP文件中的filename改成.cell前的名字,将NP改成需要计算的核数。
然后将这两个文件上传到服务器的目标文件夹中。
5.接下来就是在PUTTY中提交任务。
cd **(**是在服务器上建立的目标文件夹)dos2unix subCASTEP RunCASTEP ****.cell ****.param chmod 777 subCASTEP RunCASTEPbsub ./subCASTEP这样任务就已经提交成功了~6.计算完成后将结果下载到本地文件夹中进行分析即可。
作者:crystal0714请问一定要把“一个subCASTEP文件和一个RunCASTEP文件”放到目标文件夹中么,我没有放这个文件到文件夹中,但是可以在linux下运行,只是不会生成优化后的*.xsd文件,不知道和这个有关么,RunCASTEP.sh [-h] [-np processors] seedname (UNIX)"-h" Displays the Help text."-np " Specifies whether to use a parallel (MPI-based) version of CASTEP. When thisoption is not used, a single-CPU version of CASTEP is started. When this option isused, an MPI version of CASTEP is invoked, even if only one processor is requested."processors" Number of CPUs to be used. "seedname" The seed used to identify the set of CASTEP input and output files. Theinput files should be present in the directory in which the CASTEP script is started.RunCASTEP.sh -np 4 seedname可以看CASTEP帮助文件,写的很清楚。
用ghost备份和还原Linux系统实验环境:VMware虚拟机实验目的:安装DOS和LINUX双系统,然后用ghost备份和还原Linux系统首先,在虚拟机中新建一个Centos3操作系统然后,我们挂载ISO镜像,使用深山红叶工具箱,里面含有DOS操作系统启动虚拟机按住键盘上的Esc键,选择CD-ROM Drive从光驱启动选择MS-DOS工具箱选择纯DOS启动选择f32先对其分区按键盘上的PageDown选择FAT32格式,容量输入4024MB,用来装DOS系统,剩下的装Linux系统Boot2我们就不用操作了,直接按回车键硬盘分区,选择“是”然后格式化全部分区是否复制系统文件至硬盘中,选“否”最后重新启动电脑同样从光驱启动,进入DOS工具箱,输入:sys c: 将c盘作为系统盘如图:输入:copy GHOST c: 将ghost文件内容拷贝到C盘重启电脑,看能否进入DOS说明可以,接着双击虚拟机右下角的光驱图表,挂载Centos3的ISO镜像,再重启电脑:同样选择从光驱启动,进入Linux安装界面:这里我们跳过CD media的检测:点击“Next”:因为我们只是做个实验,这里选择"Custom"自定义安装选择手动分区:下图我们可以看到,/dev/sda1就是刚才建立的DOS操作系统,剩下的磁盘空间,建一个512MB的swap分区,余下的作为根分区:分区完成:这里我们默认选择grub引导Linux操作系统,上面的“Win32”则是刚才建立的DOS系统:接着直接点击下一步,输入Root密码,再点击下一步,直到安装完成,重启电脑,进入如下的画面现在我们就开始用ghost备份linux系统,选择“win32”输入:ghost进行备份这里选择“To Image”,将分区制作成镜像这里可以看到整个磁盘是8个G的大小回车直接进入这里可以看到有三个分区,我们要备份Linux分区,所以选择Linux,回车再按TAB键进入最顶端的look in代表我们将Linux分区备份在哪里,这里的C:1.1[]FAT drive代表DOS系统,选择它。
Linux的安装一.从虚拟机安装(所谓虚拟计算机(简称虚拟机),实际上就是一种应用软件,例如VMware实际上也只是一种应用软件,其特别之处在于,由它创建的虚拟机与真实的计算机几乎一模一样,不但虚拟有自己的CPU、内存、硬盘、光驱,甚至还有自己的BIOS。
在这个虚拟机上,可以安装 Windows、Linux等真实的操作系统,及各种应用程序。
)首先安装虚拟机。
现在虚拟机一般有两种:vmware和virtual PC。
一般我们会选择vmware虚拟机来安装linux1.安装Linux前的设置点击新建虚拟机,或者点击文件菜单下的新建—虚拟机,然后点击下一步至选择Linux的版本,点击下一步然后填写虚拟机名称和虚拟机存在的位置(所在的位置一定要有一定的空间,因为现在一般版本的linux大小都差不多在2.5-3G的体积。
)。
然后点击下一步;按照默认的选择,再点击下一步;制定虚拟磁盘的大小(这里可以根据自己需要选择比如现在选4G),一般不去选中“马上分配所有磁盘的空间”。
然后点击完成。
上图的右下侧显示的是此虚拟机的配置情况。
机器的内存是512M,所以在这边一般选中一半的内存即256MB。
硬盘就是之前设置的硬盘。
这里的CD-ROM设置要注意了,一般如果是直接用光盘安装的情况下,直接将光盘放进光驱,然后点击启动虚拟机,就可以进入安装界面。
如果安装文件是.iso形式存在于硬盘,那么请点击编辑虚拟机设置,然后选中CD-ROM 项,或者双击右下角区域的CD-ROM项,选择“使用ISO映像”浏览硬盘选择安装文件。
点击“确定“后,启动虚拟机。
接下来就是安装linux系统。
(安装时选中F2)二.从光盘安装三.从硬盘安装从硬盘安装RedHat Linux 9.0通常需要三个文件①shrike-i386-disc1.iso;②shrike-i386-disc2.iso;③ shrike-i386-disc3.iso。
这代表了安装时需要的三张光盘。
Linux下安装MS 3.1整理:wsilei lying zbaohui一、安装MS前的准备:在根用户下创建msi用户并上传MS安装文件于/home/msi/tmp下[root@lm16 home]# useradd msi[root@lm16 home]# passwd msiChanging password for user msi.New password: abcdefg 密码可自由设定,这里以abcdefg为例BAD PASSWORD: it does not contain enough DIFFERENT charactersRetype new password: abcdefgpasswd: all authentication tokens updated successfully.[root@lm16 home]# lswsl lost+found msi[root@lm16 home]# cd msi[root@lm16 msi]# ls[root@lm16 msi]# mkdir tmp[root@lm16 msi]# lstmp[root@lm16 home]# cd tmp上传MS安装文件及license于tmp下把hostname改成localhost就可以了,或者127.0.0.1,这是基于IPv4的原理二、安装过程:root下解压安装文件,修改UNIX的权限;msi用户下安装[root@lm16 tmp]# lsmsilic.lic unix.zip[root@lm16 tmp]# chmod -R 777 unix.zipunix.zip[root@lm16 tmp]$ unzip unix.zip…………[root@lm16 tmp]# chmod -R 777 UNIX/[root@lm16 tmp]# su msi[msi@lm16 tmp]$ ls0x0409.ini Info README_MS_Modeling.htm Accelrys MS Modeling 3.1.msi instmsia.exe setup.exeAutorun.exe instmsiw.exe Setup.iniautorun.inf ISScript8.Msi SplashBitmap.bmpContainer.ico Legal UNIXData1.cab License Pack unix.zip[msi@lm16 tmp]$ cd UNIX/[msi@lm16 UNIX]$ lsInstall IRIX License_Pack Linux_IA64 Tru64installer IRIX64 Linux README.txt[msi@lm16 UNIX]$ ./InstallRunning Materials Studio installer for platform Linux...Please specify an absolute destination path [/usr/people/MSI/MaterialsStudio] :/home/msi/msPlease choose the package you wish to install:1. Amorphous Cell Server2. CASTEP Server3. Discover Server4. DMol3 Server5. DPD Server6. Equilibria Server7. Forcite Server8. GULP Server9. MesoDyn Server10. Morphology Server11. Polymorph Server12. QSARModels Server13. Reflex Server14. Reflex Plus Server15. VAMP Server16. Structures database17. EverythingEnter items to install (e.g. 1,2,5) , or Q to quit : 17 根据安装需要也可只选择部分模块…………If you have not already installed an Accelrys License Pack, we recommendthat you do so. To install or update a License Pack follow the promptsbelow.License Pack environment set to:/home/msi/License_PackIs this the correct License_Pack path (y|n|q) [y]? Y/home/msi/License_Pack is lower than current version ordoesn't exist. /home/msi/License_Pack will be updated withnew files.Press <Enter> to continue. (q and <Enter> to quit) 按Enter键继续…………Would you like to start the Gateway service now (y|n) [y] :YStarting gateway...LicensePack::PostAllInstall--------------------------------------------------You have the following options:1. Install emailed or current license file.2. Install demo license.3. Continue without License Installation.--------------------------------------------------Please select one: 1Please enter a full path to the license file (q to quit):/home/msi/License_Pack/msi_lic_cshrc…………/etc/hosts.equiv exists. However The MPICH installation included aspart of this Materials Studio requires that the uncommented lines in/home/msi/ms/hosts.eqiv are present.Please ask your systems administrator to check and update /etc/hosts.equivas required.Materials Studio installation has completed.三、安装后的处理:切换到根用户,复制msilic.lic到/home/msi,变更msilic.lic的所有者与所属群组;在msi用户下用/home/msi/msilic.lic 覆盖/home/msi/License_Pack/licenses/ msilicense.dat[msi@lm16 UNIX]$ su rootPassword:[root@lm16 UNIX]# cd /home/msi/tmp[root@lm16 tmp]# ls0x0409.ini instmsia.exe setup.exeAccelrys MS Modeling 3.1.msi instmsiw.exe Setup.iniAutorun.exe ISScript8.Msi SplashBitmap.bmp autorun.inf Legal UNIXContainer.ico License Pack unix.zipData1.cab msilic.licInfo README_MS_Modeling.htm[root@lm16 tmp]# cp msilic.lic /home/msi[root@lm16 tmp]# cd /home/msi[root@lm16 msi]# lsLicense_Pack ms msilic.lic tmp[root@lm16 msi]# chown msi:msi msilic.lic[root@lm16 msi]# su msi[msi@lm16 msi]$ lsLicense_Pack ms msilic.lic tmp[msi@lm16 msi]$ cd License_Pack/[msi@lm16 License_Pack]$ lsbin ibm ibmsprs2 licenses msi_lic_cshrc Policiesconfig ibmrs2 irix6m3 Linux_2_Intel_32 msi_lic_profile Productsdata ibmsprs1 irix6m4 logs OSF1_4_Alpha_64 sun5[msi@lm16 License_Pack]$ cd licenses/[msi@lm16 licenses]$ lsbackup msilicense.dat[msi@lm16 licenses]$ cp /home/msi/msilic.lic msilicense.dat[msi@lm16 licenses]$ exitexit[root@lm16 msi]# exitexit[msi@lm16 UNIX]$ exitexit[root@lm16 tmp]# exitExit做最后的测试工作,http://liunux服务器的ip:18888,看到apache启动正常就ok了一切OK啦!这是我看了别人的的安装方法再结合自己的计算机特点给出的安装方式,经成功并行。
1. 安装并行版输入./Install --type cluster 串行版输入./Install2. 开始按提示安装了3. 指定你要Materials Studio安装到的目录,如~/location4. 指定你所需要安装的模块了,根据自己的需要选择,当然也可以全部选上5. 指定你License_Pack所在的目录,如~/location,按提示Enter,安装Licens_Pack6. 选择临时文件夹,例~/temp7. 把licene文件msilic.lic拷贝到/home/msi/ms40/License_Pack/licenses目录中,注意不要改名,4.2版需要*.lic的文件(此处一定要注意,网上的安装教程都叫要把lic文件改程mslicense.dat,但是4.2版本的一定不要改,要不程序会提示找不到*.lic文件)MS并行需要hpmpi,如果要并行但你机上没有hpmpi,中间会提示安装hpmpi到ms的目录,可以采用非root用户安装,按照提示安装就可以。