Netbeans中Tomcat服务器配置
- 格式:docx
- 大小:22.86 KB
- 文档页数:4
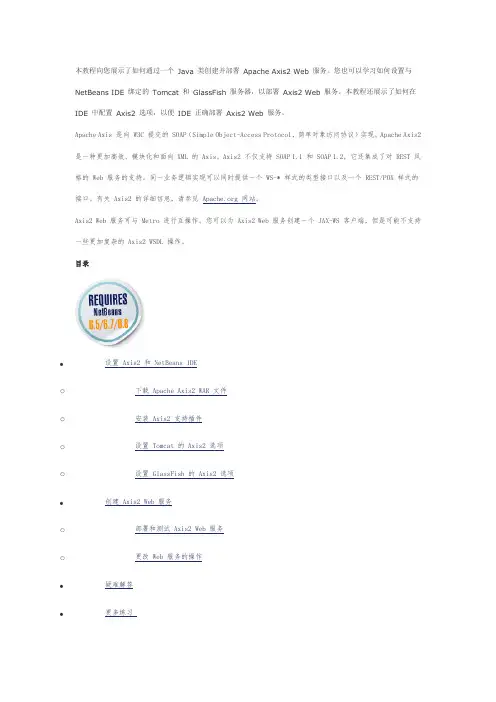
本教程向您展示了如何通过一个Java 类创建并部署Apache Axis2 Web 服务。
您也可以学习如何设置与NetBeans IDE 绑定的Tomcat 和GlassFish 服务器,以部署Axis2 Web 服务。
本教程还展示了如何在IDE 中配置Axis2 选项,以便IDE 正确部署Axis2 Web 服务。
Apache Axis 是向 W3C 提交的 SOAP(Simple Object-Access Protocol,简单对象访问协议)实现。
Apache Axis2 是一种更加高效、模块化和面向 XML 的 Axis。
Axis2 不仅支持 SOAP 1.1 和 SOAP 1.2,它还集成了对 REST 风格的 Web 服务的支持。
同一业务逻辑实现可以同时提供一个 WS-* 样式的类型接口以及一个 REST/POX 样式的接口。
有关 Axis2 的详细信息,请参见 网站。
Axis2 Web 服务可与 Metro 进行互操作。
您可以为 Axis2 Web 服务创建一个 JAX-WS 客户端,但是可能不支持一些更加复杂的 Axis2 WSDL 操作。
目录•设置 Axis2 和 NetBeans IDEo下载 Apache Axis2 WAR 文件o安装 Axis2 支持插件o设置 Tomcat 的 Axis2 选项o设置 GlassFish 的 Axis2 选项•创建 Axis2 Web 服务o部署和测试 Axis2 Web 服务o更改 Web 服务的操作•疑难解答•更多练习要学习本教程,您需要具备以下软件和资源。
软件或资源要求的版本NetBeans IDE 6.1 版 Web 和 Java EE 下载包或6.5 版 Java Web 下载包Java Development Kit (JDK)版本 6 或版本 5Apache Axis 2版本 1.3 或更高版本,WAR 分发软件符合 Java EE 规范的 Web 服务器或应用服务器Tomcat Web Server 6.0 和/或GlassFish 应用服务器 v2 或 v3Tomcat 和 GlassFish 都可以随同 NetBeans IDE 的 Java Web 分发软件一起安装。

【前言】Eclipse,MyEclipse和NetBeans皆有庞大的用户群。
还有什么JBuilder等等。
英文学得一般的人用什么工具好呢?容易调试,易于找程序中难以发现的逻辑错误,用什么工具好呢?完全免费,又获得Oracle/Sun大力支持的工具在哪里? Here !以下,除了特别说明,均以NetBeans 6.5 为例。
实际上,NetBeans 6.X系列的设置都是大同小异的。
特别是,其集成的本地帮助文件能解决几乎全部的开发中遇见的问题。
自己按下F1键,试试。
NetBeans 6.5 ml版的IDE和帮助是中文的,6.9的IDE是中文的,帮助是英文的。
【内容】一、安装与卸载步骤:【安装】机器里要安装有JDK。
没有?先要单独安装JDK,最好是JDK1.6(即JDK6.0)及以上版本;对于操作系统的环境变量:不要求设置什么东西。
默认安装即可。
对于普通用途,可以不安装以下软件:Java ME、Ruby、C/C++、PHP、SOA、GlassFish、Open ESB 。
有时候,当你的系统较慢时,安装过程最多可能要用时30分钟;这种情况很少出现,但有时会出现,而且启动也慢,原因不明。
【卸载】卸载完后,最好是删除以下文件夹:C:\Documents and Settings\Administrator 下面的.nbi.netbeans.netbeans-registration当然,不删除,也没有什么问题。
PS:任何软件,用360卸载最好。
二、推荐理由:1、全中文环境,包括完善的帮助系统也是中文的。
你按一下F1键嘛! 【好】2、可以很方便第逐条运行语句,同时观察相应变量的值的变化情况。
【特!】支持逐条语句调试 JSP、Java Script、Java、Jsf 等等;【特!】这个自己一定要练练!单击代码编辑器左边,即可增加一个断点,是个粉红色的方形。
运行:F6 。
开始调试:ctrl+F5 ;如果弹出什么在何处调试窗口,你又不清楚,点击“确定”即可。
tomcat常用的调优参数Tomcat常用的调优参数Tomcat是一个开源的Java Servlet容器,广泛应用于Java Web 应用程序的部署和运行。
为了提高Tomcat的性能和稳定性,我们可以通过调优参数来优化其配置。
本文将介绍一些常用的Tomcat 调优参数,帮助您更好地配置和优化T omcat服务器。
1. 内存设置- -Xms: 设置JVM的初始堆大小,建议设置为物理内存的1/4或1/3。
- -Xmx: 设置JVM的最大堆大小,建议设置为物理内存的1/2或2/3。
- -XX:MaxPermSize: 设置JVM的永久代大小,建议设置为256MB或512MB。
- -XX:MaxMetaspaceSize: 设置JVM的元空间大小,建议设置为256MB或512MB。
2. 线程设置- maxThreads: 设置Tomcat的最大线程数,建议根据服务器的硬件配置和并发请求数进行调整。
- acceptCount: 设置Tomcat接受请求的队列大小,建议设置为200或300。
- connectionTimeout: 设置Tomcat的连接超时时间,建议设置为30秒或60秒。
3. 连接器设置- protocol: 设置连接器的协议,常用的有HTTP/1.1和AJP/1.3。
- port: 设置连接器的监听端口,建议使用80端口作为HTTP连接器的默认端口。
- maxKeepAliveRequests: 设置每个Keep-Alive连接的最大请求数,建议设置为100或200。
- keepAliveTimeout: 设置Keep-Alive连接的超时时间,建议设置为5秒或10秒。
4. 缓存设置- cacheSize: 设置Tomcat的静态文件缓存大小,建议根据静态文件的数量和大小进行调整。
- cacheTTL: 设置静态文件缓存的过期时间,建议设置为1小时或更长。
- cacheObjectMaxSize: 设置缓存对象的最大大小,建议根据缓存对象的平均大小进行调整。
tomcat内存配置及配置参数详解1、jvm内存管理机制:1)堆(Heap)和⾮堆(Non-heap)内存按照官⽅的说法:“ 虚拟机具有⼀个堆,堆是运⾏时数据区域,所有类实例和数组的内存均从此处分配。
堆是在 Java 虚拟机启动时创建的。
”“在JVM中堆之外的内存称为⾮堆内存(Non-heap memory)”。
可以看出JVM主要管理两种类型的内存:堆和⾮堆。
简单来说堆就是Java代码可及的内存,是留给开发⼈员使⽤的;⾮堆就是JVM留给⾃⼰⽤的,所以⽅法区、JVM内部处理或优化所需的内存(如JIT编译后的代码缓存)、每个类结构(如运⾏时常数池、字段和⽅法数据)以及⽅法和构造⽅法的代码都在⾮堆内存中。
堆内存分配JVM初始分配的堆内存由-Xms指定,默认是物理内存的1/64;JVM最⼤分配的堆内存由-Xmx指定,默认是物理内存的1/4。
默认空余堆内存⼩于40%时,JVM就会增⼤堆直到-Xmx的最⼤限制;空余堆内存⼤于70%时,JVM会减少堆直到-Xms的最⼩限制。
因此服务器⼀般设置-Xms、-Xmx 相等以避免在每次GC 后调整堆的⼤⼩。
说明:如果-Xmx 不指定或者指定偏⼩,应⽤可能会导致ng.OutOfMemory错误,此错误来⾃JVM,不是Throwable的,⽆法⽤try...catch捕捉。
⾮堆内存分配JVM使⽤-XX:PermSize设置⾮堆内存初始值,默认是物理内存的1/64;由XX:MaxPermSize设置最⼤⾮堆内存的⼤⼩,默认是物理内存的1/4。
(还有⼀说:MaxPermSize缺省值和-server -client选项相关,-server选项下默认MaxPermSize为64m,-client选项下默认MaxPermSize为32m。
这个我没有实验。
)上⾯错误信息中的PermGen space的全称是Permanent Generation space,是指内存的永久保存区域。
一、安装软件需要在计算机中安装以下软件:NetBeans IDE 4.1Java Standard Development Kit (JDKTM) 1.4.2 版或 5.0 版二、WEB服务器NetBeans IDE 4.1 捆绑了 Tomcat三、创建新的 Web 应用程序项目1、选择“文件”>“新建项目”。
在“类别”下选择 "Web"。
在“项目”下选择“Web 应用程序”,然后单击“下一步”。
2、在“项目名称”下输入 Testjsp。
请注意,“上下文路径”为 /Testjsp。
3、将“项目位置”更改为d:\App。
4、选择要部署应用程序的服务器。
Bundled Tomcat( 5.5.7)5、将“设置为主项目”复选框保留为选中状态。
单击“完成”。
IDE 将创建d:/App/Testjsp项目文件夹。
该项目文件夹包含所有的源和项目元数据,如项目的 Ant 生成脚本。
将在 IDE 中打开 HelloWeb 项目。
可以在“项目”窗口中查看其逻辑结构,并在“文件”窗口中查看其文件结构。
四、创建 Java 包和 JavaBeans 组件1、展开 HelloWeb 项目节点和“源包”节点。
请注意,“源包”节点只包含一个空的缺省包节点。
2、右键单击“源包”节点并选择“新建”>“文件/文件夹”。
在“类别”下选择“JavaBeans 对象”。
在“文件类型”下选择“JavaBeans 组件”,然后单击“下一步”。
在“类名”文本框中输入 NameHandler,然后在“包”组合框中输入。
单击“完成”。
五、编辑 JavaBeans 组件1、展开 NameHandler.java 节点,然后双击 NameHandler 类节点。
在源编辑器中,删除以下类声明部分:extends Object implements Serializable2、展开 NameHandler 类节点和“字段”节点。
Tomcat配置你所需要做的就是:按照你的需求配置Tomcat,只要你正确配置,Tomcat一般都能适合你的要求。
下面是一系列关于Tomcat的配置技巧,这些技巧源自于我的书:《Tomcat权威指南》,希望对你有所帮助。
Jason Brittain1.配置系统管理(Admin Web Application)大多数商业化的J2EE服务器都提供一个功能强大的管理界面,且大都采用易于理解的Web应用界面。
Tomcat按照自己的方式,同样提供一个成熟的管理工具,并且丝毫不逊于那些商业化的竞争对手。
Tomcat的Admin Web Application最初在4.1版本时出现,当时的功能包括管理context、data source、user和group等。
当然也可以管理像初始化参数,user、group、role的多种数据库管理等。
在后续的版本中,这些功能将得到很大的扩展,但现有的功能已经非常实用了。
Admin Web Application被定义在自动部署文件:CATALINA_BASE/webapps/admin.xml 。
(译者注:CATALINA_BASE即tomcat安装目录下的server目录)你必须编辑这个文件,以确定Context中的docBase参数是绝对路径。
也就是说,CATALINA_BASE/webapps/admin.xml 的路径是绝对路径。
作为另外一种选择,你也可以删除这个自动部署文件,而在server.xml文件中建立一个Admin Web Application的context,效果是一样的。
你不能管理Admin Web Application这个应用,换而言之,除了删除CATALINA_BASE/webapps/admin.xml ,你可能什么都做不了。
如果你使用UserDatabaseRealm(默认),你将需要添加一个user以及一个role到CATALINA_BASE/conf/tomcat-users.xml 文件中。
Netbeans中Tomcat服务器配置Netbeans Tomcat服务器实例配置1.在netbeans-tools-server manerger下添加tomcat服务器,默认是已经配置好的。
配置用户:这个要在base directory 下的tomcat-users.xml文件中设置用户角色(role):admin 或者manager 或者admin,managerHome Directory.服务器所在目录,安装好以后基本不管它的事了Base Directory:用户配置所在目录,设置你的服务器和你的servlets2.发布servlet新建一个工程,samples下有tomcat servlet example.命名为TomcatServletExample 在base directory下有apache-tomcat-5.5.17_base\work\Catalina\localhost\servlets-examples\tldCache.ser 在apache-tomcat-5.5.17_base\conf\Catalina\localhost下有depth#examples.xml:这是以文件夹和文件形式发布的结构。
前面提到的servlets-examples.xml文件中的docBase 属性就是我工程文件的目录,path是制定的访问路径,比如,我这里可以通过http://localhost:8084/servlets-examples/访问, 客户端的访问就是通过这个文件来转向的docBase的典型结构是:*.html, *.jsp, etc :页面/WEB-INF/web.xml :he Web Application Deployment Descriptor for your application. This is an XML file describing the servlets and other components that make up your application, along with any initialization parameters and container-managed security constraints that you want the server to enforce for you./WEB-INF/classes/ :编译后的.class文件/WEB-INF/lib/ :This directory contains JAR files that contain Java class files (andassociated resources) required for your application, such as third party class libraries or JDBC drivers.3. 弄清了结构,然后自己动手写一个简单新建一个web application, 默认有一个index.jsp作为首页,首页可以在web.xml的pages 标签下修改index.jsp在body标签下添加:Execute在source packages下添加NewServlet.class, 代码附在后面在web.xmlservlet标签下配置NewServlet, 指定servlet class和url pattern, 我指定的是/NewServlet,在http://localhost:8084/WebServletTest/NewServlet下就访问到了发现有时候要编译两次才能显示正确的结果连接一个图片时,文件名竟然是大小写敏感的netbeans的web sample下有tomcat servlet的例子,是学习servlet的很好的例子实例代码:1.-------------------------------------2.3.import java.io.*;4.import .*;5.import javax.servlet.*;6.import javax.servlet.http.*;7.public class NewServlet extends HttpServlet {8./** Initializes the servlet. Connections to databases belong here !9.*/10.public void init(ServletConfig config) throws ServletException {11.super.init(config);12.13.}14.15./** Destroys the servlet. Close connections, files, etc.16.*/17.public void destroy() {18.19.}20.21.// Form values can be passed by 2 methods, GET or POST22.// the doGet() (resp. doPost()) method is called when the method is23.// GET (resp POST).24.// The following trick allows us to process both with one function25.26.protected void doGet(HttpServletRequest request, HttpServletResponse response)27.throws ServletException, IOException {28.processRequest(request, response);29.}30.31.protected void doPost(HttpServletRequest request, HttpServletResponse response)32.throws ServletException, IOException {33.processRequest(request, response);34.}35.36.protected void processRequest(HttpServletRequest request, HttpServletResponseresponse)37.throws ServletException, IOException {38.response.setContentType("text/html");39.PrintWriter out = response.getWriter();40.41.out.println("");42.out.println("");43.out.println("");44.out.println("");45.out.println("");46.// The real work of the servlet begins here47.48.// A servlet does nothing else than outputing HTML code49.// to the webserver. It can output the HTML code corresponding50.// to a form. The user fills this form and, when the Submit button51.// is clicked, the values are sent to the appropriate program on the52.// webserver (in this case, our servlet) which then uses these values53.// to `calculate' what it should display this time54.55.// If the servlet is simply56.// called by visiting an url or clicking a link, all parameters57.// will have null values. This is what happens when you type58.// `' in your browser. We can detect this and59.// print out a default `welcome' message (as below).60.// If the servlet is called by clicking a submit61.// button, no parameter will have null values (fields not filled62.// by the user will return empty strings, not null).63.64.if (request.getParameter("myparam") != null)65.// the request.getParameter function allows us to obtain the66.// values entered by the user in the various input fields67.out.println("Your parameter is "+request.getParameter("myparam")+"68.");69.else70.out.println("Hello, please enter a parameter !71.");72.out.println(" Enter your new parameter here:73.");74.out.println(75.// The `action` field of the `form` tag indicates which program76.// should be called by the webserver when the user clicks `submit'77.// in this case, we tell it to call the same servlet again78." "+79.// The 'name' of the input field corresponds to the name of the80.// parameter which will contain the value81.// entered in this input field (here, it is 'myparam' - see above)82."83."+84.// The special `submit` input field generates a submit button85.""86.// When the user clicks the submit button, the browser sends a87.// request to the servlet whose name is contained in the `action`88.// field of the `` tag, which in this case is the present89.// servlet. This request includes the values entered by the user90.// in the different input fields as parameters.91.+""92.);93.94.out.println("");95.out.println("");96.97.out.close();98.}99.100.public String getServletInfo() { 101.return "Short description"; 102.}103.104.}。
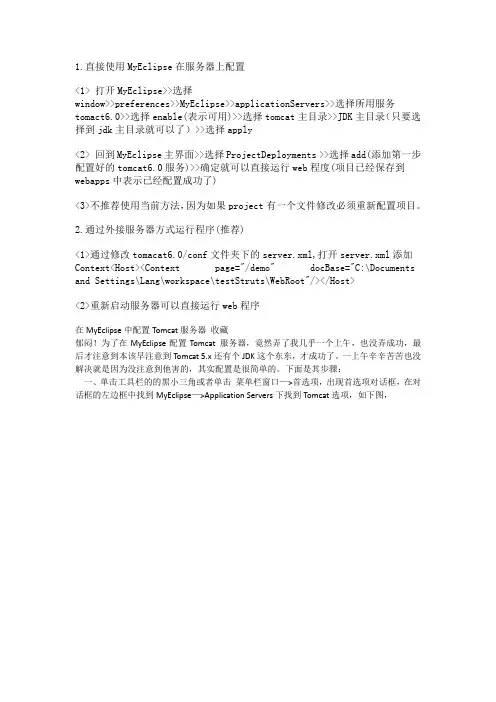
1.直接使用MyEclipse在服务器上配置<1> 打开MyEclipse>>选择window>>preferences>>MyEclipse>>applicationServers>>选择所用服务tomact6.0>>选择enable(表示可用)>>选择tomcat主目录>>JDK主目录(只要选择到jdk主目录就可以了)>>选择apply<2> 回到MyEclipse主界面>>选择ProjectDeployments >>选择add(添加第一步配置好的tomcat6.0服务)>>确定就可以直接运行web程度(项目已经保存到webapps中表示已经配置成功了)<3>不推荐使用当前方法,因为如果project有一个文件修改必须重新配置项目。
2.通过外接服务器方式运行程序(推荐)<1>通过修改tomacat6.0/conf文件夹下的server.xml,打开server.xml添加Context<Host><Context page="/demo" docBase="C:\Documents and Settings\Lang\workspace\testStruts\WebRoot"/></Host><2>重新启动服务器可以直接运行web程序在MyEclipse中配置Tomcat服务器收藏郁闷!为了在MyEclipse配置Tomcat 服务器,竟然弄了我几乎一个上午,也没弄成功,最后才注意到本该早注意到Tomcat 5.x还有个JDK这个东东,才成功了。
一上午辛辛苦苦也没解决就是因为没注意到他害的,其实配置是很简单的。
下面是其步骤:一、单击工具栏的的黑小三角或者单击菜单栏窗口—>首选项,出现首选项对话框,在对话框的左边框中找到MyEclipse—>Application Servers下找到Tomcat选项,如下图,二、根据自己的Tomcat版本选择相应的Tomcat选项(我的是5.0版本),然后在对话框右侧的Tomcat home directory选项选择Tomcat的安装目录,下面的Tomcat base directory和Tomcat temp directory系统会自动为你填上,Optional program arguments可以不用填,我也不知道这是做什么用的,再选上Enable选项,要不然在待会儿在Server中看不到Tomcat服务器三、千万别忘了Tomcat 选项下面的JDK,我就是因为没注意到它才一直不成功,单击JDK,弹出如下对话框,Notes会提示你怎么做,四、点击Tomcat JDK name旁的"Add",弹出如下对话框:JRE名称(N)选项填上名字(可以随便取),在JRE主目录选项选择你的jdk安装目录(仅仅只是jdk,不包含jre),JRE系统库系统会自动添加,缺省JVM参数可以不用填,按“确定”回到上级再按“确定”就OK了。
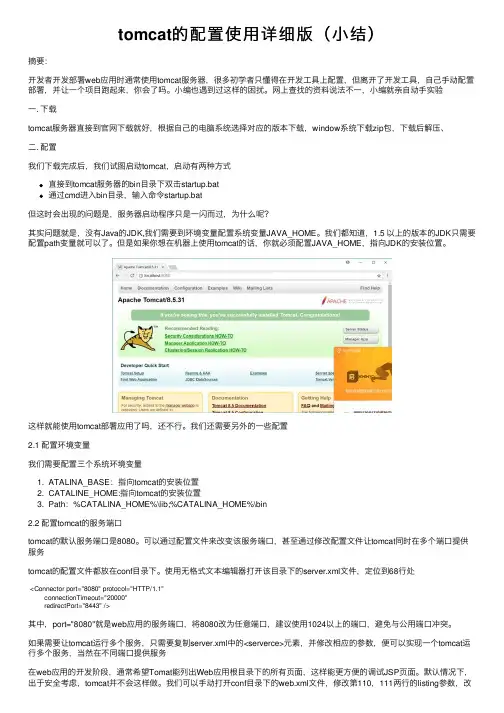
tomcat的配置使⽤详细版(⼩结)摘要:开发者开发部署web应⽤时通常使⽤tomcat服务器,很多初学者只懂得在开发⼯具上配置,但离开了开发⼯具,⾃⼰⼿动配置部署,并让⼀个项⽬跑起来,你会了吗。
⼩编也遇到过这样的困扰。
⽹上查找的资料说法不⼀,⼩编就亲⾃动⼿实验⼀. 下载tomcat服务器直接到官⽹下载就好,根据⾃⼰的电脑系统选择对应的版本下载,window系统下载zip包,下载后解压、⼆. 配置我们下载完成后,我们试图启动tomcat,启动有两种⽅式直接到tomcat服务器的bin⽬录下双击startup.bat通过cmd进⼊bin⽬录,输⼊命令startup.bat但这时会出现的问题是,服务器启动程序只是⼀闪⽽过,为什么呢?其实问题就是,没有Java的JDK,我们需要到环境变量配置系统变量JAVA_HOME。
我们都知道,1.5 以上的版本的JDK只需要配置path变量就可以了。
但是如果你想在机器上使⽤tomcat的话,你就必须配置JAVA_HOME,指向JDK的安装位置。
这样就能使⽤tomcat部署应⽤了吗,还不⾏。
我们还需要另外的⼀些配置2.1 配置环境变量我们需要配置三个系统环境变量1. ATALINA_BASE:指向tomcat的安装位置2. CATALINE_HOME:指向tomcat的安装位置3. Path:%CATALINA_HOME%\lib;%CATALINA_HOME%\bin2.2 配置tomcat的服务端⼝tomcat的默认服务端⼝是8080。
可以通过配置⽂件来改变该服务端⼝,甚⾄通过修改配置⽂件让tomcat同时在多个端⼝提供服务tomcat的配置⽂件都放在conf⽬录下。
使⽤⽆格式⽂本编辑器打开该⽬录下的server.xml⽂件,定位到68⾏处<Connector port="8080" protocol="HTTP/1.1"connectionTimeout="20000"redirectPort="8443" />其中,port="8080"就是web应⽤的服务端⼝,将8080改为任意端⼝,建议使⽤1024以上的端⼝,避免与公⽤端⼝冲突。
J2EE课程设计及项目实训教学——Tomcat服务器的Web安全管理和配置1.1.1Tomcat服务器的Web安全的解决方法1、概述(1)安全需要在高度保证企业应用程序安全的过程中我们不免会考虑到如下的安全需求,然后我们针对这些安全需求提出各种安全技术。
1)完整性验证(Integrity Verification)。
也就是以防止我们需要的内容不被篡改。
2)机密性保持(Confidentiality Preservation)。
通俗的说就是防止内容被别人读懂。
3)认证和访问授权(Authenticity Permission)。
通俗的说就是对来访者提供的信息进行分析和判断,从而确定来访者身份,然后根据身份决定该来访者具有什么权限。
4)不可抵赖的证据(Nonrepudiation Evidence)。
举个很简单的例子,如果你去银行交费,银行必须给你一个交过费的凭证,不然您的钱被银行工作人员“黑”掉怎么办?5)审计证据(Auditing Evidence)。
对一些安全性十分重要的数据操作进行纪录和观察,相当于银行的那个摄像头,在需要的时候,它能够为您提供凭据。
(2)在Tomcat中实现认证和访问授权我们经常在论坛中中见到管理员、斑竹等身份标识,并且我们更明白拥有不同的身份它们的权限也同样有差别。
但我们很想拥有管理员的权限,我们的突破口应该在哪里呢?当然是获得一个管理员的账号,这样就可以被系统的认证系统识别。
在任何一种WEB应用开发中,不论大中小规模的,每个开发者都会遇到一些需要保护程序数据的问题,涉及到用户的LOGIN ID和PASSWORD。
那么如何执行验证方式更好呢?实际上,有很多方式来实现。
下面将讨论在Tomcat中实现基本的(BASIC)和基于表单的(FORM-BASED)验证方式。
它通过server.xml和web.xml文件提供基本的和基于表单的验证。
对于采用基于表单的(FORM-BASED)验证方式,只是要求在登录的JSP页面中的j_security_check 表单(for FORM-based) 需要两个参数:j_username和j_password。
它代表整个容器,是Tomcat实例的顶层元素.由org.apache.catalina.Server接口来定义.它包含一个<Service>元素.并且它不能做为任何元素的子元素.<Server port="8005" shutdown="SHUTDOWN" debug="0">1>className指定实现org.apache.catalina.Server接口的类.默认值为org.apache.catalina.core.StandardServer2>port指定Tomcat监听shutdown命令端口.终止服务器运行时,必须在Tomcat服务器所在的机器上发出shutdown命令.该属性是必须的.3>shutdown指定终止Tomcat服务器运行时,发给Tomcat服务器的shutdown监听端口的字符串.该属性必须设置该元素由org.apache.catalina.Service接口定义,它包含一个<Engine>元素,以及一个或多个<Connector>,这些Connector元素共享用同一个Engine元素<Service name="Catalina"><Service name="Apache">第一个<Service>处理所有直接由Tomcat服务器接收的web客户请求.第二个<Service>处理所有由Apahce服务器转发过来的Web客户请求1>className 指定实现org.apahce.catalina.Service接口的类.默认为org.apahce.catalina.core.StandardService2>name定义Service的名字每个Service元素只能有一个Engine元素.元素处理在同一个<Service>中所有<Connector>元素接收到的客户请求.由org.apahce.catalina.Engine接口定义.<Engine name="Catalina" defaultHost="localhost" debug="0">1>className指定实现Engine接口的类,默认值为StandardEngine2>defaultHost指定处理客户的默认主机名,在<Engine>中的<Host>子元素中必须定义这一主机3>name定义Engine的名字,在<Engine>可以包含如下元素<Logger>, <Realm>, <Value>, <Host>它由Host接口定义.一个Engine元素可以包含多个<Host>元素.每个<Host>的元素定义了一个虚拟主机.它包含了一个或多个Web应用.<Host name="localhost" debug="0" appBase="webapps" unpackWARs="true" autoDeploy="true">1>className指定实现Host接口的类.默认值为StandardHost2>appBase指定虚拟主机的目录,可以指定绝对目录,也可以指定相对于<CATALINA_HOME>的相对目录.如果没有此项,默认为<CATALINA_HOME>/webapps3>autoDeploy如果此项设为true,表示Tomcat服务处于运行状态时,能够监测appBase下的文件,如果有新有web应用加入进来,会自运发布这个WEB应用4>unpackWARs如果此项设置为true,表示把WEB应用的WAR文件先展开为开放目录结构后再运行.如果设为false将直接运行为WAR文件5>alias指定主机别名,可以指定多个别名6>deployOnStartup如果此项设为true,表示Tomcat服务器启动时会自动发布appBase目录下所有的Web应用.如果Web应用中的server.xml没有相应的<Context>元素,将采用Tomcat 默认的Context7>name定义虚拟主机的名字,在<Host>元素中可以包含如下子元素<Logger>, <Realm>,<Value>, <Context>它由Context接口定义.是使用最频繁的元素.每个<Context元素代表了运行在虚拟主机上的单个Web应用.一个<Host>可以包含多个<Context>元素.每个web应用有唯一的一个相对应的Context代表web应用自身.servlet容器为第一个web应用创建一个ServletContext对象.<Context path="/sample" docBase="sample" debug="0" reloadbale="true">1>className指定实现Context的类,默认为StandardContext类2>path指定访问Web应用的URL入口,注意/myweb,而不是myweb了事3>reloadable如果这个属性设为true, Tomcat服务器在运行状态下会监视在WEB-INF/classes和Web-INF/lib目录CLASS文件的改运.如果监视到有class文件被更新,服务器自重新加载Web应用3>cookies指定是否通过Cookies来支持Session,默认值为true4>useNaming指定是否支持JNDI,默认值为了true,在<Context>元素中可以包含如下元素<Logger>, <Realm>, <Resource>, <ResourceParams>由Connector接口定义.<Connector>元素代表与客户程序实际交互的给件,它负责接收客户请求,以及向客户返回响应结果.<Connector port="8080" maxThread="50" minSpareThreads="25" maxSpareThread="75" enableLookups="false" redirectPort="8443" acceptCount="100" debug="0" connectionTimeout="20000" disableUploadTimeout="true" /><Connection port="8009" enableLookups="false" redirectPort="8443" debug="0" protocol="AJP/1.3" />第一个Connector元素定义了一个HTTP Connector,它通过8080端口接收HTTP请求;第二个Connector元素定义了一个JD Connector,它通过8009端口接收由其它服务器转发过来的请求.Connector元素共用属性1>className指定实现Connector接口的类2>enableLookups如果设为true,表示支持域名解析,可以把IP地址解析为主机名.WEB应用中调用request.getRemoteHost方法返回客户机主机名.默认值为true3>redirectPort指定转发端口.如果当前端口只支持non-SSL请求,在需要安全通信的场命,将把客户请求转发至SSL的redirectPort端口HttpConnector元素的属性1>className实现Connector的类2>port设定Tcp/IP端口,默认值为8080,如果把8080改成80,则只要输入http://localhost 即可因为TCP/IP的默认端口是803>address如果服务器有二个以上ip地址,此属性可以设定端口监听的ip地址.默认情况下,端口会监听服务器上所有的ip地址4>bufferSize设定由端口创建的输入流的缓存大小.默认值为2048byte5>protocol设定Http协议,默认值为HTTP/1.16>maxThreads设定在监听端口的线程的最大数目,这个值也决定了服务器可以同时响应客户请求的最大数目.默认值为2007>acceptCount设定在监听端口队列的最大客户请求数量,默认值为10.如果队列已满,客户必须等待.8>connectionTimeout定义建立客户连接超时的时间.如果为-1,表示不限制建立客户连接的时间JkConnector的属性1>className实现Connector的类2>port设定AJP端口号3>protocol必须设定为AJP/1.31:配置在进行具体的管理之前,我们先给tomcat添加一个用户,使这个用户有权限来进行管理。
首先确定你得jdk环境已配好,检验方法,dos下键入命令javac,如果出来一堆命令就说明配置正确。
本文不再赘述,教程找度娘。
第一步:到官网下载最新版tomcat(个人比较喜欢最新版,目前是7.0.21),/download-70.cgi,ok,相信大部分童鞋都是windows系统,如果你的电脑是32位,选择32-bit Windows zip;64位则选择64-bit。
第二步:下载下来之后是一个解压包,直接解压到你希望的地方,我的是;好了,最后一步就是配置环境变量了,笔者我相信你已经知道怎么进入环境变量配置页面了,不过还是说一下,win7为例,计算机-属性-高级系统设置-选择高级选项卡-下面就是环境变量。
我们需要配置4个变量,CATALINA_HOME:F:\apache-tomcat-7 .0.21CATALINA_BASE:F:\apache-tomcat-7.0.21TOMCAT_HOME:F:\apache-tomcat-7.0.21如果以前从没碰过什么tomcat,4个变量都是要新建的,(什么,才3个。
我擦,别急啊),上面3个太简单了。
还有一个ClassPath的变量,前面安装过jdk的话,应该这个变量已经有了,直接编辑,在classpath变量的最后加上servlet-api.jar这个文件的路径,最后配好的变量值是这样的:C:\Program Files\Java\jdk1.7.0\lib;.;%JAVA_HOME %\lib;F:\apache-tomcat-7.0.21\lib\ser vlet-api.jar前面的C:\Program Files\Java\jdk1.7.0\lib;.;%JAVA_HOME %\lib;是我的jdk的classpath,恩。
总之你要做的就是将servlet-api.jar路径加上就行了。
(我好啰嗦。
),分号是用来将各个路径隔开的。
那么,最后呢,我们测试一下自己的成果吧,配了半天没点成果怎么行,呵呵。
tomcat详细配置步骤版本:tomcat6.0第一步:下载jdk和tomcat:JDK下载Tomcat下载最新的jdk为1.6.10,tomcat为6.0,建议jdk1.4以上,tomcat4.0以上第二步:安装和配置你的jdk和tomcat:执行jdk和tomcat的安装程序,然后设置按照路径进行安装即可。
1.安装jdk以后,需要配置一下环境变量,在我的电脑->属性->高级->环境变量->系统变量中添加以下环境变量(假定你的jdk安装在C:\Program Files\Java):JAVA_HOME=C:\Program Files\Java\jdk1.6.0_10classpath=.;%JAVA_HOME%\lib\dt.jar;%JAVA_HOME%\lib\tools.jar;(.;一定不能少,因为它代表当前路径)path=%JAVA_HOME%\bin接着可以写一个简单的java程序来测试JDK是否已安装成功:public class Test{public static void main(String args[]){System.out.println("This is a test program.");}}将上面的这段程序保存为文件名为Test.java的文件。
然后打开命令提示符窗口,cd到你的Test.java所在目录,然后键入下面的命令javac Test.javajava Test此时如果看到打印出来This is a test program.的话说明安装成功了,如果没有打印出这句话,你需要仔细检查一下你的配置情况。
2.安装Tomcat后,在我的电脑->属性->高级->环境变量->系统变量中添加以下环境变量(假定你的tomcat安装在c:\tomcat):CATALINA_HOME:c:\tomcatCATALINA_BASE:c:\tomcatTOMCAT_HOME: C:\Tomcat然后修改环境变量中的classpath,把tomat安装目录下的common\lib下的servlet.jar追加到classpath中去,修改后的classpath 如下:classpath=.;%JAVA_HOME%\lib\dt.jar;%JAVA_HOME%\lib\tools.jar;%CATALINA_HOME%\common\lib\servlet-api.jar; 【注意最新版本的Tomcat中可能没有common这个文件夹了。
Netbeans中Tomcat服务器配置Netbeans Tomcat服务器实例配置1.在netbeans-tools-server manerger下添加tomcat服务器,默认是已经配置好的。
配置用户:这个要在base directory 下的tomcat-users.xml文件中设置用户角色(role):admin 或者manager 或者admin,managerHome Directory.服务器所在目录,安装好以后基本不管它的事了Base Directory:用户配置所在目录,设置你的服务器和你的servlets2.发布servlet新建一个工程,samples下有tomcat servlet example.命名为TomcatServletExample 在base directory下有apache-tomcat-5.5.17_base\work\Catalina\localhost\servlets-examples\tldCache.ser 在apache-tomcat-5.5.17_base\conf\Catalina\localhost下有depth#examples.xml:这是以文件夹和文件形式发布的结构。
前面提到的servlets-examples.xml文件中的docBase 属性就是我工程文件的目录,path是制定的访问路径,比如,我这里可以通过http://localhost:8084/servlets-examples/访问, 客户端的访问就是通过这个文件来转向的docBase的典型结构是:*.html, *.jsp, etc :页面/WEB-INF/web.xml :he Web Application Deployment Descriptor for your application. This is an XML file describing the servlets and other components that make up your application, along with any initialization parameters and container-managed security constraints that you want the server to enforce for you./WEB-INF/classes/ :编译后的.class文件/WEB-INF/lib/ :This directory contains JAR files that contain Java class files (andassociated resources) required for your application, such as third party class libraries or JDBC drivers.3. 弄清了结构,然后自己动手写一个简单新建一个web application, 默认有一个index.jsp作为首页,首页可以在web.xml的pages 标签下修改index.jsp在body标签下添加:Execute在source packages下添加NewServlet.class, 代码附在后面在web.xmlservlet标签下配置NewServlet, 指定servlet class和url pattern, 我指定的是/NewServlet,在http://localhost:8084/WebServletTest/NewServlet下就访问到了发现有时候要编译两次才能显示正确的结果连接一个图片时,文件名竟然是大小写敏感的netbeans的web sample下有tomcat servlet的例子,是学习servlet的很好的例子实例代码:1.-------------------------------------2.3.import java.io.*;4.import .*;5.import javax.servlet.*;6.import javax.servlet.http.*;7.public class NewServlet extends HttpServlet {8./** Initializes the servlet. Connections to databases belong here !9.*/10.public void init(ServletConfig config) throws ServletException {11.super.init(config);12.13.}14.15./** Destroys the servlet. Close connections, files, etc.16.*/17.public void destroy() {18.19.}20.21.// Form values can be passed by 2 methods, GET or POST22.// the doGet() (resp. doPost()) method is called when the method is23.// GET (resp POST).24.// The following trick allows us to process both with one function25.26.protected void doGet(HttpServletRequest request, HttpServletResponse response)27.throws ServletException, IOException {28.processRequest(request, response);29.}30.31.protected void doPost(HttpServletRequest request, HttpServletResponse response)32.throws ServletException, IOException {33.processRequest(request, response);34.}35.36.protected void processRequest(HttpServletRequest request, HttpServletResponseresponse)37.throws ServletException, IOException {38.response.setContentType("text/html");39.PrintWriter out = response.getWriter();40.41.out.println("");42.out.println("");43.out.println("");44.out.println("");45.out.println("");46.// The real work of the servlet begins here47.48.// A servlet does nothing else than outputing HTML code49.// to the webserver. It can output the HTML code corresponding50.// to a form. The user fills this form and, when the Submit button51.// is clicked, the values are sent to the appropriate program on the52.// webserver (in this case, our servlet) which then uses these values53.// to `calculate' what it should display this time54.55.// If the servlet is simply56.// called by visiting an url or clicking a link, all parameters57.// will have null values. This is what happens when you type58.// `' in your browser. We can detect this and59.// print out a default `welcome' message (as below).60.// If the servlet is called by clicking a submit61.// button, no parameter will have null values (fields not filled62.// by the user will return empty strings, not null).63.64.if (request.getParameter("myparam") != null)65.// the request.getParameter function allows us to obtain the66.// values entered by the user in the various input fields67.out.println("Your parameter is "+request.getParameter("myparam")+"68.");69.else70.out.println("Hello, please enter a parameter !71.");72.out.println(" Enter your new parameter here:73.");74.out.println(75.// The `action` field of the `form` tag indicates which program76.// should be called by the webserver when the user clicks `submit'77.// in this case, we tell it to call the same servlet again78." "+79.// The 'name' of the input field corresponds to the name of the80.// parameter which will contain the value81.// entered in this input field (here, it is 'myparam' - see above)82."83."+84.// The special `submit` input field generates a submit button85.""86.// When the user clicks the submit button, the browser sends a87.// request to the servlet whose name is contained in the `action`88.// field of the `` tag, which in this case is the present89.// servlet. This request includes the values entered by the user90.// in the different input fields as parameters.91.+""92.);93.94.out.println("");95.out.println("");96.97.out.close();98.}99.100.public String getServletInfo() { 101.return "Short description"; 102.}103.104.}。