volvo EDC使用说明书
- 格式:pdf
- 大小:2.54 MB
- 文档页数:57
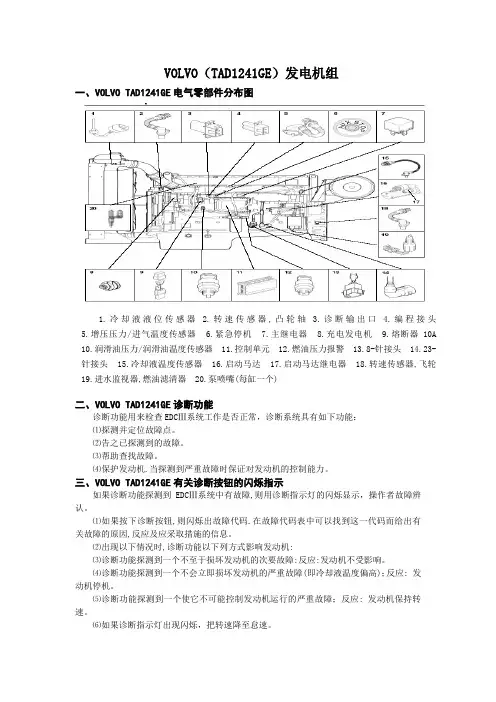
VOLVO(TAD1241GE)发电机组一、VOLVO TAD1241GE电气零部件分布图1.冷却液液位传感器2.转速传感器,凸轮轴3.诊断输出口4.编程接头5.增压压力/进气温度传感器6.紧急停机7.主继电器8.充电发电机9.熔断器10A 10.润滑油压力/润滑油温度传感器 11.控制单元 12.燃油压力报警 13.8-针接头 14.23-针接头 15.冷却液温度传感器 16.启动马达 17.启动马达继电器 18.转速传感器,飞轮19.进水监视器,燃油滤清器 20.泵喷嘴(每缸一个)二、VOLVO TAD1241GE诊断功能诊断功能用来检查EDCⅢ系统工作是否正常,诊断系统具有如下功能:⑴探测并定位故障点。
⑵告之已探测到的故障。
⑶帮助查找故障。
⑷保护发动机.当探测到严重故障时保证对发动机的控制能力。
三、VOLVO TAD1241GE有关诊断按钮的闪烁指示如果诊断功能探测到EDCⅢ系统中有故障,则用诊断指示灯的闪烁显示,操作者故障辨认。
⑴如果按下诊断按钮,则闪烁出故障代码.在故障代码表中可以找到这一代码而给出有关故障的原因,反应及应采取措施的信息。
⑵出现以下情况时,诊断功能以下列方式影响发动机:⑶诊断功能探测到一个不至于损坏发动机的次要故障:反应:发动机不受影响。
⑷诊断功能探测到一个不会立即损坏发动机的严重故障(即冷却液温度偏高);反应: 发动机停机。
⑸诊断功能探测到一个使它不可能控制发动机运行的严重故障;反应: 发动机保持转速。
⑹如果诊断指示灯出现闪烁,把转速降至怠速。
⑺按下诊断按钮以得到有关信息,松开诊断按钮并注意闪出的故障代码,从故障代码表中查阅该故障代码并采取所建议的纠正措施。
⑻读取故障代码。
如果按下诊断按钮并随后松开,就会闪出故障代码,故障。
代码由两组间隔2秒的闪烁次数组成.通过每组的闪烁次数可以读取故障代码,比如:故障代码被自动存储,并在故障未消除期间都可以读取.在故障代码表中可以找到有关的原因,反应和措施等信息。

Congratulationson your newPure Electric Volvo!This Quick Guide is designed to help familiarize you with your vehicle’s key systems, features, and operation. Please refer to your Digital Owner’s Manual for complete information.Table of ContentsThis Quick Guide is divided into the following sections:(Click on any topic to jump to that page; use the Home icon in the lower l eft of each page to return here)1. Important to know 4 •No electrical 4 •Exterior engine noise 4 •High-voltage current 42. Getting ready for your new Pure Electric Volvo 5•Preparing your home for charging of the vehicle’shigh-voltage battery 5 •Home charging 6 •Public charging 7 •An active Google account will enable access to key features 83. When You Take Delivery 9 •Shifter, parking brake, and front trunk storage 9-10 •Signing in with Google 11 •Interacting with the Google entertainment interface 12•Pairing a phone 13 •Interacting with the Digital Driver Display 14-15 •Charging basics 16-19 •Preconditioning the vehicle prior to driving 20 •Starting and driving 21 •One-pedal drive and regenerative braking 22-23 4. After Delivery 24 •If desired, schedule a “2nd Delivery” with your Retailer 24 •Charging rates and approximate times 24 •Electrification terms and their meanings 25 •Roadside Assistance 261. Important To KnowNo ElectricalKeep in mind that if there is no electrical current to the vehicle – i.e. the ignition is switched off or the start battery is discharged – certain f unctions such as power brakes, power steering, etc. will be limited.Exterior Engine NoiseWARNINGRemember that a battery electric vehicle does not emit any engine n oise. It is powered only by quiet electric motors, and may be difficult to notice by children, pedestrians, cyclists, and animals. This is especially true at low speeds, such as in parking areas.High-Voltage CurrentWARNINGSeveral components in the car work with high-voltage current that could be dangerous in the event of incorrect intervention. High-voltage o perating components and orange-coloured cables should only be handled by qualified (Volvo) technicians.Follow the instructions in your Digital Owner’s Manual.Battery DepletionWARNINGVolvo strongly recommends not letting the battery deplete to 0%.Below 20% state of charge you will receive warnings, with guidance t o charging stations.2.Getting ready for your newPure Electric VolvoPreparing Your Home for Charging of the Vehicle’s H igh-Voltage BatteryAt-home fast-charging capability is an important aspect of electricvehicle ownership.•Your Volvo will come standard witha dual mode Level 2 charging c ableapproximately 4.5 metresin length, capable of 240-volts. T hecable is supplied with an adapter toenable both Level 1 and Level 2charging.Important to know:1.Due to slow charging speed, Volvo does not recommend Level 1 homecharging as your predominant method of charging. You can set thecharging speed of your XC40 Recharge within the Charging s ection inyour centre screen. For AC charging, the default charge speed is set to 6 amps and this can be increased up to 48 amps. Ensure that your setvehicle charging rate does not exceed the amperage of the household circuit being used, to avoid trippingthe circuit breaker.2.NOTE: The charging port on your Pure Electric Volvo is located behind t herear wheel on the driver’s side. Make sure your home charging station is installed in a location where the cable will reach this section of the vehicle.Home Charging•The ChargePoint Home Flex provides fast and efficient charging. T his 240-volt Level 2 home charger provides up to 50 amps to charge your Volvo. More information can be found at:https:///en-ca/drivers/home/https:///fr-ca/drivers/home/•This option provides smart connectivity and will help ensure you s tart every day with a full charge.•We strongly recommend professional installation of home-charging technology by a licensed electrician. Please contact locally licensed electricians to arrange a home assessment and receive an installation quote. When possible, it’s also recommended to arrange for multipleinstallation quotes.Public ChargingChargePoint is an official vehicle-charging partner of Volvo Cars in North America. With an active ChargePoint account, you can pay for charging at over 90% of public stations.•A ChargePoint Welcome Kit is provided with your vehicle. Please take t he time to review its contents.•To set up your ChargePoint account, please visit/drivers/•With your active ChargePoint account and credit card information stored, you have several payment methods, including:- - The RFID card, which is included in your vehicle Welcome Kit.The ChargePoint mobile app, which is available for both iOS a nd Android.The in-car app - available in the Google Play Store - which allows f or touchless pay right from your driver’s seat.-How to begin a public charging session:1.Once in Park, tap your card or phone on the ChargePoint station, or hitthe “Start Charge” button on your mobile app or on your car’s c entre screen. This will unlock the charging connector so you can remove it from the charging station.2.Plug the connector into your Pure Electric Volvo to start charging.An Active Google Account Will Enable Access to Key Features•For the most personalized experience in your new Pure Electric Volvo, w e recommend you set up a Google account, if you don’t already have one. •An active Google account enables built-in features like Google Assistant, Google Maps, and Google Play.•When taking delivery of your car, make sure you have your Google account information readily available, together with your smartphone.3. When you take delivery of your VolvoShifter, Parking Brake, and Front Trunk StorageConsult your Digital Owner’s Manual for comprehensive instructions o n operating controls and systems.•Shifter and Parking Brake: To select R everse, push the shifter forward o nce. To select D rive, pull the shifter rearward once. Selecting P ark automatically sets the parking brake. Selecting D rive or R everse automatically releases the parking brake.3. When you take delivery of your VolvoFeatures depicted may not be standard or available. European specifications may be shown.• Front Trunk: This weather-sealed, ventilated storage area is where y ou will find the tire repair kit. To open the front trunk, pull the lever o n the left side of the driver’s footwell, then release the yellow tab above the driver’s side headlight.Signing In with Google•Pull down the tab at the top of the centre display (as shown inabove image)•Select add profile•Select language•Review and accept Google terms and conditions•Sign in to your Google account. You are able to select one of three ways: - Sign in with your Google email address and password on the centredisplaySign in with your Android phoneSign in with your iPhone--•For any of the selected options, simply follow the prompts on screen a nd on your mobile device. A confirmation message will appear once you are successfully signed in with Google. Now you can start personalizing your experience.•A short tutorial on Google Assistant is available, and you are ableto turn on personal results for access to your calendar and contacts.•In the Google Play Store, you have access to downloadable in-car a pps like Spotify,® TuneIn,® and ChargePoint. In addition to apps in the Google Play Store, FM radio is available, and you can enjoy m usic or podcasts via Bluetooth from your phone.Interacting with the Google Infotainment InterfaceInteracting with the integrated Google services is as easy and familiar a s using your smartphone.•Google Assistant supports natural speech. Simply say “Hey Google” or “OK Google” and state your command, from navigation to just about a nything that can be answered by the internet.•Google can also control some in-car features, such as climate settings a nd heated seats and steering wheel.•Built-in Google Maps provides real-time traffic and public charging information,* and it can estimate your remaining state of charge before y ou set out. Simply set your desired destination in Google Maps and the system will show you the predicted battery charge level upon arrival.•Signing into your own Google account provides a personalized experience, such as directions to work or home, as well as accessto your recent search history in Google Maps from your other signed- i n devices. This makes trip planning very easy. The system will still function without being signed in with Google.*Not all public charging stations may be compatible with your vehicle.Pairing a Phone1. First, activate Bluetooth on your phone, and verify in the phone’ssettings that the phone is visible to other devices.2. On the home screen:- Click on the “Connect Your Phone” tile. The following message will appear: “To make or receive calls, pair your phone with the vehicle. M ake sure that Bluetooth is enabled on your device.”Tap the “Connect” button.Tap the name of the phone you would like to connect.Make sure the code displayed in the vehicle matches the one i n thephone and confirm.Tap “Done.”- - - -Interacting with the Digital Driver DisplayThe 12.3” Digital Driver Display is located in front of the driver,directly behind the steering wheel.• The Digital Driver Display is where you can view information related to your vehicle’s state-of-charge – in terms of percentage charged, rate o f charge, and time to completion.• When your vehicle is in Park, and connected to a charger, the Digital D river Display shows a wealth of information about the state, and rate, o f battery charging of your vehicle.• There are 3 visual options for the Digital Driver Display to select from. To change the display mode, press the lower toggle button on the right s ide of the steering wheel, just below voice control.• Calm Mode shows only the most necessary information (e.g., state o fcharge) so you can relax and focus on your drive.• Navi Mode provides large navigation information from Google Maps f or quick reference.• Car Centric Mode gives you the greatest amount of information o nthe vehicle systems and their statuses.Charging BasicsIt is important to know how to use both at-home and public charging systems, and to understand the ways your vehicle can “assist” in the charging process. • In “Settings,” selecting the maximum charging rate of 48 amps w illensure the fastest charging with all types of chargers.• The standard cable that comes with the vehicle allows your Volvoto be plugged into both 110V and 240V home outlets, though 240V is recommended as it can fully recharge the car overnight (e.g. approx. 8hours). A 110V volt outlet does not carry sufficient current to provide aviable solution for everyday charging. Due to significantly longer charging times, it should be used only in emergencies, or to “top up.”• Charging speed can be set in your centre display. To adjust thecharging amp limit, click the gear icon on the centre touchscreen> select Charging > press the plus or minus sign to change theamperage limit for charging. Set it to 48 amps for best charging speed, if it’s not already. If you plug it into a lower amperage circuit, e .g., a 110-volt 15 amp circuit, the car will lower the charging speed b ased on theamperage available.• You can view the car’s charging speed in the instrument cluster, w hen parked and plugged in.• Your Volvo is compatible with most public chargers. It can be charged o n AC (Level 2) chargers as well as DC fast chargers. AC charges at a lower speed, up to 11 kWh, while on DC it can accept a charge up to 150 kWh. AC is most common at home, work, or in shopping centres, w hile DC is typically found on expressway routes.European specification shown•With AC charging, there’s no need to adjust the charging limit. Leave it a t 48 amps.•With DC charging, the onboard charger in the car will handle the power l oad for you, regardless of the output of the charger.•To charge the vehicle, connect any J1772 AC or CCS Combo DC Fast C harger to the vehicle’s charging port, located on the rear of the driver’s s ide exterior. With DC charging, it is necessary to pull out the rubber plug in the lower charging port. Once the charger is connected to the vehicle, the charging port will begin to blink yellow as the car initializes the charging sequence. When the light on the left side of the charging port turns green, the charger is successfully connected, and the vehicle i s charging. If a red light appears, a charging fault has occurred, and the plug should be removed. •Charging Status Lights – Adjacent to the Charging Socket Input1.2.3.4.5.6. White – LED lampYellow – Waiting mode for charging to start Flashing green – Charging in process Green –Charging completeRed – Fault has occurredBlue – Scheduled charging•The charger locks automatically into place when the vehicle is charging. To unplug the charger, press the cable button on the upper r ight side of the charging port. When the light turns white, it is safe to remove the charger. •How to stop a charging session: At any time, as long as you have the vehicle key, use the Unlock button adjacent to the vehicle’s charging p ort to interrupt charging.Note: Electric charging is new technology. You may encounter certain public charging stations which may have compatibility issues with your vehicle.Should this happen, we encourage you to call the Volvo Consumer Relations a t 1-800-663-8255, or the support line phone number located at the applicablecharging station.• “Hey, Google, find a chargingstation.” Google can provide real-time information and directionsto charging stations near you.• Long-distance route planning iseasy. On a long journey, or drivingaround town, Google can do thework for you. If you enter adestination that is beyond the car’srange, Google will automatically buildcharging stations into the route, sothere is no guesswork. • The ChargePoint in-car app makespublic charging even easier. Fromthe Google Play Store, downloadthe ChargePoint a pp and sync it toyour account.Your car will recognize when youneed a charge and display a nearbystation. Simply follow the p romptsto initiate charging from w ithin thecar. Unlock the station a nd startcharging – your car willcommunicate with the station andadminister the payment for you.Features depicted may not be standard or available.European specifications may be shown.• With your ChargePoint account, you can handle payment for ChargePoint-branded chargers, as well as their partner networks, including EVGo and Flo. For stations not on the ChargePoint network, s imply follow payment instructions provided on the station. Please be aware that out-of-network fees may be incurred.• Please see Section 4 of this Quick Guide for information on charging r atesand times.Preconditioning the vehicle prior to driving•“Preconditioning” can be used to cool or warm the vehicle’s interior p rior to driving, while the vehicle is connected to a charger. •Preconditioning helps to save battery energy that would otherwise b e used to cool or warm your cabin at the start of a drive.•You can activate Preconditioning, or program it for a desired start time i n “Settings” (see below).•Adding a Time Setting (can manage up to 8 time settings):1.Open the climate view in the centre display.2.Select the “Parking” tab.3.Tap on “Schedule.”4.Select “Add new timer.”5.Tap on “Date” to set the time for a single date; tap on “Days” to set t hetime for one or more days of the week.6.Set the time when the preconditioning should be finished byscrolling through the arrows.7. Tap on “Confirm”; the time setting is added to the list and activated.Starting and DrivingYour Pure Electric Volvo is always ready to go, so there is nostart/stop button.•To start the vehicle, sit in the driver’s seat, fasten your seatbelt,place your foot on the brake, and select Drive.•To stop, simply put the vehicle in Park and exit – it will automatically t urn off.•In vehicles driven by multiple drivers (for whom Driver Profiles have been set up), it is important to remember to override the “default”p rofile, if necessary, prior to driving while the vehicle is stationary. See your Digital Owner’s Manual for Driver Profiles information.One-Pedal Drive and Regenerative BrakingPure Electric Volvos come with a new mode of driving: One-Pedal Drive. T his mode allows the vehicle to recover energy through “regenerative braking” as the throttle is released and the vehicle decelerates.• Regenerative braking is an “energy conversion” technology. Whendecelerating, kinetic energy that would otherwise be dissipated a s heatfrom the brakes is, instead, converted into electricity to charge t he vehicle’s high-voltage battery.• With One-Pedal Drive engaged, the driver can still use the full power o f the mechanical brakes at any time via the brake pedal.•To turn on or off One-Pedal Drive, click the gear icon on the centre touchscreen > select Driving > tap on the One-Pedal Drive toggle to e ngage or disengage.•One-Pedal Drive should be turned off during open highway driving, as this will allow the vehicle to coast when the accelerator pedal is released, thereby preserving kinetic energy. During urban/suburban driving, the more frequent decelerations will enable the One-Pedal Drive technology to more effectively recapture energy to recharge the battery. •For additional information on One-Pedal Drive, including tips on when i t is most beneficial to use it, consult your Digital Owner’s Manual.4. After deliveryIf desired, schedule a “2nd” delivery with your Retailer to answer a ny questions or concerns about your Volvo.Charging rates and approximate times (individual results may vary) •The Volvo XC40 Recharge is equipped with a 78kWh battery•AC (Alternating Current)- - - 110V (Level 1; standard wall outlet): up to 1 kW240V (Level 2; typical large-appliance outlet): up to 11 kW Ensure that your set vehicle charging rate does not exceed the amperage of the household circuit being used, to avoid trippingthe circuit breaker.•DC (Direct Current Fast Charger)-Up to 150 kW (Level 3; up to 150 times faster than Level 1 w alloutlet)•Approximate charging times*-Level 2 – 10% to 80% ≈ 6 hours-150 kW DC Fast Charger – 10% to 80% ≈ 40 minutes*Volvo recommends charging to 90% for everyday use for longer battery life. F or longer trips, charge to 100%.Ambient temperature extremes (cold and hot), driving styles, routes, terrain, vehicle speed, and vehicle load are some examples o f conditions that will affect available vehicle range.•Electrification Terms and Their Meanings•Volt is electrical “pressure” and Amp(ere) is electrical “flow.” The “garden hose” analogy: Turning up the pressure (volt) moves more water, and having a larger diameter hose (amp) flows more water. I n this analogy, water is equivalent to power.•kWh – Kilowatt-Hours: amount of energy stored (comparative t o a tank of gas).•kW – Kilowatt: amount of electricity needed to “fill up” the battery v ia charger (AC or DC).•1kW = 1.34 horsepower (e.g., XC40 Recharge’s combined 300 kW= 402 horsepower).•AC – Alternating Current (typical household outlets, Level 1 or 2, including some charging stations) converts electric power to direct current (DC) via an On-board Charger (OBC).•DC – Direct Current (built-in converter, Level 3 charging stations) f eeds power directly to the car’s battery.Roadside Assistance: 1-800-263-0475Volvo Roadside Assistance is available 24/7/365 to serve you.•Volvo Roadside Assistance is provided as a complimentary service for t he duration of your vehicle’s warranty period, regardless of mileage. Please refer to your Digital Owner’s Manual, which can be found at /en-ca/support, for complete information on the operation and maintenance of your Volvo.Volvo Consumer Relations are available to support 24/7/365 1-800-663-8255.Some of the information in this document may not be correct dueto product changes which may have occurred since it was launched. S ome of the equipment described or shown may only be available in certain countries or may be available only at extra cost.Volvo Car Canada Ltd.9130 Leslie Street, Unit 101, Richmond Hill, Ontario, L4B 0B9Google, Google Play and Google Maps are trademarks of Google LLC./caCopyright © 2021 Volvo Car Corporation (or its affiliates or licensors)。
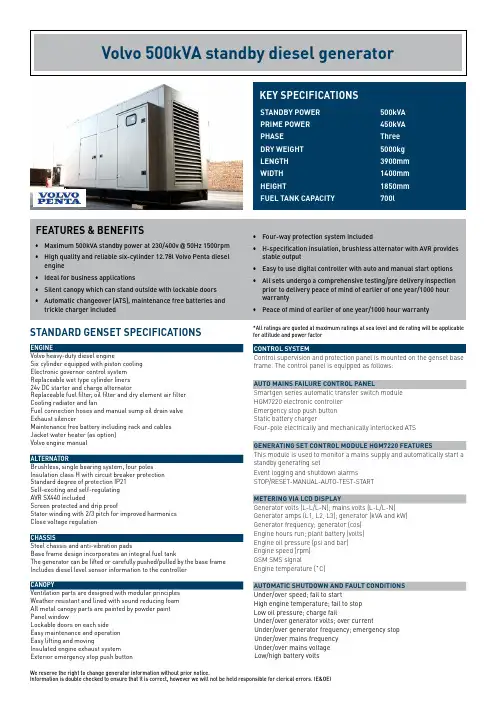
ENGINEVolvo heavy-duty diesel engineSix cylinder equipped with piston cooling Electronic governor control system Replaceable wet type cylinder liners 24v DC starter and charge alternatorReplaceable fuel filter , oil filter and dry element air filter Cooling radiator and fanFuel connection hoses and manual sump oil drain valve Exhaust silencerMaintenance free battery including rack and cables Jacket water heater (as option)Volvo engine manualALTERNATORBrushless, single bearing system, four poles Insulation class H with circuit breaker protection Standard degree of protection IP21Self-exciting and self-regulating AVR SX440 includedScreen protected and drip proofStator winding with 2/3 pitch for improved harmonics Close voltage regulationCHASSISSteel chassis and anti-vibration padsBase frame design incorporates an integral fuel tankThe generator can be lifted or carefully pushed/pulled by the base frame Includes diesel level sensor information to the controller CANOPYVentilation parts are designed with modular principles Weather resistant and lined with sound reducing foam All metal canopy parts are painted by powder paint Panel windowLockable doors on each side Easy maintenance and operation Easy lifting and movingInsulated engine exhaust system Exterior emergency stop push buttonFEATURES & BENEFITS• Maximum 500kVA standby power at 230/400v @ 50Hz 1500rpm • High quality and reliable six-cylinder 12.78l Volvo Penta dieselengine • Ideal for business applications• Silent canopy which can stand outside with lockable doors • Automatic changeover (ATS), maintenance free batteries and trickle charger includedSTANDARD GENSET SPECIFICATIONSKEY SPECIFICATIONSSTANDBY POWER 500kVA PRIME POWER 450kVA PHASE Three DRY WEIGHT 5000kg LENGTH 3900mm WIDTH 1400mm HEIGHT1850mm FUEL TANK CAPACITY700lCONTROL SYSTEMControl supervision and protection panel is mounted on the genset base frame. The control panel is equipped as follows:AUTO MAINS FAILURE CONTROL PANELSmartgen series automatic transfer switch module HGM7220 electronic controller Emergency stop push button Static battery chargerFour-pole electrically and mechanically interlocked ATSGENERATING SET CONTROL MODULE HGM7220 FEATURESThis module is used to monitor a mains supply and automatically start a standby generating setEvent logging and shutdown alarmsSTOP/RESET-MANUAL-AUTO-TEST-STARTMETERING VIA LCD DISPLAYGenerator volts (L-L/L-N); mains volts (L-L/L-N)Generator amps (L1, L2, L3); generator (kVA and kW)Generator frequency; generator (cos)Engine hours run; plant battery (volts)Engine oil pressure (psi and bar)Engine speed (rpm)GSM SMS signalEngine temperature (˚C)AUTOMATIC SHUTDOWN AND FAULT CONDITIONS Under/over speed; fail to start High engine temperature; fail to stop Low oil pressure; charge failUnder/over generator volts; over currentUnder/over generator frequency; emergency stop Under/over mains frequency Under/over mains voltage Low/high battery volts• Four-way protection system included• H-specification insulation, brushless alternator with AVR provides stable output • Easy to use digital controller with auto and manual start options • All sets undergo a comprehensive testing/pre delivery inspection prior to delivery peace of mind of earlier of one year/1000 hour warranty • Peace of mind of earlier of one year/1000 hour warranty*All ratings are quoted at maximum ratings at sea level and de rating will be applicablefor altitude and power factorENGINE SPECIFICATIONSEngine make VolvoDiesel generator model TAD1345GE Displacement12.78lCylinder bore/Stroke131mm x 158mmFuel system EMS2 governorCylinders6Cylinder arrangement Vertical in-lineEngine output power388kWTurbocharged or normally aspirated Turbocharged and intercooled Cycle Four strokeCombustion system Electronic unit injectors Compression ratio18.1:1Fuel tank capacity700lFuel consumption 100%90.5 l/hFuel consumption 75%68.3 l/hFuel consumption 50%46 l/hFuel consumption 25%25.1 l/hOil type15W40Oil capacity30lCooling method Radiator water-cooled Coolant capacity (including radiator)44lStarter24v DCGovernor system ElectronicEngine speed1500rpm ALTERNATOR SPECIFICATIONSStandby power output500kVAPrime power output550kVAInsulation class HType BrushlessPhase and connection Three phase, four wireAVR YesAVR model SX440Voltage regulation± 1%Voltage230/400vRated frequency50HzVoltage regulate change≤ ±10% UNPhase change rate± 1%Power factor 0.8Protection class IP21Stator2/3 pitchRotor Single bearingGENERAL SPECIFICATIONSStructure typeSilent weather resistantenclosureDimensionsLength x Width x Height3900mm x 1400mm x 1850mm Dry weight5000kgATS unit included YesSPECIFICATIONS TABLE。

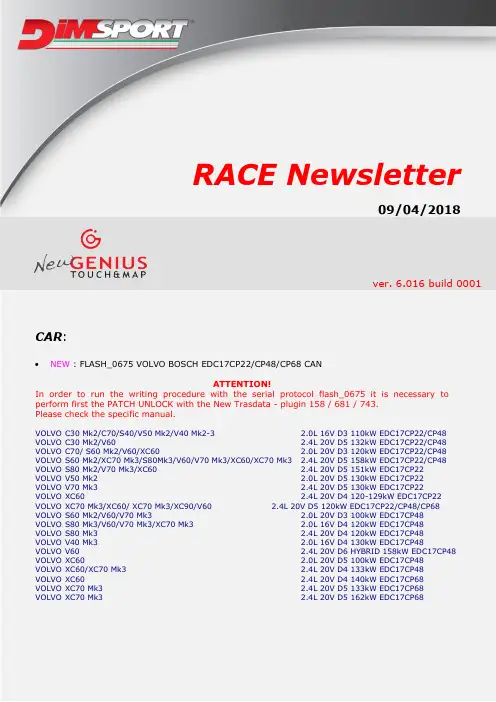
RACE Newsletter09/04/2018CAR:NEW : FLASH_0675 VOLVO BOSCH EDC17CP22/CP48/CP68 CANATTENTION!In order to run the writing procedure with the serial protocol flash_0675 it is necessary to perform first the PATCH UNLOCK with the New Trasdata - plugin 158 / 681 / 743.Please check the specific manual.VOLVO C30 Mk2/C70/S40/V50 Mk2/V40 Mk2-3 2.0L 16V D3 110kW EDC17CP22/CP48VOLVO C30 Mk2/V60 2.4L 20V D5 132kW EDC17CP22/CP48VOLVO C70/ S60 Mk2/V60/XC60 2.0L 20V D3 120kW EDC17CP22/CP48VOLVO S60 Mk2/XC70 Mk3/S80Mk3/V60/V70 Mk3/XC60/XC70 Mk3 2.4L 20V D5 158kW EDC17CP22/CP48VOLVO S80 Mk2/V70 Mk3/XC60 2.4L 20V D5 151kW EDC17CP22VOLVO V50 Mk2 2.0L 20V D5 130kW EDC17CP22VOLVO V70 Mk3 2.4L 20V D5 130kW EDC17CP22VOLVO X C60 2.4L 20V D4 120-129kW EDC17CP22VOLVO X C70 Mk3/XC60/ XC70 Mk3/XC90/V60 2.4L 20V D5 120kW EDC17CP22/CP48/CP68VOLVO S60 Mk2/V60/V70 Mk3 2.0L 20V D3 100kW EDC17CP48VOLVO S80 Mk3/V60/V70 Mk3/XC70 Mk3 2.0L 16V D4 120kW EDC17CP48VOLVO S80 Mk3 2.4L 20V D4 120kW EDC17CP48VOLVO V40 Mk3 2.0L 16V D4 130kW EDC17CP48VOLVO V60 2.4L 20V D6 HYBRID 158kW EDC17CP48 VOLVO X C60 2.0L 20V D5 100kW EDC17CP48VOLVO X C60/XC70 Mk3 2.4L 20V D4 133kW EDC17CP48VOLVO X C60 2.4L 20V D4 140kW EDC17CP68VOLVO X C70 Mk3 2.4L 20V D5 133kW EDC17CP68VOLVO X C70 Mk3 2.4L 20V D5 162kW EDC17CP68NEW : FLASH_0676 MERCEDES DELPHI CRD3.E/P CANATTENTION!In order to run the writing procedure with the serial protocol flash_0676 it is necessary to perform first the PATCH UNLOCK with the New Trasdata - plugin 935.Please check the specific manual.MERCEDES A CLASS W176 A200 2.2L 16V CDI 100kW CRD3.E/PMERCEDES A CLASS W176 A220 2.2L 16V CDI 130kW CRD3.E/PMERCEDES B CLASS W246 B200 2.2L 16V CDI 100kW CRD3.E/PMERCEDES C CLASS W205 C220 2.2L 16V CDI 100-120-125kW CRD3.E/PMERCEDES C CLASS W205 C250 2.2L 16V CDI 152kW CRD3.E/PMERCEDES CLA CLASS C117 CLA200 2.2L 16V CDI 100kW CRD3.E/PMERCEDES CLA CLASS C117 CLA220 2.2L 16V CDI 130kW CRD3.E/PMERCEDES GLA CLASS X156 GLA200 2.2L 16V CDI 100kW CRD3.E/PMERCEDES GLA CLASS X156 GLA220 2.2L 16V CDI 130kW CRD3.E/PMERCEDES SPRINTER W906 316-516 2.2L CDI 105-120kW CRD3.E/PTRUCK:NEW: FLASH_0677 CUMMINS – TEREX ATLAS TRUCK CM570 CANTEREX TRUCKS TA300 10.8L QSM 276kW CM570TRACTOR:NEW: FLASH_0674 CUMMINS – TIGERCAT TRACTOR CM2250 CANTIGERCAT FELLER BUNCHERS 724E 6.7L QSB 164kW CM2250SW : 3.0.186 DLL : 1.0.197 FW: 12.09 build 0002 MOTOROLA MPC500 CPUs:ADD : 01 - MOTOROLA MPC500BOSCH EDC7C1 MPC555/MPC556 INTERNATIONAL DieselNEW - plugin 1037 – INTERNATIONAL BUS 3100 4.8L 110kW EDC7C1 STMICROELECTRONICS CPUs:ADD : 02 - STMICROELECTRONICS ST10BOSCH DCU15 ST10C167 DAF AdBlue DCUNEW - plugin 1032 – FENDT 300 VARIO 313 4.4L 99kWINFINEON TRICORE CPUs:ADD : 03 - INFINEON TRICORE NO PSW CANLINEBOSCH REXROTH SRC 9-34 TC1796 AGCO GEARBOX CVTNEW – plugin 951 – AGCO GEARBOX CVTBOSCH ME17.9.71 TC1724 PSA PetrolNEW – plugin 1035 – PEUGEOT 206 1.6L 16V 82kW ME17.9.71BOSCH ME17.2.4/BMS-MP TC1791/TC1793 BMW MOTORRAD PetrolNEW – plugin 1057 – BMW MOTORRAD S SERIES S 1000 R my2017 1.0L 121kW ME17.2.4BMW MOTORRAD S SERIES S 1000 RR my2017 1.0L 146kW ME17.2.4BMW MOTORRAD S SERIES S 1000 XR my2017 1.0L 121kW ME17.2.4BMW MOTORRAD F SERIES F 800 R/GT my2017 1.0L 66kW ME17.2.4BMW MOTORRAD R SERIES R 1200 GS my2017 1.0L 92kW ME17.2.4BOSCH MEVD17.8.4 TC1797 BMW PetrolNEW – plugin 1065 – BMW 3 SERIES F30/F31/F35 320i 2.0L L4 16V TURBO 135kW MEVD17.8.4BMW 5 SERIES F10/F11/F18 520i 2.0L L4 16V TURBO 135kW MEVD17.8.4BMW 5 SERIES F10/F11/F18 525i 2.0L L4 16V TURBO 160kW MEVD17.8.4ADD : 04 - INFINEON TRICORE BOSCH MEDC17 TPROT2/4/7BOSCH MED17.0.7 TC1782 FORD PetrolNEW – plugin 1064 – FORD FIESTA 7 1.0L 12V Ecoboost 74kW MED17.0.7ADD: 23 - INFINEON TRICORE BOSCH MEDC17 GPT VAGBOSCH ME17.5.22 TC1724 VAG PetrolNEW – plugin 1039 – VOLKSWAGEN GOLF 7 1.6L 8V MPI 81kW ME17.5.22VOLKSWAGEN GRAN LAVIDA 1.6L 8V MPI 81kW ME17.5.22VOLKSWAGEN POLO 5 (6R, 6C) 1.6L 8V MPI 81kW ME17.5.22VOLKSWAGEN TOURAN 1.6L 8V MPI 81kW ME17.5.22SKODA OCTAVIA (5E) 1.6L 8V MPI 81kW ME17.5.22ADD: 28 - INFINEON TRICORE BOSCH MEDC17 GPT FORDBOSCH EDC17CP05 TC1797 FORD DieselNEW – plugin 1042 – FORD F250 6.7L V8 32V TD SUPERDUTY 287kW EDC17CP05FORD F350 6.7L V8 32V TD SUPERDUTY 224kW EDC17CP05FORD F250/F350 6.7L V8 32V TD SUPERDUTY 298kW EDC17CP05FORD F250/F350 6.7L V8 32V TD SUPERDUTY 328kW EDC17CP05Important: F34NTA15 flat cable is required to operate in GPT modeNEW: 61 - INFINEON TRICORE BOSCH EDC17 TPROT13 VM MOTORIBOSCH EDC17C49 TC1797 AEBI-SCHMIDT DieselNEW – plugin 1070 – AEBI-SCHMIDT MT750 4.5L V6 115kW EDC17C49ADD: 46 - INFINEON TRICORE CONTINENTAL ACM_MCM MEB TRUCK CAN LINETEMIC ACM2.1/AT25256 TC1796 ACM MERCEDES TRUCKNEW – plugin 1029 – ACM MERCEDES TRUCKWARNING: in order to communicate with this ECU ACM2.1/AT25256 using the plugin 1029 it is required the new cable F34NTA20F34NTA20ADD: 46 - INFINEON TRICORE CONTINENTAL ACM_MCM MEB TRUCK CAN LINECONTINENTAL-SIEMENS-VDO HDEP MCM2.1 TC1797 MERCEDES TRUCK E6 DieselNEW – plugin 1030 – MERCEDES TRUCK EURO6PONSEE FORWARDERS EURO6CLAAS JAGUAR EURO6FENDT KATANA 65 EURO6WARNING: in order to communicate with this ECU HDEP MCM2.1 using the plugin 1030 it is required the new cable F34NTA19F34NTA19ADD: 50 - INFINEON TRICORE SIEMENS SSM VAGCONTINENTAL-SIEMENS-VDO Simos18.X TC1791_384/TC1793_384 VAG PetrolNEW – plugin 830 –AUDI A1 (8X) 1.8L 16V TFSI 141kW SIMOS18.XAUDI A3 (8V) 1.8L 16V TFSI 132kW SIMOS18.XAUDI A3 (8V) 2.0L 16V TFSI 162kW SIMOS18.XAUDI A4 (B8-B9) 2.0L 16V TFSI 132-140-165-185kW SIMOS18.XAUDI A5 (8F/8T) 2.0L 16V TFSI 165kW SIMOS18.XAUDI A6 (C7) 1.8L 16V TFSI 140kW SIMOS18.XAUDI A6 (C7) 2.0L 16V TFSI 183-185kW SIMOS18.XAUDI A7 (4G) 1.8L 16V TFSI 140kW SIMOS18.XAUDI A7 (4G) 2.0L 16V TFSI 140-162-183-185kW SIMOS18.XAUDI Q3 (8U) 2.0L 16V TFSI 132-162kW SIMOS18.XAUDI Q5 (8RB) 2.0L 16V TFSI 132-162kW SIMOS18.XAUDI Q7 (4M) 2.0L 16V TFSI 185kW SIMOS18.XAUDI S1 (8X) 2.0L 16V TFSI 170kW SIMOS18.XAUDI S3 (8V) 2.0L 16V TFSI 205-210-220kW SIMOS18.XAUDI TT (FV) 1.8L 16V TFSI 132kW SIMOS18.XAUDI TT (FV) 2.0L 16V TFSI 161-169-210-228kW SIMOS18.XSEAT LEON (5F) 1.8L 16V TSI-TFSI 132kW SIMOS18.XSEAT LEON (5F) 2.0L 16V TSI CUPRA 195kW SIMOS18.XSKODA OCTAVIA (5E) 1.8L 16V TSI-TFSI 132kW SIMOS18.XSKODA OCTAVIA (5E) 2.0L 16V TSI RS-GTI 162-169kW SIMOS18.XSKODA SUPERB (3V) 1.8L 16V TSI-TFSI 132kW SIMOS18.XVOLKSWAGEN EOS (1F8) 2.0L 16V TFSI 162kW SIMOS18.XVOLKSWAGEN BEETLE (A5)/JETTA 6-7 1.8L 16V TFSI 125kW SIMOS18.XVOLKSWAGEN BEETLE (A5)/JETTA 6 2.0L 16V TFSI 154-155-162kW SIMOS18.XVOLKSWAGEN GOLF 7 1.8L 16V TFSI 132kW SIMOS18.XVOLKSWAGEN GOLF 7 2.0L 16V TFSI 162-205kW SIMOS18.XVOLKSWAGEN GOLF 7 2.0L 16V GTI 155-162-169-194kW SIMOS18.XVOLKSWAGEN GOLF 7 2.0L 16V R 213-220kW SIMOS18.XVOLKSWAGEN LAMANDO 1.8L 16V TSI 132kW SIMOS18.XVOLKSWAGEN LAMANDO 2.0L 16V TFSI 161kW SIMOS18.XVOLKSWAGEN PASSAT (B7-B8-B9) 1.8L 16V TFSI 125-132kW SIMOS18.XVOLKSWAGEN PASSAT (B8-B9) 2.0L 16V TFSI 162kW SIMOS18.XVOLKSWAGEN POLO (6C) 1.8L 16V TSI-GTI 141kW SIMOS18.XVOLKSWAGEN SCIROCCO 3 2.0L 16V TFSI-GTS-WRC 132-162kW SIMOS18.XVOLKSWAGEN TOURAN 1.8L 16V TSI 132kW SIMOS18.XPORSCHE MACAN (95B) 2.0L 16V TFSI 185kW SIMOS18.XCONTINENTAL-SIEMENS-VDO Simos12.X TC1797 VAG PetrolNEW – plugin 1067 –AUDI A3 (8V-8P) 1.8L 16V FSI-TFSI 162kW SIMOS12.XAUDI A4 (B8) 1.8L 16V TFSI 125kW SIMOS12.XAUDI A4 (B8) 2.0L 16V TFSI 165kW SIMOS12.XAUDI A5 (8F/8T) 1.8L 16V TFSI 106-125-130kW SIMOS12.XAUDI A5 (8F/8T) 2.0L 16V TFSI 165-169kW SIMOS12.XAUDI A7 (4G) 2.0L 16V TFSI 165kW SIMOS12.XAUDI Q5 (8RB) 2.0L 16V TFSI 132-165-169kW SIMOS12.XAUDI S3 (8P) 2.0L 16V TFSI 205-210-220kW SIMOS12.XAUDI TT (8J) 1.8L 16V FSI 162kW SIMOS12.XAUDI TT (FV) 1.8L 16V TSI 162kW SIMOS12.XAUDI TT (8J) 2.0L 16V TFSI 210-228kW SIMOS12.XImportant: F34NTA18 flat cable is required to operate in SSM modeMOTOROLA MPC55XX CPUs:ADD : 06 - MOTOROLA MPC55XX JTAGCONTINENTAL-SIEMENS-VDO CM2250 MPC5566 PETERBILT DieselNEW – plugin 1028 – PETERBILT 386 15.0L ISX15 298kW CM2250ADD : 43 - MOTOROLA MPC55XX BAMCONTINENTAL-SIEMENS-VDO MPC5534 ACM VOLVONEW – plugin 1041 – VOLVO WHEEL LOADERS ACMRENESAS SH7050 CPUs:ADD : 07 - RENESAS SH7050DELPHI DCM3.7AP SH72543R CASE/DOOSAN/NEW HOLLAND DieselNEW - plugin 1034 – CASE FARMALL 55 C CVT 2.2L 39.5kW DCM3.7APMITSUBISHI MH7XXX/MH8XXX CPUs:ADD : 08 – MITSUBISHI MH7XXX/8XXXMITSUBISHI F8T86571 MH8115F YAMAHA PetrolNEW – plugin 1033 – YAMAHA ATV WOLVERINE X4 0.85L 50kW F8T86571MITSUBISHI E6T32xxx MH8102F MITSUBISHI PetrolNEW – plugin 1038 – MITSUBISHI PAJERO V60 3.5L V6 24V 150kW E6T32xxxMITSUBISHI 33920-98J80 MH8115F SUZUKI PetrolNEW – plugin 1040 – SUZUKI MARINE DF 300 3.6L V6 220kW 33920-98J80NEC CPUs:ADD : 36 - NEC NBDDENSO 270536-6941 NEC 76F0040GD TOYOTA PetrolNEW - plugin 1031 – TOYOTA RAV4 (A2) 2.0L 16V 4L 110kW 270536-6941DENSO 275036-7581 NEC 76F0085 TOYOTA PetrolNEW - plugin 1068 – TOYOTA HILUX/VIGO (AN120-AN130) 2.7L 16V L4 VVT-i DOHC FLEX 120kW 275036-7581 FREESCALE ST MPC56XX SPC56X CPUs:ADD : 37 – FREESCALE ST MPC56XX SPC56XCONTINENTAL-SIEMENS-VDO CM2350 MPC5674F GENERIC CUMMINS ENGINE DieselNEW – plugin 638 – GENERIC CUMMINS ENGINE CM2350AGENERIC CUMMINS ENGINE CM2350BDelphi DCM6.2AP MPC5674F HYUNDAI DieselNEW – plugin 1024 – HYUNDAI i20 Mk2 1.1L 12V CRDi 55kW DCM6.2APKIA RIO/K2 (YB) 1.1L 12V CRDi 55kW DCM6.2APADD : 44 – FREESCALE MPC56XX BAMDelphi DCM6.2AP MPC5674F HYUNDAI DieselNEW - plugin 1063 – HYUNDAI i20 Mk2 1.1L CRDi 55kW DCK6.2APKIA RIO/K2 (YB) 1.1L 12V CRDi 55kW DCM6.2APNEW PLUG-IN LISTPLGID ECU Brand ECU Model Brand Connection Type Micro Flash Ext Category638 Continental-Siemens-VDO CM2350Generic CumminsEngine37 - FREESCALE/STMPC56XX/SPC56X JTAG MPC5674F TRUCK830 Continental SIMOS18.x VAG 50 - INFINEON TRICORE SIEMENSSSM VAG TC1791_384/TC1793_384 CAR951 BOSCH REXROTH SRC 9-34 GEARBOXCVT AGCO03 - INFINEON TRICORE NO PSWCANLINE TC1796 M58BW032FB TRACTOR1024 Delphi DCM6.2AP Hyundai 37 - FREESCALE/STMPC56XX/SPC56X JTAG MPC5674F CAR1028 Continental-Siemens-VDO CM2250 Peterbilt 06 - MOTOROLA MPC5500 JTAG MPC5566 TRUCK1029 Temic ACM2.1/AT25256 MEB Truck 46 - INFINEON TRICORE TEMIC MCMACM MERCEDES OBD TC1796 TRUCK1030 Continental-Siemens-VDO HDEP MCM2.1 MEB Truck46 - INFINEON TRICORE TEMIC MCMACM MERCEDES OBD TC1797 TRUCK1031 Denso 275036-6941 Toyota 36 - NEC NBD 76F0040GD CAR 1032 Bosch DCU15 DAF 02 - STMICROELECTRONICS ST10 ST10C167 AM29F400BT TRUCK 1033 Mitsubishi F8T86571 Yamaha 08 - MITSUBISHI MH7XXX/MH8XXX MH8115F BIKE1034 Delphi DCM3.7AP Case/Doosan/NewHolland 07 - RENESAS SH7050 SH72543RTRUCKTRACTOR1035 Bosch ME17.9.71 PSA 03 - INFINEON TRICORE NO PSWCANLINE TC1724 CAR1037 Bosch EDC7C1 International 01 - MOTOROLA MPC500 MPC555/MPC556 TRUCK 1038 Mitsubishi E6T32xxx Mitsubishi 08 - MITSUBISHI MH7XXX/MH8XXX MH8102F CAR1039 Bosch ME17.5.22 VAG 23 - INFINEON TRICORE BOSCHMEDC17 GPT VAG TC1724 CAR1040 Mitsubishi 33920-98J80 Suzuki 08 - MITSUBISHI MH7XXX/MH8XXX MH8102F MARINE1041 Continental-Siemens-VDO ACM Volvo 43 - MOTOROLA MPC55XX BAM MPC5534 TRUCK1042 Bosch EDC17CP05 Ford 28 - INFINEON TRICORE BOSCHMEDC17 GPT FORD TC1797 CAR1057 BOSCH ME17.2.4/BMS-MP BMW 03 - INFINEON TRICORE NO PSWCANLINE TC1791/TC1793 BIKE1063 Delphi DCM6.2AP Hyundai 44 - FREESCALE MPC56XX BAM MPC5674F CAR1064 Bosch MED17.0.7 Ford 04 - INFINEON TRICORE BOSCHMEDC17 TPROT2/4/7 TC1782 CAR1065 Bosch MEVD17.8.4 BMW 03 - INFINEON TRICORE NO PSWCANLINE TC1797 CAR1067 Continental SIMOS12.x VAG 50 - INFINEON TRICORE SIEMENSSSM VAG TC1797 CAR1068 Denso 275036-7581 Toyota 36 - NEC NBD 76F0085 CAR1070 BOSCH EDC17C49 AEBI SCMIDT 61 – INFINEON TRICORE BOSCHEDC17 TPROT13 VM MOTORI TC1797 TRUCKDIMSPORT S.r.l.。

VOLVO系列柴油发电机组使用说明书常州顺风发电设备有限公司一、概述我公司生产的VOLVO系列柴油发电机组采用瑞典国原装VOLVO柴油发动机为原动机,配套国内外先进的发电机(根据用户要求)以及本厂自行设计的控制柜组装而成。
它具有结构紧凑、性能先进、运行可靠、使用方便等特点。
本系列发电机组有公用底盘、原动机、发电机、控制屏等组成。
具有体积小、功率大、移动方便等特点,是邮电、通讯、铁道车辆与工矿照明最理想的备用应急电源,也是野外作业部门最理想的工作能源。
用户在详读本说明书的同时,必须阅读有关原动机、发电机等单独说明书。
以便能更好地、更全面地了解该机组的综合性能,以及维护、保养知识,确保机组的正常使用和安全运行。
二、机组的主要技术参数1) 电源种类交流2) 额定电压380/220V3) 额定频率50Hz4) 额定转速1500转/分5) 励磁方式无刷自励6) 功率因数0.8(滞后)7) 海拔高度1000m8) 环境温度+5℃~+40℃9) 空气相对湿度不大于60% (25℃时)10) 无导电尘埃及腐蚀性气体的场合。
11) 无爆炸危险的场所,无振动、颠簸、垂直斜度不超过5℃的场所,无日晒、雨淋的场所。
三、机组的使用1. 使用前的准备(1)将机组安置在平坦的屋内场地,屋内通风应保持良好,排风排气应保证充足。
(2)保持机组整洁无污垢。
(3)检查机油的牌号是否与柴油机说明书规定的相同。
检查机油油位,如不足应加足,并按说明书规定周期更换机油。
(4)检查冷却液液位是否到位,如液位不足,应用与原来相同的冷却液加足。
(5)检查机组的燃油系统是否漏油,燃油是否充足等。
(6)检查蓄电池是否充足,接线是否正确、牢固。
(7)检查仪表是否完好,电气接线是否牢固。
主开关是否处于断开状态。
(8)长期存放的机组,使用前应检查电气回路是否受潮。
用500兆欧表测量电气回路的绝缘电阻,不得低于2兆欧,否则应采取烘干措施。
(9)检查金属部分的接地是否牢靠。
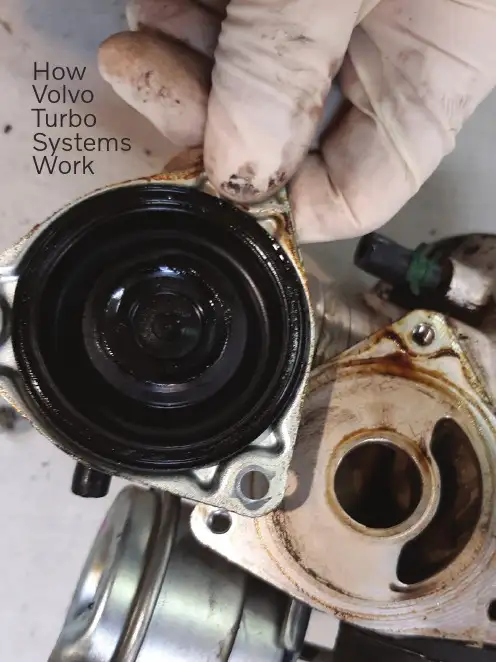
HowVolvoTurboSystemsWorkVolvo TechTips26The turbocharger boost pressure in Volvos is controlled by the Boost Pressure Control (BPC) valve whose pressure regulator is affected by the pressure from the turbocharger.The Engine Control Module (ECM) determines current throttle angle and boost pressure to achieve the calculated engine torque output.The Engine Control Module (ECM) affects the controlling pressure using the turbochargercontrol valve.When the pressure increases, the Boost Pressure Control (BPC) valve pressure regulator is affected. When boost pressure has increased to the maximum permissible value, the boost pressure control valve opens and part of the exhaust gases bypass the turbocharger's turbine which limits the boost pressure. Turbocharger control takes place constantly by measuring the current boost pressure and comparing it to the requested boost pressure.Controlling turbocharger boost pressure When the engine control module determinesthat a higher boost pressure is permissible, the turbocharger control valve opens further and a proportion of the pressure acting on the boost pressure control valve pressure servo is allowed through to the turbocharger inlet.In this way the control pressure is reduced, the boost pressure control valve opens later, and turbocharger pressure can increase. The engine control module affects the turbocharger control valve by grounding one of the terminals with a fixed frequency, wherethe signal's duty cycle determines how much the valve should open and therefore how much the boost pressure can increase.Boost pressure reductionThe charge pressure is reduced when drivingin first gear and reverse with engine speed rpm below 3,000 rpm to reduce the risk of wheel spin.If the engine has an automatic transmission, the transmission receives information from the TCM about when reduced charge pressure is required, for example, when shifting.If the car has a manual transmission, the ECM determines which gear is selected based on the transmission and final drive gear ratios, engine speed (rpm), and vehicle speed.On cars with automatic transmission there is also boost pressure reduction in the winter mode.Boost pressure can also be reduced to protect the engine from damage. If the knock sensors detect that the engine is knocking above a given threshold value, and if ignition has been retarded and the air/fuel ratio has been enriched, the ECM will reduce the boost pressure until knock ceases.A reduction in boost pressure also takes place if there is a risk of the engine overheating. If the Engine Coolant Temp (ECT) sensor indicates that the temperature has exceeded 118 degrees C (244 degrees F), the ECM lowers the boost pressure to reduce heat generation. Automatic high altitude compensation Because the ECM determines boost pressure using the signal from the intake air pressure sensor, there is automatic boost pressure control compensation when driving at altitude and in different temperatures. The engine power is not, therefore, noticeably affected by air density or temperature.When altitude exceeds around 6,000 feet above sea level, the ECM cannot compensate boost pressure any further because the air is too thin.Boost pressure monitoringThe ECM constantly monitors boost pressure using the Mass Air Flow (MAF) sensor and the intake air pressure sensor.If boost pressure exceeds permitted levels, the ECM closes the turbocharger control valve so that the engine torque can only be controlled through limiting the throttle opening. A Diagnostic Trouble Code (DTC) is stored at the same time.If the calculations display too low boost pressure, a diagnostic trouble code is stored.If a fault occurs in a component that affects boost pressure calculation, the ECM will always limit throttle opening.If there is a fault in any of the sensors, the boost pressure control goes over in an open loop. This means that it is controlled by fixed duty cycle which is a direct function of accelerator pedal position sensor and engine speed (rpm).Opposite Page: If you have a car that has low turboboost, make sure to test and visually check theturbo's bypass valve (sometimes called a blow offvalve). The vacuum diaphragm inside can crackand leak, causing some of the intake pressure to goaround the turbo fan.27Fall/Winter 2020CASE STUDY2000 VOLVO C70 2.4 L TURBOWITH LOW TURBO BOOST COMPLAINTThis car is an early model turbo system, but most of the Volvo turbo control systems have remained similar up until the last few years.The customer that brought this car in said that the car had been losing power when the car was accelerating onto the freeway, and the Check Engine light had just come on in the last week.The customer stated that the car seemed to perform normally on city streets.The technician took the car on a test drive to confirm the customer’s complaint.As the technician was accelerating on city streets, the car seemed to perform normally, but once the technician was able to go onto the freeway and accelerate past 30 mph, the power problem became clear. The car felt like it was falling on its face.The tech experienced a loss of power around 2,500-3,000 rpm, and he had to hold the pedal down to get up to freeway speeds.It almost felt like a transmission slipping symptom.The tech drove the car back to the shop to start the diagnosis.He started with a visual inspection of the engine compartment to check for any obvious issues like loose or broken hoses or wiring; on first look there were no smoking guns.The technician hooked up a laptop that had Volvo's VIDA software program and read the stored data and trouble codes.The ECM had stored the codes ECM 6806 and ECM 6800.The setting criteria for ECM 6806 is as follows:ConditionIf engine speed (rpm) is above 3,500 rpm and theengine is operating at a high load, the control signal toYou can check for wear in the turbine fan bearing by trying to wiggle the shaft; a little play is normal, a lot iscause for concern.One of the most common turbo control issues you will see on older Volvos is caused by small leaks in rottedvacuum control hoses.When checking for stored codes and data on a Volvo, the best tool to use is Volvo's VIDA software system because most generic scan tools will only give you part of the story.28Volvo TechTips How Volvo Turbo Systems Workthe turbocharger control valve is at maximum and the boost pressure (from the boost pressure sensor) is lower than a designated value [approximately 20 kPa (2.9 psi) under normal boost pressure — signal too low].If the air mass (from mass air flow sensor) is higher than a desired value (signal too high), it is interpreted as a fault and DTC ECM-6806 is stored.Substitute valueReduced boost pressurePossible sourceSignal too high:• Air leakage after turbochargerSignal too low:• Hoses between the turbocharger and the turbocharger control valve, or between the turbocharger control valve and the pressure servo, are loose or are blocked/damaged • Faulty turbocharger control valve• Faulty boost pressure control valve pressure servo • Sticking boost pressure control valve The ECM 6800 code was for a signal missing, permanent fault, and the data pointed to an open circuit or a defective turbo control valve.Volvo's test procedure for this code is as follows:Check turbocharger control valve connector for intermittent contact resistance or oxidation. Checksignal cable between engine control module #A38 and turbocharger control valve #2 for an intermittent open circuit according to Checking Wiring and Terminals.Intermittent faultsCheck power supply turbocharger control valve between turbocharger control valve #1 and system relay for an intermittent open circuit according to Checking Wiring and Terminals. Intermittent faults.Remedy as necessary.After an initial visual inspection of the enginecompartment, the tech could not find any obvious signs of damage to the turbo control system or hoses.Since the code ECM 6806 could be caused by an air leak or unmetered air in the intake system, the tech decided to perform a smoke test to see if there were any leaks in the system.The most effective way to try to isolate the intake system during a smoke machine test is to disconnect and sealthe intake tube right behind the air mass sensor. This willIf you have to repair a wire connection in a Volvo wire harness, your Volvo parts department can provide new replacement pigtails and repair kits that will fit right the first time.29Fall/Winter 2020Volvo TechTips30。
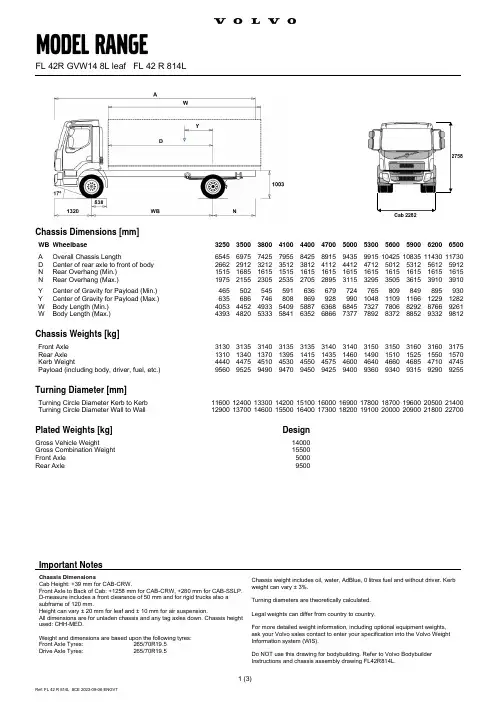
Important NotesChassis DimensionsCab Height: +39 mm for CAB-CRW.Front Axle to Back of Cab: +1258 mm for CAB-CRW, +280 mm for CAB-SSLP. D-measure includes a front clearance of 50 mm and for rigid trucks also a subframe of 120 mm.Height can vary ± 20 mm for leaf and ± 10 mm for air suspension.All dimensions are for unladen chassis and any tag axles down. Chassis height used: CHH-MED.Weight and dimensions are based upon the following tyres:Chassis weight includes oil, water, AdBlue, 0 litres fuel and without driver. Kerb weight can vary ± 3%.Turning diameters are theoretically calculated.Legal weights can differ from country to country.For more detailed weight information, including optional equipment weights, ask your Volvo sales contact to enter your specification into the Volvo WeightChassis Dimensions [mm]WB Wheelbase3250 3500 3800 4100 4400 4700 5000 5300 5600 5900 6200 6500A Overall Chassis Length6545 6975 7425 7955 8425 8915 9435 9915 10425 10835 11430 11730 D Center of rear axle to front of body 2662 2912 3212 3512 3812 4112 4412 4712 5012 5312 5612 5912 N Rear Overhang (Min.) 1515 1685 1615 1515 1615 1615 1615 1615 1615 1615 1615 1615 NRear Overhang (Max.)19752155230525352705289531153295 3505 3615 3910 3910Y Center of Gravity for Payload (Min.) 465 502 545 591 636 679 724 765 809 849 895 930 Y Center of Gravity for Payload (Max.) 635 686 746 808 869 928 990 1048 1109 1166 1229 1282 W Body Length (Min.) 4053 4452 4933 5409 5887 6368 6845 7327 7806 8292 8766 9261 W Body Length (Max.) 4393 4820 5333 5841 6352 6866 7377 7892 8372 8852 9332 9812Chassis Weights [kg]Front Axle 3130 3135 3140 3135 3135 3140 3140 3150 3150 3160 3160 3175 Rear Axle 1310 1340 1370 1395 1415 1435 1460 1490 1510 1525 1550 1570 Kerb Weight4440 4475 4510 4530 4550 4575 4600 4640 4660 4685 4710 4745 Payload (including body, driver, fuel, etc.) 9560 9525 9490 9470 9450 9425 9400 9360 9340 9315 9290 9255Turning Diameter [mm]Turning Circle Diameter Kerb to Kerb 11600 12400 13300 14200 15100 16000 1690017800 18700 19600 20500 21400 Turning Circle Diameter Wall to Wall 1290013700 1460015500 16400 17300 18200 19100 20000 20900 21800 22700Plated Weights [kg]DesignGross Vehicle Weight14000 Gross Combination Weight 15500 Front Axle 5000 Rear Axle 9500■ Standard Equipment □ Optional EquipmentFor more detailed information about cab and powertrain equipment, please refer to separate specification sheets.For all possible options and combinations of options please consult your Volvo sales contact who can create a specification to match your requirements using the Volvo Sales Support system (VSS).□ CHH-HIGH Chassis height high - approx. 1000 mm above ground level ■ CHH-MED Chassis height medium - approx. 900 mm above ground level■ RAD-L80 Rear leaf suspension, 1 axle - 1 driven (80 mm wide leafs)□ CAB-CRW Crew cab □ CAB-DAY Day cab □ CAB-SSLP Comfort cab■ EU6SCR Euro 6 emission level with Selective Catalytic Reduction (SCR), particle filter and Exhaust Gas Recirculation (EGR)■ D8K250 Six cylinder diesel engine, 7.7 litre Euro 6 SCR + EGR (Diesel Particulate Filter), 250 hp, 950 Nm□ D8K280 Six cylinder diesel engine, 7.7 litre Euro 6 SCR + EGR (Diesel Particulate Filter), 280 hp, 1050 Nm□ AL306 Automatic 6-speed Allison gearbox, max input torque 1695 Nm □ ATO1056 I-Sync, Automated manual 6 speed gearbox, 1070 Nm ■ ZTO1006 Overdrive 6 speed manual ZF gearbox, 1050 Nm□ EBR-CEB Engine compression and exhaust brake■ EBR-EPG Engine brake with Exhaust pressure governor, EPG■ RSS1125A Rear single reduction solo axle - axle load 11 tonnes, GCW 25 tonnes□ RSS1132A Rear single reduction solo axle - axle load 11 tonnes, GCW 32.5 tonnesPackages□ DRIVEFL Driver convenience package FL□ VISIFL Visibility package FL - Optimizing the drivers field of vision around the cab□ AIRFLOW Airflow package FL - Includes adjustable roof spoiler, side deflector and sun visor□ AUDIODAB Audio System DAB■ AUDIOPD Audio Preparation DAB kit, incl. DAB-amplifierChassis ■ FST-PAR Front parabolic leaf suspension (normal stiffness)□ FST-PAR3 Two-leaf front parabolic suspension (stiffer than normal)■ FAL5.0 Front axle load 5.0 tonnes □ FAL5.6 Front axle load 5.6 tonnes □ FAL5.8 Front axle load 5.8 tonnes□ RAL10.6 Rear axle load 10.6 tonnes ■ RAL9.5 Rear axle load 9.5 tonnes■ RSTAB1 Rear stabilizer with normal stiffness□ EBS-MED EBS (Electronic Brake System) medium package ■ EBS-STD EBS (Electronic Brake System) standard package■ RST-PAR1 Rear parabolic leaf suspension□ RST-PAR3 Three leaf parabolic rear suspension, stiffer than normal■ FST6060 Frame section thickness - web 6.0 mm / flange 6.0 mm □ FST7070 Frame section thickness - web 7.0 mm / flange 7.0 mm □ FST8080 Frame section thickness - web 8.0 mm / flange 8.0 mm■ 2BATT170 Batteries 2x170 Ah□ ADR2 ADR adaptation, 1 switch in dashboard, 1 outside on back of cab■ R80P Right 80 litre plastic diesel tank Min volume 80l Max volume 430l■ UL-FUEL Without left diesel tank Min volume 80l Max volume 215l□ ADTP-L AdBlue tank on left hand side ■ ADTP-R AdBlue tank on right hand side■ WHC-FIX1 One fixed wheel chock □ WHC-FIX2 Two fixed wheel chocks□ C-RO40AG Towing coupling Rockinger 400 G-145■ TOWF-NO1 One front towing device □ TOWF-NO2 Two front towing devices□ TOWR-ONE One rear towing device in frame end cross member□ TREL15 15 pol electrical trailer connector (ADR certified)□ TBC-EC Trailer brake connection, European Community□ RUP-FIX2 Fixed rear underrun protection, EC approved■ RFEND-T Transport mounted one-piece rear fenders□ 2024GSR General safety regulations 2024Rims and tyres □ RT-AL Brushed aluminium rims with std holes (long stud fixing) on allaxles□ RT-ALDP Dura-Bright polished aluminium rims with std holes (long studfixing) on all axles■ RT-STEEL Steel rims on all axles ■ SPWT-F Spare wheel with tyre equal to front wheel □ SWCP-LF Spare wheel carrier on left side in front of rear axle □ SWCP-R Spare wheel carrier transport mounted behind rear axle, onright-hand side (FH, FM)/below frame (FL,□ SWCP-T Spare wheel transport mounted on top of frame ■ SWCP-TP Spare wheel carrier transport mounted with the spare wheel ontop of the frame rails□ JACK-10T Jack, 10 tonnes ■ JACK-8T Jack, 8 tonnes□ GAUGE-TP Tyre pressure gaugePowertrain equipment ■ CS39A-O Single plate clutch, plate diameter 395 mm □ RET-TPT Retarder for hydraulic gearbox □ TC-HWO Oil cooler for hydraulic transmissions – water/oil■ 1COMP500 Single cylinder air compressor 360 cc / 500 l/min □ 2COM1080 Dual cylinder air compressor 720 cc / 1080 l/min ■ AIRIN-HI High air intake □ AIRIN-RL Low air intake, chassis mounted behind cab on left hand side ■ ACL1ST Air cleaner with one filter element □ ACL1ST-S Air cleaner with additional filter element ■ 24AL110B Alternator 110 Ampere □ 24AL130B Alternator 130 Ampere □ CCV-C Closed crankcase ventilation ■ CCV-OX Open crankcase ventilation with oil separator and amaintenance free gas centrifuge■ EST-AID Engine start pre-heating element □ PTER-100 Rear engine mounted clutch independent power-take-off withflange connection (DIN 100 / ISO 7646)□ PTER-DIN Rear engine mounted clutch independent PTO with splinedshaft groove (female) for a close coupled pump (DIN 5462 / ISO 7653)□ PTER1400 Rear engine mounted clutch independent power-take-off withflange connection (SAE 1410 / ISO 7647)□ PR-HF4S PTO transmission, Hydrocar, flange connection, side mounted □ PR-HF4SH PTO transmission, Hydrocar, flange connection, side mounted,high speed□ PR-HF6S PTO transmission, Hydrocar, flange connection, side mounted □ PR-HP4S PTO transmission, Hydrocar, pump connection, side mounted □ PR-HP4SH PTO transmission, Hydrocar, pump connection, side mounted,high speed□ PR-HP6S PTO transmission, Hydrocar, pump connection, side mounted □ PTR-FH1 Rear gearbox mounted Hydrocar S81 PTO with flangeconnection (DIN 90 / ISO 7646) for propeller shaft (800 Nm)□ PTR-FH2 Rear gearbox mounted Hydrocar S84 PTO with flangeconnection (DIN 90 / ISO 7646) for propeller shaft (430 Nm)connection (DIN 90 / ISO 7646) for propeller shaft (450 Nm)□ PTR-PH1 Rear gearbox mounted Hydrocar S81 PTO with connection(DIN 5462 / ISO 7653) for pump (800 Nm)□ PTR-PH2 Rear gearbox mounted Hydrocar S84 PTO with connection(DIN 5462 / ISO 7653) for pump (430 Nm)□ PTR-PH4 Rear gearbox mounted Hydrocar S88 PTO with connection(DIN 5462 / ISO 7653) for pump (450 Nm)□ PTR-PK Electrical and solenoid prep kit for gearbox PTO□ PTR-ZF2 Rear gearbox mounted ZF PTO with flange connection (DIN100 / ISO 7646) for prop shaft (410 Nm)□ PTR-ZF3 Rear gearbox mounted ZF PTO with connection (DIN 5462 /ISO 7653) for pump (410 Nm)□ PTR-ZF4 Rear gearbox mounted ZF PTO with flange connection (DIN100 / ISO 7646) for prop shaft (320 Nm)□ PTR-ZF5 Rear gearbox mounted ZF PTO with connection (DIN 5462 /ISO 7653) for pump (320 Nm)□ PTR-ZF6 Rear gearbox mounted ZF PTO with flange connection (DIN100 / ISO 7646) for prop shaft (270 Nm)□ HPG-F101 Gearbox mounted hydraulic pump F1-101, fixed displacement,single flow□ HPG-F41 Gearbox mounted hydraulic pump F1-41, fixed displacement,single flow□ HPG-F51 Gearbox mounted hydraulic pump F1-51, fixed displacement,single flow□ HPG-F61 Gearbox mounted hydraulic pump F1-61, fixed displacement,single flow□ HPG-F81 Gearbox mounted hydraulic pump F1-81, fixed displacement,single flow□ ETC Electronic throttle control - dash mounted switch for PTOspeed controlCab interior■ TAS-DIG4 Gen 4 one day digital tachograph, EC approved (GNSS &DSRC, EU 2020/1054)Cab exterior□ SUNV-B Exterior transparent dark grey front sun visor■ SUNV-PK Exterior front sun visor installation preparation kit (fasteners)□ AD-SIDES Short cab side air deflectors□ BEACON-P Prepared for roof beacons□ BEACONA2 2 amber beacon, roof mounted warning lampsSuperstructure preparations□ FBA-BTF Front body attachments for flexible body□ FBA-BTSF Front body attachments for semi-flexible body□ RBA-T2 Rear body attachments for helper frame□ TAILPREP Tail lift preparation kitServices□ TGW-4G Telematics gateway with 4G modem■ WVTA Whole Vehicle Type Approved■ Standard Equipment □ Optional EquipmentFor more detailed information about cab and powertrain equipment, please refer to separate specification sheets.For all possible options and combinations of options please consult your Volvo sales contact who can create a specification to match your requirements using the Volvo Sales Support system (VSS).。
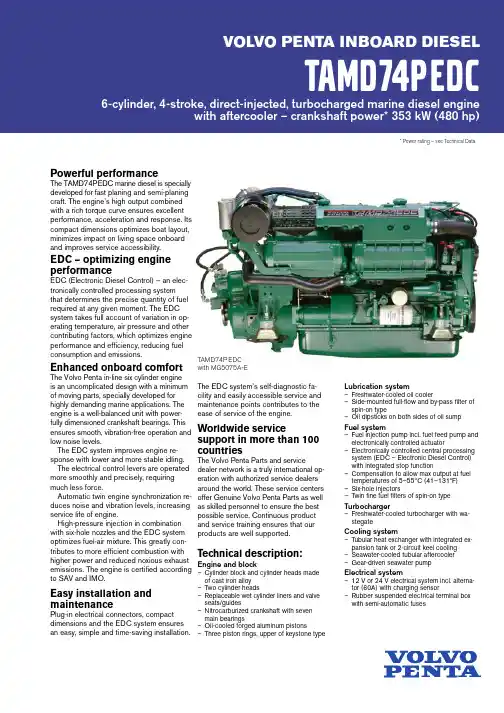
Powerful performanceThe TAMD74P EDC marine diesel is spe c ial l y developed for fast planing and semi-plan i ng craft. The engine’s high output com b ined with a rich torque curve ensures ex c el l ent per f orm a nce, acceleration and re s ponse. Its compact dimensions op t i m iz e s boat lay o ut, minimizes impact on living space on b oard and improves service ac c es s i b il i t y.EDC – optimizing engine performanceEDC (Electronic Diesel Con t rol) – an elec-t ron i c al l y controlled process i ng sys t em that de t er m ines the pre c ise quan t i t y of fuel re q uired at any giv e n moment. The EDC sys t em takes full ac c ount of var i a t ion in op-e r a t i ng temperature, air pres s ure and oth e r con t rib u t i ng factors, which op t i m iz e s en g ine performance and effi ciency, re d uc i ng fuelconsumption and emissions. Enhanced onboard comfort The Volvo Penta in-line six cylinder en g ineis an uncomplicated design with a min i m um of moving parts, specially de v el o ped for high l y demanding marine ap p li c a t ions. The engine is a well-balanced unit with pow e r -ful l y di m en s ioned crank s haft bear i ngs. This en s ures smooth, vi b ra t ion-free op e r a t ion and low noise lev e ls.The EDC system improves en g ine re-s ponse with lower and more sta b le idling. The electrical control le v ers are op e r a ted more smoothly and pre c ise l y, re q uir i ng much less force.Automatic twin en g ine syn c hro n i z a t ion re-duces noise and vi b ra t ion levels, in c reas i ng service life of engine.High-pressure injection in com b i n a t ion with six-hole nozzles and the EDC system op t i m iz e s fuel-air mix t ure. This great l y con-t rib u tes to more ef fic ient com b us t ion with higher pow e r and re d uced noxious ex h aust emissions. The en g ine is certifi ed according to SAV and IMO.Easy installation and maintenancePlug-in electrical connectors, compactdi m en s ions and the EDC system ensures an easy, simple and time-saving in s tal l a t ion. TAMD74P EDCwith MG5075A-ELubrication system–Freshwater-cooled oil cooler–Side-mounted full-fl ow and by-pass fi lter ofspin-on type–Oil dipsticks on both sides of oil sumpFuel system—Fuel injection pump incl. fuel feed pump andelec t ron i c al l y controlled actuator—Electronically controlled central process i ngsys t em (EDC – Electronic Diesel Con t rol)with in t e g rat e d stop function–Compensation to allow max output at fueltem p er a t ures of 5–55ºC (41–131ºF)—Six-hole injectors—Twin fi ne fuel fi lters of spin-on typeTurbocharger–Freshwater-cooled turbocharger with wa-ste g ateCooling system–Tubular heat exchanger with integrated ex-p an s ion tank or 2-cir c uit keel cooling–Seawater-cooled tubular aftercooler–Gear-driven seawater pumpElectrical system–12 V or 24 V electrical system incl. alterna-t or (60A) with charging sen s or–Rubber suspended electrical ter m i n al boxwith semi-automatic fus e sThe EDC system’s self-di a g n os t ic fa-c il i t y and easily accessible ser v ice andmain t e n ance points contributes to theease of service of the en g ine.Worldwide servicesupport in more than 100countriesThe Volvo Penta Parts and servicedeal e r network is a truly international op-e r a t ion with authorized ser v ice deal e rsaround the world. These ser v ice cen t ersoffer Gen u i ne Volvo Penta Parts as wellas skilled per s on n el to en s ure the bestpos s i b le ser v ice. Continuous productand ser v ice train i ng en s ures that ourprod u cts are well sup p ort e d.Technical description:Engine and block–Cylinder block and cylinder heads madeof cast iron alloy–Two cylinder heads–Replaceable wet cylinder liners and valveseats/guides–Nitrocarburized crankshaft with sev e nmain bear i ngs–Oil-cooled forged aluminum pistons–Three piston rings, upper of key s tone type* Power rating – see T echnical DataTAMD74PEDC10-2002 © 2002 A B V o l v o P e n t a .Fuel system–Single or twin fuel fi lters/water sep a r a t orsExhaust system–Exhaust elbow, wet –Exhaust riser, wet –Exhaust boot, wet –Exhaust elbow, dry –Silencer, dry–Flexible compensator, dryCooling system–Seawater strainer –Hot water outlet–Separate expansion tankElectrical system–12V 130A or 24V 100A extra al t er n a t ors –Various instrument panels–Cable harness in different lengths –EDC Monitoring panels –Multistation unit–Electrical control leverPower transmission–PTO crankshaft front end, type stub shaft incl. u niversal bracket–Hydraulic pump for steering and other du t iesReverse gear–MG5075A-E, MG5085A-E, MG5085SC-E, ZF 280A-EB, ZF 301A-EB, ZF 280IV-EB and ZF 302IV-EB, elec t ri c al l y shiftedOther equipment—Belt guard—White-painted engine and re v erse gearContact your local Volvo Penta dealer for further in f or -ma t ion.Not all models, standard equipment and accessories are avail a ble in all countries. All spec i fi c a t ions are sub j ect to change without notice.The engine illustrated may not be entirely identical to pro- d uc t ion standard engines.Technical DataEngine designation..........................TAMD74P EDC No. of cylinders and confi guration.............in-line 6Method of operation.....................................4-stroke, direct-injected, turbocharged diesel engine with aftercooler Bore, mm (in.)............................................107 (4.21)Stroke, mm (in.).........................................135 (5.31)Displacement, l (in 3).................................7.28 (444)Compression ratio...........................................17.2:1 Dry weight, kg (lb)...................................860 (1896)Weight with reverse gear MG5075A-E,excl. water and oil, kg (lb)....................1045 (2304)Crankshaft power,kW (hp) 2600 rpm ...................................353 (480)Propshaft power with MG5075A-E,kW (hp) 2600 rpm.....................................339 (461)Torque,Nm (lbf.ft) 2600 rpm..............................1297 (957)Recommended fuel toconform to.........................ASTM-D975 1-D & 2-D,..............................................EN 590 or JIS KK 2204Specifi c fuel consumption,g/kWh (lb/hph) 2600 rpm.....................234 (0.379)Fuel temperature 5–55°C (41–131°F)Rating: 5T echnical data according to ISO 3046 Fuel Stop Power and ISO 8665. Fuel with a lower calorifi c value of 42,700 kJ/kg and density of 840 g/liter at 15°C (60°F). Merchant fuel may differ from this spec i fi c a t ion which will infl uence engine power output and fuel consumption.The engine is certifi ed according to SAV and IMO.Optional equipment:Engine–Flexible suspension for engine and reverse gearLubrication system–Electrically operated oil drain pump–Rear-mounted full-fl ow and by-pass oil fi l t ers of spin-on typesRpm * 10081012141618202224262830025020015010050350kWhp metricPropeller shaft powerCalculated Propeller load exp. 2.545040035030025020015010050TAMD74P EDC Power8101214161820222426282001400120010008006004001600NmkpmTorque measured at crankshaft150125100755025TAMD74P EDC Torque8101214161820222426281201008060402014035Liters/hUS gal/h302015105Calculated Propeller load exp. 2.5At full load25TAMD74P EDC Fuel consumptionAB Volvo PentaSE-405 08 Göteborg, Sweden。
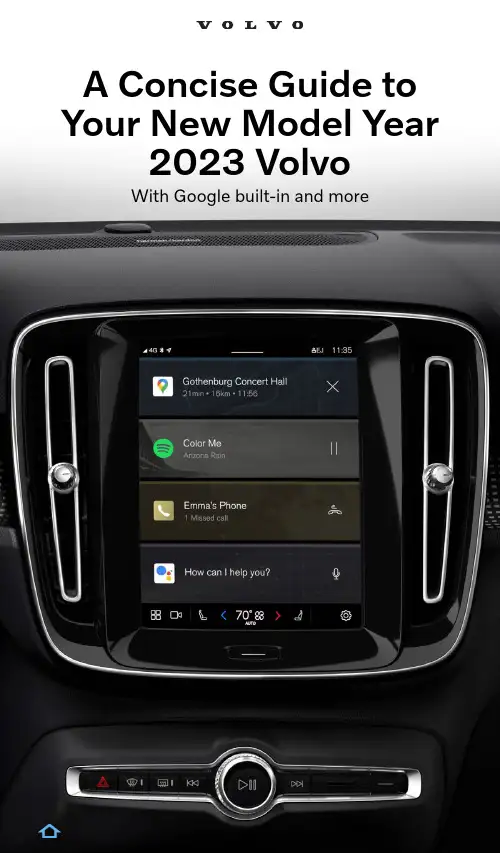
A Concise Guide to Your New Model Year 2023 VolvoWith Google built-in and moreTable of ContentsClick on any topic to jump to that page; use the Home iconon the lower left of each page to return hereKey Google Services 3Interacting with the Infotainment Systemwith Google built-in 4 Driver Profile Setup 5 Basic Navigation: Center Display 8 Pairing Your Car with the Volvo Cars App 11 Adding, Changing, and Deleting Profiles in the Car 15 Pairing and Deleting Keys 18 Screen Lock 19 Hands-Free, Foot-Activated Tailgate 20 Charging a Twin Engine Plug-In Hybrid 21 One-Pedal Drive 22 Recharge Plug-In Hybrid Drive Modes 23Key Google ServicesAn Active Google Account Will Enable Access to Key FeaturesSigning into your own Google account provides a personalized experience, such as directions to work or home, saved Google Maps destinations, and Google Map search history. This makes trip planning very easy. The system will still function without being signed in with Google.We recommend you set up a Google account, if you don’t already have one. You can do that here .Google AssistantAllows driver to control in-car functions and muchmore by voice.Google PlayAllows drivers to easily download apps and have themappear within the car center touchscreen.Google, Google Play, and Google Maps are trademarks of Google LLC. Google services are included in the 4-year Digital Services package.Interacting with the Infotainment Systemwith Google built-inInteracting with the new Infotainment system is easy and as familiar as using your smartphone• Google Assistant supports natural speech. Simply say “Hey Google” or “OK Google” and state your command – anything from navigation to most things that can be answered by the internet.• Google can also control some in-car features, such as climate settings, heated seats and steering wheel.• Our new navigation system, Google Maps, is based on the Google Maps app for smartphones, now adapted for in-car usage. Mapsare always up to date and cached in the car while driving. The routeto your destination is pre-cached in case of limited connectivity, and the system will assist you with Real Time Traffic Information, automatic rerouting, and voice control. When logged in with your Google account, saved favorites such as home, work, and recent destinations are sharedbetween smartphone and car.Driver Profile SetupC D Once in Profiles, selectComplete Profile Setup .Follow prompts to set up Volvo ID and complete step one.1. Link Volvo IDComplete Profile Setup Completing the Driver Profile is the first step in customizing the car settings to set you up for a more intuitive driving experience. We recommend each driver create their own profile in the car.Before you can set up Driver Profiles, you will need both your Volvo ID and your Google account login.If you don’t yet have a Volvo ID, your Volvo Retailer Sales Consultant can help you to create it, or you can do it yourself by downloading the Volvo Cars app with which you can create a Volvo ID login and password. You also can do it by clicking here and following the steps.*iPhone user only, no action needed for Android users.D 2. Pair PhoneMake sure the code displayed in the vehicle matches the onedisplayed on your phone and confirm.Once pairing is completed, g o to the phone’s Bluetooth settings*• Press (i) by your car’s model name• Enable Show Notifications and Sync Contacts for access to text messages and phone contacts in the car.Google Assistant, Google Play and Google Maps are trademarks of Google LLC.C A short tutorial on Google Assistant is available here , and you are able to turn on personal results for access to your calendar and contacts.A short tutorial on Drive Profile Setup is available here .3. Google Sign-InFollow prompts to sign in and view tutorials, turnon personal results and select Google Play apps,then your profile is complete!Basic Navigation: Center DisplayHome ViewHome view is displayedwhen the screen is activated.It consists of four tiles.You can choose which appswill be shown in Home view tiles.An app that is selected from Appview starts in the respective tilein Home view.The tiles are dynamic and showthe last-used apps, such asnavigation, media, phone, etc.Tap an app to expand it or swipefrom the left in the tile to viewadditional apps.Note, when the vehicle is moving:• Certain applications (e.g.the Owner’s Manual) maybe deactivated.• Certain messages(e.g. those generatedby apps) will be shortened.Status BarCurrent vehicle activities are shown at the top of the screenin the status bar: information such as active user profile,network and Bluetooth connection status, and the clock.Notifications ViewPull the tab down to access Notifications view, which shows missed calls, vehicle information, and provides access to User Profiles. To leave, tap outside of Notifications, press the Home button, or swipe upwards.User ProfilesTo access User Profiles, swipedown on the Home Screen toreach notifications.Select (tap) the profile in use(upper left corner).Only the profile that is signed-inwill appear. A new car will defaultto the name “Owner” as the primaryand only profile.On the Profiles screen you canupdate or delete an existing profile,or add a new one.Many driver personal preferencesettings can be saved in differentuser profiles, including screens,mirrors, front seat, navigation,audio and media system,language and voice control.App ViewApp view provides access to the vehicle’s preinstalledand downloaded apps. From App view, you can downloadand install additional apps and access the Owner’s Manual.Tap an app to open it in full-screen mode.Camera ViewCamera view starts automatically when gear selectorposition R is used. It shows the Park Assist Cameras,and separate views for each of the four cameras:rear, front, left and right.Camera view closes automatically when the vehiclereaches a certain speed or can be closed manuallyby tapping or the Home button.Settings ViewSelecting Settings view allows you to make changes thatinclude system units of measurement, system language,door lock and unlock settings, and resetting user data.Climate ViewButtons for App view, Camera view, Settings view, and the most common climate settings are at the bottom of the center display. Tap the blue or red arrow to adjust the temperature when left and right side temperature is synchronized. Tap the temperature button to open Climate view and additional settings options. Tap the Home button to close Climate view.The Volvo Cars app pairing process is completed in the car. Please make sure you are signed into your driver profile in the car and have all car keys with you. Don’t have a driver profile yet? Please follow the instructions on page 5.Pairing Your Car with the Volvo Cars AppDownload the Volvo Cars app by visiting the appropriate app store. Available for iOS 8 or higher and Android 4.0 or higher.Next, create your Volvo ID. If you already created your Volvo ID, go directly to Sign In .Sign In Create Volvo ID1. Download the Volvo Cars app and Sign InThe Volvo Cars app pairing process is completed in the vehicle.2. Within Car: Share Car DataThe Volvo Cars app pairing process is completed in the vehicle.3. Within Car: Pairing app Part 1CThe Volvo Cars app pairing process is completed in the vehicle.Open app while sitting in your vehicle. If you are new to the Volvo Cars app, press Add your car .Press Next on the center touch-screen. Verify the numbers on screen match the numbers in the Volvo Cars app. Pairing complete.4. Within Car: Pairing App Part 2A short tutorial on Volvo Cars app pairing is available here .Add your carAdding, Changing, and DeletingProfiles in the CarTo add, change or delete a Driver Profile, please follow the steps below. Access Profiles & ChangeAdd ProfileDelete ProfileLog into the profile you want to delete.By deleting a profile, all settings associatedwith that profile will be deleted.Pairing your key fob into your driver profile will ensure that your personal settings for seat, climate, audio, and navigation will auto-matically adjust each time you enter the car with the paired fob.Follow these easy steps on the center touchscreen to pair or remove a key fob in your profile.Pairing and Deleting KeysAccess ProfilesWith your Driver Profile set up, you can easily lock the screen when someone outside your household will be driving your car (e.g. a valet). This protects your personal information, past destinations, and apps.Screen LockAccess Screen LockHands-Free, Foot-Activated Tailgate Both hands full? You can open or close the tailgate with a single footkick movement under the rear bumper.Pro tip: Aim for the center left parking sensor or the first “V” of the “Volvo” lettering for best results.The ‘kick’ should be smooth during the inward and outward motion – no waving or holding your foot in place as this won’t activate the sensor to open /close the tailgate.Immediately after the kick, take a step back to ensure that the tailgate will open or close.A short tutorial on the foot-activated tailgate is available here.Charging a Recharge Plug-In HybridRecharge Plug-In HybridVolvo Twin Engine Plug-in Hybrid vehicles feature the “Three Layer” 18.8 kWh high-voltage battery. That means you can do longer fully electric journeys with zero tailpipe emissions on a single charge.The Charging CableThe standard dual-voltage (110V & 220V) charging cable has two connectors – one side plugs into the vehicle using an industry-standard J1772 connector. The other connector has a special adaptor that allows it to plug into either a 110V or a 220V wall outlet.Using a 110V outlet, you can expect to charge the battery in 10 to 15 hours. Using a 220V outlet or a commercial charging station, you can charge the battery in 5 to 8 hours.Two-Step Regenerative Braking SystemThe regenerative braking system recovers and transmits energy back into the high-voltage battery, either to recharge it or for immediate use. You can press the “Hold” button on the center display to keep the current battery charge for later use, or the “Charge” button for the gasolineengine to charge the battery up to 90 percent.In Recharge Plug-In Hybrid vehicles, one pedaldrive gives you intuitive, seamless control ofthe car’s acceleration and braking just by usingthe accelerator pedal. Press the pedal for instantacceleration, and release it to instantly reducespeed or to brake the car to standstill (on Rechargewith Google built-in). This adds to more relaxeddriving, more fun, and an enhanced feeling ofcontrol – especially in stop-and-go city traffic.Brake energy regeneration also adds to a longerrange – every time you release the pedal, electricenergy is generated and fed back to the car’sbattery. The level of regenerative brake forceis determined by moving the shifter between “D” mode and “B” mode. In “B” mode the car has a high level of brake energy regeneration, and it activates one pedal drive. One pedal drive can also be controlled via Google Assistant. In “D” mode one pedal drive is turned off, and it provides a lower level of energy regeneration. When driving in one pedal drive you can activate “Creep” mode –“Creep On” to allow you to continue driving at low speeds without the car coming to a complete stop, such as in precision parking situations. “Creep” mode can easily be turned on or off via the settings menu in the center display or simply by using a voice command with the help of Google Assistant:“Hey Google, turn on/off creep mode.”One-Pedal DriveRecharge Plug-In Hybrid Drive ModesThe drive mode settings in our Plug-In Hybrid are different from thosein our gasoline engine cars. The drive mode settings allow the driverto choose different settings for the engine via the center display.Hybrid Mode (Default) utilizes the electric motor and gasoline engine, either individually or in parallel. Their operation is optimized for performance, fuel consumption, and comfort. The engineand automatic gearbox are programmed for maximum comfort.This is the default mode when the engine is started.Pure Electric Mode prioritizes electric operation and low energy consumption. It helps to maximize driving on the hybrid battery.The dynamic performance is reduced, and air-conditioning is partly disengaged but can be activated manually. This mode sets a maximum speed of 87 mph using only electric propulsion. (When Hybrid Mode is active, the car’s maximum speed is 78 mph on electric propulsion only.) Power Mode combines the gasoline engine and the electric motorto ensure the strongest performance, sporty characteristics, and quick response.Launching from a stop, this mode takes advantage of the electric motor’s instant maximum torque while the combustion engine gets up to speed. eAWD (All-Wheel Drive) Mode provides constant all-wheel driveon demand. Used primarily at low speeds and in slippery conditions, it activates all-wheel drive to improve traction. You can select this mode when needed, or choose to save energy for later. There is always enough power to use AWD mode, even when the battery is depleted. Off-Road Mode (XC90 & XC60 only) can be set at speeds below approximately 12 mph to maximize traction and control on poor roads. Above 25 mph Off-Road mode is disconnected and will notbe connected automatically again, even if speed is reduced. In this mode, Hill Descent Control is automatically activated, steering is set to comfort mode, the Electronic Stability Control is set to Traction/ Sport, and the Stop/Start function is deactivated.。

Q U I C K G U I D E恭喜您拥有全新沃尔沃汽车!本文件夹包含您的汽车中最常用的功能。
《车主手册》与其它手册中包含安全说明及所有警告信息、重要说明和提示文本。
下列符号表示:在概览图像中指出不同的部件。
分步说明。
阅读《车主手册》尤为重要。
最后一页包含必须阅读的警告信息、重要说明和提示文本。
选装件用星号(*)标记。
《车主手册》可分为印刷版手册以及通过车辆屏幕、网页以及移动应用程序显示的数字版手册。
移动应用程序包含整本《车主手册》及说明影片,并具有多个文本和插图搜索路径。
移动应用程序可从苹果应用商店 (App Store) 或谷歌市场 (Google play) 下载至移动设备。
另外,更多有关您的汽车的信息,请登录 温度系统控制器大灯开关组合仪表板Infotainment 系统电话互联网外部声音设备中控台中的按钮菜单系统的设置维修中心/预订保养ECO*调节座椅调节方向盘电动尾门*03 您的驾驶环境重新添加燃油车辆维护储物区域AUX/USB 端口和 12 V 插座04 汽车中的功能05 提示起动/停止功能*行人保护系统*02 汽车中的驾驶员支持系统遥控钥匙Keyless*锁止系统起动和关闭发动机驻车制动器雨刮器轮胎压力监测*01 起动和驾驶遥控钥匙如何工作?01解锁车门和尾门并解除警报。
该功能可在MY CAR(我的汽车)中进行设定。
锁止车门和尾门并启用警报。
安全取车照明期间。
按一下可解锁尾门,长按一下可打开电动尾门*。
信息*。
紧急功能。
遥控钥匙可存储车门后视镜和电动驾驶员座椅*等设置–请参阅《车主手册》。
遥控钥匙指示灯*表示什么信息?01绿色常亮:车辆锁止。
黄色常亮:车辆解锁。
红色常亮:警报器自车辆锁止后触发。
两个指示灯交替闪烁红光:警报器在不到5分钟前触发。
如何操作Keyless*锁止系统?遥控钥匙可一直放在(例如)口袋这些位置。
锁止并激活警报器–触摸一个外部车门把手的后部区域。
解锁和解除警报–以平常的方式握住一个车门把手并打开车门,或轻按尾门的橡胶按钮。
Volvo发动机EDC4通讯协议Issuer (dept., name, phone, location, sign.) Date2003-11-03Appendix Insert Registration No.SubjectCAN Frames -EDC4 Category Uncontr.Reciever (name, dept., location)The CAN - BUS has the following adjustment:The node address of EDC4 is 0.The rate of transmission is 250 kBaudAfter switching power on EDC4 waits 10 sec for the other nodes before the time out diagnostic starts.During the 10 second after switching power on a receive message must be received 4 times at least, other wise there will be a time out error.When the power supply drops below 9Volt, EDC4 will admit the other nodes a time out of 30sec.A receive message can be missing 8 times in a row before a time out Error willbe generated.1. If a message of Torque Speed Control has generated the time out, theLimp Home Function will be started. If the message will be receivedagain it will not be accepted anymore by the EDC4 until the EDC4 isrestarted again.2. In case of other receive messages that generated a time out the lastreceived value will be used. If a message is received again it will beaccepted automatically.The node address for the received messages are 3. Only the request and engine stop request messages can be received from any node on the BUS. The priority, resolution, repetition rate and all other information is outlined in the CAN Specification for EDC4.Issuer (dept., name, phone, location, sign.) Date2003-11-03Appendix Insert Registration No.SubjectCAN Frames -EDC4 Category Uncontr.Receive Messages.TSC1ID: 0C 00 00 03Byte 1 Control Bits SAE J1939/71, Parameter3.3.1Bit 1, 2 Override control modeBit 3, 4 Requested speed control condition ( notused)Bit 5, 6 Override control priority (not used)Bit 7, 8 Not definedByte 2,3 Requested speed / speed limit 0,125 rpm /Bit Byte 4 Requested torque / torque limit 1% /Bit, -125%OffsetByte 5-8 Not definedOverride Control Mode:00 no changes, the last mode will be usedBytes 2 to 8 will be ignored.01 set speed control, using bytes 2 and 3 for requested speed Byte 4 will be ignoredno limits will be changed10 torque control mode, using byte 4 for requested torque Bytes 2 and 3 will be ignoredno limits will be changed11 setlimitsBytes 2 and 3 are the limit of speed control.Byte 4 contents the limit for torque controlPriority Bits00 HighestPriority01 HighPriority10 LowPriority11 LowestPriorityIssuer (dept., name, phone, location, sign.) Date2003-11-03Appendix Insert Registration No.SubjectCAN Frames -EDC4 Category Uncontr.DM3 Delete Passive ErrorID: 18 FE CC 03DM3:Transmission rate: if requiredData length: 0 BytesData Page: 0PDUF: 254 PDUS: 204 Priority: s. Appendix 5 Parameter group number:65228 (00FECC)Source Address: External Device Nr.ID:DM11 Delete active ErrorID: 18FE D3 03DM11:Transmission rate: if requiredData length: 0 BytesData Page: 0PDUF: 254 PDUS: 211 Priority: s. Appendix 5 Parameter group number:65235 (00FED3)Source Address: External Device Nr.ID:Issuer (dept., name, phone, location, sign.) Date2003-11-03Appendix Insert Registration No.SubjectCAN Frames -EDC4 Category Uncontr.Engine stop requestID: 08 FF 16 xxTransmission rate: s. Appendix 5Data Length: 1 BytesData Page: 0PDUF: 255PDUS: 22Priority: s. Appendix 5Parameter groupnumber:00FF16Source Address: external Device Nr.ID:Byte 1 Engine stopEngine stop = 1 the engine will be stoppedEngine stop ≠ 1 the engine will not be stopped by this commandDM5 RequestID: 18 EA 00 xxEDC4 receives this messages as a request to send the number of faults, which have occurred once at least and are active or passive at that moment. Transmission rate: If required Data Length: 3 BytesIssuer (dept., name, phone, location, sign.) Date2003-11-03Appendix Insert Registration No.SubjectCAN Frames -EDC4 Category Uncontr.Transmit MessagesEEC1ID: 0C F0 04 00Transmission rate:Data Length: 8 BytesData Page: 0PDUF: 240PDUS: 4Priority: s. Appendix 5Parameter group number: 61444Source Address: Device-Nr. EDC4Byte 1 Status8 =engine is working at limited torque(max. torque curve)3 = engine speed governor is active14 = engine torque control ( min. max.governor) is activeByte 2 Requested engine torque in %related to Md max1%/Bit, -125% OffsetByte 3 Engine torque related toMd max1%/Bit, -125% OffsetByte 4-5 Engine speed 0,125 rpm /BitByte 6-8 Not definedThe value of Byte 3 is the actual engine torque in percent of the reference engine torque of the message engine configuration.The torque values of Byte 3, TSC1 and the points 1 to 5 of the message engine configuration are directly comparable to each other because of the same reference value.Issuer (dept., name, phone, location, sign.) Date2003-11-03Appendix Insert Registration No.SubjectCAN Frames -EDC4 Category Uncontr.EEC2ID: 0C F0 03 00Transmission rate: s. Appendix 5Data Length: 8 BytesData Page: 0PDUF: 240PDUS: 3Priority: s. Appendix 5Parameter group number: 61443Source Address: Device Nr. EDC4Byte 1 Status not defined (FF)Byte 2 Pedal position 0,4 %/BitByte 3 Engine torque related to maxengine torque at engine speed0,4 %/BitByte 4-8 Not definedThe value of Byte 3 is the actual engine torque in percent of the maximum available engine torque at the actual engine speed.Fuel EconomyID: 18 FE F2 00Data Length: 8 BytesData Page: 0PDUF: 254PDUS: 242Priority: s. Appendix 5Parameter group number: 65266 (00FEF2 H)Source Address: Device Nr. EDC4ID:Byte 1-2 Fuel rate 0,05 L/h /BitByte 3,4 Instantaneous fuel economy km/lByte 5-8 Not definedIssuer (dept., name, phone, location, sign.) Date2003-11-03Appendix Insert Registration No.SubjectCAN Frames -EDC4 Category Uncontr.Engine TemperatureID: 18 FE EE 00Data Length: 8 BytesData Page: 0PDUF: 254PDUS: 238Priority: s. Appendix 5Parameter group number: 65262 (00FEEE H)Byte 1 Coolant temperature 1°C /Bit, -40 °C Offset Byte 2 Fuel temperature 1°C /Bit, -40 °C Offset Byte 3 not available (FF) Byte 4 not available (FF)Byte 5-8 Not definedInlet/Exhaust ConditionsID: 18 FE F6 00Data Length: 8 BytesData Page: 0PDUF: 254PDUS: 246Priority: s. Appendix 5Parameter group number: 65270 (00FEF6 H)Byte 1 Not definedByte 2 Boost pressure 2 kPa/Bit = 1/50 bar/BitByte 3 Intake manifoldtemperature1°C /Bit, -40 °C OffsetByte 4-8 Not definedIssuer (dept., name, phone, location, sign.) Date2003-11-03Appendix Insert Registration No.SubjectCAN Frames -EDC4 Category Uncontr.Engine Fluid Level / PressureID: 18 FE EF 00Data Length: 8 BytesData Page: 0PDUF: 254PDUS: 239Priority: s. Appendix 5Parameter group number: 65263 (00FEEF H)Byte 1 Not definedByte 2 Not definedByte 3 Oil level 0.4%/Bit, 0% Offset Byte 4 Oil pressure 4 kPa/Bit, 1/25bar /Bit Byte 5,6 not available (FF)Byte 7 not available (FF)Byte 8 Coolant level 0.4%/Bit, 0% OffsetIssuer (dept., name, phone, location, sign.) Date2003-11-03Appendix Insert Registration No.SubjectCAN Frames -EDC4 Category Uncontr.Messured Data1ID: 18 FF 04 00Transmission rate: s. Appendix 5Data Length: 8 BytesData Page: 0PDUF: 255PDUS: 4Priority: s. Appendix 5Parameter groupnumber:00FF04Source Address: EDC4 Device Nr.Byte 1 reservedByte 2-3 Engine speed 0,125 rpm /BitByte 4 Boost pressure 2kPa/Bit = 1/50 Bar/Bit Byte 5 Pedal position 0 to 100% 0,4 % BitByte 6 Coolant temperature 1°C /Bit, -40 °C Offset Byte 7 Oil pressure 4 kPa/Bit = 1/25 Bar /Bit Byte 8 Can statusCan status0 Initialization after power on1 or2 engine not started, waiting for start3 engine starts (is cranking)4 engine has started, is running, waiting for Can messageswith speed or torque demand5 engine is running, CAN messages for speed or torque control used.6 CAN messages for speed or torque demand failed (time-out)EDC4 uses another input for set point values as a substitute, i.e. acceleratorpedal7 Engine start protection is activeIssuer (dept., name, phone, location, sign.) Date2003-11-03Appendix Insert Registration No.SubjectCAN Frames -EDC4 Category Uncontr.Messured Data2ID: 18 FF 12 00Data Length: 8 BytesData Page: 0PDUF: 255PDUS: 18Parameter groupnumber:FF12Source Address: EDC4 Device Nr.Byte 1 DroopByte 2-3 set point data engine speed, droopcalculatedByte 4 source of set point data engine speedByte 5, 6 engine speed, sensor 1Byte 7, 8 engine speed, sensor 2DroopDroop = (n max - n rated) / n rated * 100 %n = engine speed, resolution 1% /BitSet point data engine speed, droop calculatedThis is a data inside EDC4 after selection of the source of requested speed at the input of the speed governor, calculated with droop.0,125 rpm/bit ; 0 rpm offsetrange: 0 to 8031,875 rpmSource of set point data engine speed:This value shows, which signal is the source of the actual set point data.0 No set point data1 Pedal input ( Analog / PWM input)2 Hand throttle lever3 Errorvalueused4 TSC1.a5 reserved ( for TSC1.b)6 reserved ( forSAE-J1587 PID 91 accelerator pedal)7 Constant speed 18 Constant speed 29 Frozen engine speed (actual engine speed saved)10 Frozen engine speed (set point speed saved)11 special function ( hold)Issuer (dept., name, phone, location, sign.) Date2003-11-03Appendix Insert Registration No.SubjectCAN Frames -EDC4 Category Uncontr.13 special function ( max)14 reserved (for PTO)15 idle calibration mode16 reserved (for VP2 pedal data)Engine speed sensor 1, 2If there is no engine speed sensor 2 available, i.e. a vehicle speed sensor is mounted, then the value will be FFh.0,125 rpm/bit ; 0 rpm offsetrange: 0 to 8031,875 rpmMessured Data3ID: 18 FF 13 00Data Length: 8 BytesData Page : 0PDUF : 255PDUS: 19Parameter groupnumber:FF13Source Address: EDC4 Device Nr.Byte 1 Power reductionByte 2 Maximum available engine torque at currentspeedByte 3, 4 Maximum available engine speedByte 5, 6 Hold engine speedByte 7, 8 not availablePower reductionThis is the actual value of the power reduction, calculated by the internal engine protection functions and the CAN message engine protection. The limits set by the message TSC1 have no influence on this value.Resolution 1%.Range 0 to 100%The value of no power reduction is 100%Maximum available engine torque at current speedThe maximum available engine torque at current speed in percent of the actual torque curve.Issuer (dept., name, phone, location, sign.) Date2003-11-03Appendix Insert Registration No.SubjectCAN Frames -EDC4 Category Uncontr.Engine protection functions and CAN messages, i.e. TSC1, can limit this data to a lower value. In that case not 100% oftorque is available.If there are no actual limitations or power reductions, the available engine torque is given by the torque curve. The value will be 100%, then.Resolution: 1%Range: 0% to 100%Maximal available engine speedThe maximum available engine speed varies because of engine protection functions and other CAN messages.Resolution: 1/8 rpmRange 0 to 8000 rpmHold engine speedIs one of the following data, depending on which data is actual used:Frozen engine speed (actual engine speed saved)Frozen engine speed (set point speed saved)If none of both data is actual used the value will be FFhMessured Data3ID: 18 FF 13 00Transmission rate: s. Appendix 5Data Length: 8 BytesData Page : 0PDUF : 255PDUS: 20Priority: s. Appendix 5Parameter groupnumber:FF14Source Address: EDC4 Device Nr.ID:Byte 1,2set point value fuel quantity 0,1 mm3 / Stroke / Bit Byte 3, 4 desired value fuel quantity for drive ability map0,1 mm3 / Stroke / BitByte 5,6actual rack position 0,01 mm / BitByte 7,8desired rack position 0,01 mm / BitIssuer (dept., name, phone, location, sign.) Date 2003-11-03Appendix Insert Registration No.SubjectCAN Frames -EDC4 Category Uncontr.LimitationID: 0C FF 15 00Transmission rate: s. Appendix 5Data Length: 8 BytesData Page : 0PDUF : 255PDUS: 21Priority: s. Appendix 5Parameter groupnumber:00FF15Source Address: EDC4-Device Nr.ID:Byte 1 Active limitation 1Byte 2 Active limitation 2Byte 3 Actual torque mapByte 4 Engine speed limitByte 5 Engine torque limitByte 6 Source of power reductionByte 7 Engine stopByte 8 not definedActive limitation 1Bit 8 Max. torque curve reachedBit 7 Max. engine speed limit reached (Engine speed limit) Bit 6 Engine speed limit TSC1 reached ( TSC1 Engine speed limit) Bit 5 Engine torque limit TSC1 reached (TSC1 Engine torque limit) Bit 4 Power reduction activeBit 3 engine shutdown protection / start prevention active Bit 2 limp home function activeBit 1 Road speed limitation active (configured limit reached )A Bit will only be set, when EDC4 is actually working at the limit.If there is a limit set, but no operation parameter has reached this limit, the corresponding bit will not be set.Issuer (dept., name, phone, location, sign.) Date2003-11-03Appendix Insert Registration No.SubjectCAN Frames -EDC4 Category Uncontr.Active Limitation 2Bit 6-8 reservedBit 5 overrun conditionBit 4 smoke limitationBit 3 limitation by barometric pressureBit 2 reserved (= 0 because limitation of vehicle speed by receive messageSAE-J1587 PID74 not available)Bit 1 reserved (= 0 because receive message torque limiting SAE-J1587 PID 68not available)A Bit will only be set, when EDC4 is actually working at the limit.If there is a limit set, but no operation parameter has reached this limit, the corresponding bit will not be setActual torque mapThis is the number of the selected max. torque curve, even when the engine is actually not working at this limit1 max. torque curve 12 max. torque curve 23 max. torque curve 3Engine speed limit0 normal speed limit (configuration parameter)1 TSC1.a2 TSC1.b3 TSC1.c4 TSC1.dThis is the number of the actual lowest engine speed limit, even when the engine is actually not working at this limit Engine torque limit0 normal limitation by max. torque curve1 TSC1.a2 TSC1.b3 TSC1.c4 TSC1.d5 reserved (will not appear, because receive message torque limitingSAE-J1587 PID 68is not available)6 smokelimitationThis is the number of the actual lowest engine torque limit, even when the engine is actually not working at this limit Issuer (dept., name, phone, location, sign.) Date2003-11-03Appendix Insert Registration No.SubjectCAN Frames -EDC4 Category Uncontr.Source of power reduction0 = no power reduction1 = engine protection2 = oil pressure3 = intake manifold temperature4 = Coolant temperature5 = barometric pressureThe number of the signal that makes the highest reduction will be send in this byte.The engine must not actually work at the limit to get a value different from zero. It is sufficient that a limit is set.Example:Power reduction 20% of max. torque curve because of Coolant temperature is too high, that means 80% of power is available. The engine may work at 10% of max. power, but the value of the byte will be 4.Engine stop0 = no special engine stop, normal engine stop1 = Engine shutdown for engine protection2 = CAN Message Engine Stop Request3 = Oil pressure too low4 = Oil level too low5 = Coolant temperature too high6 = Coolant level too low7 = Intake manifold temperature8 = reserved ( SAE-J1587 command9 = reserved (for VP2 not available)The value of this byte shows the reason, why EDC4 has shutoff the engine.If more limitations in EDC4 exist than these bytes represent, than this list will be enlarged.Issuer (dept., name, phone, location, sign.) Date2003-11-03Appendix Insert Registration No.SubjectCAN Frames -EDC4 Category Uncontr.Vehicle Electrical PowerID: 18 FE F7 00Data Length: 8 BytesData Page: 0PDUF: 254PDUS: 247Parameter group number: 65271 (00FEF7 H)Source Address: Device Number EDC4Byte 1-6 not available (FF)Byte 7,8 switched battery power at the input ofEDC40,05 V/BitAmbient ConditionsID: 18 FE F5 00Data Length: 8 BytesData Page: 0PDUF: 254PDUS: 245Parameter group number: 65269 (00FEF5 H)Source Address: Device Number EDC4Byte 1 barometric pressure 0,5 kPa/Bit = 1/200 Bar/Bit Byte 2,3 not available (FF)Byte 4-8 not available (FF)Issuer (dept., name, phone, location, sign.) Date2003-11-03Appendix Insert Registration No.SubjectCAN Frames -EDC4 Category Uncontr.State of inputs 1ID: 18 FF 0A 00Data Length: 8 BytesData Page: 0PDUF: 255PDUS: 10Parameter groupnumber:00FF0ASource Address: EDC4 Device Nr.Byte 1 Digital, PWM 1 Pin F 18Byte 2 Digital 6, Analog 1 Pin F 24Byte 3 Digital 2, PWM 2 Pin F 21Byte 4 Digital 4 Pin F 19Byte 5 Digital 8, Analog3 Pin F 20Byte 6 Digital 3 Pin F 6Byte 7 Digital 5 Pin M 6Byte 8 Digital 7, Analog 2 Pin M24What is connected to the inputs depends on the respective application.Digital:0 = boolish 0100 = boolish 1PWM:range 0 to 100 %resolution 1% / bitAnalog:range 0 to 5V = 0 to 100resolution 0.05V / bitFF H = Information not available ( Not definedIssuer (dept., name, phone, location, sign.) Date2003-11-03Appendix Insert Registration No.SubjectCAN Frames -EDC4 Category Uncontr.State of inputs 2ID: 18 FF 17 00Transmission rate: s. Appendix 5Data Length: 8 BytesData Page: 0PDUF: 255PDUS: 23Priority: s. Appendix 5Parameter groupnumber:00FF17Source Address: EDC4 Device Nr.ID:Byte 1 Digital 9, analog4 Pin M21Byte 2 Digital 10/ vehicle speed Pin F7Byte 3 not availableByte 4 not availableByte 5 not availableByte 6 not availableByte 7 not availableByte 8 not availableWhat is connected to the inputs depends on the respective application. Digital:0 = boolish 0100 = boolish 1PWM:range 0 to 100 %resolution 1% / bitAnalog:range 0 to 5V = 0 to 100resolution 0.05V / bitFF H = Information not available ( Not defined)Issuer (dept., name, phone, location, sign.) Date2003-11-03Appendix Insert Registration No.SubjectCAN Frames -EDC4 Category Uncontr.State of Digital OutputsID: 18 FF 0B 00Data Length: 8 BytesData Page: 0PDUF: 255PDUS: 11Parameter groupnumber:00FF0BSource Address: EDC4-Device Nr.Byte 1 Diagnostic lamp Pin F 4Byte 2 Digital 7, engine speed Pin F 16Byte 3 Digital, PWM 1 Pin F 5Byte 4 Digital 2 Pin F 3Byte 5 Digital 4 Pin M 3Byte 6 Digital Output 5 Pin F 15Byte 7 Digital Output 3 Pin M 2Byte 8 Digital Output 6/ PWM2 Pin M 7What is connected to the outputs depends on the respective application. Digital:0 = boolish 0100 = boolish 1PWM:range 0 to 100 %resolution 1% / bitengine speed: 40rpm / bitFF H = Information not available ( Not defined)。
w e b e d i t i o n q u i c k g u i d eVälkommen!本快速指南为您介绍新 Xc90 twin engine 汽车的一系列功能。
中央显示屏上的车主手册中包含有关您沃尔沃车辆的全面信息。
手套箱中收藏了含重要且实用信息的车主手册摘录。
车主手册还可以应用程序的形式在智能手机和平板电脑上查看,以及在 网站上查看。
支持页面对于大多数市场可用,并包含有关您的 Xc90 twin engine 汽车的进一步信息和帮助。
选装件用星号(*)标记。
01. 入门指南您可在此处找到可帮助您熟悉您的沃尔沃车辆中的一些基本功能的信息。
除其他内容外,您还可阅读有关遥控钥匙、车辆的三个显示屏以及如何起动和关闭发动机的内容。
此外,您还可了解如何控制与调节座椅以及空调控制的相关信息。
02. 混合动力相关信息除其他信息以外,您还会在此处找到有关如何开始和结束混合动力蓄电池充电的信息。
03. 驾驶和驾驶员支持系统您会在此处找到有关车内驾驶模式以及诸如巡航控制系统、自动泊车辅助系统 (PAP)*、盲点信息 (bliS)* 和 city Safety 等不同驾驶员支持功能的信息。
04. 仪表与控制器您在此处可找到有关如何控制灯光和雨刮器以及如何使用行车电脑和语音控制的信息。
05. 联网、娱乐与支持从您的沃尔沃车辆中,您就可以与外面的世界互联,获得信息、娱乐和支持功能。
本节包含有关如何将手机连接至您的沃尔沃车辆、连接至互联网以及如何使用应用程序的信息。
06. 特殊文本请务必阅读警告、重要及注意事项。
按一下可锁止车门和尾门并布设警报1。
长按一下可同时关闭全景天窗* 和所有侧窗。
按一下可解锁车门和尾门并解除警报。
长按一下可同时开启所有侧窗。
按一下仅解锁尾门并解除警报。
长按一下可开启或关闭电动*尾门。
遥控钥匙按钮1特定市场选项。
紧急功能用于在紧急情况下引起注意。
长按一下至少 3 秒钟或在 3 秒钟内按下两次可启用方向指示灯和喇叭。
This manual deals with the operation and care of your VIN information on page 62. You should also be familiar with the information in the first three chapters of this manual.Information contained in the balance of the manual is extremely useful and should be read after operating the vehicle for the first time.The manual is structured so that it can be used for reference. For this reason, it should be kept in the car for ready access.Do not export your Volvo to another country before investigating that country's applicable safety and exhaust emission requirements. In some cases it may be difficult or impossible to comply with these requirements. Modifications to the emission control system(s) may render your Volvo not certifiable for legal operation in the U.S., Canada and other countries.All information, illustrations and specifications contained in this manual are based on the latest product information available at the time of publication. Please note that some vehicles may be equipped differently, depending on special legal requirments and that optional equipment described in this manual may not be available in all markets.Volvo reserves the right to make model changes at any time, or to change specifications or design, without notice and without incurring obligation.Volvo and the environmentV olvo is committed to the well being of our customers. As a natural part of this commitment, we care about the environment in which we all live. Caring for the environment means an everyday involvement in reducing our environmental impact.V olvo's environmental activities are based on a holistic view, which means we consider the overall environmental impact of a product throughout its complete life cycle. In this context, design, production, product use, and recycling are all important considerations.In production, V olvo has partly or completely phased out several chemicals including freons, lead chromates, naphtanates, asbestos, mercury and cadmium; and reduced the amount of chemicals used in our plants 50% since 1991.In use, V olvo was the first in the world to introduce into production a threeway catalytic converter with a Lambda sond, now called oxygen sensor, in 1976. The current version of this highly efficient system reduces emissions of harmful substances (CO, HC, NOx) from the exhaust pipe by approximately 95% and the search to eliminate the remaining emissions continues. V olvo is the only automobile manufacturer to offer CFCfree retrofit kits for the air conditioning system for all models as far back as the M/Y 1975 240. Advanced electronic engine controls, refined purification systems and cleaner fuels are bringing us closer to our goal.CALL FAQ。
Load AssistPowered by Volvo Co-PilotLift up efficiencyOn-Board WeighingWhen it comes to loading the optimum amount of material, intuition can only get you so far. Are you moving enough material, or moving too much? Say goodbye to guess-work with the On-Board Weighing app. The dynamic load weighing system provides real-time insights into the bucket’s load, so you can eliminate overloading, underloading, reweighing and waiting times. Take control of your productivityLift the paceKeep it moving with On-Board Weighing, a factory-fit system which allows you to measure your bucket load on-the go, eliminating any disruption to the workflow. Simply use Volvo Co-Pilot – the high-resolution 10’’ touchscreen – to monitor loading progress, track materials and trucks, and change work orders in seconds.Operate safelyIncrease jobsite safety with a customizable alert, which notifies the operator if the bucket load exceeds a set limit. Get a full view of your surroundings when reversing thanks to the rear-view camera* which automatically combines the rear-view and load information into a single screen. For additional safety, certain functions are disabled when speed exceeds 10km/h (6mph).*Radar detect system option cannot be combined in the Volvo Co-Pilot.A simple layout and large font, visible even in bright light, illustrates the current, delivered, and to-be-delivered bucket tonnage.Work ordersSelect customer name and target tonnage with just a few touches.Loading made easyA guided calibration process, colored bars which indicate load activity progress, and icons which give insight into why the weight is not lockedproperly, combine to facilitate the loading process.Working modesChoose Project mode to control the total load of multiple trucks, or Trip mode, ideal for loading single trucks or crushers.Superior production efficiencyGet it right first time with tonnagemeasurements accurate to within +/- 1% for every bucket-load. When siteconditions or customer requirements make it impossible to lock the load within this margin, simply switch to within an accuracy of +/- 2%.Partial unloadingManaging the last bucket of the trip is easy with tip off capability.Buckets, and moreThe versatile system is optimized for standard bucket operations, and suitable for high tip buckets and side dump buckets with only some reduction in weighing functionality. It is also compatible with forks and grapples (accuracy +/-2%).Reporting on demandProduction data is stored in the Volvo Co-Pilot and can be exported over the air to a cloud-based portal, or by using a USB-stick, enabling you to analyze machine usage and productivity. Fully integrated to the machine, the system populates CareTrack – combining productivity data and fuel data into a single report.Operator CoachingAs machines become more advanced, and with smarter technology, the Operator Coaching app helps to ensure operators are using their Volvo machine to its full potential. The intuitive app provides real-time guidance to operators, helping them understand how their actions influence machine productivity and efficiency, as well as identify areas for improvement or changes in their technique. Enhanced operator performanceNew levels of efficiencyUnderstand when and how to use the many smart functions of your Volvo wheel loader to achieve optimum results on site. You can also set targets and objectives to continually develop and improve your operating practices to get the most out of yourself and the machine you are working with. Lower operating costsMake better decisions behind the controls thanks to instant feedback on operating behavior, combined with real-timeon-screen guidance. With information available at the blink-of-an-eye, operators can ensure they are working in a way which delivers optimum fuel efficiency and reduced machine wear.NotificationsOperators receive real-time guidance on how to best operate the machine, such as ‘Activate Boom Suspension System’ and ‘Activate Lock-up’.Operating behaviorMonitor operator behavior with key indicators including: idling over active time, braking over distance, throttle position (%) and lock-up over distance.Interactive guidanceNavigate the functions and get tips on how to use them.Score and trendReal-time score and graphicalvisualization of operator performance across previous shifts enables follow-up and performance improvements.User IDCreate individual profiles and easily recall personalized saved data and objectives before each shift.DashboardKey information relating to machineutilization (operating time, average speed, fuel consumption, distance traveled) is clearly displayed on the Volvo Co-Pilot, and can be reset separately from the machine display.Load Assist in detail11Ref. No VOE2220009422 / English-22 / 2019.10/ SER / Volvo, Americas Marketing。