安装Eclipse使用说明
- 格式:pdf
- 大小:615.48 KB
- 文档页数:17
在Linux上安装Eclipse,Windows通⽤在Linux上安装Eclipse⽬录1. 准备Java环境tips:现在Eclipse都会⾃带JRE了,所以不装Java运⾏时环境也可以启动Eclipse软件,但是还是建议⼩伙伴把JDK装上,因为Eclipse实现了它⾃⼰的编译器,叫做Eclipse Compile for Java (ECJ) ,⼀般⽤于学习Java⽬的的话ECJ表现和javac基本没有区别,但在某些情况下,ECJ的⾏为会和javac的⾏为有差异。
因此不在乎这些存在的差异的⼩伙伴,可以直接跳到。
打开终端,安装jdk$ sudo apt install openjdk-11-jdk需要 java8 环境的同学换成这条命令执⾏$ sudo apt install openjdk-8-jdk现在⼀部分公司开始从java8逐渐过渡到java11了,所以建议如果是学习需要的话还是着⼿java11为好。
另外jdk11中带有jshell,类似Python和Node.js的交互式命令⾏,可以直接测试想测试的代码。
相关资料⼤家都可以从⽹上搜到,这⾥就不赘述了。
安装好后打开终端输⼊$ java -version和$ javac -version查看⼀下环境变量有没有配好$ java -versionopenjdk version "11.0.4" 2019-07-16OpenJDK Runtime Environment (build 11.0.4+11-post-Debian-1deb10u1)OpenJDK 64-Bit Server VM (build 11.0.4+11-post-Debian-1deb10u1, mixed mode, sharing)$ javac -versionjavac 11.0.4如果能够成功的输出版本号信息,就说明环境变量配置成功2. 下载Eclipse点击下载需要的eclipse版本不喜欢看英⽂的同学点击,下载对应的汉化包解压到后续安装的⽂件夹下即可如果官⽹加载很慢可以从国内镜像站下载如果空间⾜够的话,还是建议下载JavaEE版本的Eclipse,以后学习企业应⽤开发的时候就会省很多事Windows下载后解压,直接双击⾥⾯的eclipse.exe程序就可以运⾏了。

eclipse的插件安装方法Eclipse的插件机制是轻型软件组件化架构。
在客户机平台上,Eclipse使用插件来提供所有的附加功能,例如支持Jav a以外的其他语言。
已有的分离的插件已经能够支持C/C++(CDT)、Perl、Ruby,Python、telnet和数据库开发。
插件架构能够支持将任意的扩展加入到现有环境中,例如配置管理,而决不仅仅限于支持各种编程语言。
Eclipse的设计思想是:一切皆插件。
Eclipse核心很小,其它所有功能都以插件的形式附加于Ecl ipse核心之上。
Eclipse基本内核包括:图形API (SWT/Jface),Java开发环境插件(JDT ),插件开发环境(PDE)等。
Eclipse插件的安装方法大体有以下几种方式:第一种:直接复制法假设Eclip se的安装目录在C:\eclipse,解压下载的ec lipse插件或者安装e clipse插件到指定目录AA(如:c:\AA)文件夹,打开AA 文件夹,在AA文件夹里分别包含两个文件夹fea tures和plugin s ,然后把两个文件夹里的文件分别复制到C:\eclipse下所对应的文件夹下的fe atures和plugin s 下,一般的把插件文件直接复制到eclips e目录里是最直接也是最愚蠢的一种方法!因为日后想要删除这些插件会非常的困难,不推荐使用。
注意:直接将插件包解压到plug ins文件夹下之后,重启eclip se,可能不会加载新的插件。
解决方法是:1、打开命令行,到当前ecli pse的目录下,输入eclip se -clean,重新启动ecl ipse,这样eclip se 就会加上新的插件了。
2、如果插件不能生效,则请将ecli pse\configu ration\org.eclipse.update目录删除后再启动eclip se;你可以在ecl ipse的菜单"Help"-->"About Eclipse SDK"-->"Feature Details" 和"Plug-in Details"中看到新安装的插件。
![Eclipse使用方法[精髓]](https://uimg.taocdn.com/1e6c9fc108a1284ac85043c4.webp)
附录C 3.2.2使用简介C.3 使用开发工具进行编程当下载并安装完毕Eclipse 3.2.2开发工具后,可以使用该开发工具进行代码的开发了,本节将使用该工具开发一段代码,介绍如何使用该开发工具进行编程,请按照如下步骤进行操作。
(1)首先打开Eclipse 3.2.2开发工具,稍等片刻之后,会进入到图C-8所示的界面,在这里将设置工程文件默认的存放路径。
图C-8 设置工程文件默认的存放路径(2)本书选用默认路径作为工程文件的存放路径,当设置完成之后,就可以单击“OK”按钮,稍等片刻进入Eclipse 3.2.2的主程序。
如图C-9所示。
图C-9 Eclipse 3.2.2主程序的欢迎界面(3)这时可以将欢迎界面关掉,并单击“File”菜单,将鼠标移动到“New”菜单项上,此时可以看到图C-10所示的界面。
(4)在图C-11所示的“New”子菜单中选择“Project…”菜单项来创建工程文件,单击之后,会弹出一个图C-12所示的对话框。
(5)在该对话框中将选择所要创建工程的类型,可以选择“Java Project”选项,并单击“Next”按钮来进行创建。
单击完“Next”按钮后,会进入图C-13所示的界面,在这里将设置工程文件的名称。
(3)可以在“Project Name”文本框中设置该工程的名称,例如这里将该工程的名称设置为“T est”,当设置完毕之后,可以单击“Fini sh”按钮完成设置。
单击完“Fini sh”按钮后,可以在开发工具的主界面左侧看到本工程的工程树。
如图C-14所示。
图C-12 选择工程文件的类型图C-13 设置工程文件的名称图C-14 主界面中的工程树(4)由于还没有创建文件,所以创建工程完毕之后,工程树比较空,这时可以为该工程创建代码文件,单击“File”菜单,并在其中“New”子菜单中选择“Class”选项。
这样会弹出一个用来创建文件的向导提示框,如图C-15所示。
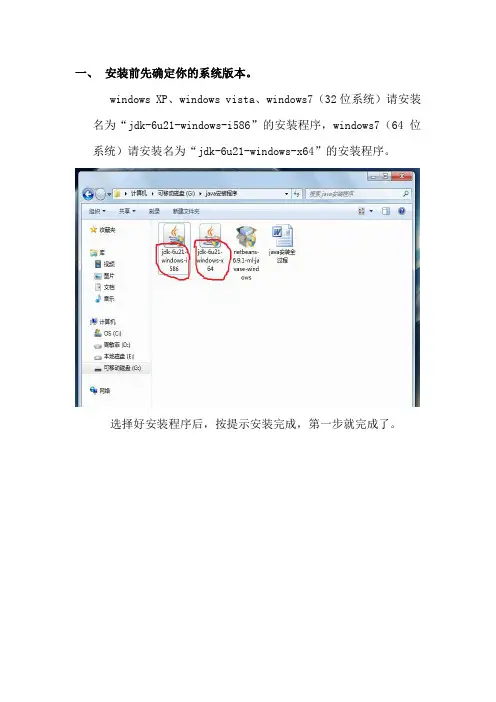
一、安装前先确定你的系统版本。
windows XP、windows vista、windows7(32位系统)请安装名为“jdk-6u21-windows-i586”的安装程序,windows7(64位系统)请安装名为“jdk-6u21-windows-x64”的安装程序。
选择好安装程序后,按提示安装完成,第一步就完成了。
二、设置环境变量(不分系统)。
1、桌面上,我的电脑处点右键——属性2、弹出下图,点击——高级系统设置3、弹出——系统属性,点击——高级中的——环境变量4、打开环境变量点击下方的——新建5、新建一个变量名为“JAVA_HOME”,变量值为先前那个程序的安装路径的变量,确定。
例如我的安装路径为“C:\Program Files\Java\jdk1.6.0_21”。
注:安装路径选择到“bin”文件所在的位置,如图:6、完成新建后,找到“path”的变量,编辑。
7、将光标移动至变量名的最前端,输入“%JAVA_HOME%\bin;”,确定。
特别注意分号。
8、完成以上步骤后,检验java是否安装成功。
点击开始,在运行框内输入“cmd”,选择。
9、在弹出的dos对话框内先后输入“java”和“javac”,若出现如图信息,则安装成功,可以进行下一步操作。
三、最后一步。
安装名为“netbeans-6.9.1-ml-javase-windows”的安装程序。
照提示完成即可。
(注:若先前的程序在安装时更改了默认的安装路径,则这个程序的安装路径要与前一个路径相同)四、成功安装。
双击“NetBeans IDE 6.9.1”快捷方式,运行开发环境。
开发环境:。

Eclipse CDT安装及使用教程Eclipse CDT安装教程一、安装配置JDK1、下载windows jdk 安装包,可以从官网下载,也可以从这里下载,下载完成后,按照一般软件安装的方法安装;2、安装完成后,找到安装目录,如C:\Program Files\Java\jdk1.6.0_35,记录下来;3、Windows7下右击电脑桌面的计算机,选择属性,然后点击右边的“高级系统设置”,在弹出的对话框点击“环境变量”,如图。
4、在步骤3中弹出的对话框的下方,看到系统变量,点击下方的“新建”(见图12),然后在变量名的地方填入JA V A_HOME,变量值填入步骤2中记录的路径,然后点击确定;5、按照步骤4的方法,新建另一个变量,变量名是:CLASSPATH,变量值是:.;%JA V A_HOME%\lib\dt.jar;%JA V A_HOME%\lib\tools.jar;%JA V A_HOME%\jre\lib\rt.jar统变量中找到变量名为PATH的变量,双击,在变量值的最后加上:;%JA V A_HOME%\bin(见图),然后一路确定。
7、至此,eclipse的运行环境配置成功。
二、配置C/C++编译器MinGWWindows下安装配置MinGW从MinGW官网下载最新程序,下载地址:/project/mingw/Installer/mingw-get-inst/mingw-get-inst-20120426/mi ngw-get-inst-20120426.exe;双击下载好的程序,然后一路点击“Next”按钮,直到图1的界面,选择“I accept the agreement”,然后点击next。
3、选择路径,默认放在C:\MinGW,点击next;接下来的界面也是next;一直到图中的组件选择界面,勾上C Compiler前面的钩,也可以按自己喜好选上C++ Compiler或其它组件,点击next;在下一个界面点击Install,就会进行安装。
使用Eclipse进行Java应用程序开发的入门教程第一章:介绍Eclipse和Java开发环境Eclipse是一款流行的集成开发环境(IDE),可用于开发各种编程语言,包括Java。
它提供了强大的工具和功能,使Java开发变得更加高效和便捷。
1.1 Eclipse的安装首先,下载适用于Java开发的Eclipse版本。
安装过程相对简单,按照向导提示顺序执行即可完成。
确保选择Java开发工具(Java Development Tools,JDT)的安装。
1.2 JDK的安装和配置Eclipse需要Java Development Kit(JDK)才能编译和运行Java 代码。
确保已安装最新版本的JDK,并将其配置为Eclipse的默认JDK。
1.3 创建Java项目启动Eclipse后,选择"File -> New -> Java Project"来创建一个新的Java项目。
在弹出的对话框中,输入项目名称并选择所需的JDK版本。
点击"Finish"来创建项目。
第二章:Eclipse的基本功能和工作空间2.1 工作空间Eclipse使用工作空间(Workspace)来组织项目和资源文件。
在启动Eclipse时,会要求选择工作空间文件夹。
一个工作空间可以包含多个项目。
2.2 项目资源Eclipse的"Package Explorer"窗口显示项目中的所有文件和文件夹。
你可以在此窗口中创建、删除和管理项目资源。
2.3 编辑器Eclipse的编辑器是主要的编码区域,用于编写和编辑Java代码。
当你双击项目中的Java文件时,它会在编辑器中打开。
2.4 调试器Eclipse提供强大的调试功能,可帮助你发现和修复代码中的错误。
你可以设置断点、单步执行代码、查看变量的值等。
调试器是开发过程中非常有用的工具。
第三章:Java项目的创建和配置3.1 创建包和类在Eclipse的"Package Explorer"窗口中,右键点击项目,选择"New -> Package"来创建一个包。
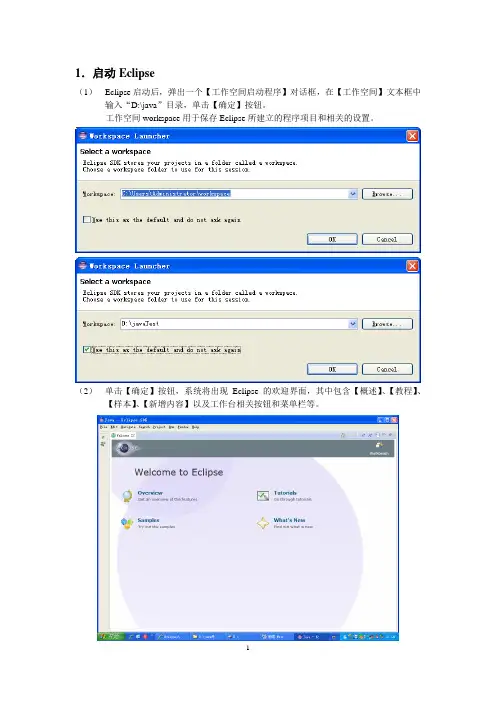
(1)Eclipse启动后,弹出一个【工作空间启动程序】对话框,在【工作空间】文本框中输入“D:\java”目录,单击【确定】按钮。
工作空间workspace用于保存Eclipse所建立的程序项目和相关的设置。
(2)单击【确定】按钮,系统将出现Eclipse的欢迎界面,其中包含【概述】、【教程】、【样本】、【新增内容】以及工作台相关按钮和菜单栏等。
在Eclipse的欢迎界面中,单击【工作台】按钮或者关闭【欢迎】的界面窗口,将显示出Eclipse的工作台,包括标题栏、菜单栏、工具栏、编辑器、透视图和相关的视图。
3.Eclipse菜单栏(1)文件菜单包含【新建】、【保存】、【关闭】以及【刷新】等命令,主要用于新项目的创建、保存以及关闭等操作。
(2)编辑菜单主要用于辅助程序设计代码设计工作、如代码的【复制】、【剪贴】和【粘贴】等。
(3)源代码菜单包含的命令都是和代码编写相关的,主要用于复制编程工作。
(4)重构菜单是Eclipse最为关键的菜单,主要包括对项目重构的相关命令,需重点掌握。
(5)项目菜单用于管理Eclipse中的项目,用于项目的打开与关闭、自动构建等操作。
(6)运行菜单包含了与程序运行和调试相关的各种操作,同时还具有保存运行和调试的记录功能。
(7)窗口菜单用于显示、隐藏或处理Eclipse中的各种视图和透视图。
4.Eclipse中创建Java项目在Eclipse中编写应用程序时,需要先创建一个项目。
Eclipse的多种项目中,其中Java 项目是用于管理和编写Java程序的。
(1)创建一个java项目(2)新建一个类文件5.在代码编辑器中编写并运行Java程序代码编辑器的使用技巧(1)自动导入程序中用到的类:Ctrl+Shift+O(2)自动补全代码:Alt+/Alt + / 具有代码提示、自动补全的功能能够帮助我们在开发的时候,如果忘了某个类的全名,只需要输入开头的几个字母,然后用alt+/出来就可以了,帮助实现快速开发的。

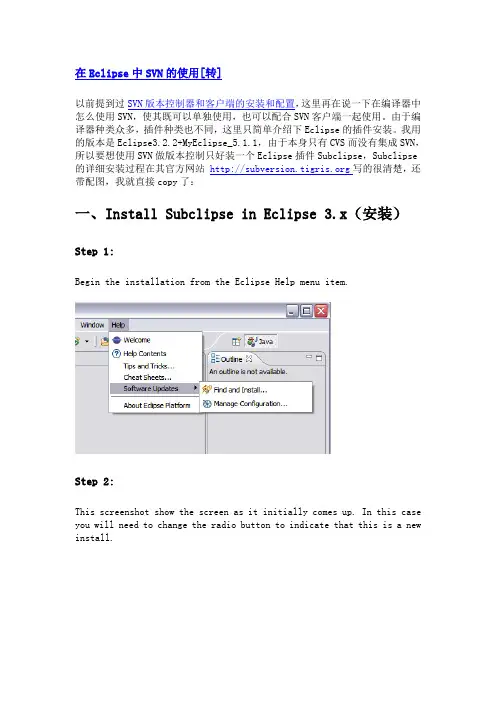
在Eclipse中SVN的使用[转]以前提到过SVN版本控制器和客户端的安装和配置,这里再在说一下在编译器中怎么使用SVN,使其既可以单独使用,也可以配合SVN客户端一起使用。
由于编译器种类众多,插件种类也不同,这里只简单介绍下Eclipse的插件安装。
我用的版本是Eclipse3.2.2+MyEclipse_5.1.1,由于本身只有CVS而没有集成SVN,所以要想使用SVN做版本控制只好装一个Eclipse插件Subclipse,Subclipse 的详细安装过程在其官方网站写的很清楚,还带配图,我就直接copy了:一、Install Subclipse in Eclipse 3.x(安装)Step 1:Begin the installation from the Eclipse Help menu item.Step 2:This screenshot show the screen as it initially comes up. In this case you will need to change the radio button to indicate that this is a new install.Step 3:This screen will vary depending on the features you have installed already. You want to click on the New Remote Site button. If you are behind a proxy and the Eclipse install mechanism does not work, then you can download a zipped version of the update site and then click the New Local Site button instead.Step 4:This screen is showing the New Remote Site dialog, filled in with the correct information to install SubclipseName: Subclipse 1.2.x (Eclipse 3.2+)URL: /update_1.2.xName: Subclipse 1.0.x (Eclipse 3.0/3.1)URL: /update_1.0.xStep 5:When you first come back to this screen, the site you added will NOT be selected. Be sure to select it before clicking Next.Step 6:This next screen shows all of the features that are available to install.Step 7:Click the button to accept the license agreement.Step 8:Confirm the install locationStep 9:There is an Eclipse preference to turn off this next dialog. I have never seen a signed feature. Not even nor IBM sign their features.Step 10:Just a screenshot of the in-process installation.Step 11:Eclipse needs to be restarted after installing Subclipse.Step 12:Finally, after restarting Eclipse, the first thing you will typically want to do is open the Subclipse Repository perspective where you can define your repositories. Be sure to also check the online help as well as the Subclipse preferences located under Team → SVN.OK到此你的插件已经安装完毕了,说明一下,在Step 5中选择的是在线安装,也可以在/servlets/ProjectDocumentList?folderID=91下载后进行本地安装,本地安装选择New Local Sit...,然后找到解压出来的那个文件夹,后面的都一样了。

eclipse可视化工具使用方法一、简介Eclipse是一款开源的集成开发环境(IDE),是Java开发最常用的工具之一。
它提供了丰富的功能和插件,使开发者能够更高效地编写、调试和管理代码。
本文将介绍如何使用Eclipse的可视化工具,以及如何充分利用这些工具提升开发效率。
二、安装与配置1. 下载Eclipse在Eclipse官网上下载最新版本的Eclipse安装包,并解压到本地目录。
2. 安装Eclipse打开解压后的文件夹,运行eclipse.exe。
首次运行Eclipse时,需要选择一个工作空间,用于存储项目文件。
3. 配置Eclipse在Eclipse的菜单栏中选择“Window”->“Preferences”,可以进行各种个性化配置。
- 在“General”->“Appearance”中,可以选择主题、字体和颜色等外观设置。
- 在“Java”->“Code Style”中,可以设置代码格式化规则,使代码更易读。
- 在“Java”->“Editor”->“Content Assist”中,可以配置代码自动补全功能。
- 在“Java”->“Build Path”中,可以添加外部库和设置编译路径。
三、常用可视化工具1. 导航视图(Package Explorer)导航视图显示项目的目录结构,可以方便地浏览和管理项目文件。
在Eclipse的左侧窗口中,找到“Package Explorer”选项卡。
2. 编辑器(Editor)编辑器是Eclipse的核心功能之一,用于编辑和查看代码。
在Eclipse的右侧窗口中,找到“Editor”选项卡。
可以在编辑器中输入代码,进行语法高亮、代码折叠等操作。
3. 调试器(Debugger)调试器可以帮助开发者在代码执行过程中进行调试和排错。
在Eclipse的底部窗口中,找到“Debug”选项卡。
可以设置断点、单步执行、查看变量的值等。
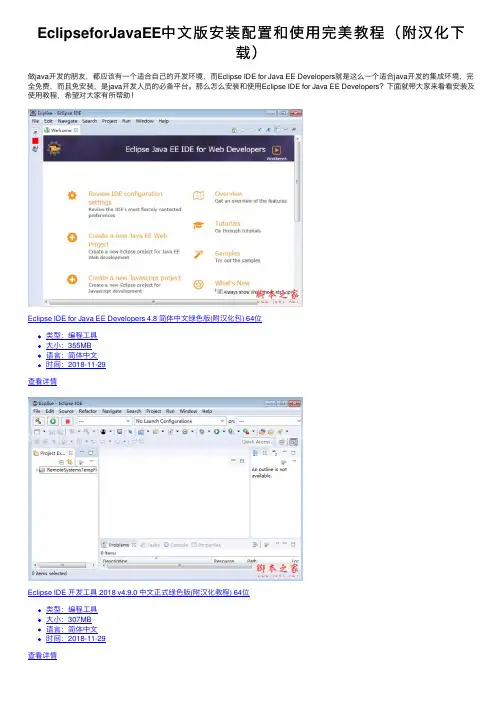
EclipseforJavaEE中⽂版安装配置和使⽤完美教程(附汉化下载)做java开发的朋友,都应该有⼀个适合⾃⼰的开发环境,⽽Eclipse IDE for Java EE Developers就是这么⼀个适合java开发的集成环境,完全免费,⽽且免安装,是java开发⼈员的必备平台。
那么怎么安装和使⽤Eclipse IDE for Java EE Developers?下⾯就带⼤家来看看安装及使⽤教程,希望对⼤家有所帮助!Eclipse IDE for Java EE Developers 4.8 简体中⽂绿⾊版(附汉化包) 64位类型:编程⼯具⼤⼩:355MB语⾔:简体中⽂时间:2018-11-29查看详情Eclipse IDE 开发⼯具 2018 v4.9.0 中⽂正式绿⾊版(附汉化教程) 64位类型:编程⼯具⼤⼩:307MB语⾔:简体中⽂时间:2018-11-29查看详情Eclipse IDE for Java EE Developers 4.8 Mars.1官⽅简体中⽂版类型:编程⼯具⼤⼩:343MB语⾔:简体中⽂时间:2018-11-29查看详情下载与安装1、,完全免费。
下载下来的是⼀个压缩包,⽆需安装,直接右键解压到当前⽂件夹,并且可以根据需要将加压后的⽂件放到其他位置。
2、设置桌⾯快捷⽅式将eclipse⽂件放置好后,打开eclipse⽂件,选择eclipse.exe,点击右键--->发送到--->桌⾯快捷⽅式。
但此时eclipse.exe是打不开的,接下来还需安装jdk搭建环境。
JDK安装与环境搭建1、JDK下载,根据电脑情况选择下载Java SE Development Kit(JDK1.8) 8u131 java8 64位 java运⾏库正式版类型:编程⼯具⼤⼩:196MB语⾔:简体中⽂时间:2017-04-21查看详情2、安装JDK双击打开安装程序根据提⽰⼀步⼀步安装,并记住安装位置3、开始搭建环境依次按照以下顺序右键我的电脑--->属性--->⾼级系统设置--->⾼级--->环境变量4、新建变量在系统变量中新建以下3个系统变量(以下全在英⽂状态下输⼊):填⼊变量名:JAVA_HOME变量值填jdk的具体安装路径(⽐如刚才的路径C:\Java\jdk1.8.0_102)同样新建变量名 CLASSPATH变量值 .;%JAVA_HOME%\lib\dt.jar;%JAVA_HOME%\lib\tools.jar;(注意最前⾯有个点)编辑Path变量名:Path变量值:%JAVA_HOME%\jre\bin;%JAVA_HOME%\bin(点击编辑在后⾯加上这个值)上⼀页12下⼀页阅读全⽂。
eclipse详细安装步骤和环境配置安装步骤:点击进⼊eclipse官⽹:找到对应软件点击下载1.右击“eclipse-jee-oxygen-R-win32-x86_64.zip”⽂件。
点击“解压到eclipse-jee-oxygen-R-win32-x86_64”。
2.根据系统类型选择安装,64位电脑安装“jdk-8u131-windows-x64_8.0.1310.11.exe”,32位电脑安装“jdk-8u131-windows-i586_8.0.1310.11” 。
3.点击“下⼀步”。
4.点击“公共JRE”,选择“此功能及所有⼦功能将安装在本地硬盘上”。
此软件为了好调⽤环境,不要更改安装路径。
5.等待安装。
6.点击更改选择安装路径,可在D盘或其它盘上,新建⼀个“java”⽂件夹。
选择安装路径后,点击“下⼀步”。
7.等待安装。
8.点击“关闭”。
9.配置JAVA运⾏环境。
右击“计算机”。
点击“属性”。
10.点击“⾼级系统设置”。
11.点击“⾼级”,再点击“环境变量”。
12.点击“新建”。
变量名输⼊“JAVA_HOME”,变量值输⼊JAVA软件安装路径。
步骤:第三步处的路径。
说明:双引号不要输⼊或复制到。
13.点击“新建”,变量名输⼊“CLASSPATH”变量值输⼊“.;%JAVA_HOME%\lib\dt.jar;%JAVA_HOME%\lib\tools.jar; ”。
说明:双引号不要输⼊或复制到。
14.在系统变量中找到“Path”,点击“编辑”。
在后⾯加⼊“ ;%JAVA_HOME%\bin ”。
说明:双引号不要输⼊或复制到。
15.同时按键盘上的“WIN键+R键”。
输⼊“cmd”。
点击确定。
16.输⼊“ java -version ”。
按⼀下“回车键”(Enter)。
出现⼀下⽂字说明安装成功。
如果出现其他⽂字。
说明安装失败,你可能需要从第11步重新配置。
17.双击“eclipse.exe”⽂件。
Copyright© Interacoustics A/S:版权所有。
本文档中的信息归 Interacoustics⅍专有。
本文档中的信息如有更改,恕不另行通知。
未经 Interacoustics A/S事先书面许可,不得以任何方式或手段复制或传播本文档的任何部分。
目录1简介 (1)1.1关于本手册 (1)1.2使用说明 (2)1.2.1预期的操作人员 (2)1.2.2患者人群 (2)1.2.3禁忌症 (2)1.3产品说明 (3)1.4警告 (4)1.5故障 (5)2开箱和安装 (6)2.1检查 (6)2.2标记 (7)2.3硬件安装 (8)2.3.1将病床 /椅子放在地上 (9)2.3.2Eclipse 后面板 (10)2.3.3Eclipse前部面板 (10)2.3.4前置放大器按钮 (11)2.4软件安装 (11)2.4.1安装前须知 (11)2.4.2计算机系统最低要求 (11)2.4.3所需材料: (12)2.4.4软件安装 (12)2.4.5驱动程序安装 (13)2.4.6恢复软件出厂默认设置 (13)2.4.7安装语言包 (13)2.5识读台 (15)2.6许可证 (15)2.6.1Eclipse序列号 (15)2.6.2DSP序列号和许可证密钥 (15)2.7从 OtoAccess® 数据库启动 (16)2.7.1OtoAccess® 数据库中的模块设置 (16)2.8从Noah启动(仅 ASSR 或 IA OAE Suite) (17)3EP15/EP25操作说明 (18)3.1记录标签 (19)3.1.1主菜单项 (19)3.1.2电子帮助 (20)3.1.3查看历史会话 (20)3.1.4协议选择 (20)3.1.5临时设置 (20)3.1.6重新排列曲线 (20)3.1.7波形分组 (20)3.1.8报告 (20)3.1.9打印 (21)3.1.10显示A-B曲线 (21)3.1.11显示对侧曲线 (21)3.1.12授话 (21)3.1.13单曲线显示 (21)3.1.14分屏显示 (22)3.1.15保存并新建 (22)3.1.16保存并退出 (22)3.1.17刺激率选择 (22)3.1.18频率选择 (23)3.1.19刺激窗口 (23)3.1.20手动刺激窗口 (23)3.1.21状态窗口 (23)3.1.22波形再现性 (24)3.1.23开始/停止 (24)3.1.24暂停 (24)3.1.25下一强度 (24)3.1.26Fmp与残留噪声曲线图 (24)3.1.27扫描数/平均数的扩展 (25)3.1.28原始EEG (25)3.1.29高级EEG (25)3.1.30隐藏刺激伪影 (26)3.1.31显示增益 (27)3.1.32记录窗口 (27)3.1.33选择波形 (27)3.1.34移动单条曲线 (27)3.1.35显示微分曲线 (27)3.1.36为波形增添一条注释 (28)3.1.37拒收监测 (29)3.1.38放置波形标记 (29)3.1.39删除波形标记 (29)3.1.40建议波形标记 (30)3.1.41标准化潜伏期数据 (30)3.1.42删除单条曲线 (30)3.1.43放大/缩小单条曲线 (30)3.1.44隐藏单条曲线 (31)3.1.45固定单条曲线/与历史会话进行比较 (31)3.1.46合并曲线(创建加总曲线) (31)3.1.47添加曲线 (32)3.1.48同侧减对侧差值(Ipsi-Contra)曲线 (32)3.1.49A减B差值(A-B(N))曲线 (32)3.1.50修改显示滤波 (33)3.1.51记录的曲线状况 (33)3.1.52向曲线添加备注 (33)3.1.53使用光标 (34)3.1.54信噪比计算(3:1) (34)3.1.55CR、RA和INC波形标记 (34)3.2潜伏期标签 (35)3.2.1潜伏期值 (35)3.2.2潜伏期间值 (35)3.2.3潜伏期曲线图 (36)3.2.4显示波峰至波谷标记(SN10标记)(仅EPx5软件) (37)3.3Windows® 8, 10 和 11 无法启动帮助 (37)3.4电脑快捷键 (38)3.5测试前患者准备 (39)3.5.1阻抗检查 (39)3.5.2换能器 (39)3.6进行ABR阈值记录 (40)3.6.1电极画面 (40)3.6.2ABR阈值刺激 (40)3.6.3编辑ABR阈值记录 (41)3.6.4使用ABR阈值结果说明 (41)3.7进行神经潜伏期记录 (42)3.7.1电极画面 (42)3.7.2编辑神经潜伏期记录 (42)3.8进行eABR记录 (44)3.8.1两个推荐eABR电极画面 (44)3.8.2编辑eABR记录 (44)3.8.3电气阈值估算(用于人工耳蜗安接) (45)3.9进行ECochG记录 (46)3.9.1ECochG 电极安装 (46)3.9.2编辑ECochG记录 (48)3.10进行CM记录 (49)针对患者的准备工作至关重要 (49)3.10.1CM电极画面 (49)3.10.2用于CM记录的刺激 (49)3.10.3CM记录示例 (49)3.10.4CM结果内差值 (49)3.11进行AMLR记录 (50)3.11.1电极画面AMLR示例 (50)3.11.2可用AMLR刺激 (50)3.11.3AMLR记录示例 (51)3.12进行ALR记录/皮层ERA (52)3.12.1ALR阈值记录的电极画面示例 (52)3.12.2刺激信号 (52)3.12.3ALR结果说明 (53)3.12.4电生理阈值估算和婴幼儿听力仪器安接 (53)3.13进行P300/MMN记录 (54)3.13.1P300/MMN电极画面示例 (54)3.13.2可用P300/MMN刺激 (54)3.13.3P300和MMN参数汇总表 (55)3.14性能/环回(LBK15)测试 (55)4VEMP操作说明 (56)4.1前置放大器设置 (56)4.2VEMP监示器 (56)4.3VEMP波形标记 (57)4.4计算VEMP不对称率(VEMP伙伴) (57)4.5VEMP比例设定 (58)4.6进行cVEMP记录 (58)4.6.1用于cVEMP的电极画面 (58)4.6.2用于cVEMP的刺激 (59)4.6.3默认收集参数 (59)4.6.4程序 (59)4.6.5编辑cVEMP结果 (59)4.6.6cVEMP结果示例 (60)4.6.7cVEMP结果示例 (60)4.7进行oVEMP记录 (61)4.7.1oVEMP电极画面 (61)4.7.2用于oVEMP的刺激 (61)4.7.3默认收集参数 (61)4.7.4程序 (62)4.7.5oVEMP结果示例 (62)5研究模块 (63)5.1.1记录每次扫描(以便以后进行“中继”) (63)5.1.2导出平均曲线和/或完整会话 (64)5.1.3导出会话(所有曲线) (65)5.1.4离线导出波形 (65)5.1.5导入用于刺激的波形文件 (65)6操作说明 (69)6.1耳塞的操作和选择 (69)6.2OAE 设备的日常系统检查 (70)6.2.1探头完整性测试 (70)6.2.2真耳检查 (71)7.IA OAE Suite (72)7.1PC 电源配置 (72)7.2兼容的设备 (72)7.2.1从 OtoAccess® 数据库启动 (72)7.2.2从 Noah 4 启动 (72)7.2.3模拟模式 (72)7.2.4崩溃报告 (73)7.3使用菜单 (74)7.4使用 DPOAE 探头 (75)7.4.1准备测试 (75)7.4.2DPOAE 模块中的元素 (77)7.5使用 TEOAE 模块 (83)7.5.1准备测试 (83)7.5.2TEOAE 模块中的元素 (85)7.6使用打印向导 (90)8.ABRIS操作说明 (92)8.1使用ABRIS模块 (92)8.2安装电极 (92)8.3阻抗检查 (92)8.4回路(LBK15)测试 (93)8.5ABRIS测试屏幕 (93)8.5.1主菜单项 (93)8.5.2查看历史会话 (94)8.5.3保存并退出 (94)8.5.4打印 (94)8.5.5电子帮助 (94)8.5.6报告 (94)8.5.7查看EEG或噪声条 (94)8.5.8刺激窗口 (94)8.5.9测试状态窗口 (95)8.5.10受试耳 (95)8.6进行ABRIS记录 (96)8.6.1开始与暂停测试 (96)8.6.2EEG曲线图 (96)8.6.3EEG噪声条 (96)8.6.4AEP波形 (96)8.6.5备注框 (96)8.6.6状态栏 (97)8.6.7ABRIS反应曲线 (97)8.7电脑快捷键 (98)8.8可拆卸零部件 (98)9.ASSR操作说明 (99)9.1使用ASSR模块 (99)9.2ASSR测试前准备 (99)9.3测试前准备 (99)9.3.1皮肤准备 (99)9.3.2放置电极 (100)9.3.3阻抗检查 (100)9.4安装电极 (101)9.5阻抗检查 (101)9.6系统性能/回路(LBK15)测试 (101)9.7ASSR标签 (102)9.7.1主菜单项 (102)9.7.2协议选择 (102)9.7.3临时设置 (103)9.7.4报告 (103)9.7.5打印 (103)9.7.6保存并退出 (103)9.7.7查看历史会话 (103)9.7.8刺激窗口 (103)9.7.9总会话状态窗口 (104)9.7.10刺激率 (104)9.8进行ASSR记录 (105)9.8.1开始/停止 (105)9.8.2暂停 (105)9.8.3原始EEG曲线图 (105)9.8.4测试频率曲线图 (105)9.8.5CM 检测器 (106)9.8.6ASSR表 (106)9.8.7延长测试时间 (107)9.8.8调整刺激强度 (107)9.8.9中止测试频率/强度 (108)9.8.10ASSR 遮蔽计算器 (108)9.9听力图标签 (110)9.9.1估计的听力图符号 (110)9.9.2NOAH 或 OtoAccess® 数据库中的听力符号 (111)9.9.3估算听力图 (112)9.9.4AC 和 BC 在同一听力图中 (113)9.9.5无反应 (114)9.9.6选定的校正系数 (114)9.9.7电脑快捷键 (114)10.维护 (115)10.1通用维护程序 (115)10.2如何清洁国际听力产品 (115)10.3清洁OAE探头尖 (116)10.4关于维修 (117)10.5保修 (117)11.技术规格 (119)11.1技术规格 - Eclipse硬件 (119)11.2EP15/EP25/VEMP技术规格 (120)11.2.1peSPL至nHL校正值 (122)11.3TEOAE25技术规格 (123)11.4DPOAE技术规格 (124)11.5ABRIS技术规格 (125)11.6ASSR技术规格 (126)11.7电磁兼容性(EMC) (127)11.8Eclipse软件模块概览 (132)11.8.1EP15/EP25/VEMP模块 (132)11.8.2P15/EP25/VEMP模块刺激最大强度 (133)11.8.3TEOAE25模块 (134)11.8.4DPOAE模块 (134)11.8.5ABRIS模块 (134)11.8.6ASSR模块 (134)1简介1.1 关于本手册本手册适用于EP15/25 v4.6软件版本、IA OAE套件1.2、ABRIS v1.6.3、VEMP v4.6和ASSR v 1.3。
简述使用eclipse开发java程序的基本步骤
1.安装eclipse:从官网下载eclipse安装程序,按照提示安装。
2. 创建java项目:打开eclipse,选择“File”菜单中的“New”-“Java Project”,输入项目名称和存储路径,点击“Finish”按钮创建项目。
3. 新建java类:在项目中右键点击“src”文件夹,选择“New”-“Class”,输入类名和包名,勾选“public static void main(String[] args)”选项,点击“Finish”按钮创建类。
4. 编写java代码:在新建的类中编写java代码。
5. 运行程序:点击“Run”菜单中的“Run”按钮或按下“Ctrl+F11”快捷键运行程序。
6. 调试程序:在代码中设置断点,点击“Debug”菜单中的“Debug”按钮或按下“F11”快捷键启动调试。
7. 导出程序:点击“File”菜单中的“Export”选项,选择“Java”-“Runnable JAR file”,按照提示设置导出选项,点击“Finish”
按钮导出程序。
以上是使用eclipse开发java程序的基本步骤,可以根据实际
需求进行扩展和优化。
- 1 -。
eclipse indigo的使用方法Eclipse Indigo是一个软件开发项目,专注于为高度集成的工具开发提供一个全功能的、具有商业品质的工业平台。
以下是一些关于Eclipse Indigo的基本使用方法:1. 安装Eclipse Indigo:首先,您需要下载并安装Eclipse Indigo。
可以从Eclipse官网下载最新版本的Indigo。
2. 创建Java项目:在Eclipse Indigo中,您可以创建一个新的Java项目。
选择“File” -> “New” -> “Java Project”,然后输入项目名称,即可创建一个新的Java项目。
3. 编写Java代码:在Eclipse Indigo中,您可以在Java项目中编写Java代码。
在编辑器中编写代码后,可以选择“Run” -> “Run”来运行代码。
4. 调试Java代码:Eclipse Indigo提供了强大的调试功能,可以帮助您调试Java代码。
可以在代码中设置断点,然后使用调试视图来查看变量的值和执行流程。
5. 创建Maven项目:如果您使用Maven进行项目管理,可以在Eclipse Indigo中创建一个新的Maven项目。
选择“File” -> “New” -> “Maven Project”,然后输入项目坐标,即可创建一个新的Maven项目。
6. 构建项目:在Eclipse Indigo中,可以使用Maven命令构建项目。
选择“Run” -> “Maven Build”,然后输入要构建的项目的坐标和要执行的命令,即可构建项目。
7. 导入现有项目:如果您已经有一个现有的Java或Maven项目,可以在Eclipse Indigo中导入该项目。
选择“File” -> “Import”,然后选择要导入的项目类型,即可导入现有项目。
以上是一些基本的使用方法,但Eclipse Indigo的功能非常强大,还有许多高级功能等待您去探索。
eclipse使用说明Eclipse 使用说明一、简介Eclipse 是一款功能强大且广泛使用的集成开发环境(IDE),可以用于开发各种类型的应用程序。
本文档将介绍如何安装、配置和使用 Eclipse,帮助你快速上手和提高开发效率。
二、安装2.1 系统要求在安装 Eclipse 前,请确保你的系统满足以下要求:- 操作系统:Windows、Mac 或 Linux- Java 运行环境:最新版本的 JDK(Java Development Kit)2.2 Eclipse在 Eclipse 官方网站()上最新版本的 Eclipse。
根据你的操作系统,选择相应的版本进行。
2.3 安装 Eclipse按照的安装包进行安装,并按照安装向导的提示进行操作。
选择合适的安装路径,完成安装过程。
三、配置3.1 设置工作区当首次启动 Eclipse 时,系统会提示你选择工作区。
工作区是Eclipse 存储你的项目和配置信息的地方。
选择一个适合的目录作为你的工作区,并“OK”按钮。
3.2 配置 JDK在 Eclipse 中,需要事先配置好 Java 运行环境(JRE 或JDK)。
打开 Eclipse 后,依次“Window”->“Preferences”->“Java”->“Installed JREs”,然后“Add”按钮,选择你的 JDK 安装路径,“OK”按钮保存配置。
3.3 添加插件Eclipse 支持通过安装插件的方式扩展功能。
“Help”->“Eclipse Marketplace”,在弹出的窗口中搜索你需要的插件,然后按照安装提示进行安装。
四、基本操作4.1 创建项目在 Eclipse 左侧的导航栏中,右键“Project Explorer”视图,选择“New”->“Java Project”,输入项目名称并“Finish”按钮。
4.2 编写代码在创建好的项目上,右键“src”目录,选择“New”->“Class”,输入类名和所在包名,并“Finish”按钮。
Nsight Eclipse Plugins Installation GuideNsight Eclipse Plugins Installation GuideTable of Contents Chapter 1. Introduction (1)1.1. Install plugins using Eclipse IDE (1)1.2. Uninstall plugins using Eclipse IDE (2)1.3. Install Using Script (3)Chapter 1.IntroductionThis guide provides the procedures to install the Nsight Eclipse Edition Plugins in users own eclipse environment.Nsight Eclipse Plugins offers full-featured IDE that provides an all-in-one integrated environment to edit, build, debug and profile CUDA-C applications.1.1. Install plugins using Eclipse IDE1.You can install Nsight Eclipse plugins in your own Eclipse environment or download andinstall Eclipse IDE for C/C++ developers.unch Eclipse and go to Help > Install New Software.. menu.3.Click on the Add Button4.Enter name (ex: NsightEE) in the Name field. Choose the the zipfile(com.nvidia.cuda.repo.zip) that contains the plugins using Archive button or Enter the full path of zip file. Nsight EE plugns zip file can be found in /usr/local/cuda-11.1/ nsightee_plugins directory.5.Click OK button6.Select “Cuda Main Features” option and go to next page.7.Accept the license agreement and click on Finish button to install the plugins.8.Click OK on the “Security Warning” dialog to ignore the warning message about unsignedcontent (This warning message is displayed for all the plugins that are not signed by).9.Restart eclipse when prompted.Nsight Eclipse plugins installation is now complete.Go to Help > Installation Details.. Menu to verify the “Cuda Developer Tools” and “Cuda Remote Launch” plugins are installed1.2. Uninstall plugins using Eclipse IDEunch Eclipse and go to Help > Installation Details menu.2.Select “Cuda Developer Tools” and “Cuda Remote Launch” options from the dialog3.Click on the Uninstall button.4.Click Finish button when asked to review and confirm.5.Restart eclipse when prompted.Nsight Eclipse plugins will be uninstalled after restarting eclipse. Go to Help > Installation Details.. menu to verify.1.3. Install Using ScriptTo install or uninstall the Nsight Eclipse Plugins using the script, run the installation script provided in the bin directory of the toolkit. By default, it is located in /usr/local/cuda-11.1/ bin:The usage of the script is as follows:Usage: ./nsight_ee_plugins_manage.sh <action> <eclipse_dir><action> : 'install' or 'uninstall'<eclipse_dir> : eclipse installation directoryTo install the Nsight Eclipse Plugins, run the following command:$ /usr/local/cuda-11.1/bin/nsight_ee_plugins_manage.sh install <eclipse_dir>To uninstall the Nsight Eclipse Plugins, run the following command:$ /usr/local/cuda-11.1/bin/nsight_ee_plugins_manage.sh uninstall <eclipse_dir>NoticeThis document is provided for information purposes only and shall not be regarded as a warranty of a certain functionality, condition, or quality of a product. NVIDIA Corporation (“NVIDIA”) makes no representations or warranties, expressed or implied, as to the accuracy or completeness of the information contained in this document and assumes no responsibility for any errors contained herein. NVIDIA shall have no liability for the consequences or use of such information or for any infringement of patents or other rights of third parties that may result from its use. This document is not a commitment to develop, release, or deliver any Material (defined below), code, or functionality.NVIDIA reserves the right to make corrections, modifications, enhancements, improvements, and any other changes to this document, at any time without notice. Customer should obtain the latest relevant information before placing orders and should verify that such information is current and complete.NVIDIA products are sold subject to the NVIDIA standard terms and conditions of sale supplied at the time of order acknowledgement, unless otherwise agreed in an individual sales agreement signed by authorized representatives of NVIDIA and customer (“Terms of Sale”). NVIDIA hereby expressly objects to applying any customer general terms and conditions with regards to the purchase of the NVIDIA product referenced in this document. No contractual obligations are formed either directly or indirectly by this document.VESA DisplayPortDisplayPort and DisplayPort Compliance Logo, DisplayPort Compliance Logo for Dual-mode Sources, and DisplayPort Compliance Logo for Active Cables are trademarks owned by the Video Electronics Standards Association in the United States and other countries.HDMIHDMI, the HDMI logo, and High-Definition Multimedia Interface are trademarks or registered trademarks of HDMI Licensing LLC.OpenCLOpenCL is a trademark of Apple Inc. used under license to the Khronos Group Inc.TrademarksNVIDIA and the NVIDIA logo are trademarks or registered trademarks of NVIDIA Corporation in the U.S. and other countries. Other company and product names may be trademarks of the respective companies with which they are associated.Copyright© -2020 NVIDIA Corporation. All rights reserved.NVIDIA Corporation | 2788 San Tomas Expressway, Santa Clara, CA 95051。
Eclipse TutorialFor Introduction to Java ProgrammingBy Y. Daniel LiangThis supplement covers the following topics:∙Getting Started with Eclipse∙Choosing a Perspective∙Creating a Project∙Creating a Java Program∙Compiling and Running a Java Program∙Run Java Applications from the Command Line∙Debugging in EclipseNOTE: To use this supplement with the text, youmay cover Sections 1 – 6 in this supplementafter Chapter 1 in the text, cover Section 7 inthis supplement after Chapter 2 in the text, andcover Section 8 in this supplement at thebeginning of Chapter 15 in the text.0 IntroductionThis tutorial is for students who are currently taking a Java course that uses Eclipse and for Java programmers who want to develop Java projects using Eclipse. Eclipse is an open source supported by IBM.You can use JDK command line utility to write Java programs. The JDK command line utility consists of a set of separate programs, such as compiler and interpreter, each of which is invoked from a command line. Besides the JDK command line utility, there are more than a dozen Java development tools on the market today, including Borland JBuilder, NetBeans, Sun ONE Studio (a commercial version of NetBeans), Eclipse, and WebGain Visual Café. These tools support an integrated development environment (IDE) for rapidly developing Java programs. Editing, compiling, building, debugging, andonline help are integrated in one graphical user interface. Using these tools effectively will greatly increase your programming productivity.This brief tutorial will help you to become familiarwith Eclipse. Specifically, you will learn how tocreate projects, create programs, compile, and runprograms.NOTE: Eclipse can run on any platform with a JavaVirtual Machine. The screen shots in the tutorialare taken from Windows using Eclipse 3.0. You candownload Eclipse from .INSTALLATION NOTE: You must install JDK 1.5before installing Eclipse. JDK 1.5 can bedownloaded from/j2se/1.5/download.html. TheWindows version of Eclipse 3.0 is contained in aZIP file named eclipse-SDK-3.0-win32.zip. Unzipthe file into c:\. All the files are nowcontained in c:\eclipse.1 Getting Started with EclipseAssume that you have installed Eclipse files in c:\eclipse. To start Eclipse, double-click on the eclipse icon in the c:\eclipse folder, as shown in Figure 1. The Workspace Launcher window now appears, as shown in Figure 2. Enterc:\smith in the Workspace field and click OK to display the Eclipse UI, as shown in Figure 3. (If the workspace already contains projects, the projects will be displayed in the UI.) Workspace is actually a directory that stores your project files.Figure 1You can start Eclipse by double-clicking the eclipseicon from the eclipse installation directory.Figure 2The Workspace Launcher lets you choose a directory tostore projects.Figure 3The Eclipse main window is the command center for theIDE.2 Choosing a PerspectiveA perspective defines the initial set and layout of views in the window. Perspectives control what appears in certain menus and toolbars. For example, a Java perspective contains the views that you would commonly use for editing Javasource files, while the Debug perspective contains the views you would use for debugging Java programs. You may switch perspectives, but you need to specify an initial perspective for a workspace.To create Java programs, set the Java perspective bychoosing Window, Open Perspective, Java from the main menu, as shown in Figure 4. The new UI is shown in Figure 5.Figure 4You need to set a perspective for the workspace.Figure 5The Eclipse UI is displayed according to theperspective.3 Creating a ProjectTo create a project, choose File, New, Project to display the New Project wizard, as shown in Figure 6. Select Java Project and click Next to display New Java Project wizard, as shown in Figure 7. Type myjavaprograms in the Project name field. As you type, the Directory field becomesc:\smith\myjavaprograms. Make sure that you selected the options Create project in workspace and Use project folder as root for sources and class files. Click Finish to create the project.Figure 6The Eclipse UI is displayed according to theperspective.Figure 7The Eclipse UI is displayed according to theperspective.4 Creating a ProgramNow you can create a program in the project by choosingFile, New, Class to display the New Java Class wizard, as shown in Figure 8. Type Welcome in the Name field. Check theoption public static void main(String[] args). Click Finish to generate the template for the source code Welcome.java, as shown in Figure 9.NOTE:You may use a package by entering a package namein the Package field in Figure 9. Since thesource code in the book does not use packages,the Package field is left blank to match thecode in the book.Figure 8The New Java Class wizard lets you create a new Javaclass.Figure 9The New Java Class wizard generates the template of Java source code.Type System.out.println(“Welcome to Java”); in the main method.NOTE: As you type, the code completionassistance may automatically come up to give yousuggestions for completing the code. Forinstance, when you type a dot (.) after Systemand pause for a second, Eclipse displays a popupmenu with suggestions to complete the code, asshown in Figure 10. You can then select theappropriate item from the menu to complete thecode.Figure 10The Code Completion popup menu is automaticallydisplayed to help you complete the code.5 Compiling and Running a ProgramBy default, your source code is dynamically compiled as you type. For example, if you forgot to type the semicolon (;)to end the statement, as shown in Figure 11, you will seethe red wriggly line in the editor pointing to the error. To run the program, right-click the class in the project to display a context menu, as shown in Figure 12. Choose Run, Java Application in the context menu to run the class. The output is displayed in the Console pane, as shown in Figure 13.Figure 11Eclipse dynamically checks syntax errors.Figure 12You can run the program from Eclipse.Figure 13The console pane displays the output to the console.6 Run Java Applications from the Command LineYou also can run program standalone directly from the operating system. Here are the steps in running the Welcome application from the DOS prompt.1. Start a DOS window by clicking the Windows Startbutton, Programs, MS-DOS Prompt in Windows.2. Type the following commands to set up the properenvironment variables for running Java programs in the DOS environment in Windows:set path=%path%;c:\j2sdk1.5\binset classpath=.;%classpath%3.Type cd c:\smith\myjavaprograms to change the directoryto c:\smith\myjavaprograms.4. Type java Welcome to run the program. A sample run ofthe output is shown in Figure 14.Figure 14You can run the Java program from the DOS prompt using the java command.NOTE: You can also compile the program using thejavac command at the DOS prompt, as shown inFigure 14.7 Debugging in EclipseThe debugger utility is integrated in Eclipse. You can pinpoint bugs in your program with the help of the Eclipse debugger without leaving the IDE. The Eclipse debugger enables you to set breakpoints and execute programs line by line. As your program executes, you can watch the values stored in variables, observe which methods are being called, and know what events have occurred in the program.To demonstrate debugging, Let us use Listing 2.9, ShowCurrentTime.java, to demonstrate debugging. Create a new class named ShowCurrentTime under c:\smith.7.1 Setting BreakpointsYou can execute a program line by line to trace it, but this is time-consuming if you are debugging a large program. Often, you know that some parts of the program work fine. It makes no sense to trace these parts when you only need to trace the lines of code that are likely to have bugs. In cases of this kind, you can use breakpoints.A breakpoint is a stop sign placed on a line of source code that tells the debugger to pause when this line is encountered. The debugger executes every line until it encounters a breakpoint, so you can trace the part of the program at the breakpoint. Using the breakpoint, you can quickly move over the sections you know work correctly and concentrate on the sections causing problems.There are several ways to set a breakpoint on a line. One quick way is to click the cutter of the line on which you want to put a breakpoint. You will see the line highlighted, as shown in Figure 15. You also can set breakpoints by choosing Run, Toggle Line Breakpoint. To remove abreakpoint, simply click the cutter of the line.As you debug your program, you can set as many breakpoints as you want, and can remove breakpoints at any time during debugging. The project retains the breakpoints you have set when you exit the project. The breakpoints are restored when you reopen it.Figure 15You can set breakpoints in the source code.7.2 Starting the DebuggerThere are several ways to start the debugger. A simple wayis shown below:1. Set a break point at the first statement in the mainmethod in the Source Editor.2. Right-click on ShowCurrentTime.java in the projectpane to display a context menu. Choose Debug, JavaApplication to start debugging. You will first seethe Confirm Perspective Switch dialog, as shown inFigure 16. Click Yes to switch to the Debugperspective. The UI for Debug perspective is shown inFigure 17.Figure 16To start debug, Eclipse needs to switch to the Debugperspective.Figure 17The debugger starts to run ShowCurrentTime.java.7.3 Controlling Program ExecutionThe program pauses at the first line in the main method.This line, called the current execution point, ishighlighted in green. The execution point marks the nextline of source code to be executed by the debugger.When the program pauses at the execution point, you canissue debugging commands to control the execution of the program. You also can inspect or modify the values ofvariables in the program.When Eclipse is in the debugging mode, the toolbar buttons for debugging are displayed in the Debug window, as shown in Figure 17. The toolbar button commands also appear in the Run menu (see Figure 18). Here are the commands forcontrolling program execution:∙Resume resumes the execution of a paused program.∙Suspend temporarily stops execution of a program.∙Terminate ends the current debugging session.∙Step Into executes a single statement or steps into a method.∙Step Over executes a single statement. If the statement contains a call to a method, the entire method isexecuted without stepping through it.∙Step Return executes all the statements in the current method and returns to its caller.∙Run to Line runs the program, starting from the current execution point, and pauses and places the executionpoint on the line of code containing the cursor, or ata breakpoint.Figure 18The debugging commands appear under the Debug menu.7.4 Examining and Modifying VariablesAmong the most powerful features of an integrated debuggeris its capability to examine the values of variables, array items, and objects, or the values of the parameters passedin a method call. You also can modify a variable value if you want to try a new value to continue debugging without restarting the program.To demonstrate it, choose Run, Step Over to execute one line in the source code, and you will see the value for totalMilliseconds in the Variables pane, as shown in Figure 19.Figure 19The value for variable totalMilliseconds is displayedin the Variable pane.To change the value in totalMilliseconds, double-click on totalMilliseconds to display the Set Value dialog box, as shown in Figure 20. You can now set a new value for totalMilliseconds.Figure 20The Set Value dialog box enables you to change thevalue for a variable.TIP:The debugger is an indispensable, powerful toolthat boosts your programming productivity. Itmay take you some time to become familiar withit, but the effort will pay off in the long run.Note:The debugger is not only a valuable tool forfinding errors, but it is also a valuablepedagogical tool for learning programming.Note:After finishing debugging, you may switch to theJava perspective by choosing Window, OpenPerspective, Java.8 Creating and Testing Java AppletsYou can create a Java applet in the same way you create a Java application. For example, you can create the WelcomeApplet class in Chapter 14, as shown in Figure 21.Figure 21Applets are created in the same way as applications. To run an applet, choose Run, Run As, Java Applet, as shown in Figure 22. Eclipse automatically creates an HTML file to contain the applet and invokes the appletviewer utility to run the applet, as shown in Figure 23.Figure 22Applets are created in the same way as applications.Figure 23The WelcomeApplet program runs from the applet viewer.。