SSD1963驱动
- 格式:pdf
- 大小:163.86 KB
- 文档页数:20
• 13•如今,人工智能成为新一轮技术革命和工业变化的核心力量,推动了传统工业的更新换代,各行各业均在积极向智能技术转变,服务行业也是如此。
传统点菜是依靠纯人工方式进行,造成了点餐效率低,服务体验质量差等问题。
因此,在智能化不断普及的背景下,服务行业进入智能服务机器人时代已经是大势所趋。
由于我国铁路的迅速发展,且具有方便、快捷、实惠等特点,使得铁路成为不少人出行的第一选择。
但是传统的铁路运输送餐模式选用人工推车式送餐,这种送餐模式效率低下,不仅不能实现随时点餐的需求而且容易因餐车体积庞大占据车厢过道而造成拥堵问题。
本文设计的餐车机器人将专门应用于铁路运输,其最大特点是缩小了传统餐车的体积,且操作灵活、运输平稳,能从根本上解决车厢拥堵问题,提高了旅客的乘车满意度。
同时,本产品的设计,实现了“随想随点、随点随做、随做随送”的一系列人性化服务,运用智能化服务模式取代人工服务模式,可以大大降低人为缘故的出错概率,有效提高服务质量和效率,更能满足旅客的用餐需求。
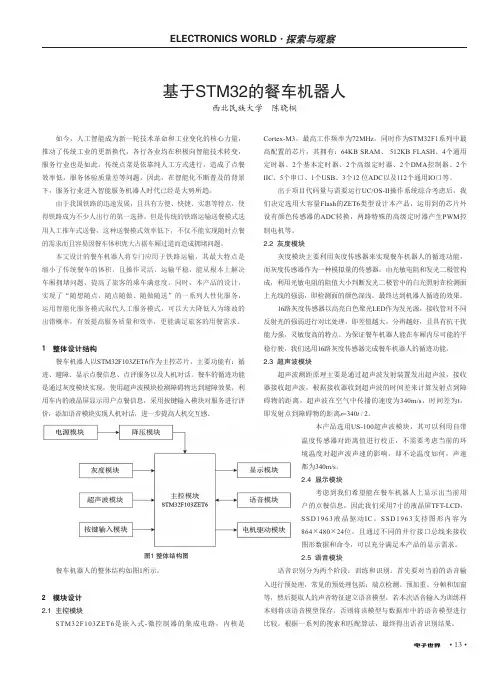
1 整体设计结构餐车机器人以STM32F103ZET6作为主控芯片,主要功能有:循迹、避障、显示点餐信息、点评服务以及人机对话。
餐车的循迹功能是通过灰度模块实现,使用超声波模块检测障碍物达到避障效果,利用车内的液晶屏显示用户点餐信息,采用按键输入模块对服务进行评价,添加语音模块实现人机对话,进一步提高人机交互感。
Cortex-M3,最高工作频率为72MHz 。
同时作为STM32F1系列中最高配置的芯片,其拥有:64KB SRAM 、 512KB FLASH 、4个通用定时器、2个基本定时器、2个高级定时器、2个DMA 控制器、2个IIC 、5个串口、1个USB 、3个12 位ADC 以及112个通用IO 口等。
出于项目代码量与需要运行UC/OS-II 操作系统综合考虑后,我们决定选用大容量Flash 的ZET6类型设计本产品,运用到的芯片外设有颜色传感器的ADC 转换,两路特殊的高级定时器产生PWM 控制电机等。
【STM32H7教程】第51章STM32H7的LTDC应⽤之LCD汉字显⽰和2D图形显⽰第51章 STM32H7的LTDC应⽤之LCD汉字显⽰和2D图形显⽰本章教程为⼤家讲解LTDC应⽤中最基本的汉字显⽰和2D图形显⽰功能实现。
51.1 初学者重要提⽰51.2 LCD相关的基础⽀持51.3 LCD硬件设计51.4 LCD驱动设计51.5 LCD板级⽀持包(bsp_ltdc_h7.c和bsp_tft_lcd.c)51.6 LCD的驱动移植和使⽤51.7 实验例程设计框架51.8 实验例程说明(MDK)51.9 实验例程说明(IAR)51.10 总结51.1 初学者重要提⽰1. 学习本章节前,务必优先学习第50章,需要对LTDC的基础知识和HAL库的⼏个常⽤API有个认识。
2. 本章的第4⼩节LCD驱动设计⾮常重要。
3. 如果⾃⼰观察的话,LCD上电会有⼀个瞬间⾼亮的问题,在此贴进⾏了描述:。
这个解决⽅案已经应⽤到本章配套的例⼦上。
4. 本章节⽤到的汉字⽅案会在下章专门为⼤家讲解,下⾯是⼩字库的制作⽅法:。
5. 测评STM32H7的LTDC+DMA2D性能,100Hz以上⽆压⼒,刷800*480图⽚和⾊块仅需2.6ms⼀张:。
6. 调试状态或者刚下载LCD的程序到H7⾥⾯,屏幕会抖动,这个是正常现象,之前F429就有这个问题,详情看此贴:。
51.2 LCD相关的基础知识51.2.1 显⽰屏相关知识显⽰屏的结构有必要给⼤家普及下,这⾥我们通过如下三种类型的显⽰屏进⾏说明,基本已经涵盖我们常⽤的⽅式了。
RA8875 + RGB接⼝裸屏⾸先RA8875是⼀个显⽰屏控制器,⾃带显存,它的作⽤就是让不⽀持RGB接⼝的MCU也可以使⽤RGB接⼝的⼤屏。
这起到了⼀个桥接的作⽤,可以将RGB接⼝屏转换成8080总线接⼝、SPI接⼝或者I2C接⼝⽅式。
这种情况下,甚⾄低速的51单⽚机都可以外接⼤屏了。
另外像SSD1963也是同样的作⽤。
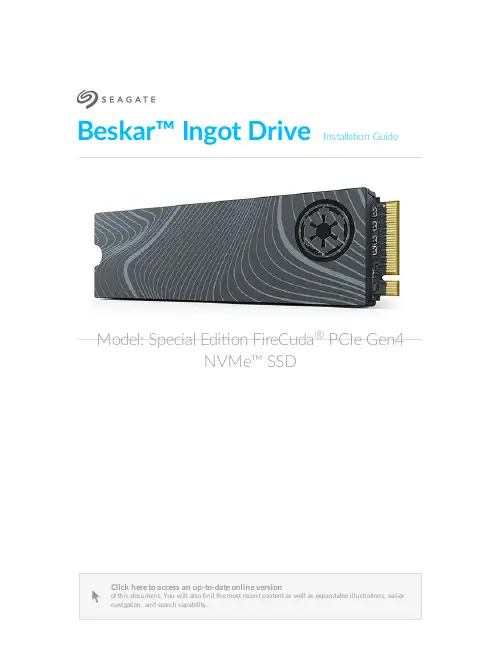
Beskar™ Ingot Drive Installation GuideClick here to access an up-to-date online version of this document. You will also find the most recent content as well as expandable illustrations, easiernavigation, and search capability.Model: Special Edi on FireCuda PCIe Gen4NVMe™ SSD ®. . . . . . . . . . . . . . . . . . . . . . . . . . . . . . . . . . . . . . . . . . . . . . . . . . . . . . . . . . . . . . . . . . . . . . . . . . . . . . . . . . . . . . . .. . . . . . . . . . . . . . . . . . . . . . . . . . . . . . . . . . . . . . . . . . . . . . . . . . . . . . . . . . . . . . . . . . . . . . . . . . . . . . . . . . . . . . . . . . . . . . . . . . . . . . . . . . . . . . . . . . . . . . . . . .. . . . . . . . . . . . . . . . . . . . . . . . . . . . . . . . . . . . . . . . . . . . . . . . . . . . . . . . . . . . . . . . . . . . . . . . . . . . . . . . . . . . . . . . . . . . . . . . . . . . . . . . . . . . . . . . . . . . . . . . . .. . . . . . . . . . . . . . . . . . . . . . . . . . . . . . . . . . . . . . . . . . . . . . . . . . . . . . . . . . . . . . . . . . . . . . . . . . . . . . . . . . . . . . . . . . . . . . . . . . . . . . . . . . . . . . . . . . . . . . . . . .. . . . . . . . . . . . . . . . . . . . . . . . . . . . . . . . . . . . . . . . . . . . . . . . . . . . . . . . . . . . . . . . . . . . . . . . . . . . . . . . . . . . . . . . . . . . . . . . . . . . . . . . . . . . . . . . . . . . . . . . . .. . . . . . . . . . . . . . . . . . . . . . . . . . . . . . . . . . . . . . . . . . . . . . . . . . . . . . . . . . . . . . . . . . . . . . . . . . . . . . . . . . . . . . . . . . . . . . . . . . . . . . . . . . . . . . . . . . . . . . . . . . . . . . . . . . . . . . . . . . . . . . . . . . . . . . . . . . . . . . . . . . . . . . . . . . . . . . . . . . . . . . . . . . . . . . . . . . . . . . . . . . . . . . . . . . . . .. . . . . . . . . . . . . . . . . . . . . . . . . . . . . . . . . . . . . . . . . . . . . . . . . . . . . . . . . . . . . . . . . . . . . . . . . . . . . . . . . . . . . . . . . . . . . . . . . . . . . . . . . . . . . . . . . . . . . . . . . . . . . . . . . . . . . . . . . . . . . . . . . . . . . . . . . . . . . . . . . . . . . . . . . . . . . . . . . . . . . . . . . . . . . . . . . . . . . . . . . . . . . . . . . . . . .. . . . . . . . . . . . . . . . . . . . . . . . . . . . . . . . . . . . . . . . . . . . . . . . . . . . . . . . . . . . . . . . . . . . . . . . . . . . . . . . . . . . . . . . . . . . . . . . . . . . . . . . . . . . . . . . . . . . . . . . . .. . . . . . . . . . . . . . . . . . . . . . . . . . . . . . . . . . . . . . . . . . . . . . . . . . . . . . . . . . . . . . . . . . . . . . . . . . . . . . . . . . . . . . . . . . . . . . . . . . . . . . . . . . . . . . . . . . . . . . . . . .. . . . . . . . . . . . . . . . . . . . . . . . . . . . . . . . . . . . . . . . . . . . . . . . . . . . . . . . . . . . . . . . . . . . . . . . . . . . . . . . . . . . . . . . . . . . . . . . . . . . . . . . . . . . . . . . . . . . . . . . . .. . . . . . . . . . . . . . . . . . . . . . . . . . . . . . . . . . . . . . . . . . . . . . . . . . . . . . . . . . . . . . . . . . . . . . . . . . . . . . . . . . . . . . . . . . . . . . . . . . . . . . . . . . . . . . . . . . . . . . . . . .. . . . . . . . . . . . . . . . . . . . . . . . . . . . . . . . . . . . . . . . . . . . . . . . . . . . . . . . . . . . . . . . . . . . . . . . . . . . . . . . . . . . . . . . . . . . . . . . . . . . . . . . . . . . . . . . . . . . . . . . . .. . . . . . . . . . . . . . . . . . . . . . . . . . . . . . . . . . . . . . . . . . . . . . . . . . . . . . . . . . . . . . . . . . . . . . . . . . . . . . . . . . . . . . . . . . . . . . . . . . . . . . . . . . . . . . . . . . . . . . . . . .. . . . . . . . . . . . . . . . . . . . . . . . . . . . . . . . . . . . . . . . . . . . . . . . . . . . . . . . . . . . . . . . . . . . . . . . . . . . . . . . . . . . . . . . . . . . . . . . . . . . . . . . . . . . . . . . . . . . . . . . . .Contents1Introduction Recommendations Precautions Parts System Requirements 2Installation Install Beskar™ Ingot Drive 3Support & Services SeaTools DiscWizard Firmware download and tools download for secure erase Internal SSD support Online support and services Warranty support Data recovery services Seagate Partner Program . . . . . . . . . . . . . . . . . . . . . . . . . . . . . . . . . . . . . . . . . . . . . . . . . . . . . . . . . . . . . . . . . . . . . . . . . . . . . . . . . . . . . . . . . . . . . . . . . . . . . . . . . . . . . . . . . . Before installation 33334455777777778Introduc on Recommenda ons Intended for desktop PCs.Beskar™ Ingot Drive's heatsink is pre-installed and should not be removed as it can damage the SSD.With the heatsink, the product exceeds standard M.2 dimensions. Dimensions of the Beskar™Ingot Drive are 80.15mm (L) x 22.9mm (W) x 18.25mm (H). Verify that your system provides enough space for installation.M.2 connectors H3.2 and above are recommended for an SSD with a heatsink.For optimal performance, provide sufficient airflow and cooling.Before installa onMost motherboards have more than one M.2 slot available for SSD drives. Before installing Beskar™ Ingot Drive:Determine the appropriate M.2 slot on your motherboard for Beskar™ Ingot Drive. If another SSD drive is already installed in the slot, you'll need to remove it during the installation.Decide whether you want to install your computer operating system on Beskar™ Ingot Drive and use it as your primary drive. See your computer or motherboard documentation for details on how to boot from an M.2 SSD.If you need to transfer files from another drive to Beskar™ Ingot Drive, consider how you will move your data or clone your drive before starting the installation.For optimal performance, it's recommended you use an M.2 PCIe Gen4x4 slot. Refer to yourmotherboard user manual.Precau ons Unpack the SSD.Inspect the SSD for any damages.For the safety of your SSD, please take the necessary precautions to avoid electrostatic discharge.Power down and power drain your computer according to the instructions provided in the computer product documentation.Back up the data from the existing storage device.IMPORTANTMake certain your computer's BIOS is up to date before installing Beskar™ Ingot Drive. See your computer or motherboard documentation for information on how to access theBIOS.PartsBeskar™ Ingot Drive System RequirementsM.2 (M key) slot, PCIe Gen4×4 interface (backwards compatible with PCIe Gen3 interface)Windows 10 or higherCAUTIONElectrostatic discharge (ESD) can damage the SSD. Make sure that you install the SSD at an ESD-safe workstation. Ground yourself to protect the device from any static electricitypresent in your body.®®Installa onInstall Beskar™ Ingot Drive1. Before installing Beskar™ Ingot Drive, power down your computer and unplug any cables attached to it.2. Open the case or cabinet.3. If an existing SSD drive is installed in the M.2 PCIe slot you intend to use for Beskar™ Ingot Drive, you'llneed to remove it.4. Power on your computer.5. Access the BIOS setup while the computer is booting. Ensure that a PCIe device is set in the BIOS bootsequence or boot priority list.6. Power down the computer and locate the M.2 PCIe slot on your motherboard.Note—Some motherboards have a pad installed in the M.2_PAD space by default.This pad can be removed to ensure a better fit for Beskar™ Ingot Drive.7. Check to make sure that the notch on Beskar™ Ingot Drive is correctly aligned with the divider in the slot.Gently push SSD into the slot until it's firmly seated.8. Hold down Beskar™ Ingot Drive while you fasten the mounting screw. Make sure the SSD is secured inplace.9. Close the case or cabinet and reassemble your computer.10. Power on your computer.11. Install the computer operating system on Beskar™ Ingot Drive if you want to use it as the primary drive.Support & ServicesSeaT oolsSeaTools™ SSD GUI is a free utility that lets you monitor and maintain your drive’s health, status, and tests. Go to /support/downloads/seatools.DiscWizardSeagate DiscWizard is an integrated software suite that lets you back up your operating system, applications, settings, and files, while also securely destroying confidential data you no longer need. Go to/support/downloads/discwizard.Firmware download and tools download for secure eraseGo to /support/downloads.Internal SSD supportGo to /support/products.Online support and servicesGo to /contacts.Warranty supportGo to /support/warranty-and-replacements.Data recovery servicesGo to /services-software/seagate-recovery-services/recover.Seagate Partner ProgramSeagate Partner Program Go to /partners.。
基于SSD1963控制器的液晶显示模块设计赵彩虹;刘凯;尹涓【摘要】为了满足嵌入式工业控制系统终端显示的需要,提出了一种基于微处理器R1610和LCD控制器SSD1963的液晶显示模块的设计方法;详细阐述了硬件接口电路的设计和控制软件的编程,重点介绍了R1610、SSD1963以及TFT液晶屏AT070TN83之间的硬件连接方法,分析了SSD1963液晶控制的使用方法以及针对液晶屏显示时序的系统设置;进行了显示控制测试,通过该显示模块实现了图像在液晶屏上的显示;测试结果表明,硬件设计和控制软件设计能够满足显示要求,显示效果良好;文章提出的显示模块设计方法同样适用于其他液晶屏的显示控制,具有一定的应用前景和参考价值.【期刊名称】《计算机测量与控制》【年(卷),期】2015(023)011【总页数】3页(P3797-3799)【关键词】SSD1963;液晶显示模块;R1610;AT070TN83【作者】赵彩虹;刘凯;尹涓【作者单位】南京航空航天大学金城学院机电工程系,南京211156;南京航空航天大学机电学院,南京210016;南京航空航天大学金城学院机电工程系,南京211156【正文语种】中文【中图分类】TN141.9液晶显示模块应用于人机交互过程中的文本及图形信息的显示[1]。
嵌入式工业控制系统中要求实时显示运行状态、系统参数以及相关图表图形等信息,采用液晶屏显示模块作为终端显示设备,显示内容丰富,直观性强[2]。
本文基于金丽科技公司(RDC)的X86系列的微处理器R1610和晶门科技公司(SolomonSystech)的SSD1963液晶显示控制器,采用群创公司(Innolux)的AT070TN83液晶屏,进行相关硬件电路和控制软件的设计,实现液晶屏的图形显示功能。
液晶显示模块结构框图如图1所示。
系统控制器采用微处理器控制,把系统信息以文本、图表的形式发送至LCD控制器;LCD控制器根据接收到的显示指令,通过LCD驱动器,以一定的扫描时序将需要显示的内容传输给液晶屏实时地进行显示。
第十八章TFTLCD显示实验上一章我们介绍了OLED模块及其显示,但是该模块只能显示单色/双色,不能显示彩色,而且尺寸也较小。
本章我们将介绍ALIENTEK 2.8寸TFT LCD模块,该模块采用TFTLCD 面板,可以显示16位色的真彩图片。
在本章中,我们将使用探索者STM32F4开发板上的LCD接口,来点亮TFTLCD,并实现ASCII字符和彩色的显示等功能,并在串口打印LCD 控制器ID,同时在LCD上面显示。
本章分为如下几个部分:18.1 TFTLCD & FSMC简介18.2 硬件设计18.3 软件设计18.4 下载验证18.1 TFTLCD&FSMC简介本章我们将通过STM32F4的FSMC接口来控制TFTLCD的显示,所以本节分为两个部分,分别介绍TFTLCD和FSMC。
18.1.1 TFTLCD简介TFT-LCD即薄膜晶体管液晶显示器。
其英文全称为:Thin Film Transistor-Liquid Crystal Display。
TFT-LCD与无源TN-LCD、STN-LCD的简单矩阵不同,它在液晶显示屏的每一个象素上都设置有一个薄膜晶体管(TFT),可有效地克服非选通时的串扰,使显示液晶屏的静态特性与扫描线数无关,因此大大提高了图像质量。
TFT-LCD也被叫做真彩液晶显示器。
上一章介绍了OLED模块,本章,我们给大家介绍ALIENTEK TFTLCD模块,该模块有如下特点:1,2.4’/2.8’/3.5’/4.3’/7’ 5种大小的屏幕可选。
2,320×240的分辨率(3.5’分辨率为:320*480,4.3’和7’分辨率为:800*480)。
3,16位真彩显示。
4,自带触摸屏,可以用来作为控制输入。
本章,我们以2.8寸(其他3.5寸/4.3寸等LCD方法类似,请参考2.8的即可)的ALIENTEK TFTLCD模块为例介绍,该模块支持65K色显示,显示分辨率为320×240,接口为16位的80并口,自带触摸屏。
50次初恋:硬盘驱动器诞生50周年回顾1956~1980:主机时代打造成型现在回过头来看,1980年以前的硬盘驱动器行业颇有些像农业社会:IBM、CDC(Contral Data Corporation,控制数据公司)、DEC、Honeywell、Memorex等大型计算机公司处于绝对的主导地位,他们自己开发生产硬盘驱动器,供自己的大型主机或小型机消费,典型的自给自足。
由于个人计算机行业尚未形成,小型的硬盘驱动器公司只能在缝隙市场求生存。
在这20多年间,IBM对硬盘驱动器技术发展的贡献可以说是居功至伟:不仅发明了硬盘驱动器,更亲手一步步完善其结构,从最初的雏形阶段发展出现代硬盘驱动器的全部主要特征,是当之无愧的“硬盘驱动器之父”。
表1:主机时代硬盘驱动器发展的里程碑RAMAC的误读每个对硬盘历史稍有了解的人都知道世界上第一台硬盘驱动器是IBM在1956年推出的RAMAC——统计控制随机存取方法(Random Access Method of Accounting Control)的缩写。
但是,在其全称上存在着一定的分歧:一说是IBM 305 RAMAC,一说是IBM 350 RAMAC。
究竟是305,还是350?305 RAMAC是一套计算机系统,红色圆圈中是两台350 Disk File其实,305和350都有道理。
确切地说,IBM在1956年9月13日推出的305 RAMAC是第一台采用磁盘驱动器的计算机,而其所用的磁盘驱动器名为IBM 350 Disk File。
换言之,世界上第一款硬盘驱动器的名字应该是IBM350 Disk File,系305 RAMAC的一个组成部分,可单独或成对使用(如上图)。
有人用IBM 350 RAMAC Disk File 来称呼,时间长了漏掉“Disk File”,就被误读成IBM 350 RAMAC。
350 Disk File,305 RAMAC的磁盘驱动器在305 RAMAC之前的计算机的存储由核心内存、磁带和磁鼓组成,而磁盘的出现代替了磁鼓。

GED1963系列——低压差线性稳压器1.产品特性◆输出电流:1.5A◆压差电压:300mV◆低噪声:40μV RMS◆1mA的静态电流◆无需保护二极管◆固定输出电压:1.5V、1.8V、2.5V、3.3V◆可调输出电压:1.33V to 20V◆电池反接保护◆无反向电流◆过热保护◆塑封3-Lead SOT-223,8-Lead SO◆可兼容LT1963系列产品◆工作温度范围:-40℃~125℃◆质量等级:工业级(I)2.产品应用◆提供逻辑电源◆开关电源的后置稳压器3.产品概述GED1963电路是低压差稳压器,用于产生一个稳定电压源,固定输出 1.5V、1.8V、2.5V、3.3V,可调输出电压 1.33V-20V,压差电压为300mV时可提供 1.5A的电流,静态工作电流小于1mA。
GED1963可使用最小10uF的输出电容,芯片具有电池反接保护、过流保护、过热保护和电流反接保护等特性。
GED1963采用SOT-223和8-Lead SO塑料封装。
4.典型应用图4-1 GED1963系列的典型应用电路C1为输入电容,一般使用10uF陶瓷电容,C2为输出电容,一般使用10uF钽电容,若使用陶瓷电容需要增加相应的ESR电阻,详见9.3节。
5.绝对最大额定值IN脚电压……………………………………………………………………………±20VOUT脚电压…………………………………………………………………………-0.6V,20V输入输出压差…………………………………………………………………………±20VADJ脚电压…………………………………………………………………………±7VSHDN脚电压………………………………………………………………………±20V工作结温范围(注2)………………………………………………………………-40℃~+125℃储存温度范围…………………………………………………………………………-65℃~+150℃引脚温度(焊接,10秒)……………………………………………………………300℃注1:列表中数值是绝对最大额定值,任何超过这些值的情况,可能对器件造成永久损害。
SSD1963初始化/************************************************************** ** mili开发板** LCD驱动代码** 版本:V1.0** 论坛:/doc/9e18679214.html,** 淘宝:/doc/9e18679214.html,/** 技术支持群:105339839*************************************************************** //* Includes ------------------------------------------------------------------*/#include "stm32f10x.h"#include "hardware.h"#include "ili932x.h"#include "font.h"#includeunsigned int HDP=479;unsigned int HT=531;unsigned int HPS=43;unsigned int LPS=8;unsigned char HPW=10;unsigned int VDP=271;unsigned int VT=288;unsigned int VPS=12;unsigned int FPS=4;unsigned char VPW=10;u32 POINT_COLOR = BLUE,BACK_COLOR = WHITE; /* 分别设置点的颜色和底色 *//******************************************** 函数名:LCD_GPIO_Config* 描述:根据FSMC配置LCD的I/O*********************************************/void LCD_GPIO_Config(void){GPIO_InitTypeDef GPIO_InitStructure;/* 使能FSMC时钟*/RCC_AHBPeriphClockCmd(RCC_AHBPeriph_FSMC, ENABLE);/* 使能FSMC对应相应管脚时钟 D E */RCC_APB2PeriphClockCmd(RCC_APB2Periph_GPIOC|RCC_AP B2Periph_GPIOD|RCC_APB2Periph_GPIOE,ENABLE);GPIO_InitStructure.GPIO_Mode = GPIO_Mode_Out_PP;GPIO_InitStructure.GPIO_Speed = GPIO_Speed_50MHz;/* 配置LCD背光控制管脚*/GPIO_InitStructure.GPIO_Pin = GPIO_Pin_8;GPIO_Init(GPIOC, &GPIO_InitStructure);/* 配置FSMC相对应的数据线,FSMC-D0~D15: PD 14 15 0 1,PE 7 8 9 10 11 12 13 14 15,PD 8 9 10*/GPIO_InitStructure.GPIO_Speed = GPIO_Speed_50MHz;GPIO_InitStructure.GPIO_Mode = GPIO_Mode_AF_PP;GPIO_InitStructure.GPIO_Pin = GPIO_Pin_0 | GPIO_Pin_1 | GPIO_Pin_8 | GPIO_Pin_9 |GPIO_Pin_10 | GPIO_Pin_14 | GPIO_Pin_15;GPIO_Init(GPIOD, &GPIO_InitStructure);GPIO_InitStructure.GPIO_Pin = GPIO_Pin_7 | GPIO_Pin_8 | GPIO_Pin_9 | GPIO_Pin_10 |GPIO_Pin_11 | GPIO_Pin_12 | GPIO_Pin_13 | GPIO_Pin_14 |GPIO_Pin_15;GPIO_Init(GPIOE, &GPIO_InitStructure);/* 配置FSMC相对应的控制线* PD4-FSMC_NOE :LCD-RD* PD5-FSMC_NWE :LCD-WR* PD7-FSMC_NE1 :LCD-CS* PD11-FSMC_A16 :LCD-DC*/GPIO_InitStructure.GPIO_Pin = GPIO_Pin_4;GPIO_Init(GPIOD, &GPIO_InitStructure);GPIO_InitStructure.GPIO_Pin = GPIO_Pin_5;GPIO_Init(GPIOD, &GPIO_InitStructure);GPIO_InitStructure.GPIO_Pin = GPIO_Pin_7;GPIO_Init(GPIOD, &GPIO_InitStructure);GPIO_InitStructure.GPIO_Pin = GPIO_Pin_11 ;GPIO_Init(GPIOD, &GPIO_InitStructure);/* TFT control gpio init *///GPIO_SetBits(GPIOC, GPIO_Pin_10); // 背光打开GPIO_SetBits(GPIOD, GPIO_Pin_4); // RD = 1GPIO_SetBits(GPIOD, GPIO_Pin_5); // WR = 1GPIO_SetBits(GPIOD, GPIO_Pin_7); // CS = 1}/******************************************** 函数名:LCD_FSMC_Config* 描述:LCD FSMC 模式配置*********************************************/void LCD_FSMC_Config(void){FSMC_NORSRAMInitTypeDef FSMC_NORSRAMInitStructure;FSMC_NORSRAMTimingInitTypeDef p;p.FSMC_AddressSetupTime = 0x02; //地址建立时间p.FSMC_AddressHoldTime = 0x00; //地址保持时间p.FSMC_DataSetupTime = 0x05; //数据建立时间p.FSMC_BusTurnAroundDuration = 0x00;p.FSMC_CLKDivision = 0x00;p.FSMC_DataLatency = 0x00;p.FSMC_AccessMode = FSMC_AccessMode_B;// 一般使用模式B来控制LCDFSMC_NORSRAMInitStructure.FSMC_Bank = FSMC_Bank1_NORSRAM1;FSMC_NORSRAMInitStructure.FSMC_DataAddressMux = FSMC_DataAddressMux_Disable;FSMC_NORSRAMInitStructure.FSMC_MemoryType = FSMC_MemoryType_NOR;FSMC_NORSRAMInitStructure.FSMC_MemoryDataWidth = FSMC_MemoryDataWidth_16b;FSMC_NORSRAMInitStructure.FSMC_BurstAccessMode = FSMC_BurstAccessMode_Disable;FSMC_NORSRAMInitStructure.FSMC_WaitSignalPolarity = FSMC_WaitSignalPolarity_Low;FSMC_NORSRAMInitStructure.FSMC_WrapMode = FSMC_WrapMode_Disable;FSMC_NORSRAMInitStructure.FSMC_WaitSignalActive = FSMC_WaitSignalActive_BeforeWaitState;FSMC_NORSRAMInitStructure.FSMC_WriteOperation = FSMC_WriteOperation_Enable;FSMC_NORSRAMInitStructure.FSMC_WaitSignal = FSMC_WaitSignal_Disable;FSMC_NORSRAMInitStructure.FSMC_ExtendedMode = FSMC_ExtendedMode_Disable;FSMC_NORSRAMInitStructure.FSMC_WriteBurst = FSMC_WriteBurst_Disable;FSMC_NORSRAMInitStructure.FSMC_ReadWriteTimingStruct = &p;FSMC_NORSRAMInitStructure.FSMC_WriteTimingStruct = &p;FSMC_NORSRAMInit(&FSMC_NORSRAMInitStructure);/* 使能 FSMC Bank1_SRAM Bank */FSMC_NORSRAMCmd(FSMC_Bank1_NORSRAM1, ENABLE);}/************************************************************** ***************** 函数名称: LCD_Write_Reg** 功能描述: 写指令及数据** 作者: Dream** 日期: 2010年12月06日*************************************************************** **************/void LCD_WriteReg(uint16_t LCD_Reg,uint16_t LCD_Dat){Write_Cmd(LCD_Reg);Write_Dat(LCD_Dat);}/************************************************************** ***************** 函数名称: Write_Cmd** 功能描述: 写指令** 作者: Dream** 日期: 2010年12月06日*************************************************************** **************/void Write_Cmd(uint16_t LCD_Reg){// LCD_CS = 0;// LCD_RS = 0;// GPIOC->ODR = (GPIOC->ODR&0xff00)|(LCD_Reg&0x00ff);// GPIOB->ODR = (GPIOB->ODR&0x00ff)|(LCD_Reg&0xff00);// LCD_WR = 0;// LCD_WR = 1;// LCD_CS = 1;((*(__IO u16 *) (Bank1_LCD_C)) = ((u16) LCD_Reg));}/************************************************************** ***************** 函数名称: Write_Dat**功能描述: 写数据** 作者: Dream** 日期: 2010年12月06日*************************************************************** **************/void Write_Dat(uint16_t LCD_Dat){// LCD_CS = 0;// LCD_RS = 1;// GPIOC->ODR = (GPIOC->ODR&0xff00)|(LCD_Dat&0x00ff);// GPIOB->ODR = (GPIOB->ODR&0x00ff)|(LCD_Dat&0xff00);// LCD_WR = 0;// LCD_WR = 1;// LCD_CS = 1;((*(__IO u16 *) (Bank1_LCD_D)) = ((u16)(LCD_Dat)));}/************************************************************** ***************** 函数名称: LCD_ReadReg** 功能描述: 读指令** 作者: Dream** 日期: 2010年12月06日*************************************************************** **************/uint16_t LCD_ReadReg(uint16_t LCD_Reg){// uint16_t temp;// Write_Cmd(LCD_Reg); //写入要读的寄存器号//// GPIOB->CRH = (GPIOB->CRH & 0x00000000) | 0x44444444; //将端口高8位配置成输入// GPIOC->CRL = (GPIOC->CRL & 0x00000000) | 0x44444444; //将端口低8位配置成输入// LCD_CS = 0;// LCD_RS = 1;// LCD_RD = 0;// temp = ((GPIOB->IDR&0xff00)|(GPIOC->IDR&0x00ff)); //读取数据(读寄存器时,并不需要读2次)// LCD_RD = 1;// LCD_CS = 1;// GPIOB->CRH = (GPIOB->CRH & 0x00000000) | 0x33333333; //释放端口高8位为输出// GPIOC->CRL = (GPIOC->CRL & 0x00000000) | 0x33333333; //释放端口低8位为输出// return temp;/* Write 16-bit Index (then Read Reg) */LCD->LCD_REG = LCD_Reg;/* Read 16-bit Reg */return (LCD->LCD_RAM);}/************************************************************** ***************** 函数名称: LCD_ReadDat** 功能描述: 读数据** 作者: Dream** 日期: 2010年12月06日*************************************************************** **************/uint16_t LCD_ReadDat(){// uint16_t temp;//// GPIOE->CRH = (GPIOE->CRH & 0x00000000) | 0x44444444; //将端口高8位配置成输入// GPIOE->CRL = (GPIOE->CRL & 0x00000000) | 0x44444444; //将端口低8位配置成输入// LCD_CS = 0;// LCD_RS = 1;// LCD_RD = 0;// temp = ((GPIOB->IDR&0xff00)|(GPIOC->IDR&0x00ff)); //读取数据(读寄存器时,并不需要读2次)// LCD_RD = 1;// LCD_CS = 1;// GPIOE->CRH = (GPIOE->CRH & 0x00000000) | 0x33333333; //释放端口高8位为输出// GPIOE->CRL = (GPIOE->CRL & 0x00000000) | 0x33333333; //释放端口低8位为输出//// return temp;u16 tmp_color = 0;u8 Green = 0,Red=0,Black=0;Green = *((__IO u8 *)(Bank1_LCD_D)); /*第一个数据无效*/Green = *((__IO u8 *)(Bank1_LCD_D));Red = *((__IO u8 *)(Bank1_LCD_D));Black = *((__IO u8 *)(Bank1_LCD_D));tmp_color = (u16)((((u16)Red>>3)<<11)|(((u16)Green>>2)<<5)|((u16)Black> >3));return(tmp_color);}/************************************************************** ***************** 函数名称: LCD_Configuration** 功能描述: LCD_IO口配置** 作者: Dream** 日期: 2010年12月06日*************************************************************** **************/void LCD_Configuration(){GPIO_InitTypeDef GPIO_InitStructure;RCC_APB2PeriphClockCmd(RCC_APB2Periph_GPIOB | RCC_APB2Periph_GPIOC,ENABLE);/* 配置数据IO 连接到GPIOB *********************/GPIO_InitStructure.GPIO_Pin = GPIO_Pin_8 | GPIO_Pin_9 | GPIO_Pin_10 | GPIO_Pin_11| GPIO_Pin_12 | GPIO_Pin_13 | GPIO_Pin_14 | GPIO_Pin_15;GPIO_InitStructure.GPIO_Mode = GPIO_Mode_Out_PP; // 推挽输出方式GPIO_InitStructure.GPIO_Speed = GPIO_Speed_50MHz; // 输出IO口最大最速为50MHZGPIO_Init(GPIOB, &GPIO_InitStructure);/* 配置控制IO 连接到PD12.PD13.PD14.PD15 *********************/GPIO_InitStructure.GPIO_Pin = GPIO_Pin_0 | GPIO_Pin_1 | GPIO_Pin_2 | GPIO_Pin_3| GPIO_Pin_4 | GPIO_Pin_5 | GPIO_Pin_6 | GPIO_Pin_7| GPIO_Pin_8 | GPIO_Pin_9 | GPIO_Pin_10 | GPIO_Pin_11;GPIO_InitStructure.GPIO_Mode = GPIO_Mode_Out_PP; // 推挽输出方式GPIO_InitStructure.GPIO_Speed = GPIO_Speed_50MHz; // 输出IO口最大最速为50MHZGPIO_Init(GPIOC, &GPIO_InitStructure);}/************************************************************** ***************** 函数名称: LCD_Init** 功能描述: LCD初始化** 作者: Dream** 日期: 2010年12月06日*************************************************************** **************/void LCD_Init(void){static uint16_t DeviceCode;//LCD_Configuration();LCD_GPIO_Config();LCD_FSMC_Config();LCD_WriteReg(0x0000,0x0001);LCD_Delay(5); // LCD_Delay 50 msDeviceCode = LCD_ReadReg(0x0000);printf(" ID=0x%x\n",DeviceCode);///////////////////////////////////LCD_Delay(5); // delay 50 msWrite_Dat(0x0023); //N=0x36 for 6.5M, 0x23 for 10M crystal Write_Dat(0x0002);Write_Dat(0x0004);Write_Cmd(0x00E0); // PLL enableWrite_Dat(0x0001);LCD_Delay(1);Write_Cmd(0x00E0);Write_Dat(0x0003);LCD_Delay(5);Write_Cmd(0x0001); // software resetLCD_Delay(5);Write_Cmd(0x00E6); //PLL setting for PCLK, depends on resolutionWrite_Dat(0x0001);Write_Dat(0x0033);Write_Dat(0x0032);Write_Cmd(0x00B0); //LCD SPECIFICATIONWrite_Dat(0x0020);Write_Dat(0x0000);Write_Dat((HDP>>8)&0X00FF); //Set HDPWrite_Dat(HDP&0X00FF);Write_Dat((VDP>>8)&0X00FF); //Set VDPWrite_Dat(VDP&0X00FF);Write_Cmd(0x00B4); //HSYNCWrite_Dat((HT>>8)&0X00FF); //Set HTWrite_Dat(HT&0X00FF);Write_Dat((HPS>>8)&0X00FF); //Set HPSWrite_Dat(HPS&0X00FF);Write_Dat(HPW); //Set HPWWrite_Dat((LPS>>8)&0X00FF); //Set HPSWrite_Dat(LPS&0X00FF);Write_Dat(0x0000);Write_Cmd(0x00B6); //VSYNCWrite_Dat((VT>>8)&0X00FF); //Set VTWrite_Dat(VT&0X00FF);Write_Dat((VPS>>8)&0X00FF); //Set VPSWrite_Dat(VPS&0X00FF);Write_Dat(VPW); //Set VPWWrite_Dat((FPS>>8)&0X00FF); //Set FPSWrite_Dat(FPS&0X00FF);// Write_Cmd(0x00BA);// Write_Dat(0x000F); //GPIO[3:0] out 1// Write_Cmd(0x00B8);// Write_Dat(0x0007); //GPIO3=input, GPIO[2:0]=output // Write_Dat(0x0001); //GPIO0 normalWrite_Cmd(0x0036); //rotationWrite_Dat(0x0010);//===================================== =======//===================================== =======// LCD_WR_REG(0x003A); //rotation// Write_Dat(0x0050);// Write_Cmd(0x0026); //rotation// Write_Dat(0x0003);// Write_Cmd(0x0030); //rotation// Write_Dat(0x0000);//===================================== ========//===================================== ========Write_Cmd(0x00F0);//pixel data interfaceWrite_Dat(0x0003);//16位模式//Write_Cmd(0x0021);//进入图形颜色翻转模式Write_Cmd(0x00BC);//重要Write_Dat(0x0040);//对比度Write_Dat(0x0070);//亮度Write_Dat(0x0040);//饱和度值 //// Write_Dat(0x0080);//对比度// Write_Dat(0x0080);//亮度// Write_Dat(0x0080);//饱和度值 //Write_Dat(0x0001);//处理机允许Write_Cmd(0x0029); //display on//---------------------------------------------// Write_Cmd(0x0037);//重要// Write_Dat(0x000);// Write_Dat(0);LCD_Clear(WHITE);}//void WR_DATA_Prepare(void)//{// Write_Cmd(0x002c);//}/************************************************************** ***************** 函数名称: LCD_DrawPoint** 功能描述: 写一个点** 作者: Dream** 日期: 2010年12月06日*************************************************************** **************/void LCD_DrawPoint(uint16_t x, uint16_t y, uint16_t color) {// LCD_SetCursor(x,y); //设置光标位置// LCD_WriteRAM_Prepare(); //开始写入GRAM// Write_Dat(color);u32 point = color;unsigned char rcode,gcode,bcode;rcode = (unsigned char)(point >> 16);gcode = (unsigned char)(point >> 8);bcode = (unsigned char)point;Write_Cmd(0x002A);Write_Dat(x>>8);Write_Dat(x&0x00ff);Write_Dat(479>>8);Write_Dat(479&0x00ff);Write_Cmd(0x002b);Write_Dat(y>>8);Write_Dat(y&0x00ff);Write_Dat(271>>8);Write_Dat(271&0x00ff);Write_Cmd(0x002c);Write_Dat(color);// Write_Dat((rcode << 8) | (gcode));// Write_Dat((bcode << 8) | (rcode));// Write_Dat((gcode << 8) | (bcode));}/************************************************************** ***************** 函数名称: LCD_WriteRAM_Prepare** 功能描述: 些准备** 作者: Dream** 日期: 2010年12月06日*************************************************************** **************/void LCD_WriteRAM_Prepare(){Write_Cmd(0x002c);}/************************************************************** ***************** 函数名称: LCD_SetCursor** 功能描述: 设置光标函数** 作者: Dream** 日期: 2010年12月06日*************************************************************** **************/void LCD_SetCursor(uint8_t Xpos,uint16_t Ypos){// Write_Cmd(0x002A);// Write_Dat(Xpos>>8);// Write_Dat(Xpos&0x00ff);// Write_Dat(479>>8);// Write_Dat(479&0x00ff);// Write_Cmd(0x002b);// Write_Dat(Ypos>>8);// Write_Dat(Ypos&0x00ff);// Write_Dat(271>>8);// Write_Dat(271&0x00ff);Write_Cmd(0x002A);Write_Dat(Xpos>>8);Write_Dat(Xpos&0x00ff);Write_Dat(479>>8);Write_Dat(479&0x00ff);Write_Cmd(0x002b);Write_Dat(Ypos>>8);Write_Dat(Ypos&0x00ff);Write_Dat(271>>8);Write_Dat(271&0x00ff);}/************************************************************** ***************** 函数名称: LCD_Clear** 功能描述: 清屏幕函数** 作者: Dream** 日期: 2010年12月06日*************************************************************** **************///清屏函数//Color:要清屏的填充色void LCD_Clear(u32 color){unsigned int l=480,w;Write_Cmd(0x002a);Write_Dat(0);Write_Dat(0);Write_Dat(HDP>>8);Write_Dat(HDP&0x00ff);Write_Cmd(0x002b);Write_Dat(0);Write_Dat(0);Write_Dat(VDP>>8);Write_Dat(VDP&0x00ff);Write_Cmd(0x002c);while(l--){for(w=0;w<272;w++){Write_Dat(color);}}}/************************************************************** ***************** 函数名称: LCD_Delay** 功能描述: 用于LCD驱动延时** 作者: Dream** 日期: 2010年12月06日*************************************************************** **************/void LCD_Delay (uint32_t nCount){__IO uint16_t i;for (i=0;i<ncount*100;i++);}/***名称:void LCD_WindowMax()*参数:*返回:无*功能:设置窗口*备注:**/void LCD_WindowMax (unsigned int xsta,unsigned int ysta,unsigned int xend,unsigned int yend){Write_Cmd(0X002A);Write_Dat(xsta>>8);Write_Dat(xsta&0X00FF);Write_Dat(xend>>8);Write_Dat(xend&0X00FF);Write_Cmd(0X002B);Write_Dat(ysta>>8);Write_Dat(ysta&0X00FF);Write_Dat(yend>>8);Write_Dat(yend&0X00FF);}/***名称:void LCD_Fill(uint8_t xsta, uint16_t ysta, uint8_t xend, uint16_t yend, uint16_t colour)*参数:xsta 起始X坐标ysta 起始Y坐标xend 结束X坐标yend 结束Y坐标color 待填充颜色*返回:无*功能:在指定矩形区域填充指定颜色,区域大小(xend-xsta)*(yend-ysta)*备注:部分区域少一行像素点**/void LCD_Fill(uint8_t xsta, uint16_t ysta, uint8_t xend, uint16_t yend, uint16_t colour){u32 n;/*设置窗口 */LCD_WindowMax (xsta, ysta, xend, yend);LCD_WriteRAM_Prepare(); /*开始写入GRAM*/n=(u32)(yend-ysta+1)*(xend-xsta+1);while(n--){Write_Dat(colour);} /*显示所填充的颜色*/}/***名称:void LCD_DrawLine(uint16_t xsta, uint16_t ysta, uint16_t xend, uint16_t yend)*参数:xsta X起</ncount*100;i++);始坐标ysta Y起始坐标xend X终点坐标yend Y终点坐标*返回:无*功能:指定坐表(两点),画线*备注:需要添加颜色参数**/void LCD_DrawLine(uint16_t xsta, uint16_t ysta, uint16_t xend, uint16_t yend, uint16_t color){u16 x, y, t;if((xsta==xend)&&(ysta==yend))LCD_DrawPoint(xsta, ysta, color);elseif(abs(yend-ysta)>abs(xend-xsta))/*斜率大于1 */{if(ysta>yend){t=ysta;ysta=yend;yend=t;t=xsta;xsta=xend;xend=t;}for(y=ysta;y{x=(u32)(y-ysta)*(xend-xsta)/(yend-ysta)+xsta; LCD_DrawPoint(x, y, color);}}else /*斜率小于等于1 */{if(xsta>xend){t=ysta;ysta=yend;yend=t;t=xsta;xsta=xend;xend=t;}for(x=xsta;x<=xend;x++) /*以x轴为基准*/ {y =(u32)(x-xsta)*(yend-ysta)/(xend-xsta)+ysta; LCD_DrawPoint(x, y, color);}}}/***名称:void Draw_Circle(uint16_t x0, uint16_t y0, uint8_t r)*参数:x0 中心点横坐标y0 中心点纵坐标r 半径*返回:无*功能:在指定位置画一个指定大小的圆*备注:加入颜色参数,是否填充等**/void Draw_Circle(uint16_t x0, uint16_t y0, uint8_t r, uint16_t color){int a,b;int di;a=0;b=r;di=3-(r<<1); /*判断下个点位置的标志*/while(a<=b){LCD_DrawPoint(x0-b, y0-a, color); //3LCD_DrawPoint(x0+b, y0-a, color); //0LCD_DrawPoint(x0-a, y0+b, color); //1LCD_DrawPoint(x0-b, y0-a, color); //7LCD_DrawPoint(x0-a, y0-b, color); //2LCD_DrawPoint(x0+b, y0+a, color); //4LCD_DrawPoint(x0+a, y0-b, color); //5LCD_DrawPoint(x0+a, y0+b, color); //6LCD_DrawPoint(x0-b, y0+a, color);a++;/*使用Bresenham算法画圆*/if(di<0)di +=4*a+6;else{di+=10+4*(a-b);b--;}LCD_DrawPoint(x0+a, y0+b, color);}}/***名称:void LCD_DrawRectangle(uint16_t xsta, uint16_t ysta, uint16_t xend, uint16_t yend)*参数:xsta X起始坐标ysta Y起始坐标xend X结束坐标yend Y结束坐标*返回:无*功能:在指定区域画矩形*备注:**/void LCD_DrawRectangle(uint16_t xsta, uint16_t ysta, uint16_t xend, uint16_t yend, uint16_t color){LCD_DrawLine(xsta, ysta, xend, ysta, color);LCD_DrawLine(xsta, ysta, xsta, yend, color);LCD_DrawLine(xsta, yend, xend, yend, color);LCD_DrawLine(xend, ysta, xend, yend, color);}/***名称:void LCD_ShowChar(u8 x, u16 y, u8 num, u8 size, u16 PenColor, u16 BackColor)*参数:x,y 起始坐标(x:0~234 y:0~308)num 字符ASCII码值size字符大小,使用默认8*16PenColor 字体颜色BackColor 字体背景颜色*功能:*备注:注意屏幕大小**/void LCD_ShowChar(u8 x, u16 y, u8 num, u8 size, u16 PenColor, u16 BackColor){#define MAX_CHAR_POSX 232#define MAX_CHAR_POSY 304u8 temp;u8 pos,t;if(x>MAX_CHAR_POSX||y>MAX_CHAR_POSY)return;num=num-' '; /*得到偏移后的值 */for(pos=0;pos<size;pos++){temp=asc2_1608[num][pos]; /*调用1608字体 */for(t=0;t{if(temp&0x01) /*从低位开始*/{LCD_DrawPoint(x+t, y+pos, PenColor); /*画字体颜色一个点*/ }elseLCD_DrawPoint(x+t, y+pos, BackColor); /*画背景颜色一个点*/temp>>=1;}}}//m^n函数u32 mypow(u8 m,u8 n){u32 result=1;while(n--)result*=m;return result;}//显示2个数字//x,y :起点坐标//len :数字的位数//size:字体大小//color:颜色//num:数值(0~4294967295);void LCD_ShowNum(u8 x,u8 y,u32 num,u8 len, u16 PenColor, u16 BackColor){u8 size = 16; /* 这里使用默认的16*8 */u8 t,temp;u8 enshow=0;for(t=0;t<len;t++){temp=(num/mypow(10,len-t-1))%10;if(enshow==0&&t<(len-1)){if(temp==0){LCD_ShowChar(x+(size/2)*t,y,' ',size, PenColor, BackColor);continue;}else enshow=1;}LCD_ShowChar(x+(size/2)*t,y,temp+'0',size, PenColor, BackColor);}}/**名称:void LCD_ShowCharString(uint16_t x, uint16_t y, const uint8_t *p, uint16_t PenColor, uint16_t BackColor)参数:x,y 起始坐标p 指向字符串起始地址PenColor 字符颜色BackColor 背景颜色功能:备注:用16字体,可以调节此函数不能单独调用**/void LCD_ShowCharString(uint16_t x, uint16_t y, const uint8_t *p, uint16_t PenColor, uint16_t BackColor){uint8_t size = 16; /*---字符大小默认16*8---*/if(x>MAX_CHAR_POSX){x=0;y+=size;} /*超出X轴字体最小单位,换行*/if(y>MAX_CHAR_POSY){y=x=0;LCD_Clear(WHITE);} /*超出Y 轴字体最小单位,回到原点,并且清屏*/LCD_ShowChar(x, y, *p, size, PenColor, BackColor); /*0表示非叠加方式*/}/***名称: u16 findHzIndex(u8 *hz)*参数:hz*功能:索引汉字存储的内存地址*备注:**/u16 findHzIndex(u8 *hz) /* 在自定义汉字库在查找所要显示 */ /* 的汉字的位置 */{u16 i=0;FNT_GB16 *ptGb16 = (FNT_GB16 *)GBHZ_16; /*ptGb16指向GBHZ_16*/while(ptGb16[i].Index[0] > 0x80){if ((*hz == ptGb16[i].Index[0]) && (*(hz+1) ==ptGb16[i].Index[1])) /*汉字用两位来表示地址码*/{return i;}i++;if(i > (sizeof((FNT_GB16 *</len;t++)</size;pos++))GBHZ_16) / sizeof(FNT_GB16) - 1)) /* 搜索下标约束 */{break;}}return 0;}/***名称:void WriteOneHz(uint16_t x0, uint16_t y0, uint8_t *pucMsk, uint16_t PenColor, uint16_t BackColor)*参数:x0,y0 起始坐标*pucMsk 指向PenColor 字符颜色BackColor 背景颜色*功能:*备注:此函数不能单独作为汉字字符显示**/void WriteOneHz(u16 x0, u16 y0, u8 *pucMsk, u16 PenColor, u16 BackColor){u16 i,j;u16 mod[16]; /* 当前字模 16*16 */u16 *pusMsk; /* 当前字库地址 */u16 y;pusMsk = (u16 *)pucMsk;for(i=0; i<16; i++) /* 保存当前汉字点阵式字模 */{mod[i] = *pusMsk; /* 取得当前字模,半字对齐访问 */mod[i] = ((mod[i] & 0xff00) >> 8) | ((mod[i] & 0x00ff) << 8);/* 字模交换高低字节*/pusMsk = pusMsk+1;}y = y0;for(i=0; i<16; i++) /* 16行 */{for(j=0; j<16; j++) /* 16列 */{if((mod[i] << j) & 0x8000) /* 显示第i行共16个点 */{LCD_DrawPoint(x0+j, y0+i, PenColor);}else{LCD_DrawPoint(x0+j, y0+i, BackColor);}}y++;}}/**u16 PenColor, u16 BackColor)*参数:x0,y0 起始坐标pcStr 指向PenColor 字体颜色BackColor 字体背景*功能:显示汉字字符串*备注:这个函数不能单独调用**/void LCD_ShowHzString(u16 x0, u16 y0, u8 *pcStr, u16 PenColor, u16 BackColor){#define MAX_HZ_POSX 224#define MAX_HZ_POSY 304u16 usIndex;u8 size = 16;FNT_GB16 *ptGb16 = 0;ptGb16 = (FNT_GB16 *)GBHZ_16;if(x0>MAX_HZ_POSX){x0=0;y0+=size;} /*超出X轴字体最小单位,换行*/if(y0>MAX_HZ_POSY){y0=x0=0;LCD_Clear(WHITE);} /*超出Y 轴字体最小单位,回到原点,并且清屏*/usIndex = findHzIndex(pcStr);WriteOneHz(x0, y0, (u8 *)&(ptGb16[usIndex].Msk[0]), PenColor, BackColor); /* 显示字符 */}/**PenColor, u16 BackColor)*参数:x0 y0 起始坐标pcstr 字符串指针PenColor 字体颜色BackColor 字体背景色*功能:调用字符和汉字显示函数,实现字符串显示*备注:**/void LCD_ShowString(u16 x0, u16 y0, u8 *pcStr, u16 PenColor, u16 BackColor){while(*pcStr!='\0'){if(*pcStr>0x80) /*显示汉字*/{LCD_ShowHzString(x0, y0, pcStr, PenColor, BackColor);pcStr += 2;x0 += 16;}else /*显示字符*/{LCD_ShowCharString(x0, y0, pcStr, PenColor, BackColor);pcStr +=1;x0+= 8;}}}/************************************************************** *************** 名称:u16 ili9320_BGRtoRGB(u16 Color)* 功能:RRRRRGGGGGGBBBBB 改为 BBBBBGGGGGGRRRRR 格式* 入口参数:Color BRG 颜色值* 出口参数:RGB 颜色值* 说明:内部函数调用* 调用方法:*************************************************************** *************/u16 LCD_RGBtoBGR(u16 Color){u16 r, g, b, bgr;b = (Color>>0) & 0x1f; /* 提取B */g = (Color>>5) & 0x3f; /* 中间六位 */r = (Color>>11) & 0x1f; /* 提取R */bgr = (b<<11) + (g<<5) + (r<<0);return( bgr );}/************************************************************** *************** 名称:void LCD_DrawPicture(u16 StartX,u16 StartY,u16 EndX,u16 EndY,u16 *pic)* 功能:在指定座标范围显示一副图片* 入口参数:StartX 行起始座标* StartY 列起始座标* EndX 行结束座标* EndY 列结束座标pic 图片头指针* 出口参数:无* 说明:图片取模格式为水平扫描,16位颜色模式* 调用方法:LCD_DrawPicture(0,0,100,100,(u16*)demo);*************************************************************** *************/void LCD_DrawPicture(u16 StartX,u16 StartY,u16 Xend,u16 Yend,u8 *pic){static u16 i=0,j=0;u16 *bitmap = (u16 *)pic;for(j=0; j{for(i=0; iLCD_DrawPoint(StartX+i, StartY+j, *bitmap++);}}//快速ALPHA BLENDING算法.//src:源颜色//dst:目标颜色//alpha:透明程度(0~32)//返回值:混合后的颜色.u16 gui_alpha_blend565(u16 src,u16 dst,u8 alpha){u32 src2;u32 dst2;//Convert to 32bit |-----GGGGGG-----RRRRR------BBBBB|src2=((src<<16)|src)&0x07E0F81F;dst2=((dst<<16)|dst)&0x07E0F81F;//Perform blending R:G:B with alpha in range 0..32//Note that the reason that alpha may not exceed 32 is that there are only//5bits of space between each R:G:B value, any higher value will overflow//into the next component and deliver ugly result.dst2=((((dst2-src2)*alpha)>>5)+src2)&0x07E0F81F;return (dst2>>16)|dst2;}。
首页阅览室馆友我的图书馆来自:mcu_mouse > 嵌入式C语言配色:字号SSD1963的样例程序2010-12-01 | 阅:1803 转:28 | 分享//===============================typedef union {unsigned char UByte[2];unsigned int UInt;} UWORD;void SSD1963Data_16(uchar sdataH,uchar sdataL);void SSD1963Data1_16(uint dat);void SSD1963Command_16(uint cmd);void SetPixel(uint Col,uint Page,uint color); //显示一个相素点uint GetPixel(uint Col,uint Page);//得到一个像素点/******************************************************SSD1963的Conf脚,用来控制读写的方式,如果为0 则为6800总线MODE如果位1 ,则为8080总线。
下面的定义是8080 MODE(默认情况下为8080),可以通过修改Conf 跳点来修改读写式。
******************************************************/void SSD1963Command_8(uchar cmd);void SSD1963Data_8(uchar sdata);uchar GetSSD1963Data_8();uint GetSSD1963Data_16();void ReadSSD1963Set();#define SetSSD1963RD() SetBit(P4,4) #define SetSSD1963WR() SetBit(P4,5)#define SetSSD1963CS() SetBit(P4,2)#define SetSSD1963DC() SetBit(P4,3) #define SetSSD1963Reset() SetBit(P4,1) #define SetSSD1963Wait() SetBit(p4,0) #define ClrSSD1963RD() ClrBit(P4,4)#define ClrSSD1963CS() ClrBit(P4,2)#define ClrSSD1963DC() ClrBit(P4,3)#define ClrSSD1963Reset() ClrBit(P4,1)#define ClrSSD1963Wait() ClrBit(p4,0)#define DataPortL P1#define DataPortH P2//UWORD 是一个结构体//注意在给1963写命令时,只能用数据线的低8位来传输数据。
void SSD1963Command_16(uint cmd){UWORD temp;temp.UInt=cmd;ClrSSD1963DC();SetSSD1963RD();ClrSSD1963CS();DataPortL=temp.UByte[1]; DataPortH=temp.UByte[0];SetSSD1963WR();SetSSD1963CS();}void SSD1963Data1_16(uint dat) {UWORD temp;temp.UInt=dat;SetSSD1963DC();SetSSD1963RD();ClrSSD1963CS();ClrSSD1963WR();DataPortL=temp.UByte[1]; DataPortH=temp.UByte[0];SetSSD1963CS();}void SSD1963Data_16(uchar sdataH,uchar sdataL) {SetSSD1963DC();SetSSD1963RD();ClrSSD1963CS();ClrSSD1963WR();DataPortL=sdataL;//temp.UByte[1];DataPortH=sdataH;//temp.UByte[0];SetSSD1963WR();SetSSD1963CS();}void SSD1963Command_8(uchar cmd) {ClrSSD1963DC();SetSSD1963RD();ClrSSD1963CS();ClrSSD1963WR();DataPortL=cmd;DataPortH=0X00;SetSSD1963WR();SetSSD1963CS();}void SSD1963Data_8(uchar sdata) {SetSSD1963DC();ClrSSD1963CS();ClrSSD1963WR();DataPortL=sdata;DataPortH=0X00;SetSSD1963WR();SetSSD1963CS();}/*void SSD1963Data_16(uchar sdataL,uchar sdataH) {SetSSD1963DC();SetSSD1963RD();ClrSSD1963WR();ClrSSD1963CS();DataPortL=sdataL;DataPortH=sdataH;nop();nop();nop(); nop();nop();nop();SetSSD1963CS();}*/uchar GetSSD1963Data_8(){uchar sdata;ClrSSD1963RD();SetSSD1963WR();SetSSD1963DC();ClrSSD1963CS();sdata=DataPortL;nop();nop();nop();nop();nop();nop(); SetSSD1963RD();SetSSD1963CS();return sdata;}{uint sdata;unsigned char SFRPAGE_save = SFRPAGE; // Save the current SFRPAGESFRPAGE = CONFIG_PAGE; //设置输入输出P1MDOUT=0x00; ///输出设置为高阻P2MDOUT=0x00;SFRPAGE = SFRPAGE_save; // Restore the SFRPAGEP1=0xff;P2=0xff;ClrSSD1963RD();SetSSD1963WR();SetSSD1963DC();ClrSSD1963CS();nop();nop();sdata=DataPortH;sdata=sdata<<8;sdata|=DataPortL;SetSSD1963CS();SFRPAGE = CONFIG_PAGE;P1MDOUT=0xff;//设置为上拉输出。
P2MDOUT=0xff;SFRPAGE = SFRPAGE_save; // Restore the SFRPAGE return sdata;}uint GetPixel(uint Col,uint Page){uint temp;uint color;SSD1963Command_8(0x2a); //设置行开始和结束的位置 SSD1963Data_8(Col/256);SSD1963Data_8(Col%256);temp=Col;SSD1963Data_8(temp/256);SSD1963Data_8(temp%256);SSD1963Command_8(0x2b);SSD1963Data_8(Page/256);temp=Page;SSD1963Data_8(temp/256);SSD1963Data_8(temp%256);SSD1963Command_8(0x2E);color=GetSSD1963Data_16();return color;}void SetPixel(uint Col,uint Page,uint color){uint temp;SSD1963Command_8(0x2a); //设置行开始和结束的位置 temp=Col;SSD1963Data_8(temp/256);SSD1963Data_8(temp%256);temp=Col;SSD1963Data_8(temp/256);SSD1963Data_8(temp%256);temp=Page;SSD1963Data_8(temp/256); SSD1963Data_8(temp%256); temp=Page;SSD1963Data_8(temp/256); SSD1963Data_8(temp%256);SSD1963Command_8(0x2c); // for(i=0;i<9;i++)// {SSD1963Data1_16(color);// }}//初始化程序void SSD1963Init(){//software resetSSD1963Command_8(0x01);Delay_Ms(400);SSD1963Command_8(0x01);Delay_Ms(400);//enable pllSSD1963Command_8(0xe0);Delay_Ms(400);SSD1963Data_8(0x01);Delay_Ms(400);SSD1963Command_8(0xe0); Delay_Ms(400);SSD1963Data_8(0x03);Delay_Ms(400);//pll: n= 34 m= 3SSD1963Command_8(0xe2); SSD1963Data_8(0x14);SSD1963Data_8(0x03);SSD1963Data_8(0x54);//dotclk settingSSD1963Command_8(0xe6); SSD1963Data_8(0x03);SSD1963Data_8(0xa0);SSD1963Data_8(0x00);//panel settingSSD1963Command_8(0xb0);Delay_Us(100);SSD1963Data_8(0x38);SSD1963Data_8(0x20);SSD1963Data_8(0x01);SSD1963Data_8(0xdf);SSD1963Data_8(0x01);SSD1963Data_8(0x0f);SSD1963Data_8(0x00);//pixel formatSSD1963Command_8(0x3a); SSD1963Data_8(0x50);//hsync settingSSD1963Command_8(0xb4); SSD1963Data_8(0x02);SSD1963Data_8(0x0D);SSD1963Data_8(0x00);SSD1963Data_8(0x25);SSD1963Data_8(0x02);SSD1963Data_8(0x00);SSD1963Data_8(0x00);SSD1963Data_8(0x00);//vsync settingSSD1963Command_8(0xb6); SSD1963Data_8(0x01);SSD1963Data_8(0x1E);SSD1963Data_8(0x00);SSD1963Data_8(0x08);SSD1963Data_8(0x01);SSD1963Data_8(0x00);SSD1963Data_8(0x00);//col start_endSSD1963Command_8(0x2a); SSD1963Data_8(0x00);SSD1963Data_8(0x00);SSD1963Data_8(0x01);SSD1963Data_8(0xdf);//480//row start_endSSD1963Command_8(0x2b); SSD1963Data_8(0x00);SSD1963Data_8(0x00);SSD1963Data_8(0x01);SSD1963Data_8(0x0f);//272SSD1963Command_8(0x36);SSD1963Data_8(0x00);//MCU IF setting//SSD1963Command_8(13);SSD1963Command_8(0xf0);SSD1963Data_8(0x03); //02//SSD1963Command_8(0x35);//display onSSD1963Command_8(0x29);SSD1963Command_8(0xbe);//设置PWMSSD1963Data_8(0X0E);SSD1963Data_8(0XFF);SSD1963Data_8(0X09);SSD1963Data_8(0XFF);SSD1963Data_8(0X00);SSD1963Data_8(0X00);SSD1963Command_8(0xD4);//(Define the threshold value) SSD1963Data_8(0X00);SSD1963Data_8(0X09);SSD1963Data_8(0X90);SSD1963Data_8(0X00);SSD1963Data_8(0X17);SSD1963Data_8(0XE8);SSD1963Data_8(0X00);SSD1963Data_8(0X39);SSD1963Data_8(0X60);SSD1963Command_8(0xd0);SSD1963Data_8(0x0d);// ReadSSD1963Set();}献花(0)分享到:(本文系mcu_mouse 首藏 源文类似文章modbus (C 语言程序)协议中UART 的两种模式转贴:单片机中关键字data,idata,xdata,...oracle 创建表空间 - NetSQL - 博客园详解Oracle 创建用户权限全过程 - 51CTO....ORACLE TABLESPACE 创建表空间例程详析动态链接库2008年数据库技术领域掠影 - DBA notes兰亭序一 更多发表评论:您好,请 登录 或者 注册 后再进行评论您可能会喜欢这是一个“伪”命题?浅谈SSD各种阴谋论越用越慢?谈谈使用SSD 的几个注意事项红日(1963版)顾客沟通管理程序Macbook Pro 升SSD 固态硬盘+。