
NC-LINK User Manual of Wireless Access Point/Router
Version V1.0
Packing Detail
User Manual of Ceiling AP
Note:
1) This user manual can use for both “PoE version” and “Passive PoE version”
PoE version: NC-AC42APP, NC-AC43APP, NC-AC44APP NC-AP721P, NC-AP722P, NC-AP221P, NC-AP222P, NC-AP223P
Passive PoE version:NC-AC42AP, NC-AC43AP, NC-AP721, NC-AP722, NC-AP221, NC-AP222, NC-AP223,
NC-AP224, these model has 2 PoE Ports(both WAN and LAN)
2) NC-AP221P, NC-AP222P, NC-AP223P,NC-AP224P work with 802.3af PoE Switch directly, WAN Port is
the PoE Port.
3) NC-AC42APP, NC-AC43APP, NC-AC44APP NC-AP721P, NC-AP722P work with 802.3at PoE Switch,
WAN Port is the PoE Port.
4) Passive PoE version:work with 24V PoE adapter or 24V PoE Switch
5) The user manual uses NC-AP222 for an example
1ST How to Power on and Operation Mode Introduce
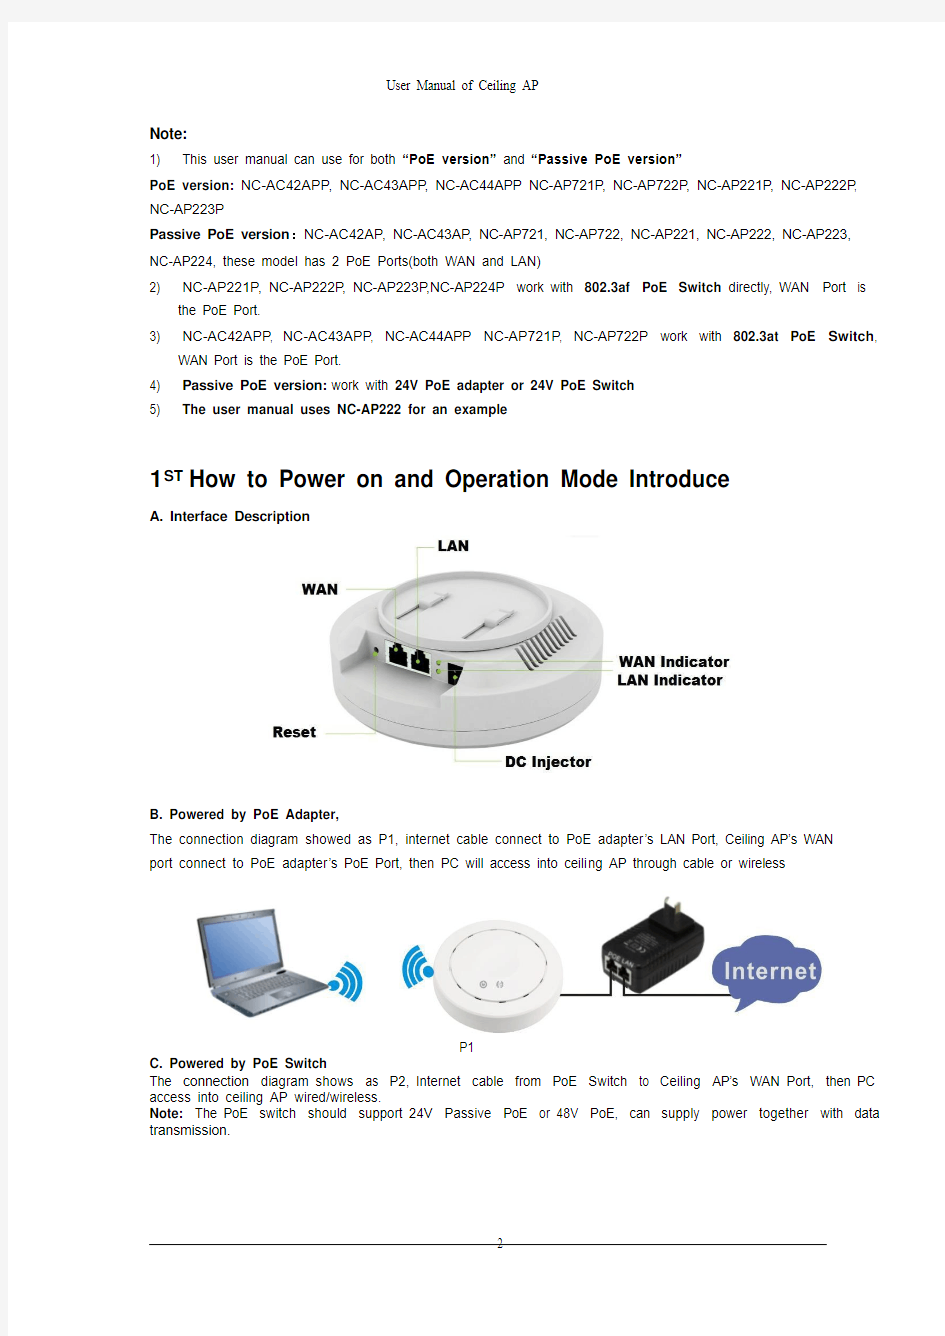
A. Interface Description
B. Powered by PoE Adapter,
The connection diagram showed as P1, internet cable connect to PoE adapter’s LAN Port, Ceiling AP’s WAN
port connect to PoE adapter’s PoE Port, then PC will access into ceili ng AP through cable or wireless
P1
C. Powered by PoE Switch
The connection diagram shows as P2, Internet cable from PoE Switch to Ceiling AP’s WAN Port, then PC access into ceiling AP wired/wireless.
Note: The PoE switch should support 24V Passive PoE or 48V PoE, can supply power together with data transmission.
User Manual of Ceiling AP
P2
The operation mode and connection:
There are three operation mode: Gateway, Wi-Fi Repeater and Wireless AP
Gateway: The cable internet can be transmitted to wireless internet through PPPOE, Static IP, Dynamic IP. The connection topology is showed as follows: Connect Internet cable to Ceiling AP’s WAN port, PC or end user connect with Ceiling AP through wired/wireless.
P3Gateway
Repeater Mode: The ceiling AP can extend the existing Wi-Fi range if it signal is weak. The connection shows as follows: Ceiling AP can search the existing Wi-Fi signal then connect it wi relessly, then PC or end user can access into ceiling AP wireless/wired.
P4Wi-Fi Repeater
AP Mode: plug and play, suitable for hotel, school, super market and so on. The connection is the internet cable is connected from router/switch to ceiling AP’s port, then ceiling AP will transmit Wi-Fi signal, PC and end user can access into internet by wired/wireless
P5AP Mode
User Manual of Ceiling AP
2 :Power On and Login
1)Choose the proper power supply mode and operation mode 2)Assign an IP address for local PC
Following steps will show how to assign an IP address for PC after connect Ceiling AP and PC by wired cable : configure local IP address as 192.168.188.X(X can be selected from 2-252) the same network segment as
ceiling AP , subnet mask 255.255.255.0, As P6 and P7 shows.
P 6 Check Local Area Connection
P7 Assign IP address for PC
3)Wireless Connection between ceiling AP and PC
Assign an IP address for PC’s wireless LAN card as 192.168.188.X(X can be selected from 2-252) , then view available wireless networking, then refresh network list, choose SSID: NC-LINK_Wireless, input the password: 66666666, then connect.
nd
User Manual of Ceiling AP
P 8 View Available Wireless Networks
P 9Wireless Network List
4) Click Internet Explorer and input 192.168.188.253 on the address bar, then press Enter, a login page will pop up, the User name: admin , Password :admin, then press Enter.
User Manual of Ceiling AP
3 Operation Mode
P 10 Login
How to set ceiling AP through Quick Guide: after Log in and enter into the WEB interface page, you can find some basic information of this wireless AP , such as SSID, Channel, Operation Mode, Software Version,
Hardware Version, System Tools...The default operation mode is Wireless AP . Following steps will show you
how to configure different operation mode.
P11 Qui c k Setup
Gateway :Click “Internet Settings” on P11, then will pop up a window show ed as P12, then choose PPPOE or Dynamic IP , then can modify the SSID, Channel, and Password.
If choose Dynamic IP in WAN Setti ng, then input the right i nformation, then click apply and sure to finish.
If choose PPPOE (ADSL) in WAN Setting , then input user name (usually it’s an email address ) and User
Password from your ISP , then input right info in wirel ess part, such as SSID, Key and so on, then click “apply”
and “Sure” to finish. Then waiting seconds for AP ’s restarting. Then set PC’s IP address as Obtain an IP
address automatically, then share internet freely.
rd:
P12 Gateway Operation Mode
P13 Change Operation Mode
Repeater Mode:Click Repeater Mode in quick setup, following page will be showed, click Scan AP, choose the right SSID (take ZMK for example) and Select AP, then input password of ZMK, then Apply.
Then waiting seconds for Ceiling AP restart. Then set PC’s IP address as Obtain an IP address
automatically, then share internet freely.
P14 Wi-Fi Repeater
P15 Select AP
AP Mode: Click Wireless Coverage , then operation mode is wireless access point, plug and play, it will
popup the following window. In this page, user can change AP’s SSID , password , channel ...then Apply to finish.
After the wireless AP restart, connect wi reless AP as showed on P5, set PC’s IP address as obtain an IP
address automatically, then can share internet.
P16 Wireless Access Point
System tools: Click System tools in quick setup, then input host IP address or any IP address want to Ping then input the ping count, ping size, then apply, user can check the connection between users and wireless AP , please check P17.
4 t h
P17 System Tools
: IP Settings and Status Checking
IP Settings: Set PC’s IP address as obtain an IP address automatically, PC and other equipment can
access into top router or switch, then access into internet successful.
Status Checking: Set an IP address for PC if want to check wireless AP’s status, then the Pc’s IP address should be in the same segment with wireless AP’s IP , such as wireless AP’s IP address is 192.168.188.253,
PC’s IP address should be 192.168.188.X, X is number of 2~252. Then input 192.168.188.253 to check
User Manual of Ceiling AP
wireless AP’s status.
P18 Device Status
5t
h
: Advanced Settings and Management
Enter into web i nterface, click Advanced Settings, and then click Management to enter into Management page as showed on P19:
P19Management
System: export the default data, or load the new configuration file to restore the AP’s system, factory Reset setting and Reboot the product.
User: Set the User Name and Password for ceiling AP WEB management
Logs: Log Enable or disable, or view the system log from here
Upgrade Firmware: Upgrade new firmware i mprove s ystem’s performance and stability.
System Time: Set Wireless AP’s system time, or optimize system time’s i nterval s.
The wireless AP can be restored to factory default by press the Reset button around 15 Note o n
6 t h : Set Qvlan binding with Multi-SSID
You can set up 4 SSID for different users access, then you bind these 4SSID to different QVLAN TAG access, let them segregate with different users group, but notice ,when use QVLAN function, you must connect your QVLAN managed switch to NC-LINK wireless AP’s WAN Port via cable, that will enabl e the QVLAN TAG data process.
P20 Multi-SSID Setting
P21 QVLAN TAG binding with Multi-SSID
seconds . Then Wi-Fi LED flash off, System reboot and restore to factory default
Trouble Shooting
F 1 Symptoms and Solution
Symptoms
Forget user name and password in login Can’t login the ceiling AP through WEB management
Forget the AP’s SSID and passwords
Can’t access to AP’s IP address
Can’t access into Internet even finish the setting of wireless AP
How to change IP address segment in local network Solution
Restore to factory default
1.Make sure PC and ceiling AP’s IP Address are in same network segment, then check whether can Ping AP’s IP address:
PC start-input “cmd” in Run, then ping 192.168.188.253
2. Login again after Restore this ceiling AP to factory default
3. Make sure there isn’t any equipment to take IP address of 192.168.188.253 in the same network
4、Check LAN cable to avoid any problem, recommend
to use unshielded twisted pair 10/100M Ethernet cable.
1. Login to AP’s interf ace page by Ethernet cable, then reset password in wireless setting.
2. Or Restore to factory default
1. Check AP’s DHCP and make it enabled in Gateway mode.
2. Check the internet connection between ceiling AP and the root router/swi tch in AP and Repeater mode
1. If dynamic IP user, login wireless AP’s WEB page, check Internet settings--WAN Setting--Dynamic IP, check the information.
2.If ADSL user, login wireless AP’s WEB page, check Internet settings--WAN setting--PPPOE, then input the right user name and password
3.Set PC’s IP address as obtain IP address
automatically
Click Advanced setting-Network-LAN setting-IP address setting-Apply