compiler_ch6
- 格式:ppt
- 大小:17.73 MB
- 文档页数:91
Mesos的地位Mesos可以认为是资源的中间商,Mesos是第一个可以在多个框架之间共享资源的集群调度器。
Mesos的设计理念:Mesos做为数据中心的内核,需要为大量不同类型的负载提供服务,没有一个调度器可以满足所有这些框架的需求,为了应对这个问题,Mesos的设计原则是:资源分配和任务调度的分离。
Mesos master 负责决定分配给每个框架多少资源,任务调度器负责如何使用这些资源,这取决于每个框架的调度器如何根据自身需求去实现。
也可以这样理解Mesos的设计理念:Mesos在各个框架间进行粗粒度的资源分配,每个框架根据自身任务的特点进行细粒度的任务调度。
BuildingDownloading MesosThere are different ways you can get Mesos:1. Download the latest stable release from Apache (Recommended)$ wget /dist/mesos/1.6.0/mesos-1.6.0.tar.gz$ tar -zxf mesos-1.6.0.tar.gz2. Clone the Mesosgit repository (Advanced Users Only)$ git clone https:///repos/asf/mesos.git NOTE: If you have problems running the above commands, you may need to first run through the System Requirements section below to install the wget, tar, and git utilities for your system.System RequirementsMesos runs on Linux (64 Bit) and Mac OS X (64 Bit). To build Mesos from source, GCC 4.8.1+ or Clang 3.5+ is required.On Linux, a kernel version >= 2.6.28 is required at both build time and run time. For full support of process isolation under Linux a recent kernel >= 3.10 is required.The Mesos agent also runs on Windows. To build Mesos from source, follow the instructions in the Windows section.Make sure your hostname is resolvable via DNS or via /etc/hosts to allow full support of Docker’s host-networking capabilities, needed for some of the Mesos tests. When in doubt, please validate that /etc/hosts contains your hostname.Ubuntu 14.04Following are the instructions for stock Ubuntu 14.04. If you are using a different OS, please install the packages accordingly.# Update the packages.$ sudo apt-get update# Install a few utility tools.$ sudo apt-get install -y tar wgetgit# Install the latest OpenJDK.$ sudo apt-get install -y openjdk-7-jdk# Install autotools (Only necessary if building from git repository). $ sudo apt-get install -y autoconflibtool# Install other Mesos dependencies.$ sudo apt-get -y install build-essential python-dev python-six python-virtualenv libcurl4-nss-dev libsasl2-dev libsasl2-modules maven libapr1-dev libsvn-devUbuntu 16.04Following are the instructions for stock Ubuntu 16.04. If you are using a different OS, please install the packages accordingly.# Update the packages.$ sudo apt-get update# Install a few utility tools.$ sudo apt-get install -y tar wgetgit# Install the latest OpenJDK.$ sudo apt-get install -y openjdk-8-jdk# Install autotools (Only necessary if building from git repository). $ sudo apt-get install -y autoconflibtool# Install other Mesos dependencies.$ sudo apt-get -y install build-essential python-dev python-six python-virtualenv libcurl4-nss-dev libsasl2-dev libsasl2-modules maven libapr1-dev libsvn-dev zlib1g-dev iputils-pingMac OS X 10.11 (El Capitan), macOS 10.12 (Sierra)Following are the instructions for Mac OS X El Capitan. When building Mesos with the Apple-provided toolchain, the Command Line Tools from XCode>= 8.0 are required; XCode 8 requires Mac OS X 10.11.5 or newer.# Install Command Line Tools. The Command Line Tools from XCode>= 8.0 are required.$ xcode-select --install# Install Homebrew.$ ruby -e "$(curl -fsSLhttps:///Homebrew/install/master/install)"# Install Java.$ brew install Caskroom/cask/java# Install libraries.$ brew install wgetgitautoconfautomakelibtool subversion maven# Install Python dependencies.$ sudoeasy_install pip$ pip install virtualenvWhen compiling on macOS 10.12, the following is needed:# There is an incompatiblity with the system installed svn and apr headers. # We need the svn and apr headers from a brew installation of subversion. # You may need to unlink the existing version of subversion installed via # brew in order to configure correctly.$ brew unlink subversion # (If already installed)$ brew install subversion# When configuring, the svn and apr headers from brew will be automatically # detected, so no need to explicitly point to them.# If the build fails due to compiler warnings, `--disable-werror` can be passed# to configure to not treat warnings as errors.$ ../configure# Lastly, you may encounter the following error when the libprocess tests run:$ ./libprocess-testsFailed to obtain the IP address for '<hostname>'; the DNS service may not be able to resolve it: nodename nor servname provided, or not known# If so, turn on 'Remote Login' within System Preferences > Sharing to resolve the issue.NOTE: When upgrading from Yosemite to El Capitan, make sure to rerun xcode-select --install after the upgrade.CentOS 6.6Following are the instructions for stock CentOS 6.6. If you are using a different OS, please install the packages accordingly.# Install a recent kernel for full support of process isolation.$ sudo rpm --import https:/// $ sudo rpm -Uvh/elrepo-release-6-6.el6.elrepo.noarch.rpm$ sudo yum --enablerepo=elrepo-kernel install -y kernel-lt# Make the just installed kernel the one booted by default, and reboot. $ sudosed -i 's/default=1/default=0/g' /boot/grub/grub.conf$ sudo reboot# Install a few utility tools. This also forces an update of `nss`, # which is necessary for the Java bindings to build properly.$ sudo yum install -y tar wgetgit which nss# 'Mesos> 0.21.0' requires a C++ compiler with full C++11 support,# (e.g. GCC > 4.8) which is available via 'devtoolset-2'.# Fetch the Scientific Linux CERN devtoolset repo file.$ sudowget -O /etc/yum.repos.d/slc6-devtoolset.repohttp://linuxsoft.cern.ch/cern/devtoolset/slc6-devtoolset.repo# Import the CERN GPG key.$ sudo rpm --importhttp://linuxsoft.cern.ch/cern/centos/7/os/x86_64/RPM-GPG-KEY-cern# Fetch the Apache Maven repo file.$ sudowget/repos/dchen/apache-maven/epel-apache-ma ven.repo -O /etc/yum.repos.d/epel-apache-maven.repo# 'Mesos> 0.21.0' requires 'subversion > 1.8' devel package, which is # not available in the default repositories.# Create a WANdisco SVN repo file to install the correct version: $ sudo bash -c 'cat > /etc/yum.repos.d/wandisco-svn.repo<<EOF [WANdiscoSVN]name=WANdisco SVN Repo 1.8enabled=1baseurl=/centos/6/svn-1.8/RPMS/$basearc h/gpgcheck=1gpgkey=/RPM-GPG-KEY-WANdiscoEOF'# Install essential development tools.$ sudo yum groupinstall -y "Development Tools"# Install 'devtoolset-2-toolchain' which includes GCC 4.8.2 and related packages.$ sudo yum install -y devtoolset-2-toolchain# Install other Mesos dependencies.$ sudo yum install -y apache-maven python-devel python-sixpython-virtualenv java-1.7.0-openjdk-develzlib-devellibcurl-developenssl-develcyrus-sasl-devel cyrus-sasl-md5 apr-devel subversion-develapr-util-devel# Enter a shell with 'devtoolset-2' enabled.$ scl enable devtoolset-2 bash$ g++ --version # Make sure you've got GCC > 4.8!# Process isolation is using cgroups that are managed by 'cgconfig'. # The 'cgconfig' service is not started by default on CentOS 6.6.# Also the default configuration does not attach the 'perf_event' subsystem.# To do this, add 'perf_event = /cgroup/perf_event;' to the entries in '/etc/cgconfig.conf'.$ sudo yum install -y libcgroup$ sudo service cgconfig startCentOS 7.1Following are the instructions for stock CentOS 7.1. If you are using a different OS, please install the packages accordingly.# Install a few utility tools$ sudo yum install -y tar wgetgit# Fetch the Apache Maven repo file.$ sudowget/repos/dchen/apache-maven/epel-apache-ma ven.repo -O /etc/yum.repos.d/epel-apache-maven.repo# Install the EPEL repo so that we can pull in 'libserf-1' as part of our # subversion install below.$ sudo yum install -y epel-release# 'Mesos> 0.21.0' requires 'subversion > 1.8' devel package,# which is not available in the default repositories.# Create a WANdisco SVN repo file to install the correct version: $ sudo bash -c 'cat > /etc/yum.repos.d/wandisco-svn.repo<<EOF [WANdiscoSVN]name=WANdisco SVN Repo 1.9enabled=1baseurl=/centos/7/svn-1.9/RPMS/\$basear ch/gpgcheck=1gpgkey=/RPM-GPG-KEY-WANdiscoEOF'# Parts of Mesos require systemd in order to operate. However, Mesos # only supports versions of systemd that contain the 'Delegate' flag. # This flag was first introduced in 'systemd version 218', which is # lower than the default version installed by centos. Luckily, centos # 7.1 has a patched 'systemd< 218' that contains the 'Delegate' flag. # Explicity update systemd to this patched version.$ sudo yum update systemd# Install essential development tools.$ sudo yum groupinstall -y "Development Tools"# Install other Mesos dependencies.$ sudo yum install -y apache-maven python-devel python-sixpython-virtualenv java-1.8.0-openjdk-develzlib-devellibcurl-developenssl-develcyrus-sasl-devel cyrus-sasl-md5 apr-devel subversion-develapr-util-develWindowsFollow the instructions in the Windows section.Building Mesos (Posix)# Change working directory.$ cdmesos# Bootstrap (Only required if building from git repository).$ ./bootstrap# Configure and build.$ mkdir build$ cd build$ ../configure$ makeIn order to speed up the build and reduce verbosity of the logs, you can append -j <number of cores> V=0 to make.# Run test suite.$ make check# Install (Optional).$ make installExamplesMesos comes bundled with example frameworks written in C++, Java and Python. The framework binaries will only be available after running make check, as described in the Building Mesos section above.# Change into build directory.$ cd build# Start Mesos master (ensure work directory exists and has proper permissions).$ ./bin/mesos-master.sh --ip=127.0.0.1 --work_dir=/var/lib/mesos# Start Mesos agent (ensure work directory exists and has proper permissions).$ ./bin/mesos-agent.sh --master=127.0.0.1:5050--work_dir=/var/lib/mesos# Visit the Mesos web page.$ http://127.0.0.1:5050# Run C++ framework (exits after successfully running some tasks). $ ./src/test-framework --master=127.0.0.1:5050# Run Java framework (exits after successfully running some tasks). $ ./src/examples/java/test-framework 127.0.0.1:5050# Run Python framework (exits after successfully running some tasks). $ ./src/examples/python/test-framework 127.0.0.1:5050Note: These examples assume you are running Mesos on your local machine. Following them will not allow you to access the Mesos web page in a production environment (e.g. on AWS). For that you will need to specify the actual IP of your host when launching the Mesos master and ensure your firewall settings allow access to port 5050 from the outside world.。
ADS1.2开发环境简介实验⼀ ADS1.2开发环境简介⼀、实验⽬的熟悉ADS1.2 开发环境,学会ARM 仿真器的使⽤。
使⽤ADS 编译、下载、调试并跟踪⼀段已有的程序,了解嵌⼊式开发的基本思想和过程。
超级终端设置及BIOS 功能使⽤。
⼆、实验内容本次实验配置ADS 集成开发环境,新建⼀个简单的⼯程⽂件,并编译这个⼯程⽂件。
学习ARM 仿真器的使⽤和开发环境的设置。
下载已经编译好的⽂件到嵌⼊式控制器中运⾏。
学会在程序中设置断点,观察系统内存和变量,为调试应⽤程序打下基础。
运⾏Windows系统下的超级终端,通过超级终端查看BIOS启动情况。
三、预备知识C 语⾔的基础知识、程序调试的基础知识和⽅法。
四、实验设备及⼯具(包括软件调试⼯具)硬件:ARM 嵌⼊式开发平台、⽤于ARM7TDMI 的JTAG 仿真器、PC 机Pentium100 以上、串⼝线。
软件:PC 机操作系统win98、Win2000 或WinXP、ARM SDT 2.51 或ADS1.2 集成开发环境、仿真器驱动程序、超级终端通讯程序。
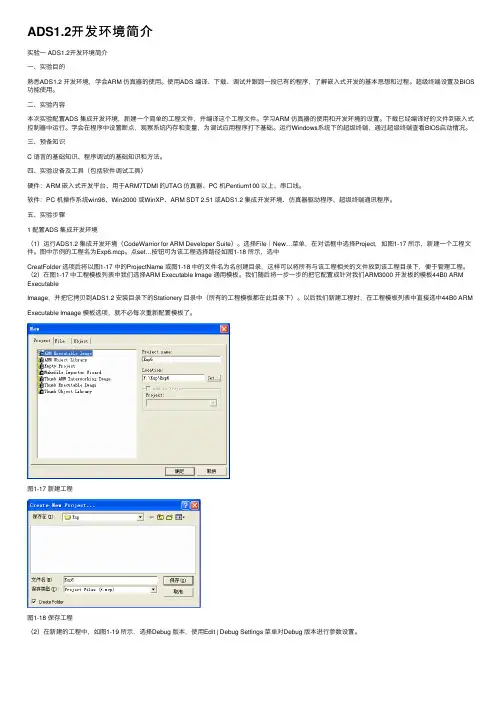
五、实验步骤1 配置ADS 集成开发环境(1)运⾏ADS1.2 集成开发环境(CodeWarrior for ARM Developer Suite)。
选择File|New…菜单,在对话框中选择Project,如图1-17 所⽰,新建⼀个⼯程⽂件。
图中⽰例的⼯程名为Exp6.mcp。
点set…按钮可为该⼯程选择路径如图1-18 所⽰,选中CreatFolder 选项后将以图1-17 中的ProjectName 或图1-18 中的⽂件名为名创建⽬录,这样可以将所有与该⼯程相关的⽂件放到该⼯程⽬录下,便于管理⼯程。
(2)在图1-17 中⼯程模板列表中我们选择ARM Executable Image 通⽤模板。
我们随后将⼀步⼀步的把它配置成针对我们ARM3000 开发板的模板44B0 ARM ExecutableImaage,并把它拷贝到ADS1.2 安装⽬录下的Stationery ⽬录中(所有的⼯程模板都在此⽬录下)。
《DSP技术实验》DSP程序的调试和分析方法实验一、实验目的1. 熟悉 CCS 集成开发环境,熟练掌握 DSP 程序设计方法;2. 熟悉利用 restrict、volatile 等关键字优化 DSP 程序,掌握利用#pragma 伪指令和内嵌操作优化 DSP 程序3. 掌握利用编译选项优化 DSP 程序的方法;4. 利用 DSPLIB 实现 FIR 滤波分析程序的优化设计。
二、实验预习内容1. 请写出 restrict 关键字的作用,并用之修改实验 1 中的 FIR 函数,优化DSP 程序。
答1:restrict关键字的作用:在函数参数中使用restrict关键字来定义指针变量,则在该函数中的指针变量不会指向同一个存储空间,这可以帮助编译器判别循环依赖性,使编译器充分利用流水线技术,从而提高优化水平。
答2:修改实验 1 中的 FIR 函数,优化 DSP 程序:DataBuf[i]=DataBuf[nx+i];改为:float*restrict pl;//Loop2float*restrict p2;p1=DataBuf;p2=&DataBuf[nx];for(i=0;i<nh-1;i++)p1[i]=p2[i];同时,把传输函数void FIR(float*x, float*h, float*y, float*DataBuf, float nh, float nx)改为:void FIR(float*restrict x, float*restrict h, float*restrict y, float*restrict DataBuf, float nh, float nx)2.请写出基于编译器反馈信息优化 DSP 程序的步骤。
答:阶段一:收集程序的剖析信息。
配置生成剖析信息选项-->生成剖析信息-->将剖析信息文件转化为相应反馈文件。
阶段二:利用收集的剖析信息优化DSP程序。
qt6源码编译范文Qt是一种跨平台的C++应用程序开发框架,可以用于开发应用程序、游戏、嵌入式设备等各种软件。
Qt6是Qt框架的最新版本,带来了许多新功能和改进,如更强大的QML支持、全新的图形渲染引擎等。
本文将为您详细介绍如何编译Qt6源码。
首先,编译Qt6源码之前,您需要按照Qt的官方文档中的指导安装依赖软件包。
具体来说,您需要安装以下软件包:1. C++编译器:Qt6源码需要使用C++17标准,所以您需要安装支持此标准的C++编译器。
对于Linux环境,您可以使用gcc或clang编译器,对于Windows环境,您可以使用MSVC编译器。
2. CMake:Qt 6使用CMake作为主要的构建工具。
您需要安装CMake的最新版本。
3. ninja:ninja是一个高效的构建工具,可以加速构建过程。
Qt 6强烈推荐使用ninja作为构建工具。
4. Perl:Qt构建过程中需要使用Perl脚本。
您需要安装Perl的最新版本。
静态构建Qt2.配置构建过程:在源码目录中打开命令行终端窗口,运行以下命令配置构建过程:```shellmkdir buildcmake -G Ninja -DCMAKE_BUILD_TYPE=Release -DCMAKE_INSTALL_PREFIX=<install_prefix> ..```其中, `<install_prefix>` 是您想要安装Qt的目标目录。
3.开始构建:运行以下命令开始构建Qt6:```shellninja```这将开始构建Qt6的所有模块。
构建过程可能需要一段时间,具体时间取决于您的计算机性能。
4.安装Qt6:构建完成后,运行以下命令将Qt6安装到之前指定的目标目录:```shellninja install```动态构建Qt动态构建Qt与静态构建类似,主要区别在于配置构建过程时需要添加`-DBUILD_SHARED_LIBS=ON`参数,将构建设置为动态库模式。
VC6编译驱动的⽅法(含32和64位)VC6只是⼀个IDE,可以⽅便的调⽤编译器,链接器,头⽂件,库⽂件,如果编辑和编译驱动能集成在⼀起,这样可以提⾼开发效率。
对于普通的Win32应⽤程序,VC6已经默认⽀持了,⽽对于驱动程序没有设定好的⼯程向导。
其实驱动程序也就是⼀个sys,是通过c语⾔写成,所以编译它理论上没有问题,只是在实际操作上有点⿇烦。
下⾯就来说明⼀下各种平台编译sys驱动的⽅法(包括64位平台)先看32位版本驱动的编译⽅法,⾸先你得准备⼀些编译必备⼯具:1.要安装VC62.安装DDK(装哪个呢?这个问题其实很简单的,只是很多⼈不明⽩,装DDK当然是越新越好了,越新⽀持的平台越多,像2000DDK你是绝对编译不出来64位sys的,因为它没带64位的库和编译器,所以我们选择现在最⽐较新的,2003DDK(WDK也可以),⽀持的平台很多,AMD64,IA64,2000,XP,2003都⽀持)。
好了,这下我们的系统已经安装了最强的开发⼯具VC6,最新DDK,在VC⾥编译各个平台的驱动都没有问题了!开始,假设我们的DDK装在C:/2003DDK⽬录,那么我会发现⾥⾯有很多驱动的例⼦(安装的时候全选),我们选择C:/2003DDK/src/wdm/usb/bulkusb作为我们的实验范例。
第⼀步:打开VC,建⽴⼀个Win32 Application⼯程,然后选择An empty Project(我⽤英⽂版的VC,建议你也换成英⽂版的),意思就是建⽴⼀个空的Win32⼯程,⼯程名字就叫bulkusb,点Finish.第⼆步:将C:/2003DDK/src/wdm/usb/bulkusb/sys(这⾥是驱动代码,另⼀个exe⾥是⽤户程序,不管它)⾥的所有⽂件拷贝到bulkusb⼯程⽬录下。
然后把.h,.c,.rc 导⼊到VC⾥对应的⽬录⾥⾯去。
第三步:然后就是开始设置⼯程选项,把这些代码编译成sys了。
qt6 c++开发指南学习笔记一、环境搭建。
1. 安装Qt6。
- 从Qt官方网站下载适合操作系统的Qt6安装包。
对于Windows系统,下载对应的.exe安装文件;对于Linux系统,可能需要根据不同的发行版选择合适的安装方式,如在Ubuntu上可以使用官方的软件仓库进行安装或者下载.run文件进行安装。
- 在安装过程中,注意选择要安装的组件,例如Qt Creator(集成开发环境)、Qt的各种模块(如Qt Widgets用于传统的桌面应用程序开发等)。
2. 配置开发环境。
- 在Qt Creator中,需要配置编译器。
对于C++开发,常见的编译器如GCC(在Linux系统中)或MSVC(在Windows系统中)。
确保编译器已经正确安装并且在Qt Creator中设置好路径。
- 可以创建一个简单的Hello World项目来测试开发环境是否搭建成功。
创建一个新的Qt Widgets Application项目,在`main.cpp`文件中编写以下代码:cpp.#include <QApplication>.#include <QLabel>.int main(int argc, char *argv[]){QApplication app(argc, argv);QLabel label("Hello World!");label.show();return app.exec();}- 编译并运行这个项目,如果能看到一个显示“Hello World!”的窗口弹出,说明环境搭建成功。
二、Qt基础概念。
1. 信号与槽机制。
- 信号(Signal)是对象发出的通知,表示某个事件发生了。
例如,当一个按钮被点击时,它会发出`clicked`信号。
信号的定义在类中使用`signals`关键字。
例如,在`QPushButton`类中定义了`clicked`信号:cpp.class QPushButton : public QAbstractButton.{Q_OBJECT.signals:void clicked(bool checked = false);// 其他信号定义。
第2讲EDA软件工具简介适合于电子系统仿真与设计的EDA软件包括:•电路仿真类(基于Pspice语言);•PCB板设计类(基于板级自动布局布线);•数字电路与系统设计类:1.逻辑仿真与时序仿真类;2.逻辑综合类;3.IDE集成环境。
1、电路仿真类(基于Spice语言)•Cadence公司的ORCAD Pspice;•NI公司的MultiSim;•Synopsys(Avant!)公司的Hspice;•Agilent公司的ADS2、PCB板设计类(基于板级自动布局布线)•Cadence公司的ORCAD PCB Design Suites、Allegro •Mentor Graphics公司的PADS Suites•Altium公司的Protel99SE、ProtelDXP、Altium Designer6.x系列(收购Protel、P-CAD、Tasking)。
3、数字电路与系统设计类(仿真、综合)•Mentor Graphics公司的ModelSim(仿真器)•Cadence公司的Verilog-XL,LDV(仿真器)•Synopsys公司的VCS(仿真器)•Synopsys公司的FPGA CompilerII(综合器)•Synplicity公司的Synplify/Synplify Pro(综合器)•Exemplar Logic公司出品的LeonardoSpectrum(综合器)4、数字电路与系统设计类(IDE集成)Lattice公司的ispLEVER•Xilinx公司的ISE•Altera公司的Quartus II集成的CPLD/FPGA开发工具综合工具(Synthesis Tools)仿真工具(Simulation tools)1.现代EDA 技术的特点有哪些?2.简要总结Bottom-Up 和Top-down 设计方式的特点3.用硬件描述语言设计电路有什么优势?4.简述基于CPLD/FPGA 的EDA 设计流程?5.简要总结EDA 开发工具的种类和功能作业。
Turbo C编译、连接和运行时的常见错误&C语言编程风格一、编译时的常见错误1. 数据类型错误。
此类错误是初学者编程时的常见现象, 下面是一些要引起注意的错误:(1) 所有变量和常量必须要加以说明。
(2) 变量只能赋给相同类型的数据。
(3) 对scanf()语句, 用户可能输入错误类型的数据项, 这将导致运行时出错, 并报出错信息。
为避免这样的错误出现, 你就提示用户输入正确类型的数据。
(4) 在执行算术运算时要注意:a. 根据语法规则书写双精度数字。
要写0.5, 而不是写.5; 要写1.0,而不是1。
尽管C语言会自动地把整型转换成双精度型, 但书写双精度型是个好习惯。
让C语言为你做强行转换这是一种效率不高的程序设计风格。
这有可能导致转换产生错误。
b. 不要用0除。
这是一个灾难性的错误, 它会导致程序失败, 不管C语言的什么版本, 都是如此, 执行除法运算要特别小心。
c. 确保所有的双精度数(包括那些程序输入用的双精度数) 是在实数范围之内。
d. 所有整数必须在整数允许的范围内。
这适用于所有计算结果, 包括中间结果。
2. 将函数后面的";"忘掉。
此时错误提示色棒将停在该语句下的一行, 并显示:Statement missing ; in function <函数名>3. 给宏指令如#include, #define等语句尾加了";"号。
4. "{"和"}"、"("和")"、"/*"和"*/"不匹配。
引时色棒将位于错误所在的行, 并提示出有关丢掉括号的信息。
5. 没有用#include指令说明头文件, 错误信息提示有关该函数所使用的参数未定义。
6. 使用了Turbo C保留关键字作为标识符, 此时将提示定义了太多数据类型。
编译原理教案说明:一、参考书:1、陈意云、张昱:《编译原理》,高等教育出版社,2003年。
2、陈意云、张昱:《编译原理习题精选》,中国科技大学出版社,2003年。
3、吕映芝、张素琴、蒋维杜:《编译原理》,清华大学出版社,1998年第二版。
4、王生原、吕映芝、张素琴:《编译原理课程辅导》,清华大学出版社,2007年。
5、伍春香:《编译原理习题与解析》,清华大学出版社,2001年。
6、Andrew W.Appel:《现代编译原理—C语言描述》,人民邮电出版社,2005年。
7、Noam Nison等:《计算机系统要素》,电子工业出版社,2007年。
8、Randall Hyde:《编程卓越之道(第二卷)》,电子工业出版社,2007年。
二、教学目的:通过学习形式语言与自动机理论、词法分析、语法分析、语义分析、代码优化和生成等内容使学生掌握构造编译程序的基本原理和基本方法,并通过上机实习使学生进一步掌握开发应用程序的基本方法,为深入理解计算机系统、程序设计语言与开发大型应用程序打下良好的基础。
三、教学时数:课堂教学51学时,上机实验30学时。
四、授课内容:第一章编译程序概述第二章 PL/0编译程序的实现第三章文法和语言第四章词法分析第五章自顶向下语法分析方法第六章自底向上优先分析方法第七章 LR分析方法第八章语法制导翻译和中间代码生成第九章符号表第一○章目标程序运行时的存储组织第一一章代码优化第一二章代码生成第一章概述一、说明:1、教学目的与要求:了解编译程序的概念、结构以及工作流程。
2、主要内容:什么是编译程序、编译过程概述、编译程序的结构、编译阶段的组合、编译技术和软件工具以及实例分析。
3、教学重点:编译程序的结构以及每一阶段的任务。
4、教学难点:理解编译程序各模块的判错功能、编译方式和解释方式执行速度上的不同。
二、教学内容第一节编译程序1、机器语言:直接用计算机能够识别的二进制代码指令来编写程序的语言。
C-Free使⽤教程(完整版)C-Free C/C++IDE使⽤⼿册C/C++教研组编写版权所有,请勿转载⽤于商业⽤途2019年8 ⽉⽬录2 C-Free 的软件特性 (1)3 安装C-Free 5.0 (2)4 C-Free使⽤⽅法 (5)5 运⾏C语⾔代码 (8)5.1 新建源⽂件 (8)5.2 编写源代码 (11)5.3 编译和链接 (12)5.4 运⾏程序 (13)5.5⽅法总结 (15)6 C-Free常见问答 (16)7 C-Free更新 (20)1 C-Free 介绍C-Free是⼀款国产的Windows下的C/C++ IDE,最新版本是 5.0,整个软件才 14M,⾮常轻巧,安装简单。
利⽤本软件,使⽤者可以轻松地编辑、编译、连接、运⾏、调试C/C++程序。
C-Free中集成了C/C++代码解析器,能够实时解析代码,并且在编写的过程中给出智能的提⽰。
C-Free提供了对⽬前业界主流C/C++编译器的⽀持,你可以在C-Free中轻松切换编译器。
可定制的快捷键、外部⼯具以及外部帮助⽂档,使你在编写代码时得⼼应⼿。
完善的⼯程/⼯程组管理使你能够⽅便的管理⾃⼰的代码。
2 C-Free 的软件特性1、C-Free⽀持多编译器,可以配置添加其他编译器;⽬前⽀持的编译器类型:(1) MinGW 2.95/3.x/4.x/5.0(2) Cygwin(3) Borland C++ Compiler(4) Microsoft C++ Compiler(5) Open Watcom C/C++(6) Digital Mars C/C++(7) Ch Interpreter2、增强的C/C++语法加亮器,(可加亮函数名,类型名,常量名等);3、 C-Free增强的智能输⼊功能;4、可添加语⾔加亮器,⽀持其他编程语⾔;5、可添加⼯程类型,可定制其他的⼯程向导;6、完善的代码定位功能(查找声明、实现和引⽤);7、代码完成功能和函数参数提⽰功能;8、能够列出代码⽂件中包含的所有符号(函数、类/结构、变量等);9、⼤量可定制的功能可定制快捷键可定制外部⼯具可定制帮助(可⽀持Windows帮助、Html帮助和在线帮助);10、彩⾊、带语法加亮打印功能;11、在调试时显⽰控制台窗⼝;12、⼯程转化功能,可将其他类型的⼯程转化为C-Free格式的⼯程,并在C-Free中打开。
StarTool ® FDM 7.8.2 ReadmeUpdated 8 May 2020General InformationThis Readme file contains information you should know before you install or use StarTool FDM 7.8.2. Information that pertains only to FDM 7.8.2 is marked with change bars in the left margin.The StarTool FDM 7.8.2 product contains the full version of the product only. Beginning with 7.8.2 the FDM.TLOD and FDM.TSRC libraries will no longer be shipped.Changes have been made to shortcuts on local installed customer PC for the install, so that for example “Edit FTP Input” is now “FDM 7.8.2 - Edit FTP Input”. The start menu location has changed from Serena to Micro Focus. Also the shipped RECEIVE file “RECEIVE.FDM782.JCL” is now “RECEIVE.V7R8M2.JCL” and no longer has FDM embedded in the dataset name.See “Installation” on page 5 for instructions on installing StarTool FDM 7.8.2.Product DescriptionStarTool ® FDM (File and Data Manager) is a multi-purpose file and data management utility for IBM mainframe systems. It provides an ISPF-based, menu-driven, integrated interface to a variety of file editors and data management tools for PDS, PDSE (V1 and V2), VSAM, sequential, extended sequential, direct-access, IMS, and Db2 files. A TSO command-line interface is supported concurrently, and bulk file updates in batch mode are also supported.Release SummarySee “New Features in StarTool FDM 7.8.2” on page 3 for a list of the enhancements in StarTool FDM 7.8.2. See “Fixes in FDM 7.8.2” on page 4 for a list of the defects that have been fixed in FDM 7.8.2.Licensing ConsiderationsLicense SERtificates from versions prior to FDM 7.7 are not compatible with StarTool FDM 7.8 and later releases.To obtain the XML licensing key needed to make the software operational, please open an incident on the Micro Focus SupportLine website at:https:///IMPORTANT! Sites that are running z/OS 2.3 or z/OS 2.2 with z/OS 2.3 compatibility PTFs must apply FDM 7.8.2.As part of your request, please copy and paste your CPU information into the Support incident. To obtain the required CPU information, run the following command from the console on all LPARs hosting your product's software:/D M=CPUCustomer CareOnline Support — The Micro Focus SupportLine website at provides an easy way for customers to manage their support cases, download software patches, or search the Knowledgebase for the latest technical information about our products at any time.A user ID and password are required to access the Micro Focus SupportLine website. To obtain a user IDand password, sign up online or contact Customer Care by email or telephone.Telephone Support — Telephone contact numbers for Customer Care are posted by region at the following URL:https:///serena/support/No user ID or password is needed to access Customer Care contact information.Email Support — Customers can send support requests by email to***************************.Authorized Support Representative — Some support contracts specify that support calls will be centrally managed within the customer organization. This practice enables related issues to beaggregated across multiple customer sites or functional groups, and it ensures accountability for the satisfactory resolution of open issues. You should determine whether you have such a support contract before contacting Customer Care. If you do have such a contract, submit your support request to the designated support manager within your organization and arrange for that person to contact Customer Care.New Features in StarTool FDM 7.8.2StarTool FDM 7.8.2 contains one new feature. (See “Fixes in FDM 7.8.2” on page4 for a link to the defects that are fixed in FDM 7.8.2.)FDM now supports new COBOL compiler options for the HISTORY command.COBOL v5 new compiler options:https:///support/knowledgecenter/en/SS6SG3_5.2.0/com.ibm.cobol52.ent.doc/ migrate/igymopt.htmlCOBOL v6 new compiler options:https:///support/knowledgecenter/en/SSUFAU_1.0.0/com.ibm.ent.cbl.zos.doc/ migrate/igymopt6.htmlThe FDM panel only allows 8 characters for the COBOL compiler option. Here is a list of the compiler options that were added, and the full name for ones that had to be shortened.The HISTORY command itself allows for a longer name, so some of these are over 8 characters, but they all have unique strings for the first 8 characters.ALLOCATE/FREECOPYRIGH/NOCOPYRIGHT COPYRIGHT string specified/COPYRIGHT string not specifiedINLINE/NOINLINEJSON/END-JSONNUMCHPAC/NONUMCHPAC NUMCHECK(PAC)/Not NUMCHECK(PAC)NUMCHBIN/NONUMCHBIN NUMCHECK(BIN)/Not NUMCHECK(BIN)NUMCHABD/NUMCHMSG NUMCHECK(ABD)/NUMCHECK(MSG)NMCHZALPHA/NONMCHZALPHA NUMCHECK(ZONE(ALPHANUMERIC))/Not NUMCHECK(ZONE(ALPHANUMERIC)) NMCHZNNOALPHA/NONMCHZNNOAL NUMCHECK(ZONE(NOALPHANUMERIC))/Not NUMCHECK(ZONE(NOALPHANUMERIC)) PARMCHK/NOPARMCHK PARMCHECK/NOPARMCHECKPARMCHKABD/PARMCHKMSG PARMCHECK(ABD)/PARMCHECK(MSG) (If PARMCHECK is on)QUALEXTEND/QUALCOMPAT QUALIFY(EXTEND)/QUALIFY(COMPAT)SERVICE/NOSERVICE SERVICE string specified/SERVICE string not specifiedSUPPRESS/NOSUPPRESS SUPPRESS/NOSUPRESSSSRNGABD/SSRNGMSG SSRANGE(ABD)/SSRANGE(MSG)SSRNGZLEN/SSRNGNOZLEN SSRANGE(ZLEN)/SSRANGE(NOZLEN)SQLIMS/NOSQLIMSUTF-8/NOUTF-8 Program uses UTF-8 dataVOLATILE/NOVOLATILEVLRCOMPAT/VLRSTAND VLR(COMPAT)/VLR(STANDARD)ZONEDATMIG/NOZONEDATMIG ZONEDATA(MIG)/Not ZONEDATA(MIG)ZONDATNOPFD/NOZONDATNOPF ZONEDATA(NOPFD)/Not ZONEDATA(NOPFD)Fixes in FDM 7.8.2Click on the following link to access the list of defects that are fixed in FDM 7.8.2./InfoCenter/index?page=content&cat=STRFDM_7.8.2_RESOLVED&channel=DEFECTS New Features in Releases Prior to 7.8.2 FDM 7.8.1.01 - see S143103FDM 7.8.1 - see S143102FDM 7.8.0.03 - see S143101FDM 7.8.0.02 - see S143100FDM 7.8.0.01 - see S103099FDM 7.8 - see S143098Fixes in Releases Prior to 7.8.2FDM 7.8.1.01 - see /InfoCenter/ index?page=content&cat=STRFDM_7.8.1.01_RESOLVED&channel=DEFECTS FDM 7.8.1 - see /InfoCenter/index?page=content&cat=STRFDM_7.8.1_RESOLVED&channel=DEFECTSFDM 7.8.0.03 - see /InfoCenter/ index?page=content&cat=STRFDM_7.8.0.03_RESOLVED&channel=DEFECTS FDM 7.8.0.02 - see /InfoCenter/ index?page=content&cat=STRFDM_7.8.0.02_RESOLVED&channel=DEFECTS FDM 7.8.0.01 - see /InfoCenter/ index?page=content&cat=STRFDM_7.8.0.01_RESOLVED&channel=DEFECTS FDM 7.8 - see /InfoCenter/index?page=content&cat=STRFDM_7.8_RESOLVED&channel=DEFECTSInstallationThe FDM 7.8.2 product distribution files contain only the full product.You can install FDM 7.8.2 by using one of two methods:Perform an IEBCOPY (non-SMP/E) install. Perform an SMP/E install.Refer to the FDM Installation Guide for the steps to follow for each install method.Be sure to reapply any customizations you may have made to your production FDM libraries after you installFDM 7.8.2.IMPORTANT! Sites that are running z/OS 2.3 or z/OS 2.2 with z/OS 2.3 compatibility PTFs must apply this FDM 7.8.2.For a complete list of software requirements and product compatibility, refer to the Platform Matrix for StarTool FDM 7.8.2 at the following location on the Micro Focus SupportLine website:https:///prodavail.aspxKnown IssuesThe following are known issues for StarTool FDM 7.8.2:PBROWSE does not support multi-volume files. Use PVIEW or PEDIT instead.VSAM linear data sets are limited by z/OS to a fixed CISIZE (Control Interval Size) of 4K. Attempts to use StarTool FDM with a linear data set of any other CISIZE results in an ABEND. This is a permanentrestriction of the operating system, not a defect in StarTool FDM.The z/OS Binder issues an "internal binder error" when it encounters an object it doesn't recognize. When this happens, the binder returns an invalid number-of-ESD-entries value rather than an error code. This error can impact StarTool FDM. FDM customers should apply the IBM fix (APAR OW52128) to correct this error.IMS Version 8 macro libraries have been used to generate the PSBs and DBDs that are distributed with FDM 7.8.1.01. Newer versions of the IMS macro libraries may generate results not supported by FDM7.8.1.01.REPRO’d aliases in a PDS do not display with MEMBERS commandOption 3.4 LISTC not returning DATSET A.B.C when pattern A.B.C*.* is specified.Panel members PDSMENU, PDSMENUS, and PDSMENUW of the FDM782.PANELS library show invalid characters WK after the version level, as follows:LEVEL - 7.8.2 WKWorkaround:These panels need to have:&PDSLEVEL = 'wk'changed to&PDSLEVEL = 'GA'This is a cosmetic issue that will be fixed in Defect DEF339247.The VMODEL command allows specification of IDCAMS DEFINE parameters for a KSDS. The PDSMODKS panel is the second panel. This panel has an invalid value for the OWNER field, which causes an invalid IDCAMS DEFINE command to be generated and the data set not to be allocated.Workaround: Remove the unused positions (represented by dots) in the OWNER field or enter a valid value.Documentation UpdatesStarTool FDM 7.7.1 manuals are distributed with FDM 7.8.2. Refer to “New Features in StarTool FDM 7.8.2” on page 3 and subsequent sections for a description of new features in FDM 7.8.2.Accessing the DocumentationAll StarTool FDM documentation is provided in Adobe ® Portable Document Format (PDF) and may be downloaded from the following Micro Focus website:https:///support-and-services/documentation/No user ID or password is needed to access the documentation.Adobe ® Reader ® is available for free download at /reader/. Version 9 or higher is recommended.Additions and corrections to documentation can be issued after the product release date. Updated Readme files and user manuals are published with the rest of the documentation for the product release. Updated Readme files and user manuals are flagged with an Updated date in the file name or description.Searching the DocumentationThere is no cross-book index for the StarTool FDM documentation suite. You can use the Advanced Search facility in Adobe Reader to search all FDM manuals in the same or subordinate folders for information thatyou want.NOTE Change bars in the left margin of StarTool FDM documentation identify substantive changes from the last published version, unless otherwise noted.。
GCC使用教程目录1.gcc1.makefile写法2.gcc_egcs使用3.gdb使用4.gcc常用选项对代码的影响1.一般情况2.-O 编译选项3.-O2 编译选项4.-fomit-frame-pointer 编译选项5.-fomit-frame-pointer && -O26.-fPIC 编译选项7.-static 编译选项5.AT&T的汇编格式6.x86内联汇编1.简述2.内联汇编3.程序模板4.操作数5.修饰寄存器列表6.操作数约束7.示例1.寄存器约束2.匹配约束3.内存操作数约束4.修饰寄存器7.不同的CPU下最佳编译参数8.代码维护1.简单cvs2.automake3.diff4.rcs5.内核重编译常见故障6.cvs7.共享库工具8.代码优化9.GNU 编码标准10.书籍gccmakefile写法蓝森林 2001年3月22日08:44作者:许明彦Abstract:在Unix 上写程式的人大概都碰过Makefile,尤其是用C 来开发程式的人。
用make来开发和编译程式的确很方便,可是要写出一个Makefile就不简单了。
偏偏介绍Makefile 的文件不多,GNU Make 那份印出来要几百页的文件,光看完Overview 就快阵亡了,难怪许多人闻Unix 色变。
本文将介绍如何利用GNU Autoconf 及Automake 这两套软体来协助我们『自动』产生Makefile 档,并且让开发出来的软体可以像Apache, MySQL 和常见的GNU 软体一样,只要会``./configure'', ``make'', ``make install'' 就可以把程式安装到系统中。
如果您有心开发Open Source 的软体,或只是想在Unix 系统下写写程式。
希望这份介绍文件能帮助您轻松地进入Unix Programming 的殿堂。