Joomla模板开发教程
- 格式:doc
- 大小:227.50 KB
- 文档页数:55
Joomla模板制作基础教程-中文版Joomla模板制作基础教程#01前言 (2)#02准备 (3)#03下载安装joomla (4)#04 预览joomla网站前台 (8)#05 joomla模板结构 (9)#06创建你的第一个模板 (11)#07使用你的模板 (12)#08增强你的模板 (15)#09 为模板增加更多的模块 (18)#10下一步学习建议 (21)#11下一步翻译计划 (21)#01前言课程简介:尽管网上的joomla模板很多,但是由于业务逻辑的不同,很难找到一款完全适合自己的模板。
创建一个joomla并不像你想象的那么难,可以说是零基础的同学,只要按照这个教程一步一步地学习,最后也可以制作一个不错的joomla模板,至少可以知道如何去修改现有的模板。
这个教程翻译自国外的一篇文章(囧,忘了具体是哪一篇了),在翻译的过程中根据国人的阅读习惯对教程进行了一些必要的修改,而且也补充了一些个人的理解。
在这个教程当中,你将学到joomla模板的基础知识,并在此基础上创建你的第一个joomla模板。
我们会一起快速地创建一个本地服务器来安装joomla,然后开始我们的joomla模板制作之旅。
译者简介:Rain(http://rain.gd),Joomla爱好者,在学习joomla的过程中深深地感受到joomla功能的强大,同时也发现国内joomla的学习资源很零散,joomla的中文社区不够活跃,新手在学习joomla的过程中如果遇到什么问题都很难及时地找到合适的解决方案。
就是在这种情况下,joomla粉丝网()上线了,joomla粉丝网以非常简洁的论坛风格、清晰的版块设置、丰富的资源优势迅速被广大joomla爱好者所认可,现在,这个joomla中文社区逐渐地活跃了起来,每天都有宝贵的资源在这里分享。
所以,如果大家在学习这个课程的过程中遇到什么问题,可以去我的博客给我留言,也可以去joomla粉丝网()寻求帮助。
相关内容-->普及一下PHP的简单知识,,就是我们所熟知的程序基本打印功能,示例即是打印出隐号部分内容,那么上述index.php中的baseurl?>便是打印当前网站的绝对路径,language; ?>的意思便是当前网站的语言设置,如果我们在后台设置的网站前台语言为中文,那么通过浏览器查看源码得到的就是。
回到正题,index.php中,我们创建了top和bottom的两个模块位置,格式:,这里的top和bottom就是我们在templateDetails.xml预设的位置配置,另外还创建了一个非常重要的组件,那就是Joomla的基本组件:文章格式如:,大部分新手忽略了这个从而测试的时候发现不了文章内容。
保存好文件之后,刷新前台,即可看到被设定位frontpage的文章了!如下图,虽然难看了点:Joomla模板制作实战教程-创建各种模块位置2011-09-27 22:22在上一节(Joomla模板制作实战教程【一】-创建一个简单的模板)中我们创建了一个非常简单的模板,包含了默认的文章组件、top和bottom两个模块位置。
虽然看起来比较不养眼,但是我们掌握了Joomla模板的一个基本结构,这节我们要针对一个设计完整的设计稿进行规划。
首先需要解释一下“模块位置”的概念。
之前做的一些开发分享,总是会碰到一些似乎入门的朋友容易把模板和“模块”当成两回事,所以有必要把它们的概念讲清楚,Joomla的模板其实就相当于一个白纸,你需要在上面画上各种具体对象,它才能成为一真正模板,而我这里说的具体对象,不仅仅包括文章内容,它主要各种模块,诸如你看到的一条一条的新闻列表、排列整齐的图片列表、带输入用户名密码的登陆区域。
他们构成了一个真正的模板。
所以当你下载了一个新的纯模板,它安装在Joomla系统之后,是看不到你所看到的模板样子,它需要各种模块去、组件内容(如文章内容)填充这张空白的纸,模块又是组件的另一种表现形式。
【开发篇】Joomla模块+组件开发简介Joomla!是一套在国内外相当知名的内容管理系统(Content Management System, CMS),它属于Portal(企业入口网站)类型,顾名思义,就是比较适合作为商业类型的网站程序。
Joomla!是使用PHP语言加上MySQL数据库所开发的软件系统,可以在Linux、Windows、MacOSX等各种不同的平台上执行。
目前是由Open Source Matters ()这个开放源码组织进行开发与支持。
我用Joomla框架开发项目已有1年多,所以对于joomla还是有些了解的。
下面我将给大家介绍下我在以前项目中开发的一个比较有用的模块功能,以及相关技术与基本思想。
网站的实例与显示效果可以参考/网站主页上的focus on 模块,当然,我要解说一下,不然你是发现不了什么效果的。
这个模块的功能根据后台的功能在所有存储在jos_content表里的文章中,选出你要显示在前台的文章标题,可以编辑模块来实现对这些文章进行排序,增加新文章,删除文章的操作,这样你只要在后台选择你想要发布的文章就可以显示在页面上了。
实现方式大家要是开发过joomla的话应该知道,joomla中模块里的xml配置文件有params 参数的设置,而其中type的类型是否起作用,是根据目录/libraries/joomla/html/parameter/element/ 文件夹下的文件所决定的,所以这样我们可以参考这些文件写出一个我们自己定义的类型出来。
所以,只要明白这个,这个模块就可以很容易的实现了。
思路做法:自定义类型,生成一个弹框的按钮,用iframe 连接到自己写的component 中,component中对文章进行增,删,改,查的操作等等。
然后把选中的文章ID 跟排序顺序放到你自定义的类型value里面,模块中取得值进行处理。
基本就是这样。
其实模块写起来很简单,主要还是所调用的component组件的处理比较麻烦。
学习使用Joomla扩展进行网站功能定制与开发的步骤第一章:理解Joomla扩展Joomla是一种流行的内容管理系统(CMS),它提供了许多扩展功能,用于扩展和定制网站的功能。
在开始学习Joomla扩展之前,首先需要了解Joomla的基本概念和结构。
Joomla由核心框架和扩展组成,扩展包括组件、模块、插件和模板。
组件用于管理和显示网站内容,模块用于在网站上展示特定的功能,插件用于增强网站的功能,而模板用于定义网站的外观和布局。
第二章:选择适合的扩展类型在进行网站功能定制和开发之前,需要根据具体的需求选择适合的扩展类型。
例如,如果想要添加一个新的功能页面,可以选择开发一个自定义组件;如果只想在某个特定位置显示一些内容,可以选择开发一个模块;如果想要增强某些功能的特定行为,可以选择开发一个插件。
第三章:学习Joomla扩展开发的基本知识在开发Joomla扩展之前,需要了解一些基本的开发知识。
这包括掌握HTML、CSS和PHP等前端和后端开发语言,熟悉Joomla的核心框架和API,以及了解数据库操作等相关知识。
第四章:创建自定义组件创建自定义组件是一种常见的网站功能定制和开发方式。
首先,在Joomla的扩展管理中创建一个新的组件,然后编写组件的代码和模板文件。
在组件的代码中,可以定义数据库表、添加前端和后端的控制器、视图和模型等功能。
同时,还需要对组件的菜单和权限进行配置,以便在后台管理中进行操作。
第五章:开发自定义模块自定义模块是展示特定功能的常用方式。
通过创建一个新的模块,可以在网站的不同位置展示自定义内容。
首先,在Joomla的扩展管理中创建一个新的模块,然后编写模块的代码和模板文件。
通过模块的代码,可以定义模块的输入参数和输出内容,以及实现模块的业务逻辑。
第六章:编写自定义插件自定义插件可以增强网站的功能和特性。
通过创建一个新的插件,可以在特定的事件或动作发生时执行自定义代码。
首先,在Joomla的扩展管理中创建一个新的插件,然后编写插件的代码。

第一章Joomla!扩展开发:概况你以前开发过动态网站但你的朋友告诉你有关Joomla!的事,所以你决定试一试。
从美食网上那些著名的厨师中得到灵感后,你想建立一个简单的关于餐厅的网站。
这个网站的安装比你期望要建立的内容管理系统要快速和平稳。
当你找到一个精美的模板并添加了一些菜单和一些内容后,你开始考虑增加一些新的特性可以给你带来更多的访问量,甚至是利润。
之后,你安装了购物车来买书,一个论坛来收集意见和一些边栏广告。
为什么扩展JoomlaJoomla!不但能够处理内容文章,而且允许你干净整合各种复杂的应用。
开发者为Joomla!开发各种扩展,如购物车、论坛、职位发布等。
所有这些扩展能够运行在单个数据库、模板和核心。
我们开发出来的扩展,界面是完全统一的。
当你正确地开发扩展后,你就不用登录数据库和做其他基本的配置。
另外,你也可以分发你自己开发的扩展给别人与别人分享你的成果,不需要另外的编程和数据库操作。
自定义VS 扩展Joomla!的代码是设计成可扩展的而不是直接修改它的核心代码。
当有升级版本或者有补丁的时候,Joomla!才会升级它本身的核心代码,而你的扩展是不会被覆盖的。
如何扩展JoomlaJoomla!支持三类扩展,每一类都有其特殊的用途。
组件组件是最基本的,组件就是你所看到的页面的主要部分。
Joomla!的设计是为每个页面加载和运行一个组件。
因此,Joomla!核心的内容管理功能本身也是一个组件(例如: com_content)。
组件通常有强大的后台管理功能。
后台通常用来创建和更新数据库记录。
你也可以通过它允许网站管理员去上传图片或者视频文件。
模块相对于组件而言,一个页面可以有很多的模块。
模块一般由边栏的元素或者是内容菜单组成,模块显示组件的内容,但它们不是页面的主要内容。
Joomla! 也支持不需要编程的内容模块(例如: 自定义模块)。
模块后台的控制是有限的,一般由一些基本的格式组成。
插件当网站需要插入一些代码来实现某些逻辑时,可以由插件实现(以前叫做Mambot)。
Joomla网站搭建的基本操作指南第一章:介绍Joomla和其优势Joomla是一种开源内容管理系统,用于创建和管理网站的工具。
它是在PHP语言下开发的,具有用户友好的界面和丰富的功能。
Joomla被广泛应用于个人博客、企业网站和电子商务平台等各种类型的网站。
其优势包括灵活性,可扩展性,以及大量的模块和插件可供选择。
第二章:Joomla的安装在开始创建网站之前,我们先来了解如何安装Joomla。
首先,您需要下载Joomla的安装包并将其上传到您的网站主机。
然后,创建一个新的MySQL数据库,并将其相关信息输入到Joomla的安装向导中。
随后,按照向导的指示完成安装。
完成后,您将获得一个Joomla的管理员账户,可以用来管理您的网站。
第三章:Joomla的基本设置一旦安装完成,您需要进行一些基本设置来适应您的网站需求。
您可以设置网站的名称、描述和Logo等信息。
此外,您还可更改网站的默认语言和时区。
要进行这些设置,只需登录到Joomla的后台管理界面,转到全局配置部分,并按照您的需求逐一调整。
第四章:Joomla的模板选择与编辑Joomla提供了大量的模板供您选择,您可以根据自己的喜好和网站主题进行选择。
从Joomla官方网站或第三方网站下载所需模板,并将其上传到Joomla的模板目录中。
然后,在后台管理界面中,转到模板管理部分,选择您上传的模板并进行编辑。
您可以调整布局、颜色和字体等,以使其与您的品牌形象一致。
第五章:Joomla的内容管理Joomla的核心功能之一是内容管理。
您可以创建各种类型的内容,包括文章、图片、视频和音频等。
在后台管理界面中,您可以创建新的文章,并设置其标题、文本和元数据等信息。
此外,您还可以为文章添加标签和分类,以便更好地组织和检索。
第六章:Joomla的扩展功能Joomla的强大之处在于其丰富的模块和插件。
它们可以为您的网站增加各种功能,如社交分享、网站地图和网上支付等。
Joomla模板制作教程在这个教程里,我们将一步步的制作一个具体的JOOMLA模板,JOOMLA是一个强大的开放代码的CMS(内容管理系统),并且她有着广泛的在线社团的支持.这里强调,我们将不使用table(表单);而是使用cascading style sheets (CSS) 建立模板.这种方式的最终目的是为了更加适应World Wide Web Consortium (W3C) 的标准.这也促进其更快的被装载load(不知是指浏览器还是搜索引擎)和更容易被搜索引擎收录.在后面的说明中我们再详细的讨论.本指导手册包括下面的章节:* 什么是JOOMLA模板? 解释怎样执行JOOMLA模板和比较没有内容的普通模板和CMS(内容管理系统)的模板有什么区别.* 本地编辑模板的过程.主要解释设计的过程与静态的web页面有什么不同* W3C标准和无表单设计.主要讨论在JOOMLA中进行无table(表单)设计和W3C标准有什么关系.* JOOMLA模板的组成.JOOMLA的模板文件组成和模板中那些过程被执行.* 使用cascading style sheets (CSS)布局.主要讨论如何使用CSS布局来取代table布局. * 默认JOOMLA样式表.介绍一些基本的JOOMLA的CSS应用.怎么调用强大的JOOMLA 内核.* Modules组件.怎样布置你的组件和一些技巧.* Menus菜单.使用CSS建立一些简单的类似于JS编出来的菜单.* Hiding Columns(隐藏列表).怎样控制Columns和隐藏一些没有内容的Columns.* 总结* 附录.一些有用的链接和资源.第一节:模板组成为了理解JOOMLA模板的目录结构, 我们将着眼于一个空白的JOOMLA模板. 不同的文件和文件夹组成了JOOMLA的一个具体模板. 这些文件必须被放置在/templates 的JOOMLA安装目录下. 比如,我们安装了两个模板,我们的目录结构看上去就是这样的:/templates/JS_Smoothportal/templates/JS_Synergy大家注意模板的名称必须就是/templates 目录下文件夹的名称,在这个例子中就是JS_Smoothportal 和JS_Synergy. 很显然,这些名字最好是能反应出模板的风格或者出处. 在一个具体模板的目录下,有以下关键文件:/JS_Smoothportal/templateDetails.xml/JS_Smoothportal/index.php这两个文件的文件名必须定义的和JOOMLA核心脚本预定义的完全相同.* templateDetails.xml(注意字母‖D‖大写) 一个XML格式的文件告诉JOOMLA核心在使用当前模板时的文件清单. 这里也描述了作者;文件名称;copyright信息;甚至包括模板使用的图片文件的清单. 最后一次使用该文件也就是我们在管理后台对该模板进行安装的时候.* index.php这个文件也是最重要的文件. 它对整站进行布局并且告诉JOOMLA内核何处放置组件和模块.它往往是一种PHP与(X)HTML的‖混合体‖.绝大多数的模板也使用了一些‖附加文件‖. 一般会像下面的定义(尽管JOOMLA内核没有要求):/JS_Smoothportal/template_thumbnail.png/JS_Smoothportal/css/template_css.css/JS_Smoothportal/images/ logo.png* template_thumbnail.png当前模板的浏览器截图(通常使用140*90像素尺寸). 安装模板完毕以后,这张图片会以‖缩略图‖的形式在后台模板管理器中展示.* css/template_css.css模板的CSS文件. 文件夹的路径是可以选择的,但是你必须对它进行指定. 注意文件名和路径是在index.php中指定的. 你可以取一个你喜欢的名字. 通常文件名反映使用状况, 我们在后面阐述这种命名方法在多个CSS文件使用时的优点.* images/logo.png在模板里面有很多图片文件. 一般的我们把这些图片归理至一个文件夹,而这个例子中我们只有一个文件logo.png你可以用管理后台安装zip格式的上传好的文件,也可以手动的在服务器上copy文件,但是你必须把他们放置在/templates目录下.templateDetails.xml格式templateDetails.xml 必须包括模板使用的所有文件. 它也包括了作者和版权信息等内容.在后台的模板管理器这些信息将会被展示,下面是一个XML文件的例子:<mosinstall type=‖template‖ version=‖1.0.x‖><name>YourTemplate</name><creationDate>March 06</creationDate><author>Barrie North</author><copyright>GNU/GPL</copyright><authorEmail> compassdesigns@这个E-mail 地址已经被防止灌水恶意程序保护,您需要激活Java Script 才能观看This e-mail address is being protected from spam bots, you need JavaScript enabled to view it </authorEmail><authorUrl></authorUrl><version>1.0</version><description> An example template that shows a basic xml details file </description><files><filename>index.php</filename><filename>js/ie.js</filename><filename>template_thumbnail.png</filename></files><images><filename>images/header.png</filename><filename>images/background.png</filename><filename>template_thumbnail.png</filename></images><css> <filename>css/base.css</filename><filename>css/norightcol.css</filename><filename>css/template_css.css</filename></css></mosinstall>让我们来解释这些行的意义:* mosinstall这个命令参数是安装程式的指令. 参数type=‖template‖ 告诉安装程序我们安装的是一个模板* name:定义你模板的名称. 这个名称会在安装模板的时候以目录夹名的形式被安装在模板目录下. 因此这个name不能包括文件系统不能处理的字符, 比如空格. 如果是手动安装, 你就必须在JOOMLA模板目录下手动创建一个与这个name一致的目录夹.* creationDate:模板建立的日期. 自由填写比如你可以填写May 2005, 08-June-1978, 01/01/2004 etc.* author:这个模板设计者的名称- 比如你的名字* copyright:版权信息的内容. 这里Licensing Primer for Developers & Designers 可以找到JOOMLA 相关的内容.* authorEmail:作者邮件信息Email.* authorURL:作者站点* version:模板版本* files:―files‖ 部分声明的是这个模板包括的PHP文件或者缩略图文件. 每个文件被列出在<filename>与</filename>之间,包括完整的路径. 它也可以包括一些附加文件, 这里的例子我们看到的是一个次模板使用的一个JS文件.* images:所有的图片文件在这个部分被列出. 所有图片文件在你模板目录下的完整路径将包含在<filename>与</filename>之间. 比如: 如果你的模板目录是‘YourTemplate‘,所有的图片文件在‘images‘下,它是在‘YourTemplate‘下的目录,那么有效的路径就是:<filename>images/my_image.jpg</filename>* css:样式表被显示与此部分. 同样也在<filename>与</filename>之间定义,这个定义对于多样式表将非常重要,我们将在下面的内容里讨论.The index.php究竟是那些内容在index.php文件中呢?它应该是一个关于网站次模板的布局外观的(X)HTML和PHP的混合体首先我们看到是下面一段有效模板的文档定义,文档类型的表述在这段顶部定义,这段代码在所有的页面文件首部都会出现,在例子模板的index.php顶部,我们看到下列代码:<!DOCTYPE html PUBLIC ―-//W3C//DTD XHTML 1.0 Transitional//EN‖―/TR/xhtml1/DTD/xhtml1-transitional.dtd‖><html xmlns=‖/1999/xhtml‖lang=‖<?php echo _LANGUAGE; ?>‖ xml:lang=‖<?php echo _LANGUAGE; ?>‖>一个具体页面要被浏览器呈现,文档类型描述―DOCTYPE‖是最基础的部分,特别的,如何让浏览器解读CSS. 为了给你一个直观的解释上面有这样一段:[W3C关于‖doctypes‖就是:] ―written by geeks for geeks. And when I say geeks, I don‘t mean ordinary web professionals like you and me. I mean geeks who make the rest of us look like Grandma on the first day She‘s Got Mail.™‖(他妈的这句真拗口,字面意思:小丑写给小丑.我说的小丑,不是说像你我一样专业的网站,我是指一些除你我以外类似一个老太太收到了一封电子邮件—–anthax)总之,有几种文档类型你可以使用. 首先, doctype定义告诉浏览器如何解读页面.这里单词‖strict‖(严格的) and ―transitional‖(过度的)开始获取浮动范围(float:left and float:right 通常). 实质上,自从WWW诞生以来,不同浏览器对CSS都有不同的支持. 比如, IE浏览器不明白―min-width‖ 命令是设置一个最小页面宽度. 另外一方面你必须对CSS进行―hacks‖ .strict(严格的)的意思就是html(or xhtml)必须严格按照标准规范执行.而transitional(过渡的)意思就是默许一些和标准不同的语法.上面的设置可能会把事情搞复杂,比如存在一些‖双关‖模式语法,如果‖doctype‖定义的不合适或者错误了,浏览器不能解读,就会进入‖双关‖模式,尝试所谓的‖逆向兼容‖,类似于IE,浏览器会在版本较低时‖伪装页面‖.很不幸,大家偶尔也会在‖双关模式‖上发生错误,有下面两种情况:使用doctype 声明straight (严格) 模式来自W3C, 结尾标识为:DTD/xhtml1-strict.dtd除了这是一个WC3 server的链接. 你必须在上面的声明加上完整的路径.* Microsoft set up IE6 so you could have valid pages, but be in quirks mode. This happens by having an ―xml prolog‖ put before the doctype.<?xml version=‖1.0″ encoding=‖iso-8859-1″?>IE6.0的‖双关模式‖非常重要. 本指导手册都是为IE6+设计的, 我们必须确信它运行于标准模式下这将让我们后期的修改工作最小化.XML智能语言几乎没有竞争, 我们将关注JOOMLA的最新版本在此方面的变化.让网页符合标准, 当你看见‖valid xhtml‖ 标记出现并不是意味这复杂的代码和难以理解的标签. 它只是告诉你doctype类型, 是的,不用考虑太多,标准化你的站点,这取决与你怎样去做.一些有用的链接:* /css/quirksmode.html* /stories/doctype* /QA/2002/04/Web-Quality* /index.php/topic,7537.0.html* /index.php/topic,6048.0.html还有其他什么内容在index.php里面?让我们来看看头部的结构, 我们尽量将其简化, 但是一个完成的站点模板index.php中必须包含一些内容. 通常header里面是这样的:<?ph p defined( ‗_VALID_MOS‘ ) or die( ‗Direct Access to this location is not allowed.‘ ); ?> <!DOCTYPE html PUBLIC ―-//W3C//DTD XHTML 1.0 Transitional//EN‖―/TR/xhtml1/DTD/xhtml1-transitional.dtd‖><html xmlns=‖/1999/xhtml‖ lang=‖<?php echo _LANGUAGE; ?>‖xml:lang=‖<?php echo _LANGUAGE; ?>‖<head><meta http-equiv=‖Content-Type‖ content=‖text/html; <?php echo _ISO; ?>‖ /><?phpif ($my->id) { initEditor(); } ?><?php mosShowHead(); ?><script type=‖text/javascript‖> </script><!–/web/css/fouc.asp–><link href=‖templates/<?php echo $cur_template; ?>/css/template_css.css‖rel=‖stylesheet‖ type=‖text/css‖ media=‖screen‖ /></head>这些都是什么意思呢?<?php defined( ‗_VALID_MOS‘ ) or die( ‗Direct Access to this location is not allowed.‘ ); ?>这里是判断文件是否可以被访问.<?php defined( ‗_VALID_MOS‘ ) or die( ‗Direct Access to this location is not allowed.‘ ); ?> <!DOCTYPE html PUBLIC ―-//W3C//DTD XHTML 1.0 Transitional//EN‖―/TR/xhtml1/DTD/xhtml1-transitional.d td‖><html xmlns=‖/1999/xhtml‖ lang=‖<?php echo _LANGUAGE; ?>‖ xml:lang=‖<?php echo _LANGUAGE; ?>‖<head>在上面这段. ―<?php echo _LANGUAGE; ?>‖ 设定了整站的语言.<meta http-equiv=‖Content-Type‖ content=‖text/html; <?php echo _ISO; ?>‖ />设定使用的字符集, _ISO 是一个我们用来定义编码字符集的特定常量.<?php if ($my->id) { initEditor(); } ?>当一个用户登录你的网站,判断变量my是否‖非零‖. 如果一个注册用户登录,那么一个默认的‖所见即所得‖编辑器被自动装载,当然是在你的允许设置下,你也可以事先就装载编辑器, 但是非法的或者一般游客是没有必要的. .<?php mosShowHead(); ?>Header信息是全局配置的集合. 它包括了下面的标签(默认安装):* <title>A Complete Guide to Creating a Joomla Template </title>* <meta name=‖description‖ content=‖Installing Joomla, doctype and the blank joomla template‖ />* <meta name=‖keywords‖ content=‖installing joomla, joomla doctype, blank joomla tempate‖ />* <meta name=‖Generator‖ content=‖Joomla! - Copyright (C) 2005 Open Source Matters. All rights reserved.‖ />* <meta name=‖robots‖ content=‖index, follow‖ />* <link rel=‖shortcut icon‖ xhref=‖images/favicon.ico‖ /><script type=‖text/javascript‖> </script>To stop a bug, that being a flash of un-styled content. Details courtesy of Blue Robot. Note this can be any script file, so if we add one, we can remove this line.<link href=‖templates/<?php echo $cur_template; ?>/css/template_css.css‖rel=‖stylesheet‖ type=‖text/css‖ media=‖screen‖ />这行是模板CSS样式文件的链接. PHP 代码<?php echo $cur_template; ?> 返回当前模板名称. 这种用变量传递模板名称的方法很灵活,不用在你手工设置模板的时候还要再来修改具体的模板名称.你也将看到, 在temmplate_css.css 文件里, 我们将使用@import 来处理Netscape 4 访问时的异常. 使用老版本的浏览器不能打开CSS脚本,如果你要求兼容老版本的浏览器, 我们将要有很多CSS HACKS.一个空白JOOMLA模板的BODY这会非常简单,准备好了么?<body><!– 1 –><?php echo $mosConfig_sitename;?><!– 2 –><?php mospathway()?><!– 3 –><?php mosLoadModules(‘top‘);?><!– 4 –><?php mosLoadModules(‘left‘);?><!– 5 –><?php mosMainBody();?><!– 6 –><?php mosLoadModules(‘right‘);?><!– 7 –><?php include_once( $mosConfig_absolute_path .‘/includes/footer.php‘ );?></body></html>这里是这样一个顺序:1. 站点名称2. pathway3. top module4. left modules5. main content6. right modules7. 默认的footer module最后是尽可能的实现‖语意相关‖. 考虑到不同的‖浏览对象‖, 浏览器;网络蜘蛛;或者是一般浏览者. 这方面的思考是站点‖易接近‖的基础.没有什么比‖语意相关‖更重要. 如果设计者随意的定义自由的模块, 你会有很多麻烦. 关于CMS站点的重要考虑, 模板是管理内容布局的不二选择. 这也是很多设计者努力让其站点‖有效化‖的原因.。
Joomla模板开发作者ZMAX程序人在本节中我们将详细介绍模板的index.php文件。
如果你做过web开发,那么你会有这样的几个问题:1.怎样给一个模板增加css2.怎样给一个模板增减js3.怎样在我的模板中使用JQuery库4.joomla模板是用什么语言开发的5.joomla模板和普通的html文件有什么不同看代码(因为代码太长,故将一个index.php文件分成3部分来讲解)/*** @package Joomla.Site* @subpackage Templates.beez_20* @copyright Copyright (C) 2005 - 2013 Open Source Matters, Inc. All rights reserved.* @license GNU General Public License version 2 or later; see LICENSE.txt*/// No direct access.defined('_JEXEC') or die;jimport('joomla.filesystem.file');// check modules$showLeftColumn = ($this->countModules('position-1') or$this->countModules('position-2') or$this->countModules('position-3'));$showRightColumn = ($this->countModules('position-5') or$this->countModules('position-6') or$this->countModules('position-7'));$showBottomBox =($this->countModules('position-8') or$this->countModules('position-9') or$this->countModules('position-10'));JHtml::_('behavior.framework', true);// get params$color = $this->params->get('templatecolor');$logo = $this->params->get('logo');$navposition = $this->params->get('navposition');$app = JFactory::getApplication();$doc = JFactory::getDocument();$templateparams = $app->getTemplate(true)->params;$doc->addStyleSheet($this->baseurl.'/templates/system/css/system.css' );$doc->addStyleSheet($this->baseurl.'/templates/'.$this->template.'/cs s/position.css', $type = 'text/css', $media = 'screen,projection'); $doc->addStyleSheet($this->baseurl.'/templates/'.$this->template.'/cs s/layout.css', $type = 'text/css', $media = 'screen,projection'); $doc->addStyleSheet($this->baseurl.'/templates/'.$this->template.'/cs s/print.css', $type = 'text/css', $media = 'print');$doc->addStyleSheet($this->baseurl.'/templates/'.$this->template.'/po sition/css/topbar.css', $type = 'text/css');$doc->addStyleSheet($this->baseurl.'/templates/'.$this->template.'/po sition/css/head.css', $type = 'text/css');$doc->addStyleSheet($this->baseurl.'/templates/'.$this->template.'/po sition/css/footer.css', $type = 'text/css');$doc->addStyleSheet($this->baseurl.'/templates/'.$this->template.'/po sition/css/mid.css', $type = 'text/css');$doc->addStyleSheet($this->baseurl.'/templates/'.$this->template.'/po sition/css/page.css', $type = 'text/css');/*$doc->addStyleSheet($this->baseurl.'/templates/'.$this->template.'/ position/css/print.css', $type = 'text/css');*/$doc->addStyleSheet($this->baseurl.'/myjs/lightbox/css/lightbox.css', $type = 'text/css');代码解释:第9行代码: defined('_JEXEC') or die 这个是joomla的安全机制。
本教程带你洞察Joomla!的模板系统并告诉你能做些什么。
模板的作用是什么?模板控制了站点的总体显示和布局。
它结合站点CSS提供了整合各种通用元素、模块和组件的架构。
站点的前台和后台都有模板。
当 Joomla! 首次安装时它自动包含了几个模板。
在其他网站你能找到更多模板。
某些模板是免费的,某些则需要购买。
另外,某些开发者可提供模板定制。
你当然也能自己开发模板。
模板通过模板管理器来管理,后者可在你站点管理后台的扩展菜单上找到。
Joomla!为何使用模板?一个初学者的真正指南!Joomla!设计的方式是剥离出核心任务,涉及生成使用软件高效维护的网站。
任务之一就是创建站点美学(外观、感觉和布局)。
这包括诸如在给定页面放置何种内容元素(组件、模块和插件)的决策。
当生成一个web页面,多数元素的定位仍保持不变(菜单,横幅定位,边栏等)。
此外,你期望为每个页面创建同样的外观(字体,头部样式,色彩设计等)。
站点的某些单元你也许想通过改变口味来提示这些页面的不同用途(例如博客单元)。
这需要一些规划,但是一旦你确定了整站的布局,你需要自己生成每个内容页。
这就需要模板了。
你可以单独为每个页面书写代码,或为站点的每个主体单元使用模板,这样当你需要创建一个新页面的时候你就只需要“填空”了。
好,也许这不是很简单,但是教程就是设计用来引导你有效使用模板,从如何开始使用模板,到如何创建自己的模板结束。
1. 使用Joomla! 提供的模板之一2. 从互联网下载免费模板3. 如果需要可考虑付费模板总结–模板控制了站点的外观,并且简化了你创建新页面的工作。
更多细节请参阅下章,“我能对模板做些什么?”模板用来操控提交给浏览器的内容的方式。
这里有些方法你可以用来部署到你的Joomla!站点。
布局模板就是设定你站点主体布局设计的地方。
这包括放置多种不同的元素(组件,模块和插件),它们组合成不同类型的内容。
例如:1. 不同的菜单(你可以从现有选项选择,也可以创建自己的菜单)2. 广告横幅3. 投票4. 页面的主体单元(你可以选择不同的样式比如典型的博客布局或一个新文章等等)如果模板设计用来提供选择,你就能“动态”地改变站点内容布置,或许把主菜单放到页面的右侧或左侧。
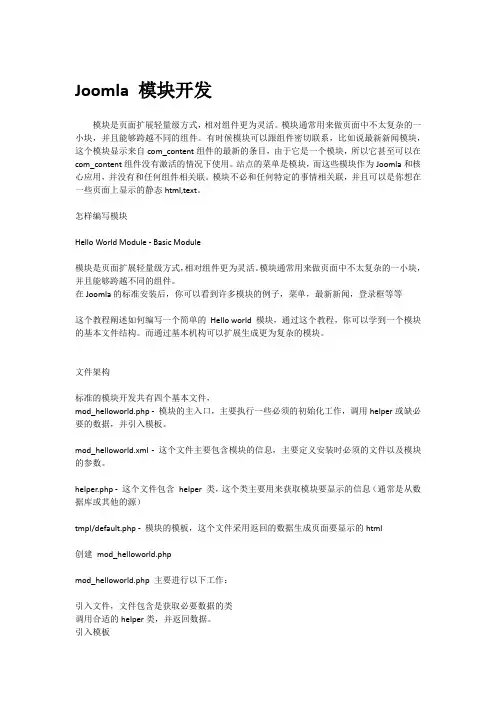
目录Developing an MVC Component/1.Introduction (18)Notes (18)Requirements (18)Migrating Joomla! 2.5 to Joomla! 3.0: (18)New MVC in Joomla! 3.0 (20)Developing an MVC Component/2.Developing a Basic Component (21)Notes (21)How to add a component to Joomla! (21)Installing the Hello World! Component (23)File Details (24)Component Contents (26)Developing an MVC Component/3.Adding a view to the site part (28)Note (28)Adding a View to Hello World! (28)Updating the Hello World! Component (29)File Details (30)Code Explanation (36)helloworld.php (36)controller.php (37)view.html.php (38)default.php (39)helloworld.xml (39)Component Contents (39)Developing an MVC Component/4.Adding a menu type to the site part (42)Note (42)Adding a Menu Item to Hello World (42)Updating the Hello World! Component (43)File Details (44)Code Explanation (46)default.xml (46)helloworld.xml (47)Component Contents (47)Developing an MVC Component/5.Adding a model to the site part (49)Note (49)Adding a Model to Hello World! (49)Updating the Hello World! Component (50)File Details (50)Code Explanation (56)helloworld.php (56)view.html.php (56)Component Contents (57)Developing an MVC Component/6.Adding a variable request in the menu type (60)Introduction (60)Adding a variable request in the menu type (60)Packaging the component (66)Developing an MVC Component/ing the database (68)Introduction (68)Using the database (68)Adding a new field type (72)Display the chosen message (76)Packaging the component (81)Developing an MVC Component/8.Basic backend (83)Introduction (83)Basic backend (83)Create the general controller (84)Create the view (86)Create the model (91)Packaging the component (93)Developing an MVC Component/9.Adding language management (98)Introduction (98)Adding language translation in the public site (98)Adding language translation when managing the component (99)Adding language translation when managing the menus in the backend (100)Language File Location Options (100)Packaging the component (103)Developing an MVC Component/10.Adding backend actions (109)Introduction (109)Adding a toolbar (109)Adding specific controllers (115)Adding an editing view (118)Adding a model and modifying the existing one (123)Packaging the component (128)Developing an MVC Component/11.Adding decorations to the backend (135)Introduction (135)Adding some icons (135)Modifying the views (136)Adding the filters (148)Modifying the main entry file (153)Adding some strings in the language file (154)Packaging the component (156)Developing an MVC Component/12.Adding verifications (163)Introduction (163)Verifying the form (client side) (163)Verifying the form (server side) (176)Packaging the component (178)Developing an MVC Component/13.Adding categories (185)Introduction (185)Modifying the SQL (186)Modifying the form (187)Modifying the menu type (189)Managing the submenu (192)Getting the associated category titles (200)Updating the Layout (203)Adding some ACL (207)Adding some translation strings (208)Packaging the component (210)Developing an MVC Component/14.Adding configuration (217)Introduction (217)Adding configuration parameters (217)Using configuration parameters as default value (222)Modifying the SQL (225)Modifying the backend (228)Modifying the frontend (231)Adding some translation strings (238)Packaging the component (240)Developing an MVC Component/15.Adding ACL (247)Introduction (247)Adding Access Control (247)Minimal ACL requirements at the component level (248)Add the 2 minimal component level actions to access.xml (248)Add the permissions fieldset to config.xml (249)Add the 'Options' toolbar button when user is authorised for it (250)Restrict the access to the component's backend to authorised usergroups (251)Adding more actions, also at category level and item level (251)Describing the actions you want to control the access to (252)Adding the setting of permissions in the component's Preferences (253)Displaying only the right toolbar buttons (255)Restricting access to the component (265)Add the asset_id column to the database table (266)Restricting access to the messages (268)Setting the permission values in the assets table (275)Showing the setting of permissions on the item level (280)Adding language strings (286)Further reading (288)Packaging the component (289)Developing an MVC Component/16.Adding an install-uninstall-update script file (296)Introduction (296)Creating the extension script file (296)Adding some language keys (300)Packaging the component (302)Developing an MVC Component/17.Adding a front-end form (310)Introduction (310)Functionality (310)Approach (311)Updating the Database (312)Adding a menu item (313)Displaying the new form view (314)Handling the form HTTP POST (326)Configuration Parameters (334)Display the new fields on the Admin list form (337)Updated Language Strings (352)Packaging the Component (357)Developing an MVC Component/18.Adding an Image (364)Functionality (364)Approach (364)Updating the Database (365)Admin Helloworld Edit Form (366)Admin Helloworlds List View (384)Site Helloworld Display (393)Site Helloworld Form (398)Updated Language Strings (414)Packaging the Component (419)Developing an MVC Component/19.Adding a Map (427)Page Under Review! (427)Functionality (427)Approach (427)Updating the Database (428)Admin Helloworld Edit Form (429)Admin Helloworlds List View (434)Site Helloworld Display (444)Map Javascript and CSS code (453)Updated Language Strings (458)Packaging the Component (462)Using Google Maps (469)Developing an MVC Component/1.IntroductionThis is a multiple-article series of tutorials on how to develop a Model-View-Controller Component for Joomla! Version.Begin with the Introduction, and navigate the articles in this series by using the navigation button at the bottom or the box to the right (the Articles in this series).∙If you are new to Joomla!, please read Absolute Basics of How a Component Functions.∙This tutorial is adapted from Christophe Demko: Developing a Model-View-Controller Component/2.5o WARNING: this tutorial will not repeat the comments of Demko. To see them, please have a look to the original tutorial for Joomla! 2.5:Developing an MVC Component for Joomla! 2.5 - IntroductionYou need Joomla! 3.0 (with PHP, MySQL and Apache/Microsoft IIS) or greater for this tutorial. I gathered a lot of information and then I started to migrate the component of the new Joomla! 2.5 to 3.0. Below is some important information used for migration. Please see also all the information about migration Upgrading Versions. Use "display_errors On" to help with debugging errors.Remember that you need to add Legacy at any place where you are directly extending JModel, JView or JController. If it is indirect (like through JModelList) you don't have to, it's already taken care of. Other than that and the fact that, as announced long ago, deprecated code has been removed (I'd guess that JParameter is the biggest impact), extensions should only need minor changes ... Although youwill want to look at the output changes that Kyle is working on. Of course, if you are building standalone platform applications, the new MVC and JApplicationWeb/JApplicationCLI are completely the way you should work and the nice thing about the way we have done this is that the new packages are already right there on your server having arrived with the CMS. (Elin in development list)Samples: DS Since we've removed the DS constant in 3.0, we need to replace the uses of the constant in com_media. The most unobtrusive change is to simply replace it with PHP's DIRECTORY_SEPARATOR constant since DS is an alias to that. However, the recommended way to do it is to simply use the slash, i.e. 'components/com_example/models/example.php' instead of'components'.DS.'com_example'.DS.'models'.DS.'example.php'. This is windows safe.(joomlacode)"Version 12.1 of the platform introduced a new format for the model-view-controller paradigm. In principle, the classes JModel, JView and JController are now interfaces and the base abstract classes are now JModelBase, JViewBase and JControllerBase, respectively. In addition, all classes have been simplified, removing a lot of coupling with the Joomla! CMS, that was unnecessary for standalone Joomla! Platform applications." ... Joomla! Platform Manual MVCDeveloping an MVC Component/2.Developing a Basic ComponentThis tutorial is part of the Developing a MVC Component for Joomla! 3.x tutorial. You are encouraged to read the previous parts of the tutorial before reading this.If you have used Joomla! before reading this tutorial, you have noticed that extensions are installed using a compressed file containing all the things which are needed for installing and uninstalling them.You can follow the steps below to create the Hello World! component, or you can directly download the archiveHere are some slides based on this documents to explain how to create basic to advance Joomla! components.Joomla! Basic Component HelpJoomla! Advance Component HelpThere are also a number of videos which accompany steps in the tutorial, beginning withStep 1, Developing a Basic Component and you can access the slides which are used in the series of video presentations at Slides.Next, inside this directory we need to create some files. Using your preferred file manager, create the following files; as you create the files, add the source code for each file which is found in File Details.Note - You should see a message letting you know if the installation succeeded or failed.You can test this basic function of the component by entering the Hello World! page for the site and administrator portions of your Joomla! website.You can also notice that the Hello World! component is visible in the administrator site of your Joomla installation underthe Components menu.admin/sql/updates/mysql/0.0.1.sql is an empty file allowing to initialise schema version of the com_helloworld component. helloworld.xmlsite/helloworld.phpadmin/helloworld.phpindex.htmlcommon to all foldersAt this point in the tutorial, your component should contain the following files:Developing an MVC Component/3.Adding a view to the site partUpdating the Hello World! ComponentTo update the Hello World! Component in the Joomla! website, please follow the same steps for the original installation.site/helloworld.php (Note that some browsers may not copy and paste highlighted text correctly into a text editor. If you find this, then please try a different browser).site/controller.phpsite/views/helloworld/view.html.phpsite/views/helloworld/tmpl/default.phpindex.html Note - the same code is used for all foldershelloworld.xmlIn case you were curious as to why this works the way it does. helloworld.phpThe controller might decide to redirect the page, usually after a task like 'save' has been completed. This last statement takes care of the actual redirection.The main entry point, helloworld.php, essentially passes control to the controller, which handles performing the task that was specified in the request. Our component specific controller doesn't do anything more than the parent class already does, which is why our controller class is empty.controller.phpWhen no task is given in the request variables, the default task will be executed. It's the display task by default. The JControllerLegacy class has such a task. In our example, it will display a view named HelloWorld.view.html.phpThe view sets up the text to be output and then calls the base display class. JViewLegacy is a base class for a Joomla! View. In our case, this method will display data using the tmpl/default.php file.Caveat: If your view needs to load or otherwise embed individual JavaScript code, do not do that in the view, as the code might not get included when caching is enabled. Load those scripts in the controller instead. See the related issue on the issue tracker.default.phpThis template file will be included by the JViewLegacy class. Therefore, here, $this refers to the HelloWorldViewHelloWorld class. helloworld.xmlUpdates the version number.Tells installer application to add controller.php and the views/directoryAt this point in the tutorial, your component should contain the following files:Developing an MVC Component/4.Adding a menu type to the site partIn this article we will cover how to add a menu item to a basic Joomla! component. For this example we will be continuing our work onthe Hello World! component.There are several ways to update a Joomla! component. As with the last tutorial, we will focus option 2.Updating the Hello World! ComponentTo update the Hello World! Component in the Joomla! website, please follow the same steps for the original installation.After the component has been updated, we will be able to add a Menu Item to it. This will allow us to access our component a menu rather than having to remember what to type into the address bar. We'll do this using the Menu Manager of Joomla!.You should now be able to access the component through the menu that you just created.site/views/helloworld/tmpl/default.xmlhelloworld.xmlIn case you were curious as to why this works the way it does.default.xmlNote - For the moment the strings won't be translated in the administrator interface. We will see in a later article how translation is performed.helloworld.xmlUpdates the version number.At this point in the tutorial, your component should contain the following files:Developing an MVC Component/5.Adding a model to the site partUpdating the Hello World! ComponentTo update the Hello World! Component in the Joomla! website, please follow the same steps for the original installation.site/models/helloworld.php。
Joomla 模块开发模块是页面扩展轻量级方式,相对组件更为灵活。
模块通常用来做页面中不太复杂的一小块,并且能够跨越不同的组件。
有时候模块可以跟组件密切联系,比如说最新新闻模块,这个模块显示来自com_content组件的最新的条目,由于它是一个模块,所以它甚至可以在com_content组件没有激活的情况下使用。
站点的菜单是模块,而这些模块作为Joomla和核心应用,并没有和任何组件相关联。
模块不必和任何特定的事情相关联,并且可以是你想在一些页面上显示的静态html,text。
怎样编写模块Hello World Module - Basic Module模块是页面扩展轻量级方式,相对组件更为灵活。
模块通常用来做页面中不太复杂的一小块,并且能够跨越不同的组件。
在Joomla的标准安装后,你可以看到许多模块的例子,菜单,最新新闻,登录框等等这个教程阐述如何编写一个简单的Hello world 模块,通过这个教程,你可以学到一个模块的基本文件结构。
而通过基本机构可以扩展生成更为复杂的模块。
文件架构标准的模块开发共有四个基本文件,mod_helloworld.php - 模块的主入口,主要执行一些必须的初始化工作,调用helper或缺必要的数据,并引入模板。
mod_helloworld.xml - 这个文件主要包含模块的信息,主要定义安装时必须的文件以及模块的参数。
helper.php - 这个文件包含helper 类,这个类主要用来获取模块要显示的信息(通常是从数据库或其他的源)tmpl/default.php - 模块的模板,这个文件采用返回的数据生成页面要显示的html创建mod_helloworld.phpmod_helloworld.php 主要进行以下工作:引入文件,文件包含是获取必要数据的类调用合适的helper类,并返回数据。
引入模板The helper class is defined in our helper.php file. This file is included with a require_once statement:helper 类在中定义,这个文件通过require_once 声明来引入:require_once( dirname(__FILE__).DS.'helper.php' );我们的helper类现在还没定义,但是以后你可以看到,包含一个方法getHello()。
joomla 教程Joomla 是一个开源的内容管理系统(CMS),它使用户能够轻松地构建和管理网站。
在本教程中,我们将介绍一些基本的Joomla 功能和操作。
第一步是安装 Joomla。
你可以从 Joomla 的官方网站上下载最新的安装程序,并按照指示进行安装。
安装完成后,你需要设置一些基本的站点信息,如站点名称和描述。
接下来,你可以开始编辑你的网站。
登录到 Joomla 后台管理界面,你将看到一个用户友好的界面,其中包含了各种功能和选项。
你可以点击“文章”选项卡,然后选择“新建文章”来创建新的文章。
在文章编辑页面中,你可以输入文章的标题和内容。
在这里,你可以使用各种文字格式、插入图片和视频等多媒体内容。
大部分的编辑选项都是直观的,并且有助于你快速创建出美观的网站内容。
一旦你完成了文章的编辑,你可以保存并发布它。
你可以选择将文章设置为公开或私有,或者安排它在特定日期和时间进行发布。
除了文章,Joomla 还支持创建和管理其他类型的内容,如图片库、产品目录和用户论坛。
你可以在 Joomla 的后台管理界面上找到这些选项,并根据你的需求进行设置和管理。
另外, Joomla 还有各种可用的模板和扩展,可以帮助你定制和扩展你的网站。
你可以从 Joomla 的官方扩展目录上下载并安装这些模板和扩展。
当然,除了这些基本的功能和操作外,Joomla 还有许多高级功能和选项,如用户管理、网站统计和备份恢复等。
你可以在Joomla 的官方文档和论坛上找到更多关于这些功能的详细信息和教程。
总结一下,Joomla 是一个强大而灵活的内容管理系统,它可以帮助你快速搭建和管理网站。
希望本教程对你有所帮助,让你能够更好地利用 Joomla 来创建出令人满意的网站。
简易五步法创建Joomla框架模板本指南循序渐进、指导大家如何在几分钟的时间内,基于JEZ Thema、根据PSD设计来创建Joomla!1.5模板。
下面就是本免费基础教程。
我们应该通过下列步骤来建立一个全新的Joomla模板:1.建立开发环境2.分析原始图形化设计3.把原始图形化设计切片为小图片4.创建表示设计的样式表5.完成新创建的Joomla模板通过本指南逐步引导,我将告诉您如何在几分钟内、根据任意一个原始图形化设计来创建一个全新而独特的Joomla 模板。
一、建立开发环境在创建Joomla模板之前,基于JEZ theme base,请确保您的Joomla网站已下载并安装了JEZ Thema。
推荐您把Joomla! 1.5和JEZ Thema安装到本地服务器以更便于开发。
•不知道如何设立本地服务器吗?我推荐XAMPP,它是个完整的安装包,只消点击一下就能帮助您快速设立本地服务器。
然后,您需要下载并安装Joomla! 1.5的最新版。
•就像其他扩展一样,下载并安装JEZ Thema到您的Joomla站点:登录至管理员面板并打开扩展->安装/卸载,在打开的页面内点击浏览按钮并选择下载好的JEZ Thema包,然后点击上传文件&安装按钮。
完成上述步骤后,让我们看下JEZ Thema 的Joomla模板插件参数。
还是在Joomla 管理员面板,打开扩展->模板管理器,在已安装模板列表内选择JEZ Thema作为默认模板并点击它的名字来查看所有可用参数。
你会看到所有参数都是内联文档类型:点击每个参数旁的显示/隐藏详情链接即可阅读指示。
二、分析原始图形化设计本指南内我们将分析一个JEZ_Rego.psd的Photoshop设计图并据此创建Joomla模板。
在分析之前,我们看下JEZ theme base 的默认布局。
如下图所示。
我们将利用默认布局来创建一个Joomla模板。
您将在另外一个指南内(尚未撰写)领略到如何定制默认布局来迎合不同的个人需求。
手把手教你使用Joomla进行电子商务网站开发一、Joomla与电子商务网站开发简介Joomla是一款开源的内容管理系统(CMS),可用于构建各种类型的网站,包括电子商务网站。
本章将介绍Joomla的基本概念和优点,并介绍如何开始使用Joomla进行电子商务网站开发。
Joomla是一种基于PHP语言和MySQL数据库的网站开发平台。
它提供了丰富的功能和强大的扩展性,使得开发人员可以快速构建功能完备的网站。
与其他CMS相比,Joomla具有更大的灵活性和高度的可定制性。
二、安装和配置Joomla在开始使用Joomla开发电子商务网站之前,首先需要安装和配置Joomla。
本章将介绍如何下载和安装Joomla,并配置基本的网站设置。
这些设置包括网站名称、描述、语言等。
安装Joomla非常简单。
首先,从官方网站下载Joomla的最新版本。
然后,将下载的文件解压到网站根目录。
接下来,通过浏览器访问网站,按照安装向导的步骤设置数据库和管理员账号。
三、选择合适的电子商务插件Joomla本身提供了基本的网站功能,但如果需要构建一个电子商务网站,则需要安装相应的插件。
本章将介绍几种常用的电子商务插件,并选择一个适合的插件。
一种常用的电子商务插件是VirtueMart。
VirtueMart是一款功能强大的电子商务扩展,提供了购物车、支付系统、产品目录等功能。
它与Joomla的整合非常紧密,容易安装和配置。
四、创建产品目录和购物车创建产品目录是电子商务网站开发的重要一步。
本章将介绍如何使用Joomla创建产品目录,并将产品添加到目录中。
同时,还将介绍如何创建购物车功能,使用户可以方便地选择和购买产品。
在Joomla中,可以通过插件或模块来创建产品目录和购物车。
首先,需要创建一个产品目录,包括产品名称、描述、价格等信息。
然后,可以使用插件或模块将产品目录展示在网站的合适位置上。
购物车功能可以通过插件实现,使用户可以将产品添加到购物车中,并进行结算。
Joomla Template TutorialLast Updated Friday, 04 August 2006在本教程中,我们将完成创建joomla模板这一步。
Joomla是一个开放源代码Content Management System (CMS),该系统可以自由(真正的)使用并且由一个很强大的在线社区支持。
具体地说,我们将创建一个模板,使用cascading style sheets(css)而不是表格来生产布局。
这是一个很合理的目标,因为它意味着模板代码会更容易符合World Wide Web Consortium (W3C)标准。
它装载的更快,更容易维持并能在搜索引擎中执行地更好。
本教程稍后将讨论这些问题的细节,它包含以下章节。
-什么是joomla模板?阐述joomla模板执行的功能有哪些,不包含内容的模板与添加了内容到CMS的模板之间的区别。
-本地设计过程设计过程与设计一个静态(x)HTML网页之间的不同之处。
-W3C与无表格设计涉及到joomla中无表格设计和W3C标准,可用性与无障碍环境三者之间的关系。
-模板组件joomla模板由什么文件组成,它们各具有什么功能。
-使用CSS创建布局如何使用CSS代替表格来创建一个源定3栏的布局-默认的joolma CSS介绍基本的CSS样式,应该与joomla一起使用,还有被joomla core使用的类型预设名单。
-模块如何放置,包含圆角新技术的类型模块。
-菜单一个简单的策略用于生产精益的CSS菜单,模仿出那些用javascript写的菜单效果。
-隐藏栏目如何控制什么时候显示栏,当没有内容时隐藏栏。
-结论-附录A:提示与技巧可变页宽度,圆角,文本成型模以及更多{mospagebreak title=What is a Joomla Template?}什么是joomla模板?Joomla模板就是在joomla CMS里面的一系列文件,用来控制内容的显示。
Joomla模板既不是一个网站,也不是一个完整的网站设计。
该木板对于查看你的joomla!网站是一个基础。
要生产出一个“完整”网站的效果,模板会和存储在joomla数据库中的内容密切合作。
以下你可看到一个这方面的例子:这个截图显示了与样本内容的使用。
图B显示了模板,它可能看着与一个原始joomla安装一起,几乎没有内容。
模板被格式化了,这样当你的内容被插入禁区时,将继承定义在模板中的样式表,比如连接类型,菜单,导航栏,文本大小和颜色等。
注意图片和内容是如何联系的(人们的相片),该内容不是模板的一部分,而在标题那的图片是模板的成分。
为一个CMS使用一个模板,就像joomla一样,有很多优点和缺点:-内容和外观完全分离,特别是当CSS用于布局时(因为反对在index.php文件中存在表格).这是网站主要标准的一个,符合现代网站标准.-一个新的模板,因此对网站而言一个全新的外观可以立刻被应用上.这甚至可以和颜色图片一样有不同的内容地点/定位-如果一个网站内部想有不同的版面配置,这很难实现.虽然不同的模板可以应用到不同的页面,这种内置的功能并不可靠.大多数设计者选择使用各种PHP代码来显示/隐藏栏取决于是否在那个位置公布了内容.(在提示与技巧中讨论到了).{mospagebreak title=Localhost Design Process}本地设计过程你在强大的joomla网站上看到的页面并不是静态的.这就说明它是动态地从存储在数据库中的内容产生的.你所看到的页面是通过在模板中各种PHP命令创建的.这种设计阶段提出了一些困难.现在使用一个”所见即所得”(WYSIWYG)的HTML编辑器已经很普遍了,比如Dreamweaver.这就意味着设计者不需要再对HTML进行编码.而在joomla模板设计过程中这是不可能的.所见即所得编辑器不能显示一个动态网页.这说明设计者必须”用手”编写代码,然后从一个服务端页面的PHP查看输出页面.只有web服务器拥有足够快速的连接,但是大多数设计者使用他们自己电脑上的”local server”.这是一款服务于设计者自己电脑上网页的软件.没有办法”立刻”创建一个页面,它取决于设计者自己的背景.那些更图形化的页面在图形软件中比如photoshop制作页面的”形象”,然后将图形分开来使用(名为片和块).高技术的设计师往往直接跳到CSS 进行编码.然而,上面我们提到,joomla模板设计者是受限制的,他不能在相同的编辑器中立刻看到她/他编码的效果.改进的设计过程如下:-在HTML编辑器中做出修改,保存修改-在背景下由本地服务器来”运行”joolma-在网站浏览器中查看编辑-回到第一步本地服务器选项几个本地主机服务器可用:- JSAS - Joomla Stand Alone Server. WAMP支持个人电脑上windows系统下joomla的服务器.一个自身包含了Apache-MySQL-PHP服务器. -XAMPP在Linux,Windows , Mac OS X和Solaris上安装Apache Distribution很简单.该包包含了Apache web server, MySQL, SQLite,PHP等./en/xampp.htmlJSAS确实有大量的广告在上面,应该会吸引你.Easy CSS Styling是设计过程更有效的令人满意的技术是为你正在设计的网页服务,然后拷贝粘贴源代码到一个编辑器中.例如,一旦你的CSS布局成立,你可以使用其中以个本地服务器来支持一个页面, View_Source,然后将它拷贝粘贴到你的编辑器中,现在你就可以很简单地使用CSS来为页面定义类型,且不需要重复上述步骤.Some HTML Editor Options for Joomla Designers对于那些不能支付商业编辑器比如Dreamweaver的人,这有一些免费的编辑器可用:Nvu是一个坚实的选择,并确认已经建成..它还是一个Mambo/Joomla的延伸,会非常有用. Nvu是100%的开放源代码.这就意味着任何人都欢迎来免费下载Nvu,如果要做特殊的修改的话还包含源代码.你可以从Manboforge得到延伸版.是在这里建立完整的项目.另外一个选在实际上也是一种验证, "CSE HTML Validator"是集HTML,XHTML,CSS,链接,拼写和无障碍环境检查于一体的验证.你可以在这里取得免费的html验证器版本.请记住,这些都不是”所见即所得”的html编辑器.{mospagebreak title=W3C and Tableless Design}W3C与无表格设计可用性,可访问性和搜索引擎优化都是用来形容今天万维网中高质量网页的词组,现实中,这三者之间存在大量的重叠,一个网页演示了其中一个的特征也就显示了三者的特征.最简单的方法来达到这三个目标就是使用W3C网页标准中的framework.例如,一个(x)html语义结构的网站(xhtml解释文件,而不是它看来如何)很容易让某些视力不好的人在一个屏幕阅读器中阅读.对于一个搜索引擎spider阅读也很简单.Google在如何阅读你的网站方面是很盲目的.一个符合W3C网站标准的网站有一个更好的基础使其变得可访问,可用以及搜索引擎优化.把这些想象成你家房子的建筑法规.一个拥有这些特性的网站会更强大,更安全.你可以用W3C HTML验证服务来核查你的页面.免费的.最简单的,一个符合W3C验证的网站运用(x)html语义结构并通过CSS将内容从外观中分离。
为了帮助你理解网站标准的来源,回顾历史是个好方法。
实际上很多网页是针对旧版本的浏览器设计的。
为什么?自从www开始后,浏览器不断地演变。
新版本已经出现而旧版本已经消失(还记得Netscape?)。
另一个复杂的因素是,不同的浏览器制造商(比如微软)试图让他们的浏览器以稍微不同的方式去解释html/xhtml。
这导致了网站设计师不得不设计他们的网站以支持旧版本的浏览器而不是新版本。
往往网页设计成与这些“遗留的”浏览器相匹配是必须的。
网站标准为所有的网页浏览器投入了一套共用的“规则”来显示一个网页。
而推动这些标准的主要组织就是W3C,其负责人,Tim Berners-Lee在1989年发明了world wide web。
如果你问5个设计者:什么是web标准?将会有5个不同的答案。
但是大多数认为它们是基于以下内容的:-有效的代码,无论是html或者xhtml(或其它)之前我们使用了一个创建结构代码的例子。
描述制作网页代码时的标准已经发展成就有连贯性。
在中检查你的代码很简单.当你验证你的代码时确保你使用了正确的doctype.在Compass Design上的这篇文章描述了一个有效的joomla doctype.-代码语义正确我们前面提到,要有语义,即在网页中的(x)html只描述内容,而不是外观.特别是这就是指有结构组织h1/h2等的标记和只用表格来存放表格数据,而不布置一个网页.-Cascading Style Sheets (CSS)与有语义的代码密切相关的,是使用CSS来控制外观和网页的布局.CSS是添加样式(例如字体,颜色,间距)到web文件的一个简单机制. (Source: /Style/CSS/). 它们存在与(x)html类似之处,这就可以让你将内容(语义代码)从外观(CSS)中完全分离. 有关这方面最好的例子是CSS Zen Garden,一个有相同语义的xhtml网站用不同的CSS样式以不同独特的方式成形.结果是很多网页看起来不一样但是却有相同的核心内容.设计joomla强大的网站,要满足验证标准目前来说是相当大的挑战.在当前发布的一系列新闻中,1.0.X,使用了大量的表格来输出它的页面.它既不使用CSS来设计外观,也不产生语义化正确的代码.这个问题与事实混合在一起,也就是极少数的第三方开发者既使用CSS,也用表格来生成代码.然而,无表格设计与valid并不一样.它很有可能在网站上使用表格来验证, 这会使其更难.在joomla论坛上有一个很有用的线程,进入了解更多详情:轻松的手法从joolma!输出标准中清除一些表格.幸运的是, Joomla Core Development团队意识到了joolma这个问题.当1.5版本中从核心内容中移除表格没有变化,在1.6版本中已经定义了路线来记录地址.无论如何.当创建一个模板时,核心内容仍然会采用,这样它变得方便(比如可升级的字体大小),实用(比如清晰的导航栏),搜索引擎优化(比如资源整齐).{mospagebreak title=The Template Components}The Template Components模板组件为了了解模板的内容.我们开始查看一个空白的joolma模板.在这个文件中,包含了各种组成一个joolma模板的文件和文件夹.这些文件必须放在joolma安装程序的/templates目录下.因此,如果你安装了两个模板,我们的目录就会看起来像:/templates/JS_Smoothportal/templates/JS_Synergy请注意模板的目录名必须和模板的名称一样.既然这样, JS_Smoothportal 和JS_Synergy,很显然它们是区分大小写的,并且不包含空格.传统上最初的设计者或者名字是用作前缀,在模板的目录中,有很多重要的文件:/JS_Smoothportal/templateDetails.xml/JS_Smoothportal/index.php这两个文件名和位置必须和joolma脚本调用时一致.-templateDetails.xml(记录大写的”D”)当装载一个使用该模板的网页时,一个XML格式的元数据文件会告诉joomla!其他文件需要什么.它还详细介绍了作者,版权以及模板的组成文件(包括所有使用的图片).最后使用该文件是在管理员端安装模板时.-index.php这个文件是最重要的.它涉及网站并告诉joomla CMS在哪放置不同的组件和模块.它是PHP和(x)HTML的结合.几乎在所有的模块中,额外的文件都会使用到.像如下显示的那样对它们进行命名和定位是常规:/JS_Smoothportal/template_thumbnail.png/JS_Smoothportal/css/template_css.css/JS_Smoothportal/images/logo.png-template_thumbnail.png一个网站浏览器,模块的截图(往往减小到大约宽140像素,高90像素).安装完模板后,功能”Preview image”可在joomla1执行中看到.Template Manager.模板管理者- css/template_css.css模板的CSS样式.文件夹的位置是可选的,但是你必须指定放在哪.请注意,文件名称只有在引用到index.php文件中时是重要的.你可以随意称呼它.通常显示的名字会被用到,但是我们稍后将看到存在其它CSS文件会有优势.- images/logo.png任意与模板匹配的图片.又是组织原因,大部分设计师把它放到图片文件夹中.这里我们将logo.png图片文件作为例子.要添加模板(再次,存在于丰富的教程中),你要到自己网站的管理端,通过上传压缩文件安装模板.注意事实上你也可以一个个地添加文件(而不是压缩文件的形式).你必须把它们放到你网站上的.com/templates 中.templateDetails.xmltemplateDetails.xml必须包含模板组成部分的所有文件.以及作者和版权信息.有的显示在Template Manager的管理员后端.如下是一个xml文件例子:<mosinstall type="template" version="1.0.x"><name>YourTemplate</name><creationDate>March 06</creationDate><author>Barrie North</author><copyright>GNU/GPL</copyright><authorEmail>compassdesigns@</authorEmail><authorUrl></authorUrl><version>1.0</version><description>An example template that shows a basic xml details file </description><files><filename>index.php</filename><filename>js/ie.js</filename><filename>template_thumbnail.png</filename></files><images><filename>images/header.png</filename><filename>images/background.png</filename><filename>template_thumbnail.png</filename></images><css><filename>css/base.css</filename><filename>css/norightcol.css</filename><filename>css/template_css.css</filename></css></mosinstall>让我们来解释一下这些代码:-mosinstallXML文件的内容用于安装说明。