Kepware opcua两个电脑间的通讯设置
- 格式:pdf
- 大小:985.22 KB
- 文档页数:30
远程访问OPC服务器设置OPC客户端一方面可以访问本机上的OPC服务器,另一方面,它还可以利用微软的DCOM机制,通过网络来访问其它计算机上的OPC服务器,从而达到远程数据连接的目的。
访问本地服务器比较简单,只要检索本地的OPC服务器,并配置相应的组(Group)和数据项(Item)即可,通过网络访问时需要考虑较多的网络连接因素,大体上来说大概有如下的几个需要配置的方面(以WINXP Xp2为例):一. 运行OPC客户端的计算机和运行OPC服务器的计算机需要彼此能互相访问。
1.1要保证其物理连接,也就是网线正确的连接着两台计算机。
1.2在这两台计算机上分别建立同一个账号及密码,比如用户名[opcuser],密码[123456](注意:用户密码最好不要设置为空),在这两台计算上使用这个账户都可以登录系统。
关于增加账号及密码请参考对应Windows操作系统的帮助文档。
1.3启用各自Windows操作系统的Guest权限。
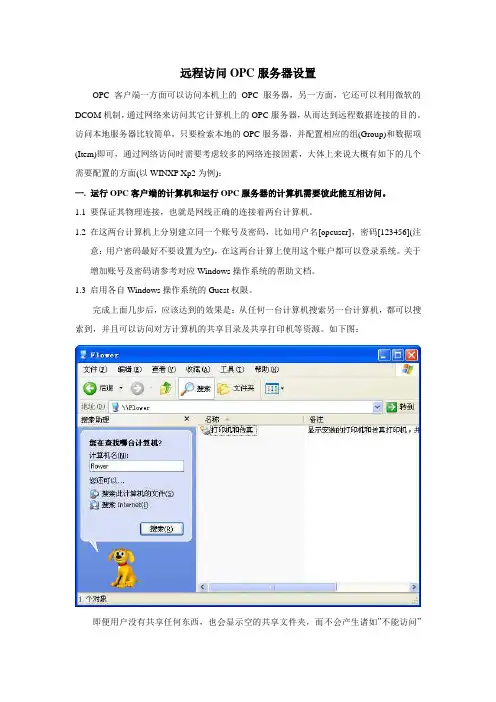
完成上面几步后,应该达到的效果是:从任何一台计算机搜索另一台计算机,都可以搜索到,并且可以访问对方计算机的共享目录及共享打印机等资源。
如下图:即便用户没有共享任何东西,也会显示空的共享文件夹,而不会产生诸如”不能访问”等信息。
如果不能访问对方的计算机,首先用ping命令来保证网络的连通,如果必要的情况下,可以关闭这两台计算机的防火墙(无论是winxp xp2自带的防火墙还是专用的防火墙)以及杀毒软件,以杜绝可能产生的问题。
如果访问另一台计算机产生”拒绝访问”的错误,可从网络查找相关资源进行解决。
二. 配置OPCServer所在的计算机2.1 注册OPCEnum.exe。
opcenum.exe是运行在服务器端的用于枚举本机OPC服务器的服务程序,由OPC基金会提供。
注册opcenum有如下几种方式:a)将opcenum.exe拷贝到系统目录下,然后用命令行运行opcenum /regserver 来注册它。
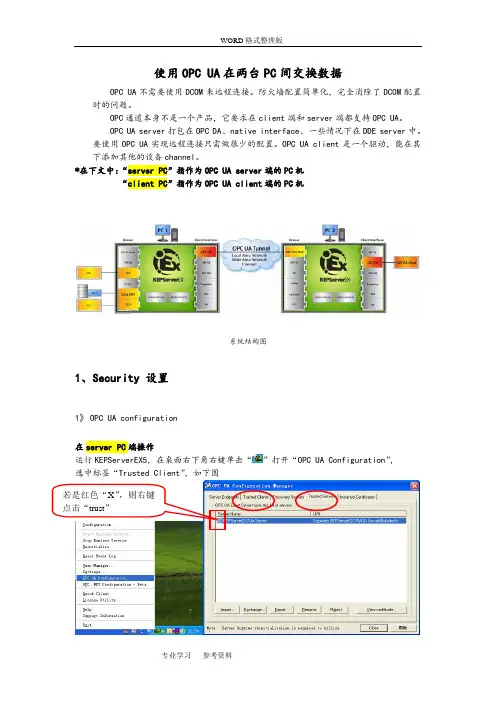
使用OPC UA 在两台PC 间交换数据OPC UA 不需要使用DCOM 来远程连接。
防火墙配置简单化,完全消除了DCOM 配置时的问题。
OPC 通道本身不是一个产品,它要求在client 端和server 端都支持OPC UA 。
OPC UA server 打包在OPC DA 、native interface 、一些情况下在DDE server 中。
要使用OPC UA 实现远程连接只需做很少的配置。
OPC UA client 是一个驱动,能在其下添加其他的设备channel 。
*在下文中:“server PC ”指作为OPC UA server 端的PC 机“client PC ”指作为OPC UA client 端的PC 机系统结构图1、Security 设置1》 OPC UA configuration在server PC 端操作运行KEPServerEX5,在桌面右下角右键单击“”打开“OPC UA Configuration ”,选中标签“Trusted Client ”,如下图若是红色“X ”,则右键点击“trust ”再选中标签“Trusted Server”,像上图中一样查看。
然后单击“close”关闭。
2》交换证书(方法1)第一步:在server PC上操作,右键桌面右下角小图标——选择“settings”——弹出右下对话框。
选中标签“Configuration”,勾选“Allow runtime to……”单击“确定”。
打开防火墙,开端口。
“开始”——“运行”——“firewall.cpl”选中标签“例外”,其中单击“添加端口”,弹出下图对话框。
点击“OK”。
端口添加成功。
第二步:在client PC上操作运行KEPServerEX5,在桌面右下角右键单击“”打开“OPC UA Configuration”选中标签“Trusted Server”,单击“exchange”弹出下面对话框单击“”弹出下图,选中“Remote Machine”中server PC的机器名与server机器上开的端口号对应*注:如果找不到要远程连接的server PC机,可以直接输入做server的 PC的IP地址,例如在局域网内“192.168.0.111”出现下图:点击“ok”完成之后会弹出对话框“the exchange was successfully”。
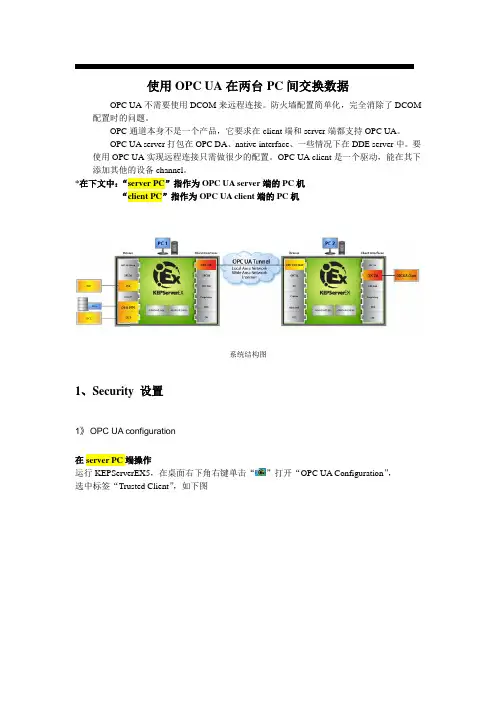
组态王7.5sp2破解补丁Patch QQ525755708 组态王7.5sp1破解补丁KingSCADA3.53破解补丁PatchQQ525755708KingSCADA3.52SP1破解补丁...........................................................................使用OPC UA在两台PC间交换数据OPC UA不需要使用DCOM来远程连接。
防火墙配置简单化,完全消除了DCOM 配置时的问题。
OPC通道本身不是一个产品,它要求在client端和server端都支持OPC UA。
OPC UA server打包在OPC DA、native interface、一些情况下在DDE server中。
要使用OPC UA实现远程连接只需做很少的配置。
OPC UA client是一个驱动,能在其下添加其他的设备channel。
*在下文中:“server PC”指作为OPC UA server端的PC机“client PC”指作为OPC UA client端的PC机系统结构图1、Security 设置1》 OPC UA configuration在server PC端操作运行KEPServerEX5,在桌面右下角右键单击“”打开“OPC UA Configuration”,选中标签“Trusted Client”,如下图若是红色“X”,则右键点击“trust”再选中标签“Trusted Server”,像上图中一样查看。
然后单击“close”关闭。
2》交换证书(方法1)第一步:在server PC 上操作,右键桌面右下角小图标——选择“settings”——弹出右下对话框。
选中标签“Configuration”,勾选“Allow runtime to……”单击“确定”。
打开防火墙,开端口。
“开始”——“运行”——“firewall.cpl”选中标签“例外”,其中单击“添加端口”,弹出下图对话框。
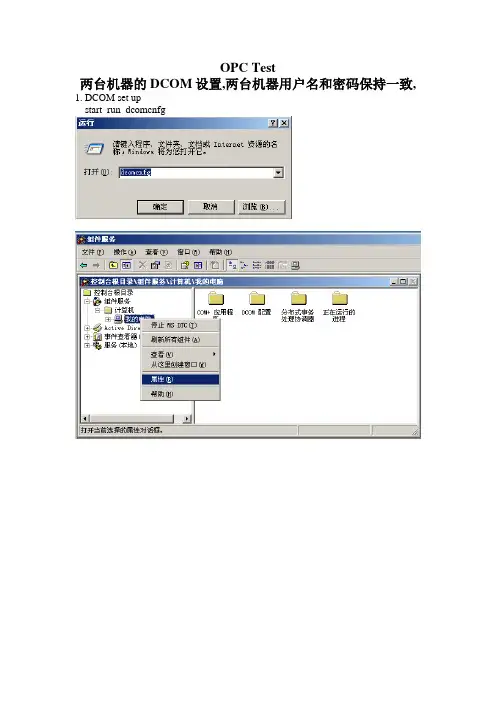
OPC Test
两台机器的DCOM设置,两台机器用户名和密码保持一致, 1. DCOM set up
start run dcomcnfg
上图4个按钮中的所有用户都需要“允许”
例如下图一共三个用户,这三个用户都需要设置“允许”权限
OpcEnum property
下图自定义中的所有用户都需要开权限,都“允许”
安全中也需要所有用户都允许
安全中也需要所有用户都允许
(注:做好dcom配置后,需要重新启动电脑才起作用。
所以为了安全起见,建议最好重新启动一下电脑,再做下一步)。
四、本地安全策略配置
1、OPC服务器和OPCClient服务器都要设置:打开“控制面版”à“管理工具”à打开“本地安全策略”
2、à安全选项—>”网络访问:本地帐户的共享和安全模式”->属性
3、选择“经典—本地用户以自己的身份验证”
注意一点不能忘了这一步,否则会在连接Opc服务器时报“拒绝访问”的错误!
五、其他设置
1、关闭操作系统运行的其他防火墙,杀毒软件等。
如何通过OPC UA实现两台WinCC SCADA电脑间的客户端/服务器通讯?OPC UA(“开放平台通讯--统一架构”)是用于交换两台不同品牌设备或应用间数据的标准软件平台。
本常见问题详细描述了如何在两台运行WinCC SCADA的PC间配置OPC UA通讯以实现客户端服务器的应用。
运行WinCC组态软件的PC可以通过OPC UA服务器和OPC UA客户端实现通讯。
在通讯时,服务器和客户端需要交换安全认证证书,详细配置步骤如下:步骤1.在服务器的PC上启动WinCC Runtime。
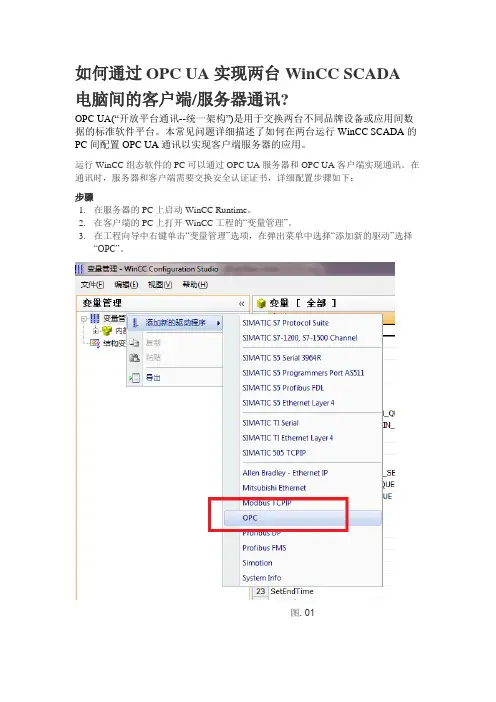
2.在客户端的PC上打开WinCC工程的“变量管理”。
3.在工程向导中右键单击“变量管理”选项,在弹出菜单中选择“添加新的驱动”选择“OPC”。
图. 01OPC通道创建完成。
4.在工程向导中右键选择“OPC Groups...” 然后再弹出菜单中选择并打开“系统参数”。
图. 02打开“OPC条目管理器”界面。
5.点击“OPC UA服务器”按钮。
图. 03打开“添加OPC UA服务器”界面。
6.在“服务器信息”对话框中输入服务器的URL地址,格式为:"opc.tcp://[服务器]:[端口号]"。
其中,“[服务器]”中输入作为服务器的PC的IP地址;“[端口号]”中输入OPC UA服务器使用的端口号,默认端口是“4862”。
(如下图中所示)图. 047.在“安全性”对话框中,“安全策略”选择“Basic128Rsa15”,“消息安全模式”选择“签名和加密”。
(如上图所示,需要注意的是,设置为“无安全”也可以达到通讯的效果,但从安全角度考虑不推荐使用)点击“确定”关闭对话框。
8.在“OPC条目管理器”中选择新创建的OPC UA服务器选项。
点击“浏览服务器”按钮。
图. 05几秒钟后会弹出对话框,显示错误提示“此OPC服务器不支持浏览器接口!”点击“OK关闭提示框”。
图. 069.打开Windows浏览器访问WinCC的安装路径。
OPC与两台INTOUCH计算机通信
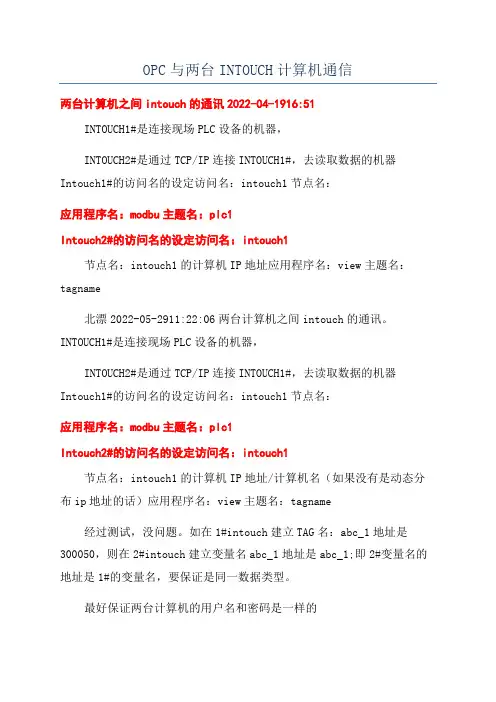
两台计算机之间intouch的通讯2022-04-1916:51
INTOUCH1#是连接现场PLC设备的机器,
INTOUCH2#是通过TCP/IP连接INTOUCH1#,去读取数据的机器Intouch1#的访问名的设定访问名:intouch1节点名:
应用程序名:modbu主题名:plc1
Intouch2#的访问名的设定访问名:intouch1
节点名:intouch1的计算机IP地址应用程序名:view主题名:tagname
北漂2022-05-2911:22:06两台计算机之间intouch的通讯。
INTOUCH1#是连接现场PLC设备的机器,
INTOUCH2#是通过TCP/IP连接INTOUCH1#,去读取数据的机器Intouch1#的访问名的设定访问名:intouch1节点名:
应用程序名:modbu主题名:plc1
Intouch2#的访问名的设定访问名:intouch1
节点名:intouch1的计算机IP地址/计算机名(如果没有是动态分布ip地址的话)应用程序名:view主题名:tagname
经过测试,没问题。
如在1#intouch建立TAG名:abc_1地址是300050,则在2#intouch建立变量名abc_1地址是abc_1;即2#变量名的地址是1#的变量名,要保证是同一数据类型。
最好保证两台计算机的用户名和密码是一样的。
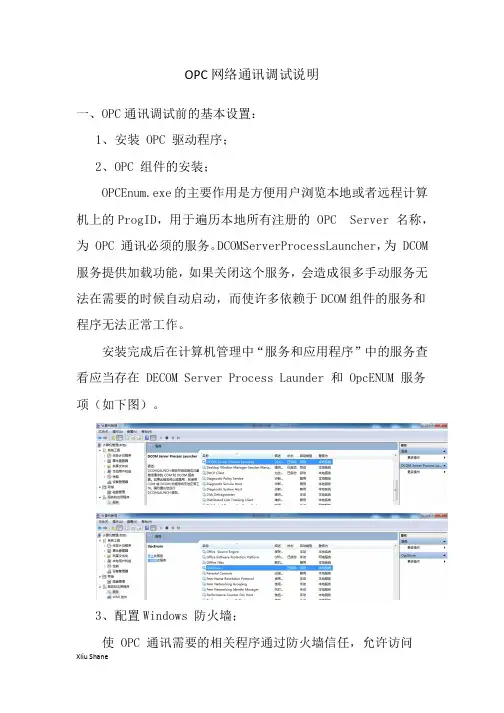
OPC网络通讯调试说明一、OPC通讯调试前的基本设置:1、安装 OPC 驱动程序;2、OPC 组件的安装;OPCEnum.exe的主要作用是方便用户浏览本地或者远程计算机上的ProgID,用于遍历本地所有注册的 OPC Server 名称,为 OPC 通讯必须的服务。
DCOMServerProcessLauncher,为 DCOM 服务提供加载功能,如果关闭这个服务,会造成很多手动服务无法在需要的时候自动启动,而使许多依赖于DCOM组件的服务和程序无法正常工作。
安装完成后在计算机管理中“服务和应用程序”中的服务查看应当存在 DECOM Server Process Launder 和 OpcENUM 服务项(如下图)。
3、配置Windows 防火墙;使 OPC 通讯需要的相关程序通过防火墙信任,允许访问OPC Server所在计算机的TCP 135 端口(如下图)。
4、配置操作系统的安全策略;a、启用安全策略“网络访问:让每个人权限应用于匿名用户” (如下图)。
如果启用此策略,会将 Everyone SID 添加到为匿名连接创建的令牌。
在这种情况下,匿名用户可以访问 Everyone 组拥有权限的所有资源。
b、为使得可以接受远程计算机的 rpc 请求,可配置为按照来访者身份验证模式或来宾模式。
1)、来访者身份验证模式此安全设置确定如何对使用本地帐户的网络登录进行身份验证。
如果将此设置设为“经典”,使用本地帐户凭据的网络登录通过这些凭据进行身份验证。
“经典”模型能够对资源的访问权限进行精细的控制。
通过使用“经典”模型,您可以针对同一个资源为不同用户授予不同类型的访问权限(如下图)。
2)、来宾模式如果将此设置设为“仅来宾”,使用本地帐户的网络登录会自动映射到来宾帐户。
使用“仅来宾”模型,所有用户都可得到平等对待。
所有用户都以来宾身份进行验证,并且都获得相同的访问权限级别来访问指定的资源,这些权限可以为只读或修改(如下图)。
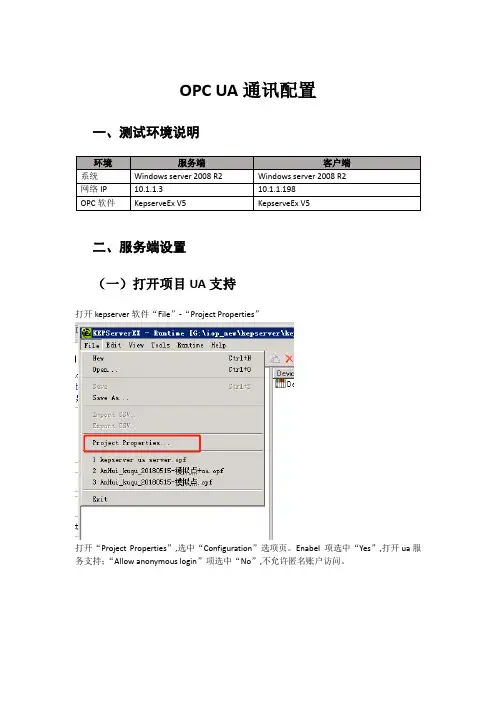
OPC UA通讯配置一、测试环境说明二、服务端设置(一)打开项目UA支持打开kepserver软件“File”-“Project Properties”打开“Project Properties”,选中“Configuration”选项页。
Enabel 项选中“Yes”,打开ua服务支持;“Allow anonymous login”项选中“No”,不允许匿名账户访问。
(二)安全设置桌面右下角,右键点击kepserver图标,选中Settings打开KEPServerEX Settings配置窗口,选中“Configuration”选项页,选中“Allow runtime to accept remote connections”,允许运行时接受远程连接。
* 打开防火墙配置,将32402端口增加到防火墙中。
(三)UA服务设置桌面右下角,右键点击kepserver图标,选中OPC UA Configuration打开OPC UA Configuration Manager配置窗口,选中“Server Endpoints”选项页,选中内容列表第一行数据,点击“Edit”。
打开“Endpoint Definition”,对应多网卡机器,需要选中使用的网卡及端口,然后查看下面opc.tcp://的地址是否是想要的IP及端口;安全策略建议选择“Basic128Rsa15”+“Sign”模式。
* 打开防火墙配置,将49320端口增加到防火墙中。
(四)配置登录账户桌面右下角,右键点击kepserver图标,选中Settings打开KEPServerEX Settings配置窗口,选中“User Manager”选项页,选中“Server Users”,右键选中“add User”。
打开“User Properties”,根据情况输入用户名及密码。
三、客户端设置(一)添加ua服务桌面右下角,右键点击kepserver图标,选中选中OPC UA Configuration打开“OPC UA Configuration Manager”,选中“Trusted Servers”选项页点击“Exchange”打开“Specify Server Instance”,输入相关信息“Remote host”输入10.1.1.3服务端IP“Remote Port”输入32402,与服务端保护一致,点击“OK”弹出“OPC UA Configuration Manager”提示框,提示“Certificates successfully exchanged.”说明服务添加成功。

使用OPCUA在两台PC间交换数据OPC UA(基于OPC Unified Architecture)是一种开放的、跨平台的、标准化的通信协议,能够进行工业自动化系统中的数据交换和通信。
使用OPC UA在两台PC之间进行数据交换,可以实现跨平台和跨网络的数据传输,实现异构设备之间的互操作性。
要在两台PC间进行数据交换,需要按照以下步骤进行操作:1. 安装OPC UA服务器软件:在每台PC上分别安装OPC UA服务器软件,比如常用的开源软件NodeOPCUA、Prosys OPC UA、Unified Automation OPC UA等。
安装完成后,配置服务器的基本信息,比如IP地址、端口号等。
2. 创建OPC UA数据模型:在服务器上创建OPC UA数据模型,定义数据的结构和属性。
数据模型的创建可以通过编程语言、OPC UA建模工具等方式进行,例如使用C#编写OPC UA服务器代码,或使用NodeOPCUA的建模工具创建模型。
3.配置OPCUA服务器:在服务器上配置OPCUA服务器,包括设置安全策略、用户认证、权限控制等。
这样可以确保数据传输的安全性和可靠性。
4.连接两台PC:在客户端PC上安装OPCUA客户端软件,连接到服务器上的OPCUA服务。
在客户端软件中,输入服务器的IP地址和端口号等连接信息,建立与服务器的通信。
5.读取和写入数据:通过OPCUA客户端软件,可以读取和写入服务器上的数据。
根据需要,设置合适的订阅和采样间隔,以实时获取数据。
6.处理数据:在客户端上,可以对获取到的数据进行处理、分析和可视化展示。
根据业务需求,可以将数据存储到数据库中,或发送到其他系统进行进一步处理。
7.错误处理和故障排除:如果在数据交换过程中出现错误或故障,需要进行错误处理和故障排除。
可以使用OPCUA提供的错误日志功能,分析错误日志以定位问题所在。
总结起来,使用OPCUA在两台PC间进行数据交换涉及安装和配置OPCUA服务器和客户端软件,创建数据模型,连接两台PC,读写数据,处理数据以及处理错误和故障排除。
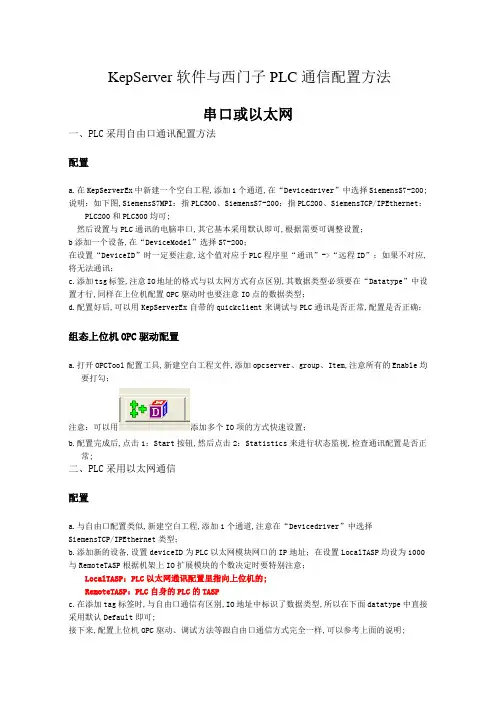
KepServer软件与西门子PLC通信配置方法串口或以太网一、PLC采用自由口通讯配置方法配置a.在KepServerEx中新建一个空白工程,添加1个通道,在“Devicedriver”中选择SiemensS7-200;说明:如下图,SiemensS7MPI:指PLC300、SiemensS7-200:指PLC200、SiemensTCP/IPEthernet:PLC200和PLC300均可;然后设置与PLC通讯的电脑串口,其它基本采用默认即可,根据需要可调整设置;b添加一个设备,在“DeviceModel”选择S7-200;在设置“DeviceID”时一定要注意,这个值对应于PLC程序里“通讯”->“远程ID”;如果不对应,将无法通讯;c.添加tsg标签,注意IO地址的格式与以太网方式有点区别,其数据类型必须要在“Datatype”中设置才行,同样在上位机配置OPC驱动时也要注意IO点的数据类型;d.配置好后,可以用KepServerEx自带的quickclient来调试与PLC通讯是否正常,配置是否正确;组态上位机OPC驱动配置a.打开OPCTool配置工具,新建空白工程文件,添加opcserver、group、Item,注意所有的Enable均要打勾;注意:可以用添加多个IO项的方式快速设置;b.配置完成后,点击1:Start按钮,然后点击2:Statistics来进行状态监视,检查通讯配置是否正常;二、PLC采用以太网通信配置a.与自由口配置类似,新建空白工程,添加1个通道,注意在“Devicedriver”中选择SiemensTCP/IPEthernet类型;b.添加新的设备,设置deviceID为PLC以太网模块网口的IP地址;在设置LocalTASP均设为1000与RemoteTASP根据机架上IO扩展模块的个数决定时要特别注意;LocalTASP:PLC以太网通讯配置里指向上位机的;RemoteTASP:PLC自身的PLC的TASPc.在添加tag标签时,与自由口通信有区别,IO地址中标识了数据类型,所以在下面datatype中直接采用默认Default即可;接下来,配置上位机OPC驱动、调试方法等跟自由口通信方式完全一样,可以参考上面的说明;。
KEPserverOPC远程访问配置步骤说明KEPserver OPC远程访问配置步骤说明声明:本⽂是为了解决实际问题,并不是最佳⽅法,也不是最安全⽅法,但是在具体⼯程中可以快速解决问题的⽅法。
因此,对本⽂所讲⽅法的吹⽑求疵,就不适合了,本来就是为了解决具体⼯程问题,没有充分利⽤微软的各种复杂的安全配置策略。
对于OPC配置,分为在域中和不在域中的远程计算机。
如果OPC Server(以下简称S)和OPC Client(以下简称C)都在域中,那么这个服务器就可以⾜以打破两台计算机的安全性了。
你也许经历过域服务器中病毒,整个⽹络瘫痪的事情。
如果没有的话,需要在S和C上建⽴同样的⽤户名和密码。
如果还不⾏,你还要S上⾯,要访问的OPC,在dcomcnfg中配置成交互式⽤户,并且S和C都以刚才建⽴的⽤户名和密码登陆。
这样还有什么安全性可⾔。
好了,现在以看图说话的⽅式来讲解⼀下。
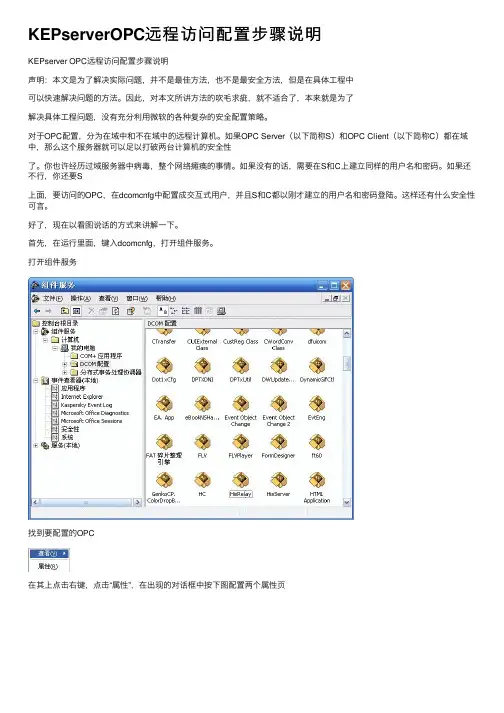
⾸先,在运⾏⾥⾯,键⼊dcomcnfg,打开组件服务。
打开组件服务找到要配置的OPC在其上点击右键,点击“属性”,在出现的对话框中按下图配置两个属性页在如下属性页中添加如下终结点协议:下⾯到了关键了,⾸先将以下属性页按照如下配置:然后依次点击三个编辑,将INTEACTIVE、NETWORK和Everyone三个⽤户加⼊,并给予所有权限。
上海泗博⾃动化技术有限公司 021-5102 8348 SiboTech解决⽅案上海泗博⾃动化技术有限公司 021-5102 8348 SiboTech解决⽅案好了,现在试试,应该从远程OPC 客户端上连接成功了。
如果是ESP-iSYS的话,可以在其安装⽬录SUPCON\ESP-iSYS\ExecFiles\iServer下找到FsClient.exe,这是⼀个标准客户端。
⽀持到OPC2.0。
在其中输⼊S的IP地址,看看是是否能够枚举到要访问的OPC Server。
对于XP系统,或⾮新安装的其它操作系统计算机,很可能因为本地安全策略的原因,导致⽆法正常建⽴DCOM连接,这个太复杂了。
使用OPCUA在两台PC间交换数据
一、简介
OPC UA(OLE for Process Control Unified Architecture)是一种
基于TCP/IP的开放式架构,用于跨本地和远程计算机之间可靠地传输信息。
它使用XML和Soap / WSDL等技术来提供可移植、可扩展和可扩展的
接口,以及安全访问和保护传输信息的能力。
OPC UA的主要优点包括服
务的灵活性和可扩展性,以及可以在多个实施者之间共享关键资源的能力。
二、使用OPCUA在两台PC之间交换数据的步骤
1、安装OPCUA服务器和客户端。
OPCUA服务器应在要连接的设备
(例如PLC或其他设备)上安装,客户端应安装在要使用的计算机上。
2、配置OPCUA服务器。
在服务器客户端和服务器之间建立安全的连接,并配置服务器以识别客户端连接要求。
3、在客户端上指定是否需要远程访问服务器。
此外,还必须指定客
户端与服务器之间的连接方式,例如TCP/IP或HTTP。
4、配置客户端以访问服务器。
客户端必须指定连接服务器的主机名
或IP地址,以及应用程序定义的网关或端口号。
5、启动客户端和服务器。
客户端启动后,它将连接服务器,以开始
交换数据。
6、客户端从服务器获取数据。
客户端可以从服务器获取传感器数据,控制信号,状态和其他信息。
7、客户端发送数据到服务器。
KEPWARE使用说明KEPServerEX是一种高度可配置且易于使用的企业级连接平台,用于连接、管理和控制自动化设备和系统。
它是一种工业物联网(IIoT)解决方案,可以帮助用户有效地集成不同设备和系统,以实现数据采集、监视和控制。
KEPServerEX提供了广泛的通信驱动程序,可以连接许多不同的设备和系统,包括PLC、DCS、传感器、仪器仪表等。
它支持各种通信协议,如OPC(OLE for Process Control)、OPC UA(OPC Unified Architecture)、MODBUS、DF1、SNMP等。
无论是否使用标准协议,用户都可以通过KEPServerEX将设备和系统连接到其他应用程序,例如SCADA (Supervisory Control And Data Acquisition)系统、HMI(Human Machine Interface)界面和数据库。
KEPServerEX提供了一个易于使用的图形化界面,可以帮助用户轻松配置和管理其连接。
通过添加设备和驱动程序,用户可以定义所需数据点的类型和属性。
这些数据点可以是数据输入、输出或状态,如模拟值、数字值或布尔值。
用户可以为每个数据点设置不同的访问级别和权限,以控制其在系统中的使用方式。
除了数据采集和监视外,KEPServerEX还提供了一套强大的控制功能。
用户可以定义自定义规则和逻辑,以根据不同的条件和事件对数据进行处理和操作。
例如,用户可以设置报警规则,以便在特定条件下触发报警通知,或者可以配置自动化控制逻辑,以根据特定数据值来执行一些操作。
KEPServerEX还提供了一些高级功能和工具,以帮助用户更好地管理其连接。
例如,它支持数据日志记录和存档,可以将历史数据保存到数据库或文件中供以后分析和查看。
它还支持远程访问和监视,用户可以通过互联网或局域网连接到KEPServerEX,随时随地管理和监视其设备和系统。
总之,KEPServerEX是一种强大而灵活的连接平台,可以帮助用户有效地集成和管理自动化设备和系统。
两台WinCC之间OPC通讯方法(WinXP)OPC客户端1.登陆计算机名及密码要与服务器端(OPCServer)一致。
a)如:用户名:administrator密码:12342.OPC客户端要与服务器端处于同一个网络。
a)如:OPCServer IP:192.168.0.100b)OPCClient IP:192.168.0.1013.关闭Windows防火墙或者在弹出Windows安全警报Loader for WinCC datamager中选择解除阻止。
或4.运行DCOMCNFG.EXEa)在弹出的组件服务右击我的电脑->选择属性->选择COM安全b)c)在访问权限中选择编辑限制d)ANONYMOUS LOGON组中选中远程访问。
5.剩下的就是在WinCC创建客户端项目。
效果如图:6.OPC服务器端1.登陆计算机名及密码要与客户端(OPCClient)一致。
a)如:用户名:administrator密码:12342.OPC服务器端要与客户端处于同一个网络。
b)如:OPCServer IP:192.168.0.100c)OPCClient IP:192.168.0.1013.关闭Windows防火墙或者在弹出Windows安全警报Loader for WinCC datamager中选择解除阻止。
或4.运行DCOMCNFG.EXEd)在弹出的组件服务右击我的电脑->选择属性->选择COM安全e)f)在访问权限中选择编辑限制g)ANONYMOUS LOGON组中选中远程访问。
5.打开DCOM配置。
如图:a)b)选择OPCEnum和OPCServer.WinCC项。
c)d)点击右键选择属性e)f)点击安全添加Everyone用户->允许完全控制。
g)6.剩下的就是在WinCC创建服务器端项目。
效果如图:。
现场OPC SERVER服务器与OPC客户端远程连接设置方法目录概述 (2)1 硬件连接 (2)2 电脑用户名及网段设置 (2)2.1 OPC Server服务器端PC查询 (2)2.2 OPC Client客户端PC设置 (3)3 电脑DCOM配置 (3)3.1 OPC服务器电脑上DCOM配置 (3)3.2 OPC SERVER 服务器上的防火墙做如下设置: (8)3.3 客户端机器上DCOM配置 (11)3.4 本地安全策略配置 (16)4 OPC Server与Client软件调试 (17)5 如何对电脑添加用户名和密码后自动重启 (19)概述现场测试OPC SERVER服务器,需要清楚现场中控系统组态软件,如何去查询变量,下面以亚控组态王6.55版本为例,简述一下测试OPC SERVER服务器的操作流程。
测试OPC Server服务器最麻烦的是双方电脑DCOM的配置,本身调试非常简单。
测试OPC SERVER服务器工具及软件,如表11硬件连接现场查看中控组态系统工控机网线接口,有的现场会配置一台交换机,只需要测试用的PC与工控机在同一个局域网内即可。
如图1OPC Server中控主机图12电脑用户名及网段设置2.1OPC Server服务器端PC查询现场查看工控机电脑的登陆用户名及密码,登陆用户名一般为Administrator,如果工控机电脑登陆用户名没有密码,还需要设置一个密码。
查看一下工控机电脑的IP,如:192.168.1.112。
2.2OPC Client客户端PC设置测试用的PC登陆用户名以及登陆密码需要跟OPC Server服务器所在的电脑设置一样。
两台PC之间的电脑IP处于同一个网段内。
3电脑DCOM配置3.1OPC服务器电脑上DCOM配置1. 在服务器工控电脑上开始—>运行—>输入:dcomcnfg,进行DCOM配置。
弹出下面的界面:2.按照上面的画面,进行操作弹出DCOM的总体默认属性页面,将“在这台计算机上启用分布式COM”打上勾,将默认身份级别改为“无”。
OPC网络通讯调试说明一、OPC通讯调试前的基本设置:1、安装 OPC 驱动程序;2、OPC 组件的安装;OPCEnum.exe的主要作用是方便用户浏览本地或者远程计算机上的ProgID,用于遍历本地所有注册的 OPC Server 名称,为 OPC 通讯必须的服务。
DCOMServerProcessLauncher,为 DCOM 服务提供加载功能,如果关闭这个服务,会造成很多手动服务无法在需要的时候自动启动,而使许多依赖于DCOM组件的服务和程序无法正常工作。
安装完成后在计算机管理中“服务和应用程序”中的服务查看应当存在 DECOM Server Process Launder 和 OpcENUM 服务项(如下图)。
3、配置Windows 防火墙;使 OPC 通讯需要的相关程序通过防火墙信任,允许访问OPC Server所在计算机的TCP 135 端口(如下图)。
4、配置操作系统的安全策略;a、启用安全策略“网络访问:让每个人权限应用于匿名用户” (如下图)。
如果启用此策略,会将 Everyone SID 添加到为匿名连接创建的令牌。
在这种情况下,匿名用户可以访问 Everyone 组拥有权限的所有资源。
b、为使得可以接受远程计算机的 rpc 请求,可配置为按照来访者身份验证模式或来宾模式。
1)、来访者身份验证模式此安全设置确定如何对使用本地帐户的网络登录进行身份验证。
如果将此设置设为“经典”,使用本地帐户凭据的网络登录通过这些凭据进行身份验证。
“经典”模型能够对资源的访问权限进行精细的控制。
通过使用“经典”模型,您可以针对同一个资源为不同用户授予不同类型的访问权限(如下图)。
2)、来宾模式如果将此设置设为“仅来宾”,使用本地帐户的网络登录会自动映射到来宾帐户。
使用“仅来宾”模型,所有用户都可得到平等对待。
所有用户都以来宾身份进行验证,并且都获得相同的访问权限级别来访问指定的资源,这些权限可以为只读或修改(如下图)。
O P C通讯配置详解Work hard in everything, everything follows fate!O P C通讯协议解析1通讯步骤1.1第一问OPCClient和OPCServer之间通讯谁是主动的答:当然是OPCClient..1.2第二问OPCClient第一次动作做了什么答:从大多数OPCClient行为来看;一是自动遍历本机已注册的OPCServer列表名称;二是等待用户定义预访问的OPCServer的信息..1.3第三问OPCClient第二次动作做了什么答:OPCClient的第一步动作会产生分支;访问本地OPCServer的这个分支就不再说了..要分析的是网络方式访问OPCServer这个分支..第二个动作是根据用户指定的IP地址或计算机名去查询远程计算机上已注册的OPCServer列表名称..从这步开始就比较复杂了..1.4第四问OPCClient是用什么协议去和远程计算机交流的答:用的是TCP/IP这个协议..OPCClient用TCP/IP135端口去打开远程计算机的那一扇门..简单解释下:在Windows操作系统中;135端口主要用于使用PRC协议并提供DCOM分布式组件对象模型服务;通过RPC可以保证在一台计算机上运行的程序可以顺利地执行远程计算机上的代码..使用DCOM可以通过网络直接进行通信;能够跨包括HTTP协议在内的多种网络传输..多年来;135端口一直被人利用..1.5第五问OPCClient去访问远程计算机的TCP135这扇门时;第一道关卡是谁答:网络安全防火墙是第一关卡;网络安全放火墙中;如果不允许远程计算机的TCP135端口;那么连接就被掐断了..后续的通讯就无法进行..要想能向下进行;网络安全防火墙必须允许对TCP135这扇门的访问..这里需要在防火墙中将135端口例外操作..1.6第六问各系统的安全策略有什么不同答:一Windows2000的安全策略:支持来访者以自己的身份进行验证;且不拒绝来宾用户从网络中访问;来宾用户默认启用..二WindowsXP和Windows2003的安全策略:支持来访者以自己的身份进行验证或将所有来访者都看成是来宾访问;默认将所有来访者都看成来宾访问..且默认拒绝Guest用户从网络访问本机..来宾用户默认禁用..三Windows7的安全策略:支持来访者以自己的身份进行验证或将所有来访者都看成是来宾访问经典-对本地用户进行身份验证;不改变其本来身份;默认支持来访者以自己的身份进行验证..且默认拒绝Guest用户从网络访问本机拒绝从网络访问这台计算机..来宾用户默认禁用..四Windows2008的安全策略:支持来访者以自己的身份进行验证或将所有来访者都看成是来宾访问;默认支持来访者以自己的身份进行验证..来宾用户默认禁用..配置OPCClient和OPCServer之间的网络通讯;先得看看对应的操作系统..选好安全审核机制再说..举例说明:例1:OPC Client和OPC Server都在Windows 2000操作系统上来举个例子:由于操行系统都是Windows 2000;那么安全策略都是来访者以自己的身份进行验证自己指OPC Server..这里的以来访者以自己的身份进行验证是什么意思就是指OPC Client去敲OPC Server的135这扇门时;会告知OPC Client的登录用户名是谁;我的登录密码是多少..OPC Server所在的操作系统通过来访者告知的用户名和密码去自己的用户列表中去查找是否也存在这个用户;密码是否正确..如果用户名和密码正确;则进入下一步工作..例2: OPC Client和OPC Server都在Windows XP操作系统上来举个例子:由于操行系统都是Windows XP;那么默认的安全策略都是将所有来访者都看成是来宾访问..对本地用户进行身份验证;其身份为来宾..且默认拒绝Guest用户从网络访问本机..这里的将所有来访者都看成是来宾访问是什么意思就是指OPC Client去敲OPC Server的135这扇门时;会告知;我的登录用户名是谁;我的登录密码是多少..OPC Server所在的操作系统却不管你是谁;所有来访者一视同仁;都是来宾;而且按照规定;来宾都拒绝掉..这下可好;后面二者之间的通讯也不用继续了..上面的一这种情况工作还能继续往下做;二这种情况就完全不行了;啥都不管了..因此二这种情况是需要修改安全策略的;一种是将安全策略修改为来访者以自己的身份进行验证;另外一种是将“拒绝从网络中访问此计算机”规则中的来宾用户给去掉;从用户管理中将来宾用户启用;且密码为空..仅来宾-对本地用户进行身份验证;其身份为来宾1.7第七问网络防火墙允许进入;操作系统的安全审核也通过了;终于可以访问OPCServer了吧答:还得问一问DCOM的安全配置同不同意..运行“组件服务”检查一下..DCOM的“访问权限”默认只有Sell和System;需要添加指定用户或者允许所有人;需要注意的是;“本地访问”与“远程访问”都需要选择“允许”..DCOM的“启动和激活权限”默认只有“Administrator”和“System”;需要添加指定用户或者允许所有人;需要注意的是;“本地访问”与“远程访问”;“本地激活”和“远程激活”都需要选择“允许”..1.8总结1.8.1小结1经过上面的一些处理过程;我们在这里可以总结一下都做了些什么一配置防火墙;允许访问OPC Server所在计算机的TCP 135端口..二配置操作系统的安全策略;使得可以接受远程计算机的rpc请求;可配置为按照来访者身份验证模式或来宾模式..直接选择以本地身份验证三配置操作系统的用户管理..来访者身份验证模式需在OPC Server所在计算机中添加来访者的用户名和密码;来宾模式需要启用Guest用户..四配置计算机全局的DCOM安全配置;使之允许远程访问;已经远程启动和激活..以上4步基本已将OPC Server这端的访问权限配置得差不多..但在实际操作过程中;还需要检查如下一些内容:一OPC库文件是否安装注册 OPC库文件没有正确的安装注册;OPC Server是无法工作的..而现在的不少OPC Server安装时并不会自动安装OPC库文件..二OPCserver是否注册 OPC Server未注册;是无法访问的;OPC Server必须正确注册..而现在的不少OPC Server安装后也不会自动注册;需要手动在程序界面上提供的功能按钮进行注册..三OPCserver的主程序是否存在有的时候OPC Server注册了;但主程序可能被误删除或改名了;这个操作系统可不会告诉你..只能自己检查一下或重新注册一遍..四OPCServer的主程序与其他程序是否有依赖关系因为OPC Server只是软件对外提供数据的一种标准接口;它本身也是通过从其他的软件获取数据;常见的如组态软件;实时数据库等;而现在的一些OPC Server启动时会检查依赖的程序是否启动;如未启动;要么退出;要么啥都提供不了;也不会告诉OPC Client出了啥问题..五OPC Server在DCOM环境中自己的配置信息;OPC Server在DCOM的环境中的配置信息如下图..如OPC Server是NT服务方式启动;那么“标识”这一栏就为系统帐户;不推荐使用“下列用户”..如OPC Server是COM方式注册;那么“标识”这一栏默认为“交互式用户”或“启动用户”各家OPC Server注册时处理方法不太一样;最好都使用..“交互式用户”;不推荐使用“启动用户”和“下列用户”..具体原因后期再说..OPCServer是NT服务方式启动;标识这栏为“系统账户仅用于服务”OPCServer是COM方式注册;标识这栏为“交互式用户”1.8.2小结2到了这一步;可能绝大部分人都会觉得这完成没有问题了..OPC Server都连接上了;增加个OPC组还不是轻而易举的事情吗而实际上;OPC的组是一个大有深意的设计..OPC的组是用来给OPC Client灵活定义数据采集方式的一个方法;如希望对OPC Server中测点;一些测点的采样频率是1秒;一些测点的采样频率是5秒;一些测点数据变化即采集;一些测点数据变化超过量程多少才采集等等..而且还定义了数据采集的两种模式;Synchronous I/O同步和Asynchronous I/O异步..对同步和异步进行一个简单的说明:同步模式:OPC Client向OPC Server要5000个测点的数据;必须等到OPCServer将5000个测点的数据都返回后才做后面的事情..异步模式:OPC Client向OPC Server要5000个测点的数据;OPC Client告诉OPCServer:“我为你留了一个通道;我要的这5000个点;只要任何点有变化;你就立马按照预定的周期告诉我”;于是OPC Server就按照预定的周期将数据发生变化的测点通过OPC Client预留的通道告知OPC Client..异步模式中;就会发生OPC Server反向连接OPC Client的情况;那么就会再次发生前面9个问题的所有事情..这也是很多时候OPC Server配置完成了;但OPC的通讯还是不正常的缘故..因为现在的绝大多数OPC Client默认都是采用异步方式与OPC Server进行通讯;这就要求OPC Client所在计算机的网络防火墙、操作系统的安全策略;DCOM的全局安全配置也需要配置正确..某OPC Client客户端添加OPC组时的属性配置..此处给各位留下一个问题:既然异步方式增加了对OPC Client 端的配置要求;那为何大家默认不使用同步模式呢1.8.3小结3到了这一步;还问这样的问题;估计有人会很愤怒了;“这种弱爆了的问题还要问吗”;其实不然;在很多实际的案例中;就遇到了OPC的通讯配置问题解决了..但却看不到测点;一般会有如下几种原因:一OPC Server真的没有测点..二仔细阅读第10问中的检测要点的第4条..OPC Server中的测点来自于组态软件或实时数据库;当组态软件和实时数据库未启动或OPC Server启动在组态软件和实时数据库之前时;OPC Server中很可能就没有测点..如何解决重启一下就好了嘛..2OPCClient/OPCServer2.1问题现象目前市场上的OPCClient与OPCServer软件在Windows上的运行方式有Windows桌面程序和WindowsNT服务..本来也没啥..但由于OPCClient是一个厂家的软件;而OPCServer 是另一家的软件;正因为软件的多样性;也就导致了如下一些现像:1:OPCClient连接目标OPCServer;发现无法连接;但在OPCServe计算机上明明看见OPCServe进程已经启动..2:OPCClient连接目标OPCServer;能连接;也能看见测试点;但无法获取到数据..经过多次现场的积累后;发现此类问题多出现在OPCClient和OPCServer软件在Windows上运行方式不同导致的..也就是说;OPCClient和OPCServer软件的运行方式不一样..譬如:OPCClient是Windows桌面程序方式;OPCServer是WindowsNT服务时;发现上面的现象基本不出现..这是为什么呢2.2问题解决原因如下:OPCClient和OPCServer都是基于DCOM的应用;DCOM的特点是OPCServer无需先运行或启动;等待OPCClient请求时;由操作系统在将OPCServer拽起来..这种机制的好处就是随用随启..但这种机制如果处理不好吧;就会导致一些问题..当OPCClient是WindowsNT 服务时;OPCServer被拽起来后;是运行在System这个系统帐户下面的..相对于Windows的桌面用户来说;是另外一个隔离开的空间..因此当桌面运行类型的OPCServer被WindowsNT服务方式的OPCClient拽起来后;被运行在System这个系统帐户的空间..而如果这个OPCServer程序又做了全局唯一进程运行的限制或与数据库只允许一个TCP连接时;上述的两种现象基本就会出现..这就是这段时间好几个朋友遇到的OPC通讯故障现象..如何让自己开发的OPC程序兼容性更好的1:当开发OPCClient程序时;最好使用Windows桌面程序方式;这种方式可兼容OPCServer程序运行在Windows桌面程序方式和WindowsNT服务方式..2:当开发OPCServer程序时;最好使用WindowsNT服务方式;这种方式可兼容OPCClient程序运行在Windows桌面程序方式和WindowsNT服务方式..如果很不幸遇到了WindowsNT服务的OPCClient去采集Windows桌面程序的OPCServer加上OPCServer本身的全局唯一限制;那么你可以去WindowsNT服务的管理器中将WindowsNT服务..。
OPC Unified Architecture - Connectivity GuideJanuary, 2010Ref. 01.02©Kepware TechnologiesTable of Contents1. Overview (1)2. Prerequisites (1)3. Security (2)3.1 Automatic (2)3.2 Exchange (3)3.3 Manual (7)4. Setting up the Server (11)4.1 Endpoints (11)4.2 Firewall (13)5. Setting up a Discovery Service (Optional) (15)5.1 Server (15)5.2 OPC Foundation (17)6. Setting up the Client (22)6.1 OPC UA Client Channel (22)6.2 OPC UA Client Device (26)6.3 Verification (28)7. Summary (28)1.O verviewThe idea of setting up a remote OPC connection can even bring fear to those who are vastly familiar with DCOM and classic remote OPC. Out of desperation, it may even be common practice to disable firewalls and also expose the computer to unauthorized or anonymous users. Even if a firewall is in place, DCOM requires that port 135 be added to the exception list by default. This port is used for Microsoft’s Remote Procedure Call and has been the target of many malicious attacks. So how can a safe and secure remote OPC connection be established?The solution comes in the form of a new specification known as OPC Unified Architecture (OPC UA). OPC UA does not require callbacks and the use of DCOM for remote connections. This greatly simplifies firewall configuration and completely eliminates the headache known as DCOM.The OPC Tunnel is not a product in itself, but rather a feature that is created out of existing components that are available. The tunnel requires the same client-server architecture as any OPC product; however, the client and server both need to have OPC UA support. In this case, it happens that the client and the server are part of the same product package.The OPC UA server is packaged in with the OPC DA, native interface and, in some cases, DDE servers. By default, the OPC UA server is running and waiting for local connections immediately after the product has been installed. Minor configuration changes are required to allow remote connections. The OPC UA client is actually a driver channel that can be added along with any other device channel. If required, an OPC UA client and an OPC UA server can both be running on the same computer and be sharing data with a remote computer with the same configuration. The result is a connection between two remote servers with the ability to easily share items in a secure way. 2.P rerequisitesInstall the server application on the client computer and include OPC UA Client on the Select Features page under Communication Drivers.Install the server application on the server computer. Since UA functionality is included, no additional features need to be selected during the install.Some situations are going to require that each computer act as a server as well as a client. If so, install the OPC UA Client driver on each computer that needs to access items remotely.3.S ecurityIn place of relying on the computer’s operating system to secure the applications, OPCUA uses X.509 authentication technology. This technology consists of a set of public andprivate keys for each entity wishing to establish a trust. The private key is protected while the public key is placed into a certificate for distribution. In order to establish asecure connection between a client and the server, their certificates must first be “swapped” and also “trusted”. The swap is only required to be done once for the lifetime of the certificate.There are a few options when deciding how to swap certificates: automatic, exchange,and manual. The automatic trust can be established during runtime when the client first attempts to connect to the server. Several UA client and server applications support this feature and most present a dialog requesting that the user trust or reject the incoming certificate. Because the Runtime doesn’t interact with the desktop, an extra step may be required on the server to “Trust” the certificate once it has been swapped. The exchange is preformed from the client side and only takes an instant to complete; however, the server computer must have an open port in the firewall and the Runtime must be allowed to accept remote configuration on that port. The manual method consists of exporting and importing a certificate file on each computer using removable media or another form of file transfer for the exchange to take place. The manual process also allows for swapping certificates between client and server applications that do not support automatic exchange.If security is not necessary, the certificate swap can be skipped. The level of security is set by the server when defining the endpoints. If None, None is selected as the a Security Policy, certificates are not checked for validation. For unsecure connections, move on to Setting up the Server.3.1AutomaticThe automatic swapping of the certificates only happens when it is required. For instance, adding an OPC UA Client channel and selecting a secure serverendpoint will prompt the user to allow the server to be trusted. Once a device is added to the OPC UA Client and user attempts to import items, the server willfirst need to trust the client. By design, this server cannot post a dialog to thedesktop so a method of trusting swapped certificates was implemented.First, let’s assume the project was already configured for this application’s ownclient and server. The client has attempted to connect for the first time so thecertificates have swapped, but are not yet trusted.1.Right-click on the Administration icon and select OPC UA Configuration.2.View the Trusted Servers tab.3.If the server’s certificate appears with a red ‘X’ it is also not yet trusted.Right-click on the certificate and select Trust.4.View the Trusted Clients tab.5.If the client’s certificate appears with a red ‘X’ it is not yet trusted. Right-clickon the certificate and select Trust.3.2Exchange1.Right-click on the Administration icon, select Settings and choose theConfiguration tab.2.Enable remote configuration by checking Allow runtime to accept remoteconnections. The change will only be applied when the Configurationinterface is shutdown since it is using the same port to configure the Runtime locally.3.Add an exception to the windows firewall for port that is specified inCommunicate using port property on the Configuration tab. Anotheroption is to temporarily turn off the firewall before the exchange is performed and return the firewall back to its secure state when the process is complete.This method also prevents unauthorized users from exchanging certificates in the future.4.Enable the exception in the windows firewall for File and Printer Sharing.5.From the client computer, launch the OPC UA Configuration Manager byright-clicking on the Administration icon and selecting OPC UAConfiguration.6.Select the Trusted Servers tab.7.Select Exchange.8.When the Server Instance dialog appears, click the Browse icon to theright of the Remote host field. Some newer operating systems will be required to have discovery and file sharing enabled.9.Browse to the server by navigating the tree.10.Select the computer name and select OK.11.Verify that the correct port is identified in the Remote port field. This valueshould be the same as what was viewed on the server computer when the exception was made to the firewall. This port is used for remote configuration of the server.12.Select OK.13.A message will appear stating that the exchange was successful. The servercertificate should appear in the Trusted Servers window and can beidentified by the URI.unch the OPC UA Configuration Manager on the server computer. Theclient certificate should already in the Trusted Clients window and can beidentified by the URI.3.3Manualunch the OPC UA Configuration Manager on the server computer byright-clicking on the Administration icon and selecting OPC UAConfiguration.2.Select the Instance Certificate tab.3.Under the Server group, select Export server certificate.4.Select a location for the certificate file so that it can be easily located. Thedefault file name is the thumbprint that identifies the certificate, but it may be changed to make managing the files easier.5.Manually copy the server certificate file from the server computer and moveit onto the client computer.unch the OPC UA Configuration Manager on the client computer.7.Select the Trusted Servers tab.8.Select Import and locate the server certificate file.9.Select Open.10.The server certificate should appear in the Trusted Servers window and canbe identified by the URI.11.Select the Instance Certificate tab.12.Under the Client Driver group, select Export client driver certificate.13.Select a location for the certificate file so that it can be easily located. Again,the file name can be changed if desired.14.Manually copy the client certificate file from the client computer and return itto the server computer.unch the OPC UA Configuration Manager on the server computer.16.Select the Trusted Clients tab.17.Select Import and locate the client certificate file.18.Select Open.19.The client certificate should appear in the Trusted Clients window and canbe identified by the URI.4.S etting up the Server4.1EndpointsIn order for an OPC UA client to connect to an OPC UA server, the client needs to know the server location and security requirements. In its complex form, theclient will use a location and port number, called a Discovery Endpoint, todiscover information about the server. The server will, in turn, return all configured endpoints along with security requirements that are available to the client.To simplify the process, the Discovery Endpoint and the Server Endpoint can be the same location as is the case for this server application.During the install of the server application, an initial endpoint is created for local connections. Minor configuration changes are required to allow remote clients to discover and connect to the server. To become familiar with this configuration or to add and make changes to the existing endpoints, follow these steps:unch the OPC UA Configuration Manager by right-clicking on theAdministration icon and selecting OPC UA Configuration.2.Select the Server Endpoints tab.3.Select the default endpoint that was created during the install for non-localconnections.4.Select Edit.5.Make note of the port number so that it can be added to the firewall.6.If necessary, modify the settings in the Security Policies group. Since thesesettings are for the server, this particular endpoint will allow all connectionswith the enabled policies. I.e. the default endpoint will only allow secureconnections using signing and encryption. If security is not required, selectNone and you may also want to disable the security policies completely.7.With the policies adjusted accordingly, select OK.8.Enable the endpoint by selecting it in the list and checking the Enable box.9.Apply the changes to the server Runtime by right-clicking on theAdministration icon and selecting Reinitialize or if the server is notrunning, select Start Runtime.4.2FirewallThe purpose of a firewall is to drop incoming traffic that is not expected(unsolicited traffic) or traffic that does not correspond to the exceptions(excepted traffic) that are set within the firewall. Since OPC UA does not require callbacks, only the server computer needs to have the exception.To add the exception, follow these steps on the server computer:unch the Windows Firewall by selecting Start | Run and then typingfirewall.cpl.2.Windows Vista or Windows Server 2008 will not directly display the settingsdialog. To view the dialog, select Change Settings.3.Select the General tab.4.Verify that the firewall is enabled by choosing On.5.Select the Exceptions tab.6.Click Add port.7.Enter UA Endpoint in the Name field.8.Enter the port number that is assigned to the endpoint in the Port numberfield.9.Verify that the correct Protocol is selected. The default is TCP.10.Click OK.11.If multiple endpoints are assigned to the server, continue to add them now.12.When done, click OK to close the settings dialog.5.S etting up a Discovery Service (Optional)Those who are familiar with Classic OPC are familiar with an application called OPCEnum. This application runs locally on the serving computer and exposes available Classic OPC servers to the remotely connecting client(s). A client simply needs to know the serving computer’s location on the network.Unfortunately, OPC UA lost this luxury in exchange for its platform independence. However, to provide the same usability, a service was created that allows OPC UA servers to be discovered at a “well-know” location. This service, called the Local Discovery Service (LDS), is expected to be installed on every computer that is running an OPC UA server (the same way OPCEnum is installed alongside most Classic OPC servers). However, the development and implementation of the LDS is not as far along as OPC UA itself so the actual usage or the service will vary.This server application does not provide a LDS, but can be register for discovery by exchanging certificates with one provided by the OPC Foundation.5.1Serverunch the OPC UA Configuration Manager by right-clicking on theAdministration icon and selecting OPC UA Configuration.3.Under the Server group, select Export server certificate.4.Select a location for the certificate file so that it can be easily located. Thedefault file name is the thumbprint that identifies the certificate, but it maybe changed to make managing the files easier.5.If the Local Discovery Service is on another machine, manually copy theserver certificate file from the server computer and move it onto thecomputer that is running the service.7.Select Import and locate the LDS certificate file.8.Select Open.9.The LDS certificate should appear in the window. The URL defaults tolocalhost and must be changed if it resides on a remote computer.5.2OPC Foundationunch the Microsoft Management Console by selecting Start | Run andthen typing mmc.exe.2.Select File | Add/Remove Snap-in.3.In the Available snap-ins window, select Certificates.4.Click Add.5.Choose Computer account in the Certificates snap-in dialog.6.Click Next.7.Choose Local computer in the Select Computer dialog.8.Click Finish.9.Back in the Add or Remove Snap-ins dialog, click OK to apply the changesto the console.10.Under the Console Root folder, expand Certificates (Local Computer),UA Applications, Certificates and select UA Local Discovery Server.11.Select Action | All Tasks > Export.12.Select Next to begin the exportation process.13.Choose DER encoded binary X.509 for the file format.14.Click Next.15.Supply a file name and a destination for the certificate.16.Click Next.17.Review the summary and click Finish.18.Under the Console Root folder, expand Certificates (Local Computer),UA Applications and select, Certificates.19.Select Action | All Tasks > Import.20.Click Next to begin the importation process.21.Browse to the server certificate file that was previously exported from theOPC UA Configuration Manager.22.Click Open.23.Click Next.24.Choose Place all certificates in the following store on the CertificateStore page. Ensure that the UA Applications store is displayed as the destination.25.Click Next.26.Review the summary and click Finish.27.The server’s certificate will appear in the UA Applications store.The discovery service is now configured.6.S etting up the Client6.1OPC UA Client ChannelThe channel wizard is used to locate and identify the OPC UA server, configure session timeouts, and provide user information when applicable.Add a UA Client channel by following these steps:unch the Configuration by right-clicking on the Administration icon andselecting Configuration.2.Select Edit | Devices > New Channel.3.On the Identification page, supply a name for the OPC UA client channel.4.Click Next.5.On the Device Driver page, select OPC UA Client in the Device driver list.6.Click Next.7.Make no changes on the Write Optimization page.8.Click Next.9.On the UA Server page, the server’s endpoint URL can be manually enteredinto the Endpoint URL field. The user can also choose to browse for thecomputer.10.Click the Browse icon to the right of the Endpoint URL field.11.Begin with disabling the Use Discovery URL option. This option is disabledby default.12.Enter the endpoint port number that was created on the server computer inthe Discover Port field. The default port number should already be assigned and should agree with the default endpoint. Also, port 4840 will always be scanned by the browser so if a discovery server is being used, it is notnecessary to enter the correct port number in this field.13.If the port number was changed, click Refresh.14.Navigate the browse tree to locate the server computer by its name.Endpoints that are assigned to localhost will only be found under the Local Machine branch.15.Expand the computer and below it will be a list of available servers.16.Expand the server(s) and select the correct endpoint.17.If you wish to continue to use this endpoint to discover OPC UA servers,enable the Use Discovery URL in the Discovery group at the top of the dialog. This is a global change that will affect all other UA client drivers when this dialog is used.18.Click OK.19.The endpoint information will appear in the UA Server page.20.Click Next.e defaults on the UA Session page. These can be optimized later.22.Click Next.23.Keep the username and password blank on the Authentication page is notrequired.24.Click Next.25.View the Summary and click Finish.6.2OPC UA Client DeviceThe device wizard will guide the user in setting up a subscription and will alsoprovide a way to browse and import items from the OPC UA server. All the items in the device will update according to the settings provided. Multiple devices can be added to the same channel to allow for different update intervals and modes.Add a UA Client device by following these steps:1.With the new channel selected, select Edit | Devices > New Device.2.On the Name page, supply a name for the OPC UA client device.3.Click Next.e defaults on the Subscription, Keep Alive, Priority and Timeout,Monitored Items, and Deadband pages. These can be optimized later.5.Click Next for each page.6.On the Import page, click the Select import items.7.The server’s available items should appear in the Browsing window. If not,the security configuration is incorrect. See Trouble Shooting.8.Select the desired items on the left and click Add Items or Add Branch toimport them into the client.9.When all the items are imported, click OK.10.Click Next back on the Import page.11.View the Summary and click Finish.12.The imported items will populate under the device using the server’s channeland device names as groups.6.3VerificationThe items added in the OPC UA Client can now be browsed by an OPC DA client.For easy verification, follow these steps:1.Simply select Tools | Launch OPC Quick Client. A connection to the localOPC DA server will be established and all items will populate the view.2.Browse for the items in the OPC UA channel and verify that the data’s qualityis good and values are updating.7.S ummaryOPC Unified Architecture provides a means of exchanging data between an OPC server and an OPC client that aims to be platform independent, firewall friendly and secure. While UA is rather new to the OPC world, its current implementation in this application benefits users who are attempting to establish remote connections between a server and its clients. For more information about OPC UA, refer to the OPC Foundation at /.。