ansible部署rsync+inotify-tools
- 格式:docx
- 大小:33.83 KB
- 文档页数:10

通过rsync+inotify-tools+ssh实现触发式远程实时同步1.安装所需软件目前各大Linux发行版本都已经具有了rsync与inotify-tools的软件包,推荐通过RPM,yum,apt-get等方式进行安装。
RHEL:[root@server1 ~]# rpm -ivh rsync-*[root@server1 ~]# rpm -ivh inotify-tools-*CentOS:[root@server1 ~]# yum install rsync inotify-toolsUbuntu:[root@server1 ~]# apt-get install rsync inotify-tools采用源码方式安装的步骤如下:[root@server1 ~]# wget ftp:///pub/rsync/rsync-3.0.8.tar.gz[root@server1 ~]# tar xzvf rsync-3.0.8.tar.gz[root@server1 ~]# cd rsync-3.0.8[root@server1 ~]# ./configure[root@server1 ~]# make[root@server1 ~]# make install[root@server1 ~]# wget/downloads/rvoicilas/inotify-tools/inotify-tools-3.14.tar.gz[root@server1 ~]# tar xzvf inotify-tools-3.14.tar.gz[root@server1 ~]# cd inotify-tools-3.14[root@server1 ~]# ./configure[root@server1 ~]# make[root@server1 ~]# make install2.配置ssh key信任建议通过普通用户进行操作,理由是通过root操作本身就危险,免密码登陆的root就更危险了。

ansible 常用命令摘要:一、Ansible 简介1.Ansible 背景2.Ansible 作用二、Ansible 安装与配置1.安装Ansible2.配置Ansible三、Ansible 常用命令1.基本命令a.ansible [hostname] [command]b.ansible [hostname] -m module_namec.ansible [hostname] -a argument_list2.常见模块a.shellmandc.copyd.filee.templateerg.grouph.packagei.serviceworkk.firewalll.vpnm.inventoryn.fact四、Ansible 实战案例1.案例一:通过Ansible 部署应用2.案例二:通过Ansible 管理远程服务器正文:【Ansible 简介】Ansible 是一款自动化运维工具,它可以帮助运维人员快速、高效地管理多台服务器。
Ansible 基于Python 语言编写,采用Playbook 形式定义任务,无需在目标服务器上安装额外软件,支持SSH、Telnet 等多种协议。
【Ansible 安装与配置】1.安装Ansible:根据操作系统和Python 版本选择合适的安装包,使用pip 进行安装。
2.配置Ansible:修改ansible.cfg 文件,设置ssh 密钥、模块缓存等参数。
【Ansible 常用命令】1.基本命令:a.ansible [hostname] [command]:执行远程命令。
b.ansible [hostname] -m module_name:执行指定模块。
c.ansible [hostname] -a argument_list:传递参数给模块。
2.常见模块:a.shell:执行远程Shell 命令。
mand:执行远程命令。
c.copy:复制文件或目录到远程服务器。

rsync+inotify远程同步⼀、rsync介绍1.rsync(Remote Sync,远程同步)是⼀个开源的快速备份⼯具,可以在不同主机之间镜像同步整个⽬录树,⽀持增量备份,并保持链接和权限,且采⽤优化的同步算法,传输前执⾏压缩,因此⾮常适⽤于异地备份、镜像服务器等应⽤2.rsync的官⽅站点的⽹址是 Wayne Davison 进⾏维护。
作为⼀种最常⽤的⽂件备份⼯具,rsync往往是Linux和UNIX系统默认安装的基本组件之⼀⼆、rsync下⾏/拉取流程1.在远程同步任务中,负责发起rsync同步操作的客户机称为发起端,⽽负责响应来⾃客户机的rsync同步操作的服务器称为同步源。
2.在同步过程中,同步源负责提供⽂件的原始位置,发起端应对该位置具有读取权限2.1 配置rsync源服务器(192.168.80.11)2.1.1 关闭防⽕墙和安全功能systemctl stop firewalld.servicesetenforce 02.1.2 安装rsync软件包rpm -q rsyncyum -y install rsync2.1.3 建⽴/etc/rsyncd.conf配置⽂件vim /etc/rsyncd.conf #添加以下配置uid = nobodygid = nobodyuse chroot = yes #禁锢在源⽬录address = 192.168.80.11 #监听地址port 873 #监听端⼝ tcp/udp 873,可通过 cat /etc/services | grep rsync 查看log file = /var/log/rsyncd.log #⽇志⽂件位置pid file = /var/run/rsyncd.pid #存放进程ID的⽂件位置hosts allow = 192.168.80.0/24 #允许访问的客户机地址[wwwroot]path = /var/www/html #源⽬录的实际路径comment = Document Root of read only = yes #是否为只读dont comperss = *.gz *.bz2 *.tgz *.zip *.rar *.z #同步时不再压缩的⽂件类型auth users = backuper #授权账户,多个账号以空格分隔secrets file = /etc/rsyncd_users.db #存放账户信息的数据⽂件#如采⽤匿名的⽅式,只要将其中的 “auth users” 和 “secrets file”配置项去掉即可2.1.4 为备份账户创建数据⽂件vim /etc/rsyncd_users.dbbackuper:264196 #⽆需建⽴同名系统⽤户chmod 600 /etc/rsyncd_users.db2.1.5 保证所有⽤户对源⽬录/var/www/html都有读的权限mkdir -p /var/www/htmlchmod +r /var/www/html/ls -ld /var/www/html/2.1.6 启动rsync服务程序rsync --daemonnetstat -natp | grep rsync2.1.7 关闭rsync服务kill $(cat /var/run/rsyncd.pid)rm -rf /var/run/rsyncd.pid2.1.8 创建⽂件⽤于测试cd /var/www/htmlecho "woshidashuaige" >> 1.txt2.2 配置rsync发起端测试备份(192.168.80.12)2.2.1 命令格式rsync [选项] 原始位置⽬标位置常⽤选项说明-r递归模式,包含⽬录及⼦⽬录中的所有⽂件-l对于符号链接⽂件仍然复制为符号链接⽂件-v显⽰同步过程的详细信息-z在传输⽂件时进⾏压缩-a归档模式,递归并保留对象属性,等同于-rlptgoD-p保留⽂件的权限标记-t保留⽂件的时间标记-g保留⽂件的属组标记(仅超级⽤户使⽤)-o保留⽂件的属主标记(仅超级⽤户使⽤)-H保留硬链接⽂件-A保留ACL属性信息-D保留设备⽂件及其他特殊⽂件--delete删除⽬标位置有⽽原始位置没有的⽂件--checksum根据对象的校验和来决定是否跳过⽂件2.2.2 将指定的资源下载到本地/opt⽬录下进⾏备份格式⼀:rsync -avz backuper@192.168.80.11::wwwroot /opt/ #密码264196格式⼆:rsync -avz rsync://backuper@192.168.80.11/wwwroot /opt/2.2.3 免交互格式配置cd /optrm -rf 1.txtecho '264196' > /etc/1.pass #编写⼀个密码⽂件chmod 600 /etc/1.pass #给上读写权限rsync -avz --delete --password-file=/etc/1.pass backuper@192.168.80.11::wwwroot /opt2.2.4 加⼊到计划性任务crontab -e30 23 * * * /usr/bin/rsync -avz --delete --password-file=/etc/1.pass backuper@192.168.80.11::wwwroot /opt/ systemctl restart crondsystemctl enable crond三、rsync上⾏/推送流程1.Linux内核从2.6.13 版本开始提供了inotify通知接⼝,⽤来监控⽂件系统的各种变化情况,如⽂件存取、删除、移动、修改等。

Shell脚本编写的高级技巧实现文件同步和数据传输Shell脚本编写技巧是在自动化任务中非常有用的。
在本文中,我们将重点介绍如何使用Shell脚本实现文件同步和数据传输的高级技巧。
通过掌握这些技巧,您可以更加高效地完成文件同步和数据传输的任务。
一、文件同步1. 使用rsync命令进行文件同步rsync是一个功能强大的工具,用于在本地或远程系统之间同步文件和目录。
以下是使用rsync命令进行文件同步的示例:```shellrsync -avz /source/directory/username@remote_host:/destination/directory/```其中,-a选项表示使用归档模式同步文件(包括文件的权限、所有者信息、时间戳等),-v选项表示以详细模式输出同步过程中的信息,-z选项表示在传输过程中进行压缩。
您需要将/source/directory/替换为源目录的路径,将username@remote_host:/destination/directory/替换为目标目录的路径。
2. 使用inotify-tools实现即时文件同步inotify-tools是一个用于监控文件系统事件的工具集,可以实现文件的即时同步。
以下是使用inotify-tools实现即时文件同步的示例:```shellinotifywait -m /source/directory/ -e create,modify,delete |while read path action file; dorsync -avz $path$file username@remote_host:/destination/directory/ done```在上述示例中,inotifywait命令用于监控/source/directory/中的文件事件,当有文件被创建、修改或删除时,会输出相应的路径、动作和文件名。
然后,通过循环读取这些输出,使用rsync命令将变动的文件同步到远程主机。

目录1 产品简介2 登录防篡改管理系统2.2 注销2.3 主题2.3.1 黑色风格主题2.3.2 Metro风格2.4 关于3 监控频道3.1 组查询3.2 监控端查询4 监控端管理4.1 组管理4.1.2 添加4.1.3 查询4.1.4 删除4.1.5 查看编辑4.2 监控端管理4.2.2 立即激活4.2.3 取消激活4.2.4 查询4.2.5 删除4.2.6 批量分组4.2.7 绑定模板4.2.8 解除模板4.2.9 查看编辑监控端配置发布端配置4.3 模板配置管理4.3.1 添加4.3.2 查询4.3.3 删除4.3.4 编辑查看4.3.5 绑定模板4.3.6 模板配置5 发布端管理5.1 发布端管理5.1.1 查询5.1.2 删除5.1.3 编辑查看5.1.4 发布端配置5.2 发布日志5.2.1 查询5.2.2 删除5.2.3 快速查询6 日志6.1 篡改日志6.1.1 查询6.1.2 删除6.1.3 快速查询6.1.4 导出6.2 攻击日志6.2.1 查询6.2.2 删除6.2.3 快速查询6.2.4 导出6.3 事件日志6.3.1 查询6.3.2 删除6.3.3 快速查询6.3.4 导出7 报表7.1 报表7.1.1 篡改日志报表7.1.2 攻击日志报表8 系统管理8.1 服务器状态8.2 用户信息8.2.1 修改admin帐号8.2.2 修改admin密码8.2.3 用户认证8.2.4 报警设置8.2.5 许可设置8.2.6 系统设置9 登录系统9.1 系统登录9.2 注销9.3 系统管理9.3.1 系统信息9.3.2 用户信息9.3.3 许可配置9.4 防护配置9.4.1 防篡改配置9.5 防护日志9.5.1 攻击日志9.5.2 篡改日志产品简介当网站网页被非法篡改后,无论是政府还是企业的网站,其造成的后果都是无法估量的,市场上急需一种应对网页篡改攻击的防网页篡改类的产品,网页防篡改系统应运而生。
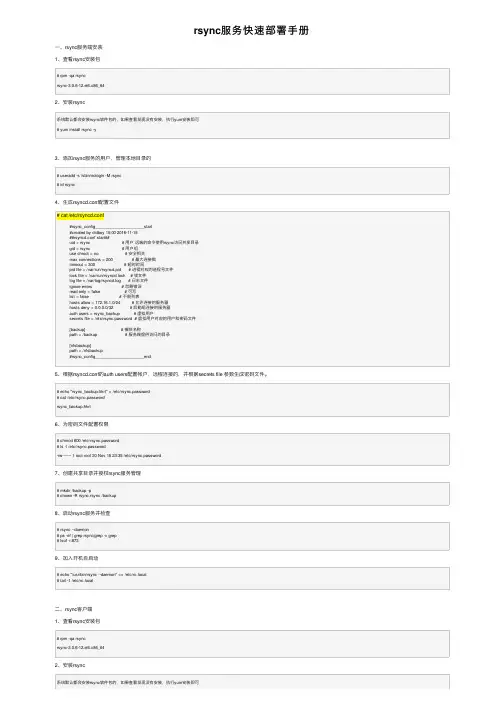
rsync服务快速部署⼿册⼀、rsync服务端安装1、查看rsync安装包# rpm -qa rsyncrsync-3.0.6-12.el6.x86_642、安装rsync系统默认都会安装rsync软件包的,如果查看发现没有安装,执⾏yum安装即可# yum install rsync -y3、添加rsync服务的⽤户,管理本地⽬录的# useradd -s /sbin/nologin -M rsync# id rsync4、⽣成rsyncd.conf配置⽂件# cat /etc/rsyncd.conf#rsync_config______________________start#created by oldboy 15:00 2016-11-15##rsyncd.conf start##uid = rsync # ⽤户远端的命令使⽤rsync访问共享⽬录gid = rsync # ⽤户组use chroot = no # 安全相关max connections = 200 # 最⼤连接数timeout = 300 # 超时时间pid file = /var/run/rsyncd.pid # 进程对应的进程号⽂件lock file = /var/run/rsyncd.lock # 锁⽂件log file = /var/log/rsyncd.log # ⽇志⽂件ignore errors # 忽略错误read only = false # 可写list = false # 不能列表hosts allow = 172.16.1.0/24 # 允许连接的服务器hosts deny = 0.0.0.0/32 # 后勤组连接的服务器auth users = rsync_backup # 虚拟⽤户secrets file = /etc/rsync.password # 虚拟⽤户对应的⽤户和密码⽂件[backup] # 模块名称path = /backup # 服务端提供访问的⽬录[nfsbackup]path = /nfsbackup#rsync_config______________________end5、根据rsyncd.conf的auth users配置帐户,远程连接的,并根据secrets file 参数⽣成密码⽂件。

rsync用法rsync是一种快速的文件和目录复制工具,它可以使用一个远程服务器,来把一台机器上的文件和目录复制到另一台机器上。
它是一个功能强大的复制工具,能够实现实时、快速和可靠地把文件从一台机器复制到另一台机器。
rsync的一个重要用途就是将一台机器上的文件备份到另一台机器上,从而实现备份的目的。
另外,它还可以用于在两台服务器之间同步文件,以实现文件的双向同步,从而实现文件与文件之间的即时同步,减少由于文件数据不一致带来的风险。
rsync和其他复制工具最大的区别在于它采用了增量复制技术,它只会复制两个文件中有变化的部分,由此可以大大降低复制文件所需要的时间,其中涉及到的算法技术也很有深度,非常强大。
rsync使用方法也很简单,它的命令行格式如下:rsync [options]文件目录/件名标文件目录/其中,options是可选的,可以添加多个命令行参数来调整rsync 的行为。
常用的参数有:--force:制复制,忽略旧文件提示。
--ignore-existing:忽略已有的文件。
--delete:删除源文件夹中不存在的文件。
--update:只复制比源文件新的文件。
--progress:显示复制进度。
--verbose:显示复制过程中的详细信息。
要在远程服务器之间同步文件,可以在rsync命令后添加一个远程用户名和服务器地址:rsync [options]文件目录/程用户名@远程服务器地址:目标文件目录/例如:rsync --progress -a --delete /test/************.1.10:/test/这条命令表示,将本地/test/目录下的文件复制到远程服务器192.168.1.10的/test/目录下,复制过程中显示进度,并保留文件的原始属性,如果远程服务器上存在本地不存在的文件则将其删除。
除了命令行方式外,rsync还提供了一个可视化的界面,叫做grsync,可以使用grsync来进行文件复制,通过grsync操作可以更加直观,也方便记录和管理文件复制历史记录。

rsync常见运维操作命令-回复rsync是一个常用的文件传输和备份的工具,它在Linux和Unix系统中广泛使用。
它可以在本地和远程系统之间复制文件和目录,并且可以通过网络安全地传输数据。
本文将介绍rsync的常见运维操作命令,帮助读者熟悉和掌握rsync的使用。
首先,我们需要安装rsync。
在大多数Linux发行版中,rsync已经预装,但如果没有安装的话,可以使用以下命令进行安装:sudo apt-get install rsync Debian或Ubuntusudo yum install rsync CentOS或Red Hatsudo dnf install rsync Fedora安装完成后,我们可以开始使用rsync进行文件传输和备份。
下面是一些常见的rsync命令:1. 复制本地文件到远程系统:rsync -avz local_fileremote_user@remote_host:remote_folder该命令将本地文件复制到远程系统的指定文件夹中。
其中,-a选项表示以归档模式复制文件,并保持原始文件的属性和权限;-v选项表示以详细模式显示复制的过程;-z选项表示在网络传输中压缩数据,以提高传输速度。
2. 复制远程系统文件到本地:rsync -avz remote_user@remote_host:remote_filelocal_folder该命令将远程系统的文件复制到本地文件夹中。
同样地,-a选项表示以归档模式复制文件;-v选项表示以详细模式显示复制的过程;-z 选项表示在网络传输中压缩数据。
3. 同步本地文件夹和远程文件夹:rsync -avz local_folderremote_user@remote_host:remote_folder该命令将本地文件夹与远程系统的文件夹进行同步,即复制本地文件夹中的文件到远程文件夹,并删除远程文件夹中不存在于本地文件夹中的文件。

inotify-tools代码
inotify-tools是一个用于监视文件系统事件的工具集,它提供了一个命令行工具inotifywait和一个C库libinotifytools。
以下是一个示例代码,演示如何使用inotify-tools来监视文件或目录的变化并打印事件信息:
```bash
#!/bin/bash
# 监视的目录或文件
WATCH_DIR="/path/to/directory"
# 使用inotifywait命令监视目录变化
inotifywait -m -r -e create,modify,delete $WATCH_DIR |
while read -r directory event file
do
echo "Event: $event"
echo "Directory: $directory"
echo "File: $file"
echo "----------------------"
done
```
上述代码通过inotifywait命令监视指定目录的文件创建、修改和
删除事件,并将事件信息打印出来。
注意,上述示例代码是一个bash脚本,需要在Linux环境下运行,并且需要安装inotify-tools工具。
安装方式可以使用以下命令:```bash
sudo apt-get install inotify-tools
```
运行示例代码时,将`/path/to/directory`替换为要监视的目录或文件的路径。

使用rsync从linux到linux做备份一、软件简介rsync是Linux系统下的数据镜像备份工具,从软件的命名上就可以看出来了——remote sync。
rsync 支持大多数的类Unix系统,无论是Linux、Solaris还是BSD上都经过了良好的测试。
它的特性如下:1、可以镜像保存整个目录树和文件系统。
2、可以很容易做到保持原来文件的权限、时间、软硬链接等等。
3、无须特殊权限即可安装。
4、优化的流程,文件传输效率高。
5、可以使用rcp、ssh等方式来传输文件,当然也可以通过直接的socket连接。
本文介绍了如何使用rsync服务从Linux到Windows和linux进行远程备份二、安装软件rysnc的主页地址为:/,可以从这里下载rsync的安装软件。
编译安装rsync的编译安装非常简单,只需要以下简单的几步(在两台服务器中都要安装):$ tar xvf rsync-2.6.3.tgz$ cd rsync-2.6.3$ ./configure$ make$ make install//如果是已安装了RPM版的Rsync,并且要安装新版的Rsync,需要先删除Rsync#rpm -e rsync(Redhat会有一个包依赖rsync,可以使用rpm -e rsync --nodeps卸载)另外,RPM版的rsync带了一个服务端的启动脚本,/etc/xinetd.d/rsync可以保留但是需要注意的是必须在主服务器和同步服务器上都安装rsync,其中主服务器上是以服务器模式运行rsync,而同步上则以客户端方式运行rsync。
这样在主服务器上运行rsyn守护进程,在同步上用crond定时运行客户程序来同步主服务器上需要同步的内容。
三、配置rsync服务器端rsync服务器的配置文件为/etc/rsyncd.conf,其控制认证、访问、日志记录等等。
该文件是由一个或多个模块结构组成。
一个模块定义以方括弧中的模块名开始,直到下一个模块定义开始或者文件结束,模块中包含格式为name=value的参数定义。

Linux命令高级技巧使用rsync命令实现高效的文件同步和备份Linux命令高级技巧:使用rsync命令实现高效的文件同步和备份Unix-like操作系统的用户常常面临着文件同步和备份的需求。
在Linux中,rsync命令是一款非常强大和灵活的文件同步工具,它可以通过局域网或互联网快速高效地同步和备份文件。
本文将介绍如何使用rsync命令实现高效的文件同步和备份。
1. 安装和配置rsync在开始使用rsync命令之前,我们首先需要确认系统中是否已经安装了rsync工具。
如果尚未安装,可以使用以下命令在终端中进行安装:```sudo apt-get install rsync // 适用于Debian/Ubuntu系统sudo yum install rsync // 适用于CentOS/Fedora系统```安装完成后,我们需要对rsync进行一些基本配置。
rsync的配置文件位于/etc/rsyncd.conf,默认情况下该文件不存在,我们需要手动创建并进行相应的配置。
2. 创建rsync配置文件使用文本编辑器创建rsync配置文件,例如:```sudo nano /etc/rsyncd.conf```在配置文件中,我们可以指定需要同步的目录、权限设置等。
以下是一个简单的配置示例:```# rsyncd.confuid = rsyncgid = rsyncuse chroot = yesmax connections = 10log file = /var/log/rsyncd.logpid file = /var/run/rsyncd.pid[backup]path = /path/to/backupcomment = Backup directoryread only = false```在上面的示例中,[backup]是我们定义的一个模块,path参数指定了需要备份的目录。
其他参数如comment、read only等也可以根据需求进行配置。
linux系统中rsync+inotify实现服务器之间⽂件实时同步之前做了“ssh信任与scp⾃动传输脚本”的技术⽂档,此⽅案是作为公司⾥备份的⽅法,但在实际的运⾏中,由于主服务器在给备份服务器传输的时候,我们的主服务器需要备份的⽂件是实时、不停的产⽣的,造成不知道主服务器给备份服务器传输了多少⽂件,磁盘空间就那么⼤,做备份的原因:⼀个是为了保持⽂件,另外⼀个是解决主服务器的磁盘饱满问题,但由于不知道备份服务器到底接收了多少⽂件,所以主服务器⾥的⽂件不敢删除(如果没有备份的情况下删除,问题就严重了,我这个是政府的项⽬,服务器⾥的⽂件都是重要的,删错了就⾛⼈~~~~(>_<)~~~~ ),所以我就采⽤了rsync+inotify的⽅式来实时同时服务器之间的⽂件,⽽且传输的过程是加密的,⽐scp安全多了(即使scp采⽤ssh信任,⽤密钥,也不是万⽆⼀失的)。
以下是我给公司运维做的备份技术⽂档,分享给⼤家,希望对⼤家有帮助。
先介绍⼀下rsync与inotify,都在在⽹上找的资料。
先声明下⾯的rsync与inotify介绍不是我⾃⼰写的。
1、rsync接下⾯我们来开始进⾏rsync与inotify的安装、配置、测试。
下⾯是2个服务器的结构,分别为主机名、ip、状态、内核、位数、同步的⽬录,并将2台服务器均是redhat5.4发⾏版本。
⼀、主服务器(server端,我这⾥是nginx)其中主服务器需要安装rsync与inotify,主服务器作为server,向备份服务器client传输⽂件1、安装rsync[root@nginx ~]# cd /usr/src/[root@nginx src]# lltotal 16drwxr-xr-x 2 root root 4096 Jan 26 2010 debugdrwxr-xr-x 2 root root 4096 Jan 26 2010 kernels[root@nginx src]# wget /ftp/rsync/src/rsync-3.0.9.tar.gz[root@nginx src]# tar zxvf rsync-3.0.9.tar.gz[root@nginx src]# cd rsync-3.0.9[*******************.9]#./configure--prefix=/usr/local/rsync[*******************.9]#make[*******************.9]#makeinstall2、建⽴密码认证⽂件复制代码代码如下:[*******************.9]#cd/usr/local/rsync/[root@nginx rsync]# echo "rsync-pwd" >/usr/local/rsync/rsync.passwd其中rsync-pwd可以⾃⼰设置密码,rsync.passwd名字也可以⾃⼰设置复制代码代码如下:[root@nginx rsync]# chmod 600 rsync.passwd⽆论是为了安全,还是为了避免出现以下错误,密码⽂件都需要给600权限复制代码代码如下:password file must not be other-accessiblecontinuing without password file3、安装inotify[root@nginx rsync]# cd /usr/src/[root@nginx src]# wget /downloads/rvoicilas/inotify-tools/inotify-tools-3.14.tar.gz[root@nginx src]# tar zxvf inotify-tools-3.14.tar.gz[root@nginx src]# cd inotify-tools-3.14[****************************]#./configure--prefix=/usr/local/inotify[****************************]#make[****************************]#makeinstall4、创建rsync复制脚本此项功能主要是将server端的⽬录/tmp⾥的内容,如果修改了(⽆论是添加、修改、删除⽂件)能够通过inotify监控到,并通过rsync实时的同步给client的/tmp⾥,下⾯是通过shell脚本实现的。
ansible 常用命令Ansible 是一种流行的自动化配置工具和部署管理平台,它能够帮助运维团队更高效地管理和维护大型服务器基础架构。
在日常的操作中,使用一些常用命令可以帮助管理员更好地使用Ansible。
本文将详细介绍一些常用的Ansible 命令及其用途,以帮助初学者更好地理解和使用Ansible。
1. `ansible` 命令:这是Ansible 的核心命令,用于向管理节点执行指定的任务。
可以使用`-m` 参数指定要执行的模块,`-a` 参数指定模块的参数,`-i` 参数指定主机清单文件。
示例:`ansible all -m ping` 用于执行`ping` 模块来检测所有主机的连通性。
2. `ansible-playbook` 命令:用于运行Ansible Playbook。
Playbook 是一种定义了Ansible 任务和配置的YAML 文件。
它是Ansible 的基本配置单元,使得多个任务可以更组织地执行。
示例:`ansible-playbook playbook.yml` 在当前目录下运行名为`playbook.yml` 的Playbook。
3. `ansible-vault` 命令:用于加密和解密敏感数据,如密码、密钥等。
可以保护敏感信息在存储和传输过程中的安全。
示例:`ansible-vault encrypt secrets.yml` 将`secrets.yml` 文件加密。
4. `ansible-galaxy` 命令:用于管理和分享Ansible 角色。
Ansible 角色是可重用的模块化组件,可以在多个Playbook 中使用。
示例:`ansible-galaxy init myrole` 创建一个名为`myrole` 的新角色。
5. `ansible-doc` 命令:用于查看Ansible 模块的帮助文档。
可以获取模块所有可用参数和示例。
示例:`ansible-doc ping` 查看`ping` 模块的帮助文档。
Linux文件双向实时同步RSYNC+INOTIFYVersion: 2017-01-03.V1.0-CN1 网络拓扑图2 软件版本3 软件安装3.1 环境准备(1)检查操作系统内核是否支持inotify功能[root@localhost ~]# ll /proc/sys/fs/inotify(2)配置本地yum源,如下图所示://PS: cat命令查看文件夹后,需要使用vim命令修改文件[root@localhost ~]# mount /dev/cdrom /media///ps:挂载操作系统ISO文件到指定目录(3)配置服务器相互信任,免密码登陆[root@localhost ~]# ssh-keygen//PS:有提示时,回车不输入任何信息即可[root@localhost ~]# cat .ssh/id_rsa.pub >>.ssh/authorized_keys//PS:将id拷贝到keys文件中然后拷贝keys文件到另一个服务器,然后将另一个服务器的id拷贝到keys文件中,然后再将keys文件拷贝回原来的服务器。
目的是要keys文件包含两个服务器的id,两个服务器的keys文件要一致。
两条服务器的详细操作步骤如下:[root@localhost ~]# cd[root@localhost ~]# cat .ssh/id_rsa.pub>>.ssh/authorized_keys[root@localhost ~]# scp .ssh/authorized_keys root@第二台服务器IP地址:/root/.ssh/然后登陆到第二胎服务器上执行一下操作[root@localhost ~]# cd[root@localhost ~]# cat .ssh/id_rsa.pub>>.ssh/authorized_keys[root@localhost ~]# scp .ssh/authorized_keys root@第一台服务器IP地址:/root/.ssh/合并两个服务器的.ssh/authorized_keys文件内容,并在两个服务器原位置保留一个副本。
ansible 使用方法Ansible 是一种自动化运维工具,它可以让系统管理员和开发人员更容易地管理和配置系统。
下面是 Ansible 的一些基本使用方法:1. 安装 Ansible:首先,你需要在你的机器上安装 Ansible。
你可以通过 pip 命令来安装 Ansible。
2. 配置主机清单:Ansible 通过读取主机清单文件来知道应该对哪些主机进行操作。
默认情况下,Ansible 会在 /etc/ansible/hosts 文件中查找主机清单。
你可以在这个文件中添加你希望 Ansible 管理的主机。
3. 编写 Playbook:Playbook 是 Ansible 的核心,它是一组任务(task)的集合,这些任务按照顺序执行,以完成特定的任务。
一个Playbook 通常包括一个或多个 Play,每个 Play 包含一组任务和一组变量。
4. 运行 Playbook:使用 ansible-playbook 命令来运行 Playbook。
你需要指定 Playbook 的路径和任何必要的选项。
例如:```shellansible-playbook -i /etc/ansible/hosts playbook.yml```这个命令会运行 playbook.yml 文件,并将 /etc/ansible/hosts 作为主机清单文件。
5. 管理主机:你可以使用 ansible 命令来管理你的主机。
例如,你可以使用以下命令来 ping 所有在主机清单中的主机:```shellansible all -m ping```这个命令会发送一个 ICMP 请求到所有在主机清单中的主机,并等待它们回复。
6. 执行 shell 命令:你可以使用 ansible 命令来执行 shell 命令。
例如,你可以使用以下命令来在所有在主机清单中的主机上执行 ls/tmp 命令:```shellansible all -m shell -a "ls /tmp"```这个命令会在所有在主机清单中的主机上执行 ls /tmp 命令,并将结果输出到控制台。
使用Ansible实现自动化部署的步骤和技巧随着企业规模的不断扩大和信息化程度的提升,自动化部署成为了每个IT团队都需要掌握的关键技能之一。
而Ansible,作为一种简单易用的自动化运维工具,逐渐成为了众多企业的首选。
本文将介绍使用Ansible实现自动化部署的步骤和技巧,为读者提供一些实用的经验。
步骤一:安装和配置Ansible第一步是安装Ansible,可以通过官网提供的安装包或者使用包管理工具进行安装。
安装完成后,需要进行一些初始配置,包括配置Ansible的主机清单文件(Inventory)、SSH密钥认证等。
在配置主机清单文件时,可以将所有需要管理的主机按照组织结构进行分组,以方便后续的管理和操作。
步骤二:编写Ansible PlaybookAnsible使用Playbook来描述需要执行的任务,可以将Playbook 理解为一系列有序的步骤。
在编写Playbook时,可以使用YAML语言进行描述,并通过一些关键字来指定具体的操作。
常用的关键字包括"hosts"(指定需要操作的主机组)、"tasks"(指定需要执行的任务)、"vars"(指定变量)等。
在编写Playbook时,可以充分利用Ansible提供的模块来完成一些通用的操作,比如安装软件、配置文件、启动服务等。
Ansible提供了众多的模块,可以根据实际需求进行选择和使用。
同时,通过使用变量和模板,可以提高Playbook的复用性和灵活性。
步骤三:执行Ansible Playbook编写好Playbook后,可以使用Ansible进行实际的部署操作。
执行Playbook的命令非常简单,只需要运行"ansible-playbook"命令,并指定Playbook的文件路径即可。
Ansible会自动根据主机清单文件中的配置信息,连接到指定的主机并执行相关的任务。
rsyncinotify一键安装脚本一、环境描述server:192.168.122.54client:192.168.122.55,192.168.122.56同步目录:/data/htmlserver端有任何数据更新,即将同步到client端,实时同步二、采用方法:rsync inotify三、关于inotify原理(略)四、操作过程4.1服务端脚本#!/bin/bashyum install rsync -ymkdir -p /data/html #如果要同步的不是此目录,可以根据实际需要添加目录#wget /downloads/rvoicilas/inotify-tools/inotify-tools-3.14.tar.gztar xzvf inotify-tools-3.14.tar.gzcd inotify-tools-3.14./configuremakemake install#cponfigure inotifycat >>/home/rsync.sh <<EOF#!/bin/bashsrc=/data/html/ #同步的源目录des=wwwhost="192.168.122.55 192.168.122.56"/usr/local/bin/inotifywait -mrq --timefmt'%d/%m/%y %H:%M' --format '%T %w%f' -e modify,delete,create,attrib \$src | while read filesdofor hostip in \$hostdorsync -vzrtopg --delete --progress --password-file=/etc/rsyncd.secrets \$src root@\$hostip::\$desdoneecho "\${files} was rsynced" >>/tmp/rsync.log 2>&1doneEOF#confiugre secretcat >> /etc/rsyncd.secrets <<EOF123456root:123456EOFchmod 0600 /etc/rsyncd.secrets#setting running onbootecho "nohup /bin/bash /home/rsync.sh &" >> /etc/rc.local nohup /bin/bash /home/rsync.sh &4.2 客户端脚本#!/bin/bashyum install rsync -ymkdir -p /data/html#configure rsyncd daemoncat >> /etc/rsyncd.conf <<EOFuid = rootgid = rootuse chroot = nomax connections = 5pid file = /var/run/rsyncd.pidlock file = /var/run/rsync.locklog file = /var/log/rsyncd.log[www]path=/data/html/comment = updateignore errorsread only = nolist = nohosts allow = 192.168.122.0/24auth users = rootuid = rootgid = rootsecrets file = /etc/rsyncd.secretsEOF#configure secretcat >> /etc/rsyncd.secrets <<EOF123456root:123456EOFchmod 0600 /etc/rsyncd.secretsecho "rsync --daemon" >> /etc/rc.localrsync --daemon五、测试过程。
Ansible部署rsync+inotify-tools (by本末,mail: p_junkai@)客户端环境:Centos 6.2 x64Rsync版本:3.0.6Ansible版本:1.8功能:部署Rsync 单向同步or 双向同步roles目录结构:roles/install_rsync|--files|`-- stop.sh # 停止客户端进程脚本|-- tasks| |-- client.yml # 配置客户端| |-- install.yml # 配置服务端| `--main.yml # 主tasks文件`-- templates|-- default_rsync # ubuntu的/etc/default/raync配置文件|-- rsync.sh # 客户端同步脚本`--rsyncd.conf # 主配置文件playbook---- hosts: "{{hosts}}"sudo: yesgather_facts: yesvars:create_server: yes# module namemodule_name: test# 同步的根路径module_path: /data# 认证的用户auth_users: webadmin# 服务端认证文件server_secrets_file: /etc/rsyncd_server.secrets# 服务端认证文件server_log: /data/logs/rsync/rsync_server.log# 认证密码secrets_pass: 123123# 是否建立客户端“-e”指定create_client: "{{client}}"# 客户端对应服务端的IPpeer_ip: "{{peer_ip}}"# 客户端日志文件client_log: /data/logs/rsync/rsync_client.log# 客户端密码文件client_secrets_file: /data/projects/rsync/rsync_client.secrets# 同步的目录,多个目录按照格式加就可以dirs_to_rsync:- "/data/projects/"roles:- { role: install_rsync }roles/install_rsync/tasks/main.yml- include: install.yml- include: client.ymlwhen: create_client == "yes"roles/install_rsync/tasks/install.yml# ubuntu 安装rsync,inotify-tools- name: ubuntu | Install Rsync and inotify-toolsapt: name={{ item }} state=latestwith_items:- rsync- inotify-toolswhen: ansible_os_family == "Debian"# ubuntu 上传default下的配置文件- name: Upload default filetemplate: src=default_rsync dest=/etc/default/rsync mode=0644 when: ansible_os_family == "Debian"# RHEL系列安装rsync,inotify-tools- name: RHEL | Install Rsync and inotify-toolsyum: name={{ item }} state=latestwith_items:- rsync- inotify-toolswhen: ansible_os_family == "RedHat"# 创建Rsync的日志目录- name: Create logs rsync directorydest=/data/logs/rsyncstate=directoryowner={{ auth_users }}group={{ auth_users }}mode=0755# 上传主配置文件- name: Upload rsync config filetemplate: src=rsyncd.conf dest=/etc/rsyncd.conf mode=0644when: create_server == "yes"# 创建server端认证文件- name: Create Rsync server secrets filelineinfile: >dest={{ server_secrets_file }}line='{{ auth_users }}:{{ secrets_pass }}'owner=rootgroup=rootmode=0600create=yeswhen: create_server == "yes"# 添加开机启动server- name: Add server to rc.locallineinfile: >dest=/etc/rc.localline='/usr/bin/rsync --daemon --config=/etc/rsyncd.conf --address={{ ansible_default_ipv4.address } }'when: ansible_os_family == "RedHat" and create_server == "yes"roles/install_rsync/tasks/client.yml# 检查认证用户是否存在- name: Check auth usershell: 'id {{ auth_users }}'register: userignore_errors: yes# 不存在用户则创建- name: Create {{ auth_users }} useruser: name= {{ auth_users }} home=/home/{{ auth_users }} shell=/bin/bashwhen: user.rc == 1# 创建rsync客户端目录和日志目录,这个logs/rsync有点重复了- name: Create rsync client directorydest=/data/{{ item }}/rsyncstate=directory owner={{ auth_users }}group={{ auth_users }} mode=0755with_items:- projects- logs# 上传rsync客户端脚本- name: Upload rsync scripts filetemplate: >src=rsync.shdest=/data/projects/rsync/rsync.showner={{ auth_users }}group={{ auth_users }}mode=0755# 创建客户端认证文件- name: Create rsyncd client secrets filelineinfile: >dest={{ client_secrets_file }}line='{{ secrets_pass }}'owner={{ auth_users }}group={{ auth_users }}mode=0600create=yes# 创建同步目录文件,内容的是需要同步的目录- name: Add rsync dirs pathlineinfile: >dest=/data/projects/rsync/dirs_to_rsyncline='{{ dirs_to_rsync }}'mode=0644 owner={{ auth_users }}group={{ auth_users }}create=yeswhen: create_client == "yes" and dirs_to_rsync is defined # 上传客户端进程kill脚本- name: Copy client stop scriptscopy: >src=stop.shdest=/data/projects/rsync/mode=0755 owner={{ auth_users }}group={{ auth_users }}when: create_client == "yes"roles/install_rsync/templates/rsync.sh(脚本含义就不再解释)rsync_user={{ auth_users }}peer_ip={{ peer_ip }}rsync_module={{ module_name }}log_file={{ client_log }}secrets_file={{ client_secrets_file }}dirs_to_sync=$1#---------- main part of scprits ----------------#module_path={{ module_path }}rsync_daemon_opts="-pthr --log-file=$log_file --password-file=$secrets_file "rsync_by_daemon(){dir=$1username=$2des=`echo"$1" |sed -e "s#$module_path##g"`host=$3module=$4file=$5is_dir=`echo$event | grep 'ISDIR'`[ $event= CREATE ] || rsync $rsync_daemon_opts$dir$file$username@$host::$module/$des }do_watch(){dirs_to_sync=$1events="create,attrib,modify,move,close_write"exclude_pattern="/.+\.tmp$|/.+\.lock$|/\.[^/]+"timefmt="--timefmt '%Y-%m-%dT%H:%M'"/usr/bin/inotifywait -mrq $timefmt--format '%T %e %w %f'-e $events \--excludei "$exclude_pattern"--fromfile $dirs_to_sync | \while read datetime event dir filedorsync_by_daemon $dir$rsync_user$peer_ip$rsync_module$filedone}# sync allwhile read linedo# display $line or do somthing with $linerelative_path="`echo $line | sed "s#${module_path}##"`"relative_path=`dirname $relative_path`rsync $rsync_daemon_opts \$line$rsync_user@$peer_ip::$rsync_module$relative_pathdone<"$dirs_to_sync"do_watch $dirs_to_syncroles/install_rsync/templates/default_rsync# defaults file for rsync daemon mode# start rsync in daemon mode from init.d script?# only allowed values are "true", "false", and "inetd"# Use "inetd" if you want to start the rsyncd from inetd,# all this does is prevent the init.d script from printing a message# about not starting rsyncd (you still need to modify inetd's config yourself). RSYNC_ENABLE=true# which file should be used as the configuration file for rsync.# This file is used instead of the default /etc/rsyncd.conf# Warning: This option has no effect if the daemon is accessed# using a remote shell. When using a different file for# rsync you might want to symlink /etc/rsyncd.conf to# that file.RSYNC_CONFIG_FILE=/etc/rsyncd.conf# what extra options to give rsync --daemon?# that excludes the --daemon; that's always done in the init.d script# Possibilities are:# --address=123.45.67.89 (bind to a specific IP address)# --port=8730 (bind to specified port; default 873)RSYNC_OPTS='--address={{ansible_default_ipv4.address }}'# run rsyncd at a nice level?# the rsync daemon can impact performance due to much I/O and CPU usage, # so you may want to run it at a nicer priority than the default priority.# Allowed values are 0 - 19 inclusive; 10 is a reasonable value.RSYNC_NICE=''# run rsyncd with ionice?# "ionice" does for IO load what "nice" does for CPU load.# As rsync is often used for backups which aren't all that time-critical,# reducing the rsync IO priority will benefit the rest of the system.# See the manpage for ionice for allowed options.# -c3 is recommended, this will run rsync IO at "idle" priority. Uncomment# the next line to activate this.# RSYNC_IONICE='-c3'# Don't forget to create an appropriate config file,# else the daemon will not start.roles/install_rsync/files/stop_client.sh(脚本含义不解释了,这个脚本也可以写成整个rsync的管理脚本)#!/bin/bashstop_client(){kill-9 $(ps -ef | egrep -v 'root|grep' | grep rsync | awk '{print $2}')exit0}演示:实现目标:双向同步website1: 10.131.134.50website2: 10.131.128.16同步目录: /data/projects/执行playbook:website1:ansible-playbook install_rsyncd.yml -e"hosts=website1 client=yes peer_ip=10.131.128.16" SSH password:sudo password [defaults to SSH password]:PLAY [website1] *************************************************************** GATHERING FACTS***************************************************************ok: [website1]TASK: [install_rsync|ubuntu|Install Rsync and inotify-tools] **************skipping: [website1]TASK: [install_rsync|Upload default file] ***********************************skipping: [website1]TASK: [install_rsync|RHEL|Install Rsync and inotify-tools] ****************changed: [website1] => (item=rsync,inotify-tools)TASK: [install_rsync|Create logs rsync directory] ***************************changed: [website1]TASK: [install_rsync|Upload rsync config file] ******************************changed: [website1]TASK: [install_rsync|Create Rsync server secrets file] **********************changed: [website1]TASK: [install_rsync|Add server to rc.local] ********************************changed: [website1]TASK: [install_rsync|Check auth user] ***************************************changed: [website1]TASK: [install_rsync|Create {{ auth_users }} user] **************************skipping: [website1]TASK: [install_rsync|Create rsync client directory] *************************changed: [website1] => (item=projects)ok: [website1] => (item=logs)TASK: [install_rsync|Upload rsync scripts file] *****************************changed: [website1]TASK: [install_rsync|Create rsyncd client secrets file] *********************changed: [website1]TASK: [install_rsync|Add rsync dirs path] ***********************************changed: [website1]TASK: [install_rsync|Copy client stop scripts] ******************************changed: [website1]PLAY RECAP********************************************************************website1 : ok=12changed=11unreachable=0failed=0website2:ansible-playbook install_rsyncd.yml -e"hosts=website2 client=yes peer_ip=10.131.134.50" SSH password:sudo password [defaults to SSH password]:PLAY [website2] *************************************************************** GATHERING FACTS***************************************************************ok: [website2]TASK: [install_rsync|ubuntu|Install Rsync and inotify-tools] **************skipping: [website2]TASK: [install_rsync|Upload default file] ***********************************skipping: [website2]TASK: [install_rsync|RHEL|Install Rsync and inotify-tools] ****************changed: [website2] => (item=rsync,inotify-tools)TASK: [install_rsync|Create logs rsync directory] ***************************changed: [website2]TASK: [install_rsync|Upload rsync config file] ******************************changed: [website2]TASK: [install_rsync|Create Rsync server secrets file] **********************changed: [website2]TASK: [install_rsync|Add server to rc.local] ********************************changed: [website2]TASK: [install_rsync|Check auth user] ***************************************changed: [website2]TASK: [install_rsync|Create {{ auth_users }} user] **************************skipping: [website2]TASK: [install_rsync|Create rsync client directory] *************************changed: [website2] => (item=projects)ok: [website2] => (item=logs)TASK: [install_rsync|Upload rsync scripts file] *****************************changed: [website2]TASK: [install_rsync|Create rsyncd client secrets file] *********************changed: [website2]TASK: [install_rsync|Add rsync dirs path] ***********************************changed: [website2]TASK: [install_rsync|Copy client stop scripts] ******************************changed: [website2]PLAY RECAP********************************************************************website2 : ok=12changed=11unreachable=0failed=0启动server端服务website1:/usr/bin/rsync --daemon --config=/etc/rsyncd.conf --address=10.131.134.50website2:/usr/bin/rsync --daemon --config=/etc/rsyncd.conf --address=10.131.128.16启动客户端同步脚本website1:website2cd/data/projects/rsync/./rsync.sh dirs_to_rsync &测试:website1:[webadmin@website_50 ~]$ cd/data/projects//[webadmin@website_50 ]$ touch index.html[webadmin@website_50 ]$ lltotal 0-rw-rw-r--1 webadmin webadmin 0 Dec 3117:14 index.html查看日志:[webadmin@website_50 ]$ tailf /data/logs/rsync/rsync_client.log 2014/12/3117:13:19 [21202] building file list2014/12/3117:13:19 [21202] sent 45 bytes received 10 bytes total size 02014/12/3117:14:26 [21538] building file list2014/12/3117:14:26 [21538] <f+++++++++ index.html到website2上查看[webadmin@website_16 rsync]$ cd/data/projects// [webadmin@website_16 ]$ lltotal 0-rw-rw-r--1 webadmin webadmin 0 Dec 3117:14 index.htmlwebsite2:[webadmin@website_16 ~]$ cd/data/projects//[webadmin@website_16 ]$ touch index2.html[webadmin@website_16 ]$ lltotal 0-rw-rw-r--1 webadmin webadmin 0 Dec 3117:14 index.html-rw-rw-r--1 webadmin webadmin 0 Dec 3117:24 index2.html查看日志[webadmin@website_16 ]$ tailf /data/logs/rsync/rsync_client.log 2014/12/3117:12:06 [19140] sent 48 bytes received 13 bytes total size 02014/12/3117:14:55 [19954] building file list2014/12/3117:14:55 [19954] sent 29 bytes received 9 bytes total size 0 2014/12/3117:24:14 [22681] building file list2014/12/3117:24:14 [22681] <f+++++++++ index2.html到website1上查看[webadmin@website_50 ]$ lltotal 0-rw-rw-r--1 webadmin webadmin 0 Dec 3117:14 index.html-rw-rw-r-- 1 webadmin webadmin 0 Dec 31 17:24 index2.html。