Linux环境下搭建WebLogic 10.3.6集群服务十步曲
- 格式:docx
- 大小:1.13 MB
- 文档页数:47
Weblogic10.3.6部署Weblogic部署1.配置服务器weblogic所需的相关参数#关闭防火墙[root@localhost ~]#service iptables stop#使用vi编辑当前文件[root@localhost ~]# vi /etc/sysconfig/network#把以下内容覆盖进去,注意更改自己的主机名NETWORKING=yesNETWORKING_IPV6=yes#HOSTNAME=localhost.localdomainHOSTNAME=主机名编辑完成后按Esc键,输入“:wq”存盘退出[root@localhost ~]# vi /etc/hosts#添加自己的ip和域名如下127.0.0.1 localhost.localdomain localhost::1 localhost6.localdomain6 localhost610.185.4.216 域名编辑完成后按Esc键,输入“:wq”存盘退出[root@localhost ~]# vi /etc/sysctl.conf#修改linux内核,把以下配置复制进去,如有特殊配置需求请自行更改kernel.shmall = 4294967296kernel.shmmni = 4096kernel.sem = 250 32000 100 128fs.file-max = 6815744fs.aio-max-nr = 1048576net.ipv4.ip_local_port_range = 9000 65500net.core.rmem_default = 4194304net.core.rmem_max = 4194304net.core.wmem_default = 262144net.core.wmem_max = 1048576[root@localhost ~]# cd /etc编辑完成后按Esc键,输入“:wq”存盘退出#使当前配置生效[root@localhost etc]# sysctl –p[root@localhost etc]#vi /etc/security/limits.conf#把以下内容复制到当前文件weblogic soft nofile 100000weblogic hard nofile 100000编辑完成后按Esc键,输入“:wq”存盘退出[root@localhost etc]# vi /etc/pam.d/login#把以下内容复制到当前文件session required /lib/security/pam_limits.sosession required pam_limits.so编辑完成后按Esc键,输入“:wq”存盘退出2.添加weblogic组和用户#添加用户组和用户[root@localhost etc]# groupadd -g 600 weblogic[root@localhost etc]# useradd -u 600 -g 600 weblogic#在根目录下创建/app/weblogic目录[root@localhost etc]#mkdir –p /app/weblogic#为目录更改属组[root@localhost etc]# chown -R weblogic:weblogic /app/weblogic#更改weblogic用户密码[root@localhost etc]#passwd weblogic3.安装JDK#把jdk文件提前传到linux服务器上#复制文件到/usr/local[root@localhost dzpj]# cp jdk-6u30-linux-x64-rpm.bin /usr/local#进入/usr/local目录[root@localhost dzpj]# cd /usr/local/#为jdk文件增加执行权限[root@localhost local]# chmod +x jdk-6u30-linux-x64-rpm.bin#安装jdk文件[root@localhost local]# ./jdk-6u30-linux-x64-rpm.bin#编辑/etc/profile文件配置jdk环境变量[root@localhost local]#vi /etc/profile#根据自己的bin目录位置配置,也可复制以下内容JAVA_HOME=/usr/java/jdk1.7.0_80CLASSPATH=.:$JAVA_HOME/lib.tools.jarPATH=$JAVA_HOME/bin:$PATHexport JAVA_HOME CLASSPATH PATH#执行以下命令[root@localhost local]# export JAVA_HOME=/usr/java/jdk1.6.0_30 [root@localhost local]# export CLASSPATH=.:$JAVA_HOME/lib.tools.jar [root@localhost local]# export PATH=$JAVA_HOME/bin:$PATH#查看当前jdk版本是否与安装版本一致[root@localhost local]# java –version4.安装weblogic#开启图形化安装[root@localhost ~]#xhost +#启动vncserver初次启动会设置密码,如系统没安装vnc请自行去下载或在系统镜像文件中#查找安装包,并安装[root@localhost ~]#vncserver#通过vnc连接应用服务器#用root提前把weblogic包传到/media,并修改包的属组为weblogic[root@localhost media]# chown -R weblogic:weblogic wls1036_generic.jar#切换到weblogic用户,进入目录/media,执行java –jar -d64 wls1036_generic.jar[root@localhost media]#su – weblogic[root@localhost media]#cd /media[root@localhost media]# java –jar -d64 wls1036_generic.jar点击next更改为/app点击next点击next点击yes选择I wish to remain ……,点击continue按钮:点next更改为自己的/app/weblogic目录点next点next点next点击Done按钮,完成安装,进入配置向导界面。
Linux系统下安装weblogic详细步骤1、环境探查与准备 安装jdk和weblogic前需要对进⾏安装的linux系统硬件和软件环境进⾏探查确认,以确保⽀持对jdk1.8和weblogic12.2.1.4的安装。
weblogic12.2.1.4对于jdk及linux操作系统版本的要求在oracle官⽹上⾯有详细的详细全⾯介绍,可⾃⼰进⾏。
安装weblogic前需要安装好jdk1.8,这⾥就不详细叙述了。
2、安装weblogic在官⽹下载linux版本压缩包fmw_12.2.1.4.0_wls_lite_generic.zip,解压通过Xftp上传jar包到/usr/local/weblogic12⽂件夹下2.1 创建weblogic⽤户和组web[root@lin-16core1 ~]# groupadd web[root@lin-16core1 ~]# useradd -g web weblogic[root@lin-16core1 ~]# passwd weblogic2.2 切换⽤户进⾏安装su weblogic2.3 创建响应⽂件 wls.rsp最好放在/home/weblogic的⽬录下⾯⽽不是usr⽬录下⾯,否则会导致创建域的权限问题在/home/weblogic⽬录下确保有如下两个⽂件并做相应的配置,否则安装时候回报各种难以预知的错误。
[ENGINE]#DO NOT CHANGE THIS.Response File Version=1.0.0.0.0[GENERIC]#The oracle home location. This can be an existing Oracle Home or a new Oracle Home insure having all dir read and write authorityORACLE_HOME=/usr/local/weblogic12/wlsInstall#Set this variable value to the Installation Type selected. e.g. WebLogic Server, Coherence, Complete with Examples.INSTALL_TYPE=WebLogic Server#Provide the My Oracle Support Username. If you wish to ignore Oracle Configuration Manager configuration provide empty string for user name.MYORACLESUPPORT_USERNAME=#Provide the My Oracle Support PasswordMYORACLESUPPORT_PASSWORD=<SECURE VALUE>#Set this to true if you wish to decline the security updates. Setting this to true and providing empty string for My Oracle Support username will ignore the Oracle Configuration Manager configuration DECLINE_SECURITY_UPDATES=true#Set this to true if My Oracle Support Password is specifiedSECURITY_UPDATES_VIA_MYORACLESUPPORT=false#Provide the Proxy HostPROXY_HOST=#Provide the Proxy PortPROXY_PORT=#Provide the Proxy UsernamePROXY_USER=#Provide the Proxy PasswordPROXY_PWD=<SECURE VALUE>#Type String (URL format) Indicates the OCM Repeater URL which should be of the format [scheme[Http/Https]]://[repeater host]:[repeater port]COLLECTOR_SUPPORTHUB_URL=备注:wls.rsp⽂件中需要修改的信息如下:ORACLE_HOME=/usr/local/weblogic12/wlsInstall (表⽰weblogic的安装⽬录) 响应⽂件中信息的编写,否则会报奇怪的错误2.4 创建Loc⽂件 oraInst.locinventory_loc=/home/weblogic/oraInventoryinst_group=web备注:oraInts.loc⽂件中修改如下信息:inventory_loc=/home/weblogic/oraInventory (表⽰产品清单⽬录)inst_group=web (web表⽰weblogic⽤户所在的组名,查看⽤户所属组的命令: groups)2.5 保证所需要的⽬录weblogic⽤户要⽤读写权限oraInst.loc,wls.rsp,fmw_12.2.1.4.0_wls_lite_generic.jar⽂件⽤户weblogic必须要有读写权限2.6 安装weblogic[weblogic@lin-16core1 root]$ cd /usr/local/weblogic12/[weblogic@lin-16core1 root]$ java -jar fmw_12.2.1.4.0_wls_lite_generic.jar -silent -responseFile /home/weblogic/wls.rsp -invPtrLoc /home/weblogic/oraInst.loc ⾄此weblogic的安装即完成3、创建域basicWLSDomain3.1 配置环境变量先创建⽂件夹⽬录执⾏setWLSEnv.sh 来配置环境变量[weblogic@lin-16core1 root]$ /usr/local/weblogic12/wlsInstall/wlserver/server/bin/setWLSEnv.sh3.2 将basicWLSDomain.py复制到 /usr/local/weblogic12/wlsInstall/user_projects/domains/pyfile ⽬录下[weblogic@lin-16core1 root]$ cd /usr/local/weblogic12/wlsInstall/user_projects/domains/pyfile[weblogic@lin-16core1 root]$ cp /usr/local/weblogic12/wlsInstall/wlserver/common/templates/scripts/wlst/basicWLSDomain.py修改basicWLSDomain.py⽂件中的如下信息:1)确定该服务的监听端⼝7001cd('Servers/AdminServer')set('ListenAddress','')set('ListenPort', 7001)2)确定weblogic控制台的登录密码cd('/')cd('Security/base_domain/User/weblogic')cmo.setPassword('weblogic123')3)确定域名basicWLSDomain域名setOption('OverwriteDomain', 'true')writeDomain('/usr/local/weblogic12/wlsInstall/wlserver/../user_projects/domains/basicWLSDomain')closeTemplate()3.3 执⾏basicWLSDomain.py进⾏域的创建[weblogic@lin-16core1 pyfile]$ /usr/local/weblogic12/wlsInstall/oracle_common/common/bin/wlst.sh basicWLSDomain.py出现如下信息表⽰安装成功:Initializing WebLogic Scripting Tool (WLST) ...Welcome to WebLogic Server Administration Scripting ShellType help() for help on available commandsExiting WebLogic Scripting Tool.3.4 启动服务进⼊ /usr/local/weblogic12/wlsInstall/user_projects/domains/basicWLSDomain/bin ⽬录下启动(前台启动),命令:./startWebLogic.sh启动(后台运⾏),命令:./startWebLogic.sh &关闭,命令:./stopWebLogic.sh3.5 静默卸载weblogic进⼊ /usr/local/weblogic12/wlsInstall/oui/bin ⽬录下执⾏命令:./deinstall.sh -silent总结:实践是检验真理的唯⼀标准,亲测可⽤。
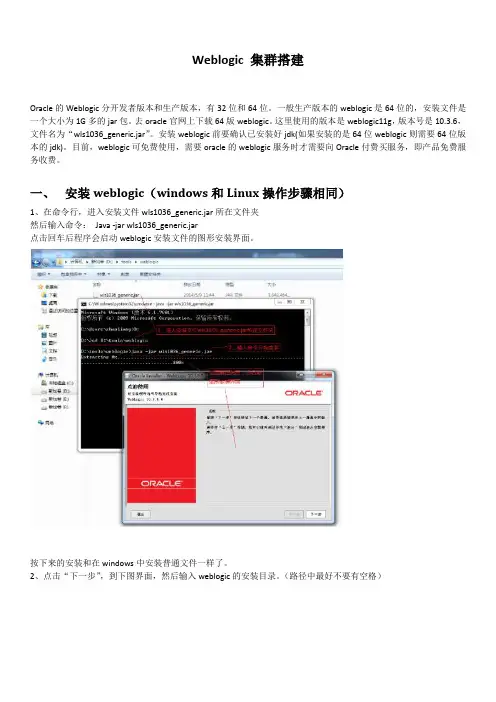
Weblogic 集群搭建Oracle的Weblogic分开发者版本和生产版本,有32位和64位。
一般生产版本的weblogic是64位的,安装文件是一个大小为1G多的jar包。
去oracle官网上下载64版weblogic。
这里使用的版本是weblogic11g,版本号是10.3.6,文件名为“wls1036_generic.jar”。
安装weblogic前要确认已安装好jdk(如果安装的是64位weblogic则需要64位版本的jdk)。
目前,weblogic可免费使用,需要oracle的weblogic服务时才需要向Oracle付费买服务,即产品免费服务收费。
一、安装weblogic(windows和Linux操作步骤相同)1、在命令行,进入安装文件wls1036_generic.jar所在文件夹然后输入命令:Java -jar wls1036_generic.jar点击回车后程序会启动weblogic安装文件的图形安装界面。
按下来的安装和在windows中安装普通文件一样了。
2、点击“下一步”,到下图界面,然后输入weblogic的安装目录。
(路径中最好不要有空格)3、点击“下一步”。
到下图界面,由于我们没有购买oracle的服务所以去掉下图中的勾。
(目前weblogic可免费使用,需要oracle技术支持的话才需要付费)4、点击“下一步”,到下图界面,会因为我们没有填写上图的的支持信息而弹出两个警告框,直接“YES”通过即可。
进入下图,勾选下面的框(不需要使用验证)5、然后点击“继续”。
到下图界面,选择“典型”和“定制”都可以,根据自己喜好设置6、选择后点击“下一步”,进入下图界面,如果没有显示jdk信息,则手动点击“浏览”选择自己机器上安装的jdk,一般默认显示出来的就已经是自己机口上安装的了(貌似是根据环境变量里的JAVA_HOME获取的)7、点击“下一步”进入下图界面,不用修改,直接点击“下一步”即可8、然后会显示出我们准备安装的组件信息,直接点击“下一步”9、然后就开始安装了10、安装完成了,这里有勾选“运行Quickstart”表示安装完成后打开域创建和配置界面。
Linux下Weblogic集群配置初步域,集群,管理服务器和被管服务器之间的关系Weblogic域是一个服务器/集群的管理组,用户可以通过某个中央位置来管理、监控整个服务器域,这个中心就是管理服务器,相对的,受控服务器或者叫被管服务器是指域中除了管理服务器以外的所有的服务器。
Weblogic集群是一个weblogic Server组,在一个集群中的服务器可以获得集群范围的命名服务、负载平衡以及容错等功能。
所以,一个weblogic域可以同时管理多个集群以及多个服务器实例。
另外,还有一个节点管理器的概念,节点管理器是指在物理的机器上运行的一个守护进程,通过它,管理服务器可以获得诸如在控制台中强制重启远程机器上的server等功能(没有节点管理器的情况下也是可以强制关闭远程服务器的,但是不能重启)。
除此之外,据说节点管理器还可以自动检查自己机器上的server实例(健康检查),当发现某个实例出现故障的时候,可以自动进行重启,这个没试过。
注意事项1.本文的weblogic均配置在linux环境下2.集群中管理服务器和被管服务器之间有用到ip组播UDP,所以这些服务器之间必须是UDP可以到达的。
3.好像动态ip的机器不能用于集群当中4.最佳实践说:请不要把管理服务器设置在集群当中5.本文所配置的集群只是实现了web层次上的负载平衡和容错,也就是servlet和jsp,其他的j2ee组件如ejb,jdbc,jms等都可以集群化。
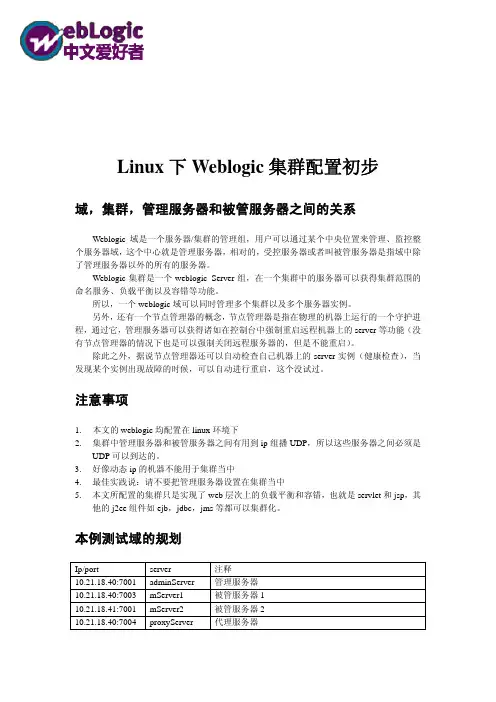
本例测试域的规划Ip/port server 注释10.21.18.40:7001 adminServer 管理服务器10.21.18.40:7003 mServer1 被管服务器110.21.18.41:7001 mServer2 被管服务器210.21.18.40:7004 proxyServer 代理服务器配置过程建立管理服务器启动linux下的配置向导进入bea目录下的weblogic81/common/bin目录输入./config.sh,这里使用的终端登陆,所以没有图形环境,程序会以控制台模式启动第一步:选择建立新的域:启动配置向导后,系统提示如下:<------- BEA WebLogic Configuration Wizard---------->Create or Extend a Configuration:---------------------------------Choose between creating and extending a configuration. Based on your selection, the Configuration Wizard guides you throughthe steps to generate a new or extend an existing configuration.->1|Create a new WebLogic configuration| Start here to create a WebLogic configuration in your projects directory. 2|Extend an existing WebLogic configuration| Start here to extend an existing WebLogic configuration. Use this option to add applications and services,|including Database access (JDBC) and Messaging (JMS). This option also enables you to extend functionality by enabling|WebLogic Workshop.Enter index number to select OR [Exit][Next]> 1录入1回车,建立一个新的域。
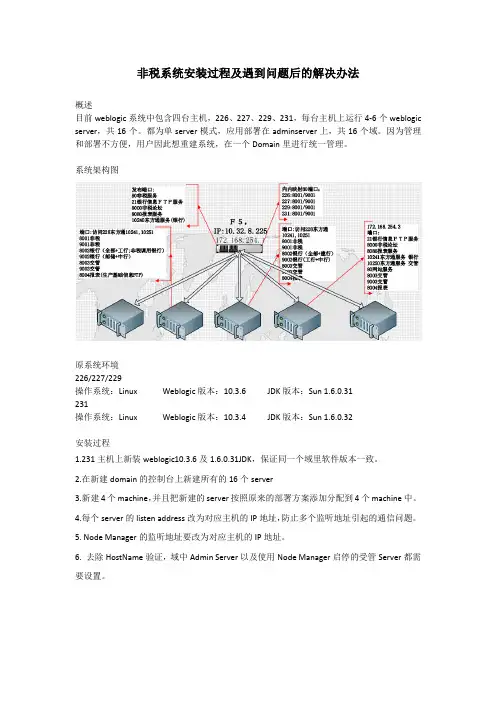
非税系统安装过程及遇到问题后的解决办法概述目前weblogic系统中包含四台主机,226、227、229、231,每台主机上运行4-6个weblogic server,共16个。
都为单server模式,应用部署在adminserver上,共16个域。
因为管理和部署不方便,用户因此想重建系统,在一个Domain里进行统一管理。
系统架构图原系统环境226/227/229操作系统:Linux Weblogic版本:10.3.6 JDK版本:Sun 1.6.0.31231操作系统:Linux Weblogic版本:10.3.4 JDK版本:Sun 1.6.0.32安装过程1.231主机上新装weblogic10.3.6及1.6.0.31JDK,保证同一个域里软件版本一致。
2.在新建domain的控制台上新建所有的16个server3.新建4个machine,并且把新建的server按照原来的部署方案添加分配到4个machine中。
4.每个server的listen address改为对应主机的IP地址,防止多个监听地址引起的通信问题。
5. Node Manager的监听地址要改为对应主机的IP地址。
6. 去除HostName验证,域中Admin Server以及使用Node Manager启停的受管Server都需要设置。
7. 配置使用节点管理器启停的被管Server启动参数8.在使用nodemanager启动被管server前,使用命令方式启动启动一次被管server,目的是创建server目录,为以后nodemanger启动写入servers/servername/data/nodemanger/nodemanager.properties文件中一些相关的信息做准备。
9.重启域中所有的weblogic server,启动每台主机上的nodemanager server。
10.在控制台中观察nodemanager server的状态,如果为Reachable,表明节点管理器可以正常工作,如果为Unreachable状态,说明配置有问题。
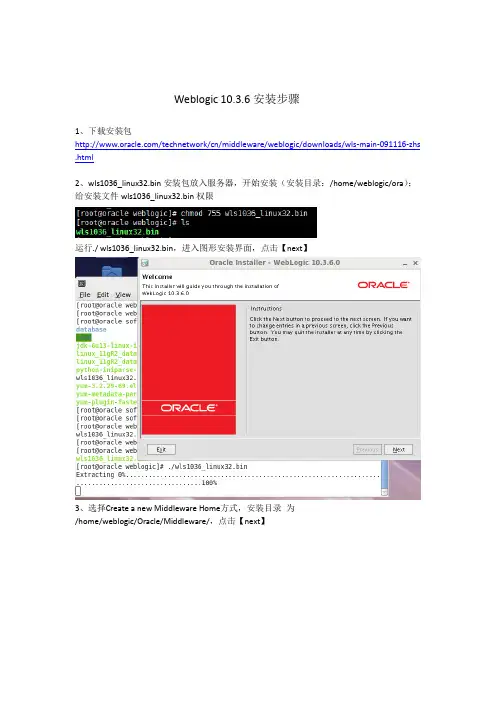
Weblogic 10.3.6安装步骤1、下载安装包/technetwork/cn/middleware/weblogic/downloads/wls-main-091116-zhs .html2、wls1036_linux32.bin安装包放入服务器,开始安装(安装目录:/home/weblogic/ora):给安装文件wls1036_linux32.bin权限运行./ wls1036_linux32.bin,进入图形安装界面,点击【next】3、选择Create a new Middleware Home方式,安装目录为/home/weblogic/Oracle/Middleware/,点击【next】4、注册,不选中复选框,点击【next】5、选择安装类型,type,点击【next】6、选择中间件、eblogic和oracle相关的目录,点击【next】7、weblogic的安装大纲,点击【next】8、开始安装9、完成安装Weblogic 配置建立Weblogic domian进入目录,运行./config.sh[root@oracle bin]# cd /home/weblogic/Oracle/Middleware/wlserver_10.3/common/bin/ [root@oracle bin]# ./config.sh1、开始画面,选择新建一个weblogic域,点击【next】2、根据实际情况修改域名称base_domain,点击【next】;3、输入管理员weblogic,密码设置root1234,点击【next】;4、选择模式,提供两种模式,开发模式和生产模式,这里我们选择生产模式,点击【next】;5、忽略高级选项,点击【next】;6、创建配置概要,点击【create】;7、完成安装8、启动服务器[root@oracle domains]# cd/home/weblogic/Oracle/Middleware/user_projects/domains/base_domain/bin/[root@oracle bin]# ./startWebLogic.sh启动完成之后,可以进入管理员控制台部署web项目等操作,账号为weblogic,密码:root1234,网址为:http://localhost:7001/console或者http://192.168.100.197:7001/consolo进行数据的配置.。

Linux环境下搭建WebLogic1036集群服务十步曲培训资料步骤一:下载WebLogic安装包访问Oracle官方网站,下载WebLogic的安装包。
确保您选择了适用于Linux系统的版本。
步骤二:安装Java Development Kit(JDK)在Linux系统上安装JDK,WebLogic需要Java环境来运行。
您可以从Oracle官方网站下载最新的JDK安装包,并按照官方文档进行安装。
步骤三:解压WebLogic安装包使用解压工具,将WebLogic安装包解压到您选择的目录中,并进入解压后的目录。
步骤四:运行配置工具运行配置工具,它位于解压后的目录中。
根据提示,选择创建新的WebLogic域,并设置集群名称、管理员用户名和密码等。
步骤五:创建WebLogic域根据配置工具的提示,创建WebLogic域。
在此过程中,您需要指定域的名称、设置域的类型(集群型)以及其他相关设置。
步骤六:创建管理服务器在创建WebLogic域的过程中,您需要指定一个管理服务器的配置。
请确保指定的服务器是启用管理的。
步骤七:创建集群在WebLogic控制台中,选择创建一个新的集群,并指定集群的名称、可扩展性等级和其他相关配置。
步骤八:创建集群中的服务器选择集群,然后在控制台中创建一些服务器。
这些服务器将成为您集群中的节点,并用于部署应用程序。
步骤九:配置集群在集群配置中,您可以设置集群的故障恢复行为、负载均衡策略等。
根据您的需求,进行相应的配置。
步骤十:部署应用程序最后,将您的应用程序部署到WebLogic集群中的服务器上。
您可以使用WebLogic控制台或命令行工具来完成此操作。
以上是在Linux环境下搭建WebLogic1036集群服务的十个步骤。
当然,在实际搭建过程中,还可能会遇到各种挑战和问题。
因此,建议您参考WebLogic官方文档和社区论坛,以获取更详细的指导和支持。
继续写相关内容:步骤一:下载WebLogic安装包在Linux环境下搭建WebLogic集群之前,首先需要从Oracle官方网站下载WebLogic的安装包。

Weblogic10集群负载均衡安装和配置1、集群系统架构操作系统: linux as4 u8Weblogic版本 Weblogic10注意:有工作流或MQ时要单独安装,不要放到集群中2、系统整体架构2.1、Weblogic方案:(建议服务器有4G以上的内存)一台管理服务器:安装weblogic10 管理节点、受管节点。
二至五台应用服务器节点:安装Weblogic10 受管节点。
一台工作流服务器:安装WebSphere Application Server。
一台MQ服务器:安装WebSphere Application Server。
2.2、本例中的部署如下所示:管理节点和受管节点安装在主机 JWZHYY1,另一个受管节点单独安装主机名为JWZHYY2,组成一个集群,通过代理服务器来完成负载均衡。
3、集群的安装3.1、安装集群的先决条件注意,必须在每个服务器中编辑/etc/hosts文件使群集的服务器之间能够互相使用机器名访问。
保证每一台应用服务器都可以使用ping 群集应用服务器名称来访问,实例文件/etc/hosts内容如下127.0.0.1 localhost.localdomain localhost #本机192.168.1.3 jwzhyy1 #节点1192.168.1.4 jwzhyy2 #节点2192.168.1.8 jwzhdb1 #数据库1192.168.1.9 jwzhdb2 #数据库2以 root 用户身份登录并在每个主机上配置 Linux 内核参数。
cat >> /etc/sysctl.conf >>EOFkernel.shmall = 2097152kernel.shmmax = 4294967295kernel.shmmni = 4096kernel.sem = 250 32000 100 128fs.file-max = 65536net.ipv4.ip_local_port_range = 1024 65000net.core.rmem_default=262144net.core.wmem_default=262144net.core.rmem_max=262144net.core.wmem_max=262144EOF/sbin/sysctl -p使用date命令查看每一台机器的系统时间,如果服务器时间相差在五分钟之内,请跳过此步。

Linux环境下搭建WebLogic 10.3.6集群服务十步曲(console模式)版本说明概要描述1. 安装前准备篇 (4)1.1. 主机资源规划 (4)1.2. 安装介质准备 (4)2. 平台基础配置篇(双节点) (4)2.1. hosts文件配置 (4)2.2. ulimit参数配置 (4)2.3. Tcp默认连接超时时间配置 (4)3. 用户及权限配置篇(双节点) (4)3.1. 新增weblogic组及用户 (4)3.2. 修改目录所有者权限 (5)4. 节点1安装篇 (5)4.1. 安装jrockit jdk (5)4.1.1. 修改文件执行权限 (5)4.1.2. 执行安装文件 (5)4.1.3. 设置jrockit-jdk安装目录 (5)4.1.4. 确认安装 (5)4.1.5. 验证是否已安装成功 (6)4.2. 安装Weblogic (6)4.2.1. 执行安装文件 (6)4.2.2. 设置中间件安装主目录 (6)4.2.3. 设置是否接收安全更新(不接收) (6)4.2.4. 选择安装内容(只安装Weblogic Server) (7)4.2.5. 选择JDK (9)4.2.6. 确认WebLogic安装目录 (9)4.2.7. 验证是否已安装成功 (11)5. 节点1配置篇 (11)5.1. 新建应用domain域 (11)5.1.1. 执行weblogic配置向导文件 (11)5.1.2. 选择新建或者扩展域(选择新建) (12)5.1.3. 选择域控件或者模版(选择控件) (12)5.1.4. 选择应用模版(默认选择Basic WebLogic Server Domain) (12)5.1.5. 编辑域名称信息 (13)5.1.6. 配置管理员用户及密码 (13)5.1.7. 配置域模式(选择2生产模式) (14)5.1.8. 选择JDK(选择JRockit JDK) (14)5.1.9. 配置管理服务器 (14)5.1.10. 创建域 (16)5.1.11. 查看域创建日志,检查域是否创建成功 (16)5.1.12. 启动域,验证管理服务器是否配置成功 (17)5.1.13. IE登录域控制台 (18)5.2. 环境参数配置 (18)5.2.1. Java.security安全策略文件配置 (18)5.2.2. 域内存参数配置 (19)5.2.3. 域JAVA_OPTIONS参数配置 (19)5.3. 管理服务器(AdminServer)配置 (20)5.3.1. 密钥文件配置 (20)5.3.2. 启动脚本配置 (20)5.4. 计算机(Machine)配置 (21)5.5. 应用集群(Cluster)配置 (22)5.6. 节点管理器(nodemanager)配置 (23)5.6.1. 配置startNodeManager.sh启动脚本 (23)5.6.2. 设置管理服务器主机名验证为“无” (24)5.7. 被管理服务器(ManagedServer)配置 (24)5.7.1. 服务器配置 (24)5.7.2. 密钥文件配置 (29)5.7.3. 启动脚本配置 (29)6. 节点2安装配置篇 (29)6.1. 拷贝节点1的jrockit jdk安装及配置 (29)6.2. 拷贝节点1的weblogic安装及配置 (29)6.3. 克隆节点1的被管理服务器配置 (29)6.4. 移除节点2上的管理服务器启动脚本 (31)6.5. 移除节点2上的服务启动日志信息 (31)6.6. 修改节点2被管理服务器启动脚本 (31)6.7. 配置节点2被管理服务器密钥文件 (32)7. 部署篇 (32)7.1. 数据源配置 (32)7.1.1. 新建数据源 (32)7.1.2. 数据源参数调优 (36)7.2. 应用部署 (38)7.2.1. 上传应用程序文件 (38)7.2.2. 部署应用 (38)8. 服务启动/查看状态/停止篇 (42)8.1. 启动服务 (42)8.1.1. 启动管理服务器 (42)8.1.2. 启动节点服务器 (43)8.1.3. 启动被管理服务器 (44)8.2. 查看/停止服务 (45)8.2.1. 查看/停止管理服务器 (45)8.2.2. 查看/停止节点服务器 (45)8.2.3. 查看/停止被管理服务器 (45)9. 安全防护篇 (46)9.1. Java反序列化安全漏洞修复 (46)10. FAQ篇 (47)10.1. 在weblogic控制台启动Server1时,报<BEA-000110> <Multicast socket receiveerror 471.安装前准备篇的名称及端口。

Linux环境下搭建WebLogic1036集群服务十步曲Linux环境下搭建WebLogic 10.3.6集群服务十步曲(console模式)版本说明版本日期作者说明V1.0 2017-03-26 王林初稿财概要描述WebLowls1036_generic.jargicJDK jrockit-jdk1.6.0_45-R28.2.7-4.1.0-linux-x64.binDataB11gaseOS Linux Redhat 6.5 64位1.安装前准备篇 (11)1.1.主机资源规划111.2.安装介质准备112.平台基础配置篇(双节点) (12)2.1.hosts文件配置122.2.ulimit参数配置132.3.Tcp默认连接超时时间配置133.用户及权限配置篇(双节点) (13)3.1.新增weblogic组及用户143.2.修改目录所有者权限144.节点1安装篇 (14)4.1.安装jrockit jdk144.1.1.修改文件执行权限144.1.2.执行安装文件144.1.3.设置jrockit-jdk安装目录164.1.4.确认安装174.1.5.验证是否已安装成功194.2.安装Weblogic194.2.1.执行安装文件194.2.2.设置中间件安装主目录194.2.3.设置是否接收安全更新(不接收) (20)4.2.4.选择安装内容(只安装WeblogicServer) (21)4.2.5.选择JDK274.2.6.确认WebLogic安装目录284.2.7.验证是否已安装成功335.节点1配置篇 (36)5.1.新建应用domain域365.1.1.执行weblogic配置向导文件365.1.2.选择新建或者扩展域(选择新建) (36)5.1.3.选择域控件或者模版(选择控件) (37)5.1.4.选择应用模版(默认选择BasicWebLogic Server Domain) (39)5.1.5.编辑域名称信息405.1.6.配置管理员用户及密码415.1.7.配置域模式(选择2生产模式)435.1.8.选择JDK(选择JRockit JDK)445.1.9.配置管理服务器445.1.10.创建域505.1.11.查看域创建日志,检查域是否创建成功 (51)5.1.12.启动域,验证管理服务器是否配置成功 (54)5.1.13.IE登录域控制台575.2.环境参数配置575.2.1.Java.security安全策略文件配置 (57)5.2.2.域内存参数配置585.2.3.域JAVA_OPTIONS参数配置615.3.管理服务器(AdminServer)配置625.3.1.密钥文件配置635.3.2.启动脚本配置635.4.计算机(Machine)配置645.5.应用集群(Cluster)配置665.6.节点管理器(nodemanager)配置675.6.1.配置startNodeManager.sh启动脚本 (67)5.6.2.设置管理服务器主机名验证为“无” (69)5.7.被管理服务器(ManagedServer)配置695.7.1.服务器配置695.7.2.密钥文件配置745.7.3.启动脚本配置756.节点2安装配置篇 (76)6.1.拷贝节点1的jrockit jdk安装及配置766.2.拷贝节点1的weblogic安装及配置766.3.克隆节点1的被管理服务器配置766.4.移除节点2上的管理服务器启动脚本786.5.移除节点2上的服务启动日志信息796.6.修改节点2被管理服务器启动脚本796.7.配置节点2被管理服务器密钥文件807.部署篇 (81)7.1.数据源配置817.1.1.新建数据源817.1.2.数据源参数调优857.2.应用部署877.2.1.上传应用程序文件877.2.2.部署应用878.服务启动/查看状态/停止篇 (92)8.1.启动服务928.1.1.启动管理服务器928.1.2.启动节点服务器958.1.3.启动被管理服务器978.2.查看/停止服务1008.2.1.查看/停止管理服务器1008.2.2.查看/停止节点服务器1018.2.3.查看/停止被管理服务器1029.安全防护篇 (105)9.1.Java反序列化安全漏洞修复10510.FAQ篇 (105)10.1.在weblogic控制台启动Server1时,报<BEA-000110> <Multicast socket receive error (105)1.安装前准备篇1.1.主机资源规划主机IP 主机名称管理服务器及端口被管理服务器及端口10.140.3 0.51 po9kcfap901AdminServer/7001Server1/808010.140.3 0.52 po9kcfap902Server2/8080双主机,配置为集群服务,其中管理服务器配置在第一个节点上,节点管理器使用默认的名称及端口。
1、布署前的准备1、创建weblogic用户组。
groupadd weblogic `useradd -g weblogic weblogicpasswd weblogic(修改weblogic密码)2、创建/oracle/weblogic目录,修改目录所有者权限mkdir –p /oracle/weblogicchown –Rf weblogic:weblogic /oracle3、赋予.bin文件可执行权限Chomd a+x platform922_linux32.bin2、安装WebLogic 9.21、进入文件夹所在目录/software下面,执行./platform922_linux32.bin安装文件,进入Webloigc控制台安装的欢迎界面,键入【Next】继续,如下图所示:2、出现厂家授权许可协议,读完后选择第【1】项,表示接受厂家许可协议,如下图所示:3、WebLogic的安装路径,键入要安装的路径之后,回车继续,如下图所示:4、WebLogic目录已经发生了相应的更改,输入【Next】继续,如下图所示:6、安装默认情况下,会完全安装,我们这里选择【2】选项,进行自定义安装,如下图所示:7、选择我们所要安装的相关组件,带X的就是我们即将安装的组件,键入【Next】继续,如下图所示:8、询问你是否需要安装Mercury Profiling工具,此工具仅使用开发环境,我们这里选择【2】项,不需要安装,如下图所示:9、我们将会看到WebLogic的安装目录,这里我们保持默认,键入【Next】继续,如下图所示:10、WebLogic安装进度情况,接下来的就是等待,如下图所示:11、等待一段时间后,我们就会看到相关提示,Weblogic安装已经成功完成,按【Enter】确认本次安装,如下图所示:3、新建Domain1、使用WebLogic用户登录系统进入/oracle/weblogic/weblogic92/common/bin/目录,此目录权限拥有者是root 请用chown -Rf weblogic:weblogic /oracle进行更改拥有者,如下所示:Suse_Web:~ # su weblogicweblogic@Suse_Web:/root> cd /oracle/weblogic/weblogic92/common/bin/ weblogic@Suse_Web:/oracle/weblogic/weblogic92/common/bin>weblogic@Suse_Web:/oracle/weblogic/weblogic92/common/binweblogic@Suse_Web:/oracle/weblogic/weblogic92/common/bin> lltotal 108-rwxr-xr-x 1 weblogic weblogic 13654 Apr 14 13:57 commEnv.sh-rwxr-xr-x 1 weblogic weblogic 1197 Apr 14 13:57 config.sh-rwxr-xr-x 1 weblogic weblogic 1039 Apr 14 13:57 config_builder.sh-rwxr-xr-x 1 weblogic weblogic 1745 Apr 14 13:57 pack.sh-rwxr-xr-x 1 weblogic weblogic 510 Apr 14 13:57 quickstart.sh-rwxr-xr-x 1 weblogic weblogic 3988 Apr 14 13:57 startManagedWebLogic.sh-rwxr-xr-x 1 weblogic weblogic 5434 Apr 14 13:57 startPointBase.sh-rwxr-xr-x 1 weblogic weblogic 2643 Apr 14 13:57 startPointBaseConsole.sh-rwxr-xr-x 1 weblogic weblogic 1794 Apr 14 13:57 stopPointBase.sh-rwxr-xr-x 1 weblogic weblogic 1190 Apr 14 13:57 unpack.sh-rwxr-xr-x 1 weblogic weblogic 2257 Apr 14 13:57 upgrade.sh-rwxr-xr-x 1 weblogic weblogic 26907 Apr 14 13:57 wlscontrol.sh-rwxr-xr-x 1 weblogic weblogic 13037 Apr 14 13:57 wlsifconfig.sh-rwxr-xr-x 1 weblogic weblogic 444 Apr 14 13:57 wlst.sh2、进入该目录,执行./config.sh -mode=console 命令,进入创建域的向导模式,如下图所示:3、保持默认,输入【Next】之后,问你需不需要创建新模板或者选择已经存在的模板,我们保持默认,创建新模板,键入【Next】继续,如下图所示:4、进入WebLogic的配置向导模式,键入【Next】进入下一步,如下图所示:5、这里主要是修改用户名与设置密码,根据自己情况进行设定,如下图所示:6、为了方便,我这里用户名保护默认,密码设定为gmcc2011,然后输入【Next】进入下一步,如图所示:7、选择布署模式,我们这里选择生产模式,因为生产模式较于安全,我们这里选择【2】进入下一步,如图所示:8、选择JDK的版本,我选择默认即可,直接输入【Next】,回车进入下一步,如下图所示:9、选择配置选项,我们这里选择【1】项,代表同意修改,如下图所示:10、保持默认即可,大家可以根据相关提示进行相应的改变,因为这些以后都可以在图形界面进行相应的更改,我这里保持默认,键入【Next】进入下一步,如下图所示:11、创建管理服务,我们这里不创建,直接输入【Next】或直接回车进入下一步,如下图所示:12、配置群集,我们这里不创建,直接输入【Next】或直接加历来进入下一步,如下图所示:13、保持默认,输入【Next】继续下一步,如下图所示:14、13、保持默认,输入【Next】继续下一步,如下图所示:15、看到Domain创建的路径,保持默认,输入【Next】进入下一步,如下图所示:16、看到域的名字为base_Domain,可以适当更当,我这里保持默认,直接输入【Next】进入一步,如下图所示:17、经过一小段时间后,我们将会看到Domain已经成功创建,如下图所示:4、修改JDK版本1、在默认情况下,SUSE LINUX Enterprise Server 9,系统安装了JDK1.4.2,我们可以用java -version查看得到,如下图所示:2、我们当时在创建域时,安装的JDK版本目前还未生效,我们更改环境变量,使用新的JDK版本。
一、webLogic 10.3.6安装1.双击“oepe-wls-indigo-installer-11.1.1.8.0.201110211138-10.3.6-win32.exe”启动安装,直接“下一步”2.选择“创建新的中间件主目录”,可以将目录放到D盘,避免占用系统盘空间,点击“下一步”3.将红色区域内的复选框去掉,点击“下一步”4.默认选择“典型”安装,点击“下一步”5.默认产品安装目录,点击“下一步”6.选择“所有用户”,点击“下一步”7.查看安装概要,没有问题,点击“下一步”,显示安装进度8.如果需要直接创建weblogic域,选择“运行Quickstart”,点击“完成”按钮,进入快速启动页面;如果想要稍后再进行创建,取消“运行Quickstart”,点击“完成”按钮,安装完成9.点击“Ggetting started with WebLogic Server”,进入Fusion Middleware配置向导也可以通过开始菜单进入配置向导:10.选择“创建新的Weblogic域”,点击“下一步”11.直接点击“下一步”12.输入域的名称和位置,直接默认即可,点击“下一步”13.配置管理员用户名、密码,之后启动weblogic和登陆控制台需要用到,输入后点击“下一步”用户名:weblogic(默认)用户口令:Password123414.选择“生产模式”、JDK最好选择Weblogic自带jdk,点击“下一步”15.选择“管理服务器”、“受管服务器、集群和计算机”,点击“下一步”16.名称默认即可,选择本地监听地址(本机IP地址)端口号默认7001,点击“下一步”17.无需配置受管服务器,直接点击“下一步”18.无需配置集群,直接点击“下一步”19.无需配置结算机,直接点击“下一步”20.点击“创建”,显示创建进度21.点击“完成”,创建域完成二、webLogic 配置1.进入“D:\Oracle\Middleware\user_projects\domains\base_domain”,双击“startWebLogic.cmd”,启动webLogic2.输入前方配置的用户名、密码3.打开浏览器输入控制台url,进入控制台进行管理(http://82.XXX.XXX.XXX:7001/console),用户名密码输入之前配置的域用户名、密码4.点击“锁定并编辑”,选择:服务-数据源5.点击新建,选择“一般数据源”,JNDI名称和工程JNDI名称保持一致。
这些天公司让我去弄weblogic集群,集群的理解就是多个物理服务器或者多个相同的服务组成一个服务器或者服务群集合在一起,由前台应用程序把多个请求分配到多个相同的后台服务器或者服务上面处理数据,实现负载均衡的不间断服务。
现在配置的Weblogic群集环境就是一个群集my_Cluster管理2台weblogic 服务器的节点.群集:my_Clusterweblogic服务器1 IP地址192.168.1.123节点node123端口号7123weblogic服务器2 IP地址192.168.1.110节点node110端口号7110这两个节点提高相同的服务,my_Cluster群集对外提供服务,把接受到的服务请求发送到节点weblogic服务器上面,实现数据的负载功能,客户端只会访问群集的地址。
不多说现在配置安装步骤1,安装sun公司的jdk,sun公司的jdk功能多,使用系统默认的jdk安装weblogic时会报错,下载jdk-6u45-linux-x64.bin jdk-6u45-linux-x64-rpm.bin jdk-7u55-linux-x64.rpm jdk-8u5-linux-x64任一版本 ./任一版本即可会自动安装到/usr/java/jdk版本号目录里面的2,安装完以后需要设置系统JAVA的环境变量,因为系统设置的是默认安装的java的环境变量,现在需要手动改过来。
vi /etc/profile加入下面的几行变量设置:export JAVA_HOME=/usr/java/jdk1.6.0_45export JAVA_BIN=/usr/java/jdk1.6.0_45/binexport PATH=$PATH:$JAVA_HOME/binexport CLASSPATH=.:$JAVA_HOME/lib/dt.jar:$JAVA_HOME/lib/tools.jarexport JAVA_HOME JAVA_BIN PATH CLASSPATH然后输入命令update-alternatives --install /usr/bin/java java /usr/java/jdk1.7.0/bin/java 400update-alternatives --install /usr/bin/javac javac /usr/java/jdk1.7.0/bin/javac 400最后输入update-alternatives --config java ,选择对应的jdk通过java -version命令可以查看当前默认jdk为sun jdk3,创建weblogic组和帐号 groupadd weblogic useradd -g weblogic weblogic passwd weblogic4,进入图形化界面安装weblogic init5进入图形化,如果在命令行输入init5 后等了很长时间画面不动那就是进入图形化桌面失败,原因是安装linux系统的时候自定义服务没有选择桌面、通用桌面这两项,现在如果配置有yum,用命令yum groupinstall desktop -y yum install gnome -y安装完成后可以进入图形化界面。
Weblogic 10.3.6安装步骤1、下载安装包/technetwork/cn/middleware/weblogic/downloads/wls-main-091116-zhs .html2、wls1036_linux32.bin安装包放入服务器,开始安装(安装目录:/home/weblogic/ora):给安装文件wls1036_linux32.bin权限运行./ wls1036_linux32.bin,进入图形安装界面,点击【next】3、选择Create a new Middleware Home方式,安装目录为/home/weblogic/Oracle/Middleware/,点击【next】4、注册,不选中复选框,点击【next】5、选择安装类型,type,点击【next】6、选择中间件、eblogic和oracle相关的目录,点击【next】7、weblogic的安装大纲,点击【next】8、开始安装9、完成安装Weblogic 配置建立Weblogic domian进入目录,运行./config.sh[root@oracle bin]# cd /home/weblogic/Oracle/Middleware/wlserver_10.3/common/bin/ [root@oracle bin]# ./config.sh1、开始画面,选择新建一个weblogic域,点击【next】2、根据实际情况修改域名称base_domain,点击【next】;3、输入管理员weblogic,密码设置root1234,点击【next】;4、选择模式,提供两种模式,开发模式和生产模式,这里我们选择生产模式,点击【next】;5、忽略高级选项,点击【next】;6、创建配置概要,点击【create】;7、完成安装8、启动服务器[root@oracle domains]# cd/home/weblogic/Oracle/Middleware/user_projects/domains/base_domain/bin/[root@oracle bin]# ./startWebLogic.sh启动完成之后,可以进入管理员控制台部署web项目等操作,账号为weblogic,密码:root1234,网址为:http://localhost:7001/console或者http://192.168.100.197:7001/consolo进行数据的配置.。
Linux下WebLogic10.3的安装与配置§2.1 安装准备●下载WebLogic10.3 for x86 linux安装文件;●安装SUSE Linux enterprise Server 11.0;●检查SUSE环境,确保/root空闲空间在2G以上。
如果/root空间不足,则应扩展root空间,或创建一个新的文件系统,并确保该文件系统空间在2G以上。
本手册假定该文件系统的mount点是/soft;如root的空间足够,则在root创建目录/soft作为安装源目录;●创建WebLogic使用的文件系统,该文件系统的mount点建议为/bea,空间应在2G以上,后续将安装WebLogic软件到该文件系统中。
§2.2 安装过程§2.2.1 创建bea组和weblogic用户使用root登录操作系统,执行下列命令创建bea组和weblogic用户。
bea组号为600,weblogic 用户号为600,属于bea组,home目录为/bea。
# groupadd -g 600 bea# useradd -d /bea -u 600 -g 600 weblogic# passwd weblogic -- 激活weblogic用户执行下列命令将/bea分配给weblogic用户。
# cd /# chown weblogic:bea /bea# chmod 755 /bea§2.2.2 上传安装文件并执行使用weblogic登录,使用bin模式,上传WebLogic安装文件server103_linux.bin到soft目录,执行下列命令执行安装文件。
$ cd /soft$ chmod a+x server103_linux.bin$ ./server103_linux.bin -mode=console系统自动解压缩安装文件,并启动文本的安装界面。
§2.2.3 欢迎界面<--------------- Oracle Installer - WebLogic Platform 10.3.0.0 --------------->Welcome:--------This installer will guide you through the installation of WebLogic Platform10.3.0.0. Type "Next" or enter to proceed to the next prompt. If you want tochange data entered previously, type "Previous". You may quit the installer at any time by typing "Exit".Enter [Exit][Next]> next§2.2.4 指定WebLogic主目录为/bea<--------------- Oracle Installer - WebLogic Platform 10.3.0.0 --------------->Choose BEA Home Directory:--------------------------"BEA Home" = [Enter new value or use default "/root/bea"]Enter new BEA Home OR [Exit][Previous][Next]> /bea<--------------- Oracle Installer - WebLogic Platform 10.3.0.0 --------------->Choose BEA Home Directory:--------------------------"BEA Home" = [/bea]Use above value or select another option:1 - Enter new BEA Home2 - Change to default [/root/bea]Enter option number to select OR [Exit][Previous][Next]> next§2.2.5 选择安装类型为Custom<--------------- Oracle Installer - WebLogic Platform 10.3.0.0 --------------->Choose Install Type:--------------------Select the type of installation you wish to perform.->1|Complete| Install the following software products and examples:| - WebLogic Server| - Workshop2|Custom| Choose software products and components to install and perform optional|configuration.Enter index number to select OR [Exit][Previous][Next]> 2§2.2.6 选择要安装的产品组件需取消安装Workshop和Server Examples<--------------- Oracle Installer - WebLogic Platform 10.3.0.0 --------------->Choose Products and Components:-------------------------------Release 10.3.0.0|_____WebLogic Server [1] x| |_____Core Application Server [1.1] x| |_____Administration Console [1.2] x| |_____Configuration Wizard and Upgrade Framework [1.3] x| |_____Web 2.0 HTTP Pub-Sub Server [1.4] x| |_____WebLogic JDBC Drivers [1.5] x| |_____Third Party JDBC Drivers [1.6] x| |_____WebLogic Server Clients [1.7] x| |_____WebLogic Web Server Plugins [1.8] x| |_____UDDI and Xquery Support [1.9] x| |_____Server Examples [1.10] x|_____Workshop [2] x|_____Workshop for WebLogic [2.1] x|_____Workshop Runtime Framework [2.2] x*Estimated size of installation: 788.3 MBEnter number exactly as it appears in brackets to toggle selection OR [Exit][Previous][Next]> 2 <--------------- Oracle Installer - WebLogic Platform 10.3.0.0 --------------->Choose Products and Components:-------------------------------Release 10.3.0.0|_____WebLogic Server [1] x| |_____Core Application Server [1.1] x| |_____Administration Console [1.2] x| |_____Configuration Wizard and Upgrade Framework [1.3] x| |_____Web 2.0 HTTP Pub-Sub Server [1.4] x| |_____WebLogic JDBC Drivers [1.5] x| |_____Third Party JDBC Drivers [1.6] x| |_____WebLogic Server Clients [1.7] x| |_____WebLogic Web Server Plugins [1.8] x| |_____UDDI and Xquery Support [1.9] x| |_____Server Examples [1.10] x|_____Workshop [2]|_____Workshop for WebLogic [2.1]|_____Workshop Runtime Framework [2.2]*Estimated size of installation: 406.3 MBEnter number exactly as it appears in brackets to toggle selection OR [Exit][Previous][Next]> 1.10 <--------------- Oracle Installer - WebLogic Platform 10.3.0.0 --------------->Choose Products and Components:-------------------------------Release 10.3.0.0|_____WebLogic Server [1] x| |_____Core Application Server [1.1] x| |_____Administration Console [1.2] x| |_____Configuration Wizard and Upgrade Framework [1.3] x| |_____Web 2.0 HTTP Pub-Sub Server [1.4] x| |_____WebLogic JDBC Drivers [1.5] x| |_____Third Party JDBC Drivers [1.6] x| |_____WebLogic Server Clients [1.7] x| |_____WebLogic Web Server Plugins [1.8] x| |_____UDDI and Xquery Support [1.9] x| |_____Server Examples [1.10]|_____Workshop [2]|_____Workshop for WebLogic [2.1]|_____Workshop Runtime Framework [2.2]*Estimated size of installation: 360.4 MBEnter number exactly as it appears in brackets to toggle selection OR [Exit][Previous][Next]> next §2.2.7 选择要安装的JDK<--------------- Oracle Installer - WebLogic Platform 10.3.0.0 --------------->JDK Selection (Any * indicates BEA Supplied VM):------------------------------------------------JDK(s) chosen for use with this product installation will be installed. Supported defaults if not deselected will be used in script string-substitution.1|Add Local Jdk2|/bea/jdk160_05[x]*3|/bea/jrockit_160_05[x]**Estimated size of installation: 713.2 MBEnter 1 to add or >= 2 to toggle selection OR [Exit][Previous][Next]> next§2.2.8 安装确认<--------------- Oracle Installer - WebLogic Platform 10.3.0.0 --------------->Choose Product Installation Directories:----------------------------------------BEA Home Directory: [/bea]Product Installation Directories:"WebLogic Server" = [Enter new value or use default "/bea/wlserver_10.3"]Enter new WebLogic Server OR [Exit][Previous][Next]> next<--------------- Oracle Installer - WebLogic Platform 10.3.0.0 --------------->The following Products and JDKs will be installed:--------------------------------------------------WebLogic Platform 10.3.0.0|_____WebLogic Server| |_____Core Application Server| |_____Administration Console| |_____Configuration Wizard and Upgrade Framework| |_____Web 2.0 HTTP Pub-Sub Server| |_____WebLogic JDBC Drivers| |_____Third Party JDBC Drivers| |_____WebLogic Server Clients| |_____WebLogic Web Server Plugins| |_____UDDI and Xquery Support|_____JDKs|_____Sun SDK 1.6.0_05|_____BEA JRockit 1.6.0_05 SDK*Estimated size of installation: 713.3 MBEnter [Exit][Previous][Next]> next§2.2.9 文件复制<--------------- Oracle Installer - WebLogic Platform 10.3.0.0 ---------------> Installing files..0% 25% 50% 75% 100%[------------|------------|------------|------------][*****************************Performing String Substitutions...Creating Domains...§2.2.10 安装结束<--------------- Oracle Installer - WebLogic Platform 10.3.0.0 ---------------> Installation CompleteCongratulations! Installation is complete.Press [Enter] to continue or type [Exit]> 按回车键§2.3 创建管理服务器的域AdminServer Name: AdminServerListen Address: 192.168.100.1Listen Port: 8080SSL Listen Port: 8081SSL enabled: trueDomain Name: weblogic§2.3.1 运行Configuration Wizard$ cd /bea/wlserver_10.3/common/bin./config.sh -mode=console§2.3.2 选择创建新域<-------------------- Oracle WebLogic Configuration Wizard -------------------> Welcome:--------Choose between creating and extending a domain. Based on your selection, the Configuration Wizard guides you through the steps to generate a new or extend an existing domain.->1|Create a new WebLogic domain| Create a WebLogic domain in your projects directory.2|Extend an existing WebLogic domain| Extend an existing WebLogic domain. Use this option to add|applications and services, or to override existing database access (JDBC)|and messaging (JMS) settings. You can also incorporate additional|functionality in your domain, for example, by including AquaLogic Service |Bus.Enter index number to select OR [Exit][Next]> 1§2.3.3 选择域源<-------------------- Oracle WebLogic Configuration Wizard -------------------> Select Domain Source:---------------------Select the source from which the domain will be created. You can create the domain by selecting from the required components or by selecting from a list of existing domain templates.->1|Choose Weblogic Platform components| You can choose the Weblogic component(s) that you want supported in |your domain.2|Choose custom template| Choose this option if you want to use an existing template. This|could be a custom created template using the Template Builder.Enter index number to select OR [Exit][Previous][Next]> 1<-------------------- Oracle WebLogic Configuration Wizard ------------------->Application Template Selection:-------------------------------Available Templates|_____WebLogic Server (Required)xEnter number exactly as it appears in brackets to toggle selection OR [Exit][Previous][Next]> next §2.3.4 配置管理员及密码<-------------------- Oracle WebLogic Configuration Wizard ------------------->Configure Administrator Username and Password:----------------------------------------------Create a user to be assigned to the Administrator role. This user is thedefault administrator used to start development mode servers.| Name | Value |_|_________________________|_________________________________________|1| *User name: | weblogic |2| *User password: | |3| *Confirm user password: | |4| Description: | This user is the default administrator. |Use above value or select another option:1 - Modify "User name"2 - Modify "User password"3 - Modify "Confirm user password"4 - Modify "Description"Enter option number to select OR [Exit][Previous][Next]> 2<-------------------- Oracle WebLogic Configuration Wizard ------------------->Configure Administrator Username and Password:----------------------------------------------Create a user to be assigned to the Administrator role. This user is thedefault administrator used to start development mode servers."*User password:" = []Enter new *User password: OR [Exit][Reset][Accept]><-------------------- Oracle WebLogic Configuration Wizard ------------------->Configure Administrator Username and Password:----------------------------------------------Create a user to be assigned to the Administrator role. This user is thedefault administrator used to start development mode servers.| Name | Value |_|_________________________|_________________________________________| 1| *User name: | weblogic |2| *User password: | *********** |3| *Confirm user password: | |4| Description: | This user is the default administrator. |Use above value or select another option:1 - Modify "User name"2 - Modify "User password"3 - Modify "Confirm user password"4 - Modify "Description"5 - Discard ChangesEnter option number to select OR [Exit][Previous][Next]> 3<-------------------- Oracle WebLogic Configuration Wizard ------------------->Configure Administrator Username and Password:----------------------------------------------Create a user to be assigned to the Administrator role. This user is thedefault administrator used to start development mode servers."*Confirm user password:" = []Enter new *Confirm user password: OR [Exit][Reset][Accept]><-------------------- Oracle WebLogic Configuration Wizard ------------------->Configure Administrator Username and Password:----------------------------------------------Create a user to be assigned to the Administrator role. This user is thedefault administrator used to start development mode servers.| Name | Value |_|_________________________|_________________________________________| 1| *User name: | weblogic |2| *User password: | *********** |3| *Confirm user password: | *********** |4| Description: | This user is the default administrator. |Use above value or select another option:1 - Modify "User name"2 - Modify "User password"3 - Modify "Confirm user password"4 - Modify "Description"5 - Discard ChangesEnter option number to select OR [Exit][Previous][Next]> Next§2.3.5 选产品模式+JRockitJDK<-------------------- Oracle WebLogic Configuration Wizard ------------------->Domain Mode Configuration:--------------------------Enable Development or Production Mode for this domain.->1|Development Mode2|Production ModeEnter index number to select OR [Exit][Previous][Next]> 2<-------------------- Oracle WebLogic Configuration Wizard ------------------->Java SDK Selection:-------------------->1|JRockit SDK 1.6.0_05 @ /bea/jrockit_160_052|Sun SDK 1.6.0_05 @ /bea/jdk160_053|Other Java SDKEnter index number to select OR [Exit][Previous][Next]> 1§2.3.6 选择要定制环境与服务设置<-------------------- Oracle WebLogic Configuration Wizard ------------------->Choose Configuration Option:----------------------------*Do you want to modify any of the preconfigured settings or defaults in*your template?**To keep the default or template settings, and proceed directly to name and *create your domain, leave No selected.1|Yes->2|NoEnter index number to select OR [Exit][Previous][Next]> 1§2.3.7 暂不配置安全存储<-------------------- Oracle WebLogic Configuration Wizard ------------------->Configure RDBMS Security Store Options:---------------------------------------Create the RDBMS tables in your datastore prior to booting your domain. Thescripts for use by your DBA are in WebLogic Server's server/lib directory.Click Next to keep the template settings or bypass RDBMS options.->1|I don't want to change anything here.2|I want to create, change, or remove RDBMS support.Enter index number to select OR [Exit][Previous][Next]> 1§2.3.8 配置管理服务器的端口<-------------------- Oracle WebLogic Configuration Wizard ------------------->Configure the Administration Server:------------------------------------Enter adminstration server configurations. Each WebLogic Server domain must have one Administration Server. The Administration Server hosts the Administration Console which is used to perform administrative tasks.| Name | Value |_|__________________|_____________________|1| *Name: | AdminServer |2| Listen address: | All Local Addresses |3| Listen port: | 7001 |4| SSL listen port: | N/A |5| SSL enabled: | false |Use above value or select another option:1 - Modify "Name"2 - Modify "Listen address"3 - Modify "Listen port"4 - Modify "SSL enabled"Enter option number to select OR [Exit][Previous][Next]> 2<-------------------- Oracle WebLogic Configuration Wizard -------------------> Configure the Administration Server:------------------------------------Enter adminstration server configurations. Each WebLogic Server domain must have one Administration Server. The Administration Server hosts the Administration Console which is used to perform administrative tasks.| Name | Value |_|__________________|_____________________|1| *Name: | AdminServer |2| Listen address: | All Local Addresses |3| Listen port: | 7001 |4| SSL listen port: | N/A |5| SSL enabled: | false |Enter value for "Listen address" OR [Exit][Previous][Next]> 192.168.100.30<-------------------- Oracle WebLogic Configuration Wizard -------------------> Configure the Administration Server:------------------------------------Enter adminstration server configurations. Each WebLogic Server domain must have one Administration Server. The Administration Server hosts the Administration Console which is used to perform administrative tasks.| Name | Value |_|__________________|________________|1| *Name: | AdminServer |2| Listen address: | 192.168.100.30 |3| Listen port: | 7001 |4| SSL listen port: | N/A |5| SSL enabled: | false |Use above value or select another option:1 - Modify "Name"2 - Modify "Listen address"3 - Modify "Listen port"4 - Modify "SSL enabled"5 - Discard ChangesEnter option number to select OR [Exit][Previous][Next]> 3<-------------------- Oracle WebLogic Configuration Wizard -------------------> Configure the Administration Server:------------------------------------Enter adminstration server configurations. Each WebLogic Server domain must have one Administration Server. The Administration Server hosts the Administration Console which is used to perform administrative tasks.| Name | Value |_|__________________|_____________________|1| *Name: | AdminServer |2| Listen address: | All Local Addresses |3| Listen port: | 7001 |4| SSL listen port: | N/A |5| SSL enabled: | false |Enter value for "Listen port" OR [Exit][Previous][Next]> 8080<-------------------- Oracle WebLogic Configuration Wizard -------------------> Configure the Administration Server:------------------------------------Enter adminstration server configurations. Each WebLogic Server domain must have one Administration Server. The Administration Server hosts the Administration Console which is used to perform administrative tasks.| Name | Value |_|__________________|_____________________|1| *Name: | AdminServer |2| Listen address: | All Local Addresses |3| Listen port: | 8080 |4| SSL listen port: | N/A |5| SSL enabled: | false |Use above value or select another option:1 - Modify "Name"2 - Modify "Listen address"3 - Modify "Listen port"4 - Modify "SSL enabled"Enter option number to select OR [Exit][Previous][Next]> 4<-------------------- Oracle WebLogic Configuration Wizard -------------------> Configure the Administration Server:------------------------------------Enter adminstration server configurations. Each WebLogic Server domain must have one Administration Server. The Administration Server hosts the Administration Console which is used to perform administrative tasks.*Enter index number to modify "Value"1|true->2|false3|UnspecifiedEnter index number to select OR [Exit][Reset][Accept]> 1<-------------------- Oracle WebLogic Configuration Wizard -------------------> Configure the Administration Server:------------------------------------Enter adminstration server configurations. Each WebLogic Server domain must have one Administration Server. The Administration Server hosts the Administration Console which is used to perform administrative tasks.| Name | Value |_|__________________|_____________________|1| *Name: | AdminServer |2| Listen address: | All Local Addresses |3| Listen port: | 8080 |4| SSL listen port: | 7002 |5| SSL enabled: | true |Use above value or select another option:1 - Modify "Name"2 - Modify "Listen address"3 - Modify "Listen port"4 - Modify "SSL listen port"5 - Modify "SSL enabled"6 - Discard ChangesEnter option number to select OR [Exit][Previous][Next]> 4<-------------------- Oracle WebLogic Configuration Wizard -------------------> Configure the Administration Server:------------------------------------Enter adminstration server configurations. Each WebLogic Server domain must have one Administration Server. The Administration Server hosts the Administration Console which is used to perform administrative tasks.| Name | Value |_|__________________|_____________________|1| *Name: | AdminServer |2| Listen address: | All Local Addresses |3| Listen port: | 8080 |4| SSL listen port: | 7002 |5| SSL enabled: | true |Enter value for "SSL listen port" OR [Exit][Previous][Next]> 8081<-------------------- Oracle WebLogic Configuration Wizard -------------------> Configure the Administration Server:------------------------------------Enter adminstration server configurations. Each WebLogic Server domain must have one Administration Server. The Administration Server hosts the Administration Console which is used to perform administrative tasks.| Name | Value |_|__________________|_____________________|1| *Name: | AdminServer |2| Listen address: | All Local Addresses |3| Listen port: | 8080 |4| SSL listen port: | 8081 |5| SSL enabled: | true |Use above value or select another option:1 - Modify "Name"2 - Modify "Listen address"3 - Modify "Listen port"4 - Modify "SSL listen port"5 - Modify "SSL enabled"6 - Discard ChangesEnter option number to select OR [Exit][Previous][Next]> next§2.3.9 暂不添加受管的服务器<-------------------- Oracle WebLogic Configuration Wizard ------------------->Configure Managed Servers:--------------------------Add or delete configuration information for Managed Servers. A typicalproduction environment has one or more Managed Servers. Each Managed Serveris an instance of WebLogic Server used to host enterprise applications.| Name* | Listen address | Listen port | SSL listen port | SSL enabled |_|_______|________________|_____________|_________________|_____________| Enter name for a new OR [Exit][Previous][Next]> next<-------------------- Oracle WebLogic Configuration Wizard ------------------->Configure Clusters:-------------------Add or delete configuration information for clusters. A cluster containsmultiple WebLogic Server instances that run simultaneously and worktogether to provide increased scalability and reliability. A clusterappears to be a single WebLogic Server instance to clients.| Name* | Multicast address | Multicast port | Cluster address |_|_______|___________________|________________|_________________|Enter name for a new Cluster OR [Exit][Previous][Next]> next§2.3.10 暂不添加受管的主机<-------------------- Oracle WebLogic Configuration Wizard -------------------> Configure Machines:-------------------Add or delete machines. A machine hosts one or more WebLogic Server instances. The Admin Server and Node Manager use this machine definition to start remote servers.| Name* | Node manager listen address | Node manager listen port |_|_______|_____________________________|__________________________| Enter name for a new Machine OR [Exit][Previous][Next]> next<-------------------- Oracle WebLogic Configuration Wizard -------------------> Configure Unix Machines:------------------------Add or delete machines. A machine hosts one or more WebLogic Server instances. The Admin Server and Node Manager use this machine definition to start remote servers.| Name |_|______|Enter name for a new Unix Machine OR [Exit][Previous][Next]> next§2.3.11 指定域名<-------------------- Oracle WebLogic Configuration Wizard ------------------->Select the target domain directory for this domain:---------------------------------------------------"Target Location" = [Enter new value or use default"/bea/user_projects/domains"]Enter new Target Location OR [Exit][Previous][Next]> next<-------------------- Oracle WebLogic Configuration Wizard -------------------> Edit Domain Information:------------------------| Name | Value |_|________|_____________|1| *Name: | base_domain |Enter value for "Name" OR [Exit][Previous][Next]> weblogic<-------------------- Oracle WebLogic Configuration Wizard -------------------> Edit Domain Information:------------------------| Name | Value |_|________|__________|1| *Name: | weblogic |Use above value or select another option:1 - Modify "Name"2 - Discard ChangesEnter option number to select OR [Exit][Previous][Next]> next§2.3.12 创建域<-------------------- Oracle WebLogic Configuration Wizard -------------------> Creating Domain...0% 25% 50% 75% 100%[------------|------------|------------|------------][***************************************************]。
前段时间由于项目需要,在redhat Linux 上搭建服务器,web服务器选择为webLogic10.3.6版本,现将安装过程整理下来,供后期项目环境搭建提供参考一、安装工具准备1、SSH操作工具:SecureCRT 7.3或Xmanager Enterprise 52、FTP文件传输工具:FileZilla Client3、webLogic安装介质:wlsXXXX_generic.jar二、创建用户组和用户1、创建用户组:groupadd用户组名称2、创建用户:useradd -g 用户组名称用户名3、创建用户密码:passwd用户名文章来源:申博官网三、上传安装介质使用Ftp工具将安装介质上传到系统的指定目录下,并为该目录及文件赋权限供用户可操作该目录四、安装WebLogic1、切换用户至weblogic用户,进入WebLogic安装介质存放路径,并使用命令执行该文件,文件加载完成后开始进入安装,输入next 按回车(Enter)2、指定安装路径:输入Enter命令,输入自己指定的路径,回车,此处最好不做修改,使用系统默认的安装路径,直接输入next3、该步骤是指定是否注册安全更新,此处选择不需要安全更新,操作方式为:1)、输入3回车2)、输入no,回车3)、输入yes回车4)、输入next回车文章来源:申博官网4、选择安装类型:典型安装和自定义安装,为了在安装过程中简单快捷,选择默认的典型安装,直接输入next 回车5、选择JDK版本:此处选择已安装的JDK,即/usr/lib/jvm/java-XXX-openJDK-XXX,输入next 按回车6、选择服务类型:webLogic服务和Oracle集群服务,此处选择1,回车7、列表展示需要安装的webLogic组件信息。
Next 回车,开始安装。
Linux环境下搭建WebLogic 10.3.6集群服务十步曲(console模式)版本说明概要描述1. 安装前准备篇 (4)1.1. 主机资源规划 (4)1.2. 安装介质准备 (4)2. 平台基础配置篇(双节点) (4)2.1. hosts文件配置 (4)2.2. ulimit参数配置 (4)2.3. Tcp默认连接超时时间配置 (4)3. 用户及权限配置篇(双节点) (4)3.1. 新增weblogic组及用户 (4)3.2. 修改目录所有者权限 (5)4. 节点1安装篇 (5)4.1. 安装jrockit jdk (5)4.1.1. 修改文件执行权限 (5)4.1.2. 执行安装文件 (5)4.1.3. 设置jrockit-jdk安装目录 (5)4.1.4. 确认安装 (5)4.1.5. 验证是否已安装成功 (6)4.2. 安装Weblogic (6)4.2.1. 执行安装文件 (6)4.2.2. 设置中间件安装主目录 (6)4.2.3. 设置是否接收安全更新(不接收) (6)4.2.4. 选择安装内容(只安装Weblogic Server) (7)4.2.5. 选择JDK (9)4.2.6. 确认WebLogic安装目录 (9)4.2.7. 验证是否已安装成功 (11)5. 节点1配置篇 (11)5.1. 新建应用domain域 (11)5.1.1. 执行weblogic配置向导文件 (11)5.1.2. 选择新建或者扩展域(选择新建) (12)5.1.3. 选择域控件或者模版(选择控件) (12)5.1.4. 选择应用模版(默认选择Basic WebLogic Server Domain) (12)5.1.5. 编辑域名称信息 (13)5.1.6. 配置管理员用户及密码 (13)5.1.7. 配置域模式(选择2生产模式) (14)5.1.8. 选择JDK(选择JRockit JDK) (14)5.1.9. 配置管理服务器 (14)5.1.10. 创建域 (16)5.1.11. 查看域创建日志,检查域是否创建成功 (16)5.1.12. 启动域,验证管理服务器是否配置成功 (17)5.1.13. IE登录域控制台 (18)5.2. 环境参数配置 (18)5.2.1. Java.security安全策略文件配置 (18)5.2.2. 域内存参数配置 (19)5.2.3. 域JAVA_OPTIONS参数配置 (19)5.3. 管理服务器(AdminServer)配置 (20)5.3.1. 密钥文件配置 (20)5.3.2. 启动脚本配置 (20)5.4. 计算机(Machine)配置 (21)5.5. 应用集群(Cluster)配置 (22)5.6. 节点管理器(nodemanager)配置 (23)5.6.1. 配置startNodeManager.sh启动脚本 (23)5.6.2. 设置管理服务器主机名验证为“无” (24)5.7. 被管理服务器(ManagedServer)配置 (24)5.7.1. 服务器配置 (24)5.7.2. 密钥文件配置 (29)5.7.3. 启动脚本配置 (29)6. 节点2安装配置篇 (29)6.1. 拷贝节点1的jrockit jdk安装及配置 (29)6.2. 拷贝节点1的weblogic安装及配置 (29)6.3. 克隆节点1的被管理服务器配置 (29)6.4. 移除节点2上的管理服务器启动脚本 (31)6.5. 移除节点2上的服务启动日志信息 (31)6.6. 修改节点2被管理服务器启动脚本 (31)6.7. 配置节点2被管理服务器密钥文件 (32)7. 部署篇 (32)7.1. 数据源配置 (32)7.1.1. 新建数据源 (32)7.1.2. 数据源参数调优 (36)7.2. 应用部署 (38)7.2.1. 上传应用程序文件 (38)7.2.2. 部署应用 (38)8. 服务启动/查看状态/停止篇 (42)8.1. 启动服务 (42)8.1.1. 启动管理服务器 (42)8.1.2. 启动节点服务器 (43)8.1.3. 启动被管理服务器 (44)8.2. 查看/停止服务 (45)8.2.1. 查看/停止管理服务器 (45)8.2.2. 查看/停止节点服务器 (45)8.2.3. 查看/停止被管理服务器 (45)9. 安全防护篇 (46)9.1. Java反序列化安全漏洞修复 (46)10. FAQ篇 (47)10.1. 在weblogic控制台启动Server1时,报<BEA-000110><Multicast socket receiveerror 471.安装前准备篇的名称及端口。
1.2.安装介质准备JDK,使用jrockit-jdk1.6.0_45-R28.2.7-4.1.0-linux-x64.binWeblogic,使用wls1036_generic.jar1.3.安装路径规划JDK安装路径,/app/jrockit-jdkWeblogic安装路径,/app/Oracle/Middleware域安装路径,/app/Oracle/Middleware/user_projects/domains/base_domain2.平台基础配置篇(双节点)--以下三点,均通过root用户配置2.1.hosts文件配置双节点主机hosts文件,都加上两台主机名称与IP对应关系[weblogic@po9kcfap901 ~]$ cat /etc/hosts127.0.0.1 localhostlocalhost.localdomainlocalhost4localhost4.localdomain4::1localhostlocalhost.localdomainlocalhost6localhost6.localdomain610.140.30.51 po9kcfap90110.140.30.52 po9kcfap902[weblogic@po9kcfap901 ~]$2.2.ulimit参数配置--在limits.conf文件中增加nofile、nproc参数配置vi /etc/security/limits.conf* softnofile 102400* hardnofile 102400* softnproc 102400* hardnproc 102400--注释90-nproc.conf文件里面*用户nproc参数配置vi /etc/security/limits.d/90-nproc.conf#* soft nproc 1024002.3.Tcp默认连接超时时间配置[root@po9kcfap901 ~]# sysctl -w net.ipv4.tcp_fin_timeout=30net.ipv4.tcp_fin_timeout = 30[root@po9kcfap901 ~]#3.用户及权限配置篇(双节点)3.1.新增weblogic组及用户[root@po9kcfap901 ~]# groupaddweblogic[root@po9kcfap901 ~]# useradd -g weblogicweblogic3.2.修改目录所有者权限[root@po9kcfap901 /]# chown -R weblogic:weblogic /app[root@po9kcfap901 /]# chown -R weblogic:weblogic /msscpmis_app4.节点1安装篇4.1.安装jrockitjdk4.1.1.修改文件执行权限chmoda+x /home/weblogic/software/jrockit-jdk1.6.0_45-R28.2.7-4.1.0-linux-x64.bin4.1.2.执行安装文件[weblogic@po9kcfap901 software]$ ./jrockit-jdk1.6.0_45-R28.2.7-4.1.0-linux-x64.binExtracting 0%....................................................................................................100%Unable to instantiate GUI, defaulting to console mode.<---------------------------------------- Oracle JRockit Installer - Oracle JRockitJDKR28.2.7 for Java SE 6 with JRMC 4.1 ---------------------------------------->Welcome:--------This installer will guide you through the installation of Oracle JRockitJDKR28.2.7 for Java SE 6 with JRMC 4.1. Type "Next" or enter to proceed to the next prompt. If you want to change data entered previously, type "Previous". You may quit the installer at any time by typing "Exit".Enter [Exit][Next]>4.1.3.设置jrockit-jdk安装目录<---------------------------------------- Oracle JRockit Installer - Oracle JRockitJDKR28.2.7 for Java SE 6 with JRMC 4.1 ---------------------------------------->Choose Product Installation Directory:--------------------------------------"Product Installation Directory" = [/app/jrockit-jdk]Use above value or select another option:1 - Enter new Product Installation Directory2 - Change to default [/home/weblogic/jrockit-jdk1.6.0_45-R28.2.7-4.1.0]Enter option number to select OR [Exit][Previous][Next]>4.1.4.确认安装<---------------------------------------- Oracle JRockit Installer - Oracle JRockitJDKR28.2.7 for Java SE 6 with JRMC 4.1 ---------------------------------------->Installing JRE to /app/jrockit-jdk/jre...0% 25% 50% 75% 100%[------------|------------|------------|------------][***************************************************]<---------------------------------------- Oracle JRockit Installer - Oracle JRockitJDKR28.2.7 for Java SE 6 with JRMC 4.1 ---------------------------------------->Installation CompleteCongratulations! Oracle JRockitJDKR28.2.7 for Java SE 6 with JRMC 4.1 has been successfully installed to /app/jrockit-jdk.Press [Enter] to continue or type [Exit]><---------------------------------------- Oracle JRockit Installer - Oracle JRockitJDKR28.2.7 for Java SE 6 with JRMC 4.1 ---------------------------------------->Clean up process in progress ...[weblogic@po9kcfap901 software]$4.1.5.验证是否已安装成功[weblogic@po9kcfap901 bin]$ /app/jrockit-jdk/bin/java -versionjava version "1.6.0_45"Java(TM) SE Runtime Environment (build 1.6.0_45-b06)Oracle JRockit(R) (build R28.2.7-7-155314-1.6.0_45-20130329-0641-linux-x86_64, compiled mode)[weblogic@po9kcfap901 bin]$4.2.安装Weblogic4.2.1.执行安装文件[weblogic@po9kcfap901 software]$ java -jar wls1036_generic.jar4.2.2.设置中间件安装主目录<-------------------- Oracle Installer - WebLogic 10.3.6.0 ------------------->Choose Middleware Home Directory:---------------------------------"Middleware Home" = [/app/Oracle/Middleware]Use above value or select another option:1 - Enter new Middleware Home2 - Change to default [/home/weblogic/Oracle/Middleware]Enter option number to select OR [Exit][Previous][Next]> Next4.2.3.设置是否接收安全更新(不接收)--注:输入3,回车;再输入No,回车;最后再输入Yes,确认不接收,回车<-------------------- Oracle Installer - WebLogic 10.3.6.0 ------------------->Register for Security Updates:------------------------------Provide your email address for security updates and to initiate configuration manager.1|Email:[]2|Support Password:[]3|Receive Security Update:[Yes]Enter index number to select OR [Exit][Previous][Next]> 34.2.4.选择安装内容(只安装Weblogic Server)--注:输入2,回车;再输入2,回车;最后再输入Next,只安装WeLogic Server<-------------------- Oracle Installer - WebLogic 10.3.6.0 ------------------->Choose Install Type:--------------------Select the type of installation you wish to perform.->1|Typical| Install the following product(s) and component(s):| - WebLogic Server| - Oracle Coherence2|Custom| Choose software products and components to install and perform optional|configuration.Enter index number to select OR [Exit][Previous][Next]> 2<-------------------- Oracle Installer - WebLogic 10.3.6.0 ------------------->Choose Products and Components:-------------------------------Release 10.3.6.0|_____WebLogic Server [1] x| |_____Core Application Server [1.1] x| |_____Administration Console [1.2] x| |_____Configuration Wizard and Upgrade Framework [1.3] x| |_____Web 2.0 HTTP Pub-Sub Server [1.4] x| |_____WebLogicSCA [1.5] x| |_____WebLogicJDBC Drivers [1.6] x| |_____Third Party JDBC Drivers [1.7] x| |_____WebLogic Server Clients [1.8] x| |_____WebLogic Web Server Plugins [1.9] x| |_____UDDI and Xquery Support [1.10] x| |_____Server Examples [1.11]| |_____Evaluation Database [1.12] x|_____Oracle Coherence [2] x|_____Coherence Product Files [2.1] x|_____Coherence Examples [2.2]*Estimated size of installation: 690.2 MBEnter number exactly as it appears in brackets to toggle selection OR [Exit][Previous][Next]><-------------------- Oracle Installer - WebLogic 10.3.6.0 ------------------->Choose Products and Components:-------------------------------Release 10.3.6.0|_____WebLogic Server [1] x| |_____Core Application Server [1.1] x| |_____Administration Console [1.2] x| |_____Configuration Wizard and Upgrade Framework [1.3] x| |_____Web 2.0 HTTP Pub-Sub Server [1.4] x| |_____WebLogicSCA [1.5] x| |_____WebLogicJDBC Drivers [1.6] x| |_____Third Party JDBC Drivers [1.7] x| |_____WebLogic Server Clients [1.8] x| |_____WebLogic Web Server Plugins [1.9] x| |_____UDDI and Xquery Support [1.10] x| |_____Server Examples [1.11] x| |_____Evaluation Database [1.12] x|_____Oracle Coherence [2]|_____Coherence Product Files [2.1]|_____Coherence Examples [2.2]*Estimated size of installation: 744.7 MBEnter number exactly as it appears in brackets to toggle selection OR[Exit][Previous][Next]>4.2.5.选择JDK--注:输入1,回车;输入/app/jrockit-jdk,回车;再输入2,把操作系统默认安装的JDK 取消勾选<-------------------- Oracle Installer - WebLogic 10.3.6.0 ------------------->JDK Selection (Any * indicates Oracle Supplied VM):---------------------------------------------------JDK(s) chosen will be installed. Defaults will be used in script string-substitution if installed.1|Add Local Jdk2|/usr/lib/jvm/java-1.7.0-openjdk-1.7.0.45.x86_64[ ]3|/app/jrockit-jdk[x]*Estimated size of installation: 744.7 MBEnter 1 to add or >= 2 to toggle selection OR [Exit][Previous][Next]> Next4.2.6.确认WebLogic安装目录<-------------------- Oracle Installer - WebLogic 10.3.6.0 ------------------->Choose Product Installation Directories:----------------------------------------Middleware Home Directory: [/app/Oracle/Middleware]Product Installation Directories:"WebLogic Server" = [Enter new value or use default"/app/Oracle/Middleware/wlserver_10.3"]Enter new WebLogic Server OR [Exit][Previous][Next]> Next<-------------------- Oracle Installer - WebLogic 10.3.6.0 ------------------->The following Products and JDKs will be installed:--------------------------------------------------WebLogic Platform 10.3.6.0|_____WebLogic Server|_____Core Application Server|_____Administration Console|_____Configuration Wizard and Upgrade Framework|_____Web 2.0 HTTP Pub-Sub Server|_____WebLogicSCA|_____WebLogicJDBC Drivers|_____Third Party JDBC Drivers|_____WebLogic Server Clients|_____WebLogic Web Server Plugins|_____UDDI and Xquery Support|_____Server Examples|_____Evaluation Database*Estimated size of installation: 744.8 MBEnter [Exit][Previous][Next]> NextMar 26, 2017 12:11:03 PM java.util.prefs.FileSystemPreferences$1 runINFO: Created user preferences directory.<-------------------- Oracle Installer - WebLogic 10.3.6.0 ------------------->Installing files..0% 25% 50% 75% 100%[------------|------------|------------|------------][***************************************************]Performing String Substitutions...<-------------------- Oracle Installer - WebLogic 10.3.6.0 ------------------->Configuring OCM...0% 25% 50% 75% 100%[------------|------------|------------|------------][***************************************************]Creating Domains...…Mar 26, 2017 12:11:35 PM [THREAD: runScript] com.oracle.cie.domain.script.ScriptExecutor outputINFO: succeed: close template<-------------------- Oracle Installer - WebLogic 10.3.6.0 ------------------->Installation CompleteCongratulations! Installation is complete.Press [Enter] to continue or type [Exit]><-------------------- Oracle Installer - WebLogic 10.3.6.0 ------------------->Clean up process in progress ...[weblogic@po9kcfap901 bin]$4.2.7.验证是否已安装成功[weblogic@po9kcfap901 logs]$ cat /app/Oracle/Middleware/logs/log.txtMar 26, 2017 12:11:10 PM -- install "WebLogic Platform" 10.3.6.0 at /app/Oracle/Middlewarerelease 10.3.6.0 [Added]|_____Common Infrastructure Engineering 7.4.0.0 [Added]| |_____Uninstall [Added]| |_____Patch Client [Added]| |_____Patch Attachment Facility [Added]| |_____Clone Facility [Added]|_____WebLogic Server 10.3.6.0 [Added]| |_____Core Application Server [Added]| |_____Administration Console [Added]| |_____Configuration Wizard and Upgrade Framework [Added]| |_____Web 2.0 HTTP Pub-Sub Server [Added]| |_____WebLogicSCA [Added]| |_____WebLogicJDBC Drivers [Added]| |_____Third Party JDBC Drivers [Added]| |_____WebLogic Server Clients [Added]| |_____WebLogic Web Server Plugins [Added]| |_____UDDI and Xquery Support [Added]| |_____Server Examples [Added]| |_____Evaluation Database [Added]| |_____Workshop Code Completion Support [Added]|_____Oracle Configuration Manager 10.3.5.0 [Added]| |_____Data Collector [Added]|_____Oracle Coherence 3.7.1.1 [Not Installed]|_____Coherence Product Files [Not Installed]|_____Coherence Examples [Not Installed][weblogic@po9kcfap901 logs]$5.节点1配置篇5.1.新建应用domain域--注:只需在节点1上新建domain域5.1.1.执行weblogic配置向导文件[weblogic@po9kcfap901bin]$ /app/Oracle/Middleware/wlserver_10.3/common/bin/config.shUnable to instantiate GUI, defaulting to console mode.<------------------- Fusion Middleware Configuration Wizard ------------------>Welcome:--------5.1.2.选择新建或者扩展域(选择新建)Choose between creating and extending a domain. Based on your selection,the Configuration Wizard guides you through the steps to generate a new orextend an existing domain.->1|Create a new WebLogic domain| Create a WebLogic domain in your projects directory.2|Extend an existing WebLogic domain| Use this option to add new components to an existing domain and modify |configuration settings.Enter index number to select OR [Exit][Next]>5.1.3.选择域控件或者模版(选择控件)<------------------- Fusion Middleware Configuration Wizard ------------------>Select Domain Source:---------------------Select the source from which the domain will be created. You can create thedomain by selecting from the required components or by selecting from alist of existing domain templates.->1|ChooseWeblogic Platform components| You can choose the Weblogic component(s) that you want supported in |your domain.2|Choose custom template| Choose this option if you want to use an existing template. This|could be a custom created template using the Template Builder.Enter index number to select OR [Exit][Previous][Next]> Next5.1.4.选择应用模版(默认选择BasicWebLogic Server Domain)<------------------- Fusion Middleware Configuration Wizard ------------------>Application Template Selection:-------------------------------Available Templates|_____Basic WebLogic Server Domain - 10.3.6.0 [wlserver_10.3]x|_____Basic WebLogic SIP Server Domain - 10.3.6.0 [wlserver_10.3] [2]|_____WebLogic Advanced Web Services for JAX-RPC Extension - 10.3.6.0 [wlserver_10.3] [3]|_____WebLogic Advanced Web Services for JAX-WS Extension - 10.3.6.0 [wlserver_10.3] [4]Enter number exactly as it appears in brackets to toggle selection OR [Exit][Previous][Next]> Next5.1.5.编辑域名称信息<------------------- Fusion Middleware Configuration Wizard ------------------>Edit Domain Information:------------------------| Name | Value |_|________|_____________|1| *Name: | base_domain |Enter value for "Name" OR [Exit][Previous][Next]> Next<------------------- Fusion Middleware Configuration Wizard ------------------>Select the target domain directory for this domain:---------------------------------------------------"Target Location" = [Enter new value or use default"/app/Oracle/Middleware/user_projects/domains"]5.1.6.配置管理员用户及密码<------------------- Fusion Middleware Configuration Wizard ------------------>Configure Administrator User Name and Password:-----------------------------------------------Create a user to be assigned to the Administrator role. This user is thedefault administrator used to start development mode servers.| Name | Value |_|_________________________|_________________________________________| 1| *Name: | weblogic |2| *User password: | ************* |3| *Confirm user password: | ************* |4| Description: | This user is the default administrator. |Use above value or select another option:1 - Modify "Name"2 - Modify "User password"3 - Modify "Confirm user password"4 - Modify "Description"5 - Discard ChangesEnter option number to select OR [Exit][Previous][Next]>5.1.7.配置域模式(选择2生产模式)<------------------- Fusion Middleware Configuration Wizard ------------------>Domain Mode Configuration:--------------------------Enable Development or Production Mode for this domain.->1|Development Mode2|Production ModeEnter index number to select OR [Exit][Previous][Next]> 25.1.8.选择JDK(选择JRockitJDK)<------------------- Fusion Middleware Configuration Wizard ------------------>Java SDK Selection:-------------------->1|JRockit SDK 1.6.0_45 @ /app/jrockit-jdk2|Other Java SDKEnter index number to select OR [Exit][Previous][Next]> Next5.1.9.配置管理服务器<------------------- Fusion Middleware Configuration Wizard ------------------>Select Optional Configuration:------------------------------1|Administration Server [x]2|Managed Servers, Clusters and Machines [ ]3|RDBMS Security Store [ ]Enter index number to select OR [Exit][Previous][Next]> Next<------------------- Fusion Middleware Configuration Wizard ------------------>Configure the Administration Server:------------------------------------Each WebLogic Server domain must have one Administration Server. The Administration Server is used to perform administrative tasks.| Name | Value |_|__________________|_____________________|1| *Name: | AdminServer |2| *Listen address: | All Local Addresses |3| Listen port: | 7001 |4| SSL listen port: | N/A |5| SSL enabled: | false |Use above value or select another option:1 - Modify "Name"2 - Modify "Listen address"3 - Modify "Listen port"4 - Modify "SSL enabled"Enter option number to select OR [Exit][Previous][Next]> 2<------------------- Fusion Middleware Configuration Wizard ------------------>Configure the Administration Server:------------------------------------Each WebLogic Server domain must have one Administration Server. The Administration Server is used to perform administrative tasks.| Name | Value |_|__________________|_____________________|1| *Name: | AdminServer |2| *Listen address: | All Local Addresses |3| Listen port: | 7001 |4| SSL listen port: | N/A |5| SSL enabled: | false |Enter option number to select OR [Exit][Previous][Next]> 2Enter value for "Listen address" OR [Exit][Previous][Next]> 10.140.30.51<------------------- Fusion Middleware Configuration Wizard ------------------>Configure the Administration Server:------------------------------------Each WebLogic Server domain must have one Administration Server. TheAdministration Server is used to perform administrative tasks.| Name | Value |_|__________________|______________|1| *Name: | AdminServer |2| *Listen address: | 10.140.30.51 |3| Listen port: | 7001 |4| SSL listen port: | N/A |5| SSL enabled: | false |Use above value or select another option:1 - Modify "Name"2 - Modify "Listen address"3 - Modify "Listen port"4 - Modify "SSL enabled"5 - Discard ChangesEnter option number to select OR [Exit][Previous][Next]>5.1.10.创建域--注:创建域等待时间可能会比较久,请耐心等待<------------------- Fusion Middleware Configuration Wizard ------------------>Creating Domain...0% 25% 50% 75% 100%[------------|------------|------------|------------][***************************************************]**** Domain Created Successfully! ****[weblogic@po9kcfap901 bin]$5.1.11.查看域创建日志,检查域是否创建成功[weblogic@po9kcfap901 logs]$ tail -f -n 100 wlsconfig_20170326124746.log2017-03-26 12:47:47,583 WARN [Main Thread]com.oracle.cie.wizard.WizardController - Unable to instantiate GUI, defaulting to console mode.2017-03-26 12:50:34,507 INFO [WizardController] ponentsXMLConverter - /app/Oracle/Middleware/wlserver_10.3/common/lib/components.xml does not contain component elements and will be skipped2017-03-26 12:50:34,507 INFO [WizardController] com.oracle.cie.wizard.domain.console.tasks.MultipleTemplateSelectionConsoleTask - Selected required template: Basic WebLogic Server Domain:10.3.6.0 [/app/Oracle/Middleware/wlserver_10.3/common/templates/domains/wls.jar] 2017-03-26 12:51:32,483 INFO [WizardController] com.oracle.cie.domain.WLSTemplateBuilder - No config-groups.xml found in template 2017-03-26 12:51:32,484 INFO [WizardController] com.oracle.cie.domain.WLSTemplateBuilder - No template-database.xml found in template 2017-03-26 12:51:32,820 INFO [WizardController] com.oracle.cie.domain.AbstractTemplate - Adding top-level component reference: WebLogic Server version 10.3.6.02017-03-26 12:51:32,823 INFO [WizardController] com.oracle.cie.domain.AbstractTemplate - Setting symbol for component WebLogic Server version 10.3.6.0 to WebLogic_Server_10.3.6.0_wlserver_10.3_ORACLE_HOME 2017-03-26 13:44:10,571 INFO [WizardController] com.oracle.cie.domain.DomainChecker - ListenPort internal Validation result= [null] 2017-03-26 13:44:10,583 INFO [WizardController] com.oracle.cie.domain.DomainChecker - ListenPort external Validation result= [null] 2017-03-26 13:55:15,687 INFO [Thread-1] com.oracle.cie.domain.DomainRegistryWrapper - need to initialize domainRegistrydocument object2017-03-26 13:55:15,696 INFO [Thread-1] com.oracle.cie.domain.DomainGenerator - Domain Generation Successful!5.1.12.启动域,验证管理服务器是否配置成功--注:根据提示,输入域控制台管理用户名及密码[weblogic@po9kcfap901bin]$ /app/Oracle/Middleware/user_projects/domains/base_domain/startWebLogic.sh ..JAVA Memory arguments: -Xms512m -Xmx512m.WLS Start Mode=Production.CLASSPATH=/app/Oracle/Middleware/patch_wls1036/profiles/default/sys_manifest_cl asspath/weblogic_patch.jar:/app/jrockit-jdk/lib/tools.jar:/app/Oracle/Middleware/wlserver _10.3/server/lib/weblogic_sp.jar:/app/Oracle/Middleware/wlserver_10.3/server/lib/weblog ic.jar:/app/Oracle/Middleware/modules/features/weblogic.server.modules_10.3.6.0.jar:/app/Oracle/Middleware/wlserver_10.3/server/lib/webservices.jar:/app/Oracle/Middleware/m odules/org.apache.ant_1.7.1/lib/ant-all.jar:/app/Oracle/Middleware/modules/net.sf.antcon trib_1.1.0.0_1-0b2/lib/ant-contrib.jar:/app/Oracle/Middleware/wlserver_10.3/common/der by/lib/derbyclient.jar:/app/Oracle/Middleware/wlserver_10.3/server/lib/xqrl.jar .PATH=/app/Oracle/Middleware/wlserver_10.3/server/bin:/app/Oracle/Middleware/m odules/org.apache.ant_1.7.1/bin:/app/jrockit-jdk/jre/bin:/app/jrockit-jdk/bin:/usr/lib64/qt-3.3/bin:/usr/local/bin:/bin:/usr/bin:/usr/local/sbin:/usr/sbin:/sbin:/home/weblogic/bin.**************************************************** To start WebLogic Server, use a username and ** password assigned to an admin-level user. For ** server administration, use the WebLogic Server ** console at http://hostname:port/console *……<Mar 26, 2017 2:01:21 PM CST><Notice><Server><BEA-002613><Channel "Default" is now listening on 10.140.30.51:7001 for protocols iiop, t3, ldap, snmp, http.><Mar 26, 2017 2:01:21 PM CST><Notice><WebLogicServer><BEA-000329><Started WebLogic Admin Server "AdminServer" for domain "base_domain" running in Production Mode><Mar 26, 2017 2:01:21 PM CST><Notice><WebLogicServer><BEA-000365><Server state changed to RUNNING><Mar 26, 2017 2:01:21 PM CST><Notice><WebLogicServer><BEA-000360><Server started in RUNNING mode>5.1.13.IE登录域控制台http://10.140.30.51:7001/console/login/LoginForm.jsp5.2.环境参数配置5.2.1.Java.security安全策略文件配置--修改java.security文件,用于解决Weblogic启动慢或者控制台访问慢的问题--将securerandom.source=file:/dev/urandom调整为securerandom.source=file:/dev/./urandom[weblogic@po9kcfap901base_domain]$ vi /app/jrockit-jdk/jre/lib/security/java.security## This is the "master security properties file".## In this file, various security properties are set for use by# On Windows systems, the URLs file:/dev/random and file:/dev/urandom# enables use of the Microsoft CryptoAPI seed functionality.#securerandom.source=file:/dev/./urandom5.2.2.域内存参数配置--注:修改-Xms、-Xmx、--XX:PermSize、--XX:MaxPermSize这4个参数[weblogic@po9kcfap901base_domain]$ vi /app/Oracle/Middleware/user_projects/domains/base_domain/bin/setDomainEnv.sh--修改JVM内存参数if [ "${JAVA_VENDOR}" = "Sun" ] ; thenWLS_MEM_ARGS_64BIT="-Xms256m -Xmx512m"exportWLS_MEM_ARGS_64BITWLS_MEM_ARGS_32BIT="-Xms256m -Xmx512m"exportWLS_MEM_ARGS_32BITelseWLS_MEM_ARGS_64BIT="-Xms2048m -Xmx3072m"exportWLS_MEM_ARGS_64BITWLS_MEM_ARGS_32BIT="-Xms512m -Xmx512m"exportWLS_MEM_ARGS_32BITfiMEM_PERM_SIZE_64BIT="-XX:PermSize=512m"exportMEM_PERM_SIZE_64BITMEM_PERM_SIZE_32BIT="-XX:PermSize=128m"exportMEM_PERM_SIZE_32BITif [ "${JAVA_USE_64BIT}" = "true" ] ; thenMEM_PERM_SIZE="${MEM_PERM_SIZE_64BIT}"exportMEM_PERM_SIZEelseMEM_PERM_SIZE="${MEM_PERM_SIZE_32BIT}"exportMEM_PERM_SIZEfiMEM_MAX_PERM_SIZE_64BIT="-XX:MaxPermSize=1024m"exportMEM_MAX_PERM_SIZE_64BITMEM_MAX_PERM_SIZE_32BIT="-XX:MaxPermSize=128m"exportMEM_MAX_PERM_SIZE_32BIT5.2.3.域JAVA_OPTIONS参数配置--注:需要在JAVA_OPTIONS中增加.preferIPv4Stack=true参数,否则在启动被管理服务器时,会出现“<BEA-000110><Multicast socket receive error”错误提示if [ "${debugFlag}" = "true" ] ; thenJAVA_DEBUG="-Xdebug -Xnoagent -Xrunjdwp:transport=dt_socket,address=${DEBUG_PORT},server=y,suspend=npiler=NONE"exportJAVA_DEBUGJAVA_OPTIONS="${JAVA_OPTIONS} ${enableHotswapFlag} -ea -da:com.bea...-da:javelin... -da:weblogic... -ea:com.bea.wli... -ea:com.bea.broker... -ea:com.bea.sbconsole....preferIPv4Stack=true"exportJAVA_OPTIONSelseJAVA_OPTIONS="${JAVA_OPTIONS} ${enableHotswapFlag} -da .preferIPv4Stack=true"exportJAVA_OPTIONS5.3.管理服务器(AdminServer)配置--以后台模式启动服务,并将控制台输出日志重定向到指定文件[weblogic@po9kcfap901base_domain]$ vi /app/Oracle/Middleware/user_projects/domains/base_domain/startWebLogic.sh #!/bin/sh# WARNING: This file is created by the Configuration Wizard.# Any changes to this script may be lost when adding extensions to this configuration.DOMAIN_HOME="/app/Oracle/Middleware/user_projects/domains/base_domain"nohup ${DOMAIN_HOME}/bin/startWebLogic.sh>${DOMAIN_HOME}/AdminServer.out $* &5.3.1.密钥文件配置--在管理服务器下新增安全认证目录及密钥文件[weblogic@po9kcfap901 ~]$ mkdir -p /app/Oracle/Middleware/user_projects/domains/base_domain/servers/AdminServer/securi ty[weblogic@po9kcfap901 ~]$ vi /app/Oracle/Middleware/user_projects/domains/base_domain/servers/AdminServer/securi ty/boot.propertiesusername=weblogicpassword=*****5.3.2.启动脚本配置--以后台模式启动服务,并将控制台输出日志重定向到指定文件[weblogic@po9kcfap901 server]$ vi /app/Oracle/Middleware/user_projects/domains/base_domain/startWebLogic.sh #!/bin/sh。