Shared Register Windows
- 格式:pdf
- 大小:109.91 KB
- 文档页数:15

关于家的单词1. 单词:home- 单词释义:指一个人居住的地方,是家庭所在之处,也可表示故乡、本国等。
- 单词用法:可作名词,如“I'm going home.”(我要回家了。
);也可作形容词,如“home cooking”(家常菜)。
- 近义词:house(强调建筑物),residence(较为正式,指居住的地方)。
- 短语搭配:at home(在家),home town(家乡)。
- 双语例句:- I love my home. It's like a warm haven where I can be myself.(我爱我的家。
它就像一个温暖的港湾,在那里我可以做自己。
) - Is there any place better than home? When I'm tired, all I want is to go back home.(有什么地方比家更好吗?当我累了的时候,我只想回家。
)2. 单词:family- 单词释义:指家庭,包括家庭成员,也可表示家族。
- 单词用法:作名词,如“My family is very big.”(我的家庭很大。
)- 近义词:household(强调家庭里的全体成员以及家庭这个单位)。
- 短语搭配:family member(家庭成员),family tree(家谱)。
- 双语例句:- My family always has dinner together. It's such a wonderful time. We share our day and laugh a lot.(我的家人总是一起吃晚餐。
那是非常美好的时光。
我们分享一天的事情,开怀大笑。
)- A family is like a smallmunity. Everyone has their role. Dad is the protector, mom is the caregiver, and we kids are the hope.(一个家庭就像一个小社区。
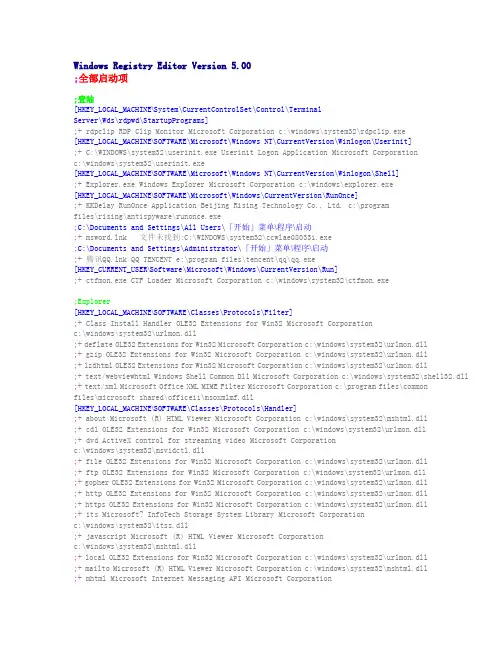
Windows Registry Editor Version 5.00;全部启动项;登陆[HKEY_LOCAL_MACHINE\System\CurrentControlSet\Control\TerminalServer\Wds\rdpwd\StartupPrograms];+ rdpclip RDP Clip Monitor Microsoft Corporation c:\windows\system32\rdpclip.exe[HKEY_LOCAL_MACHINE\SOFTWARE\Microsoft\Windows NT\CurrentVersion\Winlogon\Userinit];+ C:\WINDOWS\system32\userinit.exe Userinit Logon Application Microsoft Corporationc:\windows\system32\userinit.exe[HKEY_LOCAL_MACHINE\SOFTWARE\Microsoft\Windows NT\CurrentVersion\Winlogon\Shell];+ Explorer.exe Windows Explorer Microsoft Corporation c:\windows\explorer.exe[HKEY_LOCAL_MACHINE\SOFTWARE\Microsoft\Windows\CurrentVersion\RunOnce];+ KKDelay RunOnce Application Beijing Rising Technology Co., Ltd.c:\programfiles\rising\antispyware\runonce.exe;C:\Documents and Settings\All Users\「开始」菜单\程序\启动;+ msword.lnk 文件未找到:C:\WINDOWS\system32\ccwlae080331.exe;C:\Documents and Settings\Administrator\「开始」菜单\程序\启动;+ 腾讯QQ.lnk QQ TENCENT e:\program files\tencent\qq\qq.exe[HKEY_CURRENT_USER\Software\Microsoft\Windows\CurrentVersion\Run];+ ctfmon.exe CTF Loader Microsoft Corporation c:\windows\system32\ctfmon.exe;Explorer[HKEY_LOCAL_MACHINE\SOFTWARE\Classes\Protocols\Filter];+ Class Install Handler OLE32 Extensions for Win32Microsoft Corporationc:\windows\system32\urlmon.dll;+ deflate OLE32 Extensions for Win32Microsoft Corporation c:\windows\system32\urlmon.dll;+ gzip OLE32 Extensions for Win32Microsoft Corporation c:\windows\system32\urlmon.dll;+ lzdhtml OLE32 Extensions for Win32Microsoft Corporation c:\windows\system32\urlmon.dll;+ text/webviewhtml Windows Shell Common Dll Microsoft Corporation c:\windows\system32\shell32.dll ;+ text/xml Microsoft Office XML MIME Filter Microsoft Corporation c:\program files\commonfiles\microsoft shared\office11\msoxmlmf.dll[HKEY_LOCAL_MACHINE\SOFTWARE\Classes\Protocols\Handler];+ about Microsoft (R) HTML Viewer Microsoft Corporation c:\windows\system32\mshtml.dll;+ cdl OLE32 Extensions for Win32Microsoft Corporation c:\windows\system32\urlmon.dll;+ dvd ActiveX control for streaming video Microsoft Corporationc:\windows\system32\msvidctl.dll;+ file OLE32 Extensions for Win32Microsoft Corporation c:\windows\system32\urlmon.dll;+ ftp OLE32 Extensions for Win32Microsoft Corporation c:\windows\system32\urlmon.dll;+ gopher OLE32 Extensions for Win32Microsoft Corporation c:\windows\system32\urlmon.dll;+ http OLE32 Extensions for Win32Microsoft Corporation c:\windows\system32\urlmon.dll;+ https OLE32 Extensions for Win32Microsoft Corporation c:\windows\system32\urlmon.dll;+ its Microsoft? InfoTech Storage System Library Microsoft Corporationc:\windows\system32\itss.dll;+ javascript Microsoft (R) HTML Viewer Microsoft Corporationc:\windows\system32\mshtml.dll;+ local OLE32 Extensions for Win32Microsoft Corporation c:\windows\system32\urlmon.dll;+ mailto Microsoft (R) HTML Viewer Microsoft Corporation c:\windows\system32\mshtml.dll;+ mhtml Microsoft Internet Messaging API Microsoft Corporationc:\windows\system32\inetcomm.dll;+ mk OLE32 Extensions for Win32Microsoft Corporation c:\windows\system32\urlmon.dll;+ ms-its Microsoft? InfoTech Storage System Library Microsoft Corporationc:\windows\system32\itss.dll;+ res Microsoft (R) HTML Viewer Microsoft Corporation c:\windows\system32\mshtml.dll;+ sysimage Microsoft (R) HTML Viewer Microsoft Corporation c:\windows\system32\mshtml.dll ;+ tv ActiveX control for streaming video Microsoft Corporationc:\windows\system32\msvidctl.dll;+ vbscript Microsoft (R) HTML Viewer Microsoft Corporation c:\windows\system32\mshtml.dll ;+ wia WIA Scripting Layer Microsoft Corporation c:\windows\system32\wiascr.dll[HKEY_CURRENT_USER\SOFTWARE\Microsoft\Internet Explorer\Desktop\Components];+ 0文件未找到:About:Home[HKEY_LOCAL_MACHINE\SOFTWARE\Microsoft\Active Setup\Installed Components];+ Browser Customizations IEAK branding Microsoft Corporationc:\windows\system32\iedkcs32.dll;+ IE7 Uninstall Stub IE Per User Active Setup Uninstall Utility Microsoft Corporation c:\windows\system32\ieudinit.exe;+ Internet Explorer IE Per-User Initialization Utility Microsoft Corporationc:\windows\system32\ie4uinit.exe;+ Internet Explorer IE Per-User Initialization Utility Microsoft Corporationc:\windows\system32\ie4uinit.exe;+ Microsoft Outlook Express 6Outlook Express Setup Library Microsoft Corporationc:\program files\outlook express\setup50.exe;+ Microsoft Windows Media Player Microsoft Windows Media Player 安装实用程序Microsoft Corporation c:\windows\inf\unregmp2.exe;+ Microsoft Windows Media Player ADVPACK Microsoft Corporationc:\windows\system32\advpack.dll;+ NetMeeting 3.01ADVPACK Microsoft Corporation c:\windows\system32\advpack.dll;+ Outlook Express Windows NT User Data Migration Tool Microsoft Corporationc:\windows\system32\shmgrate.exe;+ Themes Setup Microsoft(C) Register Server Microsoft Corporationc:\windows\system32\regsvr32.exe;+ Windows Messenger 4.7ADVPACK Microsoft Corporation c:\windows\system32\advpack.dll ;+ Windows 桌面更新Microsoft(C) Register Server Microsoft Corporationc:\windows\system32\regsvr32.exe;+ 通讯簿 6Outlook Express Setup Library Microsoft Corporation c:\program files\outlook express\setup50.exe;+ 浏览器自定义组件IEAK branding Microsoft Corporation c:\windows\system32\iedkcs32.dll [HKEY_LOCAL_MACHINE\SOFTWARE\Microsoft\Windows\CurrentVersion\Explorer\SharedTaskSched uler];+ Browseui 预加载程序Shell Browser UI Library Microsoft Corporationc:\windows\system32\browseui.dll;+ 组件类别缓存程序Shell Browser UI Library Microsoft Corporationc:\windows\system32\browseui.dll[HKEY_LOCAL_MACHINE\SOFTWARE\Microsoft\Windows\CurrentVersion\ShellServiceObjectDelayL oad];+ CDBurn Windows Shell Common Dll Microsoft Corporation c:\windows\system32\shell32.dll ;+ PostBootReminder Windows Shell Common Dll Microsoft Corporationc:\windows\system32\shell32.dll;+ SysTray Systray shell service object Microsoft Corporationc:\windows\system32\stobject.dll;+ WebCheck Web Site Monitor Microsoft Corporation c:\windows\system32\webcheck.dll [HKEY_LOCAL_MACHINE\Software\Microsoft\Windows\CurrentVersion\Explorer\ShellExecuteHoo ks];+ shell32.dll Windows Shell Common Dll Microsoft Corporationc:\windows\system32\shell32.dll[HKEY_LOCAL_MACHINE\Software\Microsoft\Windows\CurrentVersion\ShellExtensions\Approved];+ %DESC_PublishDropTarget%Photo Printing Wizard Microsoft Corporationc:\windows\system32\photowiz.dll;+ &Links Internet Explorer Microsoft Corporation c:\windows\system32\ieframe.dll;+ .CAB file viewer Cabinet File Viewer Shell Extension Microsoft Corporationc:\windows\system32\cabview.dll;+ ActiveX Cache Folder Object Control Viewer Microsoft Corporationc:\windows\system32\occache.dll;+ Audio Media Properties Handler Media File Property Extractor Shell Extension Microsoft Corporation c:\windows\system32\shmedia.dll;+ Auto Update Property Sheet Extension Automatic Updates Control Panel Microsoft Corporation c:\windows\system32\wuaucpl.cpl;+ Avi Properties Handler Media File Property Extractor Shell Extension Microsoft Corporation c:\windows\system32\shmedia.dll;+ BandProxy Shell Browser UI Library Microsoft Corporationc:\windows\system32\browseui.dll;+ Cabinet Shell Extension Shell Extension DLL c:\windows\system32\ucabinet.dll;+ CDF Extension Copy Hook Shell Doc Object and Control Library Microsoft Corporation c:\windows\system32\shdocvw.dll;+ Code Download Agent Web Site Monitor Microsoft Corporationc:\windows\system32\webcheck.dll;+ Compatibility Page Compatibility Tab Shell Extension DLL Microsoft Corporationc:\windows\system32\slayerxp.dll;+ Compressed (zipped) Folder Right Drag Handler Compressed (zipped) Folders Microsoft Corporation c:\windows\system32\zipfldr.dll;+ Compressed (zipped) Folder SendTo Target Compressed (zipped) Folders Microsoft Corporation c:\windows\system32\zipfldr.dll;+ ConnectionAgent Web Site Monitor Microsoft Corporationc:\windows\system32\webcheck.dll;+ Crypto PKO Extension Crypto Shell Extensions Microsoft Corporationc:\windows\system32\cryptext.dll;+ Crypto Sign Extension Crypto Shell Extensions Microsoft Corporationc:\windows\system32\cryptext.dll;+ Darwin App Publisher Shell Application Manager Microsoft Corporationc:\windows\system32\appwiz.cpl;+ Desktop Explorer NVIDIA Desktop Explorer, Version 111.19 NVIDIA Corporationc:\windows\system32\nvshell.dll;+ Desktop Explorer Menu NVIDIA Desktop Explorer, Version 111.19 NVIDIA Corporationc:\windows\system32\nvshell.dll;+ DfsShell Distributed File System shell extension Microsoft Corporationc:\windows\system32\dfsshlex.dll;+ Directory Context Menu Verbs Directory Service Common UI Microsoft Corporationc:\windows\system32\dsuiext.dll;+ Directory Object Find Directory Service Find Microsoft Corporationc:\windows\system32\dsquery.dll;+ Directory Property UI Directory Service Common UI Microsoft Corporationc:\windows\system32\dsuiext.dll;+ Directory Query UI Directory Service Find Microsoft Corporationc:\windows\system32\dsquery.dll;+ Directory Start/Search Find Directory Service Find Microsoft Corporationc:\windows\system32\dsquery.dll;+ Disk Copy Extension Windows DiskCopy Microsoft Corporationc:\windows\system32\diskcopy.dll;+ Disk Quota UI Windows Shell Disk Quota UI DLL Microsoft Corporationc:\windows\system32\dskquoui.dll;+ Display Adapter CPL Extension Advanced display adapter properties Microsoft Corporation c:\windows\system32\deskadp.dll;+ Display Monitor CPL Extension Advanced display monitor properties Microsoft Corporation c:\windows\system32\deskmon.dll;+ Display Panning CPL Extension文件未找到:deskpan.dll;+ Display TroubleShoot CPL Extension Advanced display performance properties Microsoft Corporation c:\windows\system32\deskperf.dll;+ DS Security Page Directory Service Security UI Microsoft Corporationc:\windows\system32\dssec.dll;+ Extensions Manager Folder Extensions Manager Microsoft Corporationc:\windows\system32\extmgr.dll;+ Favorites Band Shell Doc Object and Control Library Microsoft Corporationc:\windows\system32\shdocvw.dll;+ FTP Folders Webview Microsoft Internet Explorer FTP Folder Shell Extension Microsoft Corporation c:\windows\system32\msieftp.dll;+ GDI;+ 文件缩略图解压缩程序Windows 图片和传真查看器Microsoft Corporationc:\windows\system32\shimgvw.dll;+ History Internet Explorer Microsoft Corporation c:\windows\system32\ieframe.dll;+ HTML 缩略图的解压缩程序Windows 图片和传真查看器Microsoft Corporationc:\windows\system32\shimgvw.dll;+ HyperTerminal Icon Ext HyperTerminal Applet Library Hilgraeve, Inc.c:\windows\system32\hticons.dll;+ ICC 配置文件Microsoft Color Matching System User Interface DLL Microsoft Corporation c:\windows\system32\icmui.dll;+ ICM 打印机管理Microsoft Color Matching System User Interface DLL Microsoft Corporation c:\windows\system32\icmui.dll;+ ICM 监视器管理Microsoft Color Matching System User Interface DLL Microsoft Corporation c:\windows\system32\icmui.dll;+ ICM 扫描仪管理Microsoft Color Matching System User Interface DLL Microsoft Corporation c:\windows\system32\icmui.dll;+ IE AutoComplete Internet Explorer Microsoft Corporationc:\windows\system32\ieframe.dll;+ IE BandProxy Internet Explorer Microsoft Corporation c:\windows\system32\ieframe.dll ;+ IE Custom MRU AutoCompleted List Internet Explorer Microsoft Corporationc:\windows\system32\ieframe.dll;+ IE Fade Task Internet Explorer Microsoft Corporation c:\windows\system32\ieframe.dll ;+ IE IShellFolderBand Internet Explorer Microsoft Corporationc:\windows\system32\ieframe.dll;+ IE Menu Band Internet Explorer Microsoft Corporation c:\windows\system32\ieframe.dll ;+ IE Menu Desk Bar Internet Explorer Microsoft Corporationc:\windows\system32\ieframe.dll;+ IE Menu Site Internet Explorer Microsoft Corporation c:\windows\system32\ieframe.dll ;+ IE Microsoft BrowserBand Internet Explorer Microsoft Corporationc:\windows\system32\ieframe.dll;+ IE Microsoft History AutoComplete List Internet Explorer Microsoft Corporationc:\windows\system32\ieframe.dll;+ IE Microsoft Multiple AutoComplete List Container Internet Explorer Microsoft Corporation c:\windows\system32\ieframe.dll;+ IE Microsoft Shell Folder AutoComplete List Internet Explorer Microsoft Corporation c:\windows\system32\ieframe.dll;+ IE MRU AutoComplete List Internet Explorer Microsoft Corporationc:\windows\system32\ieframe.dll;+ IE Navigation Bar Internet Explorer Microsoft Corporationc:\windows\system32\ieframe.dll;+ IE Registry Tree Options Utility Internet Explorer Microsoft Corporationc:\windows\system32\ieframe.dll;+ IE RSS Feeder Folder Internet Explorer Microsoft Corporationc:\windows\system32\ieframe.dll;+ IE Search Band Internet Explorer Microsoft Corporation c:\windows\system32\ieframe.dll ;+ IE Shell Band Site Menu Internet Explorer Microsoft Corporationc:\windows\system32\ieframe.dll;+ IE Shell Rebar BandSite Internet Explorer Microsoft Corporationc:\windows\system32\ieframe.dll;+ IE Tracking Shell Menu Internet Explorer Microsoft Corporationc:\windows\system32\ieframe.dll;+ IE User Assist Internet Explorer Microsoft Corporation c:\windows\system32\ieframe.dll ;+ IE4 套件初始屏幕Shell Doc Object and Control Library Microsoft Corporationc:\windows\system32\shdocvw.dll;+ Installed Apps Enumerator Shell Application Manager Microsoft Corporationc:\windows\system32\appwiz.cpl;+ Internet Shell Doc Object and Control Library Microsoft Corporationc:\windows\system32\shdocvw.dll;+ Internet Name Space Internet Explorer Microsoft Corporationc:\windows\system32\ieframe.dll;+ InternetShortcut Internet Explorer Microsoft Corporationc:\windows\system32\ieframe.dll;+ ISFBand OC Shell Doc Object and Control Library Microsoft Corporationc:\windows\system32\shdocvw.dll;+ Microsoft AutoComplete Shell Browser UI Library Microsoft Corporationc:\windows\system32\browseui.dll;+ Microsoft Browser Architecture Shell Doc Object and Control Library Microsoft Corporation c:\windows\system32\shdocvw.dll;+ Microsoft Browser Architecture Internet Explorer Microsoft Corporationc:\windows\system32\ieframe.dll;+ Microsoft BrowserBand Shell Browser UI Library Microsoft Corporationc:\windows\system32\browseui.dll;+ Microsoft DocProp Inplace Calendar Control Microsoft DocProp Shell Ext Microsoft Corporation c:\windows\system32\docprop2.dll;+ Microsoft DocProp Inplace Droplist Combo Control Microsoft DocProp Shell Ext Microsoft Corporation c:\windows\system32\docprop2.dll;+ Microsoft DocProp Inplace Edit Box Control Microsoft DocProp Shell Ext Microsoft Corporation c:\windows\system32\docprop2.dll;+ Microsoft DocProp Inplace ML Edit Box Control Microsoft DocProp Shell Ext Microsoft Corporation c:\windows\system32\docprop2.dll;+ Microsoft DocProp Inplace Time Control Microsoft DocProp Shell Ext Microsoft Corporation c:\windows\system32\docprop2.dll;+ Microsoft DocProp Shell Ext Microsoft DocProp Shell Ext Microsoft Corporationc:\windows\system32\docprop2.dll;+ Microsoft Internet 工具栏Shell Browser UI Library Microsoft Corporationc:\windows\system32\browseui.dll;+ Microsoft Office HTML Icon Handler Microsoft Office 2003 component Microsoft Corporation c:\program files\microsoft office\office11\msohev.dll;+ Microsoft Url History Service Internet Explorer Microsoft Corporationc:\windows\system32\ieframe.dll;+ Microsoft Url Search Hook Internet Explorer Microsoft Corporationc:\windows\system32\ieframe.dll;+ Microsoft 多个自动完成列表容器Shell Browser UI Library Microsoft Corporationc:\windows\system32\browseui.dll;+ Microsoft 历史自动完成列表Shell Browser UI Library Microsoft Corporationc:\windows\system32\browseui.dll;+ Microsoft 数据链接Microsoft Data Access - OLE DB Core Services Microsoft Corporation c:\program files\common files\system\ole db\oledb32.dll;+ Microsoft 外壳文件夹自动完成列表Shell Browser UI Library Microsoft Corporationc:\windows\system32\browseui.dll;+ Midi Properties Handler Media File Property Extractor Shell Extension Microsoft Corporation c:\windows\system32\shmedia.dll;+ MMC Icon Handler MMC Shell Extension DLL Microsoft Corporationc:\windows\system32\mmcshext.dll;+ MRU 自动完成列表Shell Browser UI Library Microsoft Corporationc:\windows\system32\browseui.dll;+ Multimedia File Property Sheet Control Panel Drivers Applet Microsoft Corporationc:\windows\system32\mmsys.cpl;+ MyDocs Copy Hook My Documents Folder UI Microsoft Corporationc:\windows\system32\mydocs.dll;+ MyDocs Drop Target My Documents Folder UI Microsoft Corporationc:\windows\system32\mydocs.dll;+ MyDocs Properties My Documents Folder UI Microsoft Corporationc:\windows\system32\mydocs.dll;+ NTFS Security Page Security Shell Extension Microsoft Corporationc:\windows\system32\rshx32.dll;+ NvCpl DesktopContext Class NVIDIA Display Properties Extension NVIDIA Corporationc:\windows\system32\nvcpl.dll;+ nView Desktop Context Menu NVIDIA Desktop Explorer, Version 111.19 NVIDIA Corporation;+ Offline Files Folder Options Client Side Caching UI Microsoft Corporationc:\windows\system32\cscui.dll;+ Offline Files Menu Client Side Caching UI Microsoft Corporationc:\windows\system32\cscui.dll;+ OLE Docfile Property Page OLE DocFile Property Page Microsoft Corporationc:\windows\system32\docprop.dll;+ Play on my TV helper NVIDIA Display Properties Extension NVIDIA Corporationc:\windows\system32\nvcpl.dll;+ PlusPack CPL Extension Windows Theme API Microsoft Corporationc:\windows\system32\themeui.dll;+ Portable Media Devices便携媒体设备命令行解释器扩展Microsoft Corporationc:\windows\system32\audiodev.dll;+ Portable Media Devices Menu便携媒体设备命令行解释器扩展Microsoft Corporationc:\windows\system32\audiodev.dll;+ PostAgent Web Site Monitor Microsoft Corporation c:\windows\system32\webcheck.dll;+ Printers Security Page Security Shell Extension Microsoft Corporationc:\windows\system32\rshx32.dll;+ Remote Sessions CPL Extension Remote Sessions CPL Extension Microsoft Corporationc:\windows\system32\remotepg.dll;+ Search Assistant OC Shell Doc Object and Control Library Microsoft Corporationc:\windows\system32\shdocvw.dll;+ Sendmail service Send Mail Microsoft Corporation c:\windows\system32\sendmail.dll;+ Sendmail service Send Mail Microsoft Corporation c:\windows\system32\sendmail.dll;+ Set Program Access and Defaults Shell Doc Object and Control Library Microsoft Corporation c:\windows\system32\shdocvw.dll;+ Shell Application Manager Shell Application Manager Microsoft Corporationc:\windows\system32\appwiz.cpl;+ Shell Automation Inproc Service Shell Doc Object and Control Library Microsoft Corporation c:\windows\system32\shdocvw.dll;+ Shell Band Site Menu Shell Browser UI Library Microsoft Corporationc:\windows\system32\browseui.dll;+ Shell DocObject Viewer Internet Explorer Microsoft Corporationc:\windows\system32\ieframe.dll;+ Shell extensions for Microsoft Windows Network objects Network object shell UI Microsoft Corporation c:\windows\system32\ntlanui2.dll;+ Shell extensions for sharing Shell extensions for sharing Microsoft Corporationc:\windows\system32\ntshrui.dll;+ Shell extensions for sharing Shell extensions for sharing Microsoft Corporationc:\windows\system32\ntshrui.dll;+ Shell Image Data Factory Windows 图片和传真查看器Microsoft Corporationc:\windows\system32\shimgvw.dll;+ Shell Image Property Handler Windows 图片和传真查看器Microsoft Corporationc:\windows\system32\shimgvw.dll;+ Shell Image Verbs Windows 图片和传真查看器Microsoft Corporationc:\windows\system32\shimgvw.dll;+ Shell properties for a DS object Directory Service Find Microsoft Corporationc:\windows\system32\dsquery.dll;+ Shell Scrap DataHandler Shell scrap object handler Microsoft Corporation;+ Shell Search Band Shell Browser UI Library Microsoft Corporationc:\windows\system32\browseui.dll;+ Subscription Folder Web Site Monitor Microsoft Corporationc:\windows\system32\webcheck.dll;+ Subscription Mgr Web Site Monitor Microsoft Corporationc:\windows\system32\webcheck.dll;+ Tasks Folder Icon Handler Task Scheduler interface DLL Microsoft Corporationc:\windows\system32\mstask.dll;+ Tasks Folder Shell Extension Task Scheduler interface DLL Microsoft Corporationc:\windows\system32\mstask.dll;+ Temporary Internet Files Internet Explorer Microsoft Corporationc:\windows\system32\ieframe.dll;+ Temporary Internet Files Internet Explorer Microsoft Corporationc:\windows\system32\ieframe.dll;+ The Internet Internet Explorer Microsoft Corporation c:\windows\system32\ieframe.dll ;+ TMD Shell Extension Tmdshell Module Trend Micro Inc.c:\program files\trendmicro\internet security 2007\tmdshell.dll;+ TrayAgent Web Site Monitor Microsoft Corporation c:\windows\system32\webcheck.dll;+ TridentImageExtractor Shell Browser UI Library Microsoft Corporationc:\windows\system32\browseui.dll;+ VBPropSheet VBProp Module Trend Micro Inc.c:\program files\trend micro\internet security 2007\vbprop.dll;+ Video Media Properties Handler Media File Property Extractor Shell Extension Microsoft Corporation c:\windows\system32\shmedia.dll;+ Video Thumbnail Extractor Media File Property Extractor Shell Extension Microsoft Corporation c:\windows\system32\shmedia.dll;+ Wav Properties Handler Media File Property Extractor Shell Extension Microsoft Corporation c:\windows\system32\shmedia.dll;+ Web Folders Microsoft Web Folders Microsoft Corporation c:\program files\commonfiles\microsoft shared\web folders\msonsext.dll;+ Web Printer Shell Extension Print UI DLL Microsoft Corporationc:\windows\system32\printui.dll;+ Web 搜索Shell Browser UI Library Microsoft Corporationc:\windows\system32\browseui.dll;+ WebCheck Web Site Monitor Microsoft Corporation c:\windows\system32\webcheck.dll;+ WebCheck SyncMgr Handler Web Site Monitor Microsoft Corporationc:\windows\system32\webcheck.dll;+ WebCheckChannelAgent Web Site Monitor Microsoft Corporationc:\windows\system32\webcheck.dll;+ WebCheckWebCrawler Web Site Monitor Microsoft Corporationc:\windows\system32\webcheck.dll;+ Windows Media Player Add to Playlist Context Menu Handler Windows Media Player Launcher Microsoft Corporation c:\windows\system32\wmpshell.dll;+ Windows Media Player Burn Audio CD Context Menu Handler Windows Media Player Launcher Microsoft Corporation c:\windows\system32\wmpshell.dll;+ Windows Media Player Play as Playlist Context Menu Handler Windows Media Player Launcher Microsoft Corporation c:\windows\system32\wmpshell.dll;+ Windows Script Host 的 Shell extensions Microsoft (r) Shell Extension for Windows ScriptHost Microsoft Corporation c:\windows\system32\wshext.dll;+ WinRAR shell extension c:\program files\winrar\rarext.dll;+ 帮助和支持Shell Doc Object and Control Library Microsoft Corporationc:\windows\system32\shdocvw.dll;+ 帮助和支持Shell Doc Object and Control Library Microsoft Corporationc:\windows\system32\shdocvw.dll;+ 补充的外壳文件夹Shell Browser UI Library Microsoft Corporationc:\windows\system32\browseui.dll;+ 补充的外壳文件夹 2Shell Browser UI Library Microsoft Corporationc:\windows\system32\browseui.dll;+ 窗格中的搜索Shell Browser UI Library Microsoft Corporationc:\windows\system32\browseui.dll;+ 地址 EditBox Shell Browser UI Library Microsoft Corporationc:\windows\system32\browseui.dll;+ 地址(&A)Shell Browser UI Library Microsoft Corporationc:\windows\system32\browseui.dll;+ 电子邮件Shell Doc Object and Control Library Microsoft Corporationc:\windows\system32\shdocvw.dll;+ 跟踪弹出栏Shell Browser UI Library Microsoft Corporationc:\windows\system32\browseui.dll;+ 公文包Windows Briefcase Microsoft Corporation c:\windows\system32\syncui.dll;+ 管理工具Shell Doc Object and Control Library Microsoft Corporationc:\windows\system32\shdocvw.dll;+ 获取 Passport 向导Map Network Drives/Network Places Wizard Microsoft Corporation c:\windows\system32\netplwiz.dll;+ 可访问的Shell Browser UI Library Microsoft Corporationc:\windows\system32\browseui.dll;+ 全局文件夹设置Shell Browser UI Library Microsoft Corporationc:\windows\system32\browseui.dll;+ 任务计划Task Scheduler interface DLL Microsoft Corporationc:\windows\system32\mstask.dll;+ 任务栏和「开始」菜单Windows Shell Common Dll Microsoft Corporationc:\windows\system32\shell32.dll;+ 扫描仪和照相机Imaging Devices Shell Folder UI Microsoft Corporationc:\windows\system32\wiashext.dll;+ 扫描仪和照相机Imaging Devices Shell Folder UI Microsoft Corporationc:\windows\system32\wiashext.dll;+ 扫描仪和照相机Imaging Devices Shell Folder UI Microsoft Corporationc:\windows\system32\wiashext.dll;+ 扫描仪和照相机Imaging Devices Shell Folder UI Microsoft Corporationc:\windows\system32\wiashext.dll;+ 扫描仪和照相机Imaging Devices Shell Folder UI Microsoft Corporationc:\windows\system32\wiashext.dll;+ 搜索Shell Doc Object and Control Library Microsoft Corporationc:\windows\system32\shdocvw.dll;+ 通过 Web 订购照片Map Network Drives/Network Places Wizard Microsoft Corporationc:\windows\system32\netplwiz.dll;+ 脱机文件夹Client Side Caching UI Microsoft Corporation c:\windows\system32\cscui.dll ;+ 外壳 DeskBar Shell Browser UI Library Microsoft Corporationc:\windows\system32\browseui.dll;+ 外壳 DeskBarApp Shell Browser UI Library Microsoft Corporationc:\windows\system32\browseui.dll;+ 外壳 Rebar BandSite Shell Browser UI Library Microsoft Corporationc:\windows\system32\browseui.dll;+ 外壳出版向导对象Map Network Drives/Network Places Wizard Microsoft Corporationc:\windows\system32\netplwiz.dll;+ 网络出版向导Map Network Drives/Network Places Wizard Microsoft Corporationc:\windows\system32\netplwiz.dll;+ 网络连接Network Connections Shell Microsoft Corporationc:\windows\system32\netshell.dll;+ 网络连接Network Connections Shell Microsoft Corporationc:\windows\system32\netshell.dll;+ 下载状态Shell Browser UI Library Microsoft Corporationc:\windows\system32\browseui.dll;+ 压缩(zipped)文件夹Compressed (zipped) Folders Microsoft Corporationc:\windows\system32\zipfldr.dll;+ 以前的版本Previous Versions property page Microsoft Corporationc:\windows\system32\twext.dll;+ 以前的版本属性页Previous Versions property page Microsoft Corporationc:\windows\system32\twext.dll;+ 用户(&P)...Find People Microsoft Corporation c:\program files\outlookexpress\wabfind.dll;+ 用户帮助Shell Browser UI Library Microsoft Corporationc:\windows\system32\browseui.dll;+ 用户帐户Map Network Drives/Network Places Wizard Microsoft Corporationc:\windows\system32\netplwiz.dll;+ 运行...Shell Doc Object and Control Library Microsoft Corporationc:\windows\system32\shdocvw.dll;+ 摘要信息缩略图处理程序(DOCFILES)Windows 图片和传真查看器Microsoft Corporationc:\windows\system32\shimgvw.dll;+ 注册数目路选项实用程序Shell Browser UI Library Microsoft Corporationc:\windows\system32\browseui.dll;+ 自定义 MRU 自动完成列表Shell Browser UI Library Microsoft Corporationc:\windows\system32\browseui.dll;+ 字体Windows Font Folder Microsoft Corporation c:\windows\system32\fontext.dll;+ 字体Shell Doc Object and Control Library Microsoft Corporationc:\windows\system32\shdocvw.dll;+ 浏览器栏Shell Doc Object and Control Library Microsoft Corporationc:\windows\system32\shdocvw.dll[HKEY_LOCAL_MACHINE\Software\Classes\Folder\Shellex\ColumnHandlers];+ {0D2E74C4-3C34-11d2-A27E-00C04FC30871}Windows Shell Common Dll Microsoft Corporation c:\windows\system32\shell32.dll;+ {24F14F01-7B1C-11d1-838f-0000F80461CF}Windows Shell Common Dll Microsoft Corporation c:\windows\system32\shell32.dll;+ {24F14F02-7B1C-11d1-838f-0000F80461CF}Windows Shell Common Dll Microsoft Corporation c:\windows\system32\shell32.dll;+ {66742402-F9B9-11D1-A202-0000F81FEDEE}Windows Shell Common Dll Microsoft Corporation c:\windows\system32\shell32.dll。
《工程学科英语》期末考试整理【题型说明】第一、二、五部分、以及第四部分的Section A均为选择题。
第一部分:听力测试15’听technology report 【Unit 1-Unit 10】片段,回答问题,大部分片段源自Task 7。
此处内容略第二部分:词汇测试20’Section A Match the definitions with the words 10’12题选自【Unit 1-6】Task 1和【Unit 1-6】单元测试,8题选自学术词汇Section B Choose the best words or phrases to fill in the blanks 10’5题选自【Unit 1, 2, 3, 6】预习任务、【Unit 1-6】Task 2、【Unit 1-4】Task 10,5题选自课外(但词汇出自上述范围)task1 【unit 1—6】(选择配对)1.discipline :a branch of knowledge [ˈdɪsəplɪn] n.学科2.maintain : keep in a certain [meɪnˈteɪn] v.维护;保持;坚持;维修3.extremely :to a high degree or extent [ɪk'striːmli] adv.非常;极其;极端4.apparatus :equipment designed to serve a specific [ˌæpəˈreɪtəs] n. 仪器,器械5.etymology :a history of word. [.etɪ'mɒlədʒi] n.词源学,词源说明6.innate : not establishde by conditioning [ˌiˈneɪt] adj.固有的;内在的;心里的7.circuit :an electrical device that provides a path for electrical ['sɜːkɪt] n.电路,线路8.generator : engine that convers mechanical energy into electrical energy by electromagnetic induction n.发电机9.overlap :a representation of common ground between theories or phenomena n.重叠部分10.permutation : an event in which one thing is substitutde for another[.pɜːmjʊ'teɪʃn] n.(一组事物可能的一种)序列11.downright :out-and-out adv.完全地;彻底地;全然12.relection: a calm lengthy intent considerationn.反映;(关于某课题的)思考;(声、光、热等的)反射13.sophisticated: complex or intricate [sə'fɪstɪ.keɪtɪd] adj. 复杂的;精致的;富有经验的14.verbalize: express in specch ['vɜːbəlaɪz] v. 描述;用言语表现15.property: a basic or essential attribute shared by all members['prɒpəti] n. 特性,属性;财产,地产16.disconnect: disjoin or unfasten n./v. 断开17.fragment: break or cause to break into pieces ['fræɡmənt] v. (使)碎裂,破裂18.inhibit: limit the range or extent of v. 抑制;禁止19.somewhat: to a small degree or extent adv. 稍微;有点20.lug: carry with difficulty v. 用力拖拉21.hooked: addicted to sth adj. 着了迷的22.foster: promote the growth of v. 培养;抚育23.atypical: not representative of a group,class,or type [.eɪ'tɪpɪkl] adj. 非典型的24.spark: put in motion or move to act v. 发动,触动25.ongoing: currently happening adj. 不间断的,进行的26.mentor: serve as a teacher or trusted counselor v. 指导mitment: the act of binding yourself (intellectually or emotionally) to a course of action n.承诺,许诺28.perennial: recurring again and again[pə'reniəl] adj. 终年的,长久的;多年生的,不断生长的;四季不断的29.prerequisite: required as a prior condition or course of study [priː'rekwəzɪt] adj. 必要的30.recruit: register formally as a participant or member [rɪ'kruːt] v. 招聘31.code: ( computer secience) the symbolic arrangement of data or instructions in a computer program or the set of such instructions n. [计]编码32.feature: an article of merchandise that is displayed or advertised more than other articles. ['fiːtʃə(r)] n. 特征(功能),特点33.hamper: prevent the progress or free movement of ['hæmpə(r)] v.妨碍,束缚,限制34.outweigh: be heavier than v. 在重量上超过;比……重要;胜过,强过;比……有价值35.bug: a fault or defect in a system or machinen. [计](制作软件程序所产生的意料不到的)错误36.pinpoint: locate exactly v. 确定,准确地指出;精确定位37.flounder: behave awkwardly; have difficulties v. 挣扎,折腾;着慌,勉强应付38.sane: marked by sound judgment adj. 明智的;稳健的39.highlight: move into the foreground to make more visible or prominent v. 强调,突出40.boost: increase or raise v. 促进,提高;增加41.boom: a state of economic prosprity n. 隆隆声;繁荣;激增42.swell: increase in size, magnitude, number, or procedures v. 增强;肿胀;膨胀43.evince: give expression to v. 表明,标示44.skeptic: someone who habitually doubts accepted beliefs n.怀疑者,怀疑论者45.prominent: conspicuous in position or importance adj. 突出的,杰出的46.slog: walk havily and firmly, as when weary, or through mud v.步履艰难地行走;努力苦干47.sluggish: ( of business ) not active or brisk ['slʌɡɪʃ] adj. 行动迟缓的,反应慢的48.stringent: demanding strict attention to rules and procedures['strɪndʒənt] adj. 严格的;迫切的;(货币)紧缩的49.marketable: fit to be offered for sale adj. 可销售的;市场的;有销路的50.plight: a situation from which extrication is difficult especially an unpleasant or trying onen.境况,困境51.aptitude: inherent ability n.(学习方面的)才能,资质,天资52.mesh: work together in harmony v. (使)吻合;相配,匹配53.evaluate: judge the worth of something v.评价,估价54.position: cause to be in an appropriate place, state, or relation v. 给……定位55.merger: the combination of two or more commercial companies n. (两个公司的)合并56.foundamentals: principles from which other truths can be derivedn. 原理;基本原则,基本法则57.proximity: the property of being close together n. 接近,临近;接近度58.procedure: a particular course of action intended to achieve a result n.程序,手续;工序59.adaptability: the ability to change ( or be changed ) to fit changed circumstances.n.适应性;合用性60.adversity: a state of misfortune or affication n.逆境;不幸;灾难单元测试【unit1—6】【含答案】单元测试一I .Useful expressionsGroup A1一系列的a range of2与相结合in combinationwith3源自,起源于derivefrom4追溯到date back to5指的是refer to6专门经营;专门从事specialize in 7涉及,参与be involved in8在规模上0n a ...scale9被称作,叫做be known as10依照,根据in the light of Group B11儿科学知识scientific knowledge 12实践知识practical knowledge 13应用科学applied science14科学原理scientific principle15操作条件operating condition 16预期功能intended function17机械原理mechanical principle18民用建筑civilian structure19技术学科technical discipline20分支学科sub-discipline21基础设施infrastructure==========================22制造工程manufacturing engineering 23技术产品technological products24客户需求customers' needs25技术手段technical means26标准概念standard notion27因果关系cause-effect relation28结果与手段的关系end-mean relation 29自然法则the laws of nature30道德准则moral rules31跨学科课程interdisciplinarycoursesⅡ.MatchingColumn A Column B(h )1 depict(f )2.biomolecule(j )3.discipline(a )4.obsolete(i )5.overlap(d )6.corrosion(e )7. flaw(b )8.microfabrication (c )9.artefact(g )10. apparatus a) 废弃的;老式的,己过时的b) 微细加工c) 人工制品,人工产物d) 腐蚀,侵蚀,锈蚀e) 瑕疵,缺点f) 生物分子g) 勤仪器,器械h) 描绘,描画i) 重叠部分j) 学科III. Blank Filling1.Engineering is the application of scientific economic , social , practical , and mechanical engineering knowledge in order to invent, design, build, maintain, and improve strctures, machines, devices, systems, materials and processes.2.Engineering is often characterized as having four main branches: chemical engineering ,civil engineering , electrical engineering , and mechanical engineering .3.The principal task of engineering is simply to take into account the customers' needs and to find the appropriate technical means to accommodate these needs.4.Technology is applied science, i.e. it is the transfonnation of nomological cause-effect relations into end-mean relations5.Applied science is regarded as an _automatic or determined process, Which is merely regulated by the laws of nature .IV. Reading Comprehension551. Nuclear physics has given us encouraging glimpses into infinitesimal structures of matter. Progress is being made in studying the mysteries of the living cell. Scientists are learning how to manipulate molecular particles to produce new drugs, materials, and plastics. The tremendous energy of the sun is being brought within our reach. There is scarcely a source of physical power that is not within the ultimate possibility of C .A ) our imaginationB ) our own destructionC ) human controlD ) space exploration552. The shorter a pendulum is, the faster it swings. Most pendulum clocks have a setscrew by which one may adjust the length of the pendulum when the clock is not keeping accurate time. If the clock is running too fast, the pendulum is swing too fast and it should be C .A ) shortenedB ) stoppedC ) lengthenedD ) replaced553. Power plants that generate electricity by means of atomic energy are in operation in several countries. Scientists hope to solve many of the problems in the use of atomic energy, and many scientists now believe that atomic energy will be the most important source of electric power A A ) in the future B ) when it is tried C ) in the laboratory D ) in the army554. There are a number of nuclear power plants now built or under construction by the government and by investor-owned power companies. Although most of the electricity used in the worid is generated in steam or hydroelectric power plants, nuclear plants will help to meet increasing demands for D .A) electrical appliances B) safe investment C ) weapons research D ) electric power555. Since buildings with steel or ferroconcrete frames can move up and down as one body, they receive little damage from an earthquake. Similarly, the ancient Greeks built their comparatively light temples on massive platforms of masonry set on swampy ground During an earthquake, the platform rocked as a whole, and the temple B .A)was damaged B) stayed C) sank in the swamp D) was destroyedV. Translation1 The discipline of engineering is extremely broad, and encompasses a range of more spescialized fields of engineering, each with a more specific emphasis on particular areas of applied science, technology and types of application.程学科内容广泛,可细分为一系列更加专业的工程领域,每个专业领域都专注于某项科学或技术的具体应用。
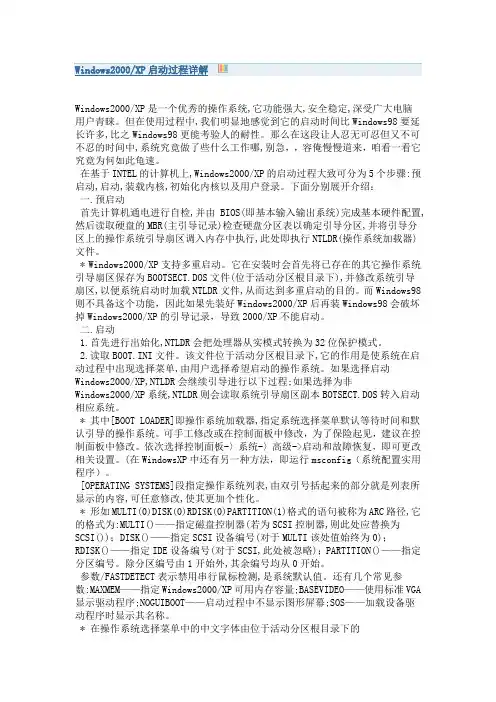
Windows2000/XP启动过程详解Windows2000/XP是一个优秀的操作系统,它功能强大,安全稳定,深受广大电脑用户青睐。
但在使用过程中,我们明显地感觉到它的启动时间比Windows98要延长许多,比之Windows98更能考验人的耐性。
那么在这段让人忍无可忍但又不可不忍的时间中,系统究竟做了些什么工作哪,别急,,容俺慢慢道来,咱看一看它究竟为何如此龟速。
在基于INTEL的计算机上,Windows2000/XP的启动过程大致可分为5个步骤:预启动,启动,装载内核,初始化内核以及用户登录。
下面分别展开介绍:一.预启动首先计算机通电进行自检,并由BIOS(即基本输入输出系统)完成基本硬件配置,然后读取硬盘的MBR(主引导记录)检查硬盘分区表以确定引导分区,并将引导分区上的操作系统引导扇区调入内存中执行,此处即执行NTLDR(操作系统加载器)文件。
* Windows2000/XP支持多重启动。
它在安装时会首先将已存在的其它操作系统引导扇区保存为BOOTSECT.DOS文件(位于活动分区根目录下),并修改系统引导扇区,以便系统启动时加载NTLDR文件,从而达到多重启动的目的。
而Windows98则不具备这个功能,因此如果先装好Windows2000/XP后再装Windows98会破坏掉Windows2000/XP的引导记录,导致2000/XP不能启动。
二.启动1.首先进行出始化,NTLDR会把处理器从实模式转换为32位保护模式。
2.读取BOOT.INI文件。
该文件位于活动分区根目录下,它的作用是使系统在启动过程中出现选择菜单,由用户选择希望启动的操作系统。
如果选择启动Windows2000/XP,NTLDR会继续引导进行以下过程;如果选择为非Windows2000/XP系统,NTLDR则会读取系统引导扇区副本BOTSECT.DOS转入启动相应系统。
* 其中[BOOT LOADER]即操作系统加载器,指定系统选择菜单默认等待时间和默认引导的操作系统。

计算机英语词汇计算机英语词汇大全英语单词的产生是汉英两种语言双向交流的产物,一些带有中国特色的名称和概念进入了英语词汇,同时还有一些英语词汇进入了汉语,在文化环境中衍生出新的含义,形成了英语词汇的语义文化特征。
以下是店铺帮大家整理的计算机英语词汇大全,欢迎阅读与收藏。
计算机英语词汇1alu(arithmetic logic unit,算术逻辑单元)agu(address generation units,地址产成单元)bga(ball grid array,球状矩阵排列)bht(branch prediction table,分支预测表)bpu(branch processing unit,分支处理单元)brach pediction(分支预测)cmos: complementary metal oxide semiconductor,互补金属氧化物半导体cisc(complex instruction set computing,复杂指令集计算机)clk(clock cycle,时钟周期)cob(cache on board,板上集成缓存)cod(cache on die,芯片内集成缓存)cpga(ceramic pin grid array,陶瓷针型栅格阵列)cpu(center processing unit,中央处理器)data forwarding(数据前送)decode(指令解码)dib(dual independent bus,双独立总线)ec(embedded controller,嵌入式控制器)embedded chips(嵌入式)epic(explicitly parallel instruction code,并行指令代码)fadd(floationg point addition,浮点加)fcpga(flip chip pin grid array,反转芯片针脚栅格阵列)fdiv(floationg point divide,浮点除)femms:fast entry/exit multimedia state,快速进入/退出多媒体状态fft(fast fourier transform,快速热欧姆转换)fid(fid:frequency identify,频率鉴别号码)fifo(first input first output,先入先出队列)flip-chip(芯片反转)flop(floating point operations per second,浮点操作/秒)fmul(floationg point multiplication,浮点乘)fpu(float point unit,浮点运算单元)fsub(floationg point subtraction,浮点减)gvpp(generic visual perception processor,常规视觉处理器) hl-pbga: 表面黏著,高耐热、轻薄型塑胶球状矩阵封装ia(intel architecture,英特尔架构)icu(instruction control unit,指令控制单元)id:identify,鉴别号码idf(intel developer forum,英特尔开发者论坛)ieu(integer execution units,整数执行单元)imm: intel mobile module,英特尔移动模块instructions cache,指令缓存instruction coloring(指令分类)ipc(instructions per clock cycle,指令/时钟周期)isa(instruction set architecture,指令集架构)kni(katmai new instructions,katmai新指令集,即sse)latency(潜伏期)ldt(lightning data transport,闪电数据传输总线)local interconnect(局域互连)mesi(modified,exclusive,shared,invalid:修改、排除、共享、废弃)mmx(multimedia extensions,多媒体扩展指令集)mmu(multimedia unit,多媒体单元)mflops(million floationg point/second,每秒百万个浮点操作) mhz(million hertz,兆赫兹)mp(multi-processing,多重处理器架构)mps(multiprocessor specification,多重处理器规范)msrs(model-specific registers,特别模块寄存器)naoc(no-account overclock,无效超频)ni:non-intel,非英特尔olga(organic land grid array,基板栅格阵列)ooo(out of order,乱序执行)pga: pin-grid array(引脚网格阵列),耗电大post-riscpr(performance rate,性能比率)psn(processor serial numbers,处理器序列号)pib(processor in a box,盒装处理器)ppga(plastic pin grid array,塑胶针状矩阵封装)pqfp(plastic quad flat package,塑料方块平面封装)raw(read after write,写后读)register contention(抢占寄存器)register pressure(寄存器不足)register renaming(寄存器重命名)remark(芯片频率重标识)resource contention(资源冲突)retirement(指令引退)risc(reduced instruction set computing,精简指令集计算机) sec: single edge connector,单边连接器shallow-trench isolation(浅槽隔离)simd(single instruction multiple data,单指令多数据流)sio2f(fluorided silicon oxide,二氧氟化硅)smi(system management interrupt,系统管理中断)smm(system management mode,系统管理模式)smp(symmetric multi-processing,对称式多重处理架构)soi: silicon-on-insulator,绝缘体硅片sonc(system on a chip,系统集成芯片)spec(system performance evaluation corporation,系统性能评估测试)sqrt(square root calculations,平方根计算)sse(streaming simd extensions,单一指令多数据流扩展)superscalar(超标量体系结构)tcp: tape carrier package(薄膜封装),发热小throughput(吞吐量)tlb(translate look side buffers,翻译旁视缓冲器)uswc(uncacheabled speculative write combination,无缓冲随机联合写操作)valu(vector arithmetic logic unit,向量算术逻辑单元)vliw(very long instruction word,超长指令字)vpu(vector permutate unit,向量排列单元)vpu(vector processing units,向量处理单元,即处理mmx、sse等simd指令的地方)adimm(advanced dual in-line memory modules,高级双重内嵌式内存模块)amr(audio/modem riser;音效/调制解调器主机板附加直立插卡) aha(accelerated hub architecture,加速中心架构)。
UNIT 1Artificial intelligence:人工智能Paper-tape reader:纸袋阅读机Optical computer:光学计算机Neural network:神经网络Instruction set:指令集Parallel processing:并行处理Difference engine:差分机Versatile logical element:通用逻辑器件Silicon substrate:硅基Vacuum tube:真空管The storage and handing of data:数据的存储与处理Very large-scale integrated circuit:超大规模集成电路Central processing unit:中央处理器Personal computer:个人计算机Analogue computer:模拟计算机Digital computer:数字计算机General-purpose computer:通用计算机Processor chip:处理器芯片Operating instruction:操作指令Input device:输入设备artificial neural network 人工神经网络computer architecture 计算机体系结构robust computer program 健壮的计算机程序human-computer interface 人机界面knowledge representation 知识表示numerical analysis 数值分析programming environment 程序设计环境data structure 数据结构information storage and retrieval 存储和检索信息virtual reality 虚拟现实Web page 网页touch screen 触摸屏blade server 刀片服务器removable storage device 可移动存储设备sound card 声卡storage server 存储服务器portable media player 便携式媒体播放器hard disk 硬盘UNIT 2function key 功能键voice recognition module 语言识别模块touch-sensitive region 触感区,触摸区address bus 地址总线flatbed scanner 平板扫描仪dot-matrix printer 点阵打印机parallel connection 并行连接cathode ray tube 阴极射线管video game 电子游戏audio signal 音频信号liquid crystal display 液晶显示(器)inkjet printer 喷墨打印机data bus 数据总线serial connection 串行连接laser printer 激光打印机volatile memory 易失性存储器disk drive 磁盘驱动器BIOS(Basic Input Output System ) 基本输入/ 输出系统video display 视频显示器interrupt handle 中断处理程序virtual memory 虚拟内存context switch 上下文切换main memory 主存bit pattern 位模式Peripheral device 外围设备Process table 进程表time slice 时间片graphical user interface 图形用户界面bulk storage 海量存储器code generator 编码发生器abstract machine 抽象机program editor 程序编辑器configuration item 配置项CAD Computer Aided Design 计算机辅助设计redundant date 数据冗余command and control system 指挥与控制系统video compression and decompression 视频压缩与解压缩UNIT 3storage register 存储寄存器function statement 函数语句program statement 程序语句object-oriented language 面向对象语言assembly language 汇编语言intermediate language 中间语言relational language 关系语言artificial language 人工语言data declaration 数据声明Structured Query Language 结构化查询语言executable program 可执行程序program module 程序模块conditional statement 条件语句assignment statement 赋值语句logic language 逻辑语言machine language 机器语言Functional language 函数式语言Programming language 程序设计语言run a computer program 运行计算机程序computer programmer 计算机程序员native code 本机代码header file 页眉文件multithreaded program 多线程程序Java-enabled browser Java的浏览器malicious code 恶意代码machine code 机器码assembler code 汇编码Trojan horse 特洛伊木马程序software package 软件包class hierarchy 类层次design pattern 设计模式reusable software 可复用软件object-oriented system 面向对象的系统software bug 软件错误real time 实时inheritance hierarchy 继承层次Unit 4inference engine 推理机system call 系统调用compiled language 编译语言parallel computing 并行计算pattern matching 模式匹配memory location 内存单元interpreter program 解释程序library routine 库程序intermediate program 中间程序source file 源文件interpreted language 解释执行的语言device driver 设备驱动程序source program 源程序debugging program 调试程序object code 目标代码application program 应用程序utility program 实用程序logic program 逻辑程序ink cartridge 墨盒program storage and execution 程序的存储与执行check box 复选框structured design 结构化设计building block 构建模块database schema 数据库模式radio button 单选钮system modeling technique 系统建模技术model-driven development 模型驱动开发data flow diagram 数据流程图drop-down menu 下拉式菜单scroll bar 滚动条procedure call 过程调用fault tolerance 容错homogeneous system 同构系统autonomous agent 自主主体routing algorithm 路由算法heterogeneous environment 异构型环境multicast protocol 多址通信协议communication link 通信链路Unit 5system specification 系统说明书unit testing 单元测试software life cycle 软件生命期system validation testing 系统验证性测试evolutionary development process 锦化发展过程linear model 简单线程模型program unit 程序单元throwaway prototype 抛弃型原型text formatting 文本格式system evolution 系统演变System Design Examples 系统设计范例Requirements Analysis and Definition 需求分析与定义Exploratory Programming Methodology 探索式编程方法System documentation 系统文件编制waterfall model 瀑布模型System Integration 系统集成commercial off-the-shell software 商用现成软件components based software engineering 基于组件的软件工程software maintenance tool 软件维护工具software reuse 软件复用black box testing 黑盒测试acceptance testing 验收测试code execution path 代码执行路径test harness 测试工具,测试框架equivalence partitioning 等价划分capture / playback tools 捕获/回放工具video resolution 视频分辨率white box testing 白盒测试test script 测试脚本use case 用例procedural language 过程化语言common design structure 通用设计结构class and object interaction 类与对象交互design constraint 设计约束UNIT 6end user 终端用户atomic operation 原子操作database administrator 数据库管理员relational database model 关系数据库模型local data 本地数据object-oriented database 面向对象数据库database management system 数据库管理系统entity-relationship model 实体关系模型distributed database 分布式数据库flat file 平面文件two-dimensional table 二维表data attribute 数据属性storge device 存储设备database object 数据库对象data type 数据类型data insert and delete 数据插入与删除hierarchical database model 层次数据库模型database architecture 数据库体系结构relational database management system 关系数据库管理系统global control bus 关系控制总线nonvolatile storage system 非易失性的存储系统equipment malfunction 设备故障wound-wait protocol 受伤等待协议exclusive lock 独占锁database integrity 数据库完整性shared lock 共享锁database implementation 数据库实现cascading rollback 级联回滚data item 数据项time sharing operating system 分时操作系统data set 数据集data warehouse 数据仓库Web community 网络社区sensor network 传感器网络、感知网data mining 数据挖掘social network 社交网络。
EXPRESSCLUSTER X for WindowsQuick Start Guide for Windows Server Container(SQL Server Express)Version 1Mar 23, 2017DisclaimerThe contents of this document are subject to change without notice. NEC Corporation assumes no responsibility for technical or editorial mistakes in or omissions from this document. To obtain the benefits of the product, it is the customer’s responsibility to install and use the product in accordance with this document. The copyright for the contents of this document belongs to NEC Corporation. Copying, altering, or translating this document, in full or in part, without the permission of NEC Corporation, is prohibited.Trademark InformationInformation in this document is subject to change without notice. No part of this document may be reproduced or transmitted in any form or by any means, electronic or mechanical, for any purpose, without the express written permission of NEC Corporation.Microsoft® and Windows® are registered trademarks of Microsoft Corporation. Other system names, company names, and product names are trademarks and registered trademarks of their respective companies.Contents1About This Guide (5)1.1Using This Guide (5)1.2Revision History (5)1.3Evaluation Environment (5)1.4For More Information (5)2Overview (7)3System Requirements and Planning (8)3.1System Requirements (8)3.2System Planning (8)4Windows Server Container Setup (10)4.1Setup Container and Docker (Primary Server) (10)4.2Setup Container and Docker (Secondary Server) (11)5EXPRESSCLUSTER X Installation (12)5.1Install EXPRESSCLUSTER X (Primary Server) (12)5.2Install EXPRESSCLUSTER X (Secondary Server) (13)5.3Confirm Connectivity Between Servers (13)6Base Cluster Setup (14)6.1Start WebManager (14)6.2Create Cluster (14)6.3Setup Network Configuration (14)6.4Create Failover Group (14)6.5Create Mirror Disk Resource (15)6.6Upload the Cluster Configuration and Start Cluster (15)7SQL Server Express Setup (17)7.1Configure SQL Server Express (Primary Server) (17)7.2Configure SQL Server Express (Secondary Server) (19)7.3Confirm Connectivity from the Client (21)8SQL Server Express Cluster Setup (23)8.1Add the Script Resource to Control Container (23)8.2Add SQL Server Monitor Resource (23)8.3Upload the Cluster Configuration (24)9Verify Functionality (26)9.1Move the Failover Group (26)9.2Failover on Server Shutdown (26)10Appendix (27)10.1System Planning Worksheet (27)1 About This Guide1.1 Using This GuideThis guide provides a hands-on “Quick Start” set of instructions to createSQL Server Express container cluster with EXPRESSCLUSTER X forWindows on Windows Server Container. The guide assumes users haveMicrosoft Windows system administration knowledge and skills withexperience in installation and configuration of Microsoft Windows operatingsystems, networks, and Windows Server Container.1.2 Revision History1.3 Evaluation EnvironmentThis clustering method has been evaluated with the following OS andsoftware.●Windows Server 2016 Datacenter (Desktop Experience)●SQL Server 2016 Express●EXPRESSCLUSTER X 3.3 for Windows (internal version: 11.33)1.4 For More InformationThe following guides are available for instant support.●Getting Started Guide– This guide explains general cluster conceptsand overview of EXPRESSCLUSTER functionality.●Installation and Configuration Guide– This guide explainsEXPRESSCLUSTER X installation and configuration procedures indetail.●Reference Guide– This is a reference of commands that can be put inEXPRESSCLUSTER X scripts and maintenance commands that canbe executed from the server command prompt.The above stated guides can also be found at/en/global/prod/expresscluster/en/support/manuals.html .2 Overview● The container OS image and the container are saved on the system drive of the primary and the secondary servers.● EXPRESSCLUSTER is installed on the container host.● SQL Server Express is installed on the container.● Database files are saved on a partition controlled by mirror disk resource . ● SQL Server Express container is controlled by script resource .● Client machines use the static IP address of SQL Server Express container to access to the database.Client Windows Server 2016 (Container Host)SQL Server Express Container EXPRESSCLUSTER Start/stop containerusing script resource Mirror Disk Database files are saved onmirror diskWindows Server 2016 (Container Host) EXPRESSCLUSTERSQL Server ExpressContainerMirror DiskReplication Primary Server Secondary Server ClientStatic IP Address3 System Requirements and Planning3.1 System Requirements●Windows Server ContainerRefer to Microsoft website.https:///en-us/virtualization/windowscontainers/quick-start/quick-start-windows-server●EXPRESSCLUSTERRefer to EXPRESSCLUSTER X Getting Started Guide.3.2 System PlanningHere are sample parameters for a cluster. In section 10.1, there is SystemPlanning Worksheet. Fill out all tables to create a cluster.Machine #1: Primary Server (Container Host)Machine #2: Secondary Server (Container Host)Machine #3: SQL Server Express ContainerMachine #4: Test Client Machine4 Windows Server Container Setup4.1 Setup Container and Docker (Primary Server)1. Install Windows updates to ensure that your Windows Server system isup-to-date.2. If a proxy server is used to access to the internet, it is necessary to setHTTP_PROXY as environment variables.3. Install the OneGet PowerShell module.4. Install the latest version of Docker.5. Restart the primary server.6. Create a transparent network.Note:If the primary and/or secondary servers are virtual machines running onHyper-V, run the following command on Hyper-V host to enable MACaddress spoofing. Replace ContainerHostVM below with the virtualmachine name.7. After network configuration is changed, IP address will be removed.Assign static IP address again.8. Download the latest Windows Server Core container image.4.2 Setup Container and Docker (Secondary Server)Follow the steps in section 4.1 on the secondary server.5 EXPRESSCLUSTER X Installation5.1 Install EXPRESSCLUSTER X (Primary Server)1. Insert the EXPRESSCLUSTER X CD-ROM into a CD-ROM drive on theprimary server (container host).2. In the pop-up window, click NEC EXPRESSCLUSTER for Windows.3. Click on NEC EXPRESSCLUSTER X 3.x for Windows.4. In the Welcome window, click Next.5. In the Choose Destination Location window, click Next.6. In the next window, click Install.7. In the Port Number window, if necessary, modify the default portnumbers. Click Next.8. In the Filter Settings of Shared Disk window, click Next.9. Click Yes in the Confirmation window to skip shared disk filtering.10. In the License Manager window, click Register.11. In the License Registration window, click Register with LicenseInformation.12. In the Product Selection window, select the OS and Product/Trialtypes. For Product Name, click EXPRESSCLUSTER X 3.x forWindows. Click Next.13. In the License Unit Selection window, depending on the type oflicense, enter the number of CPU or Node Units. Click Next.14. In the License Key Entry window, enter the Serial No. and LicenseKey. Click Next.15. In the License Registration Confirmation window, confirm theinformation entered is correct. Click Next.16. Click OK. If the license registration fails, start again from step 10.17. Repeat steps 10 - 16 again for the EXPRESSCLUSTER X Replicator3.x for Windows product license. Select EXPRESSCLUSTER XReplicator 3.x for Windows as the Product Name in step 12.18. If a Database Agent license was purchased for monitoring SQL ServerExpress inside the container, install it using the above instructions.19. When the licenses have been successfully registered, click Finish.20. On the InstallShield Wizard Complete window, click the No, I willrestart my computer later option button, and then click Finish.21. In the next window, click Exit. Click Exit. (Two times total).22. Restart the primary server.5.2 Install EXPRESSCLUSTER X (Secondary Server)Perform all of the steps in section 5.1 on the secondary server.5.3 Confirm Connectivity Between ServersPing the servers in the cluster to confirm that there are no issues inconnectivity. Also be sure that all ports used by EXPRESSCLUSTER are able to communicate through the Windows Firewall.6 Base Cluster Setup6.1 Start WebManagerConfirm that Java Runtime Environment (JRE) is installed on a machine tobe used for cluster management. See the installation requirements sectionof the EXPRESSCLUSTER X Getting Started Guide for a compatibleversion. For this guide, use the primary server for cluster management.Install JRE if necessary. Then start by accessing port 29003 of the primaryserver from the web browser of the cluster management machine, using theprimary server’s IP address (e.g. http://192.168.1.11:29003). When thesecurity warning window displays, select the Always trust content fromthis publisher check box. Click Run.6.2 Create Cluster1. When WebManager is opened for the first time, there is a pop-upwindow with two options. Click Start cluster generation wizard.2. In the confirmation window, click Start Cluster Generation Wizard forstandard edition.3. In the new window, type a Cluster Name (e.g. cluster-mssql), and clickNext.4. In the next window, to add another server to the cluster, click Add.5. Type the Server Name or the IP Address of the secondary server, andthen click OK.6. Both servers are now on the list. If the primary server is not in the top(Master Server) position, then move it up. Click Next.6.3 Setup Network Configuration1. EXPRESSCLUSTER X automatically detects the IP addresses of theservers. The primary network is for heartbeat and data mirroring; set theMDC on this row as mdc1. The secondary network is for heartbeat only.Click Next.2. In the NP Resolution window, click Next.6.4 Create Failover Group1. To add a group, in the Cluster Generation Wizard, in the Groupsection, click Add.2. In the next window, select failover for group Type. Name the group(e.g. failover-mssql), click Next, and then click Next. (Two times total).3. Select the default options for the Group Attribute Settings, and thenclick Next.6.5 Create Mirror Disk Resource1. In the Group Resource section of the Cluster Generation Wizard, toadd a resource, click Add.2. Click Get License Info to retrieve the active license.3. To add a mirror disk resource, from the Type drop down menu, selectmirror disk resource, and then click Next.4. Confirm the Follow the default dependency box is selected, and thenclick Next.5. Confirm the default options are correct, and then click Next.6. Select the primary server name and click Add.7. Click Connect to populate the server partitions.8. Select the drive letter of the data partition for mirroring (e.g. X:) in theData Partition box, and the drive letter of the cluster partition (e.g. W:)in the Cluster Partition box. Click OK.Warning:Specify different partitions for data partition and cluster partition. If thesame partition is specified, data on the mirror disk may be corrupted.9. Repeat steps 6 – 8 for the secondary server.10. Click Finish.11. Click Finish, and then click Next.12. Click Finish.13. Click Yes to enable recovery action when an error occurs in a monitorresource.6.6 Upload the Cluster Configuration and Start Cluster1. In WebManager window, click the File menu and then Apply theConfiguration File. Click OK. Click OK. (Two times total).2. After the upload is complete, change from Config Mode to OperationMode.3. Restart Cluster Manager. Click the Service menu, and then clickRestart Manager. Click OK.4. Click the Service menu, and then click Start Cluster. Click OK.5. When the cluster tree displays after a few seconds, in the left pane ofWebManager window, expand the %failover group% section, rightclick %mirror disk%, and click Details to monitor the disksynchronization progress. Mirror disk copy starts automatically,replicating data from the primary server to the secondary server.Note:This step may take a while depending on the size of the data on the mirror disk partition.6. After the copy completes, in the Mirror Disk Helper window, clickClose.7. In the Cluster Manager window, all icons in the tree view should now begreen.8. Confirm that the cluster is functioning.- Move the %failover group% to the secondary server.- Move the %failover group% back to the primary server.Note:These tests do not affect server functionality. They confirm that themirror disks on each server in the cluster are functioning properly. The mirror disk is now controlled by EXPRESSCLUSTER X and is onlyaccessible from the active server.7 SQL Server Express Setup7.1 Configure SQL Server Express (Primary Server)1. Login to the primary server with an Administrator account.2. Confirm that the failover group is running on the primary server.3. Open the TCP and UDP firewall port for SQL Server Express if thefirewall is on.4. Create a directory on the mirror disk (e.g. X:¥mssql).5. Create a container (e.g. mssql).6. Stop the SQL Server Express service on the container.7. Copy master mdf and log files from default path to C:¥mydata (mappedto X:¥mssql on the mirror disk).8. Change startup parameters of SQL Server Express.9. Confirm that the startup parameters have changed.10. Start the SQL Server Express service on the container.11. Check if SQL Server Express instance is running.12. Connect to SQL Server Express. Enter the password when prompted.13. Create a database for monitoring (e.g. testdb).14. Check if the database for monitoring is existing.15. Quit the connection.16. Stop the SQL Server Express container.17. Move the failover group from the primary server to the secondaryserver.7.2 Configure SQL Server Express (Secondary Server)1. Login to the secondary server with an Administrator account.2. Confirm that the failover group is running on the secondary server.3. Open the TCP and UDP firewall port for SQL Server Express if thefirewall is on.4. Create a container (e.g. mssql).5. Stop the SQL Server Express service on the container.6. Change startup parameters of SQL Server Express.7. Confirm that the startup parameters have changed.8.Start the SQL Server Express service on the container.10. Connect to SQL Server Express. Enter the password when prompted.11. Check if the database for monitoring is existing.12. Quit the connection.7.3 Confirm Connectivity from the Client1. Download Microsoft ODBC Driver 13 for SQL Server and MicrosoftCommand Line Utilities 13 for SQL Serverfrom Microsoft SQLServer 2016 Feature Pack.2. Run msodbcsql.msi to install Microsoft ODBC Driver 13 for SQL Server on the client machine.3. Run MsSqlCmdLnUtils.msi to install Microsoft Command Line Utilities 13 for SQL Server on the client machine.4. Connect to SQL Server Express. Enter the password when prompted.5. Check if the database for monitoring is existing.6. Quit the connection.7. Move the failover group back from the secondary server to the primaryserver.8. Follow the steps 4 - 6 to check the connectivity.9. Stop the container on the primary server before next section.C:¥> docker stop mssql8 SQL Server Express Cluster Setup8.1 Add the Script Resource to Control Container1. Download the script files for SQL Server Express container clusteringfrom the NEC web site:/en/global/prod/expresscluster/en/support/Setup.html2. Start WebManager and change to Config Mode.3. Right-click on the %failover group%, and then click Add Resource.4. From the Type drop down menu, select script resource. As theresource Name, enter script-mssql. Click Next.5. Confirm the default dependency (Follow the default dependency boxis checked), and then click Next.6. Confirm the default options are correct, and then click Next.7. Select start.bat in the left pane and click the Replace button.8. Navigate to the scripts that were downloaded, open the script-mssqlfolder, select the new start.bat file, and click Open.9. Click Yes to replace.10. Select start.bat and click Edit.11. Locate the line which starts docker start <container name>.12. Edit the container name and save changes if necessary. Close the file.13. Select stop.bat in the left pane and click the Replace button.14. Navigate to the scripts that were downloaded, open the script-mssqlfolder, select the new stop.bat file, and click Open.15. Click Yes to replace.16. Select stop.bat and click Edit.17. Locate the line which starts docker stop <container name>.18. Edit the container name and save changes if necessary. Close the file.19. Click the Tuning button.20. Enter 0 for Normal Return Value for the start and stop sections. ClickOK.21. Click Finish.8.2 Add SQL Server Monitor Resource1. Right-click on the Monitors, and then click Add Monitor Resource.2. Click Get License Info to retrieve the active license.3. From the Type drop down menu, select SQL Server monitor. ClickNext.4. In the Monitor Resource Definition window, click the Browse buttonto select the Target Resource.5. Select the recently configured script resource (e.g. script-mssql) andclick OK.6. Change the Wait Time to Start Monitoring number from 0 to 5. Thiswill give the container more time to mount before monitoring begins.This may need to be adjusted later if necessary. Click Next.7. In the next windows, choose Level 2 (monitoring by update/select)for Monitor Level.8. Enter the name of an existing database which can be used formonitoring in the Database Name field (e.g. testdb).9. The Instance Name is the <IP address of container (e.g.192.168.2.21)>¥SQLEXPRESS.10. Enter sa for the User Name.11. Click Change and enter the password.12. For the ODBC Driver Name, enter SQL Server. Click Next.13. Click the Browse button to select the script resource (e.g. script-mssql) for Recovery Target and click OK.14. Click Finish.8.3 Upload the Cluster Configuration1. Click the File menu, and then Apply the Configuration File. Click OKon the confirmation message popup. If the changes are appliedsuccessfully, click OK.2. After the upload is complete, change to the Operation Mode.3. Right-click on the %failover_group% and select Start. Select theprimary server to start the group on and click OK.4. Confirm that all icons of group resources and monitor resources aregreen.5. Confirm that SQL Server Express container is running.6. Confirm that SQL Server Express is running on the container.9 Verify Functionality9.1 Move the Failover Group1. Using WebManager, move the %failover_group% from the primaryserver to the secondary server and confirm the following.- The client can access to the database.- The container on the primary server should be in a stopped state.- The container on the secondary server should be started.2. Using WebManager, move the %failover_group% back to the primaryserver and confirm the following.- The client can access to the database.- The container on the primary server should be started.- The container on the secondary server should be in a stoppedstate.9.2 Failover on Server Shutdown1. Restart the primary server and confirm the following.- The client can access to the database.- The container on the secondary server should be started.2. After the primary server comes back to the cluster, restart thesecondary server and confirm the following.- The client can access to the database.- The container on the primary server should be started.10 Appendix10.1 System Planning WorksheetMachine #1: Primary Server (Container Host)Machine #2: Secondary Server (Container Host)Machine #3: SQL Server Epxress ContainerMachine #4: Test Client Machine。
redisearch windows 编译-概述说明以及解释1.引言文章1.1 概述:Redisearch是一个开源的基于Redis的全文搜索引擎,它能够快速地处理和搜索大量的结构化和非结构化数据。
Redisearch提供了丰富的搜索功能,如全文搜索、模糊搜索、排序和聚合等,可以轻松地满足各种搜索需求。
本篇文章旨在介绍如何在Windows操作系统上编译Redisearch,以便读者能够在自己的开发环境中快速搭建和使用Redisearch。
在正式介绍编译步骤之前,我们会先准备好Windows编译环境,确保编译的顺利进行。
通过本文的学习,读者将了解Redisearch的基本原理和功能,了解在Windows上编译Redisearch的必要环境和步骤,并能够应用所学知识进行相应的实践和项目开发。
通过对Redisearch在Windows上的编译的研究和探讨,我们可以更好地发掘Redisearch在Windows环境下的潜力和应用前景。
这对于那些使用Windows系统进行开发的用户来说将是一个重要的突破,为他们提供更多灵活和高效的搜索解决方案。
在我们结束之前,本文还将对Redisearch在Windows上的编译进行总结,并展望它的应用前景和意义。
希望读者通过本文的学习,能够对Redisearch在Windows环境下的编译有一个深入的理解,并能够将其应用到自己的实际项目中。
通过深入探索和应用Redisearch在Windows上的编译,我们相信其将为各类项目提供更好的搜索功能和性能,为用户提供更好的搜索体验,从而推动整个搜索技术的发展和创新。
1.2文章结构文章结构部分主要介绍了本文的组织和结构安排。
本文将按照以下内容来组织文章:第一部分是引言部分,包括概述、文章结构和目的三个小节。
在概述中,将简要介绍Redisearch和Windows编译的背景和概念。
在文章结构中,将详细说明本文的章节和内容安排。
在目的中,将明确本文的编写目的和期望的读者群体。


注册表命令大全1. gpedit.msc-----组策略2. sndrec32-------录音机3. Nslookup-------IP地址侦测器4. explorer-------打开资源管理器5. logoff---------注销命令6. tsshutdn-------60秒倒计时关机命令7. lusrmgr.msc----本机用户和组8. services.msc---本地服务设置9. oobe/msoobe /a----检查XP是否激活10. notepad--------打开记事本A11. cleanmgr-------垃圾整理12. net start messenger----开始信使服务13. compmgmt.msc---计算机管理14. net stop messenger-----停止信使服务15. conf-----------启动netmeeting16. dvdplay--------DVD播放器17. charmap--------启动字符映射表18. diskmgmt.msc---磁盘管理实用程序19. calc-----------启动计算器20. dfrg.msc-------磁盘碎片整理程序21. chkdsk.exe-----Chkdsk磁盘检查22. devmgmt.msc--- 设备管理器23. regsvr32 /u *.dll----停止dll文件运行24. drwtsn32------ 系统医生25. rononce -p ----15秒关机26. dxdiag---------检查DirectX信息27. regedt32-------注册表编辑器28. Msconfig.exe---系统配置实用程序29. rsop.msc-------组策略结果集30. mem.exe--------显示内存使用情况31. regedit.exe----注册表32. winchat--------XP自带局域网聊天33. progman--------程序管理器34. winmsd---------系统信息35. perfmon.msc----计算机性能监测程序36. winver---------检查Windows版本37. sfc /scannow-----扫描错误并复原38. taskmgr-----任务管理器(2000/xp/200339. winver---------检查Windows版本40. wmimgmt.msc----打开windows管理体系结构(WMI)41. wupdmgr--------windows更新程序42. wscript--------windows脚本宿主设置43. write----------写字板44. winmsd---------系统信息45. wiaacmgr-------扫描仪和照相机向导46. winchat--------XP自带局域网聊天47. mem.exe--------显示内存使用情况48. Msconfig.exe---系统配置实用程序49. mplayer2-------简易widnows media player50. mspaint--------画图板51. mstsc----------远程桌面连接52. mplayer2-------媒体播放机53. magnify--------放大镜实用程序54. mmc------------打开控制台55. mobsync--------同步命令56. dxdiag---------检查DirectX信息57. drwtsn32------ 系统医生58. devmgmt.msc--- 设备管理器59. dfrg.msc-------磁盘碎片整理程序60. diskmgmt.msc---磁盘管理实用程序61. dcomcnfg-------打开系统组件服务62. ddeshare-------打开DDE共享设置63. dvdplay--------DVD播放器64. net stop messenger-----停止信使服务65. net start messenger----开始信使服务66. notepad--------打开记事本67. nslookup-------网络管理的工具向导68. ntbackup-------系统备份和还原69. narrator-------屏幕“讲述人”70. ntmsmgr.msc----移动存储管理器71. ntmsoprq.msc---移动存储管理员操作请求72. netstat -an----(TC)命令检查接口73. syncapp--------创建一个公文包74. sysedit--------系统配置编辑器75. sigverif-------文件签名验证程序76. sndrec32-------录音机77. shrpubw--------创建共享文件夹78. secpol.msc-----本地安全策略79. syskey---------系统加密,一旦加密就不能解开,保护windows xp系统的双重密码80. services.msc---本地服务设置81. Sndvol32-------音量控制程序82. sfc.exe--------系统文件检查器83. sfc /scannow---windows文件保护84. tsshutdn-------60秒倒计时关机命令85. tourstart------xp简介(安装完成后出现的漫游xp程序)86. taskmgr--------任务管理器87. eventvwr-------事件查看器88. eudcedit-------造字程序89. explorer-------打开资源管理器90. packager-------对象包装程序91. perfmon.msc----计算机性能监测程序92. progman--------程序管理器93. regedit.exe----注册表94. rsop.msc-------组策略结果集95. regedt32-------注册表编辑器96. rononce -p ----15秒关机97. regsvr32 /u *.dll----停止dll文件运行98. regsvr32 /u zipfldr.dll------取消ZIP支持99. cmd.exe--------CMD命令提示符100. chkdsk.exe-----Chkdsk磁盘检查101. certmgr.msc----证书管理实用程序102. calc-----------启动计算器103. charmap--------启动字符映射表104. cliconfg-------SQL SERVER 客户端网络实用程序105. Clipbrd--------剪贴板查看器106. conf-----------启动netmeeting107. compmgmt.msc---计算机管理108. cleanmgr-------垃圾整理109. ciadv.msc------索引服务程序110. osk------------打开屏幕键盘111. odbcad32-------ODBC数据源管理器112. oobe/msoobe /a----检查XP是否激活113. lusrmgr.msc----本机用户和组114. logoff---------注销命令115. iexpress-------木马捆绑工具,系统自带116. Nslookup-------IP地址侦测器117. fsmgmt.msc-----共享文件夹管理器118. utilman--------辅助工具管理器------------------------------------------------------------------------------------------ 1、隐藏回收站隐藏回收站,是指不会显示在桌面及资源管理器里,隐藏并不等于停止这个功能,如使用登录文件更改者请先汇出有关登录文件作备份,登录文件更改(适用于Windows XP家用及商业版本):在[开始]-->[运行]-->键入[Regedit]-->[HKEY_LOCAL_MACHINE]-->[SOFTWARE]-->[Microsoft]-->[Windows]-->[CurrentVersion]-->[Explorer]-->[Desktop]-->[NameSpace],将[{645FF040-5081-101B-9F08-00AA002F954E}]删除便可重新登录后生效。
数据存储SharePreferences详解1.SharedPreferences存储SharedPreferences时使⽤键值对的⽅式来存储数据的,也就是在保存⼀条数据时,需要给这条数据提供⼀个对应的键,这样在读取的时候就可以通过这个键把相应的值取出来SharePreferences是⼀个接⼝,不能直接使⽤,但可以通过以下两种⽅法获得:1.1.1Context类的getSharePreferences(String name ,ine mode)⽅法来获得⼀个SharePreferences对象:此⽅法接收两个参数,第⼀个参数⽤于指定SharedPreference⽂件的名称,即存储XML⽂件的名称,如果存在,则会直接引⽤,如果指定的⽂件不存在则会创建⼀个,SharedPreference⽂件都是存放在/data/data/<包名>/shared_prefs/存储的XML⽂件⽬录下,第⼆个参数表⽰⽂件的存储模式(该⽅式创建的XML⽂件可以被同⼀个软件的Activity引⽤)。
⽂件的⼏种存储模式:MODE_PRIVATE:表⽰私有⽂佳,该⽂件智能被创建他的⽂件所访问MODE_APPEND:表⽰新的存储内容会添加在原有⽂件内容的后⾯。
MODE_WORLD_READABLE:表⽰该⽂件能被所有的⽂件读取,但是不可以写⼊。
MODE_WORLD_WEITABLE:表⽰该⽂件能被所有的⽂件写⼊,也可以读取MODE_MULTI_PROCESS:表⽰改⽂件可以被多个进程同时访问,适⽤于Android2.3及之后的版本。
1.1.2:调⽤Activity对象的getPreferences(int mode)⽅法该⽅法有⼀个参数,表⽰⽂件的存储模式,具体模式童第轶中相同,这种⽅法获得的对象只能被该⽅法所在的Activity所调⽤1.2还要创建⼀个SharePreferences.Editor类的对象,该类负责具体的写⼊操作,创建⽅法使通过SharePreferences类的edit()⽅法来创建。
Windows操作系统运行命令大全1. gpedit.msc-----组策略2. sndrec32-------录音机3. Nslookup-------IP地址侦测器4. explorer-------打开资源管理器5. logoff---------注销命令6. tsshutdn-------60秒倒计时关机命令7. lusrmgr.msc----本机用户和组8. services.msc---本地服务设置9. oobe/msoobe /a----检查XP是否激活10. notepad--------打开记事本A11. cleanmgr-------垃圾整理12. net start messenger----开始信使服务13. compmgmt.msc---计算机管理14. net stop messenger-----停止信使服务15. conf-----------启动netmeeting16. dvdplay--------DVD播放器17. charmap--------启动字符映射表18. diskmgmt.msc---磁盘管理实用程序19. calc-----------启动计算器20. dfrg.msc-------磁盘碎片整理程序21. chkdsk.exe-----Chkdsk磁盘检查22. devmgmt.msc--- 设备管理器23. regsvr32 /u *.dll----停止dll文件运行24. drwtsn32------ 系统医生25. rononce -p ----15秒关机26. dxdiag---------检查DirectX信息27. regedt32-------注册表编辑器28. Msconfig.exe---系统配置实用程序29. rsop.msc-------组策略结果集30. mem.exe--------显示内存使用情况31. regedit.exe----注册表32. winchat--------XP自带局域网聊天33. progman--------程序管理器34. winmsd---------系统信息35. perfmon.msc----计算机性能监测程序36. winver---------检查Windows版本37. sfc /scannow-----扫描错误并复原38. taskmgr-----任务管理器(2000/xp/200339. winver---------检查Windows版本40. wmimgmt.msc----打开windows管理体系结构(WMI)41. wupdmgr--------windows更新程序42. wscript--------windows脚本宿主设置43. write----------写字板44. winmsd---------系统信息45. wiaacmgr-------扫描仪和照相机向导46. winchat--------XP自带局域网聊天47. mem.exe--------显示内存使用情况48. Msconfig.exe---系统配置实用程序49. mplayer2-------简易widnows media player50. mspaint--------画图板51. mstsc----------远程桌面连接52. mplayer2-------媒体播放机53. magnify--------放大镜实用程序54. mmc------------打开控制台55. mobsync--------同步命令56. dxdiag---------检查DirectX信息57. drwtsn32------ 系统医生58. devmgmt.msc--- 设备管理器59. dfrg.msc-------磁盘碎片整理程序60. diskmgmt.msc---磁盘管理实用程序61. dcomcnfg-------打开系统组件服务62. ddeshare-------打开DDE共享设置63. dvdplay--------DVD播放器64. net stop messenger-----停止信使服务65. net start messenger----开始信使服务66. notepad--------打开记事本67. nslookup-------网络管理的工具向导68. ntbackup-------系统备份和还原69. narrator-------屏幕“讲述人”70. ntmsmgr.msc----移动存储管理器71. ntmsoprq.msc---移动存储管理员操作请求72. netstat -an----(TC)命令检查接口73. syncapp--------创建一个公文包74. sysedit--------系统配置编辑器75. sigverif-------文件签名验证程序76. sndrec32-------录音机77. shrpubw--------创建共享文件夹78. secpol.msc-----本地安全策略79. syskey---------系统加密,一旦加密就不能解开,保护windows xp系统的双重密码80. services.msc---本地服务设置81. Sndvol32-------音量控制程序82. sfc.exe--------系统文件检查器83. sfc /scannow---windows文件保护84. tsshutdn-------60秒倒计时关机命令85. tourstart------xp简介(安装完成后出现的漫游xp程序)86. taskmgr--------任务管理器87. eventvwr-------事件查看器88. eudcedit-------造字程序89. explorer-------打开资源管理器90. packager-------对象包装程序91. perfmon.msc----计算机性能监测程序92. progman--------程序管理器93. regedit.exe----注册表94. rsop.msc-------组策略结果集95. regedt32-------注册表编辑器96. rononce -p ----15秒关机97. regsvr32 /u *.dll----停止dll文件运行98. regsvr32 /u zipfldr.dll------取消ZIP支持99. cmd.exe--------CMD命令提示符100. chkdsk.exe-----Chkdsk磁盘检查101. certmgr.msc----证书管理实用程序102. calc-----------启动计算器103. charmap--------启动字符映射表104. cliconfg-------SQL SERVER 客户端网络实用程序105. Clipbrd--------剪贴板查看器106. conf-----------启动netmeeting107. compmgmt.msc---计算机管理108. cleanmgr-------垃圾整理109. ciadv.msc------索引服务程序110. osk------------打开屏幕键盘111. odbcad32-------ODBC数据源管理器112. oobe/msoobe /a----检查XP是否激活113. lusrmgr.msc----本机用户和组114. logoff---------注销命令115. iexpress-------木马捆绑工具,系统自带116. Nslookup-------IP地址侦测器117. fsmgmt.msc-----共享文件夹管理器118. utilman--------辅助工具管理器1、隐藏回收站隐藏回收站,是指不会显示在桌面及资源管理器里,隐藏并不等于停止这个功能,如使用登录文件更改者请先汇出有关登录文件作备份,登录文件更改(适用于Windows XP家用及商业版本):在[开始]-->[运行]-->键入[Regedit]-->[HKEY_LOCAL_MACHINE]-->[SOFTWARE]-->[Microsoft]-->[Windows]-->[CurrentVersio n]-->[Explorer]-->[Desktop]-->[NameSpace],将[{645FF040-5081-101B-9F08-00AA002F954E}]删除便可重新登录后生效。
怎样处理WIN7系统WINDOWSTIME无法启动篇一:win7系统无法启动Windows Time服务的原因分析以及应对方法windows time服务无法开机自动启动首先要考虑自身是否有用第三方软件对系统进行过优化清理操作,如果是设置第三方软件。
否按照以下操作进行调试。
将以下服务的启动类型更改为自动:1. 同时按住Windows键+R键输入services.msc,按回车键;2. 找到以下服务:Windows Time、Remote Procedure Call (RPC)、Remote Procedure Call (RPC) Locator;3. 双击它们,将服务类型设置为启动,服务状态改为自动后重启计算机确认。
然后执行下面方法:1.单击开始--运行中输入后回车:C:\Windows\system32\svchost.exe -k LocalService2.开始、在文件和程序搜索框中输入cmd,用右键点命令提示符,以管理员身份运行),在DOS提示符下输入:w32tm/register 回车,会提示:W32Time 成功注册3、然后到服务中去启动windows time。
如果无法问题依旧,请尝试修复系统文件:4、开始--在文件和程序搜索框中输入cmd,用右键点命令提示符以管理员身份运行),在DOS提示符下输入:sfc/scannow,按回车键。
以上就是关于“win7系统中的windows time服务无法启动怎么办?”的回答,希望对大家有一定帮助。
篇二:如何解决Win7 64位系统下windowstime服务无法启动导致时间无法同步Windowstime系统服务是保持网络上所有基于windows操作系统计算机上的日期和时间同步,对于没有加入域的计算机,可以配置 Windows Time以使时间与外部时间源同步,不过在某些情况下如果使用了优化工具盒清理助手或者中毒就会造成windowstime无法启动,就会导致本地计算机的时间设置将不能与 Windows 域中的时间服务或外部配置的时间服务同步,要怎么办呢?下面win7之家为大家带来Win7 64位系统下windowstime服务无法启动的具体解决步骤吧。
RT O S -S C I O P T AT e c h n i c a l I n f o r m a t i o n13.03.19RTOS-SCIOPTARTOS Debugger for SCIOPTA■Real time, non-intrusive display of Sciopta system resources■Sciopta specific display of analyzer listing■Statistic evaluation and graphic display of task run times■Task related evaluation of function run times ■Task stack coverage ■Task context display■PRACTICE functions for OS data ■Sciopta related pull-down menuThe TRACE32 System includes a configurable RTOSdebugger to provide symbolic debugging in real time oper-ating systems. Our software package contains a ready-to-run configuration for the Sciopta Real Time Kernel from Sciopta Systems AG.In close cooperation with Sciopta we built a special RTOS support for Sciopta. This leaflet will guide you through the additional implemented features in TRACE32, to do an effective debugging on Sciopta systems.ARMPowerPCRTOS Debugging in TRACE32 with ScioptaReal Time, Non-Intrusive Display of Sciopta System ResourcesThe TRACE32 RTOS debugger for Sci-opta provides display functions to show internal information. The systemresources modules, processes, pools and queues can be displayed. If the tar-get allows memory reads while run-ning, the display of all these regions can be viewed non-intrusively in real time. The tables are updated perma-nently (“On The Fly”), without affecting the application at all.Process Related BreakpointsAny breakpoint set in the TRACE32 debugger can be set dependent to a specific process. This means, that the breakpoint will then only halt, if hit bythe specified process. This allows pro-cess related debugging even in sharedcode.Module list, process list and pool displayBreakpoint list window with process specific breakpointsProcess Context DisplayThe TRACE32 RTOS debugger pro-vides an easy way to switch the current displayed context to another process. Normally all register related windows (e.g. listing at current PC, local vari-ables of function call stack) are dis-played related to the actual context (i.e. current executed process). Y ou can switch to the context of another pro-cess to see all this information at the time this process was scheduled.Process Stack CoverageIn real time systems it is quite impor-tant to know, how much stack space each process consumes. For this pur-pose a special window shows the cur-rent and the maximum usage of eachseparate process.Function call hierarchy of a specific processProcess stack coverage windowDynamic Process Performance MeasurementWhile Sciopta is running, TRACE32 is capable of recurrently evaluating the current running process and collecting the results. The percentage, each pro-cess consumes of the system, is thendisplayed graphically and updated per-manently. The longer time you let the measurement run, the more exact are the results. This feature is available even without any hardware trace.Sciopta Specific Display of Trace ListingThe data recorded in the real time trace buffer (if available) can be displayed and interpreted specific to the operat-ing system. The process switches aredisplayed symbolically, either exclu-sively or in addition to other informa-tion.Statistic Evaluation and Graphic Display of Process Run TimesOut of the real time trace buffer (if avail-able), the analyzer can calculate statis-tic tables of process run times and process switches. A graphical diagramshows which process was active at a specific time, giving a clear view of thebehavior of the system.Performance measurement listStatistics and flow of processesProcess Related Evaluation of Function Run TimesThe statistic and graphic evaluation of function calls and function run times (if available) can be done dependant to the actual running process. This is nec-essary, if different processes call one single function at the same time, or if a process switch occurs in between the function.PRACTICE Functions for OS DataThe support includes extended PRAC-TICE functions for OS specific data. E.g. the function “task.config(sciopta)”returns the address of the Sciopta base structure.Sciopta Related Pull-Down MenuBecause the menu bar of theTRACE32 user interface can be fully customized, you can create a new pull down menu, including operating sys-tem specific commands. We deliverSciopta support with an example for such specific menues, which provides fast and easy access to the Sciota spe-cific features.TRACE32 with source window and opened Sciopta specific displaysContactInternational RepresentativeArgentinaAnacom Eletronica Ltda.Mr. Rafael SoriceRua Nazareth, 807, BarcelonaBR-09551-200 São Caetano do Sul, SP Phone: +55 11 3422 4200FAX: +55 11 3422 4242EMAIL:******************.br AustraliaEmbedded Logic Solutions P/LMr. Ramzi KattanSuite 2, Level 3144 Marsden StreetParramatta NSW 2150Phone: +61 2 9687 1880FAX: +61 2 9687 1881EMAIL:*****************.au AustriaLauterbach GmbHAltlaufstr. 40D-85635 Höhenkirchen-Siegertsbrunn Phone: +49 8102 9876 190FAX: +49 8102 9876 187EMAIL:******************** BelgiumTritec Benelux B.V.Mr. Robbert de VoogtStationspark 550NL-3364 DA SliedrechtPhone: +31 184 41 41 31FAX: +31 184 42 36 11EMAIL:******************BrazilAnacom Eletronica Ltda.Mr. Rafael SoriceRua Nazareth, 807, BarcelonaBR-09551-200 São Caetano do Sul, SP Phone: +55 11 3422 4200FAX: +55 11 3422 4242EMAIL:******************.br CanadaLauterbach Inc.Mr. Udo Zoettler4 Mount Royal Ave.USA-Marlborough, MA 01752 Phone: +1 508 303 6812FAX: +1 508 303 6813EMAIL:********************** China BeijingLauterbach Technologies Co., LtdMr. Linglin HeBeijing OfficeA3,South Lishi Road, XiCheng District Beijing 100037, P.R. ChinaPhone: +86 10 68023502FAX: +86 10 68023523EMAIL:************************* China ShenzhenLauterbach Technologies Co., Ltd1406/E Xihaimingzhu BuildingNo.1 Taoyuan Road, Nanshan District Shenzhen 518052, P.R. China Phone: +86 755 8621 0671FAX: +86 755 8621 0675EMAIL:**************************China SuzhouLauterbach Technologies Co., Ltd Mr. Linglin HeHengyu Square, Rm 709No. 188, Xing Hai StreetSuzhou, 215021 P.R. of China Phone: +86 512 6265 8030FAX: +86 512 6265 8032EMAIL:********************** Czech. RepublicLauterbach GmbHAltlaufstr. 40D-85635 Höhenkirchen-Siegertsbrunn Phone: +49 8102 9876 130FAX: +49 8102 9876 187EMAIL:******************** DenmarkNohau Danmark A/SMr. Flemming JensenHørkær 26, Plan 4DK-2730 HerlevPhone: +45 44 52 16 50FAX: +45 44 52 26 55EMAIL:*************EgyptLauterbach GmbHAltlaufstr. 40D-85635 Höhenkirchen-Siegertsbrunn Phone: +49 8102 9876 130FAX: +49 8102 9876 187EMAIL:******************** FinlandNohau Solutions FinlandMr. Martti ViljainenTekniikantie 14FI-02150 EspooPhone: +358 40 546 0142FAX: +358 9 2517 8101EMAIL:**************FranceLauterbach S.A.R.L.Mr. Jean-Pierre ParadisoEuroparc - Le Hameau B135 Chemin Des BassinsF-94035 Créteil CedexPhone: +33 1 49 56 20 30FAX: +33 1 49 56 20 39EMAIL:********************** GermanyLauterbach GmbHSales Team GermanyAltlaufstr. 40D-85635 Höhenkirchen-Siegertsbrunn Phone: +49 8102 9876 190FAX: +49 8102 9876 187EMAIL:******************** GreeceLauterbach GmbHAltlaufstr. 40D-85635 Höhenkirchen-Siegertsbrunn Phone: +49 8102 9876 190FAX: +49 8102 9876 187EMAIL:******************** HungaryLauterbach GmbHAltlaufstr. 40D-85635 Höhenkirchen-Siegertsbrunn Phone: +49 8102 9876 190FAX: +49 8102 9876 187EMAIL:********************India-BangaloreElectro Systems Associates Pvt. Ltd. Mr. G. V. GurunathamS-606, World Trade CenterMalleswaram West, No.26/1, Dr. Rajkumar RoadIndia - Bangalore 560055Phone: +91 80 67648888FAX: +91 80 23475615EMAIL:************************* India-ChennaiElectro Systems Associates Pvt. Ltd. Mr. D. KannanNo.109 /59A , Ground FloorIV Avenue, Ashok NagarIndia - Chennai - 600 083 Tamilnadu Phone: +91 044-24715750FAX: ++91 44 24715750EMAIL:********************India-DelhiElectro Systems Associates Pvt. Ltd. Mr. R.K. BhandariNo. 705, 7th Floor, Laxmi Deep ShivajinagarIndia - Delhi - 110 092Phone: +91 11-22549351FAX:EMAIL:******************India-HyderabadElectro Systems Associates Pvt. Ltd. Mr. C.V.M. Sri Ram MurthyShop No. 14, "Global Enclave" Bhagyanagar Colony, Kukat pallyIndia - Hyderabad 500 072Phone: +91 40-23063346FAX: +91 40-23063346EMAIL:**********************India-KolkataElectro Systems Associates Pvt. Ltd. Mr. Arun RoyIndia - KolkataPhone: +91 98305 78843FAX:EMAIL:********************India-PuneElectro Systems Associates Pvt. Ltd. Mr. R K BhandariShriram Complex,1126/1, Model Colony ShivajinagarIndia - Pune - 411 016Phone: +91 20 - 30462035 / 25663FAX: +91 20-25677202EMAIL:*****************IrelandLauterbach Ltd.Mr. Richard Copeman11 Basepoint Enterprise Centre Stroudley RoadBasingstoke, Hants RG24 8UPPhone: 0044-118 328 3334FAX:EMAIL:**********************IsraelItec Ltd.Mr. Mauri GottliebP.O.Box 10002IL-Tel Aviv 61100Phone: +972 3 6491202FAX: +972 3 6497661EMAIL:***************.ilItalyLauterbach SrlMr. Maurizio MenegottoVia Enzo Ferrieri 12I-20153 MilanoPhone: +39 02 45490282FAX: +39 02 45490428EMAIL:**********************JapanLauterbach Japan, Ltd.Mr. Kenji Furukawa3-8-8 ShinyokohamaKouhoku-ku, Nisso 16th BuildingY okohama-shi, Japan 222-0033 Phone: +81 45 477 4511FAX: +81 45 477 4519EMAIL:******************.jp LuxembourgTritec Benelux B.V.Mr. Robbert de VoogtStationspark 550NL-3364 DA SliedrechtPhone: +31 184 41 41 31FAX: +31 184 42 36 11EMAIL:****************** MalaysiaFlash TechnologyMr. Teo Kian HockNo 61, # 04-15 Kaki Bukit Av 1Shun Li Industrial ParkSGP-Singapore 417943Phone: +65 6749 6168FAX: +65 6749 6138EMAIL:*******************.sg MexicoLauterbach Inc.Mr. Udo Zoettler4 Mount Royal Ave.USA-Marlborough, MA 01752 Phone: +1 508 303 6812FAX: +1 508 303 6813EMAIL:********************** NetherlandsTritec Benelux B.V.Mr. Robbert de VoogtStationspark 550NL-3364 DA SliedrechtPhone: +31 184 41 41 31FAX: +31 184 42 36 11EMAIL:******************New ZealandEmbedded Logic Solutions P/LMr. Ramzi KattanSuite 2, Level 3144 Marsden StreetParramatta NSW 2150Phone: +61 2 9687 1880FAX: +61 2 9687 1881EMAIL:*****************.au NorwayNohau Solutions ABMr. Jörgen NilssonDerbyvägen 6DSE-21235 MalmoePhone: +46 40 592 206FAX: +46-40 592 229EMAIL:*********************** PolandQUANTUM Sp. z o.o.Mr. Aleksander Bilul. Jeleniogorska 654-056 WroclawPhone: +48 71 362 6356FAX: +48 71 362 6357EMAIL:****************.pl PortugalCaptura Electronica,SCCLMr. Juan Martinezc/Duero, 40E-08031 BarcelonaPhone: +34 93 429 5730FAX: +34 93 407 0778EMAIL:******************* RomaniaLauterbach GmbHAltlaufstr. 40D-85635 Höhenkirchen-Siegertsbrunn Phone: +49 8102 9876 130FAX: +49 8102 9876 187EMAIL:********************RussiaRTSoftMr. Alexey IsaevNikitinskaya 3RUS-105037 MoscowPhone: +7 495 742 6828FAX: +7 495 742 6829EMAIL:****************.ruSingaporeFlash TechnologyMr. Teo Kian HockNo 61, # 04-15 Kaki Bukit Av 1Shun Li Industrial ParkSGP-Singapore 417943Phone: +65 6749 6168FAX: +65 6749 6138EMAIL:*******************.sgSouth Korea, PangyoHancom MDS Inc.Mr. Dongwook Jun3FL. Hancom Tower49, Daewangpangyo-ro 644, Bundang-gu Seongnam-si, Gyeonggi-do, 463-400, ROK Phone: +82-31-627-3000FAX: +82-31-627-3100EMAIL:*********************SpainCaptura Electronica,SCCLMr. Juan Martinezc/Duero, 40E-08031 BarcelonaPhone: +34 93 429 5730FAX: +34 93 407 0778EMAIL:*******************SwedenNohau Solutions ABMr. Jörgen NilssonDerbyvägen 6DSE-21235 MalmoePhone: +46 40 592 206FAX: +46 40 592 229EMAIL:*********************** SwitzerlandJDT Jberg DatenTechnikMr. Andreas JbergZimmereistrasse 2CH-5734 Reinach AGPhone: +41 62 7710 886FAX:EMAIL:********************TaiwanSuperlink Technology Corp.Mr. Sulin Huang3F-8,No.77,Sec.1,Xintaiwu Rd.,Xizhi District, New Taipei City 22101, Taiwan, R.O.C. Phone: +886 2 26983456FAX: +886 2 26983535EMAIL:**********************.tw TunisiaLauterbach Consulting S.A.R.L.Mr. Khaled JmalRoute El Ain Km 3.5TN-3062 SfaxPhone: +216-31361061FAX: +216-74611723EMAIL:********************** Turkey-1Tektronik Muh. ve Tic. A.S.Mr. Hakan Y avuzCyberPlaza B-Blok, 702BBilkent06800 AnkaraPhone: +90 312 437 3000FAX: +90 312 437 1616EMAIL:******************.tr Turkey-2G3TEK Embedded Technologies Ltd. Mr. Celal AygunIlkyerlesim Mah. 445.Sok. No: 4806370 Batikent/AnkaraPhone: +90 312 3324769FAX: +90 312 3324769EMAIL:**************UKLauterbach GmbHMr. Richard CopemanAltlaufstr. 40D-85635 Höhenkirchen-Siegertsbrunn Phone: +49 8102 9876 190FAX: +49 8102 9876 187EMAIL:******************** USA EastLauterbach Inc.Mr. Udo Zoettler4 Mount Royal Ave.USA-Marlborough, MA 01752 Phone: +1 508 303 6812FAX: +1 508 303 6813EMAIL:********************** USA WestLauterbach Inc.Mr. Bob Kupyn1111 Main Street, Suite 620USA-Vancouver, WA. 98660 Phone: +1 503 524 2222FAX: +1 503 524 2223EMAIL:************************Additional InformationLauterbach GmbHAltlaufstr. 40D-85635 Höhenkirchen-SiegertsbrunnTel. ++49 8102 9876-0 FAX -999*******************uterbach.deLauterbach Inc.4 Mount Royal Ave.Marlboro MA 01752Phone (508) 303 6812 FAX (508) 303 6813 ********************** Lauterbach Ltd.11 Basepoint Enterprise Ctre Stroudley Road Basingstoke, Hants RG24 8UPPhone ++44-1256-333-690 FAX -661**********************http:/Lauterbach S.A.R.L.135 Chemin Des BassinsF-94035 Créteil CedexPhone ++33-149-562-030FAX ++33-149-562-039**********************http:/uterbach.fr Lauterbach Japan, Ltd.3-9-5 Shinyokohama Kouhoku-kuY okohama-shi Japan 222-0033Phone ++81-45-477-4511 FAX -4519*********************uterbach.co.jp Lauterbach s.r.l.Lauterbach s.r.l.Via Enzo Ferrieri 12I-20153 MilanoPhone ++39 02 45490282FAX ++39 02 45490428*********************uterbach.itSuzhou Lauterbach Consulting Co.,Ltd.Room 1605, Xing Hai International Square No.200, Xing Hai StreetSuzhou, 215021 PR of ChinaPhone: 0086-512 6265 8030FAX: 0086-512 6265 8032*********************DisclaimerThe information presented is intended to give overview information only.Changes and technical enhancements or modifications can be made with-out notice.。
Shared Register WindowsCS701Final ProjectDouglas Thain15December1999AbstractI propose a form of interprocedural register allocation,called windowsharing,for architectures with register windows.This allocation can beperformed on an entire program at link time.Window sharing improvesexecution time by up to twenty percent on some benchmarks and hurtsexecution time by up to four percent on others.1IntroductionRegister windows are designed to provide a very fast procedure call mechanism with no memory access.Window changes are indeed fast so long as the number of physical windows is not exhausted.A large penalty is paid when an entire window must be moved to or from memory.If a procedure makes use of all the registers available,this penalty is no worse than the cost of saving and restoring on a conventional machine.However,very few procedures make full use of all the registers available on a modern RISC machine and will pay an excessive cost when moving an entire window.There are several existing remedies for this situation.Most compiler opti-mizations,such as procedure inlining,increase register use.The cost of saving and restoring a window remains the same no matter how many registers are used.If a procedure can be improved to the point where all registers in the window are used,then maximal use has been made of the inevitable memory traffic.Examples of this are the SPARC leaf procedure and tail-call conven-tions.A leaf procedure makes no calls of its own,so if it is content to work with the eight o-registers,it can compute without changing the window.Likewise, a tail-call can put a restore in the delay slot of a call so that the callee will find the return address of the caller’s parent when it attempts a ret.There are also some obstacles to these techniques.High-level programs are often written with an eye towards intangibles such as modularity or elegance, and it may not even be possible to make a trivial procedure make use of sixteen registers.The practice of separate compilation limits the information available to the compiler.A single module may be optimized to a reasonable number of register windows,but may turn out to have inefficiencies at its interface with1other modules.The leaf procedure and tail-call conventions can only be applied to a limited number of procedures.A more general mechanism for sharing register windows is possible.A pro-cedure may elect not to allocate a register window and simply use the registers left unused by its ancestors.A leaf-procedure has a similar intention,but cannot make further calls because the o-registers are occupied.If the o-registers are moved elsewhere,nested calls are possible.In this paper,I propose window sharing,a system for making efficient use of register windows.Section2describes how SPARC programs can be rewritten to share windows.Section3describes how the interprocedural analysis can be cast as a data-flow framework.Section4shows how window sharing affects a variety of programs.Finally,section5identifies areas for further work.2Rewriting Procedures for Window SharingI have written a tool,windowstacker constructs the procedure call graph,identifies what reg-isters are used by a procedure,selects procedures for sharing,and then rewrites them.The resulting object is fed to the linker,which resolves the relocation entries and loads the program without adding any further code.Rewriting a procedure works like this:At the entry,the arguments must be copied from the o-registers where the caller placed them into the corresponding replacements for the i-registers.These arguments always include the return address,placed in%o7,and the frame pointer,placed in%sp.A new register window is no longer needed,so the save may be replaced with an add to handle the side effect of creating the stack frame.In the body,every reference to a i-register or l-register must be replaced with another.(The replacement is identified by the selection algorithm.)We don’t need to reassign g-registers or o-registers because their values are not preserved across procedure calls.At the exit,the stack pointer must be moved back into place.Like save, the restore becomes an add which accomplishes the same side effect.If the2restore has no side effect,it is rewritten as a mov which places the intended result(the replacement for%i0)into the result register,%o0.On top of all that,a relocatable object contains all sorts of cross-linked information:relocations,symbols,and branches all resolve to particular address that change as code as inserted.Each insertion of additional code mustfix up affected elements to point to the new addresses.Many data elements are required to be doubleword aligned,so all code insertions must be an even number of instructions,padded with nop if necessary.Notice that rewriting does not affect calling conventions.The caller still puts arguments into o-registers,and the callee puts the result into the caller’s %o0.One can imagine a rewriting scheme that causes the caller to place the arguments directly where the callee wants them.This would have the added advantage of no code expansion,which we will see later is a slowdown.However, to do this properly requires extensive data-flow analysis of a single procedure to determine what register references belong to which call statement.This information is not available at link-time without duplicating a the work of the compiler.Suppose that the following procedure,p,has been selected for rewriting. p adds its two arguments together and returns the value of q applied to the addition.p:save%sp,-120,%spcall qadd%i0,%i1,%o0mov%o0,%i0retrestore%g0,%g0,%g0The astute reader will notice that call and ret have one delay slot each: the result of add and restore are committed before the control transfers of call and ret.Also notice that ret is an assembler shorthand for jmpl%i7+0, %g0.p explicitly uses the registers%i0,%i1,%o0,and%sp.It implicitly uses%i7 to restore the return address of the call operation,and is obliged to preserve the caller’s%sp.Let’s assume the selection algorithm provides this mapping of old registers to new ones:old%i0%l1%fp%l33The rewritten p looks like this:p:mov%o0,%l0mov%o1,%l1mov%sp,%l2mov%o7,%l3add%sp,-120,%spcall qadd%l0,%l1,%o0mov%o0,%l0mov%l2,%spnopjmpl%l3+0,%g0mov%l0,%o03Selecting Procedures for Window SharingRoughly speaking,a procedure may share a register window if there are enough registers left unused by its callers to meet its needs.Each procedure in a program must examine its predecessors tofind available registers,determine if it window sharing is possible,and then communicate the registers left over to its successors.Information about register use propagates down through the procedure call graph.Steenkiste and Hennessy[4]advocate propagating register use up through the call graph because leaf procedures are the most in need of optimization.This approach is not possible here because callers that do not share windows cannot be rewritten to use registers disjoint from their children.This sort of analysis can be expressed formally as a data-flow framework. Data-flow frameworks are discussed extensively by Cytron[1].The necessary components of a data-flow framework are a data-flow graph,a meet lattice,and a transfer function.For this program,the dataflow graph is the procedure call graph.Each node represents a procedure.An edge from a to b indicates a calls b.A special start node is assumed to use all available registers and serves as the predecessor of all procedures with no callers.A node has the following properties:•regsnew-The registers to be used by this procedure if it is rewritten.Initially the empty set.•sharesThe transfer function,F n,computes the set of registers available to succes-sors of node n.As a side effect,it determines if n should share a window and records the registers it should be rewritten to use.F_n(in){if(n.shares_window){a=size(in);r=size(n.regs_used);if(a>=r){n.regs_new=any r regs from in;}else{n.shares_window=false;}}if(n.shares_window){return in-n.regs_new;}else{return top-n.regs_used;}}A work list algorithm is used to evaluate the graph.The start node is placed in a work list.As long as the work list is not empty,a node is removed and the transfer function evaluates it.If the node is changed,its children are placed at the end of the work list.Every node will be visited at least once because either regs window must change on thefirst visit.A transfer function is generally chosen to be monotonic so that the data-flow algorithm will terminate.F n is not monotonic,but the algorithm will still terminate.When shareswindow is false,F n returns a value which remains constant through any further application.shareswindowfield is true,then the procedure is eligible for window sharing,regswindow is false,no change is needed.There are several tricky corners that this algorithm avoids.Recursive procedures have a special case.Without any intervention,the al-gorithm would iterate over a loop in the call graph until running out of registers, and then would select whatever procedure it happened to be at to allocate a window.Although this produces correct results,testing revealed several pro-grams that,when linked with the standard libraries,had gigantic loops in the program graph.As the algorithm iterated over the loop,the registers available5to each procedure in the loop(and their non-loop successors)would decrease, resulting in many non-sharable procedures across the graph.So,to prevent this, when a back edge is encountered,the caller marks its shareswindow false.Several instructions do notfit into the register-set model used by this al-gorithm.For example,the std and ldd instructions modify an adjacent pair of integer registers.If these instructions(or any other unknown opcode)are encountered,the offending procedure is marked with sharesFigure1:Benchmark Onevoid func(int a,int b){}int main(int argc,char*argv[]){int i,loops;loops=atoi(argv[1]);for(i=0;i<loops;i++){func(0,0);}return0;}The results are quite surprising!On the Super,window sharing slows down procedure calls by as much asfifteen percent.The slowdown can be attributed to the larger number of instructions needed for window sharing.On the Ultra, window sharing speeds up procedure calls when more than one argument is given. The speedup suggests that the mov instructions inserted by window sharing are easily pipelined,but the conventional save instruction causes a significant delay in the pipeline.The second benchmark,figure4,repeatedly calls two mutually recursive procedures.The depth of recursion can be varied.This benchmark was intended to show the cost of saving and restoring register windows.The results are shown infigures5and6.In the unmodified program,each procedure allocates its own register window. With window sharing enabled,a shares a window with its caller(b or main.) These results were much more as expected.On both machines,the cost of calling a procedure increases linearly with depth until the number of physical register windows is exhausted.After that,the cost increases dramatically due toflushing registers to memory.With window sharing enabled,this increase does not occur until twice the depth.4.2Macro-BenchmarksThe micro-benchmarks show that window sharing has both a cost and a benefit that depend upon the nature of the program.To evaluate the effect of window7Figure 2:Super Procedure Call Performance 01020304050600123456E x e c u t i o n T i m e (s )Number of Parameters Unmodified Window Sharing 8Figure 3:Ultra Procedure Call Performance 0246810120123456E x e c u t i o n T i m e (s )Number of Parameters Window Created Window Shared 9Figure4:Benchmark Two void b(int x){if(x<=0)return;a(x-1);}void a(int x){b(x-1);}int main(int argc,char*argv[]){int i;int loops;int depth;loops=atoi(argv[1]);depth=atoi(argv[2]);for(i=0;i<loops;i++){a(depth-1);}return0;}10Figure 5:Super Call Depth Performance051015202530246810121416E x e c u t i o n T i m e (s )Call Depth Unmodified Window Sharing 11Figure 6:Ultra Call Depth Performance00.511.522.533.544.55246810121416E x e c u t i o n T i m e (s )Call Depth Unmodified Window Sharing 12sharing on real programs,I ran the SPECint95[2]benchmark suite.1The results are shown infigures7and8.Each program show approximately one percent expansion in code size.Several programs,go,compress,li,and perl show significant speedups on both platforms.Profiles of these programs show many cross module calls to utility routines for list manipulation,memory allocation,data fetching,and the like[3].Other programs,m88ksim and gcc,have diminished performance and are generally characterized by veryflat call profiles.One program,ijpeg,speeds up with window sharing on the Super,but slows down with window sharing on the Ultra.Given the results of section4.1,this is exactly the opposite of what I expected.Figure7:Super SPECint95PerformanceWindow SharingTime(s)(percent)641+ 1.1m88ksim11641396- 4.4compress11241341+ 5.8ijpeg16991030+21.6Figure8:Ultra SPECint95PerformanceWindow SharingTime(s)(percent)197+7.6m88ksim294379- 1.6compress220288+ 3.5ijpeg439239+ 5.94.3Optimization EffectsOptimizations interact with each other.Some optimizations set up further opportunities,and some take them away.I selected one program,li,a LISPinterpreter,for further measurement of how compile-time optimization affects link-time optimization.In the GNU C compiler,optimization levels have the following meaning:-O0No optimizations.-O1Peephole optimizations such asfilling delay slots and removing saves of unused registers.-O2Aggressive optimizations such as register allocation,common subexpres-sion elimination,and instruction scheduling.-O3Interprocedural optimizations such as function inlining.Function inlining is the existing optimization most similar to window sharing. Both techniques attempt to maximize register use and are only sensible whena procedure has left registers unused.Inlining is likely to be faster because it does not involve a control transfer,but it is only available to procedures in the same compilation unit.If window stacking is to be effective in an arsenal of optimizations,it must stillfind opportunities after inlining has been applied.li was rebuilt and tested at each optimization level.The results are showninfigure9.As the optimization level increases,register use increases,and this isreflected by a decrease in procedures available for rewriting.Even at the highest optimization level,window sharing enjoys a speedup of several percent over the conventional version.This suggests that many opportunities for interprocedural optimization exist even after aggressive optimization is done on each module.Figure9:Optimization Effects on Lisp BenchmarkOpt Super Ultra UltraUnmod Speedup Shared Rewritten(s)(s)(percent)2282+6546181 11267288+31329+6279169 31241289+5platform and slows down on another.Deeper analysis of call graphs and profiles is needed.The algorithm in this paper applies window sharing blindly to every pro-cedure possible without regard to the cost.A more selective algorithm that identifies only ideal candidates is needed.Nested calls deeper than the number of physical windows,especially recursive calls,benefit the most from window sharing,and are a good place to focus.The convergence requirement for a transfer function may prevent optimal allocation of windows.For example,if a node is selected to allocate a window, this change may offer a larger number of registers to its descendants so that a node farther down in the graph may be able to share a window where it formerly did not.The convergence requirement prevents a node from changing from allocating back to sharing.Perhaps a data-flow framework is not the right model for this decision.The striking difference between processors observed in section4.1suggests that entirely different algorithms be applied for different SPARC implementa-tions.Overall,this is a positive result.Window sharing is a dramatic improvement in certain programs.Further work should concentrate on identifying the prop-erties of programs that do not benefit,so that the optimization can be applied selectively.References[1]R.Cytron,Automatic Program Optimization,SIGPLAN’93PLDI TutorialNotes.[2][3]/osg/cpu95/CINT95[4]P.Steenkiste,J.Hennessy,A simple interprocedural register allocation al-gorithm and its effectiveness for LISP,Transactions on Porgramming Lan-guages and Systems,pages1-30,January1989.[5]D.Wall,Global register allocation at link-time,Proceedings of SIGPLAN’86Symposium on Compiler Construction,pages264-275,July1986. [6]The source code is available at /˜thain15。