03-H3C SecPath UTM系列PPPoE典型配置举例
- 格式:pdf
- 大小:536.21 KB
- 文档页数:9
SecPath系列防火墙IPSec典型配置举例关键词:IKE、IPSec摘要:本章首先介绍了IKE和IPSec的基本概念,随后说明了防火墙的配置方法,最后给出两种典型应用的举例。
缩略语:缩略语英文全名中文解释IKE Internet Key Exchange 因特网密钥交换Security IP网络安全协议IPsec IP目录1 特性简介 (3)1.1 IPSec基本概念 (3)1.1.1 SA (3)1.1.2 封装模式 (3)2 应用场合 (4)3 配置指南 (4)3.1 配置概述 (4)3.2 配置ACL (6)3.3 配置IKE (6)3.3.1 配置IKE全局参数 (6)3.3.2 配置IKE安全提议 (7)3.3.3 配置IKE对等体 (8)3.4 IPSec安全提议 (10)3.5 配置安全策略模板 (12)3.6 配置安全策略 (14)3.7 应用安全策略组 (16)4 配置举例一:基本应用 (17)4.1 组网需求 (17)4.2 使用版本 (18)4.3 配置步骤 (18)4.4 配置结果验证 (27)4.4.1 查看IPSec安全联盟 (27)4.4.2 查看报文统计 (27)5 配置举例二:与NAT结合 (27)5.1 组网需求 (27)5.2 配置说明 (28)5.3 配置步骤 (28)5.4 配置验证结果 (34)5.4.1 查看IPSec安全联盟 (34)5.4.2 查看报文统计 (35)6 注意事项 (35)7 相关资料 (35)7.1 相关协议和标准 (35)7.2 其它相关资料 (36)1 特性简介IPsec(IP Security)协议族是IETF制定的一系列协议,它为IP数据报提供了高质量的、可互操作的、基于密码学的安全性。
特定的通信方之间在IP层通过加密与数据源验证等方式,来保证数据报在网络上传输时的私有性、完整性、真实性和防重放。
IPsec通过AH(Authentication Header,认证头)和ESP(Encapsulating Security Payload,封装安全载荷)这两个安全协议来实现上述目标,并且还可以通过IKE(Internet Key Exchange,因特网密钥交换协议)为IPsec提供自动协商交换密钥、建立和维护安全联盟的服务,以简化IPsec 的使用和管理。
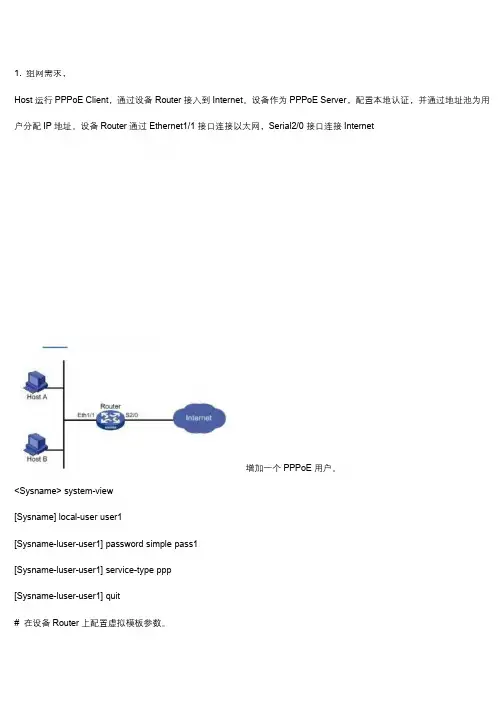
1.组网需求,Host运行PPPoE Client,通过设备Router接入到Internet。
设备作为PPPoE Server,配置本地认证,并通过地址池为用户分配IP地址。
设备Router通过Ethernet1/1接口连接以太网,Serial2/0接口连接Internet增加一个PPPoE用户。
<Sysname>system-view[Sysname]local-user user1[Sysname-luser-user1]password simple pass1[Sysname-luser-user1]service-type ppp[Sysname-luser-user1]quit#在设备Router上配置虚拟模板参数。
[Sysname]interface virtual-template1[Sysname-Virtual-Template1]ppp authentication-mode chap domain system[Sysname-Virtual-Template1]ppp chap user user1[Sysname-Virtual-Template1]remote address pool1[Sysname-Virtual-Template1]ip address1.1.1.1255.0.0.0[Sysname-Virtual-Template1]quit#在设备Router上配置PPPoE参数。
[Sysname]interface ethernet1/1[Sysname-Ethernet1/1]pppoe-server bind virtual-template1[Sysname-Ethernet1/1]quit#配置域用户使用本地认证方案。
[Sysname]domain system[Sysname-isp-system]authentication ppp local#增加一个本地IP地址池(9个IP地址)[Sysname-isp-system]ip pool11.1.1.21.1.1.10这样,以太网上各主机安装PPPoE客户端软件后,配置好用户名和密码(此处为user1和pass1)就能使用PPPoE协议,通过设备Router接入到Internet。
SecPath防火墙双机热备典型配置举例关键词:双机热备、主备模式、负载分担模式、数据同步、流量切换摘要:防火墙设备是所有信息流都必须通过的单一点,一旦故障所有信息流都会中断。
保障信息流不中断至关重要,这就需要解决防火墙设备单点故障问题。
双机热备技术可以保障即使在防火墙设备故障的情况下,信息流仍然不中断。
本文将介绍双机热备的概念、工作模式及典型应用等。
缩略语:目录1 特性简介 (3)1.1 双机热备的工作机制 (3)2 特性使用指南 (4)2.1 使用场合 (4)2.2 配置指南 (4)2.2.1 双机热备组网应用配置指南 (4)2.2.2 双机热备应用涉及的配置 (4)2.3 注意事项 (4)3 支持的设备和版本 (5)3.1 设备版本 (5)3.2 支持的设备 (5)3.3 配置保存 (5)4 配置举例 (6)4.1 典型组网 (6)4.2 设备基本配置 (9)4.2.1 其他共同配置: (9)4.3 双机热备业务典型配置举例 (9)4.3.1 透明模式+主备模式 (9)4.3.2 透明模式+负载分担模式 (14)4.3.3 路由模式+主备模式 (17)4.3.4 路由模式+负载分担模式 (19)4.3.5 路由模式+主备模式+支持非对称路径 (21)4.3.6 路由模式+负载分担模式+支持非对称路径 (27)4.3.7 动态路由模式组网 (32)5 相关资料 (33)1 特性简介双机热备在链路切换前,对会话信息进行主备同步;在设备故障后能将流量切换到其他备份设备,由备份设备继续处理业务,从而保证了当前的会话不被中断。
secpath防火墙具有多样化的组网方式,双机的组网应用也会很多种,本文试举几种双机热备的典型应用。
1.1 双机热备的工作机制互为备份的两台防火墙只负责会话信息备份,保证流量切换后会话连接不中断。
而流量的切换则依靠传统备份技术(如VRRP、动态路由)来实现,应用灵活,能适应各种组网环境。

H3CSecPathUTM系列特征库升级典型配置举例H3C SecPath UTM系列特征库升级典型配置举例关键词:特征库摘要:本⽂主要描述了UTM设备特征库升级的典型配置⽅法。
缩略语:缩略语英⽂全名中⽂解释UTM Unified Threat Management 统⼀威胁管理AV Anti-virus 防病毒IPS Intrusion prevention system ⼊侵防御系统⽬录1 特性简介 (1)2 应⽤场合 (1)3 注意事项 (1)4 配置举例 (1)4.1 组⽹需求 (1)4.2 配置思路 (2)4.3 使⽤版本 (2)4.4 配置步骤 (2)4.4.1 基本配置 (2)4.4.2 主要配置步骤 (3)4.5 验证结果 (5)5 相关资料 (5)5.1 其它相关资料 (5)1 特性简介特征库记录了设备可识别的攻击特征、病毒特征等,因此对于安全设备来说,必须保证特征库能够实时的更新升级,以保证它总是最新版本。
特征库的升级分为⼿动升级和⾃动升级:z⾃动升级可以帮助⽤户每隔指定的时间,使⽤特定的协议从特定的特征库版本服务器获取当前最新的特征库到设备。
z⼿动升级允许⽤户在需要的时候⼿动进⾏升级,⽤户可以⼿动设定获取特征库的协议、服务器地址和特征库⽂件名称,并且⼿动升级可以获取与设备兼容的任意⼀个版本的特征库。
⼿动升级⼀般是在⽤户的局域⽹内进⾏的。
2 应⽤场合运⾏在⽹络中的UTM设备启⽤了IPS和AV的功能,需要及时更新特征库3 注意事项要更新升级特征库,必须保证当前的License⽂件合法,并且在有效期限内。
主要配置步骤中的配置是在“应⽤安全策略”界⾯进⾏的,在左侧导航栏中点击“IPS|AV|应⽤控制 > ⾼级设置”,点击“应⽤安全策略”链接就可以进⼊“应⽤安全策略”界⾯。
4 配置举例4.1 组⽹需求某公司的内⽹⽹段为192.168.1.0/24,通过GE0/2连接到外⽹。
⽤户登录UTM的内⽹或外⽹接⼝地址,可以对UTM进⾏⼿动特征库升级操作;设置⾃动升级后,UTM会按照设定的时间⾃动进⾏特征库升级。
SecPath系列防火墙配置管理典型配置举例关键词:配置管理,备份摘要:配置管理模块主要用于对设备进行配置保存(加密和非加密)、备份、配置恢复和恢复出厂配置,用户可以在Web页面方便地对设备的配置进行维护和管理。
缩略语:缩略语英文全名中文解释- - -目录1 特性简介 (3)2 应用场合 (3)3 注意事项 (3)4 配置举例 (3)4.1 组网需求 (3)4.2 配置思路 (4)4.3 使用版本 (4)4.4 配置步骤 (4)4.4.1 基本配置 (4)4.4.2 配置管理 (6)4.5 验证结果 (8)4.5.1 配置保存 (8)4.5.2 配置备份 (9)4.5.3 配置恢复 (9)4.5.4 恢复出厂配置 (9)4.5.5 软件升级 (9)4.5.6 设备重启 (9)1 特性简介配置管理页面包含“配置保存”、“配置备份”、“配置恢复”和“恢复出厂配置”四个页签。
配置保存可以加密保存配置,如果将配置信息备份下来,打开文件查看时,看到的是密文显示。
在此页面可以对当前的配置信息进行配置备份和备份恢复。
软件升级和系统重启可以让用户通过Web页面对设备进行管理和操作。
2 应用场合用于设备的日常维护,当配置修改后,可以保存配置以免设备断电配置信息丢失。
也可以将配置信息备份下来,用于日后的配置恢复。
如果想清空配置信息时,可以恢复出厂配置。
3 注意事项(1) 软件升级时,尽量在流量少的时候操作,以免影响用户正常使用。
(2) 通过在命令行下输入save或在Web管理页面点击“配置保存”,可以对当前配置进行保存。
保存的配置文件有两个,分别为startup.cfg和system.xml。
(3) 备份或恢复时请将startup.cfg和system.xml一起备份和恢复。
4 配置举例4.1 组网需求本配置举例中,设备使用的是U200-S。
本典型配置适合SecPath F5000-A5、SecPath F1000E、SecPath UTM 200-A/200-M/200-S防火墙图1配置管理组网图设备默认出厂配置,GE0/0口为管理口,地址为192.168.0.1/24,用户可以将管理PC的网卡与设备的GE0/0口连接,并设置网卡地址为同网段的地址,则可以通过在浏览器的地址栏输入http://192.168.0.1 登录设备的Web网管,进行其他配置操作。
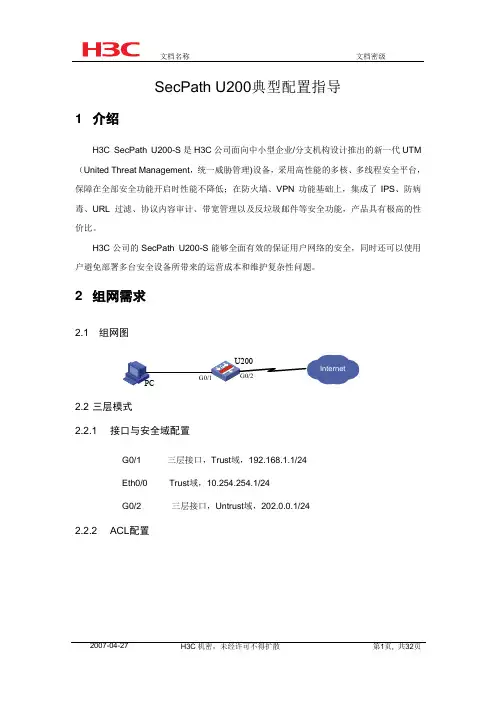
SecPath U200典型配置指导1 介绍H3C SecPath U200-S是H3C公司面向中小型企业/分支机构设计推出的新一代UTM (United Threat Management,统一威胁管理)设备,采用高性能的多核、多线程安全平台,保障在全部安全功能开启时性能不降低;在防火墙、VPN功能基础上,集成了IPS、防病毒、URL过滤、协议内容审计、带宽管理以及反垃圾邮件等安全功能,产品具有极高的性价比。
H3C公司的SecPath U200-S能够全面有效的保证用户网络的安全,同时还可以使用户避免部署多台安全设备所带来的运营成本和维护复杂性问题。
2 组网需求2.1 组网图2.2 三层模式2.2.1 接口与安全域配置G0/1 三层接口,Trust域,192.168.1.1/24Eth0/0 Trust域,10.254.254.1/24G0/2 三层接口,Untrust域,202.0.0.1/242.2.2 ACL配置用于内网访问Internet时作NAT用于iware访问内网、Internet时作NAT用于深度安全策略2.2.3 NAT配置nat server配置nat outbound配置2.3 二层模式2.3.1 接口与安全域配置G0/1 二层access口,PVID 10,Trust域G0/2 二层access口,PVID为10,UntrustEth0/0 三层接口,Trust域,10.254.254.1/24vlan-interface 10 Trust域,192.168.1.1/242.3.2 ACL配置用于iware访问内网时作NAT用于深度安全策略2.3.3 NAT配置NAT Server配置NAT outbound配置3 U200典型配置举例3.1 IPS/AV特征库升级3.1.1 特征库自动升级(1)功能简述验证U200自动升级IPS/AV特征库(2)测试步骤防火墙Web管理界面,策略管理> 深度安全策略。

H3C-PPP和PPPoE配置举例1.5 PPP典型配置举例1.5.1 PAP单向认证举例1. 组网需求如图1-3所示,Router A和Router B之间用接口Serial2/1/0互连,要求Router A用PAP方式认证Router B,Router B不需要对Router A进行认证。
2. 组网图图1-3 配置PAP单向认证组网图3. 配置步骤(1) 配置Router A# 为Router B创建本地用户。
<RouterA> system-view[RouterA] local-user userb class network# 设置本地用户的密码。
[RouterA-luser-network-userb] password simple passb# 设置本地用户的服务类型为PPP。
[RouterA-luser-network-userb] service-type ppp[RouterA-luser-network-userb] quit# 配置接口封装的链路层协议为PPP(缺省情况下,接口封装的链路层协议为PPP,此步骤可选)。
[RouterA] interface serial 2/1/0[RouterA-Serial2/1/0] link-protocol ppp# 配置本地认证Router B的方式为PAP。
[RouterA-Serial2/1/0] ppp authentication-mode pap domain system# 配置接口的IP地址。
[RouterA-Serial2/1/0] ip address 200.1.1.1 16[RouterA-Serial2/1/0] quit# 在系统缺省的ISP域system下,配置PPP 用户使用本地认证方案。
[RouterA] domain system[RouterA-isp-system] authentication ppp local(2) 配置Router B# 配置接口封装的链路层协议为PPP(缺省情况下,接口封装的链路层协议为PPP,此步骤可选)。

新手可以根据下面的配置一步一步操作,仔细一点儿就没问题了~!可以用超级终端配置,也可以用CRT配置如果配置了,还是不能上网,可以加我的QQ:957602411恢复出厂设置:Reset saved-configuration配置防火墙缺省允许报文通过:system-viewfirewall packet-filter default permit为防火墙的以太网接口(以Ethernet0/0为例)配置IP地址,并将接口加入到安全区域:interface Ethernet0/0ip address IP地址子网掩码quitfirewall zone trustadd interface Ethernet0/0quit添加登录用户为使用户可以通过Web登录,并且有权限对防火墙进行管理,必须为用户添加登录帐户并且赋予其权限:local-user 登录账号password simple 登录密码service-type telnetlevel 3quitquitsysfirewall packet-filter default permitdialer-rule 1 ip permitacl number 3000rule 0 permit ipquitinterface Dialer1link-protocol pppppp chap user PPPOE账号ppp chap password simple PPPOE密码ip address ppp-negotiatedialer-group 1dialer bundle 1nat outbound 3000quitinterface Ethernet0/4pppoe-client dial-bundle-number 1firewall zone untrustadd interface Ethernet0/4add interface Dialer1quitfirewall zone trustadd interface Ethernet0/0quitip route-static 0.0.0.0 0.0.0.0 Dialer 1 preference 60 save。

H3C路由器PPPOE拨号上⽹命令⾏配置举例建⽴拨号组拨号控制列表dialer-group 1 rule ip permit建⽴拨号接⼝1interface dialer 1开启DDR共享dialer bundle enable配置接⼝管理拨号组dialer-group 1接⼝接受PPP协商产⽣的由Server端分配的IP地址ip address ppp-negotiate设置链路空闲时间为0dialer timer idle 0配置ppp chap 验证名ppp chap user 123456配置ppp chap 验证密码ppp chap password cipher 123456填写运营商给的⽤户名和密码ppp pap local-user 123456 password cipher 123456建⽴ppp会话,绑定相应三层接⼝interface GigabitEthernet 0/0pppoe-client dial-bundle-number 1###############################################配置nat转换interface Dialer 1nat outbound################################################配置默认路由,出⼝指向拨号⼝1ip route-static 0.0.0.0 0.0.0.0 Dialer1################################################配置内⽹DHCPinterface GigabitEthernet 0/1ip address 192.168.100.1 24#DHCP enable#dhcp server ip-pool 1network 192.168.100.0 24gateway-list 192.168.100.1dns-list 114.114.114.114###########################备注:dialer timer idle 0当⼀条链路建⽴后,dialer timer idle定时起作⽤。
H3C SecPath 运维审计系统配置指南前言H3C SecPath 运维审计系统典型配置案例集共包括10 个文档,介绍了运维审计系统常用的典型配置举例,包含组网需求、配置步骤等内容。
前言部分包含如下内容:∙读者对象∙本书约定∙资料获取方式∙技术支持∙资料意见反馈读者对象本手册主要适用于如下工程师:∙网络规划人员∙现场技术支持与维护人员∙负责网络配置和维护的网络管理员本书约定1. 命令行格式约定2. 图形界面格式约定多级菜单用“/”隔开。
如[文件/新建/文件夹]多级菜单表示[文件]菜单下的[新建]子菜单下/的[文件夹]菜单项。
3. 各类标志本书还采用各种醒目标志来表示在操作过程中应该特别注意的地方,这些标志的意义如下:4. 图标约定本书使用的图标及其含义如下:TT该图标及其相关描述文字代表防火墙插卡、负载均衡插卡、NetStream插卡、SSL VPN插卡、IPS插卡、ACG插卡等安全插卡。
5. 端口编号示例约定本手册中出现的端口编号仅作示例,并不代表设备上实际具有此编号的端口,实际使用中请以设备上存在的端口编号为准。
目录1 AD域认证典型配置举例 (1)1.1 简介 (1)1.2 配置前提 (1)1.3 注意事项 (1)1.4 OU模式的认证典型配置举例 (6)1.4.1 适用产品和版本 (6)1.4.2 配置思路 (6)1.4.3 配置步骤 (6)1.4.4 验证配置 (8)1.5 CN模式的认证典型配置举例 (12)1.5.1 适用产品和版本 (12)1.5.2 配置思路 (13)1.5.3 配置步骤 (13)1.5.4 验证配置 (15)1 AD域认证典型配置举例1.1 简介本章介绍运维审计系统的AD 域认证配置。
AD是Activ e Directory(活动目录)的简称,也叫域服务(DS)。
AD DS 提供分布式数据库,该数据库存储和管理有关网络资源和来自支持目录的应用程序及应用程序特定数据的信息。
目录1路由设置 ············································································································································ 1-11.1 概述 ··················································································································································· 1-11.2 配置静态路由····································································································································· 1-11.3 查看激活路由表 ································································································································· 1-21.4 静态路由典型配置举例 ······················································································································ 1-31.5 注意事项············································································································································ 1-61 路由设置•本章所指的路由器代表了一般意义下的路由器,以及运行了路由协议的三层交换机。
H3C防⽕墙PPPOE拨号⽅式上⽹配置⽅法(WEB界⾯)1.适⽤的产品系列本案例适⽤于软件平台为Comware V7系列防⽕墙:F100-X-G2、F1000-X-G2、F100-X-WiNet、F1000-AK、F10X0等。
注:本案例是在F1000-C-G2的Version 7.1.064, Release 9323P1801版本上进⾏配置和验证的。
配置需求及实现的效果将防⽕墙部署在互联⽹出⼝,使⽤PPPOE拨号⽅式接⼊互联⽹。
初步规划防⽕墙使⽤3接⼝接⼊运营商,使⽤4接⼝连接内部⽹络,内部⽹络使⽤192.168.10.0⽹段,要求内⽹终端可以⾃动获取到地址并可以访问互联⽹。
2 组⽹图3 配置步骤3.1 基本登录#在防⽕墙接⼝⾯板找到0接⼝,⽤⽹线将电脑和设备的0接⼝连在⼀起,电脑配置与设备管理IP相同⽹段的地址192.168.0.2/243.2 配置外⽹接⼝#在“⽹络”>“IP” 选项中选择1/0/3接⼝并点击此接⼝最后⾯的”编辑”按钮。
#“IP地址”处选择PPPOE,⽤户名密码分别填⼊运营商分配的账号和密码。
3.3 配置内⽹接⼝#在 “⽹络”>“IP” 选项中选择1/0/4接⼝并点击此接⼝最后⾯的“编辑”按钮。
#“IP地址”选择指定IP地址,设置内⽹⽹关地址为192.168.10.1,掩码为255.255.255.0。
3.4 配置NAT地址转换#在 “策略”>“NAT”>“NAT动态转换”>“策略配置”选项中点击新建。
#“接⼝”选择外⽹接⼝“Dia0”接⼝,转换后源地址选择“接⼝IP地址”并点击确定。
注:外⽹⼝1/0/3接⼝配置为PPPOE时,在接⼝列表中会⽣成⼀个Dia接⼝,编号默认从0开始。
3.5 配置外⽹接⼝加⼊Untrust安全区域#在 “⽹络”>“接⼝”>“安全域” 中选择“Untrust”区域点击编辑按钮。
#在“三层成员列表”中将1/0/3、Dia0接⼝加⼊成员列表。
H3C SecPath UTM Series Anti-Spam ConfigurationExampleKeywords: Anti-spam,SMTP, POP3Abstract: This document presents an anti-spam configuration example for UTM devices.Acronyms:Acronym Full spellingUTM Unified Threat ManagementSMTP Simple Mail Transfer ProtocolPOP3 Post Office Protocol, Version 3Table of ContentsFeature Overview (3)Application Scenarios (3)Configuration Guidelines (3)Anti-Spam Configuration Example (3)Network Requirements (3)Configuration Considerations (4)Hardware/Software Version Used (4)Configuration Procedures (4)Basic Configuration (4)Anti-Spam Configuration (7)Verification (10)Related Documentation (11)Feature OverviewBy cooperating with a Commtouch mail server (a third-party mail server), the anti-spam feature of an H3C UTM device can inspect all emails sent from external networks to the internal network and process the emails as configured, so as to prevent spam from wasting the resources of the internal network.With the anti-spam feature configured, the device forwards all emails received from external networks to the Commtouch mail server for inspection and, after receiving the inspection results, processes the emails based on the actions specified in the anti-spam policy.The anti-spam feature supports inspecting Simple Mail Transfer Protocol (SMTP) emails and Post Office Protocol, Version 3 (POP3) emails:z SMTP: In a scenario where the SMTP clients are on the external network and the SMTP server is on the internal network.z POP3: In a scenario where the POP3 clients are on the internal network and the POP3 server is on the external network.Application ScenariosThe anti-spam feature can be deployed to check emails entering an internal network to prevent email spam from occupying resources of the internal network.Configuration GuidelinesBefore configuring the anti-spam feature, ensure that:z The device can communicate with the Commtouch mail server normally. The address of the Commtouch mail server is http://resolver%, where %d indicates a number in therange from 1 to 10.z The device has a legal, effective license of the anti-spam feature.z The device can connect to to verify the validity of the license for the anti-spam feature. When the license of the anti-spam feature expires, all anti-spam configurations will not beeffective any more.Anti-Spam Configuration ExampleNetwork RequirementsAs shown in Figure 1, the internal network of a company is 4.1.1.0/24, and the external network is 192.168.100.0/22. Configure the UTM device to inspect emails received from the POP3 server and process those emails as follows:z Modify the subjects of emails from known spam sources and log them.z Modify the subjects of emails from unknown spam sources and log them.z Log suspicious emails.z Forward normal emails normally.Figure 1 Network diagram for anti-spam configurationConfiguration Considerationsz Redirect the traffic of interest for in-depth inspection.z Configure the anti-spam policy and rules.z Apply the policy to the segment.Hardware/Software Version Used<H3C>dis verH3C Comware Platform SoftwareComware Software, Version 5.20, Ess 5115Copyright (c) 2004-2009 Hangzhou H3C Tech. Co., Ltd. All rights reserved.H3C SecPath U200-CM uptime is 0 week, 3 days, 20 hours, 54 minutesCPU type: RMI XLS404 800MHz CPU512M bytes DDR2 SDRAM Memory32M bytes Flash Memory247M bytes CF0 CardPCB Version:Ver.BLogic Version: 2.0Basic BootWare Version: 1.23Extend BootWare Version: 1.23[FIXED PORT] CON (Hardware)Ver.B, (Driver)1.0, (Cpld)2.0[FIXED PORT] GE0/0 (Hardware)Ver.B, (Driver)1.0, (Cpld)2.0[FIXED PORT] GE0/1 (Hardware)Ver.B, (Driver)1.0, (Cpld)2.0[FIXED PORT] GE0/2 (Hardware)Ver.B, (Driver)1.0, (Cpld)2.0[FIXED PORT] GE0/3 (Hardware)Ver.B, (Driver)1.0, (Cpld)2.0[FIXED PORT] GE0/4 (Hardware)Ver.B, (Driver)1.0, (Cpld)2.0[SUBCARD 1] 2GE (Hardware)Ver.B, (Driver)1.0, (Cpld)1.0Configuration ProceduresBasic ConfigurationConfiguring interface GE 0/1Select Device Management > Interface from the navigation tree and then click the icon of GE 0/1 to enter the interface configuration page. Perform the configurations shown in the following figure and click Apply.Select Device Management > Zone from the navigation tree and then click the icon of the Untrust zone to enter the page for modifying the security zone configurations. Add interface GE 0/1 to the Untrust zone as shown in the following figure, and click Apply to complete the operation and return to the security zone page.Configuring interface GE 0/4Similarly, assign IP address 4.1.1.1/24 to interface GE 0/4 and add the interface to security zone Trust. Selecting Device Management > Interface from the navigation tree, you should see the following list:Configuring NATTo enable internal hosts to connect to the external network through the UTM device, you need to configure a NAT policy on interface GE 0/1. In this example, the policy references ACL 3004 and uses the NAT mode of Easy IP.Select Firewall > ACL from the navigation tree and then create ACL 3004 and add a rule to the ACL to identify the flow of interest. In this example, the ACL permits packets sourced from 4.1.1.0/24. The configurations are shown in the following figure:Select Firewall > NAT Policy > Dynamic NAT from the navigation tree and then under Dynamic NAT, click Add and then specify ACL 3004 and Easy IP for interface GigabitEthernet 0/1. The following figure shows the configuration result:Configuring a routeSelect Network > Routing Management > Static Routing from the navigation tree and configure a default route, setting the next hop to the IP address for the intranet side interface of the router that connects the GE 0/1 interface of the UTM device with the external network (192.168.100.254 in this example).Configuring a redirect policyConfigure a redirect policy to redirect the flow of interest to the i-Ware platform for in-depth analysis. In this example, traffic between zone Trust and zone Untrust that matches ACL 3000 will be redirected to segment 0.First , select Firewall > ACL from the navigation tree and then create ACL 3000 and add rules to the ACL to identify the traffic of interest. The configurations are shown in the following figure:Then, select IPS | AV | Application Control > Advanced Configuration from the navigation tree and create a redirect policy to redirect traffic matching ACL 3000 to segment 0.Anti-Spam ConfigurationSelect IPS | AV | Application Control > Advanced Configuration from the navigation tree and click the Application Security Policy link to enter the in-depth inspection configuration page.Enabling anti-spam inspectionSelect Anti-Spam > Anti-Spam from the navigation tree and perform the following configurations in the Server Configuration area:z Select the Antispam inspection check box.z Click Apply.z After a while, you will see that the operation status becomes normal.z If the UTM device connects to the Commtouch mail server through a proxy server, you need to configure the proxy server according to the networking scheme.z The anti-spam signature database stores all email spam signatures that the device can identify.The license of the anti-spam feature has a validity period specified. After the license expires, you need to recharge to obtain a new license before upgrading the anti-spam signature database.Creating and applying the anti-spam policyUnder Policy Application List, click Add and perform the following configurations:z Type test as the name.z Select Modify subject and log as the action for POP3 emails from known spam sources.z Select Modify subject and log as the action for POP3 emails from unknown spam sources.z Select Log as the action for suspicious POP3 emails.z Select Log as the action for normal POP3 emails.z Under Apply Policy, click Add and perform the following configurations on the page that appears: z Select segment 0.z Click Apply.z Now, segment 0 should appear on the list under Apply Policy. Click Apply to complete the operation.Activating configurationsAfter the application operation is complete, the anti-spam configuration page appears again, as shown in the following figure. Click Activate and confirm your operation.VerificationOn internal host 4.1.1.2, configure Outlook Express to receive emails. Then, on the web interface of the device, select Log Management > Anti-Spam Logs from the navigation tree. Logs about inspection and processing of emails destined for the user should appear on the list.Hangzhou H3C Technologies Co., Ltd. 11/11Related DocumentationAnti-Spam Configuration of the Web configuration manual.。
H3C S e c P a t h防火墙在双出口下通过策略路由实现负载分担的典型配置-CAL-FENGHAI-(2020YEAR-YICAI)_JINGBIANSecPath安全产品在双出口下通过策略路由实现负载分担的典型配置一、组网需求:SecPath1000F防火墙部署在出口,有电信和网通两个出口,要求PC1通过电信的出口,PC2通过网通的出口,在任意一个出口出现故障的时候,需要能够自动切换到另外一个出口。
二、组网图radius scheme system#domain system#acl number 3000 //配置nat转换地址范围rule 0 permit ip source 192.168.1.0 0.0.0.255rule 1 permit ip source 172.16.1.0 0.0.0.255rule 2 deny ipacl number 3001 //配置策略路由的ACLrule 0 permit ip source 172.16.1.0 0.0.0.255rule 1 deny ip#interface Aux0async mode flow#interface GigabitEthernet0/0ip address 202.38.1.1 255.255.255.0nat outbound 3000#interface GigabitEthernet0/1ip address 61.1.1.1 255.255.255.0nat outbound 3000#interface GigabitEthernet1/0ip address 10.0.0.1 255.255.255.0ip policy route-policy test //应用策略路由#interface GigabitEthernet1/1#interface Encrypt2/0#interface NULL0#firewall zone localset priority 100#firewall zone trustadd interface GigabitEthernet1/0set priority 85#firewall zone untrustadd interface GigabitEthernet0/0add interface GigabitEthernet0/1set priority 5#firewall zone DMZset priority 50#firewall interzone local trust#firewall interzone local untrust#firewall interzone local DM#firewall interzone trust untrust#firewall interzone trust DMZ#firewall interzone DMZ untrust#route-policy test permit node 10 //配置策略路由if-match acl 3001apply ip-address next-hop 61.1.1.2#ip route-static 0.0.0.0 0.0.0.0 202.38.1.2 preference 60ip route-static 0.0.0.0 0.0.0.0 61.1.1.2 preference 70ip route-static 172.16.1.0 255.255.255.0 10.0.0.2 preference 60ip route-static 192.168.1.0 255.255.255.0 10.0.0.2 preference 60#四、配置关键点1. 在配置nat outbound的时候,必须允许所有的网段进行地址转换;2. 在内网口应用策略路由;3. 配置策略路由时,必须应用下一跳地址,不能应用接口地址。
H3C L2TP 典型配置举例l2tp 的呼叫可以由nas(网络接入服务器)主动发起,也可以由客户端发起。
下面将分别针对这两种情况举例说明。
2.5.1 nas-initialized vpn1. 组网需求vpn 用户访问公司总部过程如下:用户以普通的上网方式进行拨号上网。
在接入服务器(nas)处对此用户进行验证,发现是vpn 用户,则由接入服务器向lns 发起隧道连接的请求。
在接入服务器与lns 隧道建立后,接入服务器把与vpn 用户已经协商的内容作为报文内容传给lns。
lns 再根据预协商的内容决定是否接受此连接。
用户与公司总部间的通信都通过接入服务器与lns 之间的隧道进行传输。
2. 组网图3. 配置步骤(1) 用户侧的配置在用户侧,在拨号网络窗口中输入vpn 用户名vpdnuser,口令hello,拨入号码为170。
在拨号后弹出的拨号终端窗口中输入radius 验证的用户名username 和口令userpass。
(2) nas 侧的配置# 在nas 上配置拨入号码为170。
# 在radius 服务器上设置一个用户名为username、口令为userpass 的vpn 用户,并设置相应的lns 侧设备的ip 地址(本例中lns 侧与通道相连接的以太口的ip 地址为202.38.160.2)。
# 将本端的设备名称定义为lac,需要进行通道验证,通道验证密码为tunnelpwd。
(3) 防火墙(lns 侧)的配置# 设置用户名及口令(应与用户侧的设置一致)。
[h3c] local-user vpdnuser[h3c-luser-vpdnuser] password simple hello[h3c-luser-vpdnuser] service-type ppp# 对vpn 用户采用本地验证。
[h3c] domain system[h3c-isp-system] scheme local[h3c-isp-system] ip pool 1 192.168.0.2 192.168.0.100# 启用l2tp 服务,并设置一个l2tp 组。
H3C SecPath UTM系列PPPoE典型配置举例关键词:PPPoE
摘要:PPPoE拨号功能通常用于ADSL接入。
用户通过此方式可以访问公网资源。
缩略语:
缩略语英文全名中文解释PPPoE Point-to-Point Protocol over Ethernet 点对点协议
目录
1 特性简介 (1)
2 应用场合 (1)
3 注意事项 (1)
4 配置举例 (1)
4.1 组网需求 (1)
4.2 配置思路 (2)
4.3 使用版本 (2)
4.4 配置步骤 (2)
4.4.1 基本配置 (2)
4.4.2 配置域和域间策略 (4)
4.4.3 配置PPPoE (5)
4.4.4 配置出接口NAT (6)
4.5 验证结果 (6)
4.5.1 配置PPPoE验证结果 (6)
5 相关资料 (7)
5.1 其它相关资料 (7)
1 特性简介
PPP(Point to Point Protocol)协议是在点到点链路上承载网络层数据包的一种链路层协议,由于它能够提供用户验证、易于扩充,并且支持同/异步通信,因而获得广泛应用。
PPP定义了一整套的协议,包括链路控制协议(LCP)、网络层控制协议(NCP)和验证协议(PAP 和CHAP)。
z链路控制协议(Link Control Protocol,LCP):主要用来建立、拆除和监控数据链路。
z网络控制协议(Network Control Protocol,NCP):主要用来协商在该数据链路上所传输的数据包的格式与类型。
z用于网络安全方面的验证协议族PAP和CHAP。
2 应用场合
主要用于中小企业ADSL宽带接入服务。
用户通过UTM设备的PPPoE拨号功能接入ADSL网络,可以访问公网的网络资源。
3 注意事项
在接口管理中只能创建Dialer口,但是Dialer口的参数(例如账号、密码、绑定的接口信息等)需要在PPPoE的web页面进行配置。
4 配置举例
4.1 组网需求
本配置举例中,UTM设备使用的是UTM200-S。
图4-1PPPoE拨号组网图
4.2 配置思路
z为GE0/2所在的局域网(内网)接口配置地址为2.1.1.1/24,在Trust域。
z在GE0/1接口配置Dialer口,在Untrust域。
4.3 使用版本
<H3C>display version
H3C Comware Platform Software
Comware Software, Version 5.20, Beta 5112
Copyright (c) 2004-2009 Hangzhou H3C Tech. Co., Ltd. All rights reserved.
H3C SecPath U200-S uptime is 0 week, 3 days, 15 hours, 25 minutes
CPU type: RMI XLS404 800MHz CPU
512M bytes DDR2 SDRAM Memory
32M bytes Flash Memory
PCB Version:Ver.B
Logic Version: 3.0
Basic BootWare Version: 1.21
Extend BootWare Version: 1.21
[FIXED PORT] CON (Hardware)Ver.B, (Driver)1.0, (Cpld)3.0
[FIXED PORT] GE0/0 (Hardware)Ver.B, (Driver)1.0, (Cpld)3.0
[FIXED PORT] GE0/1 (Hardware)Ver.B, (Driver)1.0, (Cpld)3.0
[FIXED PORT] GE0/2 (Hardware)Ver.B, (Driver)1.0, (Cpld)3.0
[FIXED PORT] GE0/3 (Hardware)Ver.B, (Driver)1.0, (Cpld)3.0
[FIXED PORT] GE0/4 (Hardware)Ver.B, (Driver)1.0, (Cpld)3.0
[SUBCARD 1] The SubCard is not present
4.4 配置步骤
4.4.1 基本配置
1. 配置接口GE0/2地址
z在左侧导航栏中点击“设备管理 > 接口管理”。
z点击GE0/2栏中的按钮,进入“接口编辑”界面。
按照下图设置接口GE0/2,点击 < 确定>按钮返回“接口管理”界面。
2. 配置ACL
z在左侧导航栏中点击“防火墙 > ACL”,点击页面的< 新建>按钮,创建ACL2000。
z点击ACL2000 栏中的按钮,点击< 新建>按钮创建规则。
z点击< 确定>按钮。
4.4.2 配置域和域间策略
1. 接口GE0/2加入Trust域
z点击左侧导航栏“设备管理 > 安全域”。
z点击Trust栏中的按钮,进入“修改安全域”界面。
按照下图将接口GE0/2加入Trust域,点击< 确定>按钮返回“安全域”界面。
2. 配置域间策略
z点击左侧导航栏“防火墙 > 安全域 > 域间策略”。
z点击< 新建>按钮,按照下面截图信息配置Trust域到Untrust域的域间策略。
z同理,添加一条Untrust域到Trust域的域间策略。
4.4.3 配置PPPoE
z点击左侧导航栏“网络管理> PPPoE > Client信息”,在页面点击< 新建>按钮,按照下面的截图进行配置,点击< 确定>按钮。
4.4.4 配置出接口NAT
z在“防火墙> NAT > 动态地址转换”页面,点击“地址转换关联”下的< 新建>按钮。
z按照下面的截图信息配置出接口Dialer1的NAT,点击< 确定>按钮。
4.5 验证结果
4.5.1 配置PPPoE验证结果
z如果PPPoE正好和密码设置正确,可以在串口看到如下信息。
表示Dialer1接口状态和协议均UP,则此时PPPoE连接已经建立。
<U200-M>
%Apr 2 16:43:59:349 2009 U200-M IFNET/4/LINK UPDOWN:
Dialer1:0: link status is UP
%Apr 2 16:44:02:340 2009 U200-M IFNET/4/UPDOWN:
Line protocol on the interface Dialer1:0 is UP
%Apr 2 16:44:02:497 2009 U200-M IFNET/4/UPDOWN:
Protocol PPP IPCP on the interface Dialer1:0 is UP
<U200-M>dis i i br
*down: administratively down
(s): spoofing
Interface Physical Protocol IP Address Description Dialer1 up up 8.1.1.227 Dialer1 I...
GigabitEthernet0/0 up up 192.168.103.155 GigabitEt...
GigabitEthernet0/1 up down unassigned GigabitEt...
GigabitEthernet0/2 up up 2.1.1.1 GigabitEt...
GigabitEthernet0/3 down down unassigned GigabitEt...
GigabitEthernet0/4 down down unassigned GigabitEt...
z PC通过PPPoE拨号能够访问公网8.1.1.20。
5 相关资料
5.1 其它相关资料
《web配置手册PPPoE》。