torque中文教程--武器切换
- 格式:pdf
- 大小:2.52 MB
- 文档页数:6
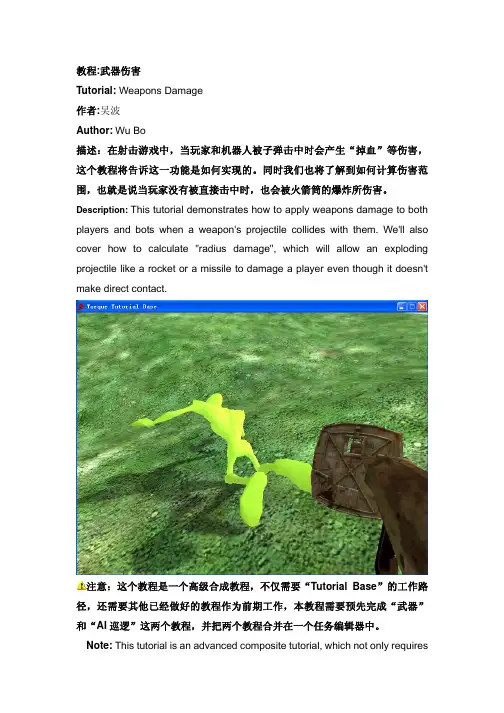
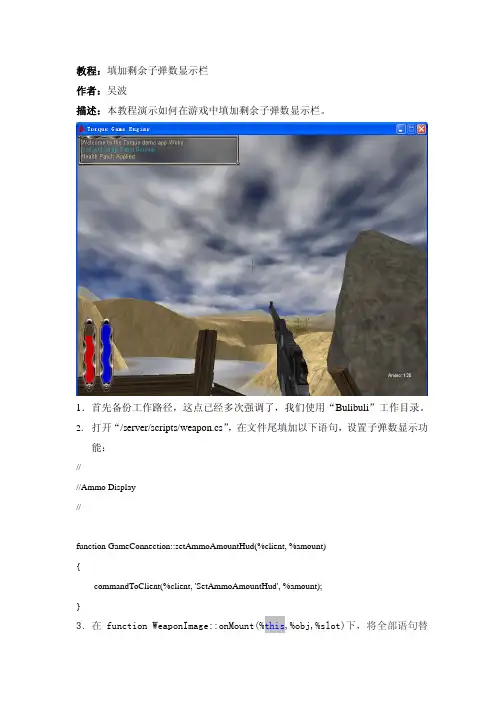
教程:武器伤害Tutorial: Weapons Damage作者:吴波Author:Wu Bo描述:在射击游戏中,当玩家和机器人被子弹击中时会产生“掉血”等伤害,这个教程将告诉这一功能是如何实现的。
同时我们也将了解到如何计算伤害范围,也就是说当玩家没有被直接击中时,也会被火箭筒的爆炸所伤害。
Description:This tutorial demonstrates how to apply weapons damage to both players and bots when a weapon's projectile collides with them. We'll also cover how to calculate "radius damage", which will allow an exploding projectile like a rocket or a missile to damage a player even though it doesn't make direct contact.注意:这个教程是一个高级合成教程,不仅需要“Tutorial Base”的工作路径,还需要其他已经做好的教程作为前期工作,本教程需要预先完成“武器”和“AI巡逻”这两个教程,并把两个教程合并在一个任务编辑器中。
Note: This tutorial is an advanced composite tutorial, which not only requiresthe “Tutorial Base” application as its starting place, but also requires the addition of one or more other tutorials to build up from. This particular tutorial requires the addition of the “Weapons”and“ Bot Path-Finding” tutorials to be completed properly.1.在你开始前,还是要先备份工作文件夹("example"下的"tutorial.base"目录)以防文件损坏。
未转变者单机指令大全在游戏世界中,单机游戏一直都是玩家们喜爱的游戏类型之一。
而在单机游戏中,指令操作更是玩家们必须掌握的重要技能之一。
今天,我们将为大家整理一份未转变者单机指令大全,帮助大家更好地掌握游戏中的操作技巧。
一、基本操作指令。
1. 移动,W(前进)、S(后退)、A(向左移动)、D(向右移动)。
2. 跳跃,空格键。
3. 攻击,鼠标左键。
4. 使用物品,E键。
5. 切换武器,数字键1-9。
6. 打开地图,M键。
7. 打开背包,B键。
8. 交互,F键。
二、战斗指令。
1. 近战攻击,鼠标左键。
2. 远程攻击,鼠标右键。
3. 使用技能,快捷键(根据技能设置不同)。
4. 躲避,方向键(根据敌人攻击方向进行躲避)。
三、交互指令。
1. 对话,与NPC接触后,按下空格键与NPC进行对话。
2. 交易,与商人接触后,按下E键进行交易。
3. 接取任务,与任务NPC接触后,按下E键接取任务。
4. 完成任务,在任务目标处按下E键完成任务。
四、系统指令。
1. 存档,按下快捷键进行游戏存档。
2. 读取存档,在游戏菜单中选择读取存档。
3. 设置,在游戏菜单中进行游戏设置。
4. 退出游戏,在游戏菜单中选择退出游戏。
五、其他指令。
1. 查看任务日志,J键。
2. 使用药品,数字键(根据药品设置不同)。
3. 进入车辆,按下E键进入车辆。
4. 驾驶车辆,W(加速)、S(减速)、A(向左转向)、D(向右转向)。
以上就是未转变者单机指令大全,希望能够帮助到大家更好地掌握游戏操作技巧。
在游戏中,熟练掌握各种指令操作,将能够让玩家们更加顺利地进行游戏,享受游戏带来的乐趣。
祝大家游戏愉快!。
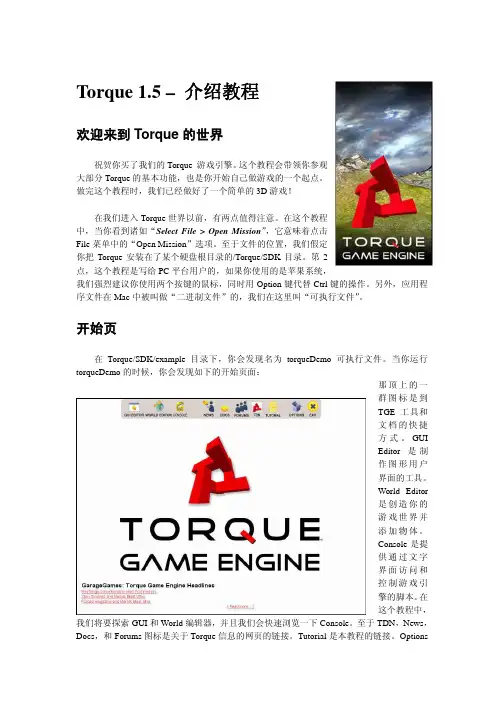
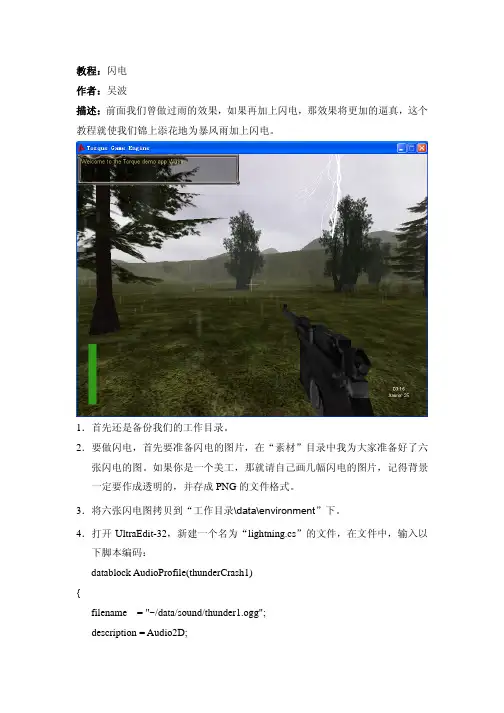
Torque 1.5 – 介绍教程欢迎来到Torque的世界祝贺你买了我们的Torque 游戏引擎。
这个教程会带领你参观大部分Torque的基本功能,也是你开始自己做游戏的一个起点。
做完这个教程时,我们已经做好了一个简单的3D游戏!在我们进入Torque世界以前,有两点值得注意。
在这个教程中,当你看到诸如“Select File > Open Mission”,它意味着点击File菜单中的“Open Mission”选项。
至于文件的位置,我们假定你把Torque安装在了某个硬盘根目录的/Torque/SDK目录。
第2点,这个教程是写给PC平台用户的,如果你使用的是苹果系统,我们强烈建议你使用两个按键的鼠标,同时用Option键代替Ctrl键的操作。
另外,应用程序文件在Mac中被叫做“二进制文件”的,我们在这里叫“可执行文件”。
开始页在Torque/SDK/example目录下,你会发现名为torqueDemo可执行文件。
当你运行torqueDemo的时候,你会发现如下的开始页面:那顶上的一群图标是到TGE工具和文档的快捷方式。
GUIEditor是制作图形用户界面的工具。
World Editor是创造你的游戏世界并添加物体。
Console是提供通过文字界面访问和控制游戏引擎的脚本。
在这个教程中,我们将要探索GUI和World编辑器,并且我们会快速浏览一下Console。
至于TDN,News,Docs,和Forums图标是关于Torque信息的网页的链接。
Tutorial是本教程的链接。
Options让你能设置普通的图形和声音选项,比如屏幕分辨率或音量等。
最后,Exit 就像你想象中的那样,退出这个引擎。
我们在这个教程中不会深入介绍Torque 的Consol (控制台),只是让你知道它能做什么,点击这个图标,在Consol 窗口你可以看到引擎启动后的一些进程记录。
你不仅仅可以用它来得到文字反馈,你也能直接在文字输入框中输入命令,举个例子,输入“quit();”,当然,这个命令退出了TGE 。
盟军敢死队2操作简介《盟军敢死队2》是一款以第二次世界大战为背景的第一人称射击游戏。
玩家将扮演一个盟军士兵,与队友一起执行各种任务,在战场上抵御敌人的进攻。
本文档将向玩家介绍《盟军敢死队2》的基本操作,帮助玩家更好地掌握游戏。
游戏操作移动与视角控制•使用W/A/S/D键控制角色前进、后退、向左和向右移动。
•使用鼠标控制视角的旋转,点击左键开火。
•使用空格键跳跃。
武器选择与切换•使用数字键1-6选择不同的武器。
每个数字键对应不同的武器槽。
•使用鼠标滚轮可以快速切换武器。
•使用Q键可以将当前使用的武器扔出。
阵营指挥•使用B键打开阵营指挥菜单,可以与队友进行交流和指挥。
•在阵营指挥菜单中,使用F键可以选择不同的指令,例如攻击、防守、集结等。
盟军伙伴•在游戏中,你将有一支由盟军战士组成的队伍。
•使用E键可以与队友进行互动,例如复活受伤的队友、分享弹药等。
•盟军伙伴将为你提供支援,例如提供火力覆盖、提供医疗补给等。
技能与道具•在游戏中,你可以通过完成任务和击败敌人获得经验值。
•当你获得足够的经验值时,可以解锁新的技能。
•使用G键可以使用已解锁的技能,例如炸药包、烟雾弹等。
任务目标与提示•游戏中的任务目标和提示将以文字的形式显示在游戏界面上方。
•请仔细阅读任务目标和提示,按照指示完成任务。
•如果在游戏中迷失方向,可以使用M键打开地图,并参考地图上标记的任务目标位置。
小贴士•在游戏中保持团队合作是非常重要的。
与队友紧密配合,合理分工,可以取得更好的战果。
•注意控制角色的血量和弹药量。
及时寻找补给箱补给,避免在关键时刻无法开火或被击倒。
•利用地形和掩体可以有效避免敌人的攻击,并提供战斗中的优势。
•随时注意敌人的位置和动向,通过观察和操控视角来获得更多的情报。
•针对不同的敌人类型,选择合适的武器和战术,才能更好地击败敌人。
结语上述只是《盟军敢死队2》中的一些基本操作,随着游戏的进行,你将不断学习和掌握更多的技巧和策略。
武器大师教学电脑操作方法武器大师是一款非常受欢迎的游戏,许多玩家都希望学习并掌握其中的电脑操作方法。
以下是我为您提供的关于武器大师电脑操作方法的详细回答。
武器大师是一款第一人称打击类游戏,玩家需要使用各种不同的武器来战胜敌人。
在游戏中,玩家需要学会如何使用键盘和鼠标来进行游戏操作。
首先,让我们来了解一下武器大师的默认键位设置:1. 移动:W,A,S,D,分别代表前进、左移、后退和右移。
2. 跳跃:空格键,按下空格键可以使角色跳起。
3. 转动视角:鼠标移动,通过鼠标的移动可以改变角色的视角。
4. 攻击:鼠标左键,按下鼠标左键可以使角色进行普通攻击。
5. 技能:鼠标右键,按下鼠标右键可以使角色释放技能。
6. 切换武器:数字键1~9,每个数字键都对应着不同的武器。
这些是武器大师的默认键位设置,但是玩家可以根据自己的习惯和需要进行重新设置。
接下来,我将为您介绍一些常用的操作技巧和操作方法。
1. 移动和跳跃:使用WASD键来控制角色的移动,通过组合按键可以进行更灵活的移动。
按下空格键可以使角色跳跃,可以使用跳跃来避免敌人的攻击或者到达高处的平台。
2. 转动视角:通过移动鼠标可以改变角色的视角,可以用来观察周围环境和发现敌人的位置。
掌握好鼠标的移动可以使你的角色更容易准确定位和攻击敌人。
3. 攻击和技能释放:使用鼠标左键进行普通攻击,使用鼠标右键释放技能。
不同的武器拥有不同的攻击方式和技能,玩家可以通过多次尝试和练习来熟悉每一种武器的攻击方式和技能释放。
同时,需要注意技能释放需要一定的冷却时间,不能过度依赖技能的使用。
4. 切换武器:使用数字键1~9可以切换不同的武器。
不同的武器在攻击方式和伤害值上会有所不同,玩家可以根据当前的战斗需求和自己的喜好来进行武器的切换。
5. 视角调整:如果您觉得角色的移动速度和视角调整速度不合适,可以进入游戏设置中进行调整。
在设置中,您可以调整鼠标的灵敏度、视角的旋转速度等参数,以适应自己的操作习惯。

使命召唤官网手柄操作方法
使命召唤官网手柄操作方法主要包括以下几个方面:
1. 主菜单操作:使用手柄的方向键来选择不同的选项,使用A键确认选择。
2. 游戏内移动:使用左手柄的左、右、上、下方向键来控制人物的移动,使用右手柄的ABXY键来控制不同的动作,例如跳跃、射击等。
3. 瞄准和射击:使用左手柄的右摇杆来控制瞄准的方向,使用右手柄的扳机键来射击。
4. 切换武器:使用左手柄的LB和RB键来切换不同的武器或者道具。
5. 互动和使用道具:根据游戏情况,使用手柄的不同键来进行互动操作,例如打开门、拾取物品等。
6. 游戏设置调整:使用手柄的START键来打开游戏设置菜单,在菜单中使用方向键选择不同的设置选项,使用A键确认设置。
每款使命召唤游戏的手柄操作方法可能会有些许差异,具体使用方式还需要根据游戏版本和平台来确定,可以参考游戏的官方手册或者在游戏中查看控制设置来
获取更详细的手柄操作方法。
使命召唤1按键操作方法《使命召唤1》是一款经典的第一人称射击游戏,被誉为射击游戏的巅峰之作之一。
游戏的按键操作方法对于新手来说可能需要一些时间来适应,下面我将详细介绍《使命召唤1》的按键操作方法以及一些高级技巧。
首先,我们来了解一下游戏的基本按键操作方法:移动:W键向前走,S键向后走,A键向左走,D键向右走。
通过鼠标可以控制视角的转动,滚轮可切换武器。
射击:鼠标左键为射击,按住鼠标左键可以连续射击,右键为瞄准,按住右键可以进入瞄准模式,提高射击的精准度。
换弹:R键为换弹操作,当你的弹药消耗殆尽时,按下R键可以更换弹夹,保证你在战斗中的持续火力。
投掷物品:G键用于投掷手雷和烟雾弹,通过G键你可以将这些物品投掷到你想要的位置。
跳跃和蹲伏:空格键用于跳跃,按住Ctrl键可以蹲伏,这两个动作在战斗中很重要,可以帮助你躲避敌人的攻击。
使用道具:F键用于使用道具,比如拆除地雷、修复坦克等。
以上就是《使命召唤1》的基本按键操作方法,对于新手来说可能需要一些时间来熟悉。
除了基本的按键操作外,下面我将介绍一些高级技巧,帮助玩家在游戏中取得更好的战绩。
头部射击:在射击时,尽量瞄准敌人的头部,因为头部射击可以造成更高的伤害,快速击倒对手。
掩体战斗:在遭遇敌人时,尽量寻找掩体,利用掩体来躲避敌人的攻击,同时也可以利用掩体射击攻击敌人。
战术移动:在行动中不断变换位置,不要停留在一个地方,这样可以增加你的生存能力,降低被敌人发现的概率。
团队配合:《使命召唤1》有多人游戏模式,团队配合是非常重要的。
与队友沟通、协作是胜利的关键。
利用战车:在游戏中经常会遇到战车,利用战车可以获得强大的火力支持,同时也可以提供良好的掩护,从而增加生存能力。
以上是《使命召唤1》的按键操作方法和一些高级技巧,通过熟练掌握这些操作方法和技巧,相信你可以在游戏中取得不错的成绩。
同样需要注意的是,以及以及和但是并没有说明两件事情之间的关系是怎样的,我们要抓住其中的联系逻辑来解决这一结构的理解,而不仅仅是解决这一结构的理解,同时也要抓住它的联系逻辑。
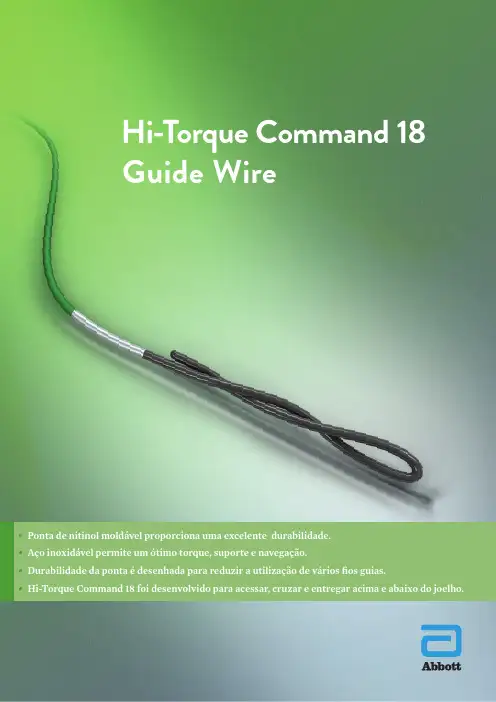
••• os guias.•O MELHOR DO NITINOL E DO PONTA DE NITINOL EXTREMAMENTE DURÁVEL com 10 cm de nitinol na ponta distal proporcionando alto suporte e fl exibilidade na ponta (4g) desenhado para cruzar oclusões ou prolapsos na subintimal do vaso .nal proximal proporciona excelente suporte e torque. nal proximal proporciona excelente suporte e torque Hi-Torque Command 18 LT pode ser utilizado com um suporte de um cateter para aumentar suporte ou controle do tamanho da circunferência.oldável, porém projetada para durar.Hi-Torque Command e Hi-Torque Command ES foram porciona excelente suporte e torque.porciona excelente suporte e torquecom um suporte de um cateter para aumentar erência.l de SuporteDO NTE DURÁVEL 10 cm de nitinol na ponta distal porte e fl exibilidade na pontaNome do ProdutoSAP Diâmetro Comprimento d a ponta de NitinolPeso de ponta Formato da Ponta Comprimento do fio Hi-Torque Command 18 ST 10137850.018´´10cm 4g Reta 300cm Hi-Torque Command 18 LT10138070.018´´25cm4gReta300cmSolda Patenteada sem transição para uma fácil compatibilidade etransmissão de torqueCobertura de Polímero com revestimento hidrofílico para lubricidade e fácilnavegaçãoAlta Resistencia à TraçãoAço InoxidávelPara um excelente suporte,navegação e torqueNúcleo Parabólico Projetado sem marcas de transições para um ótimocontrole de torque3 cm ponta radiopaca de coilsPonta Achatada projetada para moldar e remoldarPonta de Nitinol moldável e durável proporciona uma excelente durabilidade de ponta (até mesmo apósprolapsos)Design híbrido com tecnologia de dual metal, reunindo as principais vantagens do aço inoxidável e nitinolNitinolSS©2019 Abbott. Todos os direitos reservados. As informações contidas neste material são para uso exclusivo no Brasil. Abbott Laboratórios do Brasil Ltda. RuaMichigan, 735 – Brooklin, São Paulo – SP – 04566-905 - Brasil Central de Relacionamento com Cliente: 0800 703 1050 HI-TORQUE COMMAND 18 GUIDE WIRE - Registro ANVISA Nº 80146502044 A Command 18 é marca da empresa Abbott. O produto mencionado neste material destina-se à utilização por um médico. Antes da utilização, é importante ler a bula completamente para as instruções de uso, advertências e possíveis complicações associadas ao uso deste dispositivo. Para a utilização desse(s) produto(s) é necessário treinamento prévio. Todos os desenhos são apenas representações artísticas e não devem ser considerados desenhos técnicos ou fotografias. Testes realizados e dados arquivados pela Abbott Vascular. Código SAP20031600. BR-60199-07 05/2019。
F-22 Raptor的操作手册
A 自动驾驶
Enter 锁定目标
B 刹车
/ 显示操作键
C 释放金属乾扰物
’’ 显示最危险的目标
G 放下/拉起起落架
; 轮流切换武器
H 自动驾驶返回基地
. HUD显示颜色的明暗变化
L 自动拉平
[ 选择上一个目标
M 任务简报
] 选择下一个目标
N 轮流切换到下一个导航点不论是友军还是敌军R 开/关雷达
Page Down 右转
S 雷达显示范围缩小
Delete 左转
X 雷达显示范围扩大
Ctrl+J 弹射逃生
W 给僚机命令
1 切换到AIM-120空对空导弹
2 切换到AIM-9响尾蛇空对空导弹
3 切换到机炮
4 切换到JDAM空对地集束炸弹
6 发动机60%功率
7 发动机70%功率
8 发动机80%功率
9 发动机90%功率
0 发动机100%功率
F1-F4 长机的各种视角
F5-F8 僚机的各种视角
F9-F12 时间加速1、2、4、6倍
Keypad2 显示弹药贮藏状况
Keypad4/Insert 显示防御系统状况
Keypad5/Home 显示导航系统状况
Keypad6/PageUp 显示攻击系统状况
Keypad7 显示系统损坏状况
Keypad8 开启/关闭导航视窗
Keypad9 人工驾驶
BackSpace 打开加力
Tab/Crtl Tab 确定目标为攻击目标SpaceBar 开火
Break 暂停游戏。
ROBOT操作入门ROBOT操作入门1. 简介ROBOT(Remote Open Bionics Operating System)是一种远程操作的操作系统。
它提供了丰富的功能和灵活的操作方式,使用户能够轻松地控制和操作。
本文档将介绍ROBOT的基本操作入门,帮助读者快速上手。
2. 安装ROBOT要开始使用ROBOT,需要将其安装在您的操作系统上。
以下是安装ROBOT的步骤:1. ROBOT安装包:您可以从ROBOT官方网站最新的ROBOT安装包。
2. 解压安装包:将的安装包解压到您选择的目标文件夹中。
3. 配置环境变量:打开终端或命令提示符,将ROBOT安装路径添加到您的系统环境变量中。
完成上述步骤后,ROBOT就已经成功安装在您的系统中了。
3. 连接ROBOT在开始操作ROBOT之前,您需要先将ROBOT与您的设备进行连接。
以下是连接ROBOT的步骤:1. 打开ROBOT控制面板:在您的设备上启动ROBOT控制面板。
2. 选择连接方式:ROBOT支持多种连接方式,包括USB连接和Wi-Fi连接。
根据您的实际情况选择合适的连接方式。
3. 输入连接信息:根据选择的连接方式,输入相应的连接信息,如IP地质、端口号等。
完成上述步骤后,ROBOT就会与您的设备成功连接。
4. 控制ROBOTROBOT提供了多种方式来控制的运动和操作。
以下是一些常用的控制方式:4.1. 通过控制面板控制ROBOT的控制面板提供了直观的可视化界面,可以通过按钮、拖动滑块等方式来控制的动作。
您可以根据的实际情况选择相应的动作和控制方式。
4.2. 通过命令行控制ROBOT还支持通过命令行来控制。
您可以使用命令行工具,发送指令给ROBOT控制系统,实现的运动和操作。
以下是一些常用的命令行指令:- `robot.move(forward)`: 使向前移动。
- `robot.move(backward)`: 使向后移动。
- `robot.turn(left)`: 使向左转向。
坦克世界基本操作方法
1. 移动:使用W、A、S、D键或方向键控制坦克移动。
按住Shift键可加速前进。
2. 射击:使用鼠标左键或空格键射击。
按住左键可持续射击。
3. 瞄准:使用鼠标移动,调整瞄准方向。
点击右键进入瞄准模式,可更精确瞄准。
4. 切换炮弹:使用数字键1、2、3切换使用不同炮弹类型。
5. 治疗:按键“6”使用自身坦克的医疗道具进行治疗。
6. 制动:按住空格键或X键使用制动。
制动后会加快停机时间和减少制动距离,但会导致火力降低。
7. 战术命令:使用快捷键F1-F8进行战术指挥,如请求支援、攻击某个目标等。
8. 瞭望:使用C键进入瞭望模式,可以看到周围的地形和敌方坦克位置。
9. 驱逐战车:按下V键可将观察视角切换到友方驱逐战车,可进行追踪和指挥。
10. 声音控制:使用快捷键“+”、“-”调整游戏声音大小。
使命召唤技能按键操作方法使命召唤是一款非常流行的射击游戏系列,每年都会推出新作。
作为一款FPS 游戏,玩家需要掌握各种技能和按键操作来提高自己的游戏技巧。
下面是使命召唤的一些常见技能和按键操作方法:1. 移动操作:WASD - 控制角色的前进、后退、左右移动Shift - 快速奔跑Ctrl - 下蹲Space - 跳跃Caps Lock - 切换正常/奔跑姿势2. 射击操作:左键鼠标- 射击右键鼠标- 瞄准R - 重新装填弹药G - 丢手雷Q - 切换武器3. 技能和特殊操作:E - 互动(开门、捡取物品等)F - 使用特殊技能(视游戏设定而定,如近战攻击、刺杀等)V - 切换视角(第一人称/第三人称)X - 使用无人机/神经病毒等特殊技能4. 团队协作和通信:T - 文字聊天Y - 语音聊天Tab - 查看得分榜和队友状态M - 查看地图信息5. 更多高级操作:C - 趴下Alt - 同时按住可以自由转头数字键1-4 - 使用特殊技能或道具(如医疗包、子弹盒等)Ctrl + 数字键- 使用特殊技能(如无限子弹、近战加强等)在使命召唤中,玩家需要根据实际情况灵活运用这些技能和按键操作。
与队友密切合作,合理分工,展现出良好的战术意识和操作能力是取得游戏胜利的关键。
同时,玩家还可以自定义按键设置,根据个人习惯和设备性能进行适当调整。
为了在使命召唤中取得更好的成绩,玩家还可以通过练习和使用一些特殊技巧来提高自己的操作水平。
例如:- 准心定位:通过移动鼠标精确对准目标,获得更精准的射击;- 快速瞄准:利用快速瞄准技巧,在短时间内迅速准心对准目标;- 快速换枪:根据游戏情况,掌握快速切换武器的技巧,以应对不同的战斗场景;- 灵活对敌:通过及时的移动和躲避,使敌人难以命中,增加自身生存能力;- 战术手榴弹:通过合理投掷手榴弹,在特定区域内对敌人造成巨大伤害或控制敌人。
总之,使命召唤是一款需要玩家熟练掌握技能和按键操作的游戏。
1.3 初步创建游戏的场景(1)使用主菜单的窗口Window->Terrain Texture Painter 渲染游戏的地面,使用三类画面,荒草patchy.jpg 、绿地grass.jpg 和沙漠sand.jpg ,见图1(2)使用主菜单的窗口Camera->Toggle Camera 使用玩家视角,使用主菜单的窗口Action->Excavate 和Flatten 将玩家出生的地方整理的比较平坦,注意,不要将玩家埋没,只有在渲染条件下主菜单才有Action 项(3)使用主菜单的窗口Window->World Editor Creator F4 在窗口右下角按照图2的方式,在玩家出生的脚下添加一个Logo ,以便找到自己的位置。
见图2(4)使用主菜单的窗口Window->World Editor Creator F4在窗口右下角按照图3的方式,在开发平台上添加树的目录trees ,然后在里面添加各种树。
见图4(5)根据需要可以多建几个目录,例如再建一个placeEnviron 用来包含其他场景(6)添加一个logos 目录,在该目录下添加几个Shapes\items\ 下的logo 模型。
该模型将作为后面的宝使用, 如图5 所示的游戏场景的目录结构(7)使用主菜单的窗口Files->Save Mission…Ctrl S 将场景建立结果保存到Capturetreasure/data/missions/ 目录下的Capturetreasure.mis 文件中1.4 :添加模型对象完成游戏启动与退出1 .添加模型对象,将一个卵石添加为一个Item 模型对象以后作为宝石(1)修改Capturetreasure/server/logoitem.cs ,将1_logoitem+.cs 中的程序添加上,建立模型目录下的新的模型分类Boulders(2)将item.cs 复制到Capturetreasure/server/ 目录下,并在game.cs 的onServerCreated() 函数的末尾添加item.cs 的加载执行,exec(“./item.cs”);(3)重新启动游戏开发平台,就可以在shapes 目录下看到Boulders 类,及其里面的boulderitem 模型。
教程:武器连续切换系统作者:吴波描述:本教程讲述了如何连续的切换武器,使用统一的按键或鼠标滚轮,而不是按键盘上的数字键,这个功能在FPS游戏中是非常重要的,尤其当你面对一个网络玩家而不是电脑BOT的时候,快速的切换成适当的武器,以保持最强的攻击能力。
1.首先确保几个武器都可以在游戏中正常的切换,前面我们将过用“1”-“8”数字键是可以完成切换的功能的。
2.备份工作文件夹以防数据损坏。
我们这个教程用的工作文件夹是“Bulibuli”文件夹。
3.打开“client/scripts”目录下的“Default.Binds.cs”文件,在关于开火“ fire”的描述功能语句后加入:function prevWeapon( %val ){if ( %val )commandToServer( 'cycleWeapon', "prev" );}function nextWeapon( %val ){if ( %val )commandToServer( 'cycleWeapon', "next" );}moveMap.bind(keyboard, "ctrl q", prevWeapon);// "ctrl q"前一个武器moveMap.bind(keyboard, "q", nextWeapon);// "q"后一个武器4.打开“client/scripts”目录下的“optionsDLG.cs”文件,在段尾加入:$RemapName[$RemapCount] = "Previous Weapon";$RemapCmd[$RemapCount] = "prevWeapon";$RemapCount++;$RemapName[$RemapCount] = "Next Weapon";$RemapCmd[$RemapCount] = "nextWeapon";$RemapCount++;5.打开“server/scripts”目录下的“inventory.cs”文件,在开头处加入:$weaponInSlot[0] = "Browning";$weaponInSlot[1] = "shotgun";$weaponInSlot[2] = "m16";$weaponInSlot[3] = "PSWrifle";$maxWeaponSlot = 4;注意:标注成红色的武器名要与自己的武器名相同,当然也可以再加更多的武器6.在文件的段尾加入:function ShapeBase::hasInventory(%this, %data){return (%this.inv[%data] > 0);}function serverCmdCycleWeapon( %client, %data ){%client.getControlObject().cycleWeapon( %data );}function ShapeBase::cycleWeapon( %this, %data ){%slot = -1;if ( %this.getMountedImage($WeaponSlot) != 0 ) {%curWeapon = %this.getMountedImage($WeaponSlot).item.getName();if(%curWeapon $= "Browning")%slot = 0;else if(%curWeapon $= "shotgun")%slot = 1;else if(%curWeapon $= "m16")%slot = 2;else if(%curWeapon $= "PSWrifle ")%slot = 3;}if ( %data $= "prev" ) {// Previous weapon...if ( %slot == 0 || %slot == -1 ) {%i = $maxWeaponSlot;%slot = 0;}else%i = %slot - 1;}else {// Next weapon...if ( %slot == $maxWeaponSlot || %slot == -1 ) {%i = 0;%slot = $maxWeaponSlot;}else%i = %slot + 1;}%newSlot = -1;while ( %i != %slot ) {if ( $weaponInSlot[%i] !$= ""&& %this.hasInventory( $weaponInSlot[%i] )) {// player has this weapon and it has ammo or doesn't need ammo %newSlot = %i;break;}if ( %data $= "prev" ) {if ( %i == 0 )%i = $maxWeaponSlot;else%i--;}else {if ( %i == $maxWeaponSlot )%i = 0;else%i++;}}if ( %newSlot != -1 )%e( $weaponInSlot[%newSlot] );}7.打开“client”下的“config.cs”文件,填加下面的语句:moveMap.bind(keyboard, "ctrl q", prevWeapon);// "ctrl q"前一个武器moveMap.bind(keyboard, "q", nextWeapon);// "q"后一个武器8.把所有修改好的文件都存盘,进入游戏看下效果吧。
教程:武器切换作者:吴波描述:在FPS模式游戏中,武器切换是最重要的功能之一,本教程将帮大家了解武器切换的具体做法。
注意:这次我们将直接使用“starter.fps”来作为工作目录,相信在经过前几个教程的学习后,大家对Torque1.5引擎有了基本的了解,也构建了自己的工作目录,以前用到的很多脚本文件都是从Torque1.5的“starter.fps”示例文件夹中复制出来的,以便由浅入深的让大家了解整个引擎的框架,这个教程因涉及到很多内容,不能一一讲述,顾直接使用“starter.fps”示例文件来完成这个教程。
在前面的教程中,我们用的是火箭筒作为武器,而在“starter.fps”示例中,游戏者使用的是弩,我们设法将火箭筒配备给“starter.fps”中的游戏角色(兽人),闲话不多说了,现在就开始吧。
1.首先还是备份工作目录“starter.fps”,这一步是很重要的。
2.将素材目录里的“rocket_launcher”文件夹拷贝到“starter.fps\data\shapes”下,将“rocket_launcher_1.cs”文件拷贝到“\starter.fps\server\scripts”文件夹,并改名为“rocket_launcher.cs”(当然也可以不改名,但后面的操作也要做相应的调整)。
3.打开以下目录中的两个文件并填加红色的语句:game\starter.fps\client\config.cs:// Torque Input Map Fileif (isObject(moveMap)) moveMap.delete();new ActionMap(moveMap);moveMap.bindCmd(keyboard, "escape", "", "escapeFromGame();");moveMap.bind(keyboard, "f2", showPlayerList);moveMap.bind(keyboard, "f5", toggleParticleEditor);moveMap.bind(keyboard, "a", moveleft);moveMap.bind(keyboard, "d", moveright);moveMap.bind(keyboard, "w", moveforward);moveMap.bind(keyboard, "s", movebackward);moveMap.bind(keyboard, "space", jump);moveMap.bind(keyboard, "r", setZoomFOV);moveMap.bind(keyboard, "e", toggleZoom);moveMap.bind(keyboard, "z", toggleFreeLook);moveMap.bind(keyboard, "tab", toggleFirstPerson);moveMap.bind(keyboard, "alt c", toggleCamera);moveMap.bindCmd(keyboard, "ctrl w", "commandToServer(\'playCel\',\"wave\");", "");moveMap.bindCmd(keyboard, "ctrl s", "commandToServer(\'playCel\',\"salute\");", ""); moveMap.bindCmd(keyboard, "ctrl k", "commandToServer(\'suicide\');", "");moveMap.bindCmd(keyboard, "h", "commandToServer(\'use\',\"HealthKit\");", "");moveMap.bindCmd(keyboard, "1", "commandToServer(\'use\',\"Crossbow\");", "");moveMap.bindCmd(keyboard, "2", "commandToServer(\'use\',\"Rocket_Launcher\");", ""); moveMap.bind(keyboard, "u", toggleMessageHud);moveMap.bind(keyboard, "pageup", pageMessageHudUp);…game\starter.fps\client\scripts\defaultbind.cs://------------------------------------------------------------------------------// Misc. Player stuff//------------------------------------------------------------------------------moveMap.bindCmd(keyboard, "ctrl w", "commandToServer('playCel',\"wave\");", "");moveMap.bindCmd(keyboard, "ctrl s", "commandToServer('playCel',\"salute\");", ""); moveMap.bindCmd(keyboard, "ctrl k", "commandToServer('suicide');", "");//------------------------------------------------------------------------------// Item manipulation//------------------------------------------------------------------------------moveMap.bindCmd(keyboard, "h", "commandToServer('use',\"HealthKit\");", "");moveMap.bindCmd(keyboard, "1", "commandToServer('use',\"Crossbow\");", "");moveMap.bindCmd(keyboard, "2", "commandToServer(\'use\',\"Rocket_Launcher\");", "");//moveMap.bindCmd(keyboard, "3", "commandToServer(\'use\',\"mp5\");", "");//moveMap.bindCmd(keyboard, "4", "commandToServer(\'use\',\"grenadeLauncher\");", "");//moveMap.bindCmd(keyboard, "5", "commandToServer(\'use\',\"LaserBeam\");", "");//moveMap.bindCmd(keyboard, "6", "commandToServer(\'use\',\"flamer\");", "");//moveMap.bindCmd(keyboard, "7", "commandToServer(\'use\',\"grenadeTimer\");", "");//moveMap.bindCmd(keyboard, "8", "commandToServer(\'use\',\"missileLauncher\");", "");…4.在\game\starter.fps\server\scripts\game.cs脚本文件中填加火箭筒相关语句:// Load up all datablocks, objects etc. This function is called when // a server is constructed.exec("./audioProfiles.cs");exec("./envAudioProfiles.cs");exec("./camera.cs");exec("./markers.cs");exec("./triggers.cs");exec("./inventory.cs");exec("./shapeBase.cs");exec("./item.cs");exec("./environment.cs");exec("./health.cs");exec("./staticShape.cs");exec("./weapon.cs");exec("./radiusDamage.cs");exec("./crossbow.cs");exec("./rocket_launcher.cs");exec("./environment.cs");exec("common/server/lightingSystem.cs");exec("./player.cs");exec("./animy.cs");exec("./chimneyfire.cs");exec("./aiplayer.cs");exec("./sgExamples.cs");5.在“\starter.fps\server\scripts\player.cs”脚本文件中填加以下语句,以保证武器可以被检起来。