Dependency Injection
- 格式:docx
- 大小:107.69 KB
- 文档页数:10
Ioc英文为Inversion of Control,即反转模式,这里有著名的好莱坞理论:你呆着别动,到时我会找你。
后被Martin Fowler改名为Dependency Injection 依赖注射,也就是将类之间的关系通过第三方进行注射,不需要类自己去解决调用关系。
AInterface a = new AInterfaceImp();AInterfaceImp是接口AInterface的一个子类,Ioc模式可以延缓接口的实现,根据需要实现,有个比喻:接口如同空的模型套,在必要时,需要向模型套注射石膏,这样才能成为一个模型实体,因此,我们将人为控制接口的实现成为“注射”。
其实Ioc模式也是解决调用者和被调用者之间的一种关系,上述AInterface实现语句表明当前是在调用被调用者AInterfaceImp,由于被调用者名称写入了调用者的代码中,这产生了一个接口实现的原罪:彼此联系,调用者和被调用者有紧密联系,在UML中是用依赖Dependency 表示。
但是这种依赖在分离关注的思维下是不可忍耐的,必须切割,实现调用者和被调用者解耦,新的Ioc模式Dependency Injection 模式由此产生了,Dependency Injection模式是依赖注射的意思,也就是将依赖先剥离,然后在适当时候再注射进入。
在通常传统情况下,为了实现调用者和被调用者解耦,分离,一般是通过工厂模式实现的,下面将通过比较工厂模式和Ioc模式不同,加深理解Ioc模式。
工厂模式和Ioc假设有两个类B 和C:B作为调用者,C是被调用者,在B代码中存在对C的调用:实现comp实例有两种途径:单态工厂模式和Ioc。
工厂模式实现如下:特点:每次运行时,MyFactory可根据配置文件XML中定义的C子类实现,通过createInstanceOfC()生成C的具体实例。
使用Ioc依赖性注射( Dependency Injection )实现Picocontainer如下,B类如同通常POJO 类,如下:public class B{private C comp;public B(C comp){p = comp;}public void someMethod(){p.sayHello();}......}假设C接口/类有有一个具体实现CImp类。
java inject用法Java中的@Inject用法在Java中,@Inject是一个注解,用于标识依赖注入(Dependency Injection)的目标。
依赖注入是一种设计模式,通过将一个或多个依赖对象注入到目标对象中,实现对象之间的解耦和灵活性。
1. @Inject注解的使用@Inject注解可以用于构造函数、方法、字段和任何自定义注解中。
下面分别介绍在这些场景中的使用方法。
2. 在构造函数中使用@Inject@Inject注解可以用于构造函数,用于标识需要进行依赖注入的构造函数。
在依赖注入的过程中,被注入的依赖对象会自动通过构造函数来创建并传入目标对象。
javapublic class Example {private Dependency dependency;@Injectpublic Example(Dependency dependency) {this.dependency = dependency;}}上述代码中的Example类有一个Dependency类型的依赖对象,通过@Inject注解标识了构造函数,表示需要对该构造函数进行依赖注入。
3. 在方法中使用@Inject@Inject注解还可以用于方法,用于标识需要进行依赖注入的方法。
在依赖注入的过程中,被注入的依赖对象会自动通过方法调用来获取。
javapublic class Example {private Dependency dependency;@Injectpublic void setDependency(Dependency dependency) { this.dependency = dependency;}}上述代码中的Example类有一个Dependency类型的依赖对象,通过@Inject注解标识了setDependency方法,表示需要对该方法进行依赖注入。
4. 在字段中使用@Inject@Inject注解还可以用于字段,用于标识需要进行依赖注入的字段。
androidhilt用法Android Hilt 是一个用于依赖注入(Dependency Injection)的开源库,由 Google 提供和维护。
它是 Dagger2 的插件,旨在简化使用Dagger2 进行依赖注入的过程,提供更简洁、易于测试、易于维护的代码结构。
使用 Android Hilt,可以通过注解的形式轻松地将依赖注入到Android 组件(如 Activity、Fragment、Service)中,而无需手动处理依赖项的创建和管理。
下面将详细介绍 Android Hilt 的用法。
1.添加依赖首先,在项目的 build.gradle 文件中,添加以下依赖项:```groovydependencies```2. 添加 Hilt Application```kotlinclass MyApplication : Applicatio//...```注意,应该继承 Hilt 的 Application 类而不是原生的Application 类。
3.注入依赖项```kotlinlateinit var myDependency: MyDependency//...```在这个例子中,我们注入了一个名为 `MyDependency` 的依赖项。
当`MyActivity` 创建时,Hilt 会自动实例化并注入这个依赖项。
4.提供依赖项为了使 Hilt 能够创建和注入依赖项,我们需要告诉它如何提供这些依赖项。
我们可以通过两种方式来提供依赖项:```kotlin//...``````kotlinobject MyModulefun provideMyDependency(: MyDependencyreturn MyDependency}```5.绑定和限定符有时候,不同的类可能需要相同类型的依赖项,而我们又希望为它们提供不同的实现。
为了解决这个问题,我们可以使用 Hilt 的绑定和限定符功能。
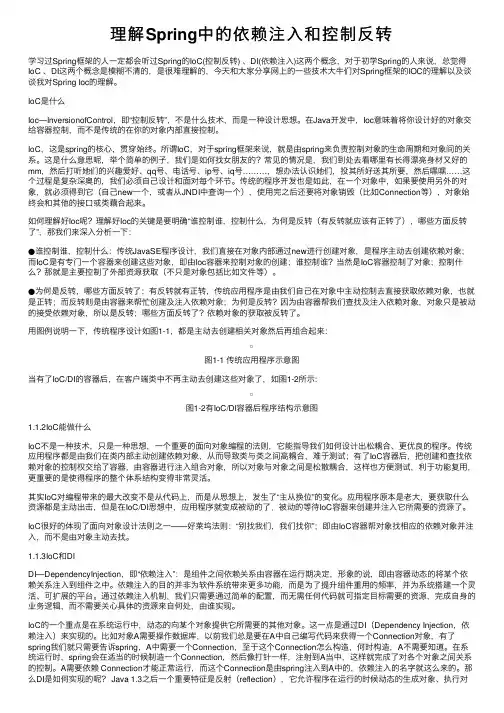
控制反转(IoC)与依赖注入(DI)1.控制反转(Inversion of Control)与依赖注入(Dependency Injection) 控制反转即IoC (Inversion of Control),它把传统上由程序代码直接操控的对象的调用权交给容器,通过容器来实现对象组件的装配和管理。
所谓的“控制反转”概念就是对组件对象控制权的转移,从1.控制反转(Inversion of Control)与依赖注入(Dependency Injection)控制反转即IoC (Inversion of Control),它把传统上由程序代码直接操控的对象的调用权交给容器,通过容器来实现对象组件的装配和管理。
所谓的“控制反转”概念就是对组件对象控制权的转移,从程序代码本身转移到了外部容器。
IoC是一个很大的概念,可以用不同的方式来实现。
其主要实现方式有两种:<1>依赖查找(Dependency Lookup):容器提供回调接口和上下文环境给组件。
EJB和Apache Avalon 都使用这种方式。
<2>依赖注入(Dependency Injection):组件不做定位查询,只提供普通的Java方法让容器去决定依赖关系。
后者是时下最流行的IoC类型,其又有接口注入(Interface Injection),设值注入(Setter Injection)和构造子注入(Constructor Injection)三种方式。
图1 控制反转概念结构依赖注入之所以更流行是因为它是一种更可取的方式:让容器全权负责依赖查询,受管组件只需要暴露JavaBean的setter方法或者带参数的构造子或者接口,使容器可以在初始化时组装对象的依赖关系。
其与依赖查找方式相比,主要优势为:<1>查找定位操作与应用代码完全无关。
<2>不依赖于容器的API,可以很容易地在任何容器以外使用应用对象。
android hilt用法Android Hilt是谷歌推出的一种依赖注入(Dependency Injection)框架,用于简化Android应用中的依赖注入过程。
Hilt结合了Dagger框架和Android框架,提供了一种更简化的方式来管理和注入应用中的依赖关系。
使用Android Hilt可以通过以下步骤:1. 在项目的build.gradle文件中添加Hilt插件依赖:```groovyplugins {id 'com.android.application'id 'kotlin-android'id 'kotlin-kapt'id 'dagger.hilt.android.plugin'}```2. 在应用的Application类上添加@HiltAndroidApp注解,这个注解会自动生成一个继承自Application的子类,用于全局管理依赖注入:```kotlin@HiltAndroidAppclass MyApplication : Application() {// ...}```3. 在依赖需要注入的地方添加@AndroidEntryPoint注解,例如在Activity、Fragment、Service等类中:```kotlin@AndroidEntryPointclass MainActivity : AppCompatActivity() {@Injectlateinit var myDependency: MyDependency// ...}```4. 在需要注入的依赖类中添加@Singleton或@Scoped等Hilt 提供的注解,并使用@Inject注解依赖的构造函数或方法:```kotlin@Singletonclass MyDependency @Inject constructor() {// ...}```5. 在Module类中使用@InstallIn注解指定依赖的作用范围,例如@Singleton表示全局单例,@ActivityScoped表示在Activity范围内等:```kotlin@Module@InstallIn(SingletonComponent::class)class AppModule {// ...}```6. 在Module类中使用@Provides注解提供具体的依赖实例: ```kotlin@Module@InstallIn(SingletonComponent::class)class AppModule {@Provides@Singletonfun provideMyDependency(): MyDependency {return MyDependency()}}```以上就是使用Android Hilt的基本步骤和用法,Hilt会自动管理依赖的创建和注入过程,大大简化了在Android应用中的依赖注入步骤。
什么是Java的依赖注入有什么作用在Java 编程的世界里,依赖注入(Dependency Injection,简称DI)是一个重要的概念。
对于初学者来说,可能一开始会觉得有些抽象和难以理解,但其实它就像是给程序中的各个部分“送物资”,让它们能够顺利地完成自己的工作。
想象一下,我们正在构建一个复杂的系统,就像是建造一座大厦。
在这座大厦中,有各种各样的房间和设施,每个房间和设施都有自己特定的功能。
比如,有一个房间是负责处理数据的,另一个房间是负责显示界面的。
如果我们不使用依赖注入,那么每个房间都需要自己去获取它所需要的资源和工具。
这就好比每个房间都要自己去外面的市场购买所需的材料,不仅麻烦,而且容易出错。
而且,如果某个材料的获取方式发生了变化,那么每个房间都需要去修改自己获取材料的代码,这会导致大量的重复工作和代码的混乱。
那么,依赖注入是如何解决这个问题的呢?简单来说,依赖注入就是把对象所需要的外部资源,通过某种方式注入到对象内部,而不是让对象自己去获取。
举个例子,假设我们有一个`UserService` 类,它需要一个`UserRepository` 对象来访问数据库获取用户数据。
如果没有依赖注入,`UserService` 可能会这样创建`UserRepository` 对象:```javapublic class UserService {private UserRepository userRepository = new UserRepository();public void doSomething(){//使用 userRepository 进行操作}}```在上述代码中,`UserService` 自己创建了`UserRepository` 对象。
这样做的问题是,如果`UserRepository` 的创建方式发生了变化,或者我们想要使用不同的`UserRepository` 实现,那么就需要修改`UserService` 的代码。

.net 依赖注入详解依赖注入(Dependency Injection,简称DI)是一种设计模式,用于降低代码之间的耦合度。
在.NET中,依赖注入主要通过构造函数、属性或方法参数来实现。
下面我将为你详解.NET中的依赖注入。
1. 什么是依赖注入?依赖注入是一种编程范式,它允许将对象的创建和配置从应用程序代码中分离出来,从而降低对象之间的耦合度。
在依赖注入中,一个对象依赖于另一个对象(即被依赖的对象),而不是直接创建被依赖的对象。
相反,被依赖的对象由外部容器(如IoC容器)负责创建和注入。
2. 为什么使用依赖注入?使用依赖注入有以下几个优点:降低耦合度:通过将对象的创建和配置从应用程序代码中分离出来,可以降低对象之间的耦合度,使得代码更加模块化和可维护。
提高可测试性:由于对象的创建和配置由外部容器负责,因此可以更容易地对对象进行单元测试,而不需要关心对象的创建过程。
提高可扩展性:通过使用接口和抽象类,可以轻松地替换或添加新的实现,而不需要修改现有的代码。
3. 如何在.NET中使用依赖注入?在.NET中,可以使用以下几种方式实现依赖注入:构造函数注入:在类的构造函数中传入需要依赖的对象。
这是最常见的依赖注入方式。
csharppublic class MyClass{private readonly IMyDependency _dependency;public MyClass(IMyDependency dependency){_dependency = dependency;}}属性注入:通过属性的方式将需要依赖的对象注入到类中。
这种方式适用于只需要一个实例的情况。
csharppublic class MyClass{public IMyDependency MyDependency { get; set; }}方法参数注入:在方法的参数中传入需要依赖的对象。
这种方式适用于方法需要多个实例的情况。
一、Spring框架的优点都有什么?Spring是分层的架构,你可以选择使用你需要的层而不用管不需要的部分Spring是POJO编程,POJO编程使得可持续构建和可测试能力提高依赖注入和IoC使得JDBC操作简单化Spring是开源的免费的Spring使得对象管理集中化合简单化二、描述一下Spring中实现DI(Dependency Injection)的几种方式方式一:接口注入,在实际中得到了普遍应用,即使在IOC的概念尚未确立时,这样的方法也已经频繁出现在我们的代码中。
方式二:Type2 IoC: Setter injection对象创建之后,将被依赖对象通过set方法设置进去方式三:Type3 IoC: Constructor injection对象创建时,被依赖对象以构造方法参数的方式注入Spring的方式三、简述你对IoC(Inversion of Control)的理解一个类需要用到某个接口的方法,我们需要将类A和接口B的实现关联起来,最简单的方法是类A中创建一个对于接口B的实现C的实例,但这种方法显然两者的依赖(Dependency)太大了。
而IoC的方法是只在类A中定义好用于关联接口B的实现的方法,将类A,接口B和接口B的实现C放入IoC的容器(Container)中,通过一定的配置由容器(Container)来实现类A与接口B的实现C的关联。
四、Spring对多种ORM框架提供了很好的支持,简单描述在Spring中使用Hibernate的方法。
在context中定义DataSource,创建SessionFactoy,设置参数;DAO类继承HibernateDaoSupport,实现具体接口,从中获得HibernateTemplate进行具体操作。
在使用中如果遇到OpenSessionInView的问题,可以添加OpenSessionInViewFilter或OpenSessionInViewInterceptor五、请介绍一下Spring的事务管理spring提供了几个关于事务处理的类:TransactionDefinition //事务属性定义TranscationStatus //代表了当前的事务,可以提交,回滚。
依赖注入怎样实现有几种方式依赖注入(Dependency Injection,简称DI)是指通过外部将依赖对象传递给一个类,而不是在类内部创建依赖对象的方式。
它是面向对象编程中的一种设计模式,旨在降低类与类之间的耦合度,提高代码的可测试性和可维护性。
依赖注入有多种实现方式,下面将详细介绍其中的几种方式。
1. 构造函数注入(Constructor Injection):构造函数注入是最常见和推荐的依赖注入方式之一、通过在类的构造函数参数中声明需要依赖的对象,然后在类的实例化过程中将依赖对象传递给构造函数。
这种方式可确保依赖对象在类的创建时就被注入,并且在类的生命周期中都存在。
2. Setter方法注入(Setter Injection):Setter方法注入是另一种常见的依赖注入方式。
通过在类中定义与依赖对象对应的setter方法,在使用类的时候通过调用setter方法将依赖对象注入。
这种方式相较于构造函数注入更加灵活,可以在任何时候替换依赖对象,并且不需要修改类的构造函数。
3. 接口注入(Interface Injection):接口注入是一种相对较少使用的依赖注入方式。
它要求类实现一个特定的接口,在调用类的方法时,通过接口的方法将依赖对象注入。
这种方式相较于构造函数注入和setter方法注入更为灵活,但也增加了代码的复杂度和维护成本。
4. 注解注入(Annotation Injection):注解注入是一种基于注解的依赖注入方式。
通过在类或者类的成员上添加特定的注解来标识依赖对象,然后在运行时使用注解处理器来解析注解,并将依赖对象注入到相应的位置。
注解注入方式相较于前面几种方式更加灵活,对类的改动要求较小,但需要依赖于特定的注解框架。
除了上述几种依赖注入方式,还有一些其他的实现方式,如上下文注入、工厂方法注入等。
不同的依赖注入方式适用于不同的场景,选择合适的方式需要结合具体的业务需求和技术架构来决定。
理解Spring中的依赖注⼊和控制反转学习过Spring框架的⼈⼀定都会听过Spring的IoC(控制反转) 、DI(依赖注⼊)这两个概念,对于初学Spring的⼈来说,总觉得IoC 、DI这两个概念是模糊不清的,是很难理解的,今天和⼤家分享⽹上的⼀些技术⼤⽜们对Spring框架的IOC的理解以及谈谈我对Spring Ioc的理解。
IoC是什么Ioc—InversionofControl,即“控制反转”,不是什么技术,⽽是⼀种设计思想。
在Java开发中,Ioc意味着将你设计好的对象交给容器控制,⽽不是传统的在你的对象内部直接控制。
IoC,这是spring的核⼼,贯穿始终。
所谓IoC,对于spring框架来说,就是由spring来负责控制对象的⽣命周期和对象间的关系。
这是什么意思呢,举个简单的例⼦,我们是如何找⼥朋友的?常见的情况是,我们到处去看哪⾥有长得漂亮⾝材⼜好的mm,然后打听她们的兴趣爱好、qq号、电话号、ip号、iq号………,想办法认识她们,投其所好送其所要,然后嘿嘿……这个过程是复杂深奥的,我们必须⾃⼰设计和⾯对每个环节。
传统的程序开发也是如此,在⼀个对象中,如果要使⽤另外的对象,就必须得到它(⾃⼰new⼀个,或者从JNDI中查询⼀个),使⽤完之后还要将对象销毁(⽐如Connection等),对象始终会和其他的接⼝或类藕合起来。
如何理解好Ioc呢?理解好Ioc的关键是要明确“谁控制谁,控制什么,为何是反转(有反转就应该有正转了),哪些⽅⾯反转了”,那我们来深⼊分析⼀下:●谁控制谁,控制什么:传统JavaSE程序设计,我们直接在对象内部通过new进⾏创建对象,是程序主动去创建依赖对象;⽽IoC是有专门⼀个容器来创建这些对象,即由Ioc容器来控制对象的创建;谁控制谁?当然是IoC容器控制了对象;控制什么?那就是主要控制了外部资源获取(不只是对象包括⽐如⽂件等)。
●为何是反转,哪些⽅⾯反转了:有反转就有正转,传统应⽤程序是由我们⾃⼰在对象中主动控制去直接获取依赖对象,也就是正转;⽽反转则是由容器来帮忙创建及注⼊依赖对象;为何是反转?因为由容器帮我们查找及注⼊依赖对象,对象只是被动的接受依赖对象,所以是反转;哪些⽅⾯反转了?依赖对象的获取被反转了。
java中injector的用法注入器(Injector)是Java中的一个重要概念,主要用于实现依赖注入(Dependency Injection),是构建可扩展、可维护和测试的应用程序的关键。
本文将详细介绍Java中注入器的用法,从基本概念开始,一步一步回答各种相关问题,帮助读者深入理解并应用注入器。
第一部分:基本概念1. 什么是注入器?注入器是一个实现了依赖注入的工具,主要用于解决对象之间的依赖关系。
2. 什么是依赖注入?依赖注入是一种设计模式,用于在对象之间传递依赖关系,而不是由对象自己创建或寻找依赖对象。
通过注入器,我们可以将依赖对象注入到需要它的对象中。
3. 注入器的作用是什么?注入器的作用是管理依赖关系,负责创建和注入对象的依赖。
第二部分:使用注入器1. 如何使用注入器?使用注入器的步骤如下:- 创建一个注入器实例。
- 配置注入器,指定依赖对象的创建方式。
- 在需要注入依赖的对象中,使用@Inject注解标记需要注入的属性或构造函数。
- 调用注入器的inject方法,注入依赖。
2. 使用注解进行依赖注入有什么好处?使用注解可以简化依赖注入的代码,并提高代码的可读性和可维护性。
3. Java中常用的注入器有哪些?在Java中,常用的注入器有Spring框架中的ApplicationContext和Google Guice。
第三部分:案例分析接下来,我们将以一个简单的示例来说明如何使用注入器。
假设我们有一个电商应用,包含订单服务和用户服务两个模块。
订单服务依赖于用户服务来获取用户信息。
1. 定义用户服务的接口和实现类:javapublic interface UserService {User getUserById(int id);}public class UserServiceImpl implements UserService { @Overridepublic User getUserById(int id) {从数据库中根据id获取用户信息}}2. 定义订单服务的接口和实现类:javapublic interface OrderService {void createOrder(int userId);}public class OrderServiceImpl implements OrderService { @Injectprivate UserService userService;@Overridepublic void createOrder(int userId) {User user = userService.getUserById(userId);创建订单并保存到数据库}}3. 使用注入器注入依赖:javapublic static void main(String[] args) {创建注入器实例Injector injector = Guice.createInjector();获取订单服务实例OrderService orderService =injector.getInstance(OrderService.class);调用订单服务方法orderService.createOrder(123);}通过上述代码,我们可以看到注入器的使用过程。
java中注入方式Java中的注入方式注入(Injection)是计算机编程中的一种常见技术,它用于将一个对象的依赖关系注入到目标对象中。
在Java编程中,注入是一种实现代码模块化和松耦合的重要技术手段之一。
本文将针对Java中的注入方式进行详细探讨,通过一步一步的方式回答有关注入的问题。
内容包括:什么是注入,为什么需要注入,在Java中的注入方式有哪些,以及如何进行注入。
希望通过本文的阐述,读者能够对Java中的注入方式有更深入的了解和应用。
第一部分:什么是注入(Introduction)注入,亦可称之为依赖注入(Dependency Injection),指的是在对象创建的过程中,通过构造函数、属性的设置方法或者接口来透明地传入对象所需要的依赖,而不需要在对象内部主动创建或者查找这些依赖。
在传统的方式中,对象需要自己负责创建和管理它所需要的依赖关系。
而通过注入的方式,将依赖关系的创建和管理交给了外部的容器或者调用者,使得对象的创建和依赖关系解耦。
第二部分:为什么需要注入(Motivation)为了更好地理解注入的必要性,我们来看一个例子:假设有一个Car类,它的构造函数中需要传入Engine对象作为其依赖关系。
在传统的方式中,Car类需要自己创建一个Engine对象并将其作为参数传入。
然而,当Car 类的依赖关系发生变化时,比如需要把Engine换成ElectricEngine,就需要修改Car类的代码。
这种紧耦合的设计不仅导致代码的可维护性和可测试性降低,还违背了面向对象设计原则中的单一职责原则和开放封闭原则。
而通过注入的方式,可以将Car类与Engine类解耦,将Engine对象的创建和管理交给外部的容器或者调用者。
这样,在更换Engine时,只需要修改容器或者调用者的配置,而不会影响到Car类的代码。
第三部分:Java中的注入方式(Injection in Java)在Java中,有多种注入方式可供选择。
依赖对象英语作文Dependency Injection (DI) is a software design pattern that is used to implement Inversion of Control (IoC) in an application. It involves separating the creation of an object from its usage, thus reducing coupling and increasing the flexibility of the code. In this article, we will explore the concept of DI and its benefits in software development.Dependency Injection is a technique that allows the creation of objects to be handled by an external entity, rather than being created within the class itself. This external entity is called a container, and it is responsible for managing the dependencies of the application. The container creates and manages the objects, and then injects them into the classes that require them.The main advantage of DI is that it reduces coupling between objects, making the code more modular and easier to maintain. By separating the creation of objects from theirusage, we can easily swap out dependencies without having to modify the code that uses them. This makes the code more flexible and adaptable to changing requirements.Another benefit of DI is that it promotes the use of interfaces, which makes the code more testable. By using interfaces, we can easily mock out dependencies during unit testing, allowing us to test our code in isolation. This makes it easier to identify and fix bugs, and ensures that our code is reliable and robust.DI can be implemented in several ways, including constructor injection, setter injection, and interface injection. Constructor injection involves passing dependencies to a class through its constructor, while setter injection involves passing dependencies through setter methods. Interface injection involves implementing an interface that defines the dependencies of a class, and then using a container to inject those dependencies.In conclusion, Dependency Injection is a powerful technique that can greatly improve the flexibility,maintainability, and testability of our code. By separating the creation of objects from their usage, we can reduce coupling and make our code more modular. This makes it easier to adapt to changing requirements and ensure that our code is reliable and robust. If you haven't already, I highly recommend exploring DI and its benefits in your own software development projects.。
javax.inject使用方法标题:javax.inject的使用方法及一步一步回答引言:在Java开发中,依赖注入(Dependency Injection)是一种常用的设计模式。
它通过将依赖关系从代码中解耦,提高了应用程序的可测试性、可维护性和可扩展性。
javax.inject包提供了依赖注入的相关接口和注解,本文将详细介绍javax.inject的使用方法。
第一部分:了解javax.inject1.1 什么是javax.inject?javax.inject是Java的一个标准扩展包,提供了依赖注入的支持。
它定义了一组接口和注解,用于描述依赖关系和注入行为。
1.2 javax.inject的核心接口和注解- 注解:@Inject、@Qualifier、@Scope、@Named等- 接口:Provider、Injector、Scope等1.3 为什么使用javax.inject?使用javax.inject可以实现以下好处:- 解耦依赖关系:通过注入依赖对象,实现了依赖关系的解耦,使得代码更加灵活、可维护和可测试。
- 可替换实现:通过使用接口和注解,可以轻松替换底层实现,提高了应用程序的可扩展性和可定制性。
- 便于单元测试:通过依赖注入,可以更方便地进行单元测试,提高了测试的可靠性和效率。
第二部分:使用javax.inject实现依赖注入2.1 添加依赖在使用javax.inject之前,需要将相关的包引入项目中。
可以通过Maven或Gradle等构建工具添加以下依赖:xml<dependency><groupId>javax.inject</groupId><artifactId>javax.inject</artifactId><version>1</version></dependency>2.2 创建依赖对象首先,需要创建一个或多个需要注入的依赖对象。
依赖注入的概念依赖注入(Dependency Injection,简称DI)是一种设计模式,它主要用于解耦和组织代码,使得代码易于测试、复用和维护。
依赖注入的核心思想是将依赖关系的创建和管理从被依赖的对象中抽离出来,由外部统一管理,通过将依赖对象注入到被依赖对象中,实现对象之间的解耦。
在传统的面向对象编程中,对象的创建和管理通常由对象自身负责。
当一个对象需要依赖其他对象进行操作时,它必须直接依赖于具体的对象实例,这就造成了对象之间的紧耦合关系。
这样的紧耦合会导致代码难以维护、扩展和测试。
而依赖注入通过将依赖的创建和管理责任交给外部来实现,从而实现了对象之间的解耦。
依赖注入的核心思想是:依赖应该由被依赖的对象的外部组件提供,被依赖的对象不应该关心依赖是如何创建的。
依赖注入的实现方式有多种,常见的有构造函数注入、Setter方法注入和接口注入。
具体的实现方式取决于编程语言和框架的特性。
构造函数注入是最常见的实现方式之一。
通过在对象的构造函数中接收依赖对象作为参数,将依赖对象注入到被依赖对象中。
这样,在创建被依赖对象时,外部组件可以通过构造函数来提供依赖对象,从而实现了依赖注入。
Setter方法注入与构造函数注入类似,通过在对象中定义Setter方法,将依赖对象通过Setter 方法注入到被依赖对象中。
接口注入是一种更加灵活的注入方式,通过定义一个接口来表示依赖,被依赖对象通过实现这个接口来表明自己需要依赖某个对象,外部组件则通过接口来提供依赖。
依赖注入的一个重要的好处是提高了代码的可测试性。
由于依赖对象的创建和管理被外部统一管理,我们可以通过使用Mock对象来代替真实的依赖对象,从而在测试环境下进行单元测试。
这种方式可以使测试更加专注和可控,提高了测试的效率和质量。
另一个重要的好处是提高了代码的复用性。
当一个对象的依赖发生变化时,只需要调整依赖注入的配置即可,而不需要修改被依赖对象的代码。
这样可以减少代码的复杂性和维护成本。
CDI原理什么是CDI?CDI(Contexts and Dependency Injection)是一种Java EE规范,用于管理对象之间的依赖关系和上下文环境。
它提供了一种强大的机制,可以在Java应用程序中实现松耦合和可扩展性。
CDI涉及的核心概念包括上下文、生命周期、依赖注入和事件。
CDI的核心概念1. 上下文(Contexts)上下文是由CDI容器维护的一种特定环境。
在上下文中,CDI容器跟踪和管理各个对象的生命周期。
常见的上下文类型包括请求上下文(Request Context)、会话上下文(Session Context)和应用程序上下文(Application Context)。
1.1 请求上下文(Request Context)请求上下文表示一次HTTP请求。
在请求上下文中创建的对象只在该请求处理期间可见,随后将被销毁。
1.2 会话上下文(Session Context)会话上下文表示整个用户会话周期。
在会话上下文中创建的对象将一直存在于整个会话过程中。
1.3 应用程序上下文(Application Context)应用程序上下文表示整个应用程序生命周期。
在应用程序上下文中创建的对象将在整个应用程序运行期间都可见。
2. 生命周期(Lifecycle)生命周期是指对象从创建到销毁的整个过程。
CDI为每个托管Bean(Managed Bean)定义了不同的生命周期,包括依赖注入、初始化和销毁。
3. 依赖注入(Dependency Injection)依赖注入是CDI的核心机制之一。
它通过注入依赖关系对象,实现了对象之间的解耦。
CDI容器负责查找依赖关系,并将其注入到需要的地方。
4. 事件(Events)CDI允许对象之间通过发布和触发事件来进行通信。
发布事件的对象称为事件生产者,而订阅并处理事件的对象称为事件消费者。
CDI的使用1. 引入CDI依赖CDI依赖可以通过Maven或Gradle等构建工具进行引入。
cdi机理随着计算机技术的不断发展,CDI也逐渐被大家所熟知。
那么,CDI机理是什么呢?下面,我们就来一步步地探究CDI的机制和原理。
第一步,什么是CDI?CDI全称为Contexts and Dependency Injection,意为上下文和依赖注入。
它是Java EE 6规范中的一部分,提供了一种在Java EE 应用程序中管理组件之间依存关系的机制。
它允许通过注入机制,让组件之间的依赖关系得到自动协调,无需手动编写那些繁琐的代码,这样可以提高开发者的生产力。
第二步,CDI的核心机制是什么?CDI的核心机制主要包括上下文、作用域、生命周期、事件、注入和装饰器等。
其中最关键的机制就是上下文机制,通过上下文机制,我们可以让不同区域的应用组件可以共享数据,从而达到复用和解耦的效果。
第三步,CDI中的作用域和生命周期是如何实现的?在CDI中,每个组件都有自己的作用域,决定了组件存在的时间和范围。
一般来说,有以下几种作用域:应用作用域、会话作用域、请求作用域和依赖作用域。
不同的作用域对应不同的生命周期,比如:应用作用域代表整个应用程序的生命周期,而依赖作用域代表某个组件的生命周期。
第四步,CDI中的事件机制是如何实现的?在CDI中,事件是通过触发事件源代码来实现的。
比如,我们可以通过注入Event<T>实例并调用fire()方法来触发事件。
同时,我们也可以通过声明观察者来监听事件,当事件被触发时自动更新相应的组件。
第五步,CDI的注入和装饰器是如何工作的?在CDI中,注入机制是通过@Inject标注实现的。
这样,组件之间的依赖关系就不再需要手动编写了,而是通过注入完成。
另外,CDI还提供了装饰器机制,可以通过装饰器对组件进行修饰,实现功能的增强和扩展。
总结起来,CDI机制的重点在于上下文、作用域、生命周期、事件、注入和装饰器等机制。
掌握这些机制的原理,可以大大提高开发效率,降低代码的耦合度,实现高效的模块化编程。
PRISM 4.0 TRAINING KIT Hands-On LabLab version: 1.0.0Last updated: 4/16/2013Contents OVERVIEW (3)EXERCISE 1 – CREATING AND REGISTERING THE SERVICE (4)Task 1 – Creating a Service (4)Task 2 –Registering the Service (4)EXERCISE 2 – CONSUMING A SERVICE (6)Task 1- Consuming the UIMessagesService (6)Task 2- Decoupling Modules (8)OverviewApplications based on the Prism Library are composite applications that potentially consist of many loosely coupled types and services. They need to interact to contribute content and receive notifications based on user actions. Because they are loosely coupled, they need a way to interact and communicate with one another to deliver the required business functionality.To tie together these various pieces, applications based on the Prism Library rely on a dependency injection container. Dependency injection containers reduce the dependency coupling between objects by providing a facility to instantiate instances of classes and manage their lifetime based on the configuration of the container. During the objects creation, the container injects any dependencies that the object requires into it. If those dependencies have not yet been created, the container creates and resolves their dependencies first. In some cases, the container itself is resolved as a dependency. For example, when using the Unity Application Block (Unity) as the container, modules have the container injected, so they can register their views and services with that container.Exercise 1 – Creating and registering the serviceIn this exercise you will learn how to create a service and register it in a dependency injection container, in this case Unity.Task 1 – Creating a Service1.Open the Prism.Workshop.slnsolution located in the \Dependency Injection\Exercise 1\Begin\folder.2.Add a new module project to the solution, named Workshop.UIMessagesModule.For moreinformation see the Modularity Hands-on-Lab located in \Modularity\Modularity-HOL.docx.Solution Structure after adding Workshop.UIMessagesModule module3.Create the UIMessagesService. Add a new UIMessagesService class to the project using thefollowing code.C#using System.Windows;namespace Workshop.UIMessagesModule.Services{public class UIMessagesService{public void ShowMessage(string message){// Show a messageMessageBox.Show(message);}}}Task 2 –Registering the Service1.Add the following references to the Workshop.UIMessagesModule project:◦Unity assembly, located at \Lib\Microsoft.Practices.Unity.Silverlight.dll.◦Prism assembly, located at \Lib\ Microsoft.Practices.Prism.dll.2.Add the following using statements to the UIMessagesModule class.e Property Injection to get an instance of the container. Add the following code to theUIMessagesModule class.C#/// <summary>/// DI Container./// Unity will inject an instance of the container. IUnityContainer isregistered in the container in the bootstrapper of the application./// </summary>[Dependency]public IUnityContainer Container { get; set; }4.Register the service in the container as a singleton when the module is initialized. To do this,use the Register method. In the UIMessageModule implement the initialize method asillustrated in the following code.C#public void Initialize(){// register the UIMessagesService as singletonthis.Container.RegisterType<UIMessagesService>(newContainerControlledLifetimeManager());}5.(Optional) Unity also allows the use of Constructor Injection for achieving the same results. Toget an instance of the Unity Container using Constructor Injection, remove the previous method and property, and add the following code in the UIMessagesModule class.private readonlyIUnityContainer container;/// <summary>/// Constructor for the UIMessagesModule./// Unity will inject an instance of the container. IUnityContainer isregistered in the container in the bootstrapper of the application./// </summary>/// <param name="container"></param>public UIMessagesModule(IUnityContainer container){this.container = container;}public void Initialize(){// register the UIMessagesService as singletonthis.container.RegisterType<UIMessagesService>(newContainerControlledLifetimeManager());}Exercise 2 – Consuming a ServiceIn this exercise, you will learn how to obtain a reference to a registered service and use it in your application.Task 1- Consuming the UIMessagesService1.Open the solution located in \Dependency Injection\Exercise 2\Begin\Prism.Workshop.sln2.In the Workshop.ModuleA, add a reference to the Workshop.UIMessagesService project. Thisreference will be removed in the last task.3.Add the following references to the Workshop.UIMessagesModule project:◦Unity assembly located at \Lib\Microsoft.Practices.Unity.Silverlight.dll.◦Prism assembly located at \Lib\ Microsoft.Practices.Prism.dll.4.In the ModuleA class add the following usingstatements:C#using System.Windows.Controls;using Microsoft.Practices.Prism.Modularity;using Microsoft.Practices.Prism.Regions;using Workshop.Infrastructure;e Constructor Injection to get an instance of the container. In the ModuleA class, add thefollowing code:C#public ModuleA(IRegionManagerregionManager, IUnityContainer container){this.regionManager = regionManager;}e the container to obtain an instance of the UIMessageService. To do this,use the Registermethod as follows:C#private readonlyUIMessagesServiceuiMessagesService;public ModuleA(IRegionManagerregionManager, IUnityContainer container){this.regionManager = regionManager;// Get an instance of the UIMessageServicethis.uiMessagesService = container.Resolve<UIMessagesService>();}7.To use the UIMessageService, add the following lines of code to the initialize the method.8.(Optional) Unity allows you to inject registered services directly, instead of using the container.To get an instance of the UIMessagesService using Constructor Injection replace the ModuleA constructor with the following code.C#/// <summary>/// Constructor for Module A/// </summary>/// <param name="regionManager">Unity will inject an instance of the container.IRegionManager is registered in the container in the bootstrapper of theapplication.</param>/// <param name="uiMessagesService">Unity will inject an instance of thecontainer. The UIMessagesService is registered by the UIMessagesModule.</param> public ModuleA(IRegionManagerregionManager, UIMessagesServiceuiMessagesService){this.regionManager = regionManager;// Get an instance of the UIMessageServicethis.uiMessagesService = uiMessagesService;}Message Shown using the UIMessageServiceTask 2- Decoupling ModulesModuleA module has a reference to UIMessageModule module. To decouple these modules perform the following steps.1.Create a new infrastructure project named Workshop.InfrastructureSolution structure adding an infrastructure project.2.Add a new interface named IUIMessageService using the following code.namespace Workshop.Infrastructure{public interface IUIMessagesService{void ShowMessage(string message);}}3.In the Workshop.UIMessageService project, add a reference to the Workshop.Infrastructureproject.4.Make the UIMessageService implement the IUIMessageService interface. In theUIMessageService class add bold code:C#using System.Windows;using Workshop.Infrastructure;namespace Workshop.UIMessagesModule.Services{public class UIMessagesService: IUIMessagesService{public void ShowMessage(string message){// Show a messageMessageBox.Show(message);}}}5.Register the service using the interface. On the Initialize method of theUIMessagesModule replace the service registration line as follows.6.In the Workshop.ModuleA project, add a reference to the Workshop.Infrastructure project.7.Make the ModuleA have a dependency on the service interface instead of the concrete class.To do this, change the theModuleA constructor as follows:using Microsoft.Practices.Prism.Regions;using Workshop.UIMessagesModule.Services;using Workshop.Infrastructure;namespace Workshop.ModuleA{public class ModuleA : IModule{private readonlyIRegionManagerregionManager;private readonlyIUIMessagesServiceuiMessagesService;/// <summary>/// Constructor for Module A/// </summary>/// <param name="regionManager">Unity will inject an instance of the container. IRegionManager is registered in the container in the bootstrapper of the application.</param>/// <param name="uiMessagesService">Unity will inject an instance of the container. The UIMessagesService is registered by theUIMessagesModule.</param>public ModuleA(IRegionManagerregionManage r,IUIMessagesServiceuiMessagesService){this.regionManager = regionManager;// Get an instance of the UIMessageServicethis.uiMessagesService = uiMessagesService;}…}8.Make ModuleA have a dependency on the UIMessagesService, by adding the following code tothe ModuleCatalog.xaml.XAML<Modularity:ModuleInfo Ref="Workshop.ModuleA.xap" ModuleName="ModuleA"ModuleType="Workshop.ModuleA.ModuleA, Workshop.ModuleA, Version=1.0.0.0" > <Modularity:ModuleInfo.DependsOn><sys:String>UIMessagesModule</sys:String></Modularity:ModuleInfo.DependsOn></Modularity:ModuleInfo>9.On the Workshop.ModuleA project, remove the reference to Workshop.UIMesssagesService.。