H3C路由器配置命令详解
- 格式:docx
- 大小:18.81 KB
- 文档页数:4
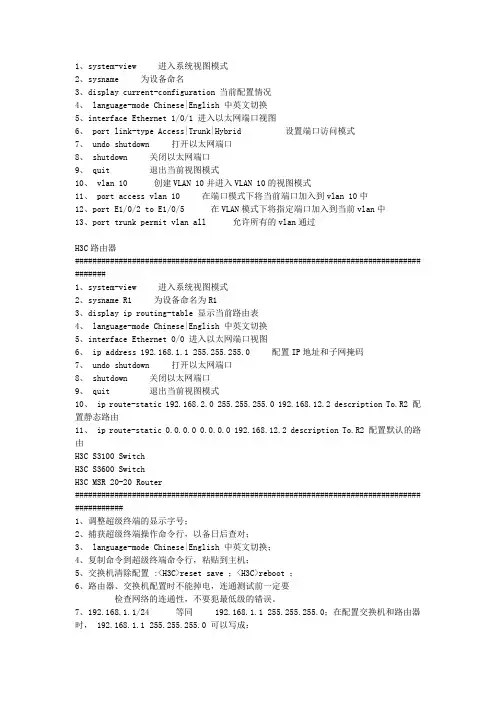
华为H3C路由器交换机配置命令详解2009-12-28 22:40:13|分类:Quidway-h3c|举报|字号订阅交换机命令[Quidway]super password修改特权用户密码[Quidway]sysname交换机命名[Quidway]interface ethernet 0/1进入接口视图[Quidway]interface vlan x进入接口视图[Quidway-Vlan-interfacex]ip address 10.65.1.1 255.255.0.0配置VLAN的IP地址[Quidway]ip route-static 0.0.0.0 0.0.0.0 10.65.1.2静态路由=网关[Quidway]user-interface vty 0 4进入虚拟终端[S3026-ui-vty0-4]authentication-mode password设置口令模式[S3026-ui-vty0-4]set authentication-mode password simple 222 设置口令[S3026-ui-vty0-4]user privilege level 3用户级别[Quidway-Ethernet0/1]duplex {half|full|auto}配置端口工作状态[Quidway-Ethernet0/1]speed {10|100|auto}配置端口工作速率[Quidway-Ethernet0/1]flow-control配置端口流控[Quidway-Ethernet0/1]mdi {across|auto|normal}配置端口平接扭接[Quidway-Ethernet0/1]port link-type {trunk|access|hybrid}设置端口工作模式[Quidway-Ethernet0/1]undo shutdown激活端口[Quidway-Ethernet0/2]quit退出系统视图[Quidway]vlan 3创建VLAN[Quidway-vlan3]port ethernet 0/1 to ethernet 0/4 在VLAN中增加端口[Quidway-Ethernet0/2]port access vlan 3当前端口加入到VLAN [Quidway-Ethernet0/2]port trunk permit vlan {ID|All}设trunk允许的VLAN [Quidway-Ethernet0/2]port trunk pvid vlan 3设置trunk端口的PVID [Quidway]monitor-port <interface_type interface_num>指定镜像端口[Quidway]port mirror <interface_type interface_num>指定被镜像端口[Quidway]port mirror int_list observing-port int_type int_num 指定镜像和被镜像[Quidway]description string指定VLAN描述字符[Quidway]description删除VLAN描述字符[Quidway]display vlan [vlan_id]查看VLAN设置[Quidway]stp {enable|disable}设置生成树,默认关闭[Quidway]stp priority 4096设置交换机的优先级[Quidway]stp root {primary|secondary}设置为根或根的备份[Quidway-Ethernet0/1]stp cost 200设置交换机端口的花费[SwitchA-vlanx]isolate-user-vlan enable设置主vlan [SwitchA]Isolate-user-vlan <x> secondary <list>设置主vlan包括的子vlan [Quidway-Ethernet0/2]port hybrid pvid vlan <id>设置vlan的pvid[Quidway-Ethernet0/2]port hybrid pvid删除vlan的pvid [Quidway-Ethernet0/2]port hybrid vlan vlan_id_list untagged 设置无标识的vlan如果包的vlan id与PVId一致,则去掉vlan信息. 默认PVID=1。
所以设置PVID为所属vlan id, 设置可以互通的vlan为untagged.路由器命令[Quidway]display version显示版本信息[Quidway]display current-configuration显示当前配置[Quidway]display interfaces显示接口信息[Quidway]display ip route显示路由信息[Quidway]sysname aabbcc更改主机名[Quidway]super passwrod 123456设置口令[Quidway]interface serial0进入接口[Quidway-serial0]ip address <ip> <mask|mask_len>配置端口IP地址[Quidway-serial0]undo shutdown激活端口[Quidway]link-protocol hdlc绑定hdlc协议[Quidway]user-interface vty 0 4[Quidway-ui-vty0-4]authentication-mode password[Quidway-ui-vty0-4]set authentication-mode password simple 222[Quidway-ui-vty0-4]user privilege level 3[Quidway-ui-vty0-4]quit[Quidway]debugging hdlc all serial0显示所有信息[Quidway]debugging hdlc event serial0调试事件信息[Quidway]debugging hdlc packet serial0显示包的信息静态路由:[Quidway]ip route-static <ip><mask>{interface number|nexthop}[value][reject|blackhole]例如:[Quidway]ip route-static 129.1.0.0 16 10.0.0.2[Quidway]ip route-static 129.1.0.0 255.255.0.0 10.0.0.2[Quidway]ip route-static 129.1.0.0 16 Serial 2[Quidway]ip route-static 0.0.0.0 0.0.0.010.0.0.2动态路由:[Quidway]rip设置动态路由[Quidway]rip work设置工作允许[Quidway]rip input设置入口允许[Quidway]rip output设置出口允许[Quidway-rip]network 1.0.0.0设置交换路由网络[Quidway-rip]network all设置与所有网络交换[Quidway-rip]peer ip-address[Quidway-rip]summary路由聚合[Quidway]rip version 1设置工作在版本1[Quidway]rip version 2 multicast设置工作在版本2,多播方式[Quidway-Ethernet0]rip split-horizon水平分隔[Quidway]router id A.B.C.D配置路由器的ID[Quidway]ospf enable启动OSPF协议[Quidway-ospf]import-route direct引入直联路由[Quidway-Serial0]ospf enable area <area_id>配置OSPF区域标准访问列表命令格式如下:acl <acl-number> [match-order config|auto]默认前者顺序匹配。
rule [normal|special]{permit|deny} [source source-addr source-wildcard|any]例:[Quidway]acl 10[Quidway-acl-10]rule normal permit source 10.0.0.0 0.0.0.255[Quidway-acl-10]rule normal deny source any扩展访问控制列表配置命令配置TCP/UDP协议的扩展访问列表:rule {normal|special}{permit|deny}{tcp|udp}source {<ip wild>|any}destination <ip wild>|any} [operate]配置ICMP协议的扩展访问列表:rule {normal|special}{permit|deny}icmp source {<ip wild>|any]destination {<ip wild>|any] [icmp-code] [logging]扩展访问控制列表操作符的含义equal portnumber等于greater-than portnumber大于less-than portnumber小于not-equal portnumber不等range portnumber1 portnumber2区间扩展访问控制列表举例[Quidway]acl 101[Quidway-acl-101]rule deny souce any destination any[Quidway-acl-101]rule permit icmp source any destination any icmp-type echo[Quidway-acl-101]rule permit icmp source any destination any icmp-type echo-reply [Quidway]acl 102[Quidway-acl-102]rule permit ip source 10.0.0.1 0.0.0.0 destination 202.0.0.1 0.0.0.0 [Quidway-acl-102]rule deny ip source any destination any[Quidway]acl 103[Quidway-acl-103]rule permit tcp source any destination 10.0.0.1 0.0.0.0 destination-port equal ftp[Quidway-acl-103]rule permit tcp source any destination 10.0.0.2 0.0.0.0 destination-port equal www[Quidway]firewall enable[Quidway]firewall default permit|deny[Quidway]int e0[Quidway-Ethernet0]firewall packet-filter 101 inbound|outbound地址转换配置举例[Quidway]firewall enable[Quidway]firewall default permit[Quidway]acl 101[Quidway-acl-101]rule deny ip source any destination any[Quidway-acl-101]rule permit ip source 129.38.1.4 0 destination any[Quidway-acl-101]rule permit ip source 129.38.1.1 0 destination any[Quidway-acl-101]rule permit ip source 129.38.1.2 0 destination any[Quidway-acl-101]rule permit ip source 129.38.1.3 0 destination any[Quidway]acl 102[Quidway-acl-102]rule permit tcp source 202.39.2.3 0 destination 202.38.160.1 0[Quidway-acl-102]rule permit tcp source any destination 202.38.160.1 0 destination-port great-than1024[Quidway-Ethernet0]firewall packet-filter 101 inbound[Quidway-Serial0]firewall packet-filter 102 inbound[Quidway]nat address-group 202.38.160.101 202.38.160.103 pool1[Quidway]acl 1[Quidway-acl-1]rule permit source 10.110.10.0 0.0.0.255[Quidway-acl-1]rule deny source any[Quidway-acl-1]int serial 0[Quidway-Serial0]nat outbound 1 address-group pool1[Quidway-Serial0]nat server global 202.38.160.101 inside 10.110.10.1 ftp tcp[Quidway-Serial0]nat server global 202.38.160.102 inside 10.110.10.2 www tcp[Quidway-Serial0]nat server global 202.38.160.102 8080 inside 10.110.10.3 www tcp [Quidway-Serial0]nat server global 202.38.160.103 inside 10.110.10.4 smtp udpPPP验证:主验方:pap|chap[Quidway]local-user u2 password {simple|cipher} aaa[Quidway]interface serial 0[Quidway-serial0]ppp authentication-mode {pap|chap}[Quidway-serial0]ppp chap user u1//pap时,不用此句pap被验方:[Quidway]interface serial 0[Quidway-serial0]ppp pap local-user u2 password {simple|cipher} aaachap被验方:[Quidway]interface serial 0[Quidway-serial0]ppp chap user u1[Quidway-serial0]local-user u2 password {simple|cipher} aaa。