VMware Server Linux上安装Oracle RAC 10g
- 格式:pdf
- 大小:727.75 KB
- 文档页数:55
Ads by Google Oracle VMware Linux VMware Console VMware3 VMwareThis SiteHomeDBA ScriptsOracle 8i Articles Oracle 9i Articles Oracle 10g Articles Miscellaneous Articles Linux ArticlesOracle Certification ForumsORACLE-BASE Blog Blog Aggregator Industry News Book StoreTSHSQL Download Firefox Search Plugins Site Info LinksPrinter FriendlyOracle SitesOracle Corporation Technology Network Oracle Metalink Oracle Certification Oracle Magazine Ask TomOracle 8i R3 Docs Oracle 9i R1 Docs Oracle 9i R2 Docs Oracle 10g R1 Docs Oracle 10g R2 Docs Oracle 9iAS DocsOracle AS10g R1 Docs Oracle AS10g R2 Docs Oracle AS10g R3 DocsError MessagesORA-Go 8i R39i R19i R210g R110g R2Search Oracle DocsGo Metalink 8i R39i R19i R210g R110g R2SiteWebGo Oracle 10g RAC On Windows 2003 Using VMware ServerThis article describes the installation of Oracle 10g release 2 (10.2.0.1) RAC on Windows 2003 Server Standard Edition using VMware Server with no additional shared disk devices.z Introduction z Download Software z VMware Server Installationz Virtual Machine Setupz Guest Operating System Installation z Oracle Installation Prerequisites z Install VMware Client Tools z Create Shared Disksz Clone the Virtual Machinez Install the Clusterware Softwarez Install the Database Software and Create an ASM Instance z Create a Database using the DBCA z TNS ConfigurationzCheck the Status of the RACIntroductionOne of the biggest obstacles preventing people from setting up test RAC environments is the requirement for shared storage. In a production environment, shared storage is often provided by a SAN or high-end NAS device, but both of these options are very expensive when all you want to do is get some experience installing and using RAC. A cheaper alternative is to use a FireWire disk enclosure to allow two machines to access the same disk(s), but that still costs money and requires two servers. A third option is to use VMware Server to fake the shared storage.Using VMware Server you can run multiple Virtual Machines (VMs) on a single server, allowing you to run both RAC nodes on a single machine. In additon, it allows you to set up shared virtual disks, overcoming the obstacle of expensive shared storage.Before you launch into this installation, here are a few things to consider.zThe finished system includes the host operating system, two guest operating systems, two sets of Oracle Clusterware, two ASM instances and two Database instances all on a single server. As you can imagine, this requires a significant amount of disk space, CPU and memory. To complete this installation I used a dual 3.0G Xeon server with 4G of memory.zThis procedure provides a bare bones installation to get the RAC working. There is no redundancy in the Clusterware installation or the ASM installation. To add this, simply create double the amount of shared disks and select the "Normal" redundancy option when it is offered. Of course, this will take more disk space.z During the virtual disk creation, I always choose not to preallocate the disk space. This makes virtual disk access slower during the installation, but saves on wasted disk space.z This is not, and should not be considered, a production-ready system. It's simply to allow you to get used to installing and using RAC.Download SoftwareDownload the following software.z VMware ServerzOracle 10g (10.2.0.1) CRS and DB softwareVMware Server InstallationFor this article, I used CentOS 4.3 as the host operating systems. To use Windows as the host operating system, simply run the executable installation file and ignore the following VMware Server installation information.First, install the VMware Server software. On Linux you do this with the following command as the root user.# rpm -Uvh VMware-server-*.rpmPreparing... ########################################### [100%] 1:VMware-server ########################################### [100%]Virtual Disaster RecoveryFree White Paper: Building disaster recovery solutions with VMware.Rac Antibodies Santa Cruz Biotechnology, Inc. Source of over26,000 antibodies. /table-rac.html#Then finish the configuration by running the vmware-config.pl script as the root user. Most of the questions can be answered with the default response by pressing the return key. The output below shows my responses to the questions.# vmware-config.plMaking sure services for VMware Server are stopped.Stopping VMware services:Virtual machine monitor [ OK ]You must read and accept the End User License Agreement to continue.Press enter to display it.VMWARE, INC.SOFTWARE BETA TEST AGREEMENT*** Editied out license agreement ***Do you accept? (yes/no) yesThank you.Configuring fallback GTK+ 2.4 libraries.In which directory do you want to install the mime type icons?[/usr/share/icons]What directory contains your desktop menu entry files? These files have a.desktop file extension. [/usr/share/applications]In which directory do you want to install the application's icon?[/usr/share/pixmaps]Trying to find a suitable vmmon module for your running kernel.The module bld-2.6.9-5.EL-i686smp-RHEL4 loads perfectly in the running kernel.Do you want networking for your virtual machines? (yes/no/help) [yes]Configuring a bridged network for vmnet0.The following bridged networks have been defined:. vmnet0 is bridged to eth0All your ethernet interfaces are already bridged.Do you want to be able to use NAT networking in your virtual machines? (yes/no)[yes]Configuring a NAT network for vmnet8.Do you want this program to probe for an unused private subnet? (yes/no/help)[yes]Probing for an unused private subnet (this can take some time)...The subnet 172.16.210.0/255.255.255.0 appears to be unused.The following NAT networks have been defined:. vmnet8 is a NAT network on private subnet 172.16.210.0.Do you wish to configure another NAT network? (yes/no) [no]Do you want to be able to use host-only networking in your virtual machines?[yes] noTrying to find a suitable vmnet module for your running kernel.The module bld-2.6.9-5.EL-i686smp-RHEL4 loads perfectly in the running kernel.Please specify a port for remote console connections to use [902]Stopping xinetd: [ OK ]Starting xinetd: [ OK ]Configuring the VMware VmPerl Scripting API.Building the VMware VmPerl Scripting API.Using compiler "/usr/bin/gcc". Use environment variable CC to override.The installation of the VMware VmPerl Scripting API succeeded.Do you want this program to set up permissions for your registered virtualmachines? This will be done by setting new permissions on all files found inthe "/etc/vmware/vm-list" file. [no] yesGenerating SSL Server CertificateIn which directory do you want to keep your virtual machine files?[/var/lib/vmware/Virtual Machines] /u01/VMDo you want to enter a serial number now? (yes/no/help) [no] yesPlease enter your 20-character serial number.Type XXXXX-XXXXX-XXXXX-XXXXX or 'Enter' to cancel: ENTER-YOUR-SERIAL-NUMBERStarting VMware services:Virtual machine monitor [ OK ]Virtual ethernet [ OK ]Bridged networking on /dev/vmnet0 [ OK ]Host-only networking on /dev/vmnet8 (background) [ OK ]NAT service on /dev/vmnet8 [ OK ]Starting VMware virtual machines... [ OK ]The configuration of VMware Server e.x.p build-22874 for Linux for this runningkernel completed successfully.#The VMware Server Console is started by issuing the command "vmware" at the command prompt, or by selecting it from the "System Tools" menu.On the "Connect to Host" dialog, accept the "Local host" option by clicking the "Connect" button.You are then presented with the main VMware Server Console screen.The VMware Server is now installed and ready to use.Virtual Machine SetupNow we must define the two virtual RAC nodes. We can save time by defining one VM, then cloning it when it is installed. In this article I use Linux as my host operating system, so all the file paths are UNIX style paths. If you are using a Windows host operating system you would expect to use Windows style paths to the various VMware files, so adjust the paths as necessary.Click the "Create a new virtual machine" button to start the "New Virtual Machine Wizard". Click the "Next" button onthe welcome page.Select the "Custom" virtual machine configuration and click the "Next" button.Select the "Windows" guest operating system option, and set the version to "Windows Server 2003 Standard Edition", then click the "Next" button.Enter the name "RAC1" and the location should default to "/u01/VM/RAC1", then click the "Next" button.Select the required number of processors and click the "Next" button.Uncheck the "Make this virtual machine private" checkbox and click the "Next" button.Select the amount of memory to associate with the virtual machine. Remember, you are going to need two instances, so don't associate too much, but you are going to need approximately 1 Gig (1024 Meg) to compete the installation successfully.Accept the "Use bridged networking" option by clicking the "Next" button.Accept the "LSI Logic" option by clicking the "Next" button.Select the "Create a new virtual disk" option and click the "Next" button.Accept the "SCSI" option by clicking the "Next" button. It's a virtual disk, so you can still use this option even if your physical disk is IDE or SATA.Set the disk size to "10.0" GB and uncheck the "Allocate all disk space now" option. The latter will make disk access slower, but will save you wasting disk space.Accept "RAC1.vmdk" as the disk file name and complete the VM creation by clicking the "Finish" button.On the "VMware Server Console" screen, click the "Edit virtual machine settings" button.On the "Virtual Machine Settings" screen, highlight the "Floppy 1" drive and click the "- Remove" button.Click the "+ Add" button and select a hardware type of "Ethernet Adapter", then click the "Next" button.Accept the "Bridged" option by clicking the "Finish" button.Click on the "Options" tab, highlight the "Startup/Shutdown" setting and select the "Don't power on virtual machine" in the "On host startup" option. Finish by clicking the "OK" button.The virtual machine is not configured so we can start the guest operating system installation.Guest Operating System InstallationPlace the first Windows 2003 SE disk in the CD drive and start the virtual machine by clicking the "Power on this virtual machine" button. The right pane of the VMware Server Console should display a boot loader, then the Windows installation screen.Continue through the Windows installation as you would for a normal server. To be consistent with the rest of the article, the following information should be set during the installation:z hostname: RAC1z IP Address eth0: 192.168.2.101 (public address)z IP Address eth1: 192.168.0.101 (private address)You are free to change the IP addresses to suit your network, but remember to stay consistent with those adjustments throughout the rest of the article.Oracle Installation PrerequisitesPerform the following steps whilst logged into the RAC1 virtual machine.Amend the C:\windows\system32\drivers\etc\hosts file to contain the following information.127.0.0.1 localhost.localdomain localhost# Public192.168.2.101 rac1.localdomain rac1192.168.2.102 rac2.localdomain rac2#Private192.168.0.101 rac1-priv.localdomain rac1-priv192.168.0.102 rac2-priv.localdomain rac2-priv#Virtual192.168.2.111 rac1-vip.localdomain rac1-vip192.168.2.112 rac2-vip.localdomain rac2-vipVMware sometimes creates additional network adapters, which will prevent the clusterware from loading. Delete any additional adapters as follows. Open a command prompt on RAC1 and issue the following commands.set devmgr_show_nonpresent_devices=1devmgmt.mscOn the resulting "Device Manager" screen, pick the "View > Show hidden devices" menu option.Now check for extra network adapters. You would expect two, but if there are more than this, uninstall the greyed out adapters.Open the "Network Connections" screen (Start > All Programs > Accessories > Communications > Network Connections). Rename the two connections to "public" and "private" respectively, making sure you apply the names to the appropriate connections.Check that the network settings are correct for both connections.The Clusterware installation is very sensitive, so make sure you read the Checking Network Requirements section of the documentation, and make any necessary changes.In addition to the configuration mentioned above, the documentation suggests two more configuration changes that I did not find necessary on VMware Server. Even so, it is advisable to make the changes.First, ensure the public interface is first in the bind order:z Open the "Network Connections" dialog by right-clicking on the "My Network Places" icon and selecting the "Properties" menu option.z Select the "Advanced > Advanced Settings..." menu option.z On the "Adapters and Bindings" tab, make sure the public interface is the first interface listed.z Accept any modifications by clicking on the "OK" button and exiting the "Network Connections" dialog. Second, disable Windows Media Sensing for TCP/IP:z Backup the Windows registry.z Run the Registry Editor (Regedt32.exe) and find the following key:HKEY_LOCAL_MACHINE\System\CurrentControlSet\Services\Tcpip\Parameters z Add the following registry value:Value Name: DisableDHCPMediaSenseData Type: REG_DWORD -BooleanValue: 1z This change will not take effect until the computer is restarted.Next, install the VMware client tools.Install VMware Client ToolsLogin on the RAC1 virtual machine, then select the "VM > Install VMware Tools..." option from the main VMware Server Console menu.Click the "Install" button on the subsequent screen.Click the "Next" button to continue.Accept the "Typical" option by clicking the "Next" button.Click the "Install" button to continue.Set the hardware acceleration when prompted by clicking the "Yes" button and following the instructions on the subsequent screens.Once the installatin is complete, click the "Finish" button.The VMware client tools are now installed.Create Shared DisksShut down the RAC1 virtual machine and create a directory on the host system to hold the shared virtual disks.# mkdir -p /u01/VM/sharedOn the VMware Server Console, click the "Edit virtual machine settings" button. On the "Virtual Machine Settings" screen, click the "+ Add" button.Select the hardware type of "Hard Disk" and click the "Next" button.Accept the "Create a new virtual disk" option by clicking the "Next" button.Accept the "SCSI" option by clicking the "Next" button.Set the disk size to "10.0" GB and uncheck the "Allocate all disk space now" option, then click the "Next" button.Set the disk name to "/u01/VM/shared/ocr.vmdk" and click the "Advanced" button.Set the virtual device node to "SCSI 1:1" and the mode to "Independent" and "Persistent", then click the "Finish" button.Repeat the previous hard disk creation steps 4 more times, using the following values:z File Name: /u01/VM/shared/votingdisk.vmdkVirtual Device Node: SCSI 1:2Mode: Independent and Persistentz File Name: /u01/VM/shared/asm1.vmdkVirtual Device Node: SCSI 1:3Mode: Independent and Persistentz File Name: /u01/VM/shared/asm2.vmdkVirtual Device Node: SCSI 1:4Mode: Independent and Persistentz File Name: /u01/VM/shared/asm3.vmdkVirtual Device Node: SCSI 1:5Mode: Independent and PersistentAt the end of this process, the virtual machine should look something like the picture below.Edit the contents of the "/u01/VM/RAC1/RAC1.vmx" file using a text editor, making sure the following entries are present. Some of the tries will already be present, some will not.disk.locking = "FALSE"diskLib.dataCacheMaxSize = "0"diskLib.dataCacheMaxReadAheadSize = "0"diskLib.dataCacheMinReadAheadSize = "0"diskLib.dataCachePageSize = "4096"diskLib.maxUnsyncedWrites = "0"scsi1.present = "TRUE"scsi1.virtualDev = "lsilogic"scsi1.sharedBus = "VIRTUAL"scsi1:1.present = "TRUE"scsi1:1.mode = "independent-persistent"scsi1:1.fileName = "/u01/VM/shared/ocr.vmdk"scsi1:1.deviceType = "plainDisk"scsi1:1.redo = ""scsi1:2.present = "TRUE"scsi1:2.mode = "independent-persistent"scsi1:2.fileName = "/u01/VM/shared/votingdisk.vmdk"scsi1:2.deviceType = "plainDisk"scsi1:2.redo = ""scsi1:3.present = "TRUE"scsi1:3.mode = "independent-persistent"scsi1:3.fileName = "/u01/VM/shared/asm1.vmdk"scsi1:3.deviceType = "plainDisk"scsi1:3.redo = ""scsi1:4.present = "TRUE"scsi1:4.mode = "independent-persistent"scsi1:4.fileName = "/u01/VM/shared/asm2.vmdk"scsi1:4.deviceType = "plainDisk"scsi1:4.redo = ""scsi1:5.present = "TRUE"scsi1:5.mode = "independent-persistent"scsi1:5.fileName = "/u01/VM/shared/asm3.vmdk"scsi1:5.deviceType = "plainDisk"scsi1:5.redo = ""Start the RAC1 virtual machine by clicking the "Power on this virtual machine" button on the VMware Server Console. When the server has started, log in so you can partition the disks.Prior to partitioning the disks on Windows Server 2003, you must enable disk automounting. I didn't need to do this, but I guess it makes sense to do as you're told. To enable automounting do the following command at the command prompt, then restart the server.C:\> diskpartDISKPART> automount enableDISKPART> exitC:\>When the server restarts, open the "Computer Management" dialog (Start > All Programs > Administrative Tools > Computer Management) and click on the Disk Management tree node. This action should initiate the "Initialize and Convert Disk Wizard". Click the "Next" button to continue.Initialize all 5 disks by clicking the "Next" button.Don't convert any of the disks. Make sure all 5 disks are unchecked, then "Next" button.Complete the process by clicking the "Finish" button.Right-click on "Disk 1" and select the "New Partition..." option to start the "New Partition Wizard".Click the "Next" button to continue.Select the "Extended partition" option, then click the "Next" button.Accept the default partition size by clicking the "Next" button.Complete the partition by clicking the "Finish" button.The partition will now be displayed with a green bar. Right-click on the partition and select the "New Logical Drive" option to restart the "New Partition Wizard".Click the "Next" button to continue.Accept the "Logical drive" option by clicking the "Next" button.Accept the default partition size by clicking the "Next" button.Select the "Do not assign a drive letter or drive path" option, then click the "Next" button.Select the "Do not format this partition" option, then click the "Next" button.Complete the logical drive by clicking the "Finish" button.The drive should now be displayed as a healthy drive with a blue bar.Repeat the previous partitioning steps for the remaining 4 disks.The shared disks are now configured.Clone the Virtual MachineThe current version of VMware Server does not include an option to clone a virtual machine, but the following steps illustrate how this can be achieved manually.Shut down the RAC1 virtual machine and copy the RAC1 virtual machine using the following command.# cp -R /u01/VM/RAC1 /u01/VM/RAC2Edit the contents of the "/u01/VM/RAC2/RAC1.vmx" file, making the following change.displayName = "RAC2"Ignore discrepancies with the file names in the "/u01/VM/RAC2" directory. This does not affect the action of the virtual machine.In the VMware Server Console, select the File > Open menu options and browse for the"/u01/VM/RAC2/RAC1.vmx" file. Once opened, the RAC2 virtual machine is visible on the console. Start the RAC2 virtual machine by clicking the "Power on this virtual machine" button and click the "Always Create" button on the subsequent "Question" screen.Open the "Network Connections" screen (Start > All Programs > Accessories > Communications > Network Connections). Amend the IP Addresses of both connections to the correct values for the RAC2 node.The cloning process sometimes alters the network connection setup, so repeat the steps mentioned previously for removing extra network adapters and renaming the connections.Open the "System Properties" dialog (Start > Control Panel > System), click on the "Computer Name" tab and click the "Change" button. Enter the name "rac2" then click the "OK" button.Click all subsequent "OK" buttons to exit the "System Properties" dialog and restart the server when prompted. Once the RAC2 virtual machine has restarted, start the RAC1 virtual machine. When both nodes have started, check they can both ping all the public and private IP addresses using the following commands.ping -c 3 rac1ping -c 3 rac1-privping -c 3 rac2ping -c 3 rac2-privAt this point the virtual IP addresses defined in the hosts file will not work, so don't bother testing them.It's a good idea to take a snapshot of the virtual machines, so you can repeat the following stages if you run into any problems. To do this, shutdown both virtual machines and issue the following commands.# cd /u01/VM# tar -cvf RAC-PreClusterware.tar RAC1 RAC2 shared# gzip RAC-PreClusterware.tarThe virtual machine setup is now complete.Install the Clusterware SoftwareStart the RAC1 and RAC2 virtual machines. The Oracle Clusterware for Windows is very sensitive, so before you start, check the network connection setup on each machine again. Remove and extra network adapters, rename the connections appropriately and check the nodes ping correctly. Make sure your network configuration matches the Checking Network Requirements section of the documentation.Start the Oracle installer on RAC1.On the "Welcome" screen, click the "Next" button.Accept the default inventory location by clicking the "Next" button.Enter the appropriate name and path for the Oracle Home and click the "Next" button.Wait while the prerequisite checks are done. If you have any failures correct them and retry the tests before clicking the "Next" button.The "Specify Cluster Configuration" screen shows only the RAC1 node in the cluster. Click the "Add" button to continue.Enter the details for the RAC2 node and click the "OK" button.Click the "Next" button to continue.The "Specific Network Interface Usage" screen defines how each network interface will be used. Highlight the "public" interface and click the "Edit" button.Set the "public" interface type to "Public" and click the "OK" button.Leave the "private" interface as private and click the "Next" button.On the "Cluster Configuration Storage" screen, highlight disk 1 and click the "Edit" button.Select the "Place OCR(Primary) on this Partition" option and click the "OK" button.Highlight disk 2 and click the "Edit" button. Select the "Place Voting Disk on this Partition" option and click the "OK" button.On the "Cluster Configuration Storage" screen, click the "Next" button and ignore the redundancy warnings by clicking the "OK" button.On the "Summary" screen, click the "Install" button to continue.Wait while the installation takes place.Wait while the configuration assistants run.The VIPCA will fail, so click the "OK" button on the resulting error screen.Click the "Next" button and accept the subsequent warning, then click the "Exit" button to leave the installer.On the RAC1 virtual machine, run the VIPCA manually by issuing the following commands in a command prompt.cd c:\oracle\product\10.2.0\crs\binvipca.batClick the "Next" button on the VIPCA welcome screen.Highlight the "public" interface and click the "Next" button.Enter the vitual IP alias and address for each node. Once you enter the first alias, the remaining values should default automatically. Click the "Next" button to continue.Accept the summary information by clicking the "Finish" button.Wait until the configuration is complete, then click the "OK" button.Accept the VIPCA results by clicking the "Exit" button.The status of the finished cluster can be checked by running the cluvfy.bat script as shown below.C:\oracle\product\10.2.0\crs\BIN>cluvfy.bat stage -post crsinst -n rac1,rac2Performing post-checks for cluster services setupChecking node reachability...Node reachability check passed from node "rac1".Checking user equivalence...User equivalence check passed for user "Administrator".Checking Cluster manager integrity...Checking CSS daemon...Daemon status check passed for "CSS daemon".Cluster manager integrity check passed.Checking cluster integrity...Cluster integrity check passedChecking OCR integrity...Checking the absence of a non-clustered configuration...All nodes free of non-clustered, local-only configurations.Uniqueness check for OCR device passed.Checking the version of OCR...OCR of correct Version "2" exists.Checking data integrity of OCR...Data integrity check for OCR passed.OCR integrity check passed.。

Oracle 10g RAC安装文档1、建oracle用户和组:(两节点的用户ID和组ID一致)groupadd oinstallgroupadd dbauseradd -g oinstall -G dba oraclepasswd oracleid oracle2、准备文件目录:mkdir -p /opt/oraclechown oracle.dba /opt/oracle/chmod 775 /opt/oracle/mkdir -p /oracle01chown oracle.dba /oracle01chmod 775 /oracle01chown oracle.oinstall /oracle013、设置环境变量:vi /etc/hosts127.0.0.1 localhost.localdomain localhost# Public192.168.3.11 rac1192.168.3.12 rac2#Private192.168.4.11 rac1-priv192.168.4.12 rac2-priv#Virtual192.168.3.13 rac1-vip192.168.3.14 rac2-vipvi /etc/sysctl.confkernel.shmmax = 2147483648kernel.shmmni = 4096kernel.shmall = 2097152kernel.sem = 250 32000 100 128fs.file-max = 65536net.ipv4.ip_local_port_range = 1024 65000net.core.rmem_default=262144net.core.wmem_default=262144net.core.rmem_max=262144net.core.wmem_max=262144vi /etc/security/limits.conforacle soft nofile 65536oracle hard nofile 65536oracle soft nproc 16384oracle hard nproc 163844、配置 Hangcheck 计时器find /lib/modules -name "hangcheck-timer"echo "options hangcheck-timer hangcheck_tick=30 hangcheck_margin=180" >> /etc/modprobe.conf echo "/sbin/modprobe hangcheck-timer" >> /etc/rc.localmodprobe hangcheck-timergrep Hangcheck /var/log/messages | tail -25、设置oracle用户环境变量vi .bash_profileexport ORACLE_BASE=/opt/oracleexport ORACLE_HOME=$ORACLE_BASE/10g/dbexport ORA_CRS_HOME=$ORACLE_BASE/10g/crsexport ORACLE_SID=db1PATH=$ORACLE_HOME/bin:$ORA_CRS_HOME/bin:$PATH:$HOME/binexport PATH=$ORACLE_HOME/bin:/bin:/sbin:/usr/bin:/usr/ccs/bin:/usr/local/bin:/usr/ucb: $ORACLE_BASE/product/10.2.0/crs_1/bin:/etcexportLD_LIBRARY_PATH=$ORACLE_HOME/lib:$ORACLE_HOME/network/lib:$ORACLE_HOME/oracm/lib:/usr/local/ lib:/usr/libexport ORACLE_TERM=xtermexportCLASSPATH=$ORACLE_HOME/JRE:$ORACLE_HOME/jlib:$ORACLE_HOME/rdbms/jlib:$ORACLE_HOME/rdbms/jlib :$ORACLE_HOME/network/jlibexport THREADS_FLAG=nativeexport TEMP=/tmpexport TMPDIR=/tmpexport LD_ASSUME_KERNEL=2.4.19unset USERNAME6、使用SSH为oracle用户配置等效性rac2上$ssh-keygen -t rsa$cat /home/oracle/.ssh/id_rsa.pub >> /home/oracle/.ssh/authorized_keysrac1上$ssh-keygen –t rsa$cat /home/oracle/.ssh/id_rsa.pub >> /home/oracle/.ssh/authorized_keys$ssh rac1 cat /home/oracle/.ssh/id_rsa.pub >> /home/oracle/.ssh/authorized_keys$ssh rac1-priv cat /home/oracle/.ssh/id_rsa.pub >> /home/oracle/.ssh/authorized_keys$ssh rac2 cat /home/oracle/.ssh/id_rsa.pub >> /home/oracle/.ssh/authorized_keys$ssh rac2-priv cat /home/oracle/.ssh/id_rsa.pub >> /home/oracle/.ssh/authorized_keys$scp /home/oracle/.ssh/authorized_keys rac2:/home/oracle/.ssh测试登录是否需要密码与时间同步 //rac1和rac2都要执行$ssh rac1 date;ssh rac2 date$ssh rac1-priv date;ssh rac2-priv date7、安装和配置ocfs安装 OCFS2把 OCFS2 文件安装到两台单处理器计算机中。
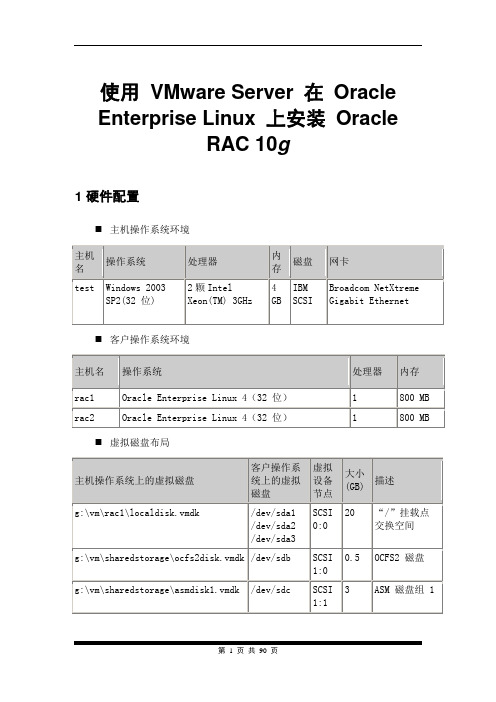
使用VMware Server 在Oracle Enterprise Linux 上安装OracleRAC 10g1 硬件配置⏹主机操作系统环境⏹客户操作系统环境⏹虚拟磁盘布局要配置共享存储,客户OS 不能与共享存储共享同一个SCSI 总线。
指定客户OS 使用SCSI0,共享磁盘使用SCSI1RAC 数据库环境2 配置第一个虚拟机VMware 版本:VMware-server 1.0.3-443562.1 虚拟机配置要创建和配置第一个虚拟机,需要添加虚拟硬件设备,如磁盘和处理器。
创建以下 windows 文件夹以存放虚拟机和共享存储。
G:\>mkdir vm\rac1G:\>mkdir vm\rac2G:\>mkdir vm\sharedstorage按 CTRL-N 创建一个新的虚拟机。
1.新建虚拟机向导:单击Next。
2.选择适当的配置:a.虚拟机配置:选择Custom。
3.选择客户操作系统:a.客户操作系统:选择Linux。
b.版本:选择Red Hat Enterprise Linux 4。
4.命名虚拟机:a.虚拟机名称:输入“rac1”。
b.位置:输入“g:\vm\rac\rac1”。
5.设置访问权限:a.访问权限:选择Make this virtual machine private。
6.启动/关闭选项:a.虚拟机帐户:选择User that powers on the virtual machine。
7.处理器配置:a.处理器:选择一个处理器。
8.虚拟机内存:a.内存:选择800MB。
9.网络类型:a.网络连接:选择Use bridged networking。
10.选择 I/O 适配器类型:a.I/O 适配器类型:选择LSI Logic。
11.选择磁盘:a.磁盘:选择Create a new virtual disk。
12.选择磁盘类型:a.虚拟磁盘类型:选择SCSI (Recommended)。

VMWare7.0环境linux5.4安装oracle10G单实例.doc注:本文档所涉及的软件仅供个人学习研究使用,请勿应用于商业环境。
如需应用请购买相应正版lisence或软件。
1. 运行环境 (3)1.1 硬件安装环境 (3)1.2 相关软件 (3)2. 安装Vmware 7.0 (4)2.1 软件 (4)2.2 图解安装过程 (4)2.2.1 欢迎界面 (4)2.2.2 安装方式 (4)2.2.3 选择安装目录 (5)2.2.4 快捷方式 (5)2.2.5 准备安装了 (5)2.2.6 安装完成,重启PC (6)2.2.7 打汉化补丁 (6)2.2.8 注册 (8)3. 安装Linux (9)3.1 运行VMWare (9)3.2 新建虚拟机,并安装Red Hat Linux5.4操作系统。
(9)3.2.1 欢迎 (9)3.2.2 安装操作系统(Red Hat Linux 5.4) (10)3.2.3 创建Linux一个用户。
(11)3.2.4 虚拟机名称和包位置 (11)3.2.5 定义虚拟机磁盘大小 (12)3.2.6 定制显示分辨率。
(12)3.2.7 选一个自己觉得合适的吧 (13)3.2.8 完成配置。
(13)3.2.9 安装完成。
(14)3.3 确认Linux核心参数。
(14)3.3.1 内核版本 (14)3.3.2 CPU (14)3.3.3 内存 (15)3.3.4 Swap交换区 (15)3.3.5 确认存储 (15)3.3.6 Linux主机名 (15)3.3.7 网络 (15)3.3.8 确认Linux版本 (15)3.3.9 确认操作系统位数 (16)3.4 可选步骤:修改主机名。
(16)4. 安装oracle 10G (17)4.1 修改Linux参数 (17)4.1.1 修改/etc/sysctl.conf,核心参数 (17)4.1.2 修改/etc/security/limits.conf,可选 (18)4.1.3 修改/etc/pam.d/login,可选 (18)4.1.4 修改/etc/profile,可选 (18)4.2 安装Linux软件包 (18)4.2.1 确认所需的软件包 (18)4.2.2 安装gcc软件包 (21)4.2.3 安装openmotif软件包 (21)4.2.4 再次检查包安装,ok! (21)4.2.5 检查其它包安装情况 (21)4.2.6 安装其它包。

vmware+linux+oracle10g rac全过程(5) - 安装clusterware来自:/Linux/2011-02/31976p32.htm2010-08-10 17:44接下来是clusterware的安装clusterware的安装在主节点上运行,所以我们接下来要做的是启动主节点RAC1,打开FTP功能,把clusterware软件传上去,然后以oracle用户的身份来执行整个安装过程,请看截图:RAC1重启之后,第三块网卡意外的丢失了动态IP地址,这里临时赋予他一个静态IP地址,和之前的地址保持一样。
上传clusterware_linux32.zip安装介质后,以unzip命令对这个文件进行解压缩,解压完成之后得到clusterware这个文件夹。
将clusterware整个文件夹的属主和权限按照oracle用户的要求进行修改。
注销当前窗口,以oracle用户登陆,这样整个环境变量就挂靠在oracle户头下了。
在安装之前,通常要检查当前的环境,命令如下:[oracle@rac1 cluvfy]$ /data/rhel5/clusterware/cluvfy/runcluvfy.sh stage -pre crsinst -n rac1,rac2 -verbose在这个过程中,系统可能会报错,比如说什么包需要安装啊,swap区过小啊,这些东西统统不用管他们,跳过即可。
这里说明一下,ORACLE有时候报的错莫名其妙,牛头不对马嘴,比如说前段时间我在HP环境下配置ORACLE RAC,在加载裸设备ocr的时候,系统报错说赋予ocr的权限和属主有问题,建议查清后再说。
仔细检查之后,权限跟属主一点问题没有,结果是因为共享卷组没有激活导致,这想起来就很气人了,有这样忽悠群众的吗?所以ORACLE下的报错不必较真,就像这里一样,经过一番检查,他认为你试验环境没有达标,但你硬要往下做他也拿你没招,典型的吃硬不吃软。

LINUX Oracle 10G RAC的安装配置与管理维护一 RAC相关以及基础知识 (2)1.CRS简介 (2)2.ASM相关 (3)3.RAC存储/网络需求 (3)4.其他 (4)二 RAC规划安装 (6)1.安装规划部署 (6)2. 安装过程 (6)3.几点注意问题. (7)三 RAC管理维护 (7)1.CRS管理维护 (7)2.RDBMS管理维护 (14)(1).spfile以及相关参数说明 (14)(2). Redo/Undo管理 (15)一 RAC相关以及基础知识1.CRS简介从Oracle 10G开始,oracle引进一套完整的集群管理解决方案—-Cluster-Ready Services,它包括集群连通性.消息和锁.负载管理等框架.从而使得RAC可以脱离第三方集群件,当然,CRS与第三方集群件可以共同使用.(1).CRS进程CRS主要由三部分组成,三部分都作为守护进程出现<1>CRSD:资源可用性维护的主要引擎.它用来执行高可用性恢复及管理操作,诸如维护OCR及管理应用资源,它保存着集群的信息状态和OCR的配置,此进程以root权限运行.<2>EVMD:事件管理守护进程.此进程还负责启动racgevt进程以管理FAN服务器端调用,此进程以root权限运行<3>OCSSD:集群同步服务进程.管理集群节点的成员资格,它以fatal方式启动,因此进程发生故障将导致集群重启,以防止数据坏死.同时,CSS还维护集群内的基本锁功能,以及负责监控voting disk的脑裂故障。
它以Oracle权限运行此外,还有一个进程OPRCD,他是集群中的进程监视程序,仅当平台上的CRS不使用厂商群件时候才出现,且无论运行了多少实例,每个节点只会存在一组后台进程.来看一下这几个守护进程:rac1-> cat /etc/inittab…………………………… .# Run xdm in runlevel 5x:5:respawn:/etc/X11/prefdm –nodaemonh1:35:respawn:/etc/init.d/init.evmd run >/dev/null 2>&1 </dev/nullh2:35:respawn:/etc/init.d/init.cssd fatal >/dev/null 2>&1</dev/nullh3:35:respawn:/etc/init.d/init.crsd run>/dev/null 2>&1 </dev/null(2).Virtual IP AddressOracle 10G RAC下,有3个重要的IP.① Public IP② Private IP ③ Vitual IPPublic IP为数据库所在主机的公共网络IP,PrivateIP被用来私有高速互联,而Oracle 较前版本,增加了一个虚拟IP,用来节点发生故障时候更快的故障转移,oracle利用每个节点的lisnter侦听VIP,一旦发生故障,VIP将进行实际的故障切换,从而在其他的可用的节点上保持联机,从而降低客户应用程序意识到节点故障所需要的时间。
vmware+linux+oracle10g rac全过程(6) - 安装database来自:/Linux/2011-02/31976p32.htm2010-08-10 17:55clusterware软件安装结束,在各自节点也看到了CRS进程,下面继续database数据库软件的安装过程,因为这个过程比较简单,这里就简要奉上截图:1,上传10201_database_linux32.zip到“ly_media”文件系统,以unzip命令解压database软件,赋予正确的权限和属主,再以oracle身份登陆进行安装:2,弹出oracle安装界面:3,点击“next”:4,oraInventory仍然使用系统默认的路径,点击“next”:5,选择企业版安装方式,点击“next”:6,选择ORACLE数据库的安装路径,点击“next”:7,选中两个节点,点击“next”:8,按惯例,执行系统级检查:9,在“warning”和“not executed”的小方框里面打勾,点击“next”:10,这里只安装database软件,实例在后期安装:11,下面是安装过程,因为在虚拟机+linux操作系统+oracle数据库安装程序同时运行,内存消耗比较大,所以这个过程比较长:12,在安装进行到尾声的时候,在弹出来的对话框中按要求执行几个脚本程序,和clusterware安装阶段类似:这个地方要注意一下,系统提示要在RAC1上以root执行orainstRoot.sh这个脚本,对RAC2没有要求。
但没有要求并不等于不需要做,先来看看RAC1下执行orainstRoot.sh都执行了什么步骤:可见这一步主要是给oraInventory目录赋予正确的权限和属主,即使系统没有要求,我们也需要到RAC2上执行类似的操作,给与oraInventory 目录真确的权限和属主,否则在最后阶段会有报错信息。
11,分别到各个节点执行root.sh脚本:12,点击“next”进行退出,database软件部分安装结束:数据库软件安装完成之后,接下来要做的是给两个节点配置listener,也就是监听。
Liunx4+Oracle10g安装与部署目录1运行环境 (2)1.1硬件安装环境 (2)1.2相关软件 (2)1.3检查配置环境 (2)1.4安装前配置 (2)2确认Linux核心参数。
(3)2.1内核版本 (3)2.2查看CPU参数 (3)2.3内存参考值 (3)2.4Swap交换区 (3)2.5确认存储空间 (4)2.6Linux主机名 (4)2.7网络参数查看 (4)2.8确认Linux版本 (4)2.9确认操作系统位数 (5)2.10可选步骤修改主机 (5)3安装Linux软件包(可以略过) (5)3.1检测所需的软件包 (5)3.2安装gcc软件包 (6)4Linux内核参数 (6)4.1配置/etc/sysctl.conf (7)4.1.1系统默认配置 (7)4.1.2手动添加内容 (7)4.2配置/etc/security/limits.conf (7)4.3配置/etc/pam.d/login (8)4.4配置/etc/profile (8)4.5其它文件配置 (8)5安装oracle 10gR2 (8)5.1创建oracle用户和组,并修改oracle用户密码。
(8)5.2创建oracle安装目录 (8)5.3配置/home/oracle/.bash_profile (9)5.4将oracle10g安装文件拷贝至安装目录并解压缩 (17)5.5root用户执行xhost +命令 (17)5.6开始安装oracle10g (18)5.7创建Oracle数据库实例 (31)6Oracle数据库基本管理 (49)6.1启动Oracle (49)6.2停止Oracle (49)6.3创建表空间 (49)6.4创建用户 (49)1运行环境本文件介绍了如何在Redhat Linux AS4上安装和初步配置Oracle 10g数据库。
及如何在Redhat9.0等其它Linux系统安装Oracle 10g数据库。
一、 Linux安装平台及Oracle软件:1、Linux平台:(1)centos5.4(2.6.18-164.e15)2、Oracle软件:(1) 10201_clusterware_linux_x86_64.cpio.gz(2) 10201_database_linux_x86_64.cpio.gz3、 ASM相关安装包oracleasm-2.6.18-164.el5-2.0.5-1.el5.x86_64.rpmoracleasm-support-2.1.3-1.el5.x86_64.rpmoracleasmlib-2.0.4-1.el5.x86_64.rpm4、Openfiler相关安装包iscsi-initiator-utils-6.2.0.871-0.10.el5.x86_64.rpm5、 OCFS相关安装包ocfs2-2.6.18-164.el5-1.4.2-1.el5.x86_64.rpmocfs2console-1.4.2-1.el5.x86_64.rpmocfs2-tools-1.4.2-1.el5.x86_64.rpm6、 Oracle集群件10201_clusterware_linux_x86_64.cpio.gzlibXp-1.0.0-8.1.el5.i386.rpm 补丁包libXp-1.0.0-8.1.el5.x86_64.rpm补丁包二、配置第一个虚拟机:要创建和配置第一个虚拟机,您需要添加虚拟硬件设备,如磁盘和处理器。
在继续执行安装之前,请创建以下windows 文件夹以存放虚拟机和共享存储。
F:\>OracleRac\oracledb1 虚拟机1F:\>OracleRac\oracledb2 虚拟机2F:\>OracleRac\sharedDisk 共享存储启动vmware应用程序1. 创建一个新的虚拟机。
2. 新建虚拟机向导:单击Next。
3. 选择适当的配置:a. 虚拟机配置:选择Custom。
vmware linux下oracle10g2r集群安装总结系统基本情况为:vmware server 1.0.8,redhat el5 xen update2,采用ocfs2文件系统存放OCR、voting和oracle data。
vmware下如何安装linux比较简单,就不再啰嗦了。
有几个地方需要稍微注意一下:1.linux安装可以选择lvm方式,也可以选择自己划分卷的方式,我选择的是自己分卷(注意此处的/usr建议在3G以上,越大越好,否则安装组建的时候可得斟酌再三了阿。
/oracle 建议3G以上)2.网卡要设置两块(分别设为vmnet1和vmnet8),网卡网段可在虚拟机的host->virtual network setting中进行修改(只修改我的连接中的内容不行),建议用原值。
3.ocfs2所用磁盘用vmware-vdiskmanager建。
4.补丁一定要打全:libXp,setarch, make, glibc,libaio,compat-libstdc++-33-3, compat-gcc-34-3, compat-gcc-34-c++-3, gcc-4*, libXp-1, openmotif22-, compat-db-4版本用安装光盘上的就可以。
安装ocfs2唯一需要注意的就是你的版本了,一定要和操作系统的版本一致,否则无法添加节点。
安装crs时可能会碰到比较多的问题,有几点需要注意:1.版本要和操作系统一致!!切记。
2.在节点2上执行时会出现问题,这是vipca脚本有问题,编辑一下:[root@oracle2 ~]vi /oracle/product/10.2.0/crs/bin/vipcaJREDIR=/oracle/product/10.2.0/crs/jdk/jre/ #把最后/的去掉,改为:JREDIR=/oracle/product/10.2.0/crs/jdk/jre然后把:if......LD_ASSUME_KERNEL=2.4.19export LD_ASSUME_KERNELfi这段去掉,redhat el5不需要这个变量设置。
使用VMware Server 在Oracle Enterprise Linux 上安装Oracle RAC 10g作者:Vincent Chan使用虚拟机在Oracle Enterprise Linux 上免费试用Oracle 真正应用集群10g第 2 版2007 年1 月发表修订者Wilson注: 为了方便初学者更好地完成本实验,Wilson对本文进行了若干注释本文所需要的VMware server 1.0.3 注册码是:注册码1: 98XY4-54VA4-4216V-4PDZ6注册码2: WH0M5-XW50J-WA4FU-4MTZ3此外,同学们还应该下载一个FTP客户端工具用于把各种软件从Windows主机传送到Linux虚拟机当中。
最好该工具支持ssh2 over ftp协议的,推荐使用FileZilla:/关于对本文的任何问题,请发送到wilsonwang66@于10 月份Oracle OpenWorld 2006 上推介的Oracle 坚不可摧的Linux 旨在为Red Hat Linux 提供企业级支持服务,更快地修复错误,以及显著降低支持价格。
此外,Oracle 自己的Enterprise Linux(基于包含额外错误修补的Red Hat Advanced Server 第4 版(Update 4))提供免费下载。
因此,现在可以通过VMware Server(VMware 提供的一个免费虚拟环境)在家用电脑上免费使用运行在Red Hat Advanced Server 上的Oracle 真正应用集群(RAC) 10g。
Wilson注:你可以选择在Redhat AS4 / CentOS 4.4 / Oracle Unbreakable Linux 4上进行本实验。
对于初学者,推荐使用Oracle的Linux,这样可以避免在实验过程中遇到更多的麻烦。
同学们可以到上下载相关Linux介质。
VMware Server 允许您在一台物理计算机上运行多个操作系统。
每个虚拟机都是一个独立的操作环境,并带有一组自己的虚拟组件,如磁盘、处理器和内存。
虚拟技术在计算环境中十分有用,它允许您在同一物理主机上独立地开发和测试软件以防止数据或软件损坏。
VMware 软件广泛地用于服务器整合,以降低总拥有成本并加快应用程序开发和测试周期。
在本指南中,您将了解如何安装和配置两个在Enterprise Linux 和VMware Server 上运行Oracle RAC 10g第2 版的节点。
注意,本指南仅用于教学/评估目的;Oracle 及其他供应商不会为本配置提供支持。
本指南分为以下几个部分:1. 硬件要求和概述2. 配置第一个虚拟机3. 在第一个虚拟机上配置Enterprise Linux4. 创建并配置第二个虚拟机5. 配置Oracle 自动存储管理(ASM)6. 配置Oracle 集群文件系统(OCFS2)7. 安装Oracle 集群件8. 安装Oracle 数据库10g第2 版9. 探索RAC 数据库环境10. 测试透明应用程序故障切换(TAF)11. 数据库备份与恢复12. 探索Oracle 企业管理器(OEM) 数据库控制台13. 常见问题1. 硬件要求和概述在本指南中,您将安装32 位Linux 客户操作系统。
只有在主机上运行的以下64 位处理器支持64 位客户操作系统:AMD Athlon 64 修订版D 或更高版本AMD Opteron 修订版E 或更高版本AMD Turion 64 修订版E 或更高版本AMD Sempron 64-bit-capable 修订版D 或更新的Intel EM64T VT-capable 处理器如果您决定安装64 位客户操作系统,请确定上面列出了您的处理器。
您还需要确保在BIOS 中启用了虚拟技术(VT)。
一些主流制造商在默认情况下禁用了该技术。
此处提供了有关处理器兼容性的其他信息。
要验证您的处理器是否受支持,请从VMware 网站下载处理器兼容性检查工具。
为每个虚拟机至少分配700MB 内存;为所有虚拟机预留至少30GB 磁盘空间。
主机操作系统环境概况:客户操作系统环境概况:虚拟磁盘布局概况:(要配置共享存储,客户OS 不能与共享存储共享同一个SCSI 总线。
指定客户OS 使用SCSI0,共享磁盘使用SCSI1。
)RAC 数据库环境概况:您将在每个节点上安装Oracle 主目录供冗余使用。
每个节点上的ASM 和Oracle RAC 实例共享同一个Oracle 主目录。
2. 配置第一个虚拟机要创建和配置第一个虚拟机,您需要添加虚拟硬件设备,如磁盘和处理器。
在继续执行安装之前,请创建以下windows 文件夹以存放虚拟机和共享存储。
D:\>mkdir vm\rac\rac1D:\>mkdir vm\rac\rac2D:\>mkdir vm\rac\sharedstorage双击桌面上的VMware Server 图标以启动应用程序:1. 按CTRL-N 创建一个新的虚拟机。
2. 新建虚拟机向导:单击Next。
3. 选择适当的配置:a. 虚拟机配置:选择Custom。
4. 选择客户操作系统:a. 客户操作系统:选择Linux。
b. 版本:选择Red Hat Enterprise Linux 4。
5. 命名虚拟机:a. 虚拟机名称:输入“rac1”。
b. 位置:输入“d:\vm\rac\rac1”。
6. 设置访问权限:a. 访问权限:选择Make this virtual machine private。
7. 启动/关闭选项:a. 虚拟机帐户:选择User that powers on the virtual machine。
8. 处理器配置:a. 处理器:选择一个处理器。
9. 虚拟机内存:a. 内存:选择700MB。
10. 网络类型:a. 网络连接:选择Use bridged networking。
11. 选择I/O 适配器类型:a. I/O 适配器类型:选择LSI Logic。
12. 选择磁盘:a. 磁盘:选择Create a new virtual disk。
13. 选择磁盘类型:a. 虚拟磁盘类型:选择SCSI (Recommended)。
14. 指定磁盘容量:a. 磁盘容量:输入“20GB”。
b. 取消选择Allocate all disk space now。
为了节省空间,您现在不必分配所有磁盘空间。
15. 指定磁盘文件:a. 磁盘文件:输入“localdisk.vmdk”。
b. 单击Finish。
重复步骤16-24 以创建四个虚拟SCSI 硬盘— ocfs2disk.vmdk (512MB)、asmdisk1.vmdk (3GB)、asmdisk2.vmdk (3GB) 和asmdisk3.vmdk (2GB)。
16. VMware Server 控制台:单击Edit virtual machine settings。
17. 虚拟机设置:单击Add。
18. 新增硬件向导:单击Next。
19. 硬件类型:a. 硬件类型:选择Hard Disk。
20. 选择磁盘:a. 磁盘:选择Create a new virtual disk。
21. 选择磁盘类型:a. 虚拟磁盘类型:选择SCSI (Recommended)。
22. 指定磁盘容量:a. 磁盘容量:输入“0.5GB”。
b. 选择Allocate all disk space now。
如果您希望节省空间,则不必分配所有磁盘空间。
出于性能方面的考虑,您需要为每个虚拟共享磁盘预先分配所有磁盘空间。
特别是在Oracle 数据库创建期间或者当数据库的DML 活动较频繁时,如果共享磁盘的大小增长快速,虚拟机可能会间歇挂起一段较短的时间甚至崩溃(这种情况很少见)。
23. 指定磁盘文件:a. 磁盘文件:输入“d:\vm\rac\sharedstorage\ocfs2disk.vmdk”。
b. 单击Advanced。
24. 新增硬件向导:a. 虚拟设备节点:选择SCSI 1:0。
b. 模式:选择Independent,针对所有共享磁盘选择Persistent。
c. 单击Finish。
最后,额外添加一个虚拟网卡以用于专用互联,并移除软盘驱动器(如果有)。
25. VMware Server 控制台:单击Edit virtual machine settings。
26. 虚拟机设置:单击Add。
27. 新增硬件向导:单击Next。
28. 硬件类型:a. 硬件类型:以太网适配器。
29. 网络类型:a. 主机模式:与主机共享的专用网络b. 单击Finish。
30. 虚拟机设置:a. 选择Floppy并单击Remove。
31. 虚拟机设置:单击OK。
修改虚拟机配置文件。
还需要设置其他参数以启用两个虚拟RAC 节点之间的磁盘共享。
打开配置文件d:\vm\rac\rac1\Red Hat Enterprise Linux 4.vmx,并添加下面列出的粗体参数。
config.version = "8"virtualHW.version = "4"scsi0.present = "TRUE"scsi0.virtualDev = "lsilogic"memsize = "700"scsi0:0.present = "TRUE"scsi0:0.fileName = "localdisk.vmdk"ide1:0.present = "TRUE"ide1:0.fileName = "auto detect"ide1:0.deviceType = "cdrom-raw"floppy0.fileName = "A:"Ethernet0.present = "TRUE"displayName = "rac1"guestOS = "rhel4"priority.grabbed = "normal"priority.ungrabbed = "normal"disk.locking = "FALSE"diskLib.dataCacheMaxSize = "0"scsi1.sharedBus = "virtual"scsi1.present = "TRUE"scsi1:0.present = "TRUE"scsi1:0.fileName = "D:\vm\rac\sharedstorage\ocfs2disk.vmdk" scsi1:0.mode = "independent-persistent"scsi1:0.deviceType = "disk"scsi1:1.present = "TRUE"scsi1:1.fileName = "D:\vm\rac\sharedstorage\asmdisk1.vmdk" scsi1:1.mode = "independent-persistent"scsi1:1.deviceType = "disk"scsi1:2.present = "TRUE"scsi1:2.fileName = "D:\vm\rac\sharedstorage\asmdisk2.vmdk" scsi1:2.mode = "independent-persistent"scsi1:2.deviceType = "disk"scsi1:3.present = "TRUE"scsi1:3.fileName = "D:\vm\rac\sharedstorage\asmdisk3.vmdk" scsi1:3.mode = "independent-persistent"scsi1:3.deviceType = "disk"scsi1.virtualDev = "lsilogic"ide1:0.autodetect = "TRUE"floppy0.present = "FALSE"Ethernet1.present = "TRUE"Ethernet1.connectionType = "hostonly"3. 在第一个虚拟机上安装并配置Enterprise Linux从Oracle 网站下载Enterprise Linux 并解压缩文件:Enterprise-R4-U4-i386-disc1.isoEnterprise-R4-U4-i386-disc2.isoEnterprise-R4-U4-i386-disc3.isoEnterprise-R4-U4-i386-disc4.isoWilson注:可以从/oraclelinux 下载这些介质1. 在VMware Server 控制台上,双击右面板上的CD-ROM 设备,然后选择第1 张磁盘的ISO 镜像Enterprise-R4-U4-i386-disc1.iso。