TANDBERG TRC-5 Remote Control User Guide
- 格式:pdf
- 大小:999.48 KB
- 文档页数:2


Blackfin Debugger Release 09.2023Blackfin DebuggerTRACE32 Online HelpTRACE32 DirectoryTRACE32 IndexTRACE32 Documents ......................................................................................................................ICD In-Circuit Debugger ................................................................................................................Processor Architecture Manuals ..............................................................................................Blackfin ....................................................................................................................................Blackfin Debugger (1)Introduction (4)Brief Overview of Documents for New Users4 Demo and Start-up Scripts5 Location of Debug Connector5Warning (5)Quick Start JTAG (6)Troubleshooting (8)SYStem.Up Errors8FAQ (8)Configuration (9)System Overview9Blackfin specific SYStem Commands (10)SYStem.CONFIG Configure debugger according to target topology10 Daisy-Chain Example13 TapStates14 SYStem.CONFIG.CORE Assign core to TRACE32 instance15 SYStem.CPU CPU type selection16 SYStem.JtagClock JTAG clock selection17 SYStem.LOCK Lock and tristate the debug port17 SYStem.MemAccess Real-time memory access (non-intrusive)18 SYStem.Mode System mode selection19 SYStem.Option.IMASKASM Interrupt disable19 SYStem.Option.IMASKHLL Interrupt disable20Breakpoints (21)Software Breakpoints21 On-chip Breakpoints21 Breakpoint in ROM21Example for Breakpoints22 Memory Classes (23)CPU specific TrOnchip Commands (24)JTAG Connector (25)Blackfin DebuggerVersion 10-Oct-2023 IntroductionThis document describes the processor specific settings and features for the Blackfin Embedded Media Processor. TRACE32-ICD supports all Blackfin devices which are equipped with the JT AG debug interface.Please keep in mind that only the Processor Architecture Manual (the document you are reading at the moment) is CPU specific, while all other parts of the online help are generic for all CPUs supported by Lauterbach. So if there are questions related to the CPU, the Processor Architecture Manual should be your first choice.If some of the described functions, options, signals or connections in this Processor Architecture Manual are only valid for a single CPU the name is added in brackets.Brief Overview of Documents for New UsersArchitecture-independent information:•“Training Basic Debugging” (training_debugger.pdf): Get familiar with the basic features of a TRACE32 debugger.•“T32Start” (app_t32start.pdf): T32Start assists you in starting TRACE32 PowerView instances for different configurations of the debugger. T32Start is only available for Windows.•“General Commands” (general_ref_<x>.pdf): Alphabetic list of debug commands.Architecture-specific information:•“Processor Architecture Manuals”: These manuals describe commands that are specific for the processor architecture supported by your Debug Cable. T o access the manual for your processorarchitecture, proceed as follows:-Choose Help menu > Processor Architecture Manual.•“OS Awareness Manuals” (rtos_<os>.pdf): TRACE32 PowerView can be extended for operating system-aware debugging. The appropriate OS Awareness manual informs you how to enable theOS-aware debugging.Demo and Start-up ScriptsLauterbach provides ready-to-run start-up scripts for known Blackfin based hardware.To search for PRACTICE scripts, do one of the following in TRACE32 PowerView:•Type at the command line: WELCOME.SCRIPTS•or choose File menu > Search for Script.Y ou can now search the demo folder and its subdirectories for PRACTICE start-up scripts(*.cmm) and other demo software.Y ou can also manually navigate in the ~~/demo/blackfin/ subfolder of the system directory ofTRACE32.Location of Debug ConnectorLocate the debug connector on your target board as close as possible to the processor to minimize the capacitive influence of the trace length and cross coupling of noise onto the JT AG signals. WarningSignal LevelThe debugger output voltage follows the target voltage level. It supports a voltage range of 0.4…5.2V. ESD ProtectionNOTE:T o prevent debugger and target from damage it is recommended to connect ordisconnect the debug cable only while the target power is OFF.Recommendation for the software start:•Disconnect the debug cable from the target while the target power is off.•Connect the host system, the TRACE32 hardware and the debug cable.•Start the TRACE32 software.•Connect the debug cable to the target.•Switch the target power ON.Power down:•Switch off the target power.•Disconnect the debug cable from the target.Quick Start JTAGStarting up the debugger is done as follows:1.Select the device prompt B: for the ICD Debugger, if the device prompt is not active after the TRACE32 software was started.2.Select the CPU type to load the CPU specific settings.3.Enter debug mode:This command resets the CPU and enters debug mode. After the execution of this command access to the registers and to memory is possible. Before performing the first access to external SDRAM or FLASH the External Bus Interface Unit (EBIU) must be configured.4.The following command sequence is for the BF537 processor and configures the SDRAM controller with default values that were derived for maximum flexibility. They work for a system clock frequency between 54MHz and 133MHz.In the example a ST M29W320DB flash device is used in 16-bit mode. All four memory banks and CLKOUT are enabled.B:SYStem.CPU BF537SYStem.Up; configure SDRAM controllerData.Set 0xFFC00A1sLONG 0x0091998D Data.Set 0xFFC00A14 %WORD 0x0025Data.Set 0xFFC00A1C %WORD 0x03A0; EBIU_SDGCTL ; EBIU_SDBCTL ; EBIU_SDRRC; enable all flash memory banks and clock outData.Set 0xFFC00A00 %WORD 0x00FF; EBIU_AMGCTL; ST M29W320DB flash device in 16-bit modeFLASH.Create 1. 0x20000000--0x20003FFF 0x4000 AM29LV100 Word FLASH.Create 1. 0x20004000--0x20007FFF 0x2000 AM29LV100 Word FLASH.Create 1. 0x20008000--0x2000FFFF 0x8000 AM29LV100 Word FLASH.Create 1. 0x20010000--0x203FFFFF 0x10000 AM29LV100 Word5.Load the program.Data.LOAD.Elf demo.dxe; The file demo.dxe is in ELF format The option of the Data.LOAD command depends on the file format generated by the compiler. A detailed description of the Data.LOAD command is given in the “General Commands Reference”. The start-up sequence can be automated using the programming language PRACTICE. A typical start sequence is shown below. This sequence can be written to a PRACTICE script file (*.cmm, ASCII format) and executed with the command DO<file>.B::; Select the ICD device promptWinClear; Delete all windowsSYStem.CPU BF537; select the processorSYStem.Up; Reset the target and enter debug modeData.Load.Elf sieve.dxe; Load the applicationRegister.Set PC main; Set the PC to function mainList.Mix; Open disassembly window *) Register.view; Open register window *) PER.view; Open window with peripheral register *) Break.Set sieve; Set breakpoint to function sieveBreak.Set 0x1000 /p; Set on-chip breakpoint to address 1000; Refer to the restrictions in; On-chip Breakpoints.*) These commands open windows on the screen. The window position can be specified with the WinPOS command.TroubleshootingSYStem.Up ErrorsThe SYStem.Up command is the first command of a debug session where communication with the target is required. If you receive error messages while executing this command this may have the following reasons.All The target has no power.All There are additional loads or capacities on the JTAG lines.All The JTAG clock is too fast.FAQPlease refer to https:///kb.Configuration System OverviewBlackfin specific SYStem CommandsSYStem.CONFIG Configure debugger according to target topologyThe four parameters IRPRE, IRPOST , DRPRE, DRPOST are required to inform the debugger about the T AP controller position in the JT AG chain, if there is more than one core in the JT AG chain (e.g. ARM + DSP). The information is required before the debugger can be activated e.g. by a SYStem.Up . See Daisy-chain Example .For some CPU selections (SYStem.CPU ) the above setting might be automatically included, since the required system configuration of these CPUs is known.T riState has to be used if several debuggers (“via separate cables”) are connected to a common JT AG port at the same time in order to ensure that always only one debugger drives the signal lines. T APState and TCKLevel define the T AP state and TCK level which is selected when the debugger switches to tristate mode. Please note: nTRST must have a pull-up resistor on the target, TCK can have a pull-up or pull-down resistor, other trigger inputs need to be kept in inactive state.Format:SYStem.CONFIG <parameter> <number_or_address>SYStem.MultiCore <parameter> <number_or_address> (deprecated)<parameter>:CORE <core><parameter>:(JTAG):DRPRE <bits>DRPOST <bits>IRPRE <bits>IRPOST <bits>DAPDRPOST <bits>DAPDRPRE <bits>DAPIRPOST <bits>DAPIRPRE <bits>TAPState <state>TCKLevel <level>TriState [ON | OFF ]Slave [ON | OFF ]DEBUGPORTTYPE [JTAG | SWD ]SWDPIDLEHIGH [ON | OFF ]SWDPTargetSel <value>CORE For multicore debugging one TRACE32 PowerView GUI has to be startedper core. To bundle several cores in one processor as required by thesystem this command has to be used to define core and processorcoordinates within the system topology.Further information can be found in SYStem.CONFIG.CORE.… DRPOST <bits>Defines the TAP position in a JT AG scan chain. Number of TAPs in theJTAG chain between the TDI signal and the TAP you are describing. InBYPASS mode, each TAP contributes one data register bit. See possibleTAP types and example below.Default: 0.… DRPRE <bits>Defines the TAP position in a JT AG scan chain. Number of TAPs in theJTAG chain between the TAP you are describing and the TDO signal. InBYPASS mode, each TAP contributes one data register bit. See possibleTAP types and example below.Default: 0.… IRPOST <bits>Defines the TAP position in a JT AG scan chain. Number of InstructionRegister (IR) bits of all TAPs in the JT AG chain between TDI signal andthe TAP you are describing. See possible T AP types and example below.Default: 0.… IRPRE <bits>Defines the TAP position in a JT AG scan chain. Number of InstructionRegister (IR) bits of all TAPs in the JTAG chain between the T AP you aredescribing and the TDO signal. See possible TAP types and examplebelow.Default: 0.TAPState(default: 7 = Select-DR-Scan) This is the state of the TAP controller whenthe debugger switches to tristate mode. All states of the JTAG T APcontroller are selectable.TCKLevel (default: 0) Level of TCK signal when all debuggers are tristated. TriState(default: OFF) If several debuggers share the same debug port, thisoption is required. The debugger switches to tristate mode after eachdebug port access. Then other debuggers can access the port. JT AG:This option must be used, if the JTAG line of multiple debug boxes areconnected by a JTAG joiner adapter to access a single JTAG chain. Slave(default: OFF) If more than one debugger share the same debug port, allexcept one must have this option active.JTAG: Only one debugger - the “master” - is allowed to control the signalsnTRST and nSRST (nRESET).DEBUGPORTTYPE [JTAG | SWD]It specifies the used debug port type “JT AG”, “SWD”. It assumes the selected type is supported by the target.Default: JT AG.SWDPIdleHigh [ON | OFF]Keep SWDIO line high when idle. Only for Serialwire Debug mode. Usually the debugger will pull the SWDIO data line low, when no operation is in progress, so while the clock on the SWCLK line is stopped (kept low).Y ou can configure the debugger to pull the SWDIO data linehigh, when no operation is in progress by usingSYStem.CONFIG SWDPIdleHigh ONDefault: OFF.SWDPTargetSel<value>Device address in case of a multidrop serial wire debug port.Default: none set (any address accepted).Daisy-Chain ExampleBelow, configuration for core C.Instruction register length of •Core A: 3 bit •Core B: 5 bit •Core D: 6 bitSYStem.CONFIG.IRPRE 6.; IR Core D SYStem.CONFIG.IRPOST 8.; IR Core A + B SYStem.CONFIG.DRPRE 1.; DR Core D SYStem.CONFIG.DRPOST 2.; DR Core A + BSYStem.CONFIG.CORE 0. 1.; Target Core C is Core 0 in Chip 1Core A Core B Core CCore D TDOTDI Chip 0Chip 1TapStates0Exit2-DR1Exit1-DR2Shift-DR3Pause-DR4Select-IR-Scan5Update-DR6Capture-DR7Select-DR-Scan8Exit2-IR9Exit1-IR10Shift-IR11Pause-IR12Run-Test/Idle13Update-IR14Capture-IR15Test-Logic-ResetSYStem.CONFIG.CORE Assign core to TRACE32 instance Format:SYStem.CONFIG.CORE<core_index><chip_index>SYStem.MultiCore.CORE<core_index><chip_index> (deprecated) <chip_index>:1 (i)<core_index>:1…kDefault core_index: depends on the CPU, usually 1. for generic chipsDefault chip_index: derived from CORE= parameter of the configuration file (config.t32). The COREparameter is defined according to the start order of the GUI in T32Start with ascending values.T o provide proper interaction between different parts of the debugger, the systems topology must bemapped to the debugger’s topology model. The debugger model abstracts chips and sub cores of these chips. Every GUI must be connect to one unused core entry in the debugger topology model. Once the SYStem.CPU is selected, a generic chip or non-generic chip is created at the default chip_index.Non-generic ChipsNon-generic chips have a fixed number of sub cores, each with a fixed CPU type.Initially, all GUIs are configured with different chip_index values. Therefore, you have to assign thecore_index and the chip_index for every core. Usually, the debugger does not need further information to access cores in non-generic chips, once the setup is correct.Generic ChipsGeneric chips can accommodate an arbitrary amount of sub-cores. The debugger still needs information how to connect to the individual cores e.g. by setting the JT AG chain coordinates.Start-up ProcessThe debug system must not have an invalid state where a GUI is connected to a wrong core type of a non-generic chip, two GUIs are connected to the same coordinate or a GUI is not connected to a core. The initial state of the system is valid since every new GUI uses a new chip_index according to its CORE= parameter of the configuration file (config.t32). If the system contains fewer chips than initially assumed, the chips must be merged by calling SYStem.CONFIG.CORE.SYStem.CPU CPU type selection Format:SYStem.CPU <cpu><cpu>:BF531 | BF532 | BF533 | BF534…Default selection: BF534.Selects the CPU type.SYStem.JtagClock JT AG clock selection Format:SYStem.JtagClock [<frequency>]SYStem.BdmClock<frequency>(deprecated)Default frequency: 1MHz.Selects the JT AG port frequency (TCK). Any frequency up to 50MHz can be entered, it will be generated by the debuggers internal PLL.For CPUs which come up with very low clock speeds it might be necessary to slow down the JT AGfrequency. After initialization of the CPUs PLL the JT AG clock can be increased.SYStem.LOCK Lock and tristate the debug port Format:SYStem.LOCK [ON | OFF]Default: OFF.If the system is locked, no access to the debug port will be performed by the debugger. While locked, the debug connector of the debugger is tristated. The main intention of the SYStem.LOCK command is to give debug access to another tool.SYStem.MemAccess Real-time memory access (non-intrusive) Format:SYStem.MemAccess Denied | StopAndGo | BTCBTC“BTC” allows a non-intrusive memory access while the core is running, if aBackground T elemetry Channel (BTC) is defined in your application. Anyinformation on how to create such a channel can be found in AnalogDevices’ VisualDSP++ user’s manual. The JT AG clock speed should be asfast as possible to get good performanceDenied Real-time memory access during program execution to target is disabled.StopAndGo Temporarily halts the core(s) to perform the memory access. Each stoptakes some time depending on the speed of the JT AG port, the number ofthe assigned cores, and the operations that should be performed.SYStem.Mode System mode selectionFormat:SYStem.Mode <mode>SYStem.Attach (alias for SYStem.Mode Attach)SYStem.Down (alias for SYStem.Mode Down)SYStem.Up (alias for SYStem.Mode Up)<mode>:DownGoAttachUpDown Disables the debugger.Go Resets the target with debug mode enabled and prepares the CPU fordebug mode entry. After this command the CPU is in the system.upmode and running. Now, the processor can be stopped with the breakcommand or if a break condition occurs.Attach User program remains running (no reset) and the debug interface isinitialized.Up Resets the target and sets the CPU to debug mode. After execution ofthis command the CPU is stopped and prepared for debugging.StandBy Not supported.NoDebug Not supported.SYStem.Option.IMASKASM Interrupt disable Format:SYStem.Option.IMASKASM [ON | OFF]Mask interrupts during assembler single steps. Useful to prevent interrupt disturbance during assembler single stepping.SYStem.Option.IMASKHLL Interrupt disable Format:SYStem.Option.IMASKHLL [ON | OFF]Mask interrupts during HLL single steps. Useful to prevent interrupt disturbance during HLL single stepping.BreakpointsThere are two types of breakpoints available: software breakpoints and on-chip breakpoints. Software BreakpointsSoftware breakpoints are the default breakpoints. A special breakcode is patched to memory so it only can be used in RAM or FLASH areas.There is no restriction in the number of software breakpoints.On-chip BreakpointsThe Blackfin processor has a total of six instruction and two data on-chip breakpoints.A pair of two breakpoints may be further grouped together to form a range breakpoint. A range breakpointcan be including or excluding. In the first case the core is stopped if an address in the range is detected, in the second case the core is stopped when an address outside of the range is observed.Breakpoint in ROMWith the command MAP.BOnchip<range> it is possible to inform the debugger about ROM(FLASH,EPROM) address ranges in target. If a breakpoint is set within the specified address range the debugger uses automatically the available on-chip breakpoints.Example for BreakpointsAssume you have a target with FLASH from 0x20000000 to 0x200FFFFF and RAM from 0x0 to 0x1000000. The command to configure TRACE32 correctly for this configuration is: Map.BOnchip 0x20000000--0x200FFFFFThe following breakpoint combinations are possible.Software breakpoints:Break.Set 0x0 /Program; Software Breakpoint 1Break.Set 0x1000 /Program; Software Breakpoint 2On-chip breakpoints:Break.Set 0x20000100 /Program; On-chip Breakpoint 1Break.Set 0x2000ff00 /Program; On-chip Breakpoint 2Memory ClassesThe following memory classes are available: Memory Class DescriptionP ProgramD DataCPU specific TrOnchip CommandsThe TrOnchip command group is not available for the Blackfin debugger.JTAG ConnectorSignal Pin Pin SignalGND12EMU-N/C34GNDVDDIO56TMSN/C78TCKN/C910TRST-N/C1112TDIGND1314TDOJTAG Connector Signal Description CPU Signal TMS JTAG-TMS,TMSoutput of debuggerTDI TDI JTAG-TDI,output of debuggerTCK TCK JTAG-TCK,output of debugger/TRST /TRST JTAG-TRST,output of debuggerTDO TDO JTAG-TDO,input for debugger/EMU JTAG Emulation Flag /EMUVDDIO VDDIO This pin is used by the debugger to sense the targetI/O voltage and to set the drive levels accordingly. Ifthe sensed voltage level is too low (e.g. target has nopower) the debugger powers down its drivers toprevent the target from damage.。
LoadRunner如何结合WinRunner测试GUI应用?步骤如下:1、安装Microsoft Terminal Server(Windows2000 Server版本应该已经有了Terminal Services)2、在MTS(Microsoft Terminal Server)上安装Loadrunner,安装WinRunner3、使用winRunner录制GUI应用的脚本4、保证能够在MTS这台机器上正确回放5、从安装controller机器上,搜索MTS这台计算机,找到winRunner脚本所在目录,映射到安装Controller这台机器6、打开LoadRunner Controller,建立新的场景,在添加脚本地方,选择脚本类型为GUI,然后选择映射目录,Winrunner脚本就会显示出来,选择相应的WinRunner脚本7、如果是LoadRunner8.0,直接添加LoadGenerator,添加时写MTS机器的名字:1,机器名:2;机器名:3等等。
or you can type the IP address:1,Ip address:2,Ip address:3..假设你要打算在MTS上并发3个GUI用户,设置三台虚拟的LoadGenerator即可。
如果LoadRunner版本低于8.0,则需要在winnt\system32\drivers\etc\hosts文件编辑如下:192.168.0.23 MTSSEVERNAME SERVERNAME:1 SERVERNAME:2 SERVERNAME:38、全选loadGenerator,details-》Vuser Limits-》保证GUI VUSER enable9、在运行场景之前,一定要保证Controller这台机器安装Terminal Client,并发几个GUI 用户,就需要在这台机器上开几个Terminal Client。

UG365: GATT Configurator User’s Guide for Bluetooth® SDK v2.xThis guide provides the information needed to effectively use theBluetooth GATT Configurator Studio. The GATT Configurator is an intuitive interface providingaccess to all the Profiles, Services, Characteristics, andsupports creating, importing, or exporting custom GATT profilesfor Bluetooth applications. This guide reviews the user interfaceand covers some most common uses of the Configurator.1 GATT Configurator OverviewThe GATT Configurator is composed of four different sections that allow you to work with the various components and aspects of the interface. The Source section, Custom GATT section, Settings section, and Tools section are shown in the following figure. This chap-ter reviews each section.ToolsSource Custom GATTSettingsFigure 1-1. GATT Configurator Interface1.1 Source SectionThe Source section displays a list of predefined Profiles, Services, Characteristics, and Descriptors. These items can be filtered based on their source using the checkboxes. Tabs allow you to switch between different lists. As shown in the following figure, the pane below the list displays textual information about the latest selection.Note: This pane is shared by the Source and the Custom GATT sections. It can be used to find more information about a selected item in the Source section or in the Custom GATT section.The top of the Source section shows the name of the configurator file and the Bluetooth SDK version. An * in the configurator file name indicates there are unsaved changes. Clicking the icon gives you more information about the current framework.Figure 1-2. Source Section1.2 Custom GATT SectionThe Custom GATT section displays the items present in the current configuration file. This includes a Custom GATT Profile, Services, Characteristics, and Descriptors displayed as a hierarchical list. The order of items shown here reflect the order in which they exist in the GATT database. You can select an item here to see its properties and configuration.Figure 1-3. Custom GATT SectionNote: Unsaved changes will be shown in this section, so this view does not necessarily reflect the true state of the GATT database.1.3 Settings SectionThe Settings section allows you to configure the properties of items such as Profiles, Services, Characteristics and Descriptors that are present in the Custom GATT section. Selecting an item populates the relevant configuration options such as the name, ID, properties and capabilities. Any changes made in this section reflect immediately for the selected item.Figure 1-4. Settings SectionNote:Unsaved changes will be shown in this view, so changes made in this view does not necessarily reflect the true state of the GATT database.1.4 Tools SectionTools allow you to create new items, duplicate, remove or reorder items, or import a new GATT database. Controls in this menu get activated when you select a relevant item in the Custom GATT view section. For example, you can only create a new Descriptor when a Characteristic is selected in the Custom GATT view. Similarly, reordering options will not work if there is only one item at that level. The purpose of the control appears when the cursor is hovered over it.Figure 1-5. Tools SectionGenerate is used to generate GATT database xml file (gatt.xml) as well as the associated source files (gatt_db.c/.h).The Import control ( ) imports an existing GATT database using an .xml file or a .bgproj file.Note: Importing a gatt.xml file using the Import function will overwrite the current custom GATT data. This message also appears asa prompt when you click the Import control. The gatt.xml structure and notation is described in UG118: Blue Gecko Blue-tooth® Profile Toolkit Developer's Guide.1.4.1 Difference between Generate and SaveSave: This saves any changes made in the GATT Configurator to the “.isc” file of the project. Unsaved changes are indicated by an asterisk ( * ) next to the name of the .isc file. Changes can be saved by pressing “Ctrl + S” or clicking Save under the File menu. Use the Save function to save changes that you intend to keep but do not need to reflect yet in the GATT database or GATT source files. Generate: When you click Generate, changes are made to the GATT database (gatt.xml) and source file (gatt_db.c/.h). Further gener-ations will overwrite the changes to these files. Additionally, it can also create files and overwrite them if they have been modified (for example. init_mcu*.c). If you have made modifications to such files, make sure to uncheck the files so that they do not get overwritten.A prompt is displayed as shown below giving you the option of selecting specific files that need to be overwritten. Generating does not save the changes to the “.isc” file.Figure 2-6. Overwrite prompt after GenerationAs a best practice, always first save the changes and then generate.2 Use CasesThis chapter describes common tasks performed with the GATT Configurator.2.1 Drag and DropTo include predefined items from the source list in your application, drag and drop the item from the Source Section to the Custom GATT section. When you drag and drop a profile or a service, all the Characteristics and Descriptors in the levels underneath get in-cluded automatically. Maintaining the hierarchical structure, Descriptors can only be included under Characteristics, which go under Services.Figure 2-1. Drag and Drop a Profile to Include all the ItemsWithin the Custom GATT section, drag and drop can be used to reorder items. This saves the trouble of including and configuring the item again. Similarly, an item can be duplicated and moved around in the section.2.2 Create New ItemNew items can be created from the tools menu. New Services get created at the bottom whereas Characteristics and Descriptors are created under the selected item. Descriptors can only be created when you have selected a Characteristic. When you select the Profile and create a new Characteristic, it gets created under the first Service.Figure 2-2. Create New ItemWhen a new item is selected, the Settings section displays the default properties of the item. Here the item can be configured as per the requirements.Figure 2-3. Default Values for a Newly Created CharacteristicThe application gets local access to the GATT database using the characteristic ID. You can enter this by selecting the checkbox and entering a unique ID. Upon generation, this ID gets a macro in the gatt_db.h file as shown below.extern const struct bg_gattdb_def bg_gattdb_data;#define gattdb_service_changed_char 3#define gattdb_device_name 7#define gattdb_ota_control 21#define gattdb_new_characteristic 24UUID or Universally Unique identifier are numbers used to identify Services, Characteristics, and Descriptors uniquely. There are two types of UUID:1. 16 bit: These 16 bit UUIDs are predefined by the Bluetooth SIG. Being short they are energy and memory efficient. For example,the Blood Pressure Service has a UUID of 0x1810 whereas the Battery level Characteristic has a UUID of 0x2A19.2. 128 bit: This overcomes the limitation of running out of 16 bit UUIDs and gives the power to declare your own UUIDs for CustomServices and Characteristics. These randomly generated UUIDs in the GATT Configurator are of version 4 (random) variant 1. You can use any UUID for a custom Service or Characteristic if it does not overlap with Bluetooth base UUID: xxxxxxxx-0000-1000-8000-00805F9B34FB.While there is no central authority ensuring other devices don’t use the same UUID, there is very little chance (1 in 340 undecillion) that two devices end up with the same UUID.2.3 Adding PropertiesProperties define what actions can be performed for a given Characteristic or Descriptor. For example, in the Blood Pressure Profile, the Blood Pressure Feature has a Mandatory Read property. The green + control on the right can be used to add properties to an item. Similarly, the red x control can be used to delete the selected item. Clicking on the fields in the table allows you to select the available options for the requirements and the state fields for a given property.Figure 2-4. Setting properties for a Characteristic or Descriptor2.4 Adding CapabilitiesBluetooth SDK 2.4 introduced a new feature called Polymorphic GATT that can be used to dynamically show or hide GATT Services and Characteristics. The GATT Configurator implements this feature using GATT capabilities. This section describes how to do it.To summarize how capabilities work, each Service/Characteristic can declare several capabilities and the state of the capabilities (ena-ble/disable) determines the visibility of those Services/Characteristics as a bit-wise OR operation. For example, the Ser-vice/Characteristic is visible when at least one of its capabilities is enabled and it is not visible when all its capabilities are disabled. Always start by declaring the GATT-level capabilities and defining their default value. That is done by selecting "Custom BLE GATT" and adding the capabilities in "Capability declaration". To add a capability just click the + control on the right-hand side and then change the capability name and default value. For example, Appearance, Temperature_measure and Tx_power are added to the profile as shown in the following figure.Figure 2-5. Declaring GATT-level CapabilitiesOnce those capabilities are added they become available on each of the services and characteristics. They can be added through the + control but this time from the list of capabilities includes all those declared at the GATT level, as shown in the following figure.Figure 2-6. Including GATT-level Capabilities in a CharacteristicNote: The capabilities state should not be changed during a connection, as that can cause misbehavior. The safest way is to change the capabilities when no devices are connected.2.5 Including ServicesIn a Service definition, you can add one or more references to other services, using the Service includes feature. Include definitions consist of a single attribute (the include declaration) that contains all the details required for the client to reference the included service. Included services can help avoid duplicating data in a GATT server. If a service will be referenced by other services, you can use this mechanism to save memory and simplify the layout of the GATT server.UG365: GATT Configurator User's Guide for Bluetooth® SDK v2.xUse CasesStart by declaring an ID for each service that needs to be included. Services without an ID cannot be referenced. This is done by select-ing the ID checkbox and providing an identifier text for the Service. Next, select the Service to be referenced. In the Settings -> Service includes section, click the + control on the right-hand side and click on the Service.Figure 2-7. Referencing a Service using Service Includes2.6 Import and Export a GATT DatabaseImport (): The Import control in the Tools section allows you to import an existing GATT database using an .xml file or a .bgproj file. Note that this will overwrite the existing GATT data.Export: The GATT database (usually named gatt.xml) gets updated whenever you generate. A validation prompt asks for permission to overwrite files, as shown in the image below. Here you can uncheck files that do not need to be overwritten. All the generated or modi-fied files are in the project folder. The gatt.xml file generated here can be used for exporting the GATT database (File menu).Figure 2-8. GATT Database Generation for ExportGeneration also has a feature of making backup files before overwriting existing files. Backup files are saved in file-name.extension.bak format for each file. These files are also located in the same folder as the overwritten files.Simplicity StudioOne-click access to MCU and wireless tools, documentation, software, source code libraries & more. Available for Windows, Mac and Linux!IoT Portfolio /IoTSW/HW/simplicityQuality/qualitySupport and Community Silicon Laboratories Inc.400 West Cesar ChavezAustin, TX 78701USADisclaimerSilicon Labs intends to provide customers with the latest, accurate, and in-depth documentation of all peripherals and modules available for system and software implementers using or intending to use the Silicon Labs products. Characterization data, available modules and peripherals, memory sizes and memory addresses refer to each specific device, and "Typical" parameters provided can and do vary in different applications. Application examples described herein are for illustrative purposes only. Silicon Labs reserves the right to make changes without further notice to the product information, specifications, and descriptions herein, and does not give warranties as to the accuracy or completeness of the included information. Without prior notification, Silicon Labs may update product firmware during the manufacturing process for security or reliability reasons. Such changes will not alter the specifications or the performance of the product. Silicon Labs shall have no liability for the consequences of use of the information supplied in this document. This document does not imply or expressly grant any license to design or fabricate any integrated circuits. The products are not designed or authorized to be used within any FDA Class III devices, applications for which FDA premarket approval is required or Life Support Systems without the specific written consent of Silicon Labs. A "Life Support System" is any product or system intended to support or sustain life and/or health, which, if it fails, can be reasonably expected to result in significant personal injury or death. Silicon Labs products are not designed or authorized for military applications. Silicon Labs products shall under no circumstances be used in weapons of mass destruction including (but not limited to) nuclear, biological or chemical weapons, or missiles capable of delivering such weapons. Silicon Labs disclaims all express and implied warranties and shall not be responsible or liable for any injuries or damages related to use of a Silicon Labs product in such unauthorized applications.Trademark InformationSilicon Laboratories Inc.® , Silicon Laboratories®, Silicon Labs®, SiLabs® and the Silicon Labs logo®, Bluegiga®, Bluegiga Logo®, Clock B uilder®, CMEMS®, DSPLL®, EFM®, EFM32®, EFR, Ember®, Energy Micro, Energy Micro logo and combinations thereof, "the world’s most energy friendly microcontrollers", Ember®, EZLink®, EZRadio®, EZRadioPRO®, Gecko®, Gecko OS, Gecko OS Studio, ISOmodem®, Precision32®, ProSLIC®, Simplicity Studio®, SiPHY®, Telegesis, the Telegesis Logo®, USBXpress® , Zentri, the Zentri logo and Zentri DMS, Z-Wave®, and others are trademarks or registered trademarks of Silicon Labs. ARM, CORTEX, Cortex-M3 and THUMB are trademarks or registered trademarks of ARM Holdings. Keil is a registered trademark of ARM Limited. Wi-Fi is a registered trademark of the Wi-Fi Alliance. All other products or brand names mentioned herein are trademarks of their respective。

A205E Carrier BoardA205EA205E User GuideNoticePacking ListI nterfacesSoftware/BSPSample ApplicationsDevelop Tool1.1 NoticePlease read manual carefully before install, operate, or transport device.•Ensure that the correct power range is being used before powering the device.•Avoid hot plugging.•To properly turn off the power, please shut down the Ubuntu system first, and then cut off the power. Due to the particularity of the Ubuntu system, on the Nvidia developer kit, if the power is turned off when the startup is not completed, there will be a 0.03% probability of abnormality, which will cause the device to fail to start.Due to the use of the Ubuntu system, the same problem also exists on the device.•Do not use cables or connectors other than described in this manual.•Do not use device near strong magnetic fields.•Backup your data before transportation or device is idle.•Recommend to transport device in its original packaging.1.2Packing list• A carrier board (A205E).•Power supply with out AC cord.Note R ecommends using the Jetson A205e Development System only with the power supply ing an incompatible power supply may damage the carrier board or the module or both. If you use another power supply in place of the one provided, you are responsible for ensuring that it is compatible with the 205E hardware.1.3 A205E Development System INTERFACESA205E Development System module and carrier board:1.3.1 A205e System carrier board: top viewDesignator Connector DescriptionW1 W2RJ45 CON RJ45 Gigabit Ethernet Connector (10/100/1000)W3 W4USB 3.0 CON USB 3.0 Link 1 Type A Connector W5HDMI CON HDMI Right Angle Vertical Connector W6Audio Jack 3.5 Earphone standW7DC Jack 131010mm 6pins DC connectorW820PIN IO CON 3.5mm pitchW9LED indicator W10TF Card TF Card SlotW11TYPE C ( 2.0)USB 2.0 Link TYPE C ConnectorW12RECOVERY KEY W13RESET KEY W14POWER KEY W15WIFI/BT ANTCON 50 Ohms, MCRF, PCB Vertical Jack Receptacle, SMT, 1.25mm Mounted HeightW16RTC CON RTC battery ConnectorW17IIC CON CON, 1.25mm PITCH, 4PIN, 4.7mm.SMDW18UDB2.0 CON FPC 0.5MM 20P H=2MMW19 W21Speaker con CON, 1.5mm PITCH, 2PIN, 5.1mm ,SMD W20NX CON NVIDIA Jetson NX W22MCU CON 2.54mm 2X2W235V DC CON HDR_1X2 2.54MM W25/W2612V DC CON HDR_1X2 2.54MM CON W27SSD CON 67 pins M.2 KEY M connectorW28CAMERA CONCON_B2B_120_F_NORM-CON_QSH_SMT_2X601.3.2 A205e System carrier board: bottom view1.3.3 Interface DetailsThis section highlights some of the Jetson A205e Development System interfaces.1.3.3.1 Module (W0)1.3.3.2 Carrier BoardPIN Signal Name PIN Signal Name 1RJ45_TD_P 2RJ45_TD_N 3RJ45_RD_P 4RJ45_TD1_P 5RJ45_TD1_N 6RJ45_RD_N 7RJ45_RD1_P 8RJ45_RD1_N 9CGND10CGND[W1W2] GbE PIN Signal Name PIN Signal Name 1VDD_5V0_IO 2USB2_N 3USB2_P 4,21,22GND 5USB2_RX_N 6USB2_RX_P 7GND8DSP2_TX_N19DSP2_TX_P110VDD_5V0_IO 11USB1_N 12USB1_P 13GND 14USB1_RX_N 15USB1_RX_P 16,19,20,21,22GND17DSP1_TX_N118DSP1_TX_P1[W1W2]USB3.0 (W3/W4 )[W5] HDMI JackPIN Signal Name PIN Signal Name1HDMI_TXD2_CON_P2GND3HDMI_TXD2_CON_N4HDMI_TXD1_CON_P5GND6HDMI_TXD1_CON_N7HDMI_TXD0_CON_P8GND9HDMI_TXD0_CON_N10HDMI_TXC_CON_P11GND12HDMI_TXC_CON_N13HDMI_CEC_CON14NC15HDMI_DDC_SCL_5V016HDMI_DDC_SDA_5V0 17GND18VDD_5V0_HDMI_CON 19HDMI_HPD_CON20,21,22,23GND21HDMI1_TXD2_CON_P22GND23HDMI1_TXD2_CON_N24HDMI1_TXD1_CON_P 25GND26HDMI1_TXD1_CON_N 27HDMI1_TXD0_CON_P28GND29HDMI1_TXD0_CON_N30HDMI1_TXC_CON_P31GND32HDMI1_TXC_CON_N33HDMI1_CEC_CON34NC35HDMI1_DDC_SCL_5V036HDMI1_DDC_SDA_5V0 37GND38VDD_5V0_HDMI_CON 39HDMI1_HPD_CON40.41.42.43.44GND[W6] Audio JackPIN Signal Name PIN Signal Name2Microphone P3GND4HP_R5HP_L6,7AUD_HP_DET[W7] DC Power Input JackPIN Signal Name PIN Signal Name1+ 2.3.4.5.6GNDNote: After plugging in the power supply to turn on normally, LED lights up (red) DC +9V(8A) ~ +36V (2A)[W8] 20PIN IO CONPIN Signal Name PIN Signal Name1CAN_L2CAN_H3RS232_TX4RS232_RX5RS485_A6RS485_B7I2C1_SDA (3.3V)8I2C1_SCL(3.3V)9GND10 3.3V11UART2_TXD_3V312UART2_RXD_3V313SPI0_MOSI_3V314SPI0_SCK_3V315SPI0_MISO_3V316SPI0_CS0_3V317SPI0_SC1_3V318GPIO2_3V319GND205VNote: UART2 is converted to 3.3V logic level by carrier board level conversion circuit; SPI0 is converted to 3.3V logic level by carrier board level conversion circuit; GPIO2_3V3 is 3.3V logic level;[W9] LED Red for power indicator, green for normal operation[W10] TF CARDPIN Signal Name PIN Signal Name1SDCARD_D22SDCARD_D33SDCARD_CMD4VDD_3V35SDCARD_CLK6GND7SDCARD_D08SDCARD_D19SD_DET10,11,12,13GND[W11] TYPE-C(2.0)PIN Signal Name PIN Signal NameA1, A12, B1, B12GND A4, A9, B4, B95V VBUSA5, B5,A8,B8USB ID A6, B6USB D+A7, B7USB D-[W12/W13/W14] Button1)W12---- (RECOVERY)2)W13----(RESET)3)W14----(POWER KEY)[W15] WIFI/BT ANT CONPIN Signal Name PIN Signal Name1RF 2.3.4GND[W16] RTC BATTARY CONNECTOR(W16)PIN Signal Name PIN Signal Name1VCC RTC2GND[W17] IICPIN Signal Name PIN Signal Name1GND2 3.3V4ID_I2C_SCL5ID_I2C_SDA [W18] 20PIN 0.5mm ZIF,USB2.0PIN Signal Name PIN Signal Name 1,2,3,4,5VDD_5V6GND7D-8D+9GPIO110GND11NC12NC13GND14NC15NC16GND17GPIO218GND19GND20GND[W19/W21] Speaker con(W19/W21)PIN Signal Name PIN Signal Name 1SPK-2SPK+[W20] NVIDIA NX interface[W22] MCU_DOWNLOAD JACKPIN Signal Name PIN Signal Name1C2D2C2K3GND4ACOKNote:PIN4 (ACOK) and PIN3 (GND) short-circuit to turn off the power-on auto power-up[W23] 5V DC Power Jack (W23)PIN Signal Name PIN Signal Name 15V2GND[W24] FAN CONPIN Signal Name PIN Signal Name 1GND2VDD_5V3FAN_TACH4FAN_PWM [W25/W26] 12V DC Power Jack (W25/W26)PIN Signal Name PIN Signal Name 112V2GND[W27] SSD CONPIN Signal Name PIN Signal Name1GND2 3.3V3GND4 3.3V5UPHY_RX5_N6NC7UPHY_RX5_P8NC9GND10NC11UPHY_TX5_N12 3.3V13UPHY_TX5_P14 3.3V15GND16 3.3V17UPHY_RX4_N18 3.3V19UPHY_RX4_P20NC21GND22NC23UPHY_TX4_N24NC25UPHY_TX4_P26NC27GND28NC29UPHY_RX3_N30NC31UPHY_RX3_P32NC33GND34NC35UPHY_TX3_N36NC37UPHY_TX3_P38NC39GND40I2C_GP4_ CLKPIN Signal Name PIN Signal Name41UPHY_RX2_N42I2C_GP4_DAT43UPHY_RX2_P44GPIO34_M2_KEYM_ALERT45GND46NC47UPHY_TX2_N48NC49UPHY_TX2_P50PEX_L0_RST_N51GND52PEX_L0_CLKREQ_N53PEX_CLK0_N54GPIO29_M2_KEYM_PEWAKE55PEX_CLK0_P56NC57GND58NC59NC6032.768KHz OUT61NC62 3.3V63GND64 3.3V65GND66 3.3V67GND68GND[W28] CAMERA CONPIN Signal Name PIN Signal Name 1CSI_0_D0_P2CSI_1_D0_P 3CSI_0_D0_N4CSI_1_D0_N 5GND6GND7CSI_0_CLK_P8CSI_1_CLK_P 9CSI_0_CLK_N10CSI_1_CLK_N 11GND12GND13CSI_0_D1_P14CSI_1_D1_P 15CSI_0_D1_N16CSI_1_D1_N 17GND18GND19CSI_2_D0_P20CSI_3_D0_P 21CSI_2_D0_N22CSI_3_D0_N 23GND24GND25CSI_2_CLK_P26CSI_3_CLK_P 27CSI_2_CLK_N28CSI_3_CLK_N 29GND30GND31CSI_2_D1_P32CSI_3_D1_P 33CSI_2_D1_N34CSI_3_D1_N 35GND36GND37CSI_4_D0_P38CSI_6_D0_P 39CSI_4_D0_N40CSI_6_D0_N 41GND42GND43CSI_4_CLK_P44CSI_6_CLK_P 45CSI_4_CLK_N46CSI_6_CLK_N 47GND48GND49CSI_4_D1_P50CSI_6_D1_P 51CSI_4_D1_N52CSI_6_D1_N 53GND54GND55NC56NC57NC58NC59CSI_5_D0_P60NC61CSI_5_D0_N62NC63GND64GND65CSI_5_CLK_P66NC67CSI_5_CLK_N68NC69GND70GND71CSI_5_D1_P72NC73CSI_5_D1_N74NC75CAM_I2C_SCL76NC77CAM_I2C_SDA78NC79GND80GND81 2.8V82 2.8V83 2.8V84TEST PIONT 85NC86NC87NC88CAM2_MCKL 89NC90CAM3_PWDN 91CAM1_MCKL92GPIO1093CAM1_PWDN94GPIO1195CAM2_PWDN96NC97CAM6_PWDN (PIN126)98NC99GND100GND101TEST PIONT102 1.8V103NC104NC105NC106NC107NC108 3.3V109TEST PIONT110 3.3V111NC112NC113NC114NC115GND116GND117NC118 3.3V119PWM2 ( PIN 206)120 3.3V121-128GND1.3.4 PHYSICAL CONFIGURATION INSTRUCTIONSTo prepare your Jetson A205E System for use, connect it as follows:Connect an external HDMI display to the carrier board’s HDMI port.Connect a USB keyboard and mouse.Connect the 205E to your local network via Ethernet cable to the carrier board's Ethernet port.Connect the included AC adapter to the carrier board's power jack. Plug the AC adapter into an appropriately rated electrical outlet.Use only the supplied AC adapter, as it is appropriately rated for your device.1.4 Software /BSP1.4.1 Software configurationNVIDIA Linux For Tegra (L4T)A205E System supports native NVIDIA Linux for Tegra (l4t) builds. HDMI, Gigabit Ethernet, USB3.0, USB OTG, serial port, GPIO, SD card, I2C bus can be supported, and can run directly on A205 . Please note that the native system does not support PWM mode to control the fan. If the native system is used, ipcall-bsp must be deployed. LT4 can be downloaded from the following link:https:///embedded/linux-tegra Note:The native system does not support PWM control of the fan, if you use the native system you must deploy IPCall-BSP NVIDIA Jetpack for L4TJetpack is a software package released by NVIDIA, The latest jetpack runs on Ubuntu 18.04 Linux 64 bit host and can be downloaded from the following link:https:///embedded/jetpack Default configuration systemA205E System with Ubuntu 18.04, default username: nvidia password: nvidia1.4.2 Installation of Jtop toolsJtop is a system monitoring utility for Jetson that can be run on a terminal to view and control the status of NVIDIA Jetson in real time.I nstallation steps :1.I nstalling the pip3 tool2.Installing jtop packages with pip33.Restart to run jtopsudo apt-get install python3-pip1sudo -H pip3 install -U jetson-stats1jtop11.4.3 Developer Tools1.4.3.1 JetPackNVIDIA JetPack SDK is the most comprehensive solution for building AI applications. It bundles Jetson platform software including TensorRT, cuDNN, CUDA Toolkit, VisionWorks, GStreamer, and OpenCV, all built on top of L4T with LTS Linux kernel.JetPack includes NVIDIA container runtime, enabling cloud-native technologies and workflows at the edge.JetPack SDK Cloud-Native on Jetson1.4.3.2 L4TNVIDIA L4T provides the Linux kernel, bootloader, NVIDIA drivers, flashing utilities, sample filesystem, and more for the Jetson platform.You can customize L4T software to fit the needs of your project. By following the platform adaptation and bring-up guide, you can optimize your use of the complete Jetson product feature set. Follow the links below for details about the latest software libraries, frameworks, and source packages.1.4.3.3 DeepStream SDK on JetsonNVIDIA’s DeepStream SDK delivers a complete streaming analytics toolkit for AI-based multi-sensor processing, video and image understanding. DeepStream is an integral part of NVIDIA Metropolis, the platform for building end-to-end services and solutions that transform pixel and sensor data to actionable insights. Learn about the latest 5.0 developer preview features in our developer news article.1.4.3.4 Isaac SDKThe NVIDIA Isaac SDK makes it easy for developers to create and deploy AI-powered robotics. The SDK includes the Isaac Engine (application framework), Isaac GEMs (packages with high-performance robotics algorithms), Isaac Apps (reference applications) and Isaac Sim for Navigation (a powerful simulation platform). These tools and APIs accelerate robot development by making it easier to add artificial intelligence (AI) for perception and navigation into robots.1.5 KEY FEATURES IN JETPACKOS NVIDIA L4T provides the bootloader, Linux kernel 4.9, necessary firmwares, NVIDIA drivers, sample filesystem based on Ubuntu 18.04, and more.JetPack 4.6.1 includes L4T 32.7.1 with these highlights:Support for Jetson AGX Xavier 64GB and Jetson Xavier NX 16GBTensorRT TensorRT is a high performance deep learning inference runtime for image classification, segmentation, and object detection neural networks. TensorRT is built on CUDA, NVIDIA’s parallel programming model, and enables you to optimize inference for all deep learning frameworks. It includes a deep learning inference optimizer and runtime that delivers low latency and high-throughput for deep learning inference applications.cuDNN CUDA Deep Neural Network library provides high-performance primitives for deep learning frameworks. It provides highly tuned implementations for standard routines such as forward and backward convolution, pooling, normalization, and activation layers.CUDAMultimedia APIComputer VisionCUDA Toolkit provides a comprehensive development environment for C and C++ developers building GPU-accelerated applications. The toolkit includes a compiler for NVIDIA GPUs, math libraries, and tools for debugging and optimizing the performance of your applications.VPI (Vision Programing Interface) is a software library that provides Computer Vision / Image Processing algorithms implemented on PVA1 (Programmable Vision Accelerator), GPU and CPUOpenCV is a leading open source library for computer vision, image processing and machine learning.VisionWorks2 is a software development package for Computer Vision (CV) and image processing.JetPack 4.6.1 includes VPI 1.2The Jetson Multimedia API package provides low level APIs for flexible application development.Camera application API: libargus offers a low-level frame-synchronous API for camera applications, with per frame camera parameter control, multiple (including synchronized) camera support, and EGL stream outputs. RAW output CSI cameras needing ISP can be used with either libargus or GStreamer plugin. In either case, the V4L2 media-controller sensor driver API is used.Developer ToolsSupported SDKs and ToolsCloud NativeJetPack component Sample locations on reference filesystem TensorRT /usr/src/tensorrt/samples/cuDNN /usr/src/cudnn_samples_/CUDA /usr/local/cuda-/samples/Multimedia API/usr/src/tegra_multimedia_api/VisionWorks /usr/share/visionworks/sources/samples//usr/share/visionworks-tracking/sources/samples/ /usr/share/visionworks-sfm/sources/samples/OpenCV /usr/share/OpenCV/samples/VPI/opt/nvidia/vpi/vpi-/samples1.5.0.5 Sample ApplicationsJetPack includes several samples which demonstrate the use of JetPack components. These are stored in the reference filesystem and can be compiled on the developer kit.CUDA Toolkit provides a comprehensive development environment for C and C++ developers building high-performance GPU-accelerated applications with CUDA libraries.The toolkit includes Nsight Eclipse Edition, debugging and profiling tools including Nsight Compute, and a toolchain for cross-compiling applications.NVIDIA Nsight Systems is a low overhead system-wide profiling tool, providing the insights developers need to analyze and optimize software performance.NVIDIA DeepStream SDK is a complete analytics toolkit for AI-based multi-sensor processing and video and audio understanding.DeepStream SDK 6.0 supports JetPack 4.6.1NVIDIA Triton™ Inference Server simplifies deployment of AI models at scale. Triton Inference Server is open source and supports deployment of trained AI models from NVIDIA TensorRT, TensorFlow and ONNX Runtime on Jetson. On Jetson, Triton Inference Server is provided as a shared library for direct integration with C API.Jetson brings Cloud-Native to the edge and enables technologies like containers and container orchestration. NVIDIA JetPack includes NVIDIA Container Runtime with Docker integration, enabling GPU accelerated containerized applications on Jetson platform.NVIDIA hosts several container images for Jetson on NVIDIA NGC. Some are suitable for software development with samples and documentation and others are suitable for production software deployment, containing only runtime components. Find more information and a list of all container images at the Cloud-Native on Jetson page.。

Management SoftwareFree NetDirector-AXS Management Software is available for access and control of select NetDirector IP KVM switches (B064-IPG series). From a single interface, you can access server ports on any of your supported KVM switches and manage the KVM settings. This software may be found on the model support page of the B064-016-04-IPG or by searching for AXS IP KVM Software on this website. NetDirector 16-Port Cat5 KVM over IP Switch -Virtual Media, 4 Remote + 1 Local User, 1U Rack-Mount, TAAMODEL NUMBER:B064-016-04-IPGDescriptionThis 16-port NetDirector® Cat5 IP KVM Switch is the optimal solution for remotely controlling multiple computers (combination of PS/2, USB and Serial) by up to five (one Local and four Remote) independent, simultaneous users. Both DVI and VGA console ports are included for connection of either a DVI or VGA monitor. High video resolution: up to 1600 x 1200 at 60 Hz with 32-bit color depth for the local console and up to 1600 x 1200 at 60 Hz with 24-bit color depth for remote sessions up to 164 feet (50 meters). A full-screen graphical OSD with multi-level authentication (Super Administrator, Administrator and User) allows you to quickly and efficiently manage your installation, and can be displayed in English, German, Russian, Japanese, traditional Chinese and simplified Chinese. Critical events on the installation can be tracked via email notification, SNMP traps, the Windows-based log server or Syslog server. Accessing the connected computers is a breeze. View multiple computers at the same time using panel array mode, automatically sync USB mice and access the on-screen keyboard feature in numerous language formats. Virtual Media allows computers connected using a B055-001-USB-V2 Server Interface Unit to access DVD/CD drives, flash drives and other storage media as if they were directly connected to the computer. In addition, three USB ports are located on the front panel of the unit for use with Virtual Media or an external keyboard and mouse. Also located on the front of the KVM is a USB Mini-B port that allows for direct connection of a laptop for easy console operation of the switch. Other features include FIPS 140-2 level 1 security standards support, dual power supplies that allow the unit to continue running in the event one power supply stops receiving power, temperature sensors that control the speed of the unit's cooling fans, remote authentication support via RADIUS, LDAP, LDAPS and Active Directory, dial-in modem access and non-browser access using Windows and Java applications. Constructed of heavy-duty steel housing.FeaturesUp to 5 users (1 Local, 4 Remote) can simultaneously access the connected computers/serversqFeatures two RJ45 network ports for redundant or dual-IP operationqIncludes both DVI and VGA console ports for connection of either a DVI or VGA monitorq HighlightsSimultaneous support for 5users (1 local, 4 remote)qSupports IPv4, Link Local IPv6Address and IPv6 StatelessAuto configuration protocolsqIncludes both DVI and VGAconsole ports for connection ofeither a DVI or VGA monitorqBlade server supportqVirtual Media allows computersconnected using a B055-001-USB-V2 SIU to access DVD/CD drives, flash drives and otherstorage media from a user'sremote computer as if it weredirectly connectedqRemote Authentication:RADIUS, LDAP, LDAPS, andActive DirectoryqCompliant with the FederalTrade Agreements Act (TAA) for GSA Schedule purchasesqSystem RequirementsRemote Console Computers(Web Browser) - To access theKVM switch via web browser,your computer needs to berunning Sun's Java RuntimeEnvironment (JRE) v.6, Update3 or higher, and your browsermust support 128-bit SSLencryption.qBrowsers - The NetDirectorCat5 IP KVM switch supportsthe following browsers; InternetExplorer 6 and higher, Firefox1.5 and higher, Mozilla 1.7 andhigher, Safari 2.0 and higher,Opera 9.0 and higher, andNetscape 8.1 and higher.qRemote Console Computers(non-Browser Windows or JavaClient) - To access the KVMswitch using the non-browserbased Windows client, yourcomputer/server must berunning Windows, and DirectX7.0 or higher must be installed.To access the non-browserbased Java client, yourcomputer must be running Sun's Java Runtime Environment(JRE) v.6, Update 3 or higher.qConnected Computers/Servers -Computers/servers beingconnected to the KVM switchmust have a Displayport, DVI,HDMI or VGA port and USB or qSpecificationsHigh video resolution: up to 1600 x 1200 @ 60Hz – 32 bit color depth for the local console; up to 1600 x 1200 @ 60Hz with 24 bit color depth for remote sessions at up to 164 ft. (50 m)qSupports IPv4, Link Local IPv6 Address and IPv6 Stateless Auto configuration protocols q Blade server supportq Multi-level authentication; Super Administrator, Administrator and Userq Advanced encryption technologies - 1024 bit RSA; 56 bit DES; 256 bit AES and 128 bit SSL q Supports FIPS 140-2 level 1 security standardsq View multiple ports at the same time using the panel array mode featureq Virtual Media allows computers connected to the KVM using a B055-001-USB-V2 SIU to access DVD/CD drives, flash drives and other storage media from a user's remote computer as if it were directly connectedqAn additional three USB ports are located on the front of the KVM for the sharing of USB peripherals.q Also located on the front of the KVM is a USB Mini-B port that allows for direct connection of a laptop for easy console operation of the switch.qRemote authentication support; RADIUS, LDAP, LDAPS and Active Directoryq Track critical events on the installation via email notification, SNMP traps, Windows-based Log Server or Syslog serverqDual power supplies allow the unit to continue running in the event one power supply ceases to receive powerqBuilt-in sensors increase/decrease the speed of the unit's cooling fans according to the temperature q Dial-in / Dial-out modem supportq Graphical OSD can be displayed in English, German, Russian, Japanese, traditional Chinese and simplified ChineseqSupports 10Base-T, 100Base-T, 1000Base-T, Auto-Sense, TCP/IP, HTTP, DNS, DHCP, UDP, ARP and PingqCompliant with the Federal Trade Agreements Act (TAA) for GSA Schedule purchases q Compatible with all major operating systems q Constructed of heavy-duty steel housingqPS/2 Keyboard and Mouse ports.Operating Systems - Compatible with all major operating systems qB055-001-USB, B055-001-USB-V2, B055-001-SER, or B055-001-PS2 (PS/2) Server Interface Unit is required for each connected computer/server q Hardware versions: A new hardware version (v2) of the B064-016-04-IPG was released in 2016, and it requires different firmware than was used in the previous version (v1). In the Technical Support page for the B064-016-04-IPG you will find a zip folder for the v1 KVM. In addition to including theapplicable firmware, it contains a Word document that will tell you how to determine which hardware version you have, and therefore, which firmware you need to use. If you have a v2KVM, the latest firmware is that which came pre-installed on the KVM.q Package IncludesB064-016-04-IPG (4+1 User)NetDirector Cat5 IP KVM switch q(x2) C13 to 5-15P power cords q CD with owner's manual, quick start guide and device files qQuick start guideq RJ45 to DB9 adapter for dial-In modem functionality q Grounding wire q Set of foot pads q Rackmount hardwareq© 2023 Eaton. All Rights Reserved. Eaton is a registered trademark. All other trademarks are the property of their respective owners.。
P/N: 1802053050012*1802053050012*TN-5305 SeriesQuick Installation GuideM12 unmanaged Ethernet switchesMoxa ToughNet SwitchEdition 3.0, July 2016Technical Support Contact Information/supportMoxa Americas:Toll-free: 1-888-669-2872 Tel: 1-714-528-6777 Fax: 1-714-528-6778 Moxa China (Shanghai office): Toll-free: 800-820-5036 Tel: +86-21-5258-9955 Fax: +86-21-5258-5505 Moxa Europe:Tel: +49-89-3 70 03 99-0 Fax: +49-89-3 70 03 99-99 Moxa Asia-Pacific:Tel: +886-2-8919-1230 Fax: +886-2-8919-1231 Moxa India:Tel: +91-80-4172-9088 Fax: +91-80-4132-10452016 Moxa Inc. All rights reserved.OverviewThe Moxa ToughNet TN-5305 series of 5-port Ethernet switches provides a hardened and cost-effective solution for your Ethernet connections. The TN-5305 switches are IP67-rated to provide protection against shock and foreign particles. IP67-rated products have the following characteristics: (1) dust proof, (2) protection against the effects of temporary immersion in water.The TN-5305 switches have a wide operating temperature range of -40 to75°C, and are designed to withstand a high degree of vibration and shock. The rugged hardware design makes the TN-5305 switches perfect for ensuring that your Ethernet equipment can withstand the rigors associated with critical industrial applications. The switches are rated for use in hazardous locations and comply with CE/FCC, UL and EN50155 (railway applications) standards.Package ChecklistYour TN-5305 is shipped with the following items. If any of these items is missing or damaged, please contact your customer service representative for assistance.•Moxa ToughNet Switch.•Quick Installation Guide (printed).•Product Warranty Statement.• 3 protective caps for unused ports and 8 port labels.•Panel Mounting Kit.FeaturesHigh Performance Network Switching Technology• 5 10/100BaseT(X) ports (4-pin shielded M12 socket with D coding). •Broadcast storm protection.•IEEE802.3/802.3u/802.3x.•Store and Forward switching process type.•10/100M, Full/Half-Duplex, MDI/MDIX auto-sensing.Industrial Grade Reliability•Active circuit protection.•Robust connection.•Dust and immersion proof.Rugged Design•Casing design meets IP67 protection standards.•M12 connectors for robust connections.•Operating temperature range of -25 to 60°C, or extended operating temperature range of -40 to 75°C.TN-5305 Panel LayoutsFront Panel View1.M12 port’s 10/100 Mbps LED.2.10/100BaseT(X) port (4-pinfemale shielded M12 socketwith D coding).3.Port Label.4.Power input (5-pin maleshielded M12 socket with Acoding).5.Power input (PWR) LED.6.Model name.7.Holes for attaching theTN-5305 to a wall with screws(there are 3 holes: bottom left,bottom right, and top middle).8.Grounding screws.Mounting Dimensions (unit = mm)Panel/Wall MountingTo mount the TN-5305 on the wall use the 3 screws included in the panel mounting kit.STEP 1: Make 3 screw holes on the wall based on the positions of the 3 screw holes on the switch shown in the mounting dimensions diagram. STEP 2: Insert one screw in the top-middle screw hole on the switch and screw it into the wall.STEP 3: Screw in the remaining 2 screws through the bottom-left and bottom-right holes on the switch.DIN-Rail Mounting (optional)Use the optional DIN-Rail mounting kit (DK-M12-305, must be purchased separately) to mount the TN-5305 on a 35-mm DIN rail.STEP 1:Fix the DIN-Rail attachment plate to the rear panel of the switch as shown in the above figure.STEP 2:Position the top hook of theDIN-Rail attachment plate to the top edge of the rail.STEP 3:Rotate the switch downwards until the bottom of the attachment plate latches onto the bottom edge of the rail.To remove the switch from the DIN-Rail, simply reverse Steps 2 and 3above.Wiring RequirementsYou should also heed the following guidelines:•Use separate paths to route wiring for power and devices. If power wiring and device wiring paths must cross, make sure the wires are perpendicular at the intersection point.NOTE: Do not run signal or communications wiring and power wiring in the same wire conduit. To avoid interference, wires with different signal characteristics should be routed separately.•You can use the type of signal transmitted through a wire to determine which wires should be kept separate. The rule of thumb is that wiring that shares similar electrical characteristics can bebundled together.•Keep input wiring and output wiring separated.•It is strongly advised that you label wiring to all devices in the system when necessary.Grounding the TN-5305Grounding and wire routing help limit the effects of noise due toelectromagnetic interference (EMI). Run the ground connection from the ground screw to the groundingsurface prior to connecting devices.10/100BaseT(X) Ethernet Port ConnectionAll TN-5305 models have 5 10/100BaseT(X) Ethernet ports (4-pinshielded M12 socket with D coding). The 10/100TX ports located on the TN-5305’s front panel are used to connect to Ethernet-enabled devices. Most users configure these ports for Auto MDI/MDI-X mode, in which case the port’s pinouts are adjusted automatically depending on the type of Ethernet cable used (straight-through or cross-over), and the type of device (NIC-type or HUB/Switch-type) connected to the port.In what follows, we give pinouts for both MDI (NIC-type) ports and MDI-X (HUB/Switch-type) ports. We also give cable wiring diagrams for straight-through and cross-over Ethernet cables. Pinouts for sockets on TN-5305 TP PortPower input Pin 1Input V+ Pin 2 Not assigned Pin 3 Input V-Pin 4 Not assigned Pin 5Chassis groundPinouts for RJ45 (8-pin)RJ45 (8-Pin) MDI Port Pinouts MDI-X Port PinoutsPin Signal1 Tx +2 Tx -3 Rx + 6 Rx - PinSignal1Rx +2 Rx -3 Tx +6 Tx -M12 (4-pin, M) to M12 (4-pin, M) Cross-Over Cable WiringM12 (4-pin, M) to M12 (4-pin, M) Straight-Trough Cable Wiring M12 (4-pin, M) to RJ45 (8-pin) Cross-Over Cable WiringM12 (4-pin, M) to RJ45 (8-pin) Straight-Trough Cable WiringAuto MDI/MDI-X ConnectionThe Auto MDI/MDI-X function allows users to connect TN-5305’s10/100BaseTX ports to any kind of Ethernet device, without needing to pay attention to the type of Ethernet cable being used for the connection. This means that you can use either a straight-through cable or cross-over cable to connect the TN-5305 to Ethernet devices.LED IndicatorsSeveral LED indicators are located on the TN-5305’s front panel. The function of each LED is described in the table below.LED Color StateDescriptionPWRAMBEROnPower is being supplied to the powerinput.OffPower is not being supplied to thepower input.LNK/ACT(10M)AMBEROn TP port’s 10 Mbps link is active.Blinking Data is being transmitted at 10 Mbps. Off TP port’s 10 Mbps link is inactive. LNK/ACT(100M)GREENOn TP port’s 100 Mbps link is active.Blinking Data is being transmitted at 100 Mbps. Off TP port’s 100 Mbps link is inactive. Auto-Negotiation and Speed SensingAll of the TN-5305’s Ethernet ports independently supportauto-negotiation for speeds in the 10BaseT and 100BaseTX modes, with operation according to the IEEE 802.3u standard. This means that some nodes could be operating at 10 Mbps, while at the same time, other nodes are operating at 100 Mbps.Auto-negotiation takes place when an M12 cable connection is made, and then each time a LINK is enabled. The TN-5305 advertises its capability for using either 10 Mbps or 100 Mbps transmission speeds, with thedevice at the other end of the cable expected to advertise in the same way. Depending on what type of device is connected, this will result in agreement to operate at a speed of either 10 Mbps or 100 Mbps. If a TN-5305’s Ethernet port is connected to a non-negotiating device, it will default to 10 Mbps speed and half-duplex mode, as required by the IEEE 802.3u standard.SpecificationsTechnologyStandards IEEE 802.3, 802.3u, 802.3xProcessing Type Store and Forward, with IEEE802.3x full duplex,back pressure flow controlInterfaceM12 Ports 10/100BaseTX auto negotiation speed, F/Hduplex mode, and auto MDI/MDI-X connection LED Indicators Power, LNK/ACTPowerInput Voltage 24 VDC (12 to 45 VDC) or18 to 30 VAC (47 to 63 Hz)Input Current 0.28 A @ 24 VAC0.10 A @ 24 VDC0.08 A @ 36 VDCConnection M12 A-coding 5-pin male connector, single powerinputProtectionOverload currentprotection / Limitedcurrent1.1AReverse polarity protection presentMechanicalCasing IP67 protection, plastic case Dimensions(W x H x D)60 x 125 x 29.6 mm (2.4 x 4.9 x 1.2 in)Weight 270gInstallation Panel mounting,DIN-Rail mounting (with optional kit) EnvironmentOperating Temperature -25 to 60°C (-13 to 140°F) for standard model, -40 to 75°C (-40 to 167°F) for -T modelsStorage Temperature -40 to 85°C (-40 to 185°F)Operating relative humidity 5 to 95% (non-condensing)Regulatory ApprovalsSafety UL 508Rail Traffic EN 50155Maritime IEC 61000-4-2 ESD: Contact: 6 kV; Air: 8 kVIEC 61000-4-3 RS: 80 MHz to 1 GHz: 20 V/mIEC 61000-4-4 EFT: Power: 2 kV; Signal: 2 kVIEC 61000-4-5 Surge: Power: 2 kV; Signal: 2 kVIEC 61000-4-6 CS: 10 VIEC 61000-4-8Shock: EN 50155, IEC 61373Freefall: IEC 60068-2-32Vibration: EN 50155, IEC 61373Note: Please check Moxa’s website for the most up-to-date certification status.MTBF (mean time between failures)Time 3,451,678 hrs.Database Telcordia (Bellcore), GB 25°CWARRANTY 5 years。
图解戴尔iDRAC服务器远程控制设置对于远程的服务器,我们不能经常性的去机房维护,所以远程控制对于服务器来说就显得至关重要。
那么你是用什么方式对服务器进行远程控制呢?远程桌面?还是KVM切换器?NO,你OUT 了!如果你用的是戴尔的服务器,那么iDRAC功能不使用的话就是个极大的浪费哦。
那么什么是iDRAC 呢?iDRAC 又称为Integrated Dell Remote Access Controller ,也就是集成戴尔远程控制卡,这是戴尔服务器的独有功能,iDRAC卡相当于是附加在服务器上的一计算机,可以实现一对一的服务器远程管理与监控,通过与服务器主板上的管理芯片BMC进行通信,监控与管理服务器的硬件状态信息。
它拥有自己的系统和IP地址,与服务器上的OS无关。
是管理员进行远程访问和管理的利器,戴尔服务器集成了iDRAC控制卡,我们就可以扔掉价格昂贵的KVM设备了。
在戴尔第12代服务器中,iDRAC的版本升级到了iDRAC 7,下面我们将以戴尔PowerEdge R820 为例,为您图解iDRAC的一步步设置。
戴尔服务器的iDRAC远程控制接口,在图的右下角,有“iDRAC字样iDRAC的网口在服务器的背面,一般都标注iDRAC的字样。
在戴尔第12代服务器中, 这个网口使用了IGbps的网口,速度更快。
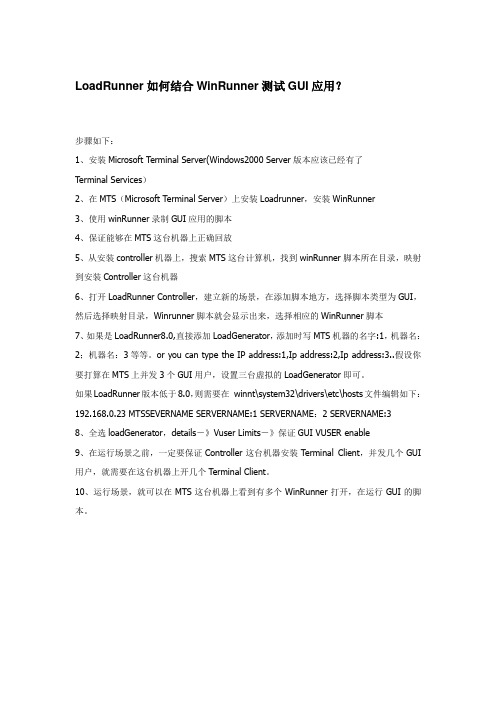
一般情况下,iDRAC功能默认都是关闭,我们需要在BIOS 里面启用,首先我们先重启计算机,然后进入BIOS,选择iDRAC Setting 。
SystGrtiSystem Setup iMan IVtenu在BIOS中选择iDRAC 设置BIOS中iDRAC详细的设置列表进入iDRAC Setting 之后,我们看到很多详细的设置,一般情况下我们只要设置网络Network就可以了。
DRAG SeltgDRK Settngs * MelworkrcrftORKSETTMGSEreheKMC Setwiiyi-------------------------------------------------------- --Fi顿或■<ivK AdoresAlto htajattatcnDui4e> MtKfei,~"g",,"",,,,"。
博科BrocadeSAN交换机常用命令编辑整理:尊敬的读者朋友们:这里是精品文档编辑中心,本文档内容是由我和我的同事精心编辑整理后发布的,发布之前我们对文中内容进行仔细校对,但是难免会有疏漏的地方,但是任然希望(博科BrocadeSAN交换机常用命令)的内容能够给您的工作和学习带来便利。
同时也真诚的希望收到您的建议和反馈,这将是我们进步的源泉,前进的动力。
本文可编辑可修改,如果觉得对您有帮助请收藏以便随时查阅,最后祝您生活愉快业绩进步,以下为博科BrocadeSAN交换机常用命令的全部内容。
博科Brocade SAN交换机常用命令1.查看IP地址命令 (3)2。
查看firmware版本 (3)3.查看交换机状态 (3)4.查看交换机license—id (4)5.配置ZONE (4)6。
查看zone配置文件 (5)7.查看ZONE (6)8.查看系统日志信息 (7)9.关机 (7)10.设置博科Brocade交换机IP地址 (7)11。
博科brocade交换机查看OS版本信息 (7)12。
博科brocade交换机添加license授权信息 (7)13。
查看博科brocade交换机license授权信息 (7)14。
博科Brocade Slikworm 300交换机license (8)15。
博科Brocade交换机修改密码命令 (8)16。
博科 brocade SAN交换机密码重置 (8)17。
登陆后是用passwddefault命令恢复出厂密码 (9)18。
交换机升级 (10)19.帮助信息 (14)1.查看IP地址命令swd77:admin> ipaddrshowSWITCHEthernet IP Address: 10.77.77。
77Ethernet Subnetmask: 255。
255.255.0Fibre Channel IP Address: noneFibre Channel Subnetmask: noneGateway IP Address: noneDHCP: Offswd77:admin〉2.查看firmware版本swd211:admin〉swd211:admin〉 firmwareshowAppl Primary/Secondary Versions-—-——--——-——------————-—---———-—-—---——-—-FOS v6。
SmartZone ™ G5 Security Handle with Reader and Optional Key Pad for Dual AuthenticationThe SmartZone ™ G5 Security Handle with built-in Prox Card Reader enables effective door access and control. Thesehandles and optional keypad are designed for indoor mounting to a cabinet in a data center.The SmartZone ™ G5 Security Handle connects directly to Panduit G5 iPDU and transmits real-time information enabling control and management of cabinet access either directly through the on-board web interface or via SmartZone ™ Cloud Software.S P E C I F I C A T I O N S H E E Ts p e c i f i c at i o n sPanduit ® SmartZone ™ G5 Security Handle is specially designed to meet the most rigorous of security challenges (both digital and physical) in today’s data center environment. There is a version with an integrated keypad which enables dual authentication by allowing for a card swipe followed by secret pin. We've paid close attention to the market ensuring that not only does it carry the respective regulations required within this environment but it also is GDPR ready, HIPAA ready and PCI-DSSReady to ensure that this design meets your cabinet security needs not only today but for many years to come.The G5 Security Handle seamlessly mates with most data center cabinets and has the capability to read both low frequency (125 kHz) and high frequency (13.5 MHz) cards. In addition it can support 200 authorized users and features an integral humidity sensor allowing humidity sensing to be optimally placed near the center of the cabinet. The Status LED provides visual indication of the handle andsecurity status. The Beacon LED is a visual indicator to give you status of the health of the cabinet at a glance. The beacon will flash yellow when the cabinet is in a minor alarm or flash red when the cabinet has a critical alarm. You can also use the beacon’s locate function to flash the beacon a certain color to easily locate the cabinet.t e c h n i c a l i n f o r m a t i o nDimensions:9.5" × 1.5" (241mm × 37mm)k e y f e a t u r e s a n d b e n e f i t sDoor access and control monitoringControls access to a rack or cabinet in a data center and provides physical status of a doorOptional combined card reader and keypad Integrated keypad enables dual authentication Cabinet compatibility Seamlessly integrates into Panduit cabinetsIntegrated sensors SmartZone ™ G5 Security Handle features an integrated humidity sensor as well as specially designed environmental and door sensors which connect to the SmartZone ™G5 Security HandleSmartZone ™ Software Suite Integration Captures data that is consolidated by connected SmartZone ™ G5 iPDU then utilized by SmartZone ™ Software for real-time monitoring management and automated documentationBeacon LED Provides the health of the cabinet at a glance. Will flash yellow when for minor alarm or flash red for critical alarm. Also features a locate function to manually flash the beacon to easily locate the cabinet Status LED Provides visual indication for authentication, lock state, key usage or handle state 200 UsersProvide card access for up to 200 usersMulti-Frequency Card ReaderReads both low frequency (125 kHz) and high frequency (13.56 MHz) cards On board Keypad (ACF06)Enables dual authentication for high security environmentsap p l i c at i o n ss w i n g h a n d l e w i t h o r w i t h o u t k e y p a d*The MA030 features a coupler to optimize door removal and is 10 ft. (3m) in length.™r e p l a c e a b l e t u m b l e r s a n d k e y sNote: For increased security custom replaceable tumblers & keys may be made available via a project. 90 day lead times on custom Tumblers/Keys with a MOQ of 500 pieces required for project consideration.Connection Diagram: SmartZone ™ G5 PDUs, SmartZone ™ G5 Security Handle and Environmental Monitoring SensorsACF20ACF05T+ Door HarnessACF20ACF05GripRotation Limiter17.5(0.69)Pre-installed20.3(0.80)ExtendedRotation limiters set the rotation direction of the latch. To flip the actuation direction, remove and reinstall the rotation limiter 90 degrees offset from original orientation.Two rotation limiters are provided with each handle. The pre-installed one is for standard applications, an extended version can be used when additional clearance is required.Dimensions are in inches. (Dimensions in parenthesis are metric).WORLDWIDE SUBSIDIARIES AND SALES OFFICESPANDUIT US/CANADA Phone: 800.777.3300PANDUIT EUROPE LTD. London, UKPhone: 44.20.8601.7200PANDUIT SINGAPORE PTE. LTD. Republic of Singapore Phone: 65.6305.7575PANDUIT JAPAN Tokyo, JapanPhone: 81.3.6863.6000PANDUIT LATIN AMERICA Guadalajara, Mexico Phone: 52.33.3777.6000PANDUIT AUSTRALIA PTY. LTD. Victoria, Australia Phone: 61.3.9794.9020For a copy of Panduit product warranties, log on to /warrantyFor more informationVisit us at ©2022 Panduit Corp.Panel Cutout mm (inches)Panel Thickness: 1mm to 2.5mmGripDoor Thickness1 – 2.5(0.04 – 0.10)22(0.9)241(9.5)37(1.5)Card Connectionfor HarnessConnectionforTemperatureand Door Sensor Aisle Selector Switch。