Colorant Basics
- 格式:ppt
- 大小:4.53 MB
- 文档页数:32

VB中的颜色设置界面上的彩色图形能够产生更强的视觉效果,因而越来越受到用户的重视。
在Visual Basic中,窗体、控件、图形以及文字信息都可以用不同的颜色显示。
对于所有的颜色属性和图形方法,每种颜色都由一个Long整数表示。
基于具有能处理256色或256色以上的视频适配器和显示驱动程序的系统,Visual Basic 可支持256种颜色。
对于多媒体应用程序,或对于那些需要显示接近相片质量图像的应用程序来说,具有同时显示256色的功能是特别有价值的。
Visual Basic中的许多控件,有决定控件显示颜色的属性。
请记住,这些属性中有些也适用于不是图形的控件。
BackColor:对用于绘画的窗体或控件设置背景颜色。
如果在绘图方法进行绘图之后改变BackColor属性,则已有的图形将会被新的背景颜色所覆盖。
ForeColor:设置绘图方法在窗体或控件中创建文本或图形的颜色。
改变ForeColor属性不影响已创建的文本或图形。
BorderColor:给形状控件边框设置颜色。
FillColor:为用Circle方法创建的圆和用Line方法创建的方框,设置填充颜色。
一、调色板在VB应用程序的界面设计阶段,使用调色板能够可视化地设置当前对象的颜色。
打开调色板的方法有两种:(1)从属性窗口找到要设置的颜色属性,单击右端的向下箭头,就弹出一个如图11-14 所示的调色板,可以可视化地设定颜色。
图11-15 VB的调色板(2)另一种方法是从VB集成环境的“视图”菜单中选取“调色板”(图11-15)。
这个调色板具有更强的颜色设置功能。
它既可以设置对象的前景色、背景色,也可以进行细致的颜色调整。
单击调色板左上方的设置选择框可以选定设置前景色或背景色。
这个选择框的下方右一个标有“Aa”的小方框是效果显示框。
如果觉得调色板现有的缺省颜色不够满意,可以双击第4排中的任一个小空格(或单击,然后再击“定义颜色”按钮),将弹出一个颜色定义框(图11-16)。
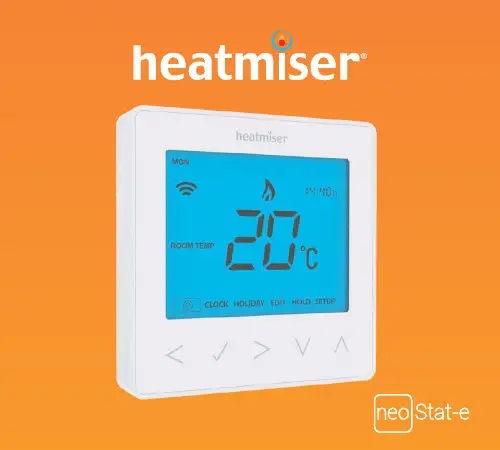
Model:Series1Available in : Sapphire Black and Glacier White12 Section Header348When the neoStat-e successfully connects to the neoHub the MESH symbol willMode 1 - Thermostat Section Header10To view the current floor temperature, press and hold the Left and Right arrow keysPress Tick to confirm selection ........................................................................................... Press Tick to confirm selection ........................................................................................... Press Tick to confirm selection ........................................................................................... Press Tick to confirm selection and return to the main display ...........................Press Tick to confirm selection .......................................................................................................Press Tick to confirm selection ........................................................................................................ WAKE will now flash and the current time and temperature setting will be shown.Press Tick to confirm ..............................................................................................................Press Tick to confirm ..............................................................................................................Press Tick to confirm the settings ..................................................................................... Press the Right arrow key .....................................................................................................Press Tick to confirm settings and return to the main display ....................................Note: This new temperature is maintained only until the next programmed comfort level. At this time, the thermostat will revert back to the programmed levels.Press Tick to confirm selection ..........................................................................................Press Tick to confirm selection ..........................................................................................Press Tick to confirm selection ..........................................................................................To cancel a temperature Hold, repeat these steps but reduce the Hold time to 00:00 hrsUse the Left / Right keys to scroll to HOLD & press Tick for 10 secondsThe display will show 00:00 and you will need to enter a four digit pin number.Press Tick to confirm .............................................................................................................Press Tick to confirm ............................................................................................................ The display will return to the main screen and display the keypad lock indicator .....The frost icon will toggle ON/OFF each time Tick is pressed ................................................... In this mode, the neoStat-e will display the frost icon and will only turn the heatingON should the room temperature drop below the set frost temperature (see page 23).Thermostat completely OFF Thermostat powered ONUsing the Up / Down keys enter the number of days holiday ..................... Press Tick to confirm settings ............................................................................................Press and hold Tick to turn the display OFF ........................................................... Press and hold the Tick and Down keys together for 10 seconds ..................TC-EMRepeat the steps above to set all periods. For any unused periods enter -- : --Use the Up / Down keys to set the override duration e.g. 01:00 hours ....... Press Tick to confirm settings and return to main display ...............................the holding clips then pushing down on the opposite end against the brass holding bracket.We advise that replacement of the lithium battery becarried out by a qualified professional.......................................................................................................................................................................... ......................................................................................................................................................................... ......................................................................................................................................................................... ......................................................................................................................................................................... ......................................................................................................................................................................... ......................................................................................................................................................................... ......................................................................................................................................................................... ......................................................................................................................................................................... ......................................................................................................................................................................... ......................................................................................................................................................................... ......................................................................................................................................................................... ......................................................................................................................................................................... .................................................................................................................................................................................................................................................................................................................................................. ......................................................................................................................................................................... ......................................................................................................................................................................... ......................................................................................................................................................................... ......................................................................................................................................................................... ......................................................................................................................................................................... ......................................................................................................................................................................... ......................................................................................................................................................................... ......................................................................................................................................................................... ......................................................................................................................................................................... ......................................................................................................................................................................... ......................................................................................................................................................................... .........................................................................................................................................................................38PDF FAQTwitter: @heatmiseruk Facebook: /thermostats。
蓝宝石插件中英文对照蓝宝石插件中英文对照2011-11-05 20:40GenArts Sapphire1.Sapphire AdjustsS_ClampChroma(色度和亮度的钳位调整)S_DuoT one(双色调渐变的色彩替换)S_Gamma(RGB反差系数调整,不错)S_Hotspots(可控高亮区域的调整,不错)S_HueSatBright(一个HSL色彩空间调色器)S_Monochrome(灰度化,不错)S_Threshold(针对各色彩通道的对比度强化)S_Tint(双色调的着色器)2.Sapphire Blur+SharpenS_Blur(多种方式的模糊,不错)S_BlurChannels(多种方式的通道模糊)S_BlurChroma(少见的色度模糊,不错)S_BlurMoCurves(带有变形效果的运动模糊)S_BlurMotion(区域运动模糊效果,不错)S_DefocusPrism(带有色散的虚焦模糊)S_EdgeBlur(边缘模糊,用于字幕的效果不错)S_GrainRemove(降噪,速度较快)S_RackDefocus(可调项较多的虚焦模糊)S_RackDfComp(双层的虚焦模糊合成)S_Sharpen(简单的锐化)S_SoftFocus(柔焦效果)S_ZDepthCueBlur(模拟变焦模糊,不错)3.Sapphire CompositeS_EdgeFlash(加光的层叠加效果)S_Layer(多种混合方式的层叠加效果)S_MathOps(多种数学运算方式的层混合效果)S_MatteOps(通道边缘噪声处理,多用于抠像)S_MatteOpsComp(处理通道噪声并进行层叠加)S_ZComp(Z方向的层叠加效果)4.Sapphire DistortS_Distort(自定义镜头变形效果,不错)S_DistortBlur(带有模糊的自定义镜头变形效果)S_DistortChroma(带有色散的自定义镜头变形效果)S_DistortRGB(带RGB通道分离的自定义镜头变形效果,好)S_Shake(镜头震动效果)S_WarpBubble(噪波变形效果)S_WarpBubble2(双重的噪波变形效果)S_WarpChroma(连续的色相扭曲,可以模仿某些空间观测的色散效果,好)S_WarpDrops(自定义的水波纹效果,不错)S_WarpFishEye(鱼眼镜头效果)S_WarpPerspective(平面图像的透视叠放,好)S_WarpPolar(圆盘状扭曲)S_WarpPuddle(较简单的水波纹效果)S_WarpPuff(以自身为镜头层的液化变形)S_WarpRepeat(复制自身并进行平均化,不错)S_WarpTransform(多种线性变形效果的综合)S_WarpVortex(漩涡变形,好)S_WarpWaves(波动变形)S_WarpWaves2(双重的波动变形)5.Sapphire LightingS_DropShadow(简单的阴影)S_EdgeRays(边缘光效果)S_Glare(虹状眩光效果)S_Glint(光斑效果)S_GlintRainbow(虹色星光效果)S_Glow(光晕效果)S_GlowAura(条纹光斑效果)S_GlowDarks(暗区加光效果)S_GlowDist(透射加光效果)S_GlowEdges(边缘加光效果)S_GlowNoise(加光噪波效果)S_GlowOrthicon(超正析摄象管效果,增强了边缘对比并降低亮度)S_GlowRainbow(多层色散透射效果)S_GlowRings(彩色光环效果,不错)S_LensFlare(镜头眩光效果)S_LensFlareAutoTrack(仿真镜头眩光效果,不错)S_Rays(光芒放射效果)S_SpotLight(聚光灯效果)S_Streaks(胶片曝光效果,类似加光的运动模糊)6.Sapphire RenderS_Clouds(简单的云状噪波)S_CloudColorSmooth(杂色噪波)S_CloudsMultColor(彩色云状噪波)S_CloudsPerspective(有景深的云状噪波)S_CloudsPsyko(色散噪波效果)S_CloudsVortex(漩涡状噪波)S_Gradient(简单的线性渐变色填充)S_GradientRadial(环形渐变色填充)S_Grid(网格效果)S_Sparkles(星光镜效果)S_TextureCells(细胞噪波效果)S_TextureChromaSpiral(带有色散的螺旋状噪波效果)S_TextureFolded(褶皱噪波效果)S_TextureMoire(摩尔纹效果)S_TextureNoiseEmboss(水面反射效果)S_TextureNoisePaint(水彩笔触噪波,不错)S_TexturePlasma(电离噪波效果)S_TextureSpots(点状噪波,不错)S_TextureWeave(编织物效果)S_Zap(闪电效果)S_ZapFrom(放射闪电效果)S_ZapTo(闪电充填效果)7.Sapphire StylizeS_AutoPaint(油漆效果)S_BandPass(放射线余辉效果)S_Diffuse(弥散效果)S_EdgeColorize(边缘加色效果)S_EdgeDetect(突出边缘效果)S_EdgeDetectDouble(双重的突出边缘效果)S_EdgesInDirection(方向性的突出边缘效果)S_Emboss(浮雕效果)S_EmbossDistort(变形浮雕效果)S_EmbossGlass(带有色散的变形浮雕效果)S_EmbossShiny(加光的浮雕效果)S_Etching(雕版印刷效果)S_FilmEffect(模仿胶片效果,有少量模板)S_FlysEyeCircles(圆形复眼效果)S_FlysEyeHex(六角形复眼效果)S_FlysEyeRect(矩形复眼效果)S_Grain(噪点效果)S_GrainStatic(随机噪点效果)S_HalfTone(双色点阵效果)S_HalfToneColor(彩色点阵效果)S_HalfToneRings(双色环形纹理效果)S_JpegDamage(模仿JPEG压缩造成的图像损失)S_Kaleido(多边形万花筒效果)S_KaleidoPolar(圆形万花筒效果)S_Mosaic(可调项较多的马赛克效果)S_PseudoColor(热成像效果)S_PsykoBlobs(水面油渍效果)S_PsykoStripes(条纹油渍效果)S_ScanLines(模仿电视效果)S_ScanLinesMono(模仿黑白电视效果)S_Sketch(手绘效果)S_Solarize(负片效果)S_Zebrafy(扭曲的单色底片效果)S_ZebrafyColor(带有色彩漂移和扭曲的底片效果)S_ZFogExponential(指数增长的蒙雾效果)S_ZFogLinear(线性增长的蒙雾效果)8.Sapphire TimeS_Feedback(延迟视频回馈效果)S_FeedbackBubble(带有变形的延迟视频回馈效果)S_FieldRemove(去场工具)S_Flicker(随机闪烁效果)S_FlickerMatch(同步闪烁效果)S_FlickerMatchMatte(指定区域的同步闪烁效果)S_FlickerMatchColor(对色彩通道的同步闪烁效果)S_FlickerMchMatteColor(同时带有变色和蒙板的同步闪烁效果)S_FlickerRemove(去除闪烁)S_FlickerRemoveMatte(指定区域的消除闪烁)S_FlickerRemoveColor(去除色彩闪烁)S_FlickerRmMatteColor(去除指定区域的色彩闪烁)S_FreezeFrame(跳帧效果,不错)S_GetFrame(静帧效果)S_JitterFrames(随机抽帧效果)S_MotionDetect(帧变化检测,好)S_NearestColor(检测指定的色彩部分)S_RandomEdits(帧乱序播放,好)S_ReverseClip(帧反序播放)S_ReverseEdits(指定区段帧的反序播放,不错)S_TimeAverage(指定帧平均合成,类似于追迹效果)S_TimeDisplace(动态贴图替换)S_TimeSlice(参数与时间有关的帧切分效果)S_TimeWarpRGB(色偏移效果)S_Trails(追迹效果)S_TrailsDiffuse(带有像素扩散的追迹效果)9.Sapphire TransitionsS_DissolveBlur(模糊过渡,不错)S_DissolveBubble(液化过渡,不错)S_DissolveDiffuse(像素扩散过渡)S_DissolveLuma(各种亮度过渡)S_DissolvePuddle(水波纹过渡,不错)S_DissolveSpeckle(可控斑点过渡)S_DissolveStatic(随机像素过渡)S_DissolveVortex(漩涡过渡)S_DissolveWaves(波浪过渡)S_WipeBlobs(气泡转场,不错)S_WipeBubble(液化划像,不错)S_WipeCells(细胞结构过渡)S_WipeChecker(网格划像)S_WipeCircle(圆形划像)S_WipeClock(扇形划像)S_WipeClouds(云雾转场,少见)S_WipeDiffuse(像素扩散划像)S_WipeDots(点阵划像)S_WipeDoubleWedge(双楔形划像)S_WipeFourWedges(四楔形划像)S_WipeLine(线性划像)S_WipePixelate(随机像素块划像)S_WipeRectangle(矩形划像)S_WipeRings(多重环形划像)S_WipeStar(星形划像)S_WipeStripes(条纹划像)S_WipeTiles(多边形划像)S_WipeWedge(楔形划像)==================================== Sapphire蓝宝石5.0中英文对照图。

新译林版英语四年级上册各单元知识点默写纸Unit 1: Hello!- Greeting: Hello, Hi, Good morning, Good afternoon, Goodbye- Introducing oneself: My name is..., I am...- Basic questions: What's your name? How old are you? Where are you from?- Classroom objects: book, pen, pencil, bag, desk, chairUnit 2: My Family- Family members: mom, dad, brother, sister, grandma, grandpa- Possessive pronouns: my, your, his, her- Basic questions: How many people are there in your family? Who is this?Unit 3: Numbers- Numbers 1 to 100- Counting objects- Basic math operations: addition and subtractionUnit 4: Colors- Basic colors: red, blue, yellow, green, orange, purple- Describing objects using colors- Basic questions: What color is it? What's your favorite color?Unit 5: Food and Drinks- Food vocabulary: apple, banana, cake, bread, rice, noodles- Drinks vocabulary: water, milk, tea, juice- Expressing likes and dislikes: I like..., I don't like...- Basic questions: Do you like...?Unit 6: At School- School subjects: English, math, science, music, art- Classroom actions: listen, speak, write, read, draw, sing- Basic questions: What subject do you like? What's your favorite subject?Unit 7: Daily Routines- Daily activities: wake up, brush teeth, wash face, have breakfast, go to school, have lunch, go home, do homework, go to bed - Time: morning, afternoon, evening- Basic questions: What do you do in the morning? What time do you go to bed?Unit 8: Weather- Weather vocabulary: sunny, cloudy, rainy, windy- Describing weather conditions- Basic questions: What's the weather like today?Unit 9: At the Park- Park vocabulary: swing, slide, seesaw, sandbox- Activities at the park: play, run, jump, slide- Basic questions: What can you do at the park? Do you like going to the park?Unit 10: In the City- City vocabulary: hospital, supermarket, school, park, restaurant - Means of transportation: bus, car, bike, subway- Basic questions: How do you go to school? Where do you go on weekends?Unit 11: Happy Holidays- Holiday vocabulary: Christmas, Easter, Halloween, New Year- Holiday activities: give presents, wear costumes, go trick-or-treating- Basic questions: What do you do on Christmas? What's your favorite holiday?Unit 12: Review- Review of all previous units' vocabulary and themes- Consolidation of knowledge through various activities以上为新译林版英语四年级上册各单元知识点默写纸的内容,希望对您有所帮助。
Page 1 of 2 ColiComplete ®AOAC Official Method 992.30General DescriptionColiComplete ® contains 5-bromo-4-chloro-3-indolyl-ß-Dgalactopyranoside (X-Gal) and 4-methyl umbelliferyl-ß-D-glucuronide (MUG). Discs are added to LST inoculated with selected dilutions of samples. Samples are incubated at 35–37 °C and examined after 24 and 48 ±2 h for confirmed total coliforms and after 30 ±2 h for confirmed E. coli results. ß-Galactosidase, from coliforms present in samples, cleaves X-Gal into 5-bromo-4-chloro-indoxyl intermediate which undergoes oxidation to yield water-insoluble blue dimer, visually detectable on disc or in surrounding medium as confirmed positive result for total coliform activity. ß-Glucuronidase, from E. coli present in samples, cleaves MUG into glucuronide and methyl umbelliferone which fluoresces under long wave UV light (366 nm) as confirmed positive result for E. coli presence.NOTE : As E. coli O157:H7 does not produce ß-glucuronidase, ColiComplete ® is not suitable for the detection of E. coli O157:H7.A. Sample PreparationPrepare appropriate serial dilutions as indicated in FDA Bacteriological Analytical Manual (BAM), or AOAC Official Methods of Analysis according to sample type.B. InoculationInoculate LST tubes with appropriate sample dilution series selected to determine MPN levels or presence/absence of total coliforms and E. coli in sample. Aseptically add a single ColiComplete ® disc to each tube. Incubate at 35–37 °C.C. Reading ColiComplete ®a. For total coliforms — After at least 24 h incubation, examine each tube for visually detectable blue color on disc or in surrounding medium. Presence of blue color indicates confirmed positive result for total coliforms.NOTE: A wide range of blue color intensity may be expected, depending on sample composition and microflora. All blue reactions are positive regardless of intensity of color.Reincubate at 35–37 °C. After additional 24 ±2 h re-examine. Continued absence of blue indicates negative result; presence of blue indicates confirmed positive result for total coliforms. Read and record the MPN code or presence/absence of total coliforms in the sample.b. For E.coli — After 30 ±2 h from start of initial incubation, examine tubes under long-wave UV light (366 nm). Fluorescent tubes indicate confirmed positive result for E. coli. Read and record the MPN code or presence/absence of E. coli in the sample.D. CONTROLSPositive and negative controls should be used to facilitate interpretation of MUG fluorescent reaction. Use one known positive E. coli tube and two negative controls - one non -E. coli /coliform tube (e.g., Klebsiella spp.) and one uninoculated media tube.NOTE: Use borosilicate glass tubes, flint glass gives fluorescence that may be misinterpreted for a positive result.Lit. No. MK_UG4655EN Merck KGaAFrankfurter Strasse 25064293 DarmstadtGermanyPage 2 of 2 E. Method Modification for Certain JuicesApplicable to juice products/processors which rely on treatments that do not come into direct contact with all parts of the juice, as contained in 21 CFR Part 120: Rules and Regulations. Hazard Analysis and Critical Control Point (HAACP); Procedures for the Safe and Sanitary Processing and Importing of Juice; Final Rule. Vol 66 No. 13. 6137-6202. Use the modified method “Analysis for Escherichia coli in Citrus Juices - Modifi cation of AOAC Official Method 992.30” as stated in Section 120.25 (a).F. StorageStore unused discs at 2–8 °C (36–46 °F) in a sealed container, with desiccant.G. DisposalAfter use, all tubes must be steam-sterilized at 121 °C for at least 30 min before discarding. For in-vitro diagnostic use only.Manufacturing EntityBioControl Systems, Inc, 12822 SE 32nd St, Bellevue, WA 98005, USA.BioControl Systems, Inc is an affiliate of Merck KGaA, Darmstadt, Germany.。
Developed in 1950 by AATCC Committee RA60; revised 1952, 1954, 1957, 1960, 1961, 1970, 1972, 1986 (title change), 1989, 1993, 1994, 1996, 2003, 2006 (title change), 2007, 2009, 2010, 2013; reaffirmed 1956, 1962, 1965, 1968, 1969, 1975, 1980, 1985; editorially re-vised 1973, 1974, 1975, 1976, 1981, 1983, 1984, 1991, 1995, 1998, 2002, 2004, 2008, 2012; editorially revised and reaffirmed 2001. Partly equivalent to ISO 105-C06.1.Purpose and Scope1.1These accelerated laundering tests are to evaluate the colorfastness to laun-dering of textiles which are expected to withstand frequent laundering. The fabric color loss and surface changes resulting from detergent solution and abrasive ac-tion of five typical hand or home launder-ings, with or without chlorine, are roughly approximated by one 45 min test (see 9.2-9.6). However, the staining ef-fect produced by five typical hand or home launderings cannot always be pre-dicted by the 45min test. Staining is a function of the ratio of colored to undyed fabrics, fiber content of fabrics in the wash load and other end-use conditions which are not always predictable.1.2When this test method was origi-nally developed, various options of this method were intended to evaluate the color change and staining by five home or commercial launderings, on an accel-erated basis. Throughout the years, com-mercial laundering procedures have changed and commercial cleaning today involves many different types of pro-cesses, dependent on the type of product being cleaned that cannot be duplicated by one accelerated laboratory procedure. In 2005, all references to commercial laundering were removed as it is not known if these procedures accurately rep-licate typical commercial laundering pro-cesses used today.2. Principle2.1Specimens are tested under appro-priate conditions of temperature, deter-gent solution, bleaching and abrasive ac-tion such that the color change is similar to that occurring in five hand or home launderings. The color change is obtained in a conveniently short time. The abra-sive action is a result of the frictional ef-fects of fabric against canister, the low li-quor ratio and the impact of the steel balls on the fabric.3. Terminology3.1colorfastness, n.—the resistance ofa material to change in any of its colorcharacteristics, to transfer of its color-ant(s) to adjacent materials or both, as aresult of the exposure of the material toany environment that might be encoun-tered during the processing, testing, stor-age or use of the material.3.2laundering, n.—of textile mate-rials, a process intended to remove soilsand/or stains by treatment (washing) withan aqueous detergent solution and nor-mally including subsequent rinsing, ex-tracting and drying.4. Safety PrecautionsNOTE: These safety precautions arefor information purposes only. The pre-cautions are ancillary to the testing proce-dures and are not intended to be all inclu-sive. It is the user’s responsibility to usesafe and proper techniques in handlingmaterials in the test method. Manufactur-ers MUST be consulted for specific de-tails such as material safety data sheetsand other manufacturer’s recommenda-tions. All OSHA standards and rulesmust also be consulted and followed.4.1Good laboratory practices shouldbe followed. Wear safety glasses in alllaboratory areas.4.2All chemicals should be handledwith care.4.3The 1993 AATCC Standard Refer-ence Detergent (with and without opticalbrighteners) and the 2003 AATCC Stan-dard Reference Liquid Detergent (withand without optical brighteners) maycause irritation. Care should be taken toprevent exposure to skin and eyes.4.4An eyewash/safety shower shouldbe located nearby for emergency use.4.5Manufacturer’s safety recommen-dations should be followed when operat-ing laboratory testing equipment.5.Apparatus, Reagents and Materials(see 12.1)5.1Accelerated laundering machine.5.1.1A laundering machine for rotat-ing closed canisters in a thermostaticallycontrolled water bath at 40 ± 2 rpm.5.1.2Stainless steel lever lock canis-ters Type 1 500 mL (1 pt), 75 × 125 mm(3.0 × 5.0 in.) for Test No. 1A.5.1.3Stainless steel lever lock canistersType 2 1200 mL, 90 × 200 mm (3.5 × 8.0in.) for Tests No. 1B, 2A, 3A, 4A and 5A.5.1.4Adapter plates for holding canisters(see 5.1.3) on laundering machine shaft.5.1.5Stainless steel balls, 6 mm (0.25in.) in diameter.5.1.6 White Synthetic (SBR) RubberBalls 9-10 mm (3/8 in.) dia. 70 Durome-ter hardness for Test 1B (see 12.1)5.1.7Teflon fluorocarbon gaskets (see7.4.2 and 12.2).5.1.8Preheater/storage module (see7.4, 12.1 and 12.3).5.2Scales for rating test results.5.2.1AA TCC 9-Step Chromatic Trans-ference Scale (AA TCC Evaluation Proce-dure 8) (see 12.4).5.2.2Gray Scale for Color Change(AATCC Evaluation Procedure 1) (see12.4).5.2.3Gray Scale for Staining (AATCCEvaluation Procedure 2) (see 12.4).5.3Reagents and materials.5.3.1Multifiber test fabrics (8 mm[0.33 in.] bands) containing acetate, cot-ton, nylon, silk, viscose rayon and wool.Multifiber test fabrics (8 mm [0.33 in.]bands) and (15 mm [0.6 in.] bands) con-taining acetate, cotton, nylon, polyester,acrylic and wool (see 12.5).5.3.2Bleached cotton test fabric, 32 ×32 ends × picks/cm (80 × 80 ends ×picks/in.) construction, 100 ± 3 g/m2 (3.0± 0.1 oz/yd2), desized without opticalbrightener (see 12.5).5.3.31993 AATCC Standard Refer-ence Detergent WOB (without opticalbrightener and without phosphate) or2003 AA TCC Standard Reference LiquidDetergent WOB (without optical bright-eners) (see 10.5 and 12.6).5.3.41993 AATCC Standard Refer-ence Detergent (with optical brighteners)or 2003 AATCC Standard Reference Liq-uid Detergent (with optical brighteners)(see 10.5 and 12.6).5.3.5Water, distilled or deionized (see12.7).5.3.6Sodium hypochlorite (NaOCl)bleach (see 12.8).5.3.7Sulfuric acid (H2SO4), 10% (see12.8.1).5.3.8Potassium iodide (KI), 10% (see12.8.1).5.3.9Sodium thiosulfate (Na2S2O3),0.1N (see 12.8.1).5.3.10Crockmeter test cloth cut in 50mm (2 in.) squares (see 12.9).5.3.11White cards (specimen mounts)with Y tristimulus value at least 85%.6. Test Specimens6.1The sizes of the specimens requiredfor the various tests are as follows:50 × 100 mm (2.0 × 4.0 in.) for TestNo. 1A,AATCC Test Method 61-2013Colorfastness to Laundering: Accelerated50 × 150 mm (2.0 × 6.0 in.) for Tests No. 1B, 2A, 3A, 4A and 5A.6.2Test only one specimen in each canister.6.2.1Test one specimen per laboratory sample. Replication may be advisable for improved precision.6.3To determine staining in Tests No. 1A and 2A, use multifiber test fabric. To determine staining in Test No. 3A, use ei-ther multifiber test fabric or bleached cot-ton test fabric. With respect to Test No. 3A, the use of multifiber test fabric is optional but the staining of acetate, nylon, polyester and acrylic is disregarded unless one of these fibers is present in the fabric being tested or known to be in the final garment. For Test 3A, multifiber test fabric with heat-sealed edges is recommended. Stain-ing is not determined in Tests No. 4A and 5A (see 12.10 and 12.11).6.4Specimen preparation.6.4.1Preparation with multifiber test fabric with individual component bands 8mm (0.33 in.) wide or with bleached cotton test fabric. Prepare pieces with a 50 mm (2.0 in.) square of multifiber test fabric cloth or bleached cotton test fabric (as required) sewn, stapled or suitably attached along one 50 mm (2.0 in.) edge of the test specimen and in contact with the face of the material. When multifiber test fabric is used, attach it so that each of the six fiber bands is along the 50 mm (2.0in.) edge of the specimen with the wool on the right. The fiber bands in the multifiber test fabric will be parallel to the lengthwise direction of the test specimen.6.4.2Preparation with multifiber test fabric with individual component bands15 mm (0.6 in.) wide. Prepare pieces witha 50 × 100 mm (2.0 × 4.0 in.) rectangle of multifiber test fabric sewn, stapled or suitably attached centered along one 100 mm (4.0 in.) or 150 mm (6.0 in.) edge of the test specimen and in contact with the face of the material. Attach it so that each of the six fiber bands will be parallel to the widthwise direction of the specimen. Attach and secure the wool band at the top of the specimen to avoid fiber loss. 6.4.3It is recommended that knitted fabrics be sewn or stapled at the four edges to equivalent size pieces of bleached cotton test fabric to avoid rolled edges and to assist in obtaining a uniform test result over the entire surface. Attach the multifiber test fabric to the face of the knitted fabric.6.4.4For pile fabric specimens with a pile lay direction, attach the multifiber test fabric at the top of the specimen with the pile lay direction pointing away from the top of the specimen.6.5When the textile to be tested is yarn, specimens may be tested using Op-tion 1 or Option 2.6.5.1Option 1. Knit yarn on an appro-priate sample knitting machine. Prepare specimens and multifiber test fabrics ac-cording to 6.1-6.4.3. Keep one knittedspecimen of each sample as an unwashedoriginal.6.5.2Option 2. Prepare two 110 m(120 yd) skeins of each yarn. Fold theskein so that there is a uniform amount ofyarn across a 50 mm (2 in.) width with alength appropriate for the procedure to beused. Keep one skein of each sample asan unwashed original. Sew or stapleCrockmeter test cloth squares (see 12.9)or squares of bleached cotton test fabrichaving approximately the same weightfolded over each end of the layered yarnspecimen. Attach a multifiber test fabricaccording to 6.4.1 or 6.4.2.7. Procedure7.1Table I summarizes the conditionsof the tests.7.2Adjust the laundering machine tomaintain the designated bath tempera-ture. Prepare the required volume ofwash liquor. Preheat this solution to theprescribed temperature.7.3Run Test No. 1A in 75 × 125 mm(3.0 × 5.0 in.) lever lock stainless steelcanisters. Run Tests No. 2A, 3A, 4A and5A in 90 × 200 mm (3.5 × 8.0 in.) leverlock stainless steel canisters.7.3.1For Tests No. 1A, 1B, 2A and3A, add to the canister the amount of de-tergent solution designated in Table I.7.3.2For Test No. 4A, prepare a 1500ppm available chlorine solution. For 1 L,determine the amount of stock sodiumhypochlorite bleach solution (see 12.8) todilute as follows:159.4/% NaOCl = g to addWeigh the correct amount of bleach into avolumetric flask and dilute to 1 L. Toeach canister, add 5 mL of 1500 ppmavailable chlorine solution and 45 mL ofdetergent solution making a total volumeof 50 mL.7.3.3For Test No. 5A, determine theamount of stock sodium hypochloritebleach solution (see 12.8) to dilute asfollows:4.54/% NaOCl = g to addWeigh the correct amount of bleach into agraduated cylinder and add detergent so-lution to make a total volume of 150 mL.Prepare this solution separately for eachcanister.7.3.4For all the tests, add the desig-nated number of stainless steel balls orwhite rubber balls to each canister.7.4The two options for preheating thecanisters to the test temperature are byuse of the laundering machine or the pre-heater/storage unit. If the canisters are tobe preheated in the laundering machine,proceed to 7.4.2.7.4.1Place the canisters in the pre-heater module at the prescribed test tem-perature. They are to remain in themodule for at least 2 min. Enter a wellcrumpled test specimen into each canister.7.4.2Clamp the covers on the canis-ters. A Teflon fluorocarbon gasket (see5.1.6) may be inserted between the neo-prene gasket and the top of each canisterto prevent contamination of the wash so-lution by the neoprene. Fasten the 75 ×125 mm (3.0 × 5.0 in.) lever lock canis-ters vertically and the 90 × 200 mm (3.5× 8.0 in.) lever lock canisters horizontallyin the adapters on the rotor of the laun-dering machine in such a manner thatwhen the canisters rotate, the coversstrike the water first. Place an equal num-ber of canisters on each side of the shaft.For canisters preheated in the module,proceed to 7.7.7.5Start the rotor and run it for at least2 min to preheat the canisters.7.6Stop the rotor and with a row ofcanisters in an upright position, unclampthe cover of one canister, enter a wellcrumpled test specimen into the solutionand replace the cover, but do not clamp it.Repeat this operation until all the canis-ters in the row have been loaded. Thenclamp the covers in the same order inwhich the canisters were loaded (delayclamping the covers to allow equalizationof pressure). Repeat this operation untilall rows of canisters have been loaded.7.7Start the laundering machine andrun it at 40 ± 2 rpm for 45 min.7.8The rinsing, extracting and dryingTable I—Test Conditions aTestNo.bTemp TotalLiquorVolume(mL)PercentPowderDetergentof TotalVolumePercentLiquidDetergentof TotalVolumePercentAvailableChlorineof TotalVolumeNo.SteelBallsNo. ofRubberBallsTime(Min)°C (±°2)°F (±°4)1A401052000.370.56None100451B c31881500.370.56None010202A491201500.150.23None500453A71160500.150.23None1000454A71160500.150.230.0151000455A491201500.150.230.02750045a Refer to Section 9 for objectives for each test method.b All Tests include an alternate use for 2003 AATCC Standard Liquid Detergent.c Test 1B provides for the use of White Rubber Balls instead of Stainless Steel Balls.procedures are the same for all the tests. Stop the machine, remove the canisters and empty the contents into beakers, keeping each test specimen in a separate beaker. Rinse each test specimen three times, in beakers, in distilled or deionized water at 40 ± 3°C (105 ± 5°F) for 1 min periods with occasional stirring or hand squeezing. To remove excess water, cen-trifuge, blot or pass the test specimens through wringer rolls. Dry the specimens in an air circulating oven in which the temperature does not exceed 71°C (160°F), or tumble dry in a nylon mesh bag in an automatic tumble dryer at nor-mal cycle, which has an exhaust tempera-ture of 60-71°C (140-160°F), or air dry.7.9 Allow specimens to condition at 65± 2% relative humidity and 21 ± 1°C (70± 2°F) for 1 h before evaluating.7.10Prepare tested fabric specimens and adjacent fabrics for evaluation by trimming off raveled yarns and lightly brushing off any loose fiber and yarn on the fabric surfaces. Brush pile fabric specimens in required direction to restore them as nearly as possible to the same pile angle as the untreated specimens. Specimens should be smoothed or flat-tened if they are wrinkled and messy due to washing and/or drying. Specimens may be mounted on cards to facilitate identification and handling in their evalu-ation. For consistency in backing mate-rial, use a white mounting card with Y tristimulus value of at least 85%. Mount-ing material must not be visible in the area to be viewed and must not interfere with rating as specified in 5.1 of both AATCC Evaluation Procedures 1 and 2 for the Gray Scale for Color Change and Gray Scale for Staining or instrumental assessment of color according to AATCC Evaluation Procedure 7, Instrumental As-sessment of the Change in Color of a Test Specimen (see 12.4).7.10.1Yarn skein specimens should be combed and brushed for improved align-ment of the yarns before comparison with the unwashed original. The original spec-imens may also need further combing and brushing for uniformity of appearance.8. Evaluation (see 12.16)8.1Evaluation of color change.8.1.1Evaluate the color change of the test specimens by comparison with the Gray Scale for Color Change (AATCC Evaluation Procedure 1), or using AATCC Evaluation Procedure 7, Instru-mental Assessment of the Change in Color of a Test Specimen, and record the numerical rating that corresponds to the appropriate one on the Gray Scale. For improved precision and accuracy the specimens should be rated by more than one rater.8.2Evaluation of staining.8.2.1Evaluate staining (see 12.10) by comparison with the Gray Scale forStaining (AATCC Evaluation Procedure2), the AATCC 9-Step Chromatic Trans-ference Scale (AATCC Evaluation Proce-dure 8), or Instrumental Assessment ofDegree of Staining (AATCC EvaluationProcedure 12), and record the numericalrating that corresponds to the appropriateone on either of them. The scale usedshould be indicated when reporting thetest results.8.2.2The color transferred to the multi-fiber test fabric or bleached cotton testfabric square of 6.4.1 can be quantita-tively determined by measuring the colordifference between a piece of the originalmaterial and the stained material. Multifi-ber test fabrics (15 mm [0.6 in.]) have fill-ing bands of sufficient width to be withinthe aperture diameter capability of manycolorimeters and spectrophotometers (seeAA TCC Evaluation Procedure 6, Instru-mental Color Measurement and 12.14).9. Interpretation of Results9.1Results from these tests are in-tended to approximate the color changeeffects (see 1.1) of five typical homelaunderings. These are accelerated tests,and in obtaining the required degree ofacceleration some of the conditions, suchas temperature, were purposely exagger-ated. The tests have remained largely thesame over many years while laundry de-tergents, washers and dryers, laundrypractices and fabrics have changed (seeAATCC Monograph M6, “Standardiza-tion of Home Laundry Test Conditions,”elsewhere in this T ECHNICAL M ANUAL).Consequently, caution in interpreting testresults is advisable.9.2 Test No. 1A—This test is for evalu-ating the colorfastness of textiles that areexpected to withstand repeated handlaundering at low temperature. Speci-mens subjected to this test should showcolor change similar to that produced byfive typical careful hand launderings at atemperature of 40 ± 3°C (105 ± 5°F).9.3 Test No. 1B—This test is for evalu-ating the colorfastness of textiles that areexpected to withstand repeated handlaundering at cool temperatures. Speci-mens subjected to this test should showcolor change similar to that produced byfive typical careful hand launderings at atemperature of 27 ± 3°C (80 ± 5°F).9.4 Test No. 2A—This test is for eval-uating the colorfastness to washing oftextiles that are expected to withstand re-peated low temperature machine launder-ing in the home. Specimens subjected tothis test should show color change similarto that produced by five home machinelaunderings at medium or warm setting inthe temperature range of 38 ± 3°C (100 ±5°F).9.5 Test No. 3A—This test is for evalu-ating colorfastness to washing of textilesconsidered washable under vigorous con-ditions. Specimens subjected to this testshould show color change similar to thatproduced by five home machine launder-ings at 60 ± 3°C (140 ± 5°F), withoutchlorine.9.6 Test No. 4A—This test is for evalu-ating the colorfastness to washing of tex-tiles laundered in the presence of avail-able chlorine. Specimens subjected tothis test should show color change similarto that produced by five home machinelaunderings at 63 ± 3°C (145 ± 5°F) with3.74 g per L (0.50 oz/gal) of 5% availablechlorine per 3.6 kg (8.0 lb) load.9.7 Test No. 5A—This test is for eval-uating the colorfastness to washing oftextiles that may be laundered in the pres-ence of available chlorine. Specimenssubjected to this test should show colorchange similar to that produced by fivehome machine launderings at 49 ± 3°C(120 ± 5°F) with 200 ± 1 ppm availablechlorine.10. Report10.1Report the test number.10.2Report the grade number deter-mined for color change in 8.1 and thestaining grade numbers for the evaluatedfibers in the multifiber test fabric and/orbleached cotton test fabric as determinedin 8.2.10.3State which scale (Gray Scale forStaining or AATCC 9-Step ChromaticTransference Scale) was used in evaluat-ing staining (see 12.12).10.4Report the multifiber test fabricused and if bleached cotton test fabricwas employed to avoid knit curling.10.5Report the detergent used with colorchange and staining results (see 12.6).10.6Report which laundering ma-chine is used.11. Precision and Bias (see 12.15)11.1Precision and bias statementshave been developed for Tests No. 2Aand 5A. Although correlation work hasbeen done, no precision and bias state-ments have been developed for Tests No.1A, 3A and 4A.11.1.1Because of changes in the deter-gents used in this method, these precisionand bias statements may not apply to dataor information obtained with the cur-rently available detergents.11.2Test No. 2A.11.2.1Summary. An interlaboratorytest was carried out in May 1985 to estab-lish the precision of Test No. 2A. A partof the test was to determine if the wider15 mm (0.6 in.) No. 10A multifiber testfabric could be substituted for the 8 mm(0.33 in.) wide No. 10. The complete testconsisted of six laboratories evaluating10 materials in duplicate by one operatorusing Test No. 2A.11.2.2Color Change . Three raters from six laboratories independently eval-uated nine materials in duplicate using the Gray Scale for Color Change. The components of variance as standard devi-ations of the colorfastness grades (aver-ages of variances for No. 10 and No. 10A multifiber test fabrics) were calculated as follows:Single-Operator Component 0.29Within-Laboratory Component0.29Between-Laboratory Component0.2911.2.3Critical Differences . For the components of variance reported in 11.2.2, two averages of observed values should be considered significantly differ-ent at the 95% probability level if the dif-ference is equal to or exceeds the critical differences shown in Table II.11.2.4Staining . Three raters indepen-dently rated the six fibers of the multifi-ber test fabric (No. 10 and No. 10A) for 10 materials at six laboratories using the Gray Scale for Staining. Of the 60 possi-ble fiber/fabric combinations, only 51could be used. The components of vari-ance were averaged for the No. 10 and No. 10A multifiber test fabrics and ap-pear below as standard deviations of staining ratings:Single Operator Component 0.27Within-Laboratory Component0.34Between-Laboratory Component0.2511.2.5Critical Differences . For the components of variance reported in 11.2.4, two averages of observed values should be considered significantly differ-ent at the 95% probability level if the dif-ference equals or exceeds the critical dif-ferences shown in Table III.11.2.6 Bias . Tests comparing five home launderings at 40°C (105°F) with one Launder-Ometer Test No. 2A indi-cate there is no bias between the two methods for the colorfastness and stain-ing levels evaluated.Table II—Critical Differences, Grades,for the Condition Noted aNo. of Observations Single-Operator Precision Within-Lab Precision Between-Lab Precision10.80 1.12 1.3730.460.92 1.2150.360.87 1.18aThe critical differences were calculated using t =1.950 which is based on infinite degrees of freedom.11.3Test No. 5A, Chlorine Bleach.11.3.1Summary . An interlaboratory test was carried out in 1984 to establish the precision of Test No. 5A for deter-mining the effect of chlorine bleach on the colorfastness of fabrics. All speci-mens were laundered in a Launder-Ometer by one operator. Color change in Test No. 5A was determined both visu-ally and instrumentally. Details of the sta-tistical analysis of the data can be found in the report, Third Interlaboratory Study of Proposed Launder-Ometer Test for Colorfastness of Fabrics to Chlorine and Non-Chlorine Bleaches, October 21,1985, by J. W. Whitworth, Milliken Re-search Corp., Spartanburg, SC.11.3.2Visual Assessment . Four materi-als were tested at each of five laborato-ries. Three raters visually assessed the color change of four specimens. The components of variance as standard devi-ations of colorfastness grades were calcu-lated as follows:Single Operator Component 0.38Within-Laboratory Component0.28Between-Laboratory Component0.2711.3.3Critical Differences . For the components of variance in 11.3.2, two averages of observed values should be considered significantly different at the 95% probability level if the difference equals or exceeds the critical differences shown in Table IV .11.3.4Instrumental Assessment . Color change as total color difference (CIELAB) was measured on a spectro-Table III—Critical Differences, Grades,for the Condition Noted aNo. of Observations Single-Operator Precision Within-Lab Precision Between-Lab Precision10.75 1.20 1.3930.43 1.03 1.2550.33 1.00 1.22aThe critical differences were calculated using t =1.950 which is based on infinite degrees of freedom.Table IV—Critical Differences, Grades,for the Condition Noted aNo. of Observations Single-Operator Precision Within-Lab Precision Between-Lab Precision1 1.03 1.29 1.4930.590.98 1.2350.460.91 1.17aThe critical differences were calculated using t =1.950 which is based on infinite degrees of freedom.photometer or colorimeter using aper-tures ranging in size from 13-51 mm (0.5-2.0 in.) in diameter, illuminant D 65/10° observer or illuminant C/2° observer.Six materials were tested at each of six laboratories. One operator in each labora-tory tested four specimens of each fabric.The components of variance for ∆E* ex-pressed as coefficients of variation were calculated to be:Single-Operator Component6.8%Between-Laboratory Component11.2%11.3.5Critical Differences . For the components of variance reported in 11.3.4, two averages of observed values should be considered significantly differ-ent at the 95% probability level if the dif-ference equals or exceeds the critical dif-ferences shown in Table V .11.3.6Bias . Tests comparing five home launderings at 49°C (120°F) with one Launder-Ometer Test No. 5A indi-cate there is no bias between the two methods for the colorfastness levels eval-uated (see 12.13).12. Notes12.1 For potential equipment information pertaining to this test method, please visit the online AATCC Buyer’s Guide at /bg. AATCC provides the pos-sibility of listing equipment and materials sold by its Corporate members, but AATCC does not qualify, or in any way approve, endorse or certify that any of the listed equipment or materials meets the requirements in its test methods.12.2Teflon is a registered trademark of the DuPont Co., Wilmington DE 19898.12.3The preheater/storage unit may be a side unit to the laundering machine or a sepa-rate module with its individual electric heater and thermostat to control water bath tempera-tures for heating containers and solutions prior to loading the laundering machine.12.4Available from AATCC, P.O. Box 12215, Research Triangle Park NC 27709; tel:+1.919.549.8141; fax: +1.919.549.8933; e-mail:Table V—Critical Differences, Percent of Grand Average for the Conditions Noted a,bNo. of Observations in Each AverageSingle-Operator PrecisionBetween-Laboratory Precision118.736.2310.832.858.432.1aThe critical differences were calculated using t =1.950 which is based on infinite degrees of freedom.bTo convert the values of the critical differences to units of measure, multiply the critical differences by the average of the two specific sets of data being compared and then divide by 100.。
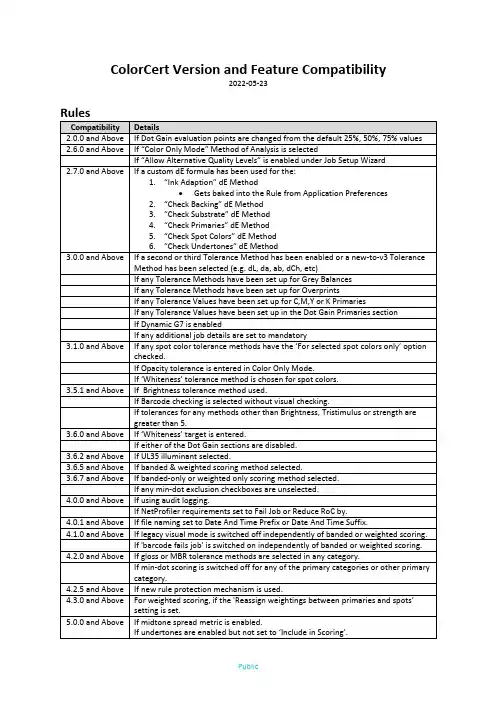
ColorCert Version and Feature Compatibility2022-05-23RulesCompatibility Details2.0.0 and Above If Dot Gain evaluation points are changed from the default 25%, 50%, 75% values 2.6.0 and Above If “Color Only Mode” Method of Analysis is selectedIf “Allow Alternative Quality Levels” is enabled under Job Setup Wizard2.7.0 and Above If a custom dE formula has been used for the:1.“Ink Adaption” dE Method•Gets baked into the Rule from Application Preferences2.“Check Backing” dE Method3.“Check Substrate” dE Method4.“Check Primaries” dE Method5.“Check Spot Colors” dE Method6.“Check Undertones” dE Method3.0.0 and Above If a second or third Tolerance Method has been enabled or a new-to-v3 ToleranceMethod has been selected (e.g. dL, da, ab, dCh, etc)If any Tolerance Methods have been set up for Grey BalancesIf any Tolerance Methods have been set up for OverprintsIf any Tolerance Values have been set up for C,M,Y or K PrimariesIf any Tolerance Values have been set up in the Dot Gain Primaries sectionIf Dynamic G7 is enabledIf any additional job details are set to mandatory3.1.0 and Above If any spot color tolerance methods have the ‘For selected spot colors only’ optionchecked.If Opacity tolerance is entered in Color Only Mode.If ‘Whiteness’ tolerance method is chosen for spot colors.3.5.1 and Above If Brightness tolerance method used.If Barcode checking is selected without visual checking.If tolerances for any methods other than Brightness, Tristimulus or strength aregreater than 5.3.6.0 and Above If ‘Whiteness’ target is entered.If either of the Dot Gain sections are disabled.3.6.2 and Above If UL35 illuminant selected.3.6.5 and Above If banded & weighted scoring method selected.3.6.7 and Above If banded-only or weighted only scoring method selected.If any min-dot exclusion checkboxes are unselected.4.0.0 and Above If using audit logging.If NetProfiler requirements set to Fail Job or Reduce RoC by.4.0.1 and Above If file naming set to Date And Time Prefix or Date And Time Suffix.4.1.0 and Above If legacy visual mode is switched off independently of banded or weighted scoring.If 'barcode fails job' is switched on independently of banded or weighted scoring.4.2.0 and Above If gloss or MBR tolerance methods are selected in any category.If min-dot scoring is switched off for any of the primary categories or other primarycategory.4.2.5 and Above If new rule protection mechanism is used.4.3.0 and Above For weighted scoring, if the 'Reassign weightings between primaries and spots’setting is set.5.0.0 and Above If midtone spread metric is enabled.If undertones are enabled but not set to ‘Include in Scoring’.ProfilesCompatibility Details2.7.0 and Above If no Substrate or no Primaries are set up.If a custom dE formula has been used for the “Ink Adaption” dE Method.•Gets baked into the Profile from Application Preferences3.0.0 and Above If there are more than 8 Primaries or Spot Colors configured.If any Primaries have a classification other than ‘Other Primary’ or any Spot Colorshave a classification other than ‘Spot’.3.1.0 and Above If any spot colors have the ‘Apply additional tolerance methods’ option selected. 3.6.2 and Above If UL35 illuminant selected.If any spot colors are marked as critical.4.1.0 and Above If the profile contains a mixture of M-Modes.4.2.0 and Above If the profile contains a mixture of M-Modes with SPIN, SPEX or both.Jobs Rules and profiles checked as listed above with the following additional checks…Compatibility Details2.7.3 and Above If a Custom Media Strip has been set up and it contains more than 48 patches.If a Custom Media Strip has been set up and it contains skipped patchesNOTE: There was a bug in the logic which meant that if the Default Media Strip wasused, the Custom Media Strip only contained skipped patches, and this was thereforewrongly interpreted as containing skipped patches leading to an error message.3.6.0 and Above If any additional Press Setup options have been configured using the languageoverride options (additional finishes, substrates, thicknesses or varnishes).3.6.2 and Above If any additional Press Setup Coatings options have been configured using thelanguage override options.3.6.5 and Above If either of the new visual job defects categories have been marked (Bouncing orMissing Dots).4.0.1 and Above If Manual [Patch by Patch] mode checked on application screen.If file naming set to Date and Time Prefix or Date and Time Suffix.4.3.0 and Above If Murray Davies dot gain is active in the rules and the first roll is saved in 4.3.0 andabove.4.3.5 and Above If job is measured with 4.3.4 and above, undertones are enabled and there’s an inkwith an original tint ramp and no substrate adaption. This state used to cause anundertone calculation error in earlier versions of CC and this check prevents a ‘fixed’job from being opened in those earlier versions.5.0.0 and Above If new press setup fields are used (Plate specification, Cylinder specification or Tapespecification).Applications Rules and profiles checked as listed above the same as Jobs…CombiJobsCompatibility Details3.1.0 and Above Any CombiJob saved under 3.1.0 will be incompatible with previous versions due tothe fact that the individual jobs are now packed inside the CCM file rather than beingsaved to a subfolder. This allows them to be saved to the repository.。

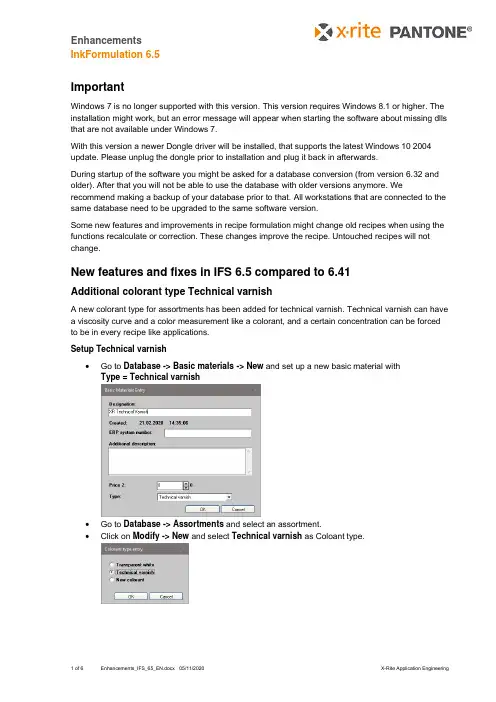
ImportantWindows 7 is no longer supported with this version. This version requires Windows 8.1 or higher. The installation might work, but an error message will appear when starting the software about missing dlls that are not available under Windows 7.With this version a newer Dongle driver will be installed, that supports the latest Windows 10 2004 update. Please unplug the dongle prior to installation and plug it back in afterwards.During startup of the software you might be asked for a database conversion (from version 6.32 and older). After that you will not be able to use the database with older versions anymore. We recommend making a backup of your database prior to that. All workstations that are connected to the same database need to be upgraded to the same software version.Some new features and improvements in recipe formulation might change old recipes when using the functions recalculate or correction. These changes improve the recipe. Untouched recipes will not change.New features and fixes in IFS 6.5 compared to 6.41Additional colorant type Technical varnishA new colorant type for assortments has been added for technical varnish. Technical varnish can have a viscosity curve and a color measurement like a colorant, and a certain concentration can be forced to be in every recipe like applications.Setup Technical varnish•Go to Database -> Basic materials -> New and set up a new basic material with Type = Technical varnish•Go to Database -> Assortments and select an assortment.•Click on Modify -> New and select Technical varnish as Coloant type.•Set up Colorant with•Price•Specific Weight•Basic materials =100% Technical varnish•Viscosity•Default concentrationpercentage in recipes.•Click OK•You will now be forced toprepare the concentrationsamples with measurements,at least the 100% sample.Samples without measurementswill be ignored.Using Technical varnish in RecipesBefore you calculate a recipe with Technical varnish go to Settings -> Formulation.•For Recipe output select either Basic materials or Basic inks and solvent.•With the selection for Default you define the Total mode if the technical varnish concentration is based on Total or Total basic ink. Typical selection woul be Total basic ink so that thesolvent has no influence on the technical varnish concentration. This setting is now saved for each recipe, so that you can always recalculate with the same settingsTo calculate a recipe with technical varnish you need to select an assortment with technical varnish included and select your target color, substrate, etc. as usual. There is now a new area in the formulation window to add the technical varnish to the recipe.•Move the relevant available technical varnish to the selected area on the right. If there is no default concentration defined in the setup you will be forced to enter a concentration. You can also amend the default concentration of the technical varnish by clicking Modify.•Continue as usual. The recipe will now be calculated taking the techical varnish and it’s color and viscosity curve into account.With a mouse over the icons on the bottom left you can see which total mode is used for the recipe. This is saved with the recipe and used for the technical varnish calculation every time the recipe is edited or recalculated.Technical varnish in specific workflows•Recipe editor and Recipe new with Technical varnish in Basic material mode: Recipe editing with Technical varnish and Applications in Modify proportionally mode is notrecommended as two different rules are working against each other.For the same reason the function Recipe new in combination with Technical varnish in Basic material mode is only possible in Free modification mode.•Leftover handling is not restricted with Technical varnish:As InkFormulation does not always know what components are used in a leftover, it expects that it has the same amount of technical varnish already included. It should be assumed the operator knows what leftovers to select when working with technical varnish.•Restrictions when working with palette formulation:Next to the usual requirements for palette formulation, only recipe that have the sametechnical varnish concentration will be shown as palette recipes.•Batch processing with Technical varnish:If you select Use colorants of respective recipe within the batch processing setup, then the technical varnish will be used according to the original recipe in the same concentration and based on the same total mode.Improvements in Recipe Formulation•Improved recipe prediction when the target viscosity in the formulation settings is different to the viscosity of colorant calibrations in the assortments.•Improved recalculations when the viscosity has changed. The colorants are now kept constant in relation to the total ink. Only transparent white and solvent are leveled out to amend theviscosity.•Included new formulation metrics Spectral Shape Sorting, to ensure best suited pigmentation in the best ranked recipe.•Fixed a problem with leftover restrictions in corrections and recalculations.•New optional sorting criterion for dE (white/black) has been added to take the match for bot measurements over black and over white into account for sorting the list of recipes.Improvements with PantoneLIVE references•When importing from cxf or from ColorCert, PantoneLIVE references are now shown with correct color icons and measurement conditions.•If a PantoneLIVE reference cannot be found, for example because the relevant palette has not been subscribed, it shows a message in the request view.• A PantoneLIVE search button is now also available in the function Define Target Color -> Get.•When searching PantoneLIVE references based on a measurement you can now also see the Delta E value in the list of search results. The formula is based on the display setting forDelta E formula.Additional objects for the Print LayoutThere is a new layout “Recipe A4 – 2” where thefollowing items have been improved and added•color patches for target and recipe•the Spectral graph is now colored•the CIE-Lab graph has been added.•the recipe result is now labeled if it is measuredor calculated.If you want to use these new parameters in your self-created print layouts here are the necessary items, youneed to include:For the color patches and the Lab graph•Go to Settings -> Set up printer.•Modify the layout you want to amend.•Click Insert -> Image and define where and inwhat size the new objects should appear.•Amend the following parameters depending on what image you want to includeImage resource: FileImage file: %TEMP%\RecipeReport\Target.bmp for the target patch%TEMP%\RecipeReport\Recipe.bmp for the recipe patch%TEMP%\RecipeReport\LabGraph.bmp for the Lab Graph Transformation: SmoothFor recipe measured/calculated•Click Insert -> Field and define where and in what size the new objects should appear.•Amend the following parametersField source type: DatasourceField: colorData_MeasuredWord wrapping: ticked•Amend font size, color and weight as required.Additional options for Recipe export as csv fileWhen exporting a recipe as csv file you can now select, if you would like to add LabCh° values from the target and the recipe and/or the result in the relevant Delta E formula.Fixed issues with Thickness objects•Thickness objects are now linked to assortments after import correctly again.•Thickness objects can now be assigned to assortments in databases that were empty or didn’t had any calibrated thickness object applied.•Creators of a thickness objects are now saved in the database.Further fixes and improvements•Changes of the substrate and thickness object in the recipe editor are now saved correctly.•Improved handling of cxf files with multiple measurement modes as recipe requests.•Fixed an issue in User Administrator where the Delta E formula was changeable without user permission.•Fixed an issue with external command interface.•Fixed an issue with the search options in the function Define target color -> get.•Improved Chinese translations.•Improved Italian translations.。
First StepsContentsRemarks (3)Description of toolbar elements (4)Settings (6)General Settings (6)Program Settings (7)Spectrophotometer Settings (8)Display Settings (9)Check-Area Settings (10)Communication Settings (11)CXF Browser Settings (11)Setting up a New Job (12)Measurement and Various Display (17)Using of presets (18)Viewing Samples (20)Modify a Job (21)Defining a Standard (22)Placing a Standard into a Job (23)Quick Compare (24)Backup a Database (25)Restore a Database (26)Remarks•This guide gives an overview of the important functions of the ColorQuality 6. •The main objective of this document is to get familiar with the functioning of thisprogram.•As this is only a help document, colorimetric aspects are not discussed.TrademarksX-Rite ColorQuality TM and X-Rite InkFormulation TM are trademarks of X-Rite.Windows is a registered trademark of the Microsoft Corporation.Copyright 2010 by X-Rite®All rights reserved. Duplicating, processing or translating beyond the scope of the copyright are expressly forbidden without previous written permission.Description of Toolbar ElementsNew jobCreating a new jobOpen jobOpening an existing jobModify current jobAltering the colors in a job or adding new color references into a jobMeasure sampleCopy sample from ColorNetRetrieving samples from ColorNetDelete existing samplesThe most recently measured or loaded sample is deletedSelect displayed samplesFilter the samples to show only those of interestPrint jobPrints the selected viewSPMLooks for and connects the attached spectrophotometerChange to InkFormulationLoading InkFormulation or changing between ColorQuality andInkFormulationQuick CompareCompare measurements without creating a job firstSettingsGeneral Settings1.Click menu Settings: General.2.Please select the following measuring conditions.3. Click OK.Program Settings1.Click menu Settings: Program.Default tolerance, dE* formula, white base for density calculation, and dye strength calculation are defined in Program settings. New jobs will use these settings. NOTE: In Graphic Arts, density and dye strength calculations are normally based on the white of the substrate. ColorQuality™ allows you to choose the white base. If "Substrate" is selected, then the substrate would have to be measured in the "Modify current job" window, field "Series"(See arrow "1"). The values of density and dye strength are then relative to the substrate.Changing the white base has no influence on colorimetric data (e.g. L*a*b* values), as they are always based on absolute white.2.Exit the window by clicking OK or Cancel.Spectrophotometer Settings1.Click menu Settings: SPM.A connected spectrophotometer can be searched and calibrated. The COM port and the baud rate can be selected or changed. At the bottom of the window, information about the connected instrument is displayed.2.Exit the window by clicking Close.Please note that NetProfiler can be enabled or disabled from the Setup button.Display Settings1.Click menu Settings: Displays.In this window you can define the default displays for the program. If “Accept settings for ‘New job’ ” is activated then all new jobs will appear as defined here.2. Exit the window by clicking OK or Cancel.Check-Area SettingsThis setting allows you to define an additional range within the tolerance limit. The purpose of "Check-Area" is to warn if samples approach that limit. Samples situated between "Check-Area" (dark grey line) and this tolerance area (light grey line) appears in yellow.1.Click menu Settings: Check Area.2.Enter a value in the "Factor" field (e.g. 0.833).If the defined tolerance is dE*=3.0, the above factor creates a Check-Areabetween dE*=2.5 and dE*=3.0 (see arrow "3").Communication SettingsThe input path for the jobs can be defined in this setting. This can also be used for the appropriate CXF Browser.CXF Browser SettingsConnect to the protocol for Color Communication – CXF Browser. Color information in digital form can be imported to ColorQuality.Setting Up a New Job1.Click menu Job: New, or click the New Job button.2.Customer.•Select a customer for this job and click next (>>)or•Create a new customer by clicking NewName the customer and click OKClick next (>>)NOTE: Color Quality is job-related. This means, jobs are assigned to customers. If a customer does not yet exist, it can be created while setting up the job. However, a customer can also be created previously in database "Customers". An already existing customer can simply be highlighted and selected.3.Job description.•Enter job name and descriptionClick next (>>)4.Measuring conditions.•Review default setting or define the conditions. The displayed conditions correspond to those defined in the general settings•Click Finish5.Define a reference.•Create a reference by clicking NewCreate a new reference via:•Measurement•ColorNetNOTE: ColorNet is the connection between the various X-Rite applications (InkFormulation, ColorQuality and Spectrophotometer). Saved colors can be exchanged via ColorNet).•Enter ValuesNOTE: that if values are defined it will NOT be possible to download this reference to a SpectroEye.•Standards•Color Libraries or•From CXFSelect your option and click on the “reference” and then OK.•the reference appears in the field•you can define many references, however, the user interface cannot show more than 50 references•define the substrate if desired (not necessary and only used in density/dye strength calculations)•click OK to close the windowAfter closing the window, the program switches automatically to the main window where now the samples will be read in by ColorNet or measure.1)Note: ColorNet® is the interconnection between different X-rite applications (e.g. ColorQuality™, Ink Formulation™, spectrophotometer). That means the color can be exchanged between the individual applications via ColorNet.2)Note: The structure of the folders in ColorNet is similar to the Windows® Explorer. This means that by double-clicking on a folder, the hidden subfolders expand below. By double-clicking on the upmost folder(X-Rite ColorNet), all available applications appear (including a connected measuring device).Measurement and Various DisplayThere are two ways to read the samples: via measurement or ColorNet.ColorQuality can assign the samples to the right references. So it is possible to read the samples in series. The selection is defined by:•settings → display•define displays for all following jobs•windows → presets•define various displays for different jobs•click the small icons1. define one job with various displays2. define one display for all jobs3. choose between one job ↔ one display4. manage presets for displays (choose between defined presets)Using of PresetsIn ColorQuality you can define various displays for all jobs. There are two functions to select from:•Store as presetClick on the Store as preset to saving the current display options.•Manage presetClick menu Preset: Organize, or click the button.In the open window you can:Select select a presetDelete delete the presetsAs Default highlight as defaultViewing Samples1.Click on the left- and right-arrows in the sample selection field several times to pagethrough the samples backward and forward.2.Position the cursor into the sample information field (i) and type in note if requiredfor the displayed sample. The note will be overwritten each time.Modify a JobThere are three methods to modify a job:- Click the Modify icon- Select F4 keyboard button- Click menu Job: Modify current jobIn the open window you can:New create a new referenceModify modify a reference or the range of a tolerance Delete highlight a reference and click Delete Substrate create or modify a substrateDefining a StandardIn cases where a customer has specific colors which are always used, they can be assigned to the customer as so-called standards.1.Click menu Database: Standards.2.Choose the Customer.3.Click New.ing Measure or ColorNet you can define a new Standard.plete the Definition of the Standard and click Close.Placing a Standard into a Job1.Open the job where you are placing the standard.•Click menu Job:Open or click the Open Job button.2.Select the Modify current job icon and click New.3.The standard can define using ColorNet.4.Choose the standard by double-clicking on it or by selecting it and then clickingSelect.5.The standard is now “imported” into the job.6.Click OK to close the window.Quick CompareThe quick compare mode option is used to compare a reference value with sample measurements.1.Click the Quick Compare icon.2.Before measuring the reference check the measurement conditions. Select thedesired conditions and click OK.3.Define the reference by measuring or loading using ColorNet and click OK.The program switches to the main window and is ready for measuring the samples.Click on Quick Compare again to close this mode. The program asks you whether you want to save as a quick compare job. This gives you the option to save the job for a customer.As the volume of stored data increases, a regularly performed backup of the data becomes more and more important.The procedure for backing up data in ColorQuality is very organized and user-friendly.1.Click menu File:Database: Backup.2.Highlight the database and click Save.The procedure for restoring data in ColorQuality is also very easy.1.Click menu File:Database: Restore.2.Select the database and click Open.3.Highlight the database to be restored and click Select.4.Choose Overwrite DB in the open window and click OK. The data will now bewritten back into ColorQuality.By selecting Overwrite DB all existing data in the database will be overwritten with data in the backup. Selecting Append to the database will only add data to the current database that does not exist. No data will be overwritten.。
colortracktablayout tabtextcolorColorTrackTabLayout 是一个自定义的 TabLayout,它允许开发者在 Android 应用中自定义标签页的颜色和样式。
其中,tabTextColor 是一个属性,用于设置标签页的文本颜色。
为什么需要自定义 TabLayout?Android 原生的 TabLayout 提供了基本的标签页功能,但对于追求个性化设计的应用来说,这些基本功能可能无法满足需求。
ColorTrackTabLayout 就是在这样的背景下诞生的,它提供了更多的自定义选项,使得开发者可以更加灵活地设计标签页的样式。
如何使用 tabTextColor?要使用 tabTextColor 属性,你首先需要在你的项目中引入 ColorTrackTabLayout。
这通常是通过在项目的 build.gradle 文件中添加依赖来实现的。
gradledependencies {implementation 'com.example:colortracktablayout:版本号'}然后,在你的 XML 布局文件中,使用 ColorTrackTabLayout 替换原生的 TabLayout,并设置 tabTextColor 属性。
xml<com.example.ColorTrackTabLayoutandroid:id="@+id/tabLayout"android:layout_width="match_parent"android:layout_height="wrap_content"app:tabTextColor="@color/你的文本颜色代码" />注意事项确保你使用的 ColorTrackTabLayout 版本与你的 Android 项目兼容。
蓝宝石插件中英文对照蓝宝石插件中英文对照2011-11-05 20:40GenArts Sapphire1.Sapphire AdjustsS_ClampChroma(色度和亮度的钳位调整)S_DuoT one(双色调渐变的色彩替换)S_Gamma(RGB反差系数调整,不错)S_Hotspots(可控高亮区域的调整,不错)S_HueSatBright(一个HSL色彩空间调色器)S_Monochrome(灰度化,不错)S_Threshold(针对各色彩通道的对比度强化)S_Tint(双色调的着色器)2.Sapphire Blur+SharpenS_Blur(多种方式的模糊,不错)S_BlurChannels(多种方式的通道模糊)S_BlurChroma(少见的色度模糊,不错)S_BlurMoCurves(带有变形效果的运动模糊)S_BlurMotion(区域运动模糊效果,不错)S_DefocusPrism(带有色散的虚焦模糊)S_EdgeBlur(边缘模糊,用于字幕的效果不错)S_GrainRemove(降噪,速度较快)S_RackDefocus(可调项较多的虚焦模糊)S_RackDfComp(双层的虚焦模糊合成)S_Sharpen(简单的锐化)S_SoftFocus(柔焦效果)S_ZDepthCueBlur(模拟变焦模糊,不错)3.Sapphire CompositeS_EdgeFlash(加光的层叠加效果)S_Layer(多种混合方式的层叠加效果)S_MathOps(多种数学运算方式的层混合效果)S_MatteOps(通道边缘噪声处理,多用于抠像)S_MatteOpsComp(处理通道噪声并进行层叠加)S_ZComp(Z方向的层叠加效果)4.Sapphire DistortS_Distort(自定义镜头变形效果,不错)S_DistortBlur(带有模糊的自定义镜头变形效果)S_DistortChroma(带有色散的自定义镜头变形效果)S_DistortRGB(带RGB通道分离的自定义镜头变形效果,好)S_Shake(镜头震动效果)S_WarpBubble(噪波变形效果)S_WarpBubble2(双重的噪波变形效果)S_WarpChroma(连续的色相扭曲,可以模仿某些空间观测的色散效果,好)S_WarpDrops(自定义的水波纹效果,不错)S_WarpFishEye(鱼眼镜头效果)S_WarpPerspective(平面图像的透视叠放,好)S_WarpPolar(圆盘状扭曲)S_WarpPuddle(较简单的水波纹效果)S_WarpPuff(以自身为镜头层的液化变形)S_WarpRepeat(复制自身并进行平均化,不错)S_WarpTransform(多种线性变形效果的综合)S_WarpVortex(漩涡变形,好)S_WarpWaves(波动变形)S_WarpWaves2(双重的波动变形)5.Sapphire LightingS_DropShadow(简单的阴影)S_EdgeRays(边缘光效果)S_Glare(虹状眩光效果)S_Glint(光斑效果)S_GlintRainbow(虹色星光效果)S_Glow(光晕效果)S_GlowAura(条纹光斑效果)S_GlowDarks(暗区加光效果)S_GlowDist(透射加光效果)S_GlowEdges(边缘加光效果)S_GlowNoise(加光噪波效果)S_GlowOrthicon(超正析摄象管效果,增强了边缘对比并降低亮度)S_GlowRainbow(多层色散透射效果)S_GlowRings(彩色光环效果,不错)S_LensFlare(镜头眩光效果)S_LensFlareAutoTrack(仿真镜头眩光效果,不错)S_Rays(光芒放射效果)S_SpotLight(聚光灯效果)S_Streaks(胶片曝光效果,类似加光的运动模糊)6.Sapphire RenderS_Clouds(简单的云状噪波)S_CloudColorSmooth(杂色噪波)S_CloudsMultColor(彩色云状噪波)S_CloudsPerspective(有景深的云状噪波)S_CloudsPsyko(色散噪波效果)S_CloudsVortex(漩涡状噪波)S_Gradient(简单的线性渐变色填充)S_GradientRadial(环形渐变色填充)S_Grid(网格效果)S_Sparkles(星光镜效果)S_TextureCells(细胞噪波效果)S_TextureChromaSpiral(带有色散的螺旋状噪波效果)S_TextureFolded(褶皱噪波效果)S_TextureMoire(摩尔纹效果)S_TextureNoiseEmboss(水面反射效果)S_TextureNoisePaint(水彩笔触噪波,不错)S_TexturePlasma(电离噪波效果)S_TextureSpots(点状噪波,不错)S_TextureWeave(编织物效果)S_Zap(闪电效果)S_ZapFrom(放射闪电效果)S_ZapTo(闪电充填效果)7.Sapphire StylizeS_AutoPaint(油漆效果)S_BandPass(放射线余辉效果)S_Diffuse(弥散效果)S_EdgeColorize(边缘加色效果)S_EdgeDetect(突出边缘效果)S_EdgeDetectDouble(双重的突出边缘效果)S_EdgesInDirection(方向性的突出边缘效果)S_Emboss(浮雕效果)S_EmbossDistort(变形浮雕效果)S_EmbossGlass(带有色散的变形浮雕效果)S_EmbossShiny(加光的浮雕效果)S_Etching(雕版印刷效果)S_FilmEffect(模仿胶片效果,有少量模板)S_FlysEyeCircles(圆形复眼效果)S_FlysEyeHex(六角形复眼效果)S_FlysEyeRect(矩形复眼效果)S_Grain(噪点效果)S_GrainStatic(随机噪点效果)S_HalfTone(双色点阵效果)S_HalfToneColor(彩色点阵效果)S_HalfToneRings(双色环形纹理效果)S_JpegDamage(模仿JPEG压缩造成的图像损失)S_Kaleido(多边形万花筒效果)S_KaleidoPolar(圆形万花筒效果)S_Mosaic(可调项较多的马赛克效果)S_PseudoColor(热成像效果)S_PsykoBlobs(水面油渍效果)S_PsykoStripes(条纹油渍效果)S_ScanLines(模仿电视效果)S_ScanLinesMono(模仿黑白电视效果)S_Sketch(手绘效果)S_Solarize(负片效果)S_Zebrafy(扭曲的单色底片效果)S_ZebrafyColor(带有色彩漂移和扭曲的底片效果)S_ZFogExponential(指数增长的蒙雾效果)S_ZFogLinear(线性增长的蒙雾效果)8.Sapphire TimeS_Feedback(延迟视频回馈效果)S_FeedbackBubble(带有变形的延迟视频回馈效果)S_FieldRemove(去场工具)S_Flicker(随机闪烁效果)S_FlickerMatch(同步闪烁效果)S_FlickerMatchMatte(指定区域的同步闪烁效果)S_FlickerMatchColor(对色彩通道的同步闪烁效果)S_FlickerMchMatteColor(同时带有变色和蒙板的同步闪烁效果)S_FlickerRemove(去除闪烁)S_FlickerRemoveMatte(指定区域的消除闪烁)S_FlickerRemoveColor(去除色彩闪烁)S_FlickerRmMatteColor(去除指定区域的色彩闪烁)S_FreezeFrame(跳帧效果,不错)S_GetFrame(静帧效果)S_JitterFrames(随机抽帧效果)S_MotionDetect(帧变化检测,好)S_NearestColor(检测指定的色彩部分)S_RandomEdits(帧乱序播放,好)S_ReverseClip(帧反序播放)S_ReverseEdits(指定区段帧的反序播放,不错)S_TimeAverage(指定帧平均合成,类似于追迹效果)S_TimeDisplace(动态贴图替换)S_TimeSlice(参数与时间有关的帧切分效果)S_TimeWarpRGB(色偏移效果)S_Trails(追迹效果)S_TrailsDiffuse(带有像素扩散的追迹效果)9.Sapphire TransitionsS_DissolveBlur(模糊过渡,不错)S_DissolveBubble(液化过渡,不错)S_DissolveDiffuse(像素扩散过渡)S_DissolveLuma(各种亮度过渡)S_DissolvePuddle(水波纹过渡,不错)S_DissolveSpeckle(可控斑点过渡)S_DissolveStatic(随机像素过渡)S_DissolveVortex(漩涡过渡)S_DissolveWaves(波浪过渡)S_WipeBlobs(气泡转场,不错)S_WipeBubble(液化划像,不错)S_WipeCells(细胞结构过渡)S_WipeChecker(网格划像)S_WipeCircle(圆形划像)S_WipeClock(扇形划像)S_WipeClouds(云雾转场,少见)S_WipeDiffuse(像素扩散划像)S_WipeDots(点阵划像)S_WipeDoubleWedge(双楔形划像)S_WipeFourWedges(四楔形划像)S_WipeLine(线性划像)S_WipePixelate(随机像素块划像)S_WipeRectangle(矩形划像)S_WipeRings(多重环形划像)S_WipeStar(星形划像)S_WipeStripes(条纹划像)S_WipeTiles(多边形划像)S_WipeWedge(楔形划像)==================================== Sapphire蓝宝石5.0中英文对照图。
蓝宝石插件中英文对照2011-11-05 20:40GenArts SapphireSapphire Adjusts1.S_ClampChroma(色度和亮度的钳位调整)2.S_DuoTone(双色调渐变的色彩替换)3.S_Gamma(RGB反差系数调整,不错)4.S_Hotspots(可控高亮区域的调整,不错)5.S_HueSatBright(一个HSL色彩空间调色器)6.S_Monochrome(灰度化,不错)7.S_Threshold(针对各色彩通道的对比度强化)8.S_Tint(双色调的着色器)2.Sapphire Blur+SharpenS_Blur(多种方式的模糊,不错)S_BlurChannels(多种方式的通道模糊)S_BlurChroma(少见的色度模糊,不错)S_BlurMoCurves(带有变形效果的运动模糊)S_BlurMotion(区域运动模糊效果,不错)S_DefocusPrism(带有色散的虚焦模糊)S_EdgeBlur(边缘模糊,用于字幕的效果不错)S_GrainRemove(降噪,速度较快)S_RackDefocus(可调项较多的虚焦模糊)S_RackDfComp(双层的虚焦模糊合成)S_Sharpen(简单的锐化)S_SoftFocus(柔焦效果)S_ZDepthCueBlur(模拟变焦模糊,不错)Sapphire CompositeS_EdgeFlash(加光的层叠加效果)S_Layer(多种混合方式的层叠加效果)S_MathOps(多种数学运算方式的层混合效果)S_MatteOps(通道边缘噪声处理,多用于抠像)S_MatteOpsComp(处理通道噪声并进行层叠加)S_ZComp(Z方向的层叠加效果)Sapphire DistortS_Distort(自定义镜头变形效果,不错)S_DistortBlur(带有模糊的自定义镜头变形效果)S_DistortChroma(带有色散的自定义镜头变形效果)S_DistortRGB(带RGB通道分离的自定义镜头变形效果,好)S_Shake(镜头震动效果)S_WarpBubble(噪波变形效果)S_WarpBubble2(双重的噪波变形效果)S_WarpChroma(连续的色相扭曲,可以模仿某些空间观测的色散效果,好)S_WarpDrops(自定义的水波纹效果,不错)S_WarpFishEye(鱼眼镜头效果)S_WarpPerspective(平面图像的透视叠放,好)S_WarpPolar(圆盘状扭曲)S_WarpPuddle(较简单的水波纹效果)S_WarpPuff(以自身为镜头层的液化变形)S_WarpRepeat(复制自身并进行平均化,不错)S_WarpTransform(多种线性变形效果的综合)S_WarpV ortex(漩涡变形,好)S_WarpWaves(波动变形)S_WarpWaves2(双重的波动变形)Sapphire LightingS_DropShadow(简单的阴影)S_EdgeRays(边缘光效果)S_Glare(虹状眩光效果)S_Glint(光斑效果)S_GlintRainbow(虹色星光效果)S_Glow(光晕效果)S_GlowAura(条纹光斑效果)S_GlowDarks(暗区加光效果)S_GlowDist(透射加光效果)S_GlowEdges(边缘加光效果)S_GlowNoise(加光噪波效果)S_GlowOrthicon(超正析摄象管效果,增强了边缘对比并降低亮度)S_GlowRainbow(多层色散透射效果)S_GlowRings(彩色光环效果,不错)S_LensFlare(镜头眩光效果)S_LensFlareAutoTrack(仿真镜头眩光效果,不错)S_Rays(光芒放射效果)S_SpotLight(聚光灯效果)S_Streaks(胶片曝光效果,类似加光的运动模糊)Sapphire RenderS_Clouds(简单的云状噪波)S_CloudColorSmooth(杂色噪波)S_CloudsMultColor(彩色云状噪波)S_CloudsPerspective(有景深的云状噪波)S_CloudsPsyko(色散噪波效果)S_CloudsVortex(漩涡状噪波)S_Gradient(简单的线性渐变色填充)S_GradientRadial(环形渐变色填充)S_Grid(网格效果)S_Sparkles(星光镜效果)S_TextureCells(细胞噪波效果)S_TextureChromaSpiral(带有色散的螺旋状噪波效果)S_TextureFolded(褶皱噪波效果)S_TextureMoire(摩尔纹效果)S_TextureNoiseEmboss(水面反射效果)S_TextureNoisePaint(水彩笔触噪波,不错)S_TexturePlasma(电离噪波效果)S_TextureSpots(点状噪波,不错)S_TextureWeave(编织物效果)S_Zap(闪电效果)S_ZapFrom(放射闪电效果)S_ZapTo(闪电充填效果)Sapphire Stylize S_AutoPaint(油漆效果)S_BandPass(放射线余辉效果)S_Diffuse(弥散效果)S_EdgeColorize(边缘加色效果)S_EdgeDetect(突出边缘效果)S_EdgeDetectDouble(双重的突出边缘效果)S_EdgesInDirection(方向性的突出边缘效果)S_Emboss(浮雕效果)S_EmbossDistort(变形浮雕效果)S_EmbossGlass(带有色散的变形浮雕效果)S_EmbossShiny(加光的浮雕效果)S_Etching(雕版印刷效果)S_FilmEffect(模仿胶片效果,有少量模板)S_FlysEyeCircles(圆形复眼效果)S_FlysEyeHex(六角形复眼效果)S_FlysEyeRect(矩形复眼效果)S_Grain(噪点效果)S_GrainStatic(随机噪点效果)S_HalfTone(双色点阵效果)S_HalfToneColor(彩色点阵效果)S_HalfToneRings(双色环形纹理效果)S_JpegDamage(模仿JPEG压缩造成的图像损失)S_Kaleido(多边形万花筒效果)S_KaleidoPolar(圆形万花筒效果)S_Mosaic(可调项较多的马赛克效果)S_PseudoColor(热成像效果)S_PsykoBlobs(水面油渍效果)S_PsykoStripes(条纹油渍效果)S_ScanLines(模仿电视效果)S_ScanLinesMono(模仿黑白电视效果)S_Sketch(手绘效果)S_Solarize(负片效果)S_Zebrafy(扭曲的单色底片效果)S_ZebrafyColor(带有色彩漂移和扭曲的底片效果)S_ZFogExponential(指数增长的蒙雾效果)S_ZFogLinear(线性增长的蒙雾效果)Sapphire TimeS_Feedback(延迟视频回馈效果)S_FeedbackBubble(带有变形的延迟视频回馈效果)S_FieldRemove(去场工具)S_Flicker(随机闪烁效果)S_FlickerMatch(同步闪烁效果)S_FlickerMatchMatte(指定区域的同步闪烁效果)S_FlickerMatchColor(对色彩通道的同步闪烁效果)S_FlickerMchMatteColor(同时带有变色和蒙板的同步闪烁效果)S_FlickerRemove(去除闪烁)S_FlickerRemoveMatte(指定区域的消除闪烁)S_FlickerRemoveColor(去除色彩闪烁)S_FlickerRmMatteColor(去除指定区域的色彩闪烁)S_FreezeFrame(跳帧效果,不错)S_GetFrame(静帧效果)S_JitterFrames(随机抽帧效果)S_MotionDetect(帧变化检测,好)S_NearestColor(检测指定的色彩部分)S_RandomEdits(帧乱序播放,好)S_ReverseClip(帧反序播放)S_ReverseEdits(指定区段帧的反序播放,不错)S_TimeAverage(指定帧平均合成,类似于追迹效果)S_TimeDisplace(动态贴图替换)S_TimeSlice(参数与时间有关的帧切分效果)S_TimeWarpRGB(色偏移效果)S_Trails(追迹效果)S_TrailsDiffuse(带有像素扩散的追迹效果)Sapphire TransitionsS_DissolveBlur(模糊过渡,不错)S_DissolveBubble(液化过渡,不错)S_DissolveDiffuse(像素扩散过渡)S_DissolveLuma(各种亮度过渡)S_DissolvePuddle(水波纹过渡,不错)S_DissolveSpeckle(可控斑点过渡)S_DissolveStatic(随机像素过渡)S_DissolveV ortex(漩涡过渡)S_DissolveWaves(波浪过渡)S_WipeBlobs(气泡转场,不错)S_WipeBubble(液化划像,不错)S_WipeCells(细胞结构过渡)S_WipeChecker(网格划像)S_WipeCircle(圆形划像)S_WipeClock(扇形划像)S_WipeClouds(云雾转场,少见)S_WipeDiffuse(像素扩散划像)S_WipeDots(点阵划像)S_WipeDoubleWedge(双楔形划像)S_WipeFourWedges(四楔形划像)S_WipeLine(线性划像)S_WipePixelate(随机像素块划像)S_WipeRectangle(矩形划像)S_WipeRings(多重环形划像)S_WipeStar(星形划像)S_WipeStripes(条纹划像)S_WipeTiles(多边形划像)S_WipeWedge(楔形划像)。
浦东新区2018学年第二学期期中教学质量检测高三英语试卷考生注意:1.考试时间120分钟,试卷满分140分。
2.本考试设试卷和答题纸两部分。
所有答题必须涂(选择题)或写(非选择题)在答题纸上,做在试卷上一律不得分。
3.答题前,务必在答题纸上填写准考证号和姓名。
I. Listening ComprehensionSection ADirections: In Section A, you will hear ten short conversations between two speakers. At the end of each conversation, a question will be asked about what was said. The conversations and the questions will be spoken only once. After you hear a conversation and the question about it, read the four possible answers on your paper, and decide which one is the best answer to the question you have heard.1.A. In the boat.B. At the gallery.C. At the gas station.D. In the countryside.【答案】B【解析】【分析】W: This oil painting Fishing Boats on the Water is very impressive. M: Yes. It reminds me of growing up in the countryside.Q: Where does this conversation most probably take place?【详解】此题为听力题,解析略。