威德福大位移井减阻减扭工具Lotad
- 格式:pdf
- 大小:1.61 MB
- 文档页数:25


威德福套管开窗工艺介绍引言威德福套管开窗工艺是一种常用于石油钻采工程中的技术。
套管开窗工艺可以使油井在垂直段和水平段之间进行联通,从而实现油气的采集和输送。
本文将介绍威德福套管开窗工艺的原理、步骤以及应用场景。
工艺原理威德福套管开窗工艺是通过使用专门的工具,将套管壁打开一定长度,以形成油井的开窗。
这样一来,油井的井筒和套管之间就形成了连接通道,可以使油气从地下储层流入井筒,进而被提取。
工艺步骤威德福套管开窗工艺一般包括以下步骤:1.准备工作:包括明确开窗的目的和位置、制定详细工艺方案、选择合适的工具和设备等。
2.固定套管:使用夹具等工具将套管稳定在预定位置,以确保后续操作的准确性和安全性。
3.定位工具:使用定位工具将开窗工具送入套管内部,并精确定位到开窗的位置。
4.切割套管:使用特殊的切割工具,对套管进行切割作业,形成想要的开窗形状和尺寸。
5.清洁井内:利用清洗工具对井内进行清洁,以确保开窗后的油气流动畅通无阻。
6.测试效果:进行开窗效果的测试,如测试井底压力、流体产能等,以判断开窗的效果。
7.修复套管:根据测试结果进行修复套管,如使用砾石压裂、水泥固化等方法来加固套管。
应用场景威德福套管开窗工艺在油井工程中有着广泛的应用场景。
以下是一些常见的应用情况:•提高采收率:通过开窗工艺,可以将原本被封闭的油层与井筒连接起来,提高油气的采收率。
•水平井开发:在水平井开发中,套管开窗工艺可以使水平段与垂直段之间实现联通,为水平井提供更大的有效产能。
•修复损坏套管:当套管出现损坏或阻塞时,可以使用开窗工艺来修复套管,恢复油井正常的生产状态。
•增强防塌能力:在特殊情况下,开窗工艺也可以用于提高套管的抗塌能力,以防止地层塌陷。
结论威德福套管开窗工艺是石油钻采工程中一个常用且有效的技术。
通过准备工作、固定套管、定位工具、切割套管、清洁井内、测试效果和修复套管等步骤,可以实现油井的开窗。
威德福套管开窗工艺的应用场景非常广泛,包括提高采收率、水平井开发、修复损坏套管和增强防塌能力等。
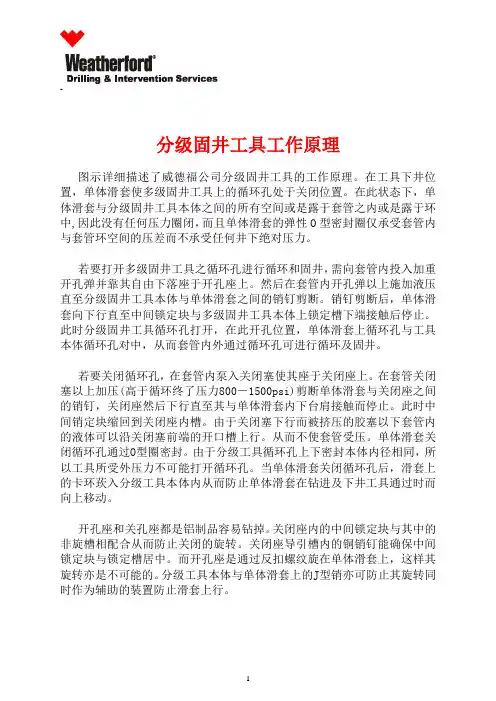
-_________________________________________________________________________________________ _分级固井工具工作原理图示详细描述了威德福公司分级固井工具的工作原理。
在工具下井位置,单体滑套使多级固井工具上的循环孔处于关闭位置。
在此状态下,单体滑套与分级固井工具本体之间的所有空间或是露于套管之内或是露于环中,因此没有任何压力圈闭,而且单体滑套的弹性O型密封圈仅承受套管内与套管环空间的压差而不承受任何井下绝对压力。
若要打开多级固井工具之循环孔进行循环和固井,需向套管内投入加重开孔弹并靠其自由下落座于开孔座上。
然后在套管内开孔弹以上施加液压直至分级固井工具本体与单体滑套之间的销钉剪断。
销钉剪断后,单体滑套向下行直至中间锁定块与多级固井工具本体上锁定槽下端接触后停止。
此时分级固井工具循环孔打开,在此开孔位置,单体滑套上循环孔与工具本体循环孔对中,从而套管内外通过循环孔可进行循环及固井。
若要关闭循环孔,在套管内泵入关闭塞使其座于关闭座上。
在套管关闭塞以上加压(高于循环终了压力800-1500psi)剪断单体滑套与关闭座之间的销钉,关闭座然后下行直至其与单体滑套内下台肩接触而停止。
此时中间销定块缩回到关闭座内槽。
由于关闭塞下行而被挤压的胶塞以下套管内的液体可以沿关闭塞前端的开口槽上行。
从而不使套管受压。
单体滑套关闭循环孔通过O型圈密封。
由于分级工具循环孔上下密封本体内径相同,所以工具所受外压力不可能打开循环孔。
当单体滑套关闭循环孔后,滑套上的卡环莰入分级工具本体内从而防止单体滑套在钻进及下井工具通过时而向上移动。
开孔座和关孔座都是铝制品容易钻掉。
关闭座内的中间锁定块与其中的非旋槽相配合从而防止关闭的旋转。
关闭座导引槽内的铜销钉能确保中间锁定块与锁定槽居中。
而开孔座是通过反扣螺纹旋在单体滑套上,这样其旋转亦是不可能的。
分级工具本体与单体滑套上的J型销亦可防止其旋转同时作为辅助的装置防止滑套上行。
BENCH DRILL PRESSOWNER'S MANUALItem # WARNING:Read carefully and understand all INSTRUCTIONS beforeoperating. Failure to follow the safety rules and other basicsafety precautions may result in serious personal injury.45266Thank you very much for choosing a Northern Industrial Tools Product!For future reference, please complete the owner's record below:Model: _______________ Purchase Date: _______________Save the receipt, warranty and these instructions. It is important that you read the entire manual to become familiar with this product before you begin using it.This machine is designed for certain applications only. The distributor cannot be responsible for issues arising from modification. We strongly recommend this machine is not modified and/or used for any application other than that for which it was designed. If you have any questions relative to a particular application, DO NOT use the machine until you have first contacted the distributor to determine if it can or should be performed on the product.For technical questions please call 1-800-222-5381.INTENDED USEThis bench drill press is designed for drilling in metal or wooden pieces.TECHNICAL SPECIFICATIONSDescription SpecificationsMotor:1/2 HPVolts:120VSpeed:570 - 3050 RPMChuck Size:1/2”Swing:10"Stroke:21/3"Drilling Capacity:1/2”Work tabel:715/16" x 73/4"Work base:1311/16" x 81/4"Ship Weight:71 lbsGENERAL SAFETY RULESin electric shock, fire and/or serious injury.that common sense and caution are factors which cannot be built into this product, but must besupplied by the operator.SAVE THESE INSTRUCTIONSWORK AREA• Keep work area clean, free of clutter and well lit. Cluttered and dark work areas can cause accidents.• Do not use your tool where there is a risk of causing a fire or an explosion; e.g. in the presence of flammable liquids, gasses, or dust. Power tools create sparks, which may ignite the dust or fumes.• Keep children and bystanders away while operating a power tool. Distractions can cause you to lose control, so visitors should remain at a safe distance from the work area.12• Be aware of all power lines, electrical circuits, water pipes and other mechanical hazards in your work area, particularly those hazards below the work surface hidden from the operator's view that may beunintentionally contacted and may cause personal harm or property damage.• Be alert of your surroundings. Using power tools in confined work areas may put you dangerously close to cutting tools and rotating parts.ELECTRICAL SAFETYWARNING!Always check to ensure the power supply corresponds to the voltage on the rating plate.• Do not abuse the cord. Never yank tool or extension cords from the receptacle. Keep power and extension cords away from heat, oil, sharp edges or moving parts. Replace damaged cords immediately.Damaged cords may cause a fire and increase the risk of electric shock.• Grounded tools must be plugged into an outlet properly installed and grounded in accordance with all codes and ordinances. Never remove the grounding prong or modify the plug in any way. Do not use any adapter plugs. Check with a qualified electrician if you are in doubt as to whether the outlet is properly grounded. • Double insulated tools are equipped with a polarized plug (one blade is wider than the other). This plug will fit in a polarized outlet only one way. If the plug does not fit fully in the outlet, reverse the plug. If it still doesn't fit, contact a qualified electrician to install a polarized outlet. Do not change the plug in any way.• Avoid body contact with grounded surfaces such as pipes, radiators, ranges, and refrigerators. There is an increase risk of electric shock if your body is grounded.• When operating a power tool outside, use an outdoor extension cord marked “W-A” or “W.” These cords are rated for outdoor use and reduce the risk of electric shock.• Extension Cord Use:A. Use only 'Listed' extension cords. If used outdoors, they must be marked “For Outdoor Use.” Thosecords having 3-prong grounding type plugs and mating receptacles are to be used with grounded tools.B. Replace damaged or worn cords immediately.C. Check the name plate rating of your tool. Use of improper size or gauge of extension cord may causeunsafe or inefficient operation of your tool. Be sure your extension cord is rated to allow sufficient current flow to the motor. For the proper wire gauge for your tool, see chart.•Do not expose power tools to rain or wet conditions. Water entering a power tool will increase the risk of electric shock.• Do not let your fingers touch the terminals of plug when installing to or removing from the outlet.• Ground fault circuit interrupters. If work area is not equipped with a permanently installed Ground Fault Circuit Interrupter outlet (GFCI), use a plug-in GFCI between power tool or extension cord and power receptacle.PERSONAL SAFETY• Stay alert, watch what you are doing and use common sense when operating a power tool. Do not use a power tool while you are tired or under the influence of drugs, alcohol or medication. A moment of inattention while operating power tools may result in serious personal injury.• Dress properly. Do not wear loose clothing, dangling objects, or jewelry. Keep your hair, clothing and gloves away from moving parts. Loose clothes, jewelry or long hair can be caught in moving parts. Air vents often cover moving parts and should be avoided.• Use safety apparel and equipment. Use safety goggles or safety glasses with side shields which comply with current national standards, or when needed, a face shield. Use as dust mask in dusty work conditions.This applies to all persons in the work area. Also use non-skid safety shoes, hardhat, gloves, dust collection systems, and hearing protection when appropriate.• Avoid accidental starting. Do not carry the power tool with your finger on the switch. Ensure the switch is in the off position before plugging tool into power outlet. In the event of a power failure, while a tool is being used, turn the switch off to prevent surprise starting when power is restored.• Do not overreach. Keep proper footing and balance at all times.• Remove adjusting keys or wrenches before connecting to the power supply or turning on the tool. A wrench or key that is left attached to a rotating part of the tool may result in personal injury.• Never place your fingers in a position where they could contact the drill or other cutting tool if the workpiece should unexpectedly shift or your hand should slip.• Whenever possible, position the WORKPIECE to contact the left side of the column if it is too short or the table is tilted, clamp solidly to the table. Use table slots or clamping ledge around the outside edge of the table.• When using a drill press VISE, always fasten it to a table.• Never climb on or allow others to climb on the drill press table; it could break or pull the entire drill press down.• Turn the motor Switch OFF and put away the Switch Key when leaving the drill press.• To avoid injury from thrown work or tool contact, do NOT perform layout, assembly, or setup work on the table while the cutting tool is rotating.TOOL USE AND CARE• Do not force the tool. Tools do a better and safer job when used in the manner for which they are designed.Plan your work, and use the correct tool for the job.• Never use a tool with a malfunctioning switch. Any power tool that cannot be controlled with the switch is dangerous and must be repaired by an authorized service representative before using.• Disconnect power from tool and place the switch in the locked or off position before servicing, adjusting, installing accessories or attachments, or storing. Such preventive safety measures reduce the risk of starting the power tool accidentally.• Secure work with clamps or a vise instead of your hand to hold work when practical. This safety precaution allows for proper tool operation using both hands.• Store idle tools. When tools are not is use, store them in a dry, secure place out of the reach of children.Inspect tools for good working condition prior to storage and before re-use.• Use only accessories that are recommended by the manufacturer for your model. Accessories that may be suitable for one tool may create a risk of injury when used on another tool.• Keep guards in place and in working order.For your own safety, do not try to use your drill press or plug it in until it is completely assembled and installed according to the instructions, read and understood this Instruction manual:•Your drill press must be bolted securely to a workbench. In addition, if there is any tendency for your drill press to move during certain operations, bolt the workbench to the floor•This drill press is intended for use in dry conditions, indoor use only.•Always keep hands out of the path of a drill bit. Avoid awkward hand positions where a sudden slip could cause your hand to move into the drill bit.•Do not install or use any drill bit that exceeds 175 mm (7") in length or extends 150 mm (6") below the chuck jaws. They can suddenly bend outward or break.•Do not use wire wheels, router bits, shaper cutters, circle (fly) cutters, or rotary planers on this drill press. •When cutting a large piece of material make sure it is fully supported at the table height.•Do not perform any operation freehand. Always hold the workpiece firmIy against the table so it will not rock or twist. Use clamps or a vise for unstable workpieces.•Make sure there are no nails or foreign objects in the part of the workpiece to be drilled.•Do not touch the bit or chips. Drill bits and cuttings are hot immediately offer drilling.•Never reach around or under the working head, or grab the chuck key to stop the drill press.•Make sure the drill press speed is appropriate for both the type of material and bit size you are using.34• Clamp workpiece or brace against the left side of the column to prevent rotation. If it is too short or the table is tilted, clamp solidIy to the table and use the fence provided. • If the workpiece overhangs the table such that it will fall or tip if not held, clamp it to the table. Provide auxiliary support. • Make sure all clamps and locks are firmly tightened before drilling. • Securely lock the head and table support to the column, and the table to the table support before operating the drill press. • Never turn your drill press on before clearing the table of all objects. (tools, scraps of wood, etc.) • Before starting the operation, jog the motor switch to make sure the drill bit does not wobble or vibrate. • Let the spindle reach full speed before starting to drill. If your drill press makes an unfamiliar noise or if it vibrates excessively, stop immediately, turn the drill press off and unplug. Do not restart until the problem is corrected. • Do not perform layout assembly or set up work on the table while the drill press is in operation. • Make sure the spindle has come to a complete stop before touching the workpiece. • To avoid injury from accidental starting, always turn the switch "OFF" and unplug the drill press before installing or removing any accessory or attachment or making any adjustment. • Keep guards in place and in working order. • Use onIy self-ejecting type chuck key as provided with the drill press. • Do not try to drill material too small to be securely held.• Use the drill press in a well-lit area and on a level surface clean and smooth enough to reduce the risk of trips, slips, or falls. Use it where neither the operator nor a casual observer is forced to stand in line with a potential kickback.For your own safety, do not attemp to operate your drill press until it is completely assembled 1. General Safety Instructions for Power Tools 2. Getting to Know Your Drill Press 3. Basic Drill Press Operation 4. Adjustments 5. MaintenanceUNPACKINGOn receipt, carefully unpack the components ensuring that no damage was suffered in transit, and that all following parts are accounted for.A. Table Support AsmB. Column Support AsmC. ManualD. Box of Loose PartsE. BaseF. Head AsmG. Bag of Loose Parts5Check the parts againts the abovelist and refer to the diagrams.Should there be any deficiencies ordamage, you should contactthe distributor.GETTING TO KNOW YOUR DRILL PRESSASSEMBLY1.Position base on workbench.2.Remove protective sleeve from column tube and discard. Placecolumn assembly on base, and align holes in column support withholes in base.3.Locate four (4) 5/16” Dia. x 3/4” long bolts among loose parts bag.4.Install a bolt in each hole through column support and base andtighten with adjustable wrench.5.Loosen set screw in cloumn collar with 3mm HEX “L” wrench andremove collar and rack from column.1. Belt Tension Lock Handles2. Feed Handle3. Table Crank4. Chuck Key5. Chuck6. Depth Scale7. Drill “ON-OFF” Switch8. Depth Scale Lock9. Spring Cap10. Head Locks11. Bevel Scale12. Support Lock Handle13. Table Bevel Lock66.Find elevation worm gear shaft in the loose parts bag. Insert the elevation shaft into the table support and extend the shaft through the opening as far as possible. The crank is to be installed on the elevation worm gear shaft, the set screw is to be aligned with the flat portion of the shaft. The crank is to be positioned as close to the arm support as possible, then tighten set screw. (see illustration)7.With long smooth end of rack pointing upward, slide rack down through large round opening in table support. Engage rack in gear mechanism found inside opening of table support.8.While holding rack and table support in an engaged position slide both down over column. Slide rack down column until rack is positioned against lower column support.9.Replace column collar and position it bevel side down over rack. Tighten set screw in collar with 7/64” HEX “L” wrench. To let the rack slide when the table is swing to the left or right around the column, the collar must sit loosely over rack and should not be angled on the column. Only tighten set screw enough to keep collar in place, otherwise the collar may break due to excess pressure.10.Check column collar for proper adjustment. Collar should not be angled on the column and it should be positioned so rack will slide freely in collars when table is rotated 360º around column tube. If re-adjusted, only tighten set screw enough to keep collar in place.Note:To avoid column or collar damage, do not over-tighten set screw.11.Locate support lock handle in loose parts bag and tighten by hand.12.To minimize crank backlash; tighten the support lock and rotate elevation worm shaft clockwise with the crank. Loosen the set screw in the crank and reposition the crank as close to the table support as possible. Tighten the set screw in the crank.ing a 4mm HEX “L” wrench tighten the head lock set screws on the rightside of the head.OPERATIONDrill “ON-OFF” switchThis feature is intended to help prevent unauthorized and possible hazardous use by children and others.Insert KEY into switch.Note: Key is made of yellow plastic.To turn drill ON:Insert finger under switch lever and pull.To turn drill OFF:Push lever in.In an emergency: If the drill bit BINDS... STALLS...STOPS... or tends to tear the workpiece loose... you can quickly turn the drill OFF by hitting the switch with the palm of your hand.WARNING! For your own safety, always push the switch “OFF” when drill press is not in use; Remove key and keep it in a safe place. In the event of a power fallure (all of your lights go out) or blown fuse or tripped circult breaker, turn switch off, lock it and remove the key. This will prevent the drill press from starting up again when the power comes back on.MAINTENANCEWARNING! For your own safety, turn switch “off” and remove plug from power source outlet beforemaintaining or lubricating your drill press.WARNING! To avoid shock or fire hazard, if the power cord is worn or cut, or damaged in any way, have it replaced.WARNING! Make sure this tool is disconnected from its power source before attempting any maintenance, cleaning, or inspection.• Maintain your tools.It is recommended that the general condition of any tool be examined before it is used.Keep your tools in good repair by adopting a program of conscientious repair and maintenance in accordance with the recommended procedures found in this manual. If any abnormal vibrations or noise occurs, turn the tool off immediately and have the problem corrected before further use. Have necessary repairs made by qualified service personnel.• Keep cutting tools sharp and clean.Properly maintained cutting tools with sharp cutting edges are less likely to bind and are easier to control. Keep handles dry, clean, and free from oil and grease.• e only soap and a damp cloth to clean your tools. Many household cleaners are harmful to plastics and other insulation. Never let liquid get inside a tool.78WARRANTYOne-Year Limited WarrantyFor warranty questions, call 1-800-222-5381DIAGRAM & PARTS LIST9Distributed byNorthern Tool + Equipment Co., Inc.Burnsville, MN 55306Made in China。