在ComponentOne FlexGrid for Winform中添加编辑和删除按钮
- 格式:pdf
- 大小:348.38 KB
- 文档页数:2

WPFComponentOneFlexGrid设置样式技巧:(四)选择行样式设置WPFComponentOneFlexGrid设置样式技巧:(四)选择行样式设置对于选择,C1FlexGrid提供了SelectionBackground和SelectionForeground属性,可以设置选择的背景色和前景色。
本文就在此基础上扩展,选择行的样式该如何设置。
同样的我们需要继承CellFactory,并且重写ApplyCellStyls方法。
代码参考:flex.CellFactory=newMyCellFactory();然后我们重写ApplyCellStyles方法,代码参考:publicoverridevoidApplyCellStyles(C1FlexGridgrid,CellTypecellType,CellRangerange,Borderbdr){if(cellType==CellType.Cell&&(grid.Rows[range.Row]asRow)!=null){RowrowExt=grid.Rows[range.Row]asRow; if(grid.Selection.Row==range.Row){rowExt.FontWeight=FontWeights.Bold; rowExt.FontStyle=FontStyles.Italic; rowExt.FontSize=16;rowExt.Foreground=Brushes.Gray;}else{rowExt.FontWeight=FontWeights.Normal; rowExt.FontStyle=FontStyles.Normal;rowExt.FontSize=12;rowExt.Foreground=Brushes.Black;}}base.ApplyCellStyles(grid,cellType,range,bdr);}在这段代码中,我们可以看出来,我们需要通过grid拿到行,并且通过行的相关属性来设置字体、样式。

ComponentOne FlexGrid for Winform:在单元格范围内排序有些实际案例中需要实现针对单元格范围而不是整个 C1FlexGrid 排序。
C1FlexGrid 本身不具备该功能。
在这篇文章中我们将讨论如何通过代码实现针对单元格范围的排序。
背景:首先通过鼠标或代码选择单元格范围,在通过代码排序。
我们在窗体中添加 button,添加点击事件,用于调用排序方法。
代码如下:1.获取当前选择单元格范围:C1.Win.C1FlexGrid.CellRange cr = this.c1FlexGrid1.Selection;2.创建临时 C1FlexGrid 用于排序。
var fg = new C1.Win.C1FlexGrid.C1FlexGrid();3.在临时 C1FlexGrid 中添加相同的行列数。
fg.Cols.Count = cr.c2 - cr.c1 + 1;fg.Cols.Fixed = 0;fg.Rows.Count = cr.r2 - cr.r1 + 1;fg.Rows.Fixed = 0;4.在临时 C1flexGrid 中添加选中单元格范围的值。
for (int i = cr.r1; i <= cr.r2; i++){for (int j = cr.c1; j <= cr.c2; j++){fg[_row, _col] = this.c1FlexGrid1[ i , j ];_col += 1;}_row += 1;_col = 0;}5.排序当前 C1FlexGrid.fg.Sort(C1.Win.C1FlexGrid.SortFlags.Ascending, 0);6.把临时 C1FlexGrid 的排序结果存储进选中的单元格范围内。
for (int i = cr.r1; i <= cr.r2; i++){for (int j = cr.c1; j <= cr.c2; j++){this.c1FlexGrid1[ i , j ] = fg[_row, _col];_col += 1;}_row += 1;_col = 0;}以下为排序效果图:。
ComponentOne FlexGrid for WinForms中添加ChartC1FlexGrid 是一款功能丰富体积轻巧的表格控件。
它借鉴了微软Excel 的操作风格,丰富的数据操作功能、快捷键、选择模式剪切板支持等。
并且具有灵活的外观设置和高效的性能。
本篇文章阐述如何添加Chart 到C1FlexGrid-Excel 的另一个强大功能。
在本文中,我们将添加C1Chart 控件,怎样设置C1Chart 的位置。
添加Chart 到图表中如Excel 中,当用户选择数据,添加图表到表单中,Chart 将直观的显示数据的走势。
在C1FlexGrid 中,我们可以通过以下代码实现:private void addChartToolStripMenuItem_Click(object sender, EventArgs e){if (c1FlexGrid1.Clip != ""){data = c1FlexGrid1.Clip; // capture the selected data in the gridstring[] values = data.Split('\r');if (ischart == true) // if the chart already exists in the grid then clea r the series collection{chart.ChartGroups[0].ChartData.SeriesList.Clear();C1.Win.C1Chart.ChartDataSeries cds; // Add new datafor (int i = 0; i < values.Length; i++){if (values[ i ] != ""){cds = new C1.Win.C1Chart.ChartDataSeries();cds = chart.ChartGroups[0].ChartData.SeriesList.AddNewSeries();cds.PointData.Length = 1;bel = "Series " + values[ i ].ToString();cds.Y[0] = Convert.ToInt16(values[ i ]);}}}else // if it doesn't, then add a new chart{chart = new C1.Win.C1Chart.C1Chart();c1FlexGrid1.Controls.Add(chart);chart.Location = new Point(200, 100);chart.Size = new Size(300,300);chart.Legend.Visible = true;chart.Header.Visible = true;chart.Header.Text = "ADDED CHART CONTROL";chart.MouseDown += new MouseEventHandler(chart_MouseDown);chart.MouseCaptureChanged += new EventHandler(chart_MouseCaptureChang ed);chart.ChartGroups[0].ChartType = C1.Win.C1Chart.Chart2DTypeEnum.Pie;chart.ChartGroups[0].ChartData.SeriesList.Clear();C1.Win.C1Chart.ChartDataSeries cds;for (int i = 0; i < values.Length; i++) // Add Data{if (values[ i ] != ""){cds = new C1.Win.C1Chart.ChartDataSeries();cds = chart.ChartGroups[0].ChartData.SeriesList.AddNewSeries();cds.PointData.Length = 1;bel = "Series " + values[ i ].ToString();cds.Y[0] = Convert.ToInt16(values[ i ]);}}}ischart = true; // now the chart is there on the grid}}设置 Chart 的位置:添加 Chart 后,Chart覆盖于 C1FlexGrid 上,可以通过以下代码设置 Chart 位置。

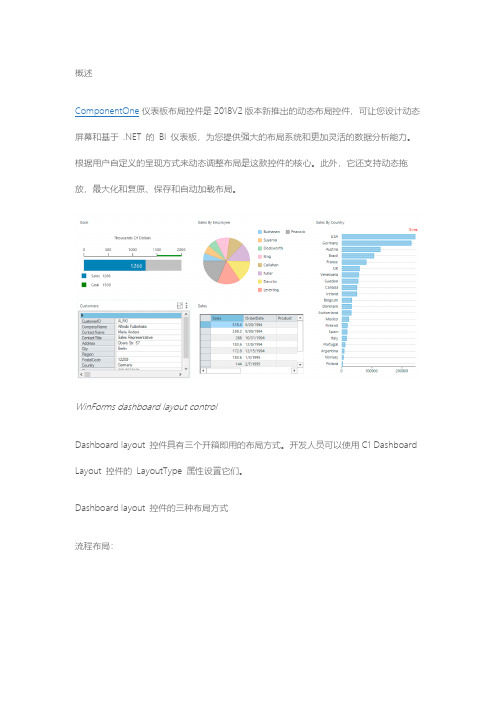
概述ComponentOne仪表板布局控件是2018V2版本新推出的动态布局控件,可让您设计动态屏幕和基于 .NET 的BI 仪表板,为您提供强大的布局系统和更加灵活的数据分析能力。
根据用户自定义的呈现方式来动态调整布局是这款控件的核心。
此外,它还支持动态拖放,最大化和复原、保存和自动加载布局。
WinForms dashboard layout controlDashboard layout 控件具有三个开箱即用的布局方式。
开发人员可以使用C1 Dashboard Layout 控件的LayoutType 属性设置它们。
Dashboard layout 控件的三种布局方式流程布局:Flow layout当DashboardLayout 控件的LayoutType 设置为Flow 时,DashboardLayout控件将使用FlowContentPanel。
根据FlowDirection 属性,此布局将子容器排列为行或列。
默认情况下,项目流包裹在控件的边缘,因此当一个列/行结束时,另一个列/行会自动启动。
表格布局Grid layout表格布局以表格的形式排列项目,包括行和列。
用户将LayoutType 设置为Grid 时,Dashboard Layout 控件将使用GridContentPanel。
它允许用户使用SmartTag 、Rows 或Columns 集合将行和列添加到此布局中。
表格布局的单元格可以跨越多个,如果您希望控件跨越多个行或列,请设置控件的RowSpan 或ColumnSpan 属性。
拆分布局Split layout当上述两个布局不满足要求或需要嵌套布局时,此类布局将非常有用。
在将LayoutType 设置为Split 时,Dashboard Layout 控件将使用拆分布局系统。
该布局系统使用面板将界面划分为不同的区域,您可以使用拆分方式调整每个面板的大小。
该控件提供SmartTag 和Panels集合,用以将添加/删除面板放置到布局控件中。

在Winform中向DataGridView控件添加数据的三种方式在Winform中向DataGridView控件添加数据很常用到,现总结3种填充DataGridView方法:1.利用SqlDataAdapter对象向DataGridView中添加数据关键代码:(可以将该代码放到窗体加载事件的方法中)using (SqlDataAdapter da = new SqlDataAdapter("select * from Product", DBService.Conn)){DataSet ds = new DataSet();da.Fill(ds);this.dataGridView1.DataSource = ds.T ables[0];}2. 利用SqlDataReader填充DataGridView关键代码://使用SqlDataReader填充DataGridViewusing (SqlCommand command = new SqlCommand("select * from product", DBService.Conn)){SqlDataReader dr = command.ExecuteReader();BindingSource bs = new BindingSource();bs.DataSource = dr;this.dataGridView1.DataSource = bs;}备注:在很多情况下,BindingSource对象起到一个过渡的作用,因为SqlDataReader对象直接赋给DataGridView时,不能正常显示数据,所以利用BindingSource对象做一个绑定。
3.利用泛型集合向DataGridView中添加数据关键代码:(List<>泛型集合)private void Form1_Load(object sender, EventArgs e){//使用List<>泛型集合填充DataGridViewList<Student> students = new List<Student>();Student hat = new Student("Hathaway", "12", "Male");Student peter = new Student("Peter","14","Male");Student dell = new Student("Dell","16","Male");Student anne = new Student("Anne","19","Female");students.Add(hat);students.Add(peter);students.Add(dell);students.Add(anne);this.dataGridView1.DataSource = students;}关键代码:(Dictionary<>泛型集合,与List<>泛型集合略有不同)private void Form1_Load(object sender, EventArgs e){//使用Dictionary<>泛型集合填充DataGridViewDictionary<String, Student> students = new Dictionary<String, Student>();Student hat = new Student("Hathaway", "12", "Male");Student peter = new Student("Peter","14","Male");Student dell = new Student("Dell","16","Male");Student anne = new Student("Anne","19","Female");students.Add(hat.StuName,hat);students.Add(peter.StuName,peter);students.Add(dell.StuName,dell);students.Add(anne.StuName,anne);//在这里必须创建一个BindIngSource对象,用该对象接收Dictionary<>泛型集合的对象BindingSource bs = new BindingSource();//将泛型集合对象的值赋给BindingSourc对象的数据源bs.DataSource = students.Values;this.dataGridView1.DataSource = bs;}★ Writer:cheng ★。
winform中datagrid和datagridview设置列标题的实现原来Blog上⾯的,抛弃有点可惜,贴过来[datagrid]using System;using System.Collections.Generic;using System.Text;using System.Drawing;using System.Windows;using System.Windows.Forms;using System.Data;namespace DgHeader{public class FormNoVS:Form{private DataGrid dg1;public FormNoVS(){this.Size = new Size(800, 600);DataTable table = new DataTable();table.Columns.Add("name");table.Columns.Add("age");DataRow row = table.NewRow();row["name"] = "Test";row["age"] = 13;table.Rows.Add(row);dg1 = new DataGrid();this.Controls.Add(dg1);dg1.Location = new Point(100,50);dg1.Size = new Size(400, 200); = "dg1";dg1.ColumnHeadersVisible = true;dg1.DataSource = table;DataGridTableStyle style = new DataGridTableStyle();DataGridTextBoxColumn headerName = new DataGridTextBoxColumn();headerName.HeaderText = "姓名";headerName.MappingName = "name";headerName.Width = 100;style.GridColumnStyles.AddRange(new DataGridColumnStyle[] { headerName });dg1.TableStyles.AddRange(new DataGridTableStyle[] { style });}}}[datagridview]using System;using System.Collections.Generic;using System.Text;using System.Drawing;using System.Windows;using System.Windows.Forms;using System.Data;namespace DgHeader{public class FormNoVS:Form{private DataGridView dgv1;public FormNoVS(){this.Size = new Size(800, 600);DataTable table = new DataTable();table.Columns.Add("name");table.Columns.Add("age");DataRow row = table.NewRow();row["name"] = "Test";row["age"] = 13;table.Rows.Add(row);dgv1 = new DataGridView();dgv1.Location = new Point(10,10);dgv1.Size = new Size(400, 200);this.Controls.Add(dgv1);dgv1.DataSource = table;dgv1.AutoGenerateColumns =true;dgv1.Columns[0].HeaderText = "姓名";}}}。
ComponentOneFlexGrid for WPF过滤:1.自定义过滤
下拉框的值
C1FlexGrid在WPF平台支持过滤,默认的过滤会在ColumnHeader 显示过滤下拉框,用户可以在下拉框选择过滤的条件以及过滤的值,然后通过应用实现过滤。
本文就来介绍如何自定义过滤下拉框里的值。
假设某列的值是布尔类型,里面显示的是True/False。
那么在过滤的下拉框将出现True/False的选项,可以供用户选择。
但是目前我们需要自定义过滤,在下拉框显示的是有效/无效,那么就需要自定义下拉框。
自定义的步骤如下:
1.定义Converter
首先需要自定义Converter,将原本的True/False的值转成有效/无效。
代码参考:
2.自定义CheckBox下拉框模板
定义一个模板,将原本的值转成需求的值。
代码参考:
3.实现自己的FilterEditor
从ColumnFilterEditor接口继承,实现自己的FilterEditor,其中将原本的下拉框部分替换成设计好的Checkbox
代码参考:
最后将之前设计好的自定义Editor设置给flexgrid的列。
代码参考:
这样子,就可以将原本过滤下拉框的值进行自定义,效果如图:。