Photoshop CS5基础教程第5章
- 格式:ppt
- 大小:7.68 MB
- 文档页数:129
第2章 PhotoshopCS5新增功能1、选择工具的优化2、内容识别功能3、自动镜头更正4、混合器画笔5、操控变形第4章选区应用1、基本选择工具2、选区的基本操作3、快速选择工具和魔棒工具4、应用色彩范围创建选区5、应用快速蒙版创建选区6、编辑选区(一)7、编辑选区(二)综合案例:应用磁性套索工具更换图像背景第5章基础色彩编辑1、颜色模式2、智能调色3、色彩平衡4、色相/饱和度5、替换颜色6、可选颜色7、匹配颜色综合案例:应用阈值命令制作插画第6章高级色彩编辑1、照片滤镜2、阴影/高光3、变化4、曝光度5、亮度/对比度6、色阶7、曲线命令8、调整曲线显示选项9、色调分离和色调均化综合练习案例:应用色彩调整命令给图像添加彩霞效果第7章了解绘画1、画笔工具和铅笔工具2、自定义画笔3、历史记录画笔工具4、历史记录艺术画笔工具5、填充和描边图像6、渐变选项栏7、渐变编辑器8、自定义图案综合练习案例:应用颜色替换工具替换人物的衣服DVD2: 提高进阶篇共 101 个教学视频学习目标掌握Photoshop CS5的核心内容,比如路径、图层、通道、蒙版、滤镜、3D工具和输出图形的等技巧,真正领略Photoshop的魅力主要内容第8章掌握路径1、路径的基础知识2、应用钢笔工具创建路径3、应用自由钢笔工具创建路径4、路径的基本编辑5、路径的高级编辑6、绘制形状路径7、应用直线工具绘制直线8、创建自定义形状9、了解路径调板10、路径与选区的转换综合案例:应用描边路径制作邮票第9章图像的润饰与修饰1、模糊与锐化工具2、加深与减淡工具3、涂抹工具4、海绵工具5、橡皮擦工具6、背景橡皮擦工具7、魔术橡皮擦工具8、仿制图章工具9、污点修复画笔工具10、修复画笔工具11、红眼工具综合案例:应用修补工具修复图像第10章认识图层1、创建新图层2、选择图层3、显示、隐藏和锁定图层4、复制与删除图层5、调整图层顺序6、链接图层7、对齐与分布图层8、创建图层组9、编辑图层组10、合并与盖印图层11、创建复合图层12、编辑复合图层13、图层混合综合练习案例:应用图层样式制作纪念币1综合练习案例:应用图层样式制作纪念币2第11章熟悉蒙版1、蒙版是什么2、蒙版类型3、剪贴蒙版4、为剪贴蒙版设置混合模式和不透明度5、为剪贴蒙版添加图层样式6、了解图层蒙版7、创建图层蒙版8、应用图层蒙版9、图层缩览图与图层蒙版的链接关系10 、矢量蒙版11 、编辑矢量蒙版综合练习案例:应用图层蒙版制作水中倒影第12章学习通道1、通道类型2、Alpha通道基本操作3、选区的保存与运算4、编辑通道5、通道与抠图6、分离与合并通道7、应用图像命令8、计算命令9、蒙版与通道综合练习案例:应用通道制作制作雪景第13章文字艺术1、文字工具2、点文字与段落文字3、设置字符属性4、设置段落属性5、创建路径文字6、变换文字7、转换文字8、查找和替换文字综合练习案例:创建变形文字第14章滤镜特效1、什么是滤镜2、应用模糊滤镜打造明星气质3、应用液化滤镜美化人物脸型4、应用去斑滤镜去除图像上的噪点5、应用艺术效果滤镜制作水彩画6、神奇“消失点”滤镜7、智能滤镜综合练习案例:应用粗糙蜡笔滤镜制作素描画第15章 3D工具的应用1、3D工具2、创建和编辑3D模型3、从2D对象创建3D对象4、新建拼贴绘画5、制作3D网络6、在3D模型上绘画第16章 Web图形处理1、WEB安全颜色2、创建切片3、编辑切片4、优化图像5、优化GIF格式6、优化JPEG格式第17章动作与自动化命令1、了解动作调板2、创建动作3、调整和编辑动作4、应用已有动作5、批处理6、裁切与修齐图片7、制作全景图片综合练习案例:动感相册设计第18章打印1、设置打印选项2、打印输出3、使用色彩管理打印图像4、指定印前输出选项全程多媒体视频讲解,内容分成2DVD,课时长度 7 个小时左右,轻松易学,专业实用!DVD1: 基础教学篇共 56 个教学视频学习目标从零开始,了解Photoshop CS5的最新功能,基础知识、基本操作、选区、色彩编辑、绘画等基础内容,帮你快速进入数码图像创作的世界。


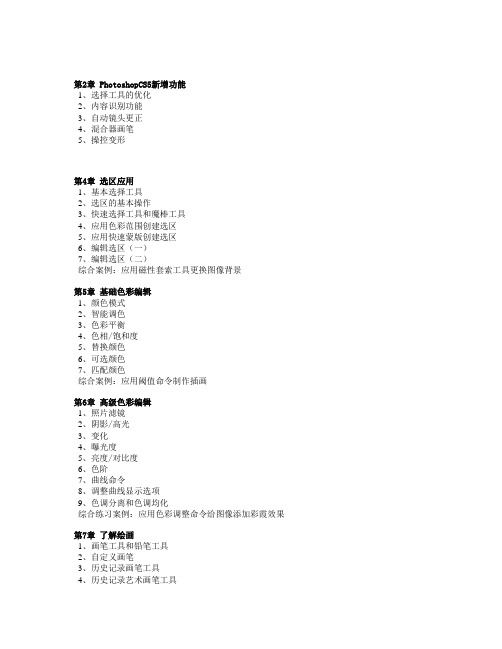
1. 了解PS中的基本概念1.1 PS中的基本概念位图:位图图像在技术上称为栅格图像,它使用像素来表现图像。
选择“缩放”工具,在视图中多次单击,将图像放大,可以看到图像是由一个个的像素点组成的,每个像素都具有特定的位置和颜色值。
位图图像最显著的特征就是它们可以表现颜色的细腻层次。
基于这一特征,位图图像被广泛用于照片处理、数字绘画等领域。
矢量图:矢量图形也称为向量图形,是根据其几何特性来描绘图像。
矢量文件中的图形元素称为对象,每个对象都是一个自成一体的实体。
使用“缩放”工具将图像不断放大,此时可看到矢量图形仍保持为精确、光滑的图形。
分辨率:简单讲即是电脑的图像给读者自己观看的清晰与模糊。
图像尺寸与图像大小及分辩率的关系:如图像尺寸大,分辩率大,文件较大,所占内存大,电脑处理速度会慢,相反,任意一个因素减少,处理速度都会加快。
通道:很多读者对于通道概念都感到困惑不解。
其实它很简单,通道代表了色彩的区域。
一般来说一种基本色为一个通道,例如RGB颜色模式,R为红色,代表图像中的红色范围,G为绿色,B为蓝色。
图层:在制作一幅作品时,要使用多个图层。
图层就像把一张张透明拷贝纸叠放在一起,由于拷贝纸的透明特征,使图层上没有图像的区域透出下一层的内容。
1.2 图像的色彩模式(1)RGB彩色模式:又叫加色模式,是屏幕显示的最佳颜色,由红、绿、蓝三种颜色组成,每一种颜色可以有0-255的亮度变化。
(2)CMYK彩色模式:由品蓝,品红,品黄和黄色组成,又叫减色模式。
一般打印输出及印刷都是这种模式,所以打印图片一般都采用CMYK模式。
(3)Lab彩色模式:这种模式通过一个光强和两个色调来描述,一个色调叫a,另一个色调叫b。
它主要影响着色调的明暗。
(4)索引颜色:这种颜色下图像像素用一个字节表示它最多包含有256色的色表储存并索引其所用的颜色,它图像质量不高,占空间较少。
(5)灰度模式:即只用黑色和白色显示图像,像素0值为黑色,像素255为白色。

529 USING PHOTOSHOP3DApplying Repoussé to a pixel selectionA. Increasing the depth of extrusionB. Twisting the extrusion 180°C. Inflating the front1Create a pixel selection, or select a text layer, layer mask, or work path.2Choose 3D > Repoussé, then choose the item that reflects your selection in step 1.3Set the following options:Mesh tools Available along the upper left of the dialog box, these tools function like 3D object tools. See “Move, rotate, or scale a model with 3D object tools” on page510 and Move, rotate, or scale selected items with the 3D Axis.Repoussé Presets Apply a predefined group of settings. To create your own preset from custom settings, click the pop-up menu, and choose New Repoussé Preset.To organize groups of presets, see “Work with the Preset Manager” on page46.Extrude Extends the original 2D shape in 3D space. Depth controls the length of extrusion; Scale controls thewidth. Select Bend for a curved extrusion, or Shear for a straight one, then set X and Y Angle to control thehorizontal and vertical tilt. If desired, enter Twist in degrees.To change the bend or shear origin, click a point on the reference icon.Inflate Expands or collapses the middle of the front or back. Positive Angle settings expand, negative collapse.Strength controls the level of inflation.Materials Apply materials such as brick or cotton either globally or to various sides of the object. (Bevel1 is the front bevel; Bevel2 the back.) For more information, see “Apply, save, or load material presets” on page519.Bevel Applies beveled edges to the front or back of the object. Contour options are similar to those for layer effects.See “Modify layer effects with contours” on page263.Scene Settings Lights in the form of a spherical panorama shine onto the object; choose a style of lights from the menu. Render Settings control how object surfaces look. (See “Select a render preset” on page535.) Higher Mesh Quality settings increase mesh density, improving appearance but reducing processing speed.The Shaded and Solid Wireframe render settings superimpose the 3D mesh on objects, revealing any meshdistortion that will distort textures.Readjust repoussé settings1Select a text layer, layer mask, or work path to which you previously applied repoussé.2Choose 3D > Repoussé > Edit In Repoussé.Split repoussé meshesBy default, the Repoussé command creates a single mesh with five materials. If you want to separately control different elements (such as each letter in a string of text), you can create separate meshes for each closed path.A B C由于文档过大进行了拆分,导致完整性破坏,包括标签,目录导航和链接想要完整版请到小店支持我!!店铺:/Autocad2012 :/item.htm?id=10506668536Photoshop CS5: /item.htm?id=10447569804尽在Autodesk软件!!!!Note: If numerous closed paths exist, the resulting meshes can create highly complex 3D scenes that are difficult to edit. 1Select a text layer, layer mask, or work path to which you previously applied repoussé.2Choose 3D > Repoussé > Split Repoussé Meshes.Understanding internal constraintsInternal constraints let you improve mesh resolution in specific areas, precisely vary inflation, or poke holes in surfaces. Along a path you specify on a repoussé object, constraint curves extend away from the object for an expansion, or toward the object for a contraction. You manipulate these curves using constraint tools that are similar to 3D object tools.Inactive constraints Guarantee sufficient mesh resolution, creating smooth paths.Inflated object with inactive constraintActive Constraints Expand or contract the surface along constraint paths.Dragging active constraint to different position in 3D spaceHole Constraints Cut out the surface along constraint paths.Panning hole constraint to increase depthCreate internal constraints from selections, work paths, or text1Do one of the following:•Create a selection or path that falls entirely within the front surface of a repoussé object.• For text objects that already have internal paths, like the letter A, skip to step 3.2Choose 3D > Repoussé > Create Constraints From Selection or Work Path.3In the Repoussé dialog box, click the triangle to expand the Internal Constraints section.4Choose a Type option. For Active or Hole, the following options are available:Constraint tools Adjust the constraint curve and function similarly to 3D object tools. See “3D object and camera tools (Photoshop Extended)” on page510.If the repoussé object contains multiple internal paths (for example, both ovals in the number 8), select each path individually with the constraint tools.Position coordinatesLet you precisely place constraints in 3D space.Side Lets you apply uniform Strength and Angle settings to both sides, or unique settings to each.Each constraint curve has two sides; the orientation of those sides depends on how a curve divides the surface. The Left and Right menu options reflect a vertical constraint. For a horizontal constraint, Left and Right mean up and down, and for a closed constraint, those options mean inside and outside.Side settingsA. Both creates consistent deformation.B. Left or Right allows for varied deformation.Strength Controls the level of inflation along the path.Angle Controls the direction of inflation.Remove an internal constraint1Select a 3D repoussé layer that includes an internal constraint.2Choose 3D > Repoussé > Edit In Repoussé.3In the Internal Constraints section, click Delete.To reapply a deleted constraint, click Add Selection or Add Path.Create 3D objects from 2D images (Photoshop Extended)Photoshop can build a variety of basic 3D objects using 2D layers as a starting point. After creating a 3D object, you can move it in 3D space, change render settings, add lighting, or merge it with other 3D layers.•Convert 2D layers into 3D postcards (planes with 3D properties). If your starting layer is a text layer, any transparency is retained.•Wrap a 2D layer around a 3D object, such as a cone, cube, or cylinder.•Create a 3D mesh from the grayscale information in a 2D image.•Simulate a metalworking technique called repoussé by extruding a 2D object in 3D space. See “Create 3D repoussé (Photoshop Extended)” on page528.A B•Build a 3D volume from a multi-frame file such as a DICOM medical imaging file. Photoshop combines the individual slices of the file into a 3D object that you can manipulate in 3D space and view from any angle. You can apply various 3D volume render effects to optimize the display of various materials in the scan, such as bone or soft tissue. See “Create a 3D volume from DICOM frames (Photoshop Extended)” on page541.For a video about creating 3D content from 2D layers, see /go/lrvid4006_ps.Create a 3D postcardYou can add a 3D postcard to an existing 3D scene to create a surface that displays shadows and reflections from otherobjects in the scene.1Open a 2D image and select the layer you want to convert to a postcard.2Choose 3D > New 3D Postcard From Layer.•The 2D layer is converted to a 3D layer in the Layers panel. The 2D layer content is applied as a material to both sides of the postcard.•The original 2D layer appears in the Layers panel as the Diffuse texture map for the 3D postcard object. (See “3D panel overview (Photoshop Extended)” on page513.)•The 3D layer retains the dimensions of the original 2D image.3(Optional) To add the 3D postcard as a surface plane to a 3D scene, merge the new 3D layer with an existing 3D layer containing other 3D objects, then align it as necessary. (See “Combine 3D objects (Photoshop Extended)” on page533.)4To retain the new 3D content, export the 3D layer in a 3D file format or save it in PSD format. (See “Export a 3D layer” on page539.)Create 3D shapesDepending on the object type you choose, the resulting 3D model can contain one or more meshes. The Spherical Panorama option maps a panoramic image inside a 3D sphere.1Open a 2D image and select the layer that you want to convert to a 3D shape.2Choose 3D > New Shape From Layer, and select a shape from the menu. Shapes include single-mesh objects like a donut, sphere, or hat, as well as multiple mesh objects such as a cone, cube, cylinder, soda can, or wine bottle.Note: You can add your own custom shapes to the shape menu. Shapes are Collada (.dae) 3D model files. To add a shape, place the Collada model file in the Presets\Meshes folder inside the Photoshop program folder.•The 2D layer is converted to a 3D layer in the Layers panel.•The original 2D layer appears in the Layers panel as a Diffuse texture map. It may be used on one or more surfaces of the new 3D object. Other surfaces may be assigned a default diffuse texture map with a default color setting. See “3D panel overview (Photoshop Extended)” on page513.3(Optional) Use the Spherical Panorama option if you are using a panoramic image as your 2D input. This option converts a complete 360 x 180 degree spherical panorama to a 3D layer. Once converted to a 3D object, you can paint areas of the panorama that are typically difficult to reach, such as the poles or areas containing straight lines.For information on creating a 2D panorama by stitching images together, see “Create 360-degree panoramas (Photoshop Extended)” on page206.4Export the 3D layer in a 3D file format or save in PSD format to retain the new 3D content. See “Export a 3D layer”on page539.Create a 3D meshThe New Mesh from Grayscale command converts a grayscale image into a depth map, which translates lightness values into a surface of varying depth. Lighter values create raised areas in the surface, darker values create lower areas. Photoshop then applies the depth map to one of four possible geometries to create a 3D model.1Open a 2D image and select one or more layers that you want to convert to a 3D mesh.2(Optional) Convert the image to grayscale mode. (Choose Image > Mode > Grayscale, or use Image > Adjustments > Black & White to fine-tune the grayscale conversion.Note: If you use an RGB image as input when creating a mesh, the green channel is used to generate the depth map. 3(Optional) Make adjustments to the grayscale image if necessary to limit the range of lightness values.4Choose 3D > New Mesh From Grayscale, and then select a mesh option.Plane Applies depth map data to a planar surface.Two-Sided Plane Creates two planes reflected along a central axis and applies depth map data to both planes.Cylinder Applies depth map data outward from the center of a vertical axis.Sphere Applies depth map data radially outward from a center point.Photoshop creates a 3D layer containing the new mesh. It also creates Diffuse, Opacity, and Planar Depth Map texture maps for the 3D object, using the original grayscale or color layer.You can reopen the Planar Depth Map as a Smart Object at any time and edit it. When you save it, the mesh is regenerated.Note: The Opacity texture map does not appear in the Layers panel, because that map uses the same texture file as the Diffuse map (the original 2D layer). When two texture maps reference the same file, the file appears only once in the Layers panel.Combine 3D objects (Photoshop Extended)Merging 3D layers allows you to combine multiple 3D models in one scene. Once combined, each 3D model can be manipulated separately, or you can use position and camera tools on all models simultaneously.1Open two document windows, each containing a 3D layer.2Make the source document (the file from which you are copying the 3D layer) active.3Select the 3D layer in the Layers panel and drag it into the window of the target document (the file which will contain the combined 3D objects).The 3D layer is added as a new 3D layer in the target document. It becomes the active layer in the Layers panel of the target document.4In the Tools panel, select a 3D camera tool.5In the options bar, from the Position menu, select the layer name for the original 3D layer in the target file.After you match the camera position of the two 3D layers, the two 3D objects appear together in the scene. Use the 3D object tools to reposition the objects before merging.6From the Layers panel options menu, choose Merge Down.The two 3D layers are combined into one 3D layer. The point of origin of each model is aligned.Note: Depending on the size of each 3D model, one model may appear partially or completely embedded in the other model after merging 3D layers.After merging two 3D models, all meshes and materials from each 3D file are contained in the target file and appear in the 3D panel. In the Meshes panel, you can select and reposition individual meshes using the 3D position tools in the panel. See “3D Mesh settings (Photoshop Extended)” on page516.To alternate between moving all models at once and moving individual models in the layer, switch between the 3Dposition tools in the Tools panel and the tools in the Meshes panel.Combine 3D and 2D layers (Photoshop Extended)You can combine 3D layers with one or more 2D layers to create composite effects. For example, you can place a model against a background image and change its position or viewing angle to match the background.❖Do one of the following:•With the 2D file open, choose 3D > New Layer from 3D File, and open a 3D file.•With both a 2D file and a 3D file open, drag either the 2D or 3D layer from one file into the open document window of the other file. The layer you add moves to the top of the Layers panel.When working in a file with combined 2D and 3D layers, you can temporarily hide the 2D layers while working with the 3D layer. See “Hide layers for better performance” on page534.Hide layers for better performanceIn a multi-layer document with 2D layers above a 3D layers, you can temporarily move the 3D layer to the top of the layer stack for faster screen rendering.1Choose 3D > Auto-Hide Layers For Performance.2Select a 3D Position or Camera tool.When you hold down the mouse button with either tool, all 2D layers are temporarily hidden. When you release the mouse, all 2D layers reappear. Moving any part of the 3D Axis also hides all 2D layers.Create 3D animations (Photoshop Extended)Using the Photoshop Animation timeline, you can create 3D animations that move a 3D model through space and change the way it displays over time. You can animate any of the following properties of a 3D layer:•3D object or camera position. Use the 3D position or camera tools to move the model or 3D camera over time.Photoshop can tween frames between position or camera movements to create smooth motion effects.•3D render settings. Change render modes, with the ability to tween transitions between some render modes. For example, change Vertices mode gradually to Wireframe over time, to simulate the sketching-in of a model’s structure.•3D cross section. Rotate an intersecting plane to display a changing cross section over time. Change cross section settings between frames to highlight different model areas during an animation.For high quality animations, you can render each animation frame using the Render for Final Output render setting. See “Change 3D render settings (Photoshop Extended)” on page535.More Help topics“Creating timeline animations (Photoshop Extended)” on page493Convert a 3D layer to a 2D layer (Photoshop Extended)Converting a 3D layer to a 2D layer rasterizes the 3D content in its current state. Convert a 3D layer to a regular layer only if you no longer want to edit the 3D model position, render mode, textures, or lights. The rasterized image retains the appearance of the 3D scene, but in a flattened 2D format.❖Select the 3D layer in the Layers panel, and choose 3D > Rasterize.Convert a 3D layer to a Smart Object (Photoshop Extended)Converting a 3D layer to a Smart Object allows you to retain the 3D information contained in the 3D layer. After converting, you can apply transforms or other adjustments like Smart Filters to the Smart Object. You can reopen the Smart Object layer to edit the original 3D scene. Any transforms or adjustments applied to the Smart Object are then applied to the updated 3D content.1Select the 3D layer in the Layers panel.2From the Layers panel option menu, choose Convert to Smart Object.3(Optional) To reedit the 3D content, double-click the Smart Object layer in the Layers panel.More Help topics“About Smart Objects” on page2713D rendering and saving (Photoshop Extended)Change 3D render settings (Photoshop Extended)Render settings determine how 3D models are drawn. Photoshop installs several presets with common settings. Customize settings to create your own presets.Note: Render settings are layer-specific. If a document contains multiple 3D layers, specify separate render settings for each.Select a render presetThe standard render preset is Default, which displays the visible surfaces of models. Wireframe and Vertices presets reveal the underlying structure. To combine solid and wireframe rendering, choose the Solid Wireframe preset. To view a model as a simple box reflecting its outermost dimensions, choose a Bounding Box preset.1At the top of the 3D panel, click the Scene button.2In the lower half of the panel, choose an option from the Preset menu.Installed render presetsA. Default (Quality set to Interactive)B. Default (Quality set to Ray Traced and ground plane visible)C. Bounding BoxD. Depth MapE. Hidden WireframeF. Line IllustrationG. NormalsH. Paint maskI. Shaded IllustrationJ. Shaded VerticesK. Shaded WireframeL. Solid WireframeM. Transparent Bounding Box OutlineN. Transparent Bounding BoxO. Two-SidedP. VerticesQ. WireframeThe Two-Sided preset applies only to cross sections, displaying a solid model on one half of the section, and a wireframe on the other.Customize render settings1At the top of the 3D panel, click the Scene button.2To the right of the Render Settings menu, click Edit.3(Optional) To see the effect of new settings as you make changes, select Preview. Or, deselect this option to slightly improve performance.To specify unique settings for each half of a cross section, click the cross section buttonsat the top of the dialog box.4Enable Face, Edge, Vertex, Volume, or Stereo rendering by clicking the checkboxes on the left side of the dialogbox. Then adjust the related settings below.For information about Volume options, used primarily with DICOM images, see “View a 3D volume in different render modes ” on page 542. A B C D EF G H I JK L M QN OPFace optionsFace options determine how model surfaces appear.Face Style Draws surfaces using any of these methods:•Solid Draws without shadows or reflections using the GPU on an OpenGL video card.•Unlit Texture Draws without lighting, instead displaying only the selected Texture option. (Diffuse is selected by default.)•Flat Applies the same surface normal for all vertices in a face, creating a faceted look.•Constant Replaces textures with currently specified color.To adjust face, edge, or vertex color, click the Color box.•Bounding Box Displays boxes reflecting the outermost dimensions of each component.•Normals Displays X, Y, and Z components for surface normals in different RGB colors.•Depth Map Displays a gray model, using luminosity to reveal depth.•Paint Mask Displays paintable regions as white, oversampled regions in red, and undersampled regions in blue. (See “Identify paintable areas” on page525.)Texture When Face Style is set to Unlit Texture, specifies the texture map. (See “3D Materials settings (Photoshop Extended)” on page517.)Render For Final Output For exported video animations, produces smoother shadows and realistic color bleeds from reflected objects and environments. This option requires more processing time, however.Reflections, Refractions, Shadows Show or hide these Ray Traced rendering features.Remove Backfaces Hides surfaces on the back of two-sided components.Edge optionsEdge options determine how wireframe lines appear.Edge Style Reflects the Constant, Flat, Solid, and Bounding Box options described for Face Style above.Crease Threshold Adjusts the number of structural lines that appear in the model. A crease or line, is formed when two polygons in a model come together at a particular angle. If edges meet at an angle below the Crease Threshold setting (0-180), the line they form is removed. At a setting of 0, the entire wireframe is displayed.Line Width Specifies width in pixels.Remove Backfaces Hides edges on the back of two-sided components.Remove Hidden Lines Removes lines that foreground lines overlap.Vertex optionsVertex options adjust the appearance of vertices (intersections of polygons that make up the wireframe model). Vertex Style Reflects the Constant, Flat, Solid, and Bounding Box options described for Face Style above.Radius Determines the pixel radius of each vertex.Remove Backfaces Hides vertices on the back of two-sided components.Remove Hidden Vertices Removes vertices that foreground vertices overlap.Stereo optionsStereo options adjust settings for images that will either be viewed with red-blue glasses or printed to objects that include a lenticular lens.Stereo Type Specifies Red/Blue for images viewed with colored glasses or Vertical Interlaced for lenticular prints. Parallax Adjusts the distance between the two stereo cameras. Higher settings increase three-dimensional depth but reduce depth of field, making items ahead or behind the focal plane appear out of focus.Lenticular Spacing For vertically interlaced images, specifies how many lines per inch the lenticular lens has.Focal Plane Determines the position of the focal plane relative to the center of the model’s bounding box. Enter negative values to move the plane forward, and positive values to move it backward.Save or delete a render preset1At the top of the 3D panel, click the Scene button.2Click Render Settings.3Do either of the following:•To save a preset, customize settings, and click the Save button.•To delete a preset, select it from the Preset menu, and click the Delete button.Render a 3D file for final output (Photoshop Extended)When you’ve finished working with your 3D file, create a final render to produce the highest quality version for output to web, print, or animation. Final rendering uses ray tracing and a higher sampling rate to capture more realistic lighting and shadow effects.Use final render mode to enhance the following effects in your 3D scene:•Image based lighting and global ambient color.•Lighting from object reflectance (color bleed).•Reduced noise in soft shadows.Note: A final render can be time-consuming, depending on the model, lighting, and maps in your 3D scene.1Make any necessary adjustments to your model, including lighting and shadow effects.You don’t need to change Anti-Alias settings for the scene before rendering. By default, theBest setting is used.2At the top of the 3D panel, click the Scene button, and then click the Scene entry in the list below.3From the Quality menu in the lower half of the panel, select Ray Traced Final.After the render is complete, you can flatten the 3D scene for output in anther format, composite the 3D scene with 2D content, or print directly from the 3D layer.For exported video animations, Render For Final Output is available as an option in the 3D Render Settings dialogbox. See “Customize render settings” on page536.Saving and exporting 3D files (Photoshop Extended)To preserve the 3D content in a file, save the file in Photoshop format or another supported image format. You can also export a 3D layer as a file in a supported 3D file format.539 USING PHOTOSHOP3DExport a 3D layerYou can export 3D layers in all supported 3D formats: Collada DAE, Wavefront/OBJ, U3D, and Google Earth 4 KMZ. When choosing an export format, consider the following factors:•Texture layers are saved in all 3D file formats; however, U3D preserves only Diffuse, Environment, and Opacity texture maps.•Wavefront/OBJ format does not save camera settings, lights, or animation.•Only Collada DAE saves render settings.To export a 3D layer, do the following:1Choose 3D > Export 3D layer2Choose a format for exporting textures:•U3D and KMZ support JPEG or PNG as texture formats.•DAE and OBJ support all Photoshop-supported image formats for textures.3(Optional) If exporting to U3D format, choose an encoding option. ECMA 1 is compatible with Acrobat 7.0; ECMA3 is compatible with Acrobat 8.0 and later and provides some mesh compression.4Click OK to export.Save a 3D fileTo preserve 3D model position, lighting, render mode, and cross sections, save files with 3D layers in PSD, PSB, TIFF,or PDF format.❖Choose File> Save or File> Save As, select Photoshop (PSD), Photoshop PDF, or TIFF format, and click OK.540 Chapter 19: Technical imagingDICOM files (Photoshop Extended)About DICOM files (Photoshop Extended)For a video about DICOM files, see /go/vid0028.DICOM (an acronym for Digital Imaging and Communications in Medicine) is the most common standard for receiving medical scans. Photoshop Extended allows you to open and work with DICOM (.dc3, .dcm, .dic, or no extension) files. DICOM files can contain multiple “slices” or frames, which represent different layers of a scan. Photoshop reads all frames from a DICOM file and converts them to Photoshop layers. Photoshop can also place all DICOM frames in a grid on one layer, or open frames as a 3D volume which you can rotate in 3D space. Photoshopcan read 8-, 10-, 12-, or 16-bit DICOM files. (Photoshop converts 10- and 12-bit files to 16-bit files.)Once you’ve opened a DICOM file in Photoshop, you can use any Photoshop tool to adjust, mark up, or annotate the file. For example, use the Notes tool to add a comment to the file, the Pencil tool to mark a specific area of the scan orthe Dust And Scratches filter to remove dust or scratches from a scan. Use the Ruler or selection tools to make measurements of image content.Note: Any measurement scale present in a DICOM file is automatically imported with the file. If no scale is present, the default scale of 1 pixel = 1 mm is added as a custom measurement scale. See “Set the measurement scale (Photoshop Extended)” on page544.You can save 8-bit DICOM files in any file format Photoshop supports (16-bit files must be saved as DICOM, Large Document Format, Photoshop, Photoshop PDF, Photoshop Raw, PNG, or TIFF files).Important: When you save a file as DICOM, any layer styles, adjustments, blend modes, or masks are discarded.You can also view and edit metadata for DICOM files in Bridge or in the Photoshop File Info dialog box. DICOM files support external automation through scripting (see “Scripting” on page568).More Help topics“Notes” on page427“Paint with the Brush tool or Pencil tool” on page288“Apply the Dust And Scratches filter” on page360Open a DICOM file (Photoshop Extended)Before you open a DICOM file, you can specify how DICOM frames are opened (as layers, in a grid, or as a 3D volume), and set options (in the DICOM File Import dialog box) that anonymize patient metadata and display overlays. During the import you can also perform pans, zooms, and window leveling.The DICOM import dialog box also displays DICOM header information—textual information about the file, such asits dimensions, data resolution, and whether the data has been compressed.。
1。
工具的使用一、Photoshop 简介:Adobe 公司出品的Photoshop 是目前最广泛的图像处理软件,常用于广告、艺术、平面设计等创作.也广泛用于网页设计和三维效果图的后期处理,对于业余图像爱好者,也可将自己的照片扫描到计算机,做出精美的效果.总之,Photoshop 是一个功能强大、用途广泛的软件,总能做出惊心动魄的作品.二、认识工具栏1、 选框工具:用于选取需要的区域-—-—选择一个像素的横向区域----选择一个像素的竖向区域属性栏: 注:按shift 键+框选,可画出正方形或正圆形区域 2、移动工具: ---—-用于移动图层或选区里的图像3、套索工具:套索工具 移动工具魔术棒工具 修复工具仿制图章工具 选框工具 单个选区 选区相加 选区相减 选区相交 裁剪工具--—-用于套索出选区-——-用于套索出多边形选区—-——可根据颜色的区别而自动产生套索选区4、魔术棒工具: --—-根据颜色相似原理,选择颜色相近的区域。
注:“容差”,定义可抹除的颜色范围,高容差会抹除范围更广的像素。
5、修复工具:且是 -———类似于“仿制图工具”,但有智能修复功能.———-用于大面积的修复一新 -—--用采样点的颜色替换原图像的颜色注:Alt+鼠标单击,可拾取采样点。
6、仿制图章工具—--—仿制图章工具从图像中取样,然后您可将样本应用到其它图像或同一图像的其它部分。
--——仿制图章工具从图像中取样,然后将样本应用到其它图像或同一图像的其它部分(按Alt键,拾取采样点)。
————可先自定义一个图案,然后把图案复制到图像的其它区域或其它图像上。
三、小技巧:①、取消选区:【Ctrl+D】②、反选选区:【Shif+F7】③、复位调板:窗口—工作区—复位调板位置。
④、ctrl+[+、-]=图像的缩放⑤空格键:抓手工具⑥Atl+Delete = 用前景色填充Ctrl+Delete = 用背景色填充第二课:工具的使用二一、工具栏二、小技巧 1、自由变换工具:【Ctrl +T 】2、使用框选工具的时候,按【Shift 】后再框选,则框选出正圆或正方形。