思科路由器系列软件安装与升级步骤
- 格式:doc
- 大小:37.00 KB
- 文档页数:6

IOS升级方法一在对能够正常启动的CISCO路由器的IOS进行升级时,比较简单。
具体步骤如下:1、寻找一种TFTP服务器软件(有CISCO公司的TFTPServer或3COM公司的3Cserver等,在升级较大IOS 映象文件时,建议用3Cserver),安装在一台计算机上,将要升级的IOS映象文件拷贝到相关的目录中(例:D:\),并运行TFTP服务器软件,通过菜单设置Root目录为拷贝IOS映象文件所在目录(如D:\)。
假设该计算机的IP地址为;2、连接路由器的console口和PC机的COM1,使用PC的终极终端软件访问路由器,将路由器的地址设为(和计算机的IP地址同网段即可)。
建议在进行IOS升级前将原有IOS文件备份下来,防止待升级的IOS文件存在问题不可用;QUOTE:? ???Router# dir flash:? ???(查看目前IOS映象文件名,也可用Router#Show version)? ???Directory of flash:/? ???1??-rw-? ???5998292? ?? ?? ?? ?? ? C2600-I-MZ.122-11.BIN? ???8388608 bytes total (2390252 bytes free)? ???Router#copy flash tftp? ?? ?? ?? ?(备份IOS文件)? ???Source filename []?c2600-i-mz.122-11.bin服务器地址)? ???Destination filename [c2600-i-mz.122-11.bin]?? ???!!!!!!!!!!!!!!!!!!!!!!!!!!!!!!!!!!!!!!!!!!!!!!!!!!!!!!!!!!!!!!!!!!!!!!!!!!!!!!!!? ???…? ???!!!!!!!!!!!!!!!!!!!!!!!!!!!!!!!!!!!!!!!!!!!!!!!!!!!!!? ???5998292 bytes copied in 324.071 secs (18509 bytes/sec)? ???Router#3、对路由器进行IOS升级;QUOTE:? ???Router#copy tftp flash服务器地址)? ???Source filename []? c2600-i-mz.122-11.bin? ?? ?? ?(需升级的新IOS映象文件名)? ???Destination filename [c2600-i-mz.122-11.bin]?? ???Do you want to over write? [confirm]? ???Erase flash: before copying? [confirm]? ???Erasing the flash filesystem will remove all files! Continue? [confirm]? ???Erasing device... eeeeeeeeeeeeeeeeeeeeeeeeeeeeeeee ...erasedee? ???Erase of flash: complete: !!!!!!!!!!!!!!? ???!!!!!!!!!!!!!!!!!!!!!!!!!!!!!!!!!!!!!!!!!!!!!!!!!!!!!!!!!!!!!!!!!!!!!!!!!!!!!!!!? ???…? ???!!!!!!!!!!!!!!!!!!!!!!!!!!!!!!!!!!!!!!? ???[OK - 5998292 bytes]? ???Verifying checksum...??OK (0xA0C0)? ???5998292 bytes copied in 318.282 secs (18846 bytes/sec)? ???Router#++++++++++++++++++++++++++++++++++++++++++++++++++++++++++++++IOS升级方法二由于升级失败后或路由器的config-register寄存器值为0x2101时,开启路由器时、或在开启(某些型号)Cisco 路由器的电源开关后30秒内按下Ctrl+break键,中断路由器的正常启动,路由器都会进入rom监视模式,即Router(boot)>,在这种情形下,对路由器的IOS进行升级,也比较简单。

快速入门指南思科RV215W Wireless-N VPN 路由器包装内容物•Wireless-N VPN 路由器•以太网电缆•电源适配器•快速入门指南•文档和软件(存储于 CD-ROM 光盘上)2思科 RV215W Wireless-N VPN 路由器欢迎感谢您选择思科 RV215W Wireless-N VPN 路由器。
本指南介绍了如何安装思科RV215W 并启动基于 Web 的设备管理器。
安装思科RV215W安放提示为防止路由器过热或者受损:•环境温度 - 请勿在环境温度超过 104°F (40°C) 的区域中使用。
•通风 - 请确保路由器周围的通风良好。
•机械负载 - 请确保路由器放置平稳,以免出现任何对路由器造成损坏的情况。
请将设备放置在平面上,以便设备依靠其四个橡胶支脚来支撑。
思科RV215W 特性前面板电源绿色持续亮起表示设备已开启电源并完成启动过程。
设备正在启动或加载固件时,指示灯会呈绿色闪烁状态。
USB 当相应端口连接至一个 USB 装置时,指示灯会呈绿色亮起状态。
当端口正在发送或接收数据时,指示灯会呈绿色闪烁状态。
WAN当使用有线连接将路由器连接至互联网后,指示灯会呈绿色持续亮起状态。
当路由器未连接至互联网或者使用 USB 无线上网适配器连接时,指示灯处于熄灭状态。
通过有线连接发送或接收数据时,指示灯处于闪烁状态。
12思科 RV215W Wireless-N VPN 路由器3后面板RESET (重置)- RESET 按钮有两种用途:•要重新启动设备且保持当前配置,使用曲别针或笔尖按住 RESET 至少 3秒,但不能超过 10 秒。
•要重新启动设备并恢复出厂默认配置,按住 RESET 按钮 10 秒以上。
您对思科RV215W 配置所做的更改将会丢失。
LAN (1-4) — RJ-45 设备连接,用于将 PC 、打印机服务器或交换机等局域网设备连接至路由器。
WAN (互联网)— 互联网设备连接,用于将路由器连接至有线调制解调器或 DSL 调制解调器等广域网设备。

IOS升级方法一在对能够正常启动的CISCO路由器的IOS进行升级时,比较简单。
具体步骤如下:1、寻找一种TFTP服务器软件(有CISCO公司的TFTPServer或3COM公司的3Cserver等,在升级较大IOS映象文件时,建议用3Cserver),安装在一台计算机上,将要升级的IOS映象文件拷贝到相关的目录中(例:D:\),并运行TFTP服务器软件,通过菜单设置Root目录为拷贝IOS映象文件所在目录(如D:\)。
假设该计算机的IP地址为10.32.10.1;2、连接路由器的console口和PC机的COM1,使用PC的终极终端软件访问路由器,将路由器的地址设为10.32.10.32(和计算机的IP地址同网段即可)。
建议在进行IOS升级前将原有IOS文件备份下来,防止待升级的IOS文件存在问题不可用;QUOTE:Router# dir flash: (查看目前IOS映象文件名,也可用Router#Show version)Directory of flash:/1 -rw- 5998292 C2600-I-MZ.122-11.BIN8388608 bytes total (2390252 bytes free)Router#copy flash tftp (备份IOS文件)Source filename []?c2600-i-mz.122-11.binAddress or name of remote host []? 10.32.10.1 (TFTP服务器地址)Destination filename [c2600-i-mz.122-11.bin]?!!!!!!!!!!!!!!!!!!!!!!!!!!!!!!!!!!!!!!!!!!!!!!!!!!!!!!!!!!!!!!!!!!!!!!!!!!!!!!!!…!!!!!!!!!!!!!!!!!!!!!!!!!!!!!!!!!!!!!!!!!!!!!!!!!!!!!5998292 bytes copied in 324.071 secs (18509 bytes/sec)Router#3、对路由器进行IOS升级;QUOTE:Router#copy tftp flashAddress or name of remote host []? 10.32.10.1 (TFTP服务器地址)Source filename []? c2600-i-mz.122-11.bin (需升级的新IOS映象文件名)Destination filename [c2600-i-mz.122-11.bin]?Do you want to over write? [confirm]Accessing tftp://10.32.10.1/c2600-i-mz.122-11.bin...Erase flash: before copying? [confirm]Erasing the flash filesystem will remove all files! Continue? [confirm]Erasing device... eeeeeeeeeeeeeeeeeeeeeeeeeeeeeeee ...erasedeeErase of flash: completeLoading c2600-i-mz.122-11.bin from 10.32.10.1 (via Ethernet0/0): !!!!!!!!!!!!!!!!!!!!!!!!!!!!!!!!!!!!!!!!!!!!!!!!!!!!!!!!!!!!!!!!!!!!!!!!!!!!!!!!!!!!!!!!!!!!!!…!!!!!!!!!!!!!!!!!!!!!!!!!!!!!!!!!!!!!![OK - 5998292 bytes]Verifying checksum... OK (0xA0C0)5998292 bytes copied in 318.282 secs (18846 bytes/sec)Router#++++++++++++++++++++++++++++++++++++++++++++++++++++++++++++++IOS升级方法二由于升级失败后或路由器的config-register寄存器值为0x2101时,开启路由器时、或在开启(某些型号)Cisco路由器的电源开关后30秒内按下Ctrl+break键,中断路由器的正常启动,路由器都会进入rom监视模式,即Router(boot)>,在这种情形下,对路由器的IOS 进行升级,也比较简单。

如何使用MY CISCO ENTITLEMENTS (MCE)引導MCE 使用者執行版本升級的逐步指南2020 年6 月前言目的對象文件更新時間2020 6© 2019 思科和/或其附屬機構。
保留所有權利。
一種帳戶類型,可讓您在同一個位置,輕鬆跨組織檢視、儲存及管理所有資產和權利,思科客戶和合作夥伴獲得的下列權限:使用權限、技術支援權限、軟體下載權限、授CCO ID 網域代表企業或組織在網際網路上的身分,以電子郵件地址詞彙表字詞定義智慧型帳戶(SA)也可用來整合使用者的存取管理作業。
虛擬帳戶(VA)SA 內的子資料夾,有助於您在內部整理資產和權利。
資產硬體/裝置、軟體、訂閱和服務。
權利權管理權限、軟體版本升級權限、硬體更換權限、內容存取權限等等。
CCO ID是用於 網站的個人登入資訊。
您可以使用CCO ID 報名訓練課程、活動、計畫和促銷活動,以及存取其他工具和內容。
網域**************為例,網域是「 」。
目錄第1 節•透過MCE 進行版本升級第2 節•透過含SA 的產品升級工具(PUT) 進行版本升級第3 節•透過不含SA 的產品升級工具(PUT) 進行版本升級若要從MCE 存取訂購版本升級功能,以訂購軟體版本升級,步驟如下:1.按一下「Licenses 」。
2.按一下「VersionUpgrade 」,查看所有可用的版本升級授權,然後前往「Create Order 」頁面。
1212透過MCE透過MCE現在您已可在MCE 內存取「Version Upgrade」標籤。
「Version Upgrade」可讓您檢視適用於客戶帳戶的可用升級。
在「Create Order 」頁面中, 1.您可以套用篩選器,尋找要購買的升級。
2.選取產品授權,可展開及取得詳細檢視。
3.視需求為必要產品更新訂購數量。
4.按一下「Order Virtual Account 」欄中的鉛筆圖示,將訂購的授權存入VA 。
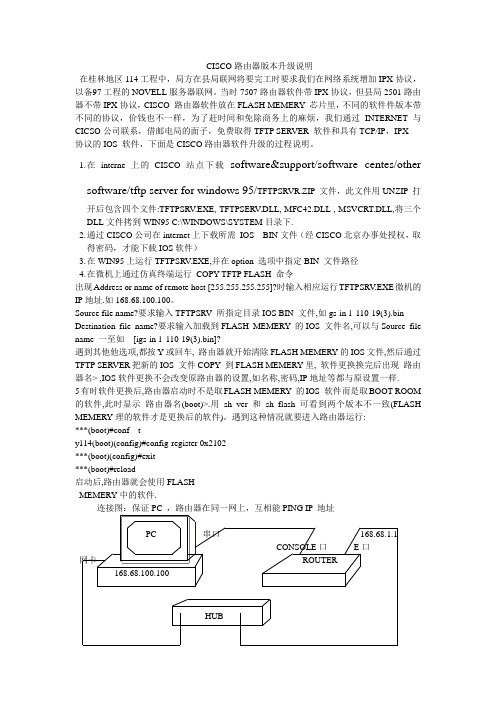
CISCO路由器版本升级说明在桂林地区114工程中,局方在县局联网将要完工时要求我们在网络系统增加IPX协议,以备97工程的NOVELL服务器联网。
当时7507路由器软件带IPX协议,但县局2501路由器不带IPX协议,CISCO 路由器软件放在FLASH MEMERY 芯片里,不同的软件件版本带不同的协议,价钱也不一样,为了赶时间和免除商务上的麻烦,我们通过INTERNET与CICSO公司联系,借邮电局的面子,免费取得TFTP SERVER 软件和具有TCP/IP,IPX协议的IOS 软件,下面是CISCO路由器软件升级的过程说明。
1.在interne上的CISCO 站点下载software&support/software centes/other software/tftp server for windows 95/TFTPSRVR.ZIP 文件,此文件用UNZIP 打开后包含四个文件:TFTPSRV.EXE, TFTPSERV.DLL, MFC42.DLL , MSVCRT.DLL,将三个DLL文件拷到WIN95 C:\WINDOWS\SYSTEM目录下.2.通过CISCO公司在internet上下载所需IOS BIN文件(经CISCO北京办事处授权,取得密码,才能下载IOS软件)3.在WIN95上运行TFTPSRV.EXE,并在option 选项中指定BIN 文件路径4.在微机上通过仿真终端运行COPY TFTP FLASH 命令出现Address or name of remote host [255.255.255.255]?时输入相应运行TFTPSRV.EXE微机的IP地址.如168.68.100.100。
Source file name?要求输入TFTPSRV 所指定目录IOS BIN 文件,如gs-in-l_110-19(3).bin Destination file name?要求输入加载到FLASH MEMERY 的IOS 文件名,可以与Source file name 一至如[igs-in-l_110-19(3).bin]?遇到其他他选项,都按Y或回车, 路由器就开始清除FLASH MEMERY的IOS文件,然后通过TFTP SERVER把新的IOS 文件COPY 到FLASH MEMERY里, 软件更换换完后出现路由器名> ,IOS软件更换不会改变原路由器的设置,如名称,密码,IP地址等都与原设置一样.5有时软件更换后,路由器启动时不是取FLASH MEMERY 的IOS 软件而是取BOOT ROOM 的软件,此时显示路由器名(boot)>.用sh ver 和sh flash 可看到两个版本不一致(FLASH MEMERY理的软件才是更换后的软件)。

快速入门指南思科RV130多功能VPN路由器思科RV130W无线多功能VPN路由器包装内容物•路由器•以太网电缆•电源适配器•快速入门指南•文档和软件(存储于 CD-ROM 光盘上)欢迎感谢您选择思科RV130/RV130W路由器。
本指南介绍了如何安装思科 RV130/RV130W并启动基于Web的设备管理器。
安装思科 RV130/RV130W1安放提示为防止设备过热或者受损:•环境温度 — 请勿在环境温度超过 40°C (104°F)的区域中使用。
•通风 — 请确保设备周围的通风良好。
•机械负载 — 请确保设备放置平稳,以免出现任何对设备造成损坏的情况。
请将设备放置在水平的表面上,以便设备依靠四个橡胶支脚来支撑。
壁挂式安装路由器的底部面板上有两个壁挂槽。
要将路由器安装到墙上,您需要安装硬件(未随机附赠)。
建议的木螺丝尺寸如图所示(非真实比例)。
2思科RV130/RV130W多功能VPN路由器思科RV130/RV130W 多功能VPN 路由器 3思科 RV130/RV130W 的特性RV130前面板电源当设备开启电源并启动时,指示灯呈绿色常亮状态。
设备正在启动或升级固件时,指示灯呈绿色闪烁状态。
如果设备在运行损坏的固件,指示灯会快速闪烁。
VPN (仅适用于站点到站点的 IPsec VPN )当至少有一个 VPN 隧道处于活动状态时,指示灯呈绿色常亮状态。
当通过 VPN 隧道接收或传输数据时,指示灯呈绿色闪烁状态。
当没有任何启用的 VPN 隧道处于活动状态时,指示灯呈琥珀色状态。
USB USB 装置成功连接到 Internet 服务提供商 (ISP)且 IP 地址已分配时,指示灯呈绿色常亮状态。
端口正在发送或接收数据时,指示灯呈绿色闪烁状态。
当 USB 装置已被识别但未能连接到 ISP 时,指示灯呈琥珀色状态。
WAN 当使用有线连接将设备连接至互联网后,指示灯呈绿色常亮状态。
当设备未连接到互联网或正在使用 USB 装置连接时,指示灯处于熄灭状态。
Americas Headquarters:Cisco Systems, Inc., 170 West Tasman Drive, San Jose, CA 95134-1706USACisco Nexus 1000V Installation and Upgrade VideoGuide, Release 4.2(1) SV1(4)A set of brief screencast videos is available to assist in the installation and upgrade of the Cisco Nexus1000V to Release 4.2(1) SV1(4). This document describes the screencasts.Cisco Nexus 1000V Installation and Upgrade DocumentationThe screencast videos described in this document are intended to supplement the Cisco Nexus 1000Vinstallation and upgrade guides. For more comprehensive and detailed information, see the followingdocuments:Cisco Nexus 1000V Getting Started Guide, Release 4.2(1)SV1(4)Cisco Nexus 1000V Software Installation Guide, Release 4.2(1) SV1(4)Cisco Nexus 1000V Software Upgrade Guide, Release 4.2(1) SV1(4)Cisco Nexus 1000V VEM Software Installation and Upgrade Guide, Release 4.2(1) SV1(4)Note We strongly recommend that you read the prerequisites listed in these documents before performing anyof the procedures described in the screencasts.Other Cisco Nexus 1000V documentation can be found at this URL:/go/nexus1000v/docsYou should also read the Cisco release notes for this release and the VMware release notes for anyassociated VMware software releases, upgrades, or patches.Cisco Nexus 1000V and VMware Compatibility InformationCisco Nexus 1000V and VMware Compatibility InformationThe Cisco Nexus 1000V system comprises several Cisco and VMware software components. Tomaintain compatible versions of these components, and to know which components must be upgradedwhen others are upgraded, see the Cisco Nexus 1000V Compatibility Information, Release 4.2(1)SV1(4),at this URL:/en/US/docs/switches/datacenter/nexus1000/sw/4_2_1_s_v_1_4/compatibility/information/n1000v_compatibility.htmlThe links on the Compatibility Information page provide compatibility matrices for release levels ofCisco Nexus 1000V and VMware software components and configurations that have been tested andvalidated by Cisco, by Cisco partners, or both. Use this information as a reference when installing orupgrading software components.Cisco Nexus 1000V Installation VideosThe following screencast videos are available to assist you in the installation of Release 4.2(1) SV1(4)of the Cisco Nexus 1000V. We recommend that you view these videos and perform the procedures in theorder shownUnderstanding Cisco Nexus 1000V and VMware Software Version CompatibilityView This video introduces and explains the use of the Host Software Version Compatibilitytable in the Cisco Nexus 1000V and VMware Compatibility Information documentprovided for each release. Given the VMware host ESX or ESXi software version, thecompatibility table shows the appropriate Virtual Ethernet Module (VEM) installationfiles and the minimum required software versions of the VMware vCenter Server, thevCenter Update Manager, and the vSphere CLI. The video also shows how to determinethe software version of various components and how to download update software.Installing a Redundant Pair of VSMs from an OVA file Using the Installer ApplicationView This video shows how to install a redundant pair of VSMs in an HA configuration froman OVA file using the Installer Application.Installing the VEM using the VUM [two parts]View View Part 1 of the video shows you how to install the VEM on an ESX host using the VUM. Part 2 of the video shows you how to troubleshoot and verify the installation.Installing the VEM using the vSphere CLIView This video shows how to install the VEM on an ESX host using the VMware vSphere CLI.Cisco Nexus 1000V Installation and Upgrade Video Guide, Release 4.2(1) SV1(4)Cisco Nexus 1000V Upgrade VideosCisco Nexus 1000V Upgrade VideosThe following videos are available to assist you in upgrading the Cisco Nexus 1000V to Release 4.2(1)SV1(4). We recommend that you view these videos and perform the procedures in the order shown.Understanding Cisco Nexus 1000V and VMware Software Version CompatibilityView This video introduces and explains the use of the Host Software Version Compatibilitytable in the Cisco Nexus 1000V and VMware Compatibility Information documentprovided for each release. Given the VMware host ESX or ESXi software version, thecompatibility table shows the appropriate Virtual Ethernet Module (VEM) installationfiles and the minimum required software versions of the VMware vCenter Server, thevCenter Update Manager, and the vSphere CLI. The video also shows how to determinethe software version of various components and how to download update software.Understanding the Upgrade Process for the Cisco Nexus 1000V Release 4.2(1) SV1(4)View This video provides an overview of the steps required to update your VMwareinfrastructure for a non-disruptive upgrade, and to update your VEMs and VSMs to CiscoNexus 1000V Release 4.2(1) SV1(4).Upgrading the VMware vCenter Update Manager to Release 4.0 Update 1 Patch 2View This video shows how to upgrade the VMware vCenter Update Manager (VUM) to theminimum required version for the upgrade to Cisco Nexus 1000V Release 4.2(1) SV1(4).Upgrading the Cisco Nexus 1000V from 4.0(4) SV1(3, 3a, or 3b) to 4.2(1) SV1(4) [three parts]This three-part video shows you how to upgrade your Virtual Ethernet Modules (VEMs)and Virtual Supervisor Modules (VSMs) to Cisco Nexus 1000V Release 4.2(1)SV1(4).View Part 1 of the video describes the process, lists the prerequisites, and shows how todownload the required software.View Part 2 of the video shows you how to upgrade the VEMs.View Part 3 of the video shows you how to upgrade the Virtual Supervisor Modules (VSMs).Upgrading the Cisco Nexus 1000V from VMware Release 4.0 to 4.1 [three parts]This video shows how to upgrade your vCenter Server, vCenter Update Manager, andvSphere CLI from VMware Release 4.0 to Release 4.1.View Part 1 describes how to check software compatibility and how to upgrade the vCenterServer.View Part 2 describes how to upgrade the VUM.View Part 3 describes how to upgrade the hosts.Obtaining Documentation and Submitting a Service Request For information on obtaining documentation, submitting a service request, and gathering additionalinformation, see the monthly What’s New in Cisco Product Documentation, which also lists all new andrevised Cisco technical documentation, at:/en/US/docs/general/whatsnew/whatsnew.htmlSubscribe to the What’s New in Cisco Product Documentation as an RSS feed and set content to bedelivered directly to your desktop using a reader application. The RSS feeds are a free service. Cisco currentlysupports RSS Version2.0.Cisco Nexus 1000V Installation and Upgrade Video Guide, Release 4.2(1) SV1(4)Cisco Nexus 1000V Upgrade Videos© 2011 Cisco Systems, Inc. All rights reserved.Cisco and the Cisco Logo are trademarks of Cisco Systems, Inc. and/or its affiliates in the U.S. and other countries. A listing of Cisco's trademarkscan be found at /go/trademarks. Third party trademarks mentioned are the property of their respective owners. The use of the wordpartner does not imply a partnership relationship between Cisco and any other company. (1005R)Cisco Nexus 1000V Installation and Upgrade Video Guide, Release 4.2(1) SV1(4)。
思科认证辅导给你的路由器安装系统Cisco路由器IOS映像恢复及升级方法由于历史原因,Cisco公司的路由器产品丰富且繁杂,Cisco路由器的专用操作系统IOS 映像也同时存在多个版本,以下就分别针对两类加载不同版本的IOS映像文件的Cisco路由器做讨论。
一、Cisco 1000,1600,2500,4000系列1、IOS映像恢复的方法及步骤1)连接PC的COM1口与路由器的console口,使用PC的超级终端软件访问该路由器;2)开启路由器的电源开关,并在30秒内按下键盘的Ctrl+break,中断路由器的正常启动以进入rom监视模式,屏幕上提示符如下:>3)键入如下命令:>o /r 0x2101改变路由器虚拟寄存器的默认值(0x2102);4)键入重启命令:>i路由器重启,当屏幕显示以下信息表明路由器重启完毕:System Bootstrap,Version 5.2(8a),RELEASE SOFTWARECopyright(c)1986-1995 by cisco Systems2500 processor with 1024 Kbytes of main memory…Press RETURN to get started!5)路由器在虚拟寄存器的值为0x2101时自动进入rom启动模式:router(boot)>6)此时,将TFTP服务器上的IOS映像文件恢复至路由器flash memory中,依次键入以下命令:router(boot)>enrouter(boot)#copy tftp flashSystem flash directory:No files in System flash[0 bytes used,4194304 available,4194304 total] Address or name of remote host [255.255.255.255]?192.168.18.168(IP 地址已作技术处理,下同)Source file name?igs-i-l.110-22a.bin(IOS映像文件名)Destination file name [igs-i-l.110-22a.bin]?Accessing file 'igs-i-l.110-22a.bin' on 192.168.18.168……Loading igs-i-l.110-22a.bin from 192.168.18.168 (via Ethernet0):![OK]Device needs erasure before copying new fileErase flash device before writing?[confirm] Copy 'igs-i-l.110-22a.bin' from server as 'igs-i-l.110-22a.bin' into Flash WITH erase?[yes/no]yErasing device……eeeeeeeeeeeeeeee……erasedLoading igs-i-l.110-22a.bin from 192.168.18.168 (via Ethernet0):(!表示恢复成功)7)还原路由器虚拟寄存器的默认值(0x2102),恢复路由器的正常启动顺序,依次键入以下命令:router(boot)#conf trouter(boot)(config)#config-register 0x2102router(boot)(config)#exitrouter(boot)#wrrouter(boot)#reload2、IOS映像升级的方法及步骤1)升级之前先备份,将相关文件备份至TFTP服务器,键入如下命令:router#copy bootflash tftp(Cisco 2500系列路由器不存在bootflash,相应的是rom)router#copy flash tftprouter#copy startup-config tftp2)因为Cisco 1000,1600,2500,4000系列路由器不允许在正常工作状态下重写flash memory,所以只有进入rom(或bootflash)启动模式才能升级IOS映像,依次键入以下命令:router#conf trouter(config)#config-register 0x2101router(config)#exitrouter#wrrouter#reload3)路由器重启完毕后进入rom(或bootflash)启动模式,从TFTP服务器将新的IOS 映像文件拷贝至路由器的flash memory中:router(boot)#copy tftp flash4)还原路由器虚拟寄存器的默认值(0x2102),恢复路由器的正常启动顺序,依次键入以下命令:router(boot)#conf trouter(boot)(config)#config-register 0x2102router(boot)(config)#exitrouter(boot)#wrrouter(boot)#reload二、Cisco 1700,2600,3600,7200系列1、IOS映像恢复的方法及步骤1)连接PC的COM1口与路由器的console口,使用PC的超级终端软件访问该路由器;2)开启路由器的电源开关,并在30秒内按下键盘的Ctrl+break,中断路由器的正常启动以进入rom监视模式,屏幕上提示符如下:rommon 1>3)键入xmodem命令:rommon 1>xmodem c3640-i-mz.120-10.bin(IOS映像文件名)4)然后,路由器一直等待从PC上接收该IOS映像文件,此时在超级终端软件中点击发送选项,选择存放在PC本地硬盘中的IOS映像文件,确定后即开始下载文件至路由器的flash memory中,由于通讯带宽只有9600波特,整个文件下载时间约为1.5小时(依文件大小而定),屏幕显示信息如下:Do not start the sending program yet……device does not contain a valid magic numberdir:cannot open device flash:W ARNING:All existing data in flash will be lost!Invoke this application only for disaster recovery. Do you wish to continue?y/n[n]:yReady to receive file c3640-i-mz.120-10.bin ……Erasing flash at 0x307c0000program flash location 0x30380000Download Complete!program load complete,entry point:0x80008000,size:0x38f410 5)接着,路由器将自动重启,屏幕显示信息如下:Self decompressing the image:################################# [OK]…Press RETURN to get started!2、IOS映像升级的方法及步骤1)同理,升级之前先备份,将关键文件备份至TFTP服务器,键入下列命令:router#copy bootflash tftp(Cisco 3600系列路由器不存在bootflash)router#copy flash tftprouter#copy startup-config tftp2)因为Cisco 1700,2600,3600,7200系列路由器允许在正常工作状态下重写flash memory,所以直接键入以下命令就可完成IOS映像的在线升级:router#copy tftp flashrouter#reload或者,为保险起见(以路由器停止服务为代价),在进入rom监视模式后才进行IOS映像的升级,则依次进行下列操作:2)在路由器重启加电后30秒内按下键盘的Ctrl+break,中断路由器的正常启动直接进入rom监视模式,屏幕上提示符如下:rommon 1>或者,在路由器重启过程完成后进行以下操作,同样可以进入路由器的rom监视模式:router#conf trouter(config)#config-register 0x0router(config)#exitrouter#wrrouter#reloadrommon 1>3)键入以下命令,将IOS映像的升级文件从TFTP服务器复制至路由器的flash memory 中:rommon 1>b c3640-i-mz.121-2.T 192.168.18.168 program load complete,entry point:0x80008000,size:0x4ed478Self decompressing the image:##################################[OK]Loading c3640-i-mz.121-2.T from 192.168.18.168 (via Ethernet0/0):[OK - 5166484/10332160 bytes]4)还原路由器虚拟寄存器的默认值(0x2102),恢复路由器的正常启动顺序,依次键入以下命令:rommon 1>confreg 0x21025)键入重启命令,使得新配置生效,完成IOS映像的离线升级:rommon 2>reset。
本文说明了接入路由器平台上的Cisco IOS软件镜像的升级步骤。
2600与3600系列路由器的升级实例也适用于下文所列的路由器平台。
Cisco IOS软件文件名可能会根据Cisco IOS软件版本、功能设定以及平台等情况而发生变化。
本文说明的是以下Cisco系列路由器:Cisco 1000系列路由器Cisco 1400系列路由器Cisco 1600- R系列路由器Cisco 1700系列路由器Cisco 2600系列路由器Cisco 3600系列路由器Cisco 3700系列路由器Cisco 4000系列路由器Cisco 4700系列路由器Cisco AS5300系列路由器Cisco MC3810系列路由器本文的信息基于Cisco IOS软件版本12.0或更新版本。
开始之前步骤1:安装TFTP服务器在TCP/IP就绪的工作站或者PC机上必须安装有小文件传送协议(TFTP)服务器或者远程复制协议(RCP)服务器应用程序。
一旦安装了应用程序,则必须执行最低配置。
首先,必须将TFTP应用程序配置为作为TFTP 服务器运行,而非TFTP 客户机。
必须指定出站文件目录。
在该目录中保存了Cisco IOS软件镜像(请参阅下文的步骤2 )。
大多数TFTP应用程序提供安装常规程序辅助这些配置任务。
注意:软件功能套装光盘上包括TFTP服务器,可以在运行Windows 95、Windows 98、NT4.0以及Windows 2000的PC机上使用。
对于其它的操作系统,可从独立软件供应商处获得许多TFTP或者RCP应用程序,或者从万维网公共资源中获得TFTP或者RCP 应用程序的共享软件。
软件功能套装光盘上的TFTP服务器应用程序也可在CCO上获得。
对Windows 95、Windows 98、NT4.0以及Windows 2000下载TFTP服务器。
步骤2:选择Cisco IOS软件镜像检验您下载的Cisco IOS系统软件镜像是否同时支持您的硬件以及所需软件功能。
您可以通过Cisco Software Advisor找到这些信息。
下载您所选的软件版本之前,请确保您的路由器具有足够的动态RAM(DRAM)以及闪存来保存Cisco IOS软件镜像。
在每个Cisco IOS软件版本的版本说明以及Cisco Software Center IOS Upgrade Planner中,您可以找到推荐的最小DRAM和闪存。
有关如何选择正确的软件版本以及功能设置的更多信息,请参阅“ 如何选择Cisco IOS 软件版本”。
步骤3:下载Cisco IOS软件镜像将Cisco IOS软件镜像从Cisco IOS Upgrade Planner 下载至您的工作站或者PC机上。
Cisco 2600系列路由器的升级步骤建立到路由器的控制台会话检验TFTP服务器是否具有到路由器的IP连接经由TFTP服务器将新镜像复制到2600系列路由器的闪存中分步程序步骤1:建立到路由器的控制台会话即使可以通过telnet话路连接至路由器,我们仍然强烈建议使用控制台端口直接连接至路由器。
理由是:如果在升级期间发生了某些故障,则可能需要在物理上离路由器近一点,以便对它进行重启。
另外,在路由器升级步骤中,当路由器重新启动时,telnet连接将丢失。
采用反转电缆(通常是扁平黑色电缆)进行连接,并将路由器的控制台端口连接至PC 机的一个COM端口。
一旦PC机连接至路由器的控制台端口,您需要开启PC机上的超级终端,并且使用以下设定:Speed 9600 bits per second8 databits0 parity bits1 stop bitNo Flow Control注意:如果您在超级终端会话中获得了无效字符,这说明您没有正确设置超级终端的属性,或者路由器的config - register设定为非标准值,使得控制台连接速度高于9600 bps。
请使用show version 命令(在输出结果的最后一行中显示)检查config - register的值,并确保该值设定为0x2102或者0x102。
必须重新加载路由器使配置寄存器生效。
一旦您确信控制台速度在路由器方面设定为9600 bps,您应该检查上述超级终端属性。
有关设定超级终端属性的详情,请参阅“ 应用正确的终端仿真器设定,实现控制台连接”。
启动问题一旦您连接了路由器的控制台端口,您可能会注意到路由器处于ROMmon模式或者Boot模式。
这两种模式用于恢复与诊断步骤。
如果您没有看见通常的路由器提示,您应该遵循以下的建议以继续进行升级步骤配置。
1.路由器以rommon模式启动,当您发出dir flash: 命令时,将出现以下信息。
rommon 1 > dir flash:device does not contain a valid magic numberdir: cannot open device "flash:"rommon 2 >当您看见以上报错信息时,这意味着闪存全空或者文件系统损坏。
请参阅“使用ROMmon 的Xmodem控制台下载步骤”。
注意:您还可能需要查阅引导故障恢复步骤。
2.路由器以boot模式启动,控制台上出现以下信息:router(boot)>device does not contain a valid magic numberboot: cannot open "flash:"boot: cannot determine first file name on device "flash:"当您在控制台输出结果中看见以上报错信息时,这意味着闪存全空或者文件系统损坏。
请通过执行本文提供的步骤将有效的镜像复制到闪存中。
注意:您可能需要查阅“ 引导故障恢复步骤”。
步骤2:检验TFTP服务器是否有到路由器的IP连接TFTP服务器和路由器之间必须有网络连接,且必须能ping出TFTP软件升级的目标路由器IP地址。
要实现该操作,路由器接口与TFTP服务器必须具备:同范围的IP地址,或者配置了默认网关。
若要进行检验,请检查TFTP服务器的IP地址。
有关详情,请参阅“确定IP地址”。
步骤3:经由TFTP服务器将新镜像复制到2600系列路由器的闪存中您有IP连接,并能在担任TFTP服务器的计算机以及路由器之间执行ping操作,您可以将Cisco IOS软件镜像复制到闪存中。
注意:在复制之前,请确保您已开启了PC机上的TFTP服务器软件,并具备在TFTP 服务器根目录中提及的文件名称。
我们建议您在升级之前保留路由器/接入服务器配置的备份。
升级本身并不影响配置(配置保存在非易失RAM(NVRAM)中)。
但是,如果没有正确执行操作步骤,则可能会产生影响。
对于RCP应用程序,将所出现的每一个TFTP替换为RCP。
例如,用copy rcp flash 命令代替copy tftp flash 命令。
2600> enablePassword:xxxxx2600#2600# copy tftp flash如果有必要,您可以将镜像从一个设备复制到另一个设备。
指定TFTP服务器的IP地址。
出现提示时,按照下面的样例输入TFTP服务器的IP地址:Address or name of remote host []? 10.10.10.2指定新Cisco IOS软件镜像的文件名称。
出现提示时,请按照下面的样例输入将要安装的Cisco IOS软件镜像的文件名称:Source filename []? c2600-i-mz.121-14.bin注意:文件名称区分大小写,因此请确保正确输入。
指定目的地文件名称。
这是新软件镜像加载至路由器时所具有的名称。
可对该镜像任意命名,但是一般都输入相同的镜像文件名称。
Destination filename []? c2600-i-mz.121-14.bin注意:如果您看到以下报错信息:%Error copying tftp://10.10.10.2/c2600-i-mz.121-14.bin(Not enough space on device)这个说明闪存中没有足够的空间来复制该镜像。
在从TFTP服务器复制新的镜像之前,您需要删除一个或者多个文件。
从TFTP服务器升级新的镜像2610#copy tftp flashAddress or name of remote host []? 10.10.10.2Source filename []? c2600-i-mz.121-14.binDestination filename [c2600-i-mz.121-14.bin]?yAccessing tftp://10.10.10.2/c2600-i-mz.121-14.bin...Erase flash: before copying? [confirm]y !---如果没有足够的存储容量,可擦除闪存。
Erasing the flash filesystem will remove all files! Continue? [confirm]yErasing device... eeeeeeeeeeeeeeeeeeeeeeeeeeeeeeeeeeeeeeeeeeeeeeeeeeeeeeeee ...erasedErase of flash: completeLoading c2600-i-mz.121-14.bin from 10.10.10.2 (via Ethernet0/0): !!!!!!!!!!!!!!!!!!!!!!!!!!!!!!!!!!!!!!!!!!!!!!!!!!!!!!!!!!!!!!!!!!!!!!!!!!!!!!!!!!!!!!!!!!!!!!!!!!!!!!!!!!!!!!!!!!!!!!!!!!!!!!!!!!!!!!!!!!!!!!!!!!!!!!!!!!!!!!!!!!!!!!!!!!!!!!!!!!!!!!!!!!!!!!!!!!!!!!!!!!!!!!!!!!!!!!!!!!!!!!!!!!!!!!!!!!!!!!!!!!!!!!!!!!!!!!!!!!!!!!!!!!!!!!!!!!!!!!!!!!!!!!!!!!!!!!!!!!!!!!!!!!!!!!!!!!!!!!!!!!!!!!!!!!!!!!!!!!!!!!!!!!!!!!!!!!!!!!!!!!!!!!!!!!!!!!!!!!!!!!!!!!!!!!!!!!!!!!!!!!!!!!!!!!!!!!!!!!!!!!!!!!!!!!!!!!!!!!!!!!!!!!!!!!!!!!!!!!!!!!!!!!!!!!!!!!!!!!!!!!!!!!!!!!!!!!!!!!!!!!!!!!!!!!!!!!!!!!!!!!!!!!!!!!!!!!!!!!!!!!!!!!!!!!!!!!!!!!!!!!!!!!!!!!!!!!!!!!!!!!!!!!!!!!!!!!!!!!!!!!!!!!!!!!!!!!!!!!!!!!!!!!!!!!!!!!!!!!!!!!!!!!!!!!!!!!!!!!!!!!!!!!!!!!!!!!!!!!!!!!!!!!!!!!!!!!!!!!!!!!!!!!!!!!!!!!!!!!!!!!!!!!!!!!!!!!!!!!!!!!!!!!!!!!!!!!!!!!!!!!!!!!!!!!!!!!!!!!!!!!!!!!!!!!!!!!!!!!!!!!!!!!!!!!!!!!!!!!!!!!!!!!!!!!!!!!!!!!!!!!!!!!!!!!!!!!!!!!!!!!!!!!!!!!!!!!!!!!!![OK - 4501480/9001984 bytes]Verifying checksum... OK (0xAC8A)4501480 bytes copied in 56.88 secs (80383 bytes/sec)复制过程将需要数分钟时间,时间长短因网络的不同而有所差异。