windows 2008 radius配置
- 格式:docx
- 大小:671.28 KB
- 文档页数:13

Windows2008下配置cisco radius server配置环境:Windows2008域环境域管理员帐户登陆基本步骤:∙ Install the Network Policy and Access Service Role∙ Register in Active Directory∙ Configure the RADIUS Client Settings∙ Configure the Access policy∙ Configure the Cisco DeviceInstall the Network Policy and Access Service Role∙ From the Initial Configuration Task Windows ->Click Add a Role∙ Select the “Network Policy and Access Server Role”∙ Select the Role Service “Network Policy Server” – This is all that is require to provide RADIUS authentication for our Cisco devicesRegister in Active Directory∙ Once the Role has been configured then we can continue with the NPS configuration.You can find the NPS console under administrative tools∙ Right Click NPS (local) and Select Register in Active DirectoryConfigure the RADIUS Client Settings∙ In the RADIUS Client and Server Folder Right Click RADIUS Client and Select New RADIUS Client∙ Enter Friendly Name and IP address of the Cisco Device∙ Select Cisco as the RADIUS Vendor∙ Click Generate to make a unique RADIUS key (make sure you copy this somewhere you can access it later to paste into the Cisco Device)Configure the Access policy∙ Right Click the Network policy and Select New∙ Enter a Policy Name (Leave as unspecified)∙ Enter a Windows Group Condition – Enter the name of the group from AD who should have access∙ Enter a Client Friendly Name as a Condition – Enter the name of the RADIUS Client (we can use wild cards here so “CISCO–R?” would match multiple RADU IS Clients∙ Enter a NAS-Port-Type as a condition –Select Virtual (VPN)∙ Specify Access Granted in Specify Access Permissions∙ Configure Authentication Method as PAP∙ You can select No when asked if you want to look up the help file.∙ There are no sett ing necessary in the “Configure Constraint”“Configure Settings” – Here is where we setup the access level ∙ Remove Frame-Protocol PPP∙ Remove Service-Type Framed∙ Select Vendor Specific∙ Now Add Cisco Vendor Attribute AV=Pair∙ Add Attribute Shell:priv-lvl=15You should now end up with something like thisConfigure the Cisco DeviceThe device in the following example is a Cisco router, and only the key lines are shownUsername XXX secret XXXXXXaaa new-modelaaa group server radius RADIUS_AUTHserver a.a.a.a auth-port 1812 acct-port 1813server b.b.b.b auth-port 1812 acct-port 1813aaa authentication login networkaccess group RADIUS_AUTH localaaa authorization exec default group RADIUS_AUTH noneip radius source-interface g0/48radius-server host a.a.a.a auth-port 1812 acct-port 1813 key XXXXXradius-server host b.b.b.b auth-port 1812 acct-port 1813 key XXXXXline vty 0 15exec-time 15 0login authentication networkaccessprivilege level 1501:定义一个本地用户,如果radius服务器失效,可以用来登陆02: Switch to Access Authentication, Authorisation and Accounting new command set 03: configure a radius group “RADIUS_AUTH” to logical group RADIUS Servers04: specify primary RADIUS server as part of “RADIUS_AUTH”05: specify backup RADIUS server as part of “RADIUS_AUTH”06: define “networkaccess” as a logical name to apply logon and local access to07: allow RADIUS_AUTH users access to exec mode,计费可以不用08:specifies the interface RADIUS uses as the source.09: specify secret key for primary RADIUS server10: specify secret key for backup RADIUS server11: modify the telnet access12: set the time out for the login session13:assign networkaccess from 05: for Login access14:设置登陆权限,为了可以不用输入enable密码。

域网络的搭建目前很多公司的网络中的PC数量均超过10台:按照微软的说法,一般网络中的PC数目低于10台,则建议采对等网的工作模式,而如果超过10台,则建议采用域的管理模式,因为域可以提供一种集中式的管理,这相比于对等网的分散管理有非常多的好处,那么如何把一台成员服务器提升为域控?我们现在就动手实践一下:本篇文章中所有的成员服务器均采用微软的Windows Server 2008,客户端则采用Windows7系统。
第一步首先,当然是在成员服务器上安装上Windows Server 2008,安装成功后进入系统,我们要做的第一件事就是给这台成员服务器指定一个固定的IP,在这里指定情况如下: 注意:网络设置使用静态ip机器名:ServerIP:192.168.0.59子网掩码:255.255.255.0默认网关:192.168.0.1DNS:192.168.0.59(因为我要把这台机器配置成DNS服务器) dns的安装就不做介绍了第二步安装完DNS以后,就可以进行提升操作了,先点击“开始—运行”,输入“Dcpromo”,然后回车就可以看到“Active Directory安装向导”在这里直接点击“下一步”: 这里是一个兼容性的要求,选择windows2008及以上的操作系统来做为客户端。
然后点击“下一步”: 在这里由于这是第一台域控制器,所以选择第一项:“新域的域控制器”,然后点“下一步”:既然是第一台域控,那么当然也是选择“在新林中的域”: 在这里我们要指定一个域名,我在这里指定的是,这里是指定NetBIOS名,注意千万别和下面的客户端冲突,也就是说整个网络里不能再有一台PC的计算机名叫“FM”,虽然这里可以修改,但个人建议还是采用默认的好,省得以后麻烦。
在这里要指定AD数据库和日志的存放位置,如果不是C盘的空间有问题的话,建议采用默认。
这里是指定SYSVOL文件夹的位置,还是那句话,没有特殊情况,不建议修改:第一次部署时总会出现上面那个DNS注册诊断出错的画面,主要是因为虽然安装了DNS,但由于并没有配置它,网络上还没有可用的DNS服务器,所以才会出现响应超时的现像,所以在这里要选择:“在这台计算机上安装并配置DNS,并将这台DNS服务器设为这台计算机的首选DNS服务器”。
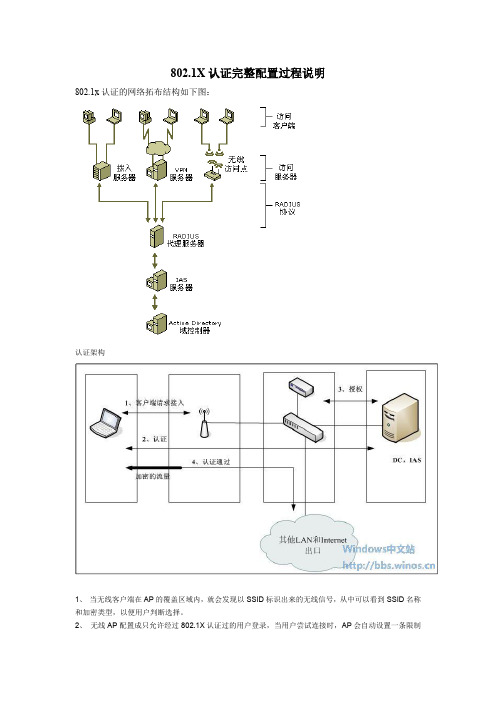
802.1X认证完整配置过程说明802.1x认证的网络拓布结构如下图:认证架构1、当无线客户端在AP的覆盖区域内,就会发现以SSID标识出来的无线信号,从中可以看到SSID名称和加密类型,以便用户判断选择。
2、无线AP配置成只允许经过802.1X认证过的用户登录,当用户尝试连接时,AP会自动设置一条限制通道,只让用户和RADIUS服务器通信,RADIUS服务器只接受信任的RADIUS客户端(这里可以理解为AP或者无线控制器),用户端会尝试使用802.1X,通过那条限制通道和RADIUS服务器进行认证。
3、RADIUS收到认证请求之后,首先会在AD中检查用户密码信息,如果通过密码确认,RADIUS会收集一些信息,来确认该用户是否有权限接入到无线网络中,包括用户组信息和访问策略的定义等来决定拒绝还是允许,RADIUS把这个决定传给radius客户端(在这里可以理解为AP或者无线控制器),如果是拒绝,那客户端将无法接入到无线网,如果允许,RADIUS还会把无线客户端的KEY传给RADIUS客户端,客户端和AP会使用这个KEY加密并解密他们之间的无线流量。
4、经过认证之后,AP会放开对该客户端的限制,让客户端能够自由访问网络上的资源,包括DHCP,获取权限之后客户端会向网络上广播他的DHCP请求,DHCP服务器会分配给他一个IP地址,该客户端即可正常通信。
我们的认证客户端采用无线客户端,无线接入点是用TP-LINK,服务器安装windows Server 2003 sp1;所以完整的配置方案应该对这三者都进行相关配置,思路是首先配置RADIUS server 端,其次是配置无线接入点,最后配置无线客户端,这三者的配置先后顺序是无所谓的。
配置如下:配置RADIUS server步骤:配置RADIUS server 的前提是要在服务器上安装Active Directory ,IAS(internet验证服务),IIS管理器(internet信息服务管理器),和证书颁发机构;在AD和证书服务没有安装时,要先安装AD然后安装证书服务,如果此顺序反了,证书服务中的企业根证书服务则不能选择安装;一:安装AD,IIS安装见附件《AD安装图文教程》二:安装IAS1、添加删除程序—》添加删除windows组件2、选择“网络服务”,点击“详细信息”3、选择“Internet验证服务”,点击“确定”4、点击“下一步”,windows会自动安装IAS。

Windows 2008 R2 SP1部署WSUS 3.0 SP21 实验环境1)域:域名为;网段:192.168.0网段,不连接外网。
域功能级别和林功能级别为Windows server 2003模式。
2)DC服务器:域控制器;Windows2008 R2 SP1企业版;主机名:DC015个操作主机角色服务器;证书服务器;DNS服务器IP地址为192.168.0.101;IP地址为192.168.0.101。
3)WSUS服务器:Windows2008 R2 SP1企业版;主机名:WSUS01;不加入域;主机双网卡:网卡一的IP地址为192.168.0.108;网卡二的IP地址为DHCP自动分配,连接外网。
4)客户端:Windows7企业版X86;主机名:WIN701;加入域;DNS服务器IP地址为192.168.0.101;IP地址为192.168.0.103。
2 安装WSUS SP2准备1) 以本地管理登陆WSUS01服务器。
2) 安装Microsoft Report Viewer Redistributable 2008,下载链接:/downloads/zh-cn/details.aspx?displaylang=zh-cn&FamilyI D=6ae0aa19-3e6c-474c-9d57-05b2347456b13) 运行Report Viewer.exe文件,下一步。
4) 接受协议,选择“安装”。
5) 选择“完成”。
6) 安装IIS组件。
7) 打开“服务器管理器”,选择“角色---添加角色”,选中“Web服务器(IIS)”,下一步。
8) 如果您要安装 Web 服务器 IIS,则在“Web 服务器 (IIS)”页中,单击“下一步”。
在“Web 服务器 (IIS) 角色服务”页中,除了选中的默认设置外,还请选择“”、“Windows 身份验证”、“动态内容压缩”和“IIS 6 管理兼容性”。

RADIUS服务器搭建配置功能测试指导书信锐网科技术有限公司2015年05 月25 日第一章功能概述本文介绍AD域、CA证书颁发机构以及RADIUS服务器搭建和服务器配置。
第二章场景需求2.1 服务器搭建部分2.1.1 系统重封装因为这两台虚拟机都是克隆的,避免实验中出现不必要的问题,将两台Windows server 2008 R2 系统重新封装。
使用sysprep命令2.1.2 在server1 上完成AD和DNS搭建首先给服务器命名server1、server2并配置静态IP地址。
第一步打开服务管理器查看该服务器的基本信息。
在服务器管理器界面选择角色,选择添加角色。
默认选择下一步选择Active Directory 域服务器这个服务器角色下一步,选择安装。
安装完成之后,关闭此对话框。
在运行里,输入dcpromo完成域控制器的安装。
直接选择下一步选择,在新林中新建域,选择下一步输入创建域的FQDN ,例如:下一步在此界面现在林功能级别为windows server 2008 R2,然后选择下一步在此选择DNS服务器,一并安装。
忽略此提示,选择‘是’此次选择默认,下一步此处输入目录还原模式的独立密码。
此次选择下一步,保持默认。
在此勾上完成后重新启动,重启之后,AD域安装成功。
重启之后,原来server1的管理员帐号成为了域控制器的管理员帐号,权限最高。
域管理员帐号域用户名登录方式example\administrator或者administrator@2.1.3 在server1上搭建证书颁发机构CA此处选择服务器角色Active Directory证书服务选择证书颁发机构和web注册,支持用户通过网页方式申请CA证书。
此处选择企业CA此处选择根CA,然后下一步。
此处选择新建私钥,然后下一步此次选择安装,安装完成之后,关闭此对话框,CA安装完毕。
配置组策略,新加域的计算机,自动颁发计算机证书。

Published2020-07-21Network Configuration ExampleConfiguring Windows Server2008for Radius AuthenticationiiJuniper Networks,Inc.1133Innovation WaySunnyvale,California94089USA408-745-2000Juniper Networks,the Juniper Networks logo,Juniper,and Junos are registered trademarks of Juniper Networks,Inc.inthe United States and other countries.All other trademarks,service marks,registered marks,or registered service marksare the property of their respective owners.Juniper Networks assumes no responsibility for any inaccuracies in this document.Juniper Networks reserves the rightto change,modify,transfer,or otherwise revise this publication without notice.Network Configuration Example Configuring Windows Server2008for Radius AuthenticationCopyright©2020Juniper Networks,Inc.All rights reserved.The information in this document is current as of the date on the title page.YEAR2000NOTICEJuniper Networks hardware and software products are Year2000compliant.Junos OS has no known time-relatedlimitations through the year2038.However,the NTP application is known to have some difficulty in the year2036.END USER LICENSE AGREEMENTThe Juniper Networks product that is the subject of this technical documentation consists of(or is intended for use with)Juniper Networks e of such software is subject to the terms and conditions of the End User License Agreement (“EULA”)posted at https:///support/eula/.By downloading,installing or using such software,youagree to the terms and conditions of that EULA.Table of ContentsExample:How to Configure Windows Server 2008for RadiusAuthentication1Overview of Radius Authentication on Windows Server 2008Example |5About This Network Configuration Example |5Use Case Overview |5Need for a Radius Server |5Radius Server Benefits |6Technical Overview |6Understanding Radius Servers |7Server Network Topology |7How to Configure Windows Server 2008for Radius Authentication |8Requirements |8Overview |8Topology |10Configure Windows Server 2008for Radius Authentication |10iii1C HAPTERExample:How to Configure Windows Server2008for Radius AuthenticationOverview of Radius Authentication on Windows Server2008Example|5How to Configure Windows Server2008for Radius Authentication|8Overview of Radius Authentication on Windows Server2008ExampleIN THIS SECTIONAbout This Network Configuration Example|5Use Case Overview|5Technical Overview|6About This Network Configuration ExampleThis network configuration example(NCE)describes how to configure Windows Server2008to authenticate users by using EX Series switches for Protected Extensible Authentication Protocol(PEAP)authentication.A Radius server is very flexible and secure.It uses complex authentication methods such as LDAP,NTLM,and Kerberos to authenticate users.It uses a central database to secure wired or wireless networks and provides centralized Authentication,Authorization,and Accounting(AAA or Triple A)management for users.The use case shows how to deploy Network Policy Server(NPS)as the Radius server for an EX4300switch. Use Case OverviewNeed for a Radius ServerA Radius server maintains user profile information,authenticates and authorizes when a user tries toconnect to the network.It ensures a secure wired or wireless network.It efficiently manages dial-in access to various Points-Of-Presence(POPs)across its network and provides a centralized AAA management.A Radius server provides more functionality than other authentication protocols.All two-factorauthentication vendors and VPN providers support Radius servers.Radius servers are very simple and easy to manage.To activate the Radius server,all you need is the IP address of each network device anda shared secret.To authenticate and communicate with users,Radius server uses Extensible Authentication Protocol(EAP). PEAP is the authentication protocol that a Radius server uses to authenticate users by using credentials such as username and password.Radius servers use Splitting Authorization and Authentication method to ensure data security.For more information about the Radius server and authentication workflow,see802.1X and RADIUS AccountingRadius Server BenefitsThe Radius server provides the following benefits:•Active Directory—Offers complex authentication methods such as LDAP,NTLM,and Kerberos.These authentication methods make sure that when a device tries to authenticate users,it requires valid credentials within Active Directory.•Central database—Uses a central database to secure wired or wireless networks and to authenticate users instead of using a pre-shared key.•AAA—Provides centralized AAA management.This makes the system incredibly flexible,and can perform authentication and authorization against any user directory source.This flexibility combined with a wealth of supported authentication protocols and a variety of client integration has kept Radius in high demand.•Secure authentication methods—Provides a variety of secure authentication methods,that can leverage username or password,PKI certificates,or a combination of both.Based on the results of the authentication and authorization,Radius helps to provide access to the appropriate network gear or networks.When you use Radius with802.1x,control over access is strong and powerful.•Secure directory services—Provides a way to couple Radius with directory services to create a layer of security for wireless networks.Technical OverviewIN THIS SECTIONUnderstanding Radius Servers|7Server Network Topology|7Understanding Radius ServersRadius servers manage all authenticationand use Extensible Authentication Protocol (EAP)to communicate with users.Most popular are:•Protected EAP (PEAP)–Authenticates using a username and password.•EAP-TLS -Authenticate wireless users.Radius servers show a certificate to users so that they can verify and confirm that they are communicating with the correct Radius server.Server Network TopologyRadius architecture makes the network infrastructure secure for wired or wireless users.It uses EAP to authenticate users by using credentials such as username and password.Figure 1:Radius Server Network TopologyRadius ServerPEAP AuthenticatorUserRELATED DOCUMENTATIONHow to Configure Windows Server 2008for Radius Authentication |87How to Configure Windows Server2008for Radius AuthenticationIN THIS SECTIONRequirements|8Overview|8Configure Windows Server2008for Radius Authentication|10RequirementsThis configuration example uses the following devices:•Windows2008R2as the Radius server.•One EX4300switch as the authenticator.Software version:Junos OS Release18.4R2-S3.•One laptop or PC running Windows10or MAC OS as the user.OverviewUse this NCE to configure Windows Server2008to authenticate users by using the EX Series switches for PEAP authentication.To configure Windows Server2008for radius authentication,you must:1.Configure the server:a.Change the computer name and IP address.b.Configure Active Directory Domain Services(ADDS)and add DNS server as the domain controller.ADDS stores information about users,computers,and other devices on the network.ADDS helps administrators to securely manage this information and facilitates resource sharing and collaboration between users.ADDS is also required for directory-enabled applications such as Microsoft Exchange Server and for other Windows Server technologies such as Group Policy.To ensure that you can log on to the network in case of a server outage,we recommend that you install at least two domain controllers for a domain.ADDS requires a DNS server on the network.If you have not installed a DNS server,you areprompted to install the DNS server role on the server.c.Configure Active Directory Certificate Services.When the user tries to connect to the network,the RADIUS server sends a certificate to the user for self authentication.To prevent users from receiving fake certificates and to ensure authenticity of the certificate and the Radius server,you should configure the server as a root Certificate Authority (CA).This allows the server to generate a computer certificate and client certificates.d.Install Network Policy Server(NPS).NPS is the Radius server that ensures the health and security of your network.NPS allows you to create and enforce organization-wide network access policies for client health,connection request authentication,and connection request authorization.With NPS,you can also enable Network Access Protection(NAP),which is a client health policy creation,enforcement,and remedialtechnology.2.Create certificates.These certificates are digital credentials that connect to wireless networks,protect data,establish identity,and perform network and data security related tasks.The Radius server sends these certificates to the users to verify and ensure that they are communicating with the correct Radius server.3.Configure NPS for EAP authetication.This enables NPS to authenticate users in the Active Directory.4.Add Radius Authenticator details.Radius clients allow you to specify the network access servers that provide access to your network.5.Create network policies for users.Network policies allow you to designate who is authorized to connect to the network and thecircumstances under which they can or cannot connect.6.Add wireless users to the active directory.7.Export root CA from the server.8.Import root CA to Windows7.9.Configure EX switch for the10.Select the dot1x authentication the user device to trigger the dot1x authentication withthe NPS server.TopologyIn this example,EX Series switch acts as an authenticator and Windows server with NPS acts as the Radius server.Figure 2on page 10shows the physical topology and the IP addressing scheme used in this example.Figure 2:Radius Authentication Topologyge-0/0/46Radius Server Configure Windows Server 2008for Radius AuthenticationOverviewThis section shows how to configure Windows Server 2008for Radius authentication by using NPS.Configure the ServerIN THIS SECTIONConfigure Computer Name and IP Address |11Configure ADDS |11Add DNS Server as Domain Controller |1110Configure Active Directory Certificate Services|12Install NPS|13Use this section to configure the Windows Server2008.Configure Computer Name and IP AddressStep-by-Step Procedure1.On Windows Server2008,click Start>Computer,right-click on Computer,and select Properties.2.Click Change settings.The Computer Name/Domain Changes page opens.3.Enter the computer name in the Computer name field.4.Select Workgroup and enter the workgroup name in the Workgroup field.5.Click OK to save the settings.Configure ADDSStep-by-Step Procedure1.On Windows Server2008,click Start>Administrative Tools>Server Manager.The Server Managerpage opens.2.From the left navigation bar,click Roles>Add Roles and follow the Add Roles Wizard.3.On the Before You Begin page,click Next.4.On the Select Server Roles page,select Active Directory Domain Services and click Next.5.On the Active Directory Domain Services page,click Next.6.On the Confirmation Installation Selections page,click Install.7.Click Close.The Active Directory Domain Services is installed.Add DNS Server as Domain ControllerStep-by-Step Procedure1.On Windows Server2008,click Start,type dcpromo,press Enter,and follow the Active DirectoryDomain Services Installation Wizard.2.From the left navigation bar,click Roles>Add Roles and follow the Add Roles Wizard.3.Deselect the Use advanced mode installation check-box and click Next.4.On the Select Server Roles page,select Active Directory Domain Services and click Next.5.On the Active Directory Domain Services page,click Next.6.Click Next.7.Select Create a new domain in a new forest and click Next.8.Enter the domain name in the FQDN of the forest root domain field and click Next.9.From the Forest functional level drop-down list,select Windows Server2008R2and click Next.10.Select DNS server and click Next.11.Click Yes to continue.12.Click Next.13.Enter a password in the Password field,re-enter the password in the Confirm password field,and clickNext.Setting a password allows you to restore your Active Directory.14.Click Next.Installation begins and it takes a few minutes time to complete the installation.15.Click Finish.16.Click Restart Now to restart the server for the changes to take effect.Configure Active Directory Certificate ServicesStep-by-Step Procedure1.On the Windows Server2008,click Start>Administrative Tools>Server Manager.The Server Managerpage opens.2.From the left navigation bar,click Roles>Add Roles and follow the Add Roles Wizard.3.On the Before You Begin page,click Next.4.On the Select Server Roles page,select Active Directory Certificate Services and click Next.5.On the Introduction to Active Directory Certificate Services page,click Next.6.On the Select Role Services page,select Certification Authority and click Next.7.On the Specify Setup Type page,select Enterprise and click Next.8.On the Specify CA Type page,select Root CA and click Next.9.On the Set Up Private Key page,select Create a new private key and click Next.10.On the Configure Cryptography for CA page,click Next.11.On the Configure CA Name page,enter the CA name in the Common name for this CA field,enter thename suffix in the Distinguished name suffix field,and click Next.On this page,click Next to use the computer name and domain name as the default CA name.12.On the Set Validity Period page,select the validity period from the Select validity period for thecertificate generated for this CA field and click Next.The default validity period for the root CA certificate is5years.13.On the Configure Certificate Database page,click Next.14.On the Web Server(IIS)page,click Next.15.On the Select Role Services page,click Next.16.On the Confirmation Installation Selections page,click Install.17.Click Close.The Active Directory Certificate Services and Web Server(IIS)are installed.Install NPSStep-by-Step Procedure1.On Windows Server2008,click Start>Administrative Tools>Server Manager.The Server Managerpage opens.2.From the left navigation bar,click Roles>Add Roles and follow the Add Roles Wizard.3.On the Before You Begin page,click Next.4.On the Select Server Roles page,select Network Policy and Access Services and click Next.5.On the Select Role Services page,select Network Policy Server and click Next.6.On the Confirmation Installation Selections page,click Install.7.Click Close.The NPS is installed.Create CertificatesUse this section to create certificates.Step-by-Step Procedure1.On Windows Server2008,click Start,type mmc,and press Enter.The Console1page opens.2.From the File menu,select Add/Remove Snap-in.3.On the Add/Remove Snap-in page,under Available snap-ins,select Certificates,click Add,and clickOK.4.On the Certificates snap-in page,select Computer account and click Next.5.On the Select Computer page,select Local computer and click Finish.6.On the Add/Remove Snap-in page,click OK.The Console1page opens.7.On the left navigation bar,under Console Root>Certificates>Personal,select Certificates to see allavailable computer certificates.The Intended Purposes tab on the right side space lists the Client Authentication,Server Authentication certificate.If you do not see the certificate listed under the Intended Purposes tab,you can create a certificate.To create a certificate,right-click on the white space and select All Tasks>Request New Certificate.If you do not see a certificate under Selected snap-ins,you can create a certificate:a.On the Add/Remove Snap-in page,under Selected snap-ins,right-click and select All Tasks>RequestNew Certificate.b.On the Certificate Enrollment page,click Next.c.Under Select Certificate Enrollment Policy,select Active Directory Enrollment Policy and clickNext.d.Click Finish.Certificate installation is complete.Configure NPS for EAP AuthenticationUse this section to configure NPS for EAP authentication.Step-by-Step Procedure1.On Windows Server2008,click Start>Administrative Tools>Network Policy Server.The NetworkPolicy Server page opens.2.Click NPS(Local)and select Register Server in Active Directory.3.Click OK.4.Click OK.Add Radius Authenticator DetailsUse this section to add the IP address and the shared secret that are configured on the EX4300switch. Step-by-Step Procedure1.On Windows Server2008,click Start>Administrative Tools>Network Policy Server.The NetworkPolicy Server page opens.2.Click NPS(Local),expand RADIUS Clients and Servers,right-click on RADIUS Clients,and select New.3.On the New RADIUS Client page,under Settings,enter a name in the Friendly name field and IP orDNS address in the Address field.Enter a password in the Shared secret field and re-enter the password in the Confirm shared secret field.The Radius client is added.Create Network Policies for UsersUse this section to create network policies for users.Step-by-Step Procedure1.On Windows Server2008,click Start>Administrative Tools>Network Policy Server.The NetworkPolicy Server page opens.2.Click NPS(Local),expand Policies,right-click on Network Policies,and select New.3.On the New Network Policy page,enter a policy name in the Policy name field,select Type of networkaccess server,select Unspecified from the drop-down list,and click Next.4.On the Specify Conditions page,click Next.5.On the Specify Access Permission page,select Access granted and click Next.6.On the Configure Authentication Methods page,under EAP Types,click Add.7.On the Add EAP page,under Authentication methods,select Microsoft:Protected EAP(PEAP),andclick OK.8.Under EAP Types,select Microsoft:Protected EAP(PEAP),click Edit,and click Next.9.On the Edit Protected EAP Properties page,select the certificate from the Certificate Issued drop-downlist,select the required certificate,and click OK.10.On the Configure Authentication Methods page,click Next.11.On the Configure Constraints page,under Constraints,select Idle Timeout,and click Next.12.On the Configure Settings page,under Settings>RADIUS Attributes,select Standard,and click Next.13.Click Finish.The policy for user is created.Add Users to the Active DirectoryUse this section to add users to the active directory.Step-by-Step Procedure1.On Windows Server2008,click Start>Administrative Tools>Active Directory Users and Computers.The Active Directory Users and Computers page opens.2.Under Active Directory Users and Computers>Domain-name,right-click on Users,and select New>User.3.Enter username and password.4.Create user and click ers are added to the active directory.Export CA Root Certificate from the serverUse this section to export CA root certificate from the server.Step-by-Step Procedure1.On Windows Server2008,click Start,type mmc,and press Enter.The Console1page opens.2.From the File menu,select Add/Remove Snap-in.3.On the Add/Remove Snap-in page,under Available snap-ins,select Certificates,click Add,and clickOK.4.On the Certificates snap-in page,select Computer account and click Next.5.On the Select Computer page,select Local computer>Trusted Root Certification Authorities>Certificates.On the right-side space,your root CA certificate is listed.6.Right-click on your root CA certificate and select All Tasks>Export.Follow the Certificate ExportWizard and click Next.7.On the Export Private Key page,select No,do not export the private key and click Next.8.Select the DER encoded binary X.509(CER)file format and click Next.9.Choose a folder and file name and click Next and click Finish to complete the export.10.Copy the certificate that you have exported to a USB drive or any other storage device and transferthe certificate to your Windows client.Import CA Root Certificate to Windows7Use this section to import CA root certificate to Windows7.Step-by-Step Procedure1.Double-click on the certificate file that you exported on your Windows7computer and click InstallCertificate.2.Click Next.3.Select the Trusted Root Certification Authorities tab and click Import.4.In the Certificate Import Wizard,click Finish.A security warning message is displayed that you areabout to trust a new root certificate.Click Yes to continue.The CA root certificate is imported on Windows7.5.Add this certificate in the Windows registry.a.On Windows Server2008,click Start,type cmd,and press Ctrl+Shift+Enter.A command promptwith administrative rights opens.b.Enter Desktop>certutil-f-enterprise-addstore NTAuth<certificate-name>Configure EX Switch for the Authenticator RoleUse this section to configure EX switch as an authenticator.User facing interfaces should be enabled for dot1x.The device being authenticated must be reachable by the RADIUS server so that EAP frames can be processed.Step-by-Step Procedure1.Configure the EX switch:user@host# set access radius-server server-ip port1812secret secret-passworduser@host# set access profile dot1x authentication-order radiususer@host# set access profile dot1x radius authentication-server192.0.2.1/24user@host# set protocols dot1x authenticator interface ge-0/0/46supplicant single user@host# set interfaces ge-0/0/0unit0family inet address192.0.2.1/242.Verify the configuration:user@host# run show dot1x interfaceFor example:root@EX4300# run show dot1x interface802.1X Information:Interface Role State MAC address User ge-0/0/22.0 Authenticator Authenticated 38:C9:86:23:7E:48 DAVIDroot@jtac-ex2300-24t-r2001# run show dot1x interface detailge-0/0/22.0Role: AuthenticatorAdministrative state: AutoSupplicant mode: SingleNumber of retries: 3Quiet period: 60 secondsTransmit period: 2 secondsMac Radius: DisabledMac Radius Restrict: DisabledReauthentication: EnabledReauthentication interval: 3600 secondsSupplicant timeout: 45 secondsServer timeout: 30 secondsMaximum EAPOL requests: 2Guest VLAN member: server-failNumber of connected supplicants: 1Supplicant: DAVID, 38:C9:86:23:7E:48Operational state: AuthenticatedBackend Authentication state: IdleAuthentication method: RadiusAuthenticated VLAN: DOT1X-CLIENTSession Reauth interval: 3600 secondsReauthentication due in 3562 secondsEapol-Block: Not In EffectDomain: DataEnable dot1x client for Dot1xStep-by-Step Procedure1.On the user device,click Start,type services.msc,and press Enter.The Wired AutoConfig page opens.2.Right-click on Wired AutoConfig and select Properties.The Wired AutoConfig Properties page opens.3.From the Startup type drop-down list,select Automatic,click Start,and click OK.4.On the user device,click Start>Control Panel.5.Double click on Network and Sharing Center and click Change adapter settings.6.Right-click on Local Area Connection and select Properties.The Local Area Connection Propertiespage opens.7.Click Authentication tab and complete the following:a.Select the Enable IEEE802.1x authentication check-box.b.From the Choose a network authentication method drop-down list,select Microsoft ProtectedEAP(PEAP).c.Click Settings.The Protected EAP Properties page opens.d.Select the Verify the server’s identity by validating the certificate check-box,select Securedpassword(EAP-MSCHAP v2)from the Select Authentication Method drop-down list,and click Configure.If this is a Domain Computer,select the Automatically use my Windows logon name and password (and domain if any)check-box.e.Click OK to return to the Ethernet Properties page and click Settings.f.Click OK to return to the Ethernet Properties page and click Additional Settings.g.Select the Specify authentication mode check-box and select User authentication from the Useror computer authentication drop-down list.Click OK.8.Click OK on the Ethernet Properties page to finish the dotx configuration.You are now ready to connectto the network using PEAP.21RELATED DOCUMENTATIONOverview of Radius Authentication on Windows Server2008Example|5。
WindowsServer搭建radius认证服务器radius简介RADIUS(Remote Authentication Dial-In User Server,远程认证拨号⽤户服务)是⼀种分布式的、C/S架构的信息交互协议,能包含⽹络不受未授权访问的⼲扰,常应⽤在既要求较⾼安全性、⼜允许远程⽤户访问的各种⽹络环境中。
协议定义了基于UDP(User Datagram Protocol)的RADIUS报⽂格式及其传输机制,并规定UDP端⼝1812、1813分别作为认证、计费端⼝。
如果是思科设备:认证和授权端⼝为UDP1645,计费端⼝1646.RADIUS最初仅是针对拨号⽤户的AAA协议,后来随着⽤户接⼊⽅式的多样化发展,RADIUS也适应多种⽤户接⼊⽅式,如以太⽹接⼊等。
它通过认证授权来提供接⼊服务,通过计费来收集、记录⽤户对⽹络资源的使⽤。
环境信息本⽂为之前搭建记录,使⽤了WinServer2016作为AD,安装了NPS功能作为radius认证服务器,radius客户端为UniFi AP。
策略需求为限定某个⽤户组只能连接AP指定的SSID。
需要部署CA和NPS服务器证书,缺少证书从事件查看器中会看到报错:“客户端不能⾝份验证,因为可扩展的⾝份验证协议(EAP)不能被服务器处理”。
设置⽹络策略服务器NPSWin+R运⾏输⼊mmc,打开Microsoft管理控制台(MMC),添加NPS管理单元。
配置radius客户端添加所⽤radius客户端(UniFi AP),填写友好名称与地址,和共享机密。
配置策略连接请求策略:可以使⽤默认的“所有⽤户使⽤ Windows ⾝份验证”策略,如果有特殊需求可以新建⾃定义策略。
⽹络策略:1. 新建策略-输⼊策略名称。
2. 添加条件-可以指定⽤户组、⽇期和时间限制、连接属性等,我需要根据⽤户组来限定可连接的SSID,所以条件只加了⽤户组。
3. 指定访问权限-已授予访问权限。
北信源radius在windows2008下安装指南一,微软IAS的安装1.点击左下角的“服务器管理器”按钮,如图:2.点击“角色”选项中的“添加角色”按钮,如图:3.点击“下一步”按钮,勾选“web服务器(IIS)”,如图:4.点击“下一步”按钮,如图:5.点击“下一步”按钮,勾选“应用程序开发”,如图:6.点击“下一步”按钮,如图:8.点击“功能”选项中的“添加功能”按钮,如图:9.勾选“.NET Framework 3.5.1 功能”,并安装。
如图:10.选中“Web 服务器(IIS)”选项,右键单击选择“添加角色服务”,如图:11.勾选“IIS 6 管理兼容性”和“IIS 可承载Web核心”选项,并安装。
安装VRVRadius服务器,安装成功以后用IE游览器访问:“服务器IP/radius”,如图:登录页面出现后输入用户名密码,默认用户名:admin 密码:123456。
登录后可做修改。
登录后可创建管理员账号和权限分配,可根据向导或者自行进行配置和管理操作。
登陆管理员账号进入管理配置界面。
管理平台首页1、部门设置:部门是采用了相同认证方式的用户群。
一般情况下,同部门的人员采用相同的认证策略。
部门设置界面可进行添加部门,删除部门,查询部门,编辑部门等操作,并以列表方式显示,清晰明了,方便管理员查看和操作(就是对同一批人执行相同的认证)。
2、用户设置这里指的用户,是保存在数据库中的用户,认证时,服务器将发起认证的用户名和保存在数据库中的用户名进行比较从而进行下一步认证。
在用户设置界面,可进行添加用户,删除用户,查询用户,批量导入用户和列设置等操作。
在高级查询中,可根据用户的不同属性进行查询(就是之前IAS中需要新建的用户)。
3、认证日志用户每发起一次认证请求,系统便会记录一条认证信息,如果用户认证失败,系统会给出失败原因。
在认证日志界面,以列表形式直观显示用户认证时间,所属部门,认证类型,认证结果,认证设备等,方便管理员对用户认证信息的查看(在列设置中,可根据需求选择显示在列表中的项目)。
Winradius使用手册RADIUS概述RADIUS(Remote Authentication Dial In User Service,远程用户拨号认证服务),它是一种在网络接入服务器(Network Access Server,NAS)和共享认证服务器间传输认证、授权和配置信息的标准协议,并负责传送网络接入服务器和共享计费服务器之间的计费信息。
设置WinRadius服务器的操作步骤(1)运行WinRadius。
在真实计算机上打开软件包中的"4\WinRadius"文件夹。
双击文件夹中的"WinRadius.exe"文件运行WinRadius,第1次运行会提示"未发现数据源名称并且未指定默认的驱动程序"提示信息,如图4-16所示。
图4-16 提示信息(2)配置ODBC。
单击WinRadius中的菜单"设置"→"数据库"选项,打开"ODBC设置"对话框,如图4-17所示,单击"自动配置ODBC"按钮,ODBC配置完成,单击"确定"按钮返回。
系统提示"您修改了重要配置参数,您必须重新启动WinRadius以便使这些参数生效"。
图4-17 "ODBC设置"对话框(3)配置WinRadius客户端。
关闭WinRadius,然后重新运行WinRadius。
单击WinRadius"设置"→"多重密钥"选项,打开"多重密钥"对话框,如图4-18所示。
在对于"IP(NAS)"文本框中输入ROS服务器外网接口的IP地址"10.0.248.231",在"采用密钥"文本框中输入"12345"(这里配置的密钥需要与ROS中设置的密钥相同),单击"添加"按钮。
1、登录Windows 2008 Server操作系统,选择服务器管理器 >> 角色 >> 添加角色。
2、进入添加角色向导>> 开始之前,点击下一步。
3、进入服务器角色,勾选网络策略和访问服务,点击下一步。
4、进入网络策略和访问服务,点击下一步。
5、进入角色服务,勾选网络策略服务器,点击下一步。
6、进入确认,点击安装。
7、安装完毕,点击关闭。
1、进入开始 >> 管理工具 >> 计算机管理,选择本地用户和组 >> 用户,右击选择新用户。
2、添加用户名、密码(本例为customer、customer),点击创建。
3、右击新建的用户,选择属性 >> 拨入,网络访问权限选择为允许访问,点击应用>> 确定。
3、右击组,选择新建组,设置组名(本例为portal),在成员选项中点击添加。
4、选择用户,将添加的用户(customer)添加到该组中,点击创建。
1、进入开始 >> 管理工具 >> 网络策略服务器,选择用于拨号或VPN连接的RADIUS服务器,点击配置VPN或拨号。
2、选择拨号连接,点击下一步。
3、进入指定拨号或VPN服务器,在RADIUS客户端选项中点击添加。
4、在地址(IP或DNS)一栏中输入AC无线控制器的IP地址,设定共享机密,点击确定 >> 下一步。
注意:此处“共享机密”需同AC中的“共享密钥”相同。
5、进入配置身份验证方法,勾选MS-CHAP、MS-CHAP2 两种加密方式,点击下一步。
6、指定用户组,点击添加。
7、选择高级 >> 立即查找,将之前建立的用户组(portal)添加进来,点击确定 >> 确定 >> 下一步。
8、依次进入IP筛选器 >> 指定加密设置 >> 指定一个领域名称,无需设置,直接点击下一步。
9、设置完成,点击完成
通过以上配置,使用Windows 2008 Server操作系统成功搭建Radius服务器,可以作为Portal 认证的外部认证服务器。
AC中需建立相应的服务器条目对应该服务器,点击参考:。