玻妞新版说明书
- 格式:docx
- 大小:233.74 KB
- 文档页数:12

TBV-AN BERLIN SERIESTBV123-ANArrayable 2 Way 12" Constant Curvature Loudspeaker with Dendritic Waveguide, Klark Teknik DSP Technology and ULTRANET NetworkingTBV118L-AN18" Powered Subwoofer with Klark Teknik DSP Technology and ULTRANET Networking V 1.0欢迎感谢您为您的应用选择 Turbosound 扬声器产品。
如果您想了解有关此产品或任何其他产品的更多信息, 请访问我们的网站 。
打开扬声器包装打开设备包装后, 请仔细检查是否有损坏。
如果发现损坏, 请立即通知您的供应商。
收货人您必须提出任何索赔要求。
请保留所有包装, 以备将来退货时使用。
控制项(1) 过程 按钮逐步浏览 DSP 处理模块。
(2) 液晶屏 显示当前的 DSP 模块和参数设置。
(3) 设置 按钮可逐步浏览 DSP 处理模块中的参数。
(4) 出口 按下后, 按钮返回到顶级 DSP 屏幕。
(5) 进入 按钮保存更改, 并在按下时停用编辑模式。
(6) 编码器旋钮 在 “图形” 和 “编辑” 模式之间切换 (按下时) 并更改参数值 (旋转时)。
(7) USB 连接可通过计算机进行固件更新和参数远程控制。
请访问 为您的计算机下载 DSP 控制软件。
(8) 音频输入 组合插孔使用 XLR , 平衡的 ¼" TRS 或不平衡的 ¼" TS 连接器接受输入信号。
(9) 音频链接卡侬 连接器提供未处理的 AUDIO INPUT 信号副本。
(10) ULTRANET IN RJ45 / Neutrik etherCON 插孔, 用于连接其他配有 ULTRANET 的设备。

finiti™Array使用說明書組裝及使用本產品前請先閱讀說明書全文15公斤/0-36個月5612F IG U R E 1 ~ 57113F IG U R E 6 ~ 11109821211412212 16F IG U R E 17 ~ 21F IG U R E 22 ~ 27231322224F IG U R E 28 ~ 33252611227121283032313329F IG U R E 34 ~ 383435112F IG U R E 39 ~ 433738393640414221143444 7F IG U R E 4 8 ~ 53F IG U R E 54 ~ 5756211F IG U R E 58 ~ 625860595712262615455747 9CH15目錄參照圖示1-16緊急情況處理 18產品資訊 19產品組件及各部件名稱 20警告21產品組裝23打開手推車23組裝&拆卸前輪23組裝&拆卸後輪23組裝遮陽篷23組裝&拆卸置物杯 23產品操作24調整背靠角度24使用安全扣24使用肩帶和腰帶25使用扶手25調節小腿靠支撐板 25前輪定向26使用剎車踏板26使用遮陽篷26調整車手26調整座椅方向 26使用置物口袋 26收合手推車27使用配件 27使用汽車椅 27使用雨篷 27使用置物袋 28使用小座墊 28拆卸&組裝座布28保養常識29緊急情況處理遇緊急事件或事故時,需迅速急救或送醫治療照顧您的寶寶是非常重要的。
1920產品資訊Allison Baby UK Ltd.Venture Point, Towers Business Park,Rugeley, Staffordshire, WS15 1UZ 產品名稱 Finiti 手推車產品型號 S1606最大體重 15公斤適用嬰幼兒年齡 0-36個月主要材質 塑膠、合金、布淨 重 11.21公斤產品尺寸 850mmX610mmX1095mm製造日期 詳見產品上貼紙日期(年/月/日)專利號碼 專利申請中原 產 地 中國委 製 商 巧兒宜國際股份有限公司進 口 商 巧兒宜國際股份有限公司地 址 台北市內湖區瑞光路431號2樓電 話 02-27973000統一編號 52603333代 理 商 奇哥股份有限公司Chickabiddy Co., Ltd 地 址 台北市南京東路四段186號5樓服務專線 0800-001-256 / 02-25781188統一編號 04222671網 址 使用本產品前請先閱讀說明書全文,如果您對於使用本產品還有任何疑問,請撥服務專線0800-001-256 / 02-25781188警告! 本產品須由成人進行組裝。
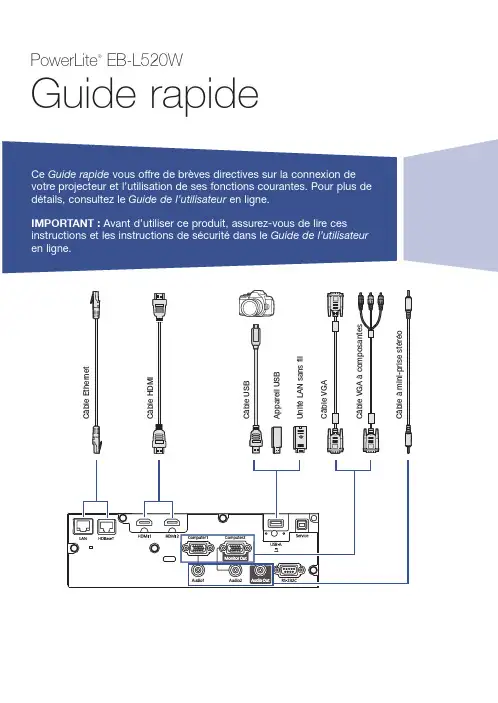
Alterner entre les sources d’imageAppuyez sur la touche Source Search ou sur l’une des touches de source de la télécommande.Afficher un motif de testRemarque : Consultez le Guide del’utilisateur en ligne pour des instructions sur la façon d’afficher un motif de test depuis la télécommande à l’aide du menu Réglage.1. A ppuyez sur la touche fléchée versle bas/ du projecteur.2. A ppuyez sur la touche Enter pourmodifier le motif de test.3. L orsque vous avez terminé, appuyezsur la touche Esc pour effacer le motif de test.Modifier le format d’écranRéglez le paramètre de format d’écran selon le rapport largeur/hauteur de l’écran que vous utilisez.1. A ppuyez sur la touche Menu .2. S électionnez Avancé > Affichage >Réglages Écran > Format d’écran .3. S électionnez le rapportlargeur/hauteur de l’écran.R emarque : L’image affichée devrait correspondre à la taille et la forme de l’écran.Allumer le projecteur1. M ettez l’ordinateur ou la sourced’image sous tension.2. A ppuyez sur la touched’alimentation du projecteur ou de la télécommande. Lorsque le témoin d’état reste bleu, le projecteur est prêt à être utilisé.R emarque : Si la fonction Aliment.Directe est activée, vous pouvez allumer le projecteur sans appuyer sur latouche d’alimentation; vous pouvez le brancher ou actionner l’interrupteur contrôlant la prise de courant à laquelle le projecteur est branché. Pour activer cette fonctionnalité, consultez le Guide de l’utilisateur en ligne.3. S i votre image ne s’affiche pas,consultez la section « Alterner entre les sources d’image » ou « Dépannage ».Modifier la langue du système des menus du projecteurLa langue par défaut du système des menus du projecteur est l’anglais, mais vous pouvez modifier la langue si nécessaire.1. A ppuyez sur la touche Menu pouraccéder au système des menus du projecteur.2. S électionnez Extended >Language .3. S électionnez votre langue.4. L orsque vous avez terminé, appuyezsur la touche Menupour quitter.Corriger la forme de l’image Si les bords de votre image ne sont pas égaux, vous pouvez utiliser les fonctionnalités de correction de la distorsion du projecteur telles queH/V-Keystone, Quick Corner® et Correction de l’arc pour régler la forme. Consultez le Guide de l’utilisateur en ligne.Effectuer d’autres réglages de l’imagePour obtenir de l’aide concernantl’utilisation des fonctionnalités du projecteur afin d’améliorer la qualitéde l’image, consultez le Guide del’utilisateur en ligne.Éteindre le projecteur Appuyez sur la touche d’alimentation du projecteur ou de la télécommande. Si un message de confirmations’affiche, appuyez de nouveau sur la touche d’alimentation. Remarque : Si la fonction Aliment. Directe est activée, vous pouvez actionner l’interrupteur contrôlant la prise de courant à laquelle le projecteur est branché. Pour activer cette fonctionnalité, consultez le Guide de l’utilisateur en ligne.Avec la technologie Instant Off®d’Epson, vous n’avez pas besoind’attendre le refroidissement du projecteur. Vous pouvez simplement le mettre hors tension et le débrancher lorsque vous avez terminé.DépannageL’écran est vide ou le message« Aucun signal » s’affiche.• A ssurez-vous que le témoin d’état du projecteur est bleu et qu’il ne clignote pas.4. L orsque vous avez terminé, appuyezsur la touche Menu pour quitter.R emarque : Après avoir modifié le format d’écran, il est possible que vous deviez modifier le rapport largeur/hauteur de l’image projetée selon le signal d’entrée. Appuyez sur la touche Aspect de la télécommande pour modifier le rapport largeur/hauteur, au besoin.Ajuster la position del’image en utilisant la position à l’écran1. A ppuyez sur la touche Menu.2. Sélectionnez Avancé > Affichage > Réglages Écran > Position àl'écran.3. U tilisez les touches fléchées sur leprojecteur ou sur la télécommandepour régler la position de l’image.Ajuster la mise au point et le zoomFaites tourner la bague de mise au point pour rendre l’image plus nette.F aites tourner la bague de zoom pourréduire ou agrandir l’image.Soutien InternetVisitez /support (É.-U.) ou www.epson.ca/support(Canada) et effectuez une recherche de votre produit afin de télécharger des logiciels et des utilitaires, de consulter les manuels, la FAQ et des conseils de dépannage et de communiquer avec Epson.Parler à un représentant du soutien techniquePour utiliser le service de soutien Epson ® PrivateLine ®, composez le 1 800 637-7661. Ce service est disponible pendant toute la durée de votre garantie. Vous pouvez aussi parler à un spécialiste du soutien en composant le (562) 276-4394 (É.-U.) ou (905) 709-3839 (Canada).Les heures de soutien sont de 6 h à 20 h, heure du Pacifique, du lundi au vendredi, et de 7 h à 16 h, heure du Pacifique, le samedi.Les heures et les jours de soutienpeuvent être modifiés sans préavis. Des frais d’interurbain sont éventuellement à prévoir.Achat d’accessoires et consommablesVous pouvez vous procurer un filtre à air (V13H134A56), des écrans ou d’autres accessoires auprès d’un revendeur autorisé Epson. Composez le 1 800 463-7766 pour obtenir les coordonnées du revendeur le plus près de chez vous. Ou vous pouvez vous les procurer en ligne à (ventes aux É.-U.) ou www.epsonstore.ca (ventes au Canada).Pour obtenir la liste des accessoires optionnels, consultez le Guide de l’utilisateuren ligne.• A ssurez-vous que les câbles sontbranchés correctement. Consultez le Guide de l’utilisateur en ligne.• I l est possible que vous deviezmodifier la source d’image.Consultez la section « Alterner entre les sources d’image ». Assurez-vous aussi que le dispositif de la source est sous tension.Le projecteur et l’ordinateur portable n’affichent pas la même image.Windows ®Si vous utilisez un ordinateur portable Windows, enfoncez la touche de fonction de votre clavier qui vous permet d’afficher sur un moniteurexterne. Elle pourrait être identifiée avec une icône comme celle-ci , ou encore avec les lettres CRT/LCD . Il est possible que vous deviez maintenir la touche Fn du clavier de votre ordinateur portable enfoncée au même moment (comme Fn + F7). Vous devez attendre quelques instants pour que l’image s’affiche.Pour Windows 7 ou une versionultérieure, maintenez la touche Windows enfoncée et appuyez sur P en même temps, puis cliquez sur Dupliquer .MacOuvrez Préférences Système et sélectionnez Moniteurs . Cliquez sur l’onglet Disposition et cochez la case Recopie vidéo .Comment obtenir de l’aideManuelsPour obtenir plus d’informationsconcernant l’utilisation du projecteur, vous pouvez consulter ou télécharger les manuels en ligne à partir du site Web d’Epson, tel que décrit ci-contre.Affiche l’écran d’accueilOuvre les menus attribuéspar l’utilisateurMaintenez enfoncé et utilisez les touches numériques pourentrer des chiffres Réinitialise les paramètres du menu à leurs valeurs par défaut Allume/éteint le projecteurOuvre les menus du projecteur Règle automatiquement l’image de l’ordinateur Permet de naviguer à travers les paramètres des menus Désactive temporairementl’affichage et le son Agrandit ou rapetisse unepartie de l’imageSélectionne un desmodes couleurModifie le rapport largeur/hauteurDivise l’écran entredeux entréesCommande le volume Arrête la fonction en cours ou retourne au menu précédent Permet de basculer entre les sources d’imageSélectionne une sourceMaintenez enfoncé et utilisez les touches numériques pour sélectionner le projecteur à commanderPermet de figer l’imageFonctions de la télécommandeSeiko Epson Corporation.PrivateLine est une marque déposée d’Epson America, Inc.Windows est une marque déposée de Microsoft Corporation aux États-Unis et/ou dans d’autres pays.Mac est une marque de commerce d’Apple Inc., enregistrée aux États-Unis et dans d’autres pays.HDBaseT est une marque de commerce de HDBaseT Alliance.Avis général : Les autres noms de produit figurant dans le présent document ne sont cités qu’à des fins d’identification et peuvent être des marques de commerce de leurs propriétaires respectifs. Epson renonce à tous les droits associés à ces marques.L’information contenue dans le présent document peut être modifiée sans préavis.© 2021 Epson America, Inc., 2/21CPD-60565。

WARRANTY: RIPLEY warrants its products against defective materials and workmanship for a period of one year from date of shipment from the RIPLEY factory provided the product is utilized in accordance with instructions and specified ratings.46 Nooks Hill RoadTMThe Banana PeelerOperating Instructions for BP1A-R & BP2A-RBlade changes: BP1A-R, and BP2A-R with adjustable score depth cartridge1. Turn the knurled adjustment knob clockwise (CW) until it stops at “50” on the dial. .2. Loosen blade retaining screw(small set screw in brass collar) with 1/16 hex wrench.3. Insert new blade assembly, blade point down through the brass collar. Position the blade so it protrudesapproximately .050 inches past the blade guide surface.4. Tighten the blade retaining screw against the flat portion of the blade shaft. This will secure the blade in theadjusting collar mechanism.5. Adjust blade score depth, turn adjustment wheel counter clockwise to desired blade score depth setting.6. PLEASE NOTE THAT THIS SETTING MAY NOT BE EXACT IN VALUE BUT IS TO BE USED AS AREFERENCE. Proper setting of each application is such that the scoring blade has not cut completely through the jacket material.Operating instructions: Adjustable ModelsOn adjustable models, BP1A-R and BP2A-R, the blade score depth desired must be set on the bladedepth dial to correspond with the score depth required. Always set the score depth slightly less than thematerial thickness to be scored.1. Grasp cable in one hand; depresslever on Banana Peeler and placethe cutting blade at the desiredscoring point. Spring-loaded jawsclose, and blade penetrates thesemi-con precisely to the set depth.Rotate tool around circumference ofcable. Blade scores sheathing 360degrees. Remove tool.2. Turn tool 90 degrees, depress lever, andposition blade so it seats in the scored grooveyou created with the first operation. Releaselever and draw the tool lengthwise off the end ofthe cable. Repeat this procedure several timesaround the cable, as required. Some sheathingsare more tightly bonded to the insulation thanothers and more longitudinal scores makes theirremoval easier.3. Peel scored segments withneedle nose pliers or othersuitable tool.Scoring Blade Adjustment for BP1A-R and BP2A-RSAFETY INSTRUCTIONS: This tool is not insulated against electrical shock and is not intended for use on live lines. Always wear safety glasses and keep fingers away from cutting blade.Refer to Banana Peeler Instruction Sheet for tool operating instructions.Scoring Blade Adjustments for BP1A-R and BP2A-R1. The tool is packaged with the blade set at .025 inches setting.2. Turn the knurled adjustment knob clockwise (CW) until it stops at “)” on the dial.3. Loosen blade retaining screw (small set screw in the brass collar) with a 1/16 hex wrench. Put the end of the blade flush with the end of the brass collar. This will cause the cutting portion of the blade to protrude approximately .100 inch past the cable/blade guide.4. Tighten the blade retaining screw. This will secure the blade in the adjusting collar mechanism.5. At this point, the dial is set at “0” but the blade is protruding out approximately .100 inch. This setting can now be referenced as 100 mils. Any continued rotation of the knurled adjusting knob ina counter clockwise (CCW) direction will increase the blade depth accordingly in increments equal to .001 inch or 1 mil.PLEASE NOTE THAT THIS SETTING IS MAY NOT BE EXACT IN VALUE BUT IS TO BE USED AS A REFERENCE. Proper setting of each application is such that the scoring blade has not cut completely through the jacket material.46 Nooks Hill Road。
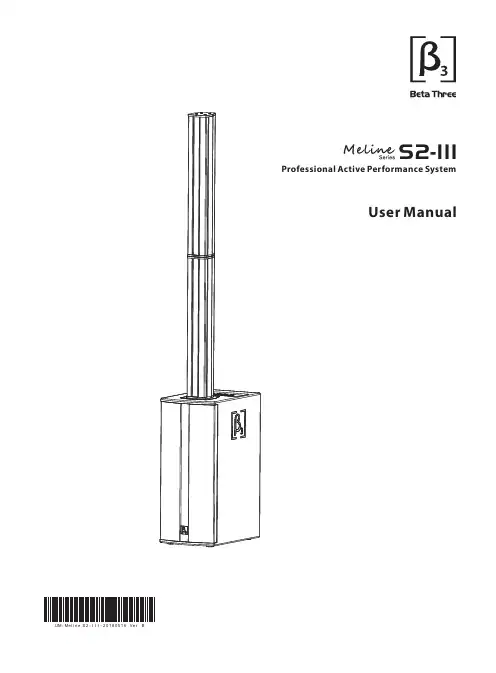
S2-IIIProfessional Active Performance SystemUser Manual UM-Mel i n e S2-I I I-20180516Ve r B11. 2. 3. 4. 5. 6. 7. 8. 9. 10. Read the instruction first before using this product.Pay attention to all warnings.Obey all operating instructions.Do not expose this product to rain or moisture.Do not block any ventilation openings. Install according to instructions .Do not install this product near any heat source, such as , heater, burner, or any other equipment with heat radiation .Only use spare parts by manufacturer.Pay attention to the safety symbol on the of the cover.manual Please keep this manual for future reference Clean this equipment with a dry cloth.manufacturer's a supplied the outside SAFETY INSTRUCTIONSPLEASE READ THIS MANUAL FIRSTThank you for a buyin product. Read this manual first as it will help you operate the system properly. Please keep this manual for future reference.g WARNING:This product must be installed by professionals. When using hanging brackets or rigging other than those supplied withthe product, please ensure they comply with the local safety codes.The exclamation point within an equilateral triangle is intended to alert you to the presence of important operating and servicing instructions.ATTENTION: Don't refit the system or spare parts without being authorized as this will .void the warranty WARNING: Don't (such as candles) the equipment.place naked flames close to2S2-IIICONTENT4533334556667CONTENTFeatures Description Applications Frequency Response and THD Curve Curve AMPLIFIER MODULEINSTALLATIONMounting Accessories Installation Reference INTRODUCTIONTechnical Sheet2D DimensionTECHNICAL SPECIFICATIONAmplifier Module Product information is subject to change without prior notification. Please visit for the latest updates.3S2-IIIS2-IIIINTRODUCTIONApplicationsMultifunctional hallAuditorium Church Conference room Small performance FeaturesDescriptionProfessional Active Performance SystemCompact,portable and eye catching design.System is 1.8M high to deliver full,natural sound.12 2.75"full range and 2 25mm ×× Silk dome tweetervertical column speakers to ensure smooth sound coverage.Bi-amp module including DSP.Exclusive CLIK together connections,no cables required.Handle on back of subwoofer.Carry bags for system,ease of transportation.β3 Meline S2-III is a performance sound reinforcement system designed for musicians,meeting room presentation,DJ's etc for an audience up to 300.The three piece system is designed for quick and easy setup with new click together interconnecting speakers.The amplifier module is housed within the subwoofer.This bi-amp module includes DSP to enable superior performance. The active 3-way column speaker system Meline S2-III can be used for various PA applications. The individual components of the Meline S2-III(1 subwoofer module,2 column modules) can be connected so that the Meline S2-III is also ideally suited for mobile applications. Two class D amplifiers,each with a power of 400W RMS,are available for the low-frequency and the mid-high frequency ranges. Two audio units and two microphones can be connected to the 4-channel mixer unit. For sound adjustment and frequency splitting,the audio signals pass a digital signal processor(DSP)that also includes a signal limiter. ...AC INPUT 230V~50Hz,T5AL DONGGUAN 3G AUDIO TECHNOLOGY CO., LTD.S/N:Professional Active Performance SystemS2-III4S2-III12 53 4 6PROFESSIONAL ACTIVEPERFORMANCE SYSTEMS2-III789101617121314151819202122AMPLIFIER MODULEAmplifier Module1. Volume control for the input LINE IN(12)2. Volume control for the input MIC IN(11)3. Volume control for the input COMBI IN(15)4. Volume control for the input AUX IN(16)5. Control to adjust the strength of the low frequencies radiated by the subwoofer6. Control CONTOUR to define the level of the aurally compensated sound correction for the input LINE IN(12)7. Equalizer control for the signal of the input MIC IN(11), continuously adjustable between vocals(SING), neutral (FLAT)and speech8. Equalizer control for the signal of the input COMBI IN(15),continuously adjustable between neutral(FLAT),music and speech 9. Control CONTOUR to define the level of the aurally compensated sound correction for the input AUX IN(16)10. LED indicatorsON = Power indicator SIGNAL = Signal indicatorLIMIT = Limiter indicator:Lights up when the signal level is too high;the limiter will reduce the signal level to protect the speaker.11. MP3 music player module12. Input MIC IN(combined 6.3mm jack/XLR,bal.)to connect a microphone13. Stereo input LINE IN(combined 6.3mm jacks/XLR,bal.)to connect a signal source with line output level(e.g.mixer,CD/MP3 player)14. Output LINE OUT(XLR,unbal.)At this output,the signal of the input LINE IN(12)is available; either as a mono signal or only the signal of the right channel, can be selected by means of the selection switch(14).15. Switch to select the operating modeMONO = The speaker column reproduces the signal of the input LINE IN(12)monophonically;the monophonic input signal is available at the output LINE OUT(13).RIGHT = The speaker column reproduces the left channel of the input LINE IN;the input signal of the right channel is available at the output LINE OUT.16. Mono input COMBI IN(combined 6.35mm jack/XLR,bal.)to connect a microphone17. Stereo input AUX IN(RCA jacks and 3.5mm jack,unbal.)to connect a signal source with line output level18. Output MIX OUT(XLR,unbal.)to send the mixed mono signal to an additional amplifier,for example19. Output REC OUT(RCA)to connect a recorderAt this output,the mixed stereo signal is available.20. Support for the mains fuseAlways replace a blown fuse by one of the same type.21. Mains jack for connection to a socket(230V~50Hz)by means of the mains cable provided 22. Power switch115S2-IIIINSTALLATIONInstallation Accessories(Optional)Installation ReferenceReference A Reference B1.Meline S2-II BAG2.Meline S2-II EXTMeline S2-II EXT1. Place the subwoofer module on an even,horizontal surface(floor).2. Start with the column module where a 6.35mm jack is located on the upper side.Place the column module- turned by approx.20°to the left-onto the connector of the subwoofer module and then turn it to the right stop so that it is firmly engaged.3. Proceed in the same way to connect the second column module to the first one.4. If the tweeters located in the centre of the connected columns do not have the optimal height(ear's height), use the adapter piece Meline S2-II EXT(available as an option)to increase the height of the column modules.6S2-III20000100001000100502018010860708090100S e n s i t i v i t y (d B )50Frequency (Hz )36-36-108-180TECHNICAL SPECIFICATIONSpecificationFrequency response(-3dB):Max.SPL:Transducer:Input:Connector:Input impedance(line):Input level:Input overloading level: Wire connection: Heat radiation: Power cable:45Hz-20kHz 113dB/119dB(PEAK)2 8" Woofer,12 2.75" Midrange Unit ××T channel (MIC/COMBI/LINE) balanced input(XLR and 6.35mm jack)hree XLR for input, XLR for output20kohm balanced input, 10kohm unbalanced input pin 1: ground; pin2: signal +; pin3: signal -Forced air-cooled drives 090×400Dispersion(H ×V):2 25mm × Silk dome tweeterSafety voltage range: Amplifier power output:Cabinet: Handle: Painting:Cabinet dimension(W D H): ××Packing dimension :(W ×D ×H)Net weight:Gross weight:AC 220V-230V~50Hz/60Hz 800WRated impedance:4 OhmsFrequency response curve & THD curveLINE IN 775mVrms, AUX IN 200mVrms MIC IN: 20mVrms, COMBI IN: 40mVrms : : LINE IN Vrms, AUX IN 2VrmsMIC IN: 200mVrms,COMBI IN: 400mVrms : 3.5: 23.5kg(51.7 lbs)25.5kg(56.1 lbs)2504001726mm(9.815.768.0in)××××615355705mm(24.214.027.8in)××××LF:200W,M HF:30W F:180W,Power:One channel (AUX) unbalanced input(RCA and 3.5mm jack)PowerCon, three pins Plywood,column loudspeaker1× Wooden handlesCabinet coated by Polyurethane paint; grille is powder coatedFrequency Response 2nd Distortion 3rd Distortion7400mm (15.75in)586m m (23.07i n )250mm (9.84in)1726m m (67.95i n )86.5mm (3.41in)108.6mm (4.28in)570m m (22.44i n )S2-IIITop viewFront viewSide viewBack viewBottom view2D DimensionTECHNICAL SPECIFICATIONFront view Side view Back viewMeline S2-II EXT:Notes:。
说明书改版形式:图文结合,上图下文,形象说明框架:1,安全注意事项2,产品组成1)包装内容:主机、适配器、安全绳、遥控器、清洁环、清洁布2)技术参数3)部件名称:产品每个按键部位介绍3,产品使用步骤:1)使用前检查:2)安装清洁布3)连接适配器与DC延长线4)连接安全绳5)喷清洁液6)产品工作:连接电源、打开电源开关,吸附、开始工作7)产品暂停8)结束工作4,维护保养:清洁布保养,机器主机5,灯效及提示音6,故障排除1.安全注意事项使用本产品前请仔细阅读此说明书。
请保存好说明书。
1.产品不能由8岁以下的儿童、身体或者精神上有障碍的人使用。
若需要使用,请在监护人的监督指导下进行.请不要让儿童靠近处于工作状态的产品,或将产品作为玩具玩耍。
2.仅当室外温度在0度以上40度以下、无大风、无雨,空气干燥的情况下方可在室外使用此产品。
产品工作温度:0℃~40℃(32℉~104℉)。
产品储藏温度:—10℃~50℃(14℉~122℉)。
3.第一次使用前务必充电5小时左右,保证内置锂电池充满电(绿灯亮)后使用。
4.本产品在工作时,请始终保持产品处于通电状态。
产品内置锂电池仅用于维持产品在突然断电情况下、在限定时间内保持吸附在玻璃上不跌落,不作为正常工作供电。
5.使用前请检查安全绳是否破损,绳結是否松脱。
使用时系好安全绳,并将安全绳绑住屋內的固定物,以免发生危险.6.本产品在使用过程中,请确保有人在旁看护,必要时可以为产品提供帮助。
7.请勿在无框玻璃,有弧度玻璃、破损缝隙及凹凸不平玻璃上使用本产品,以避免玻璃破碎、产品跌落等风险。
8.严禁在大面积潮湿或油性玻璃上使用,以避免产品打滑造成跌落的风险.产品使用存放需远离热源或易燃物。
9.请勿将本产品放在水中或其他液体中,请勿直接对机器喷水,造成电击危险;禁止用潮湿的手触碰插头或产品。
10.高层户外使用本产品时,建议在楼下地面设置危险警示区,禁止人员靠近。
11.产品使用时需确保产品完全吸附在玻璃上方可放手,清洁完毕时先拿下机器再关闭电源。

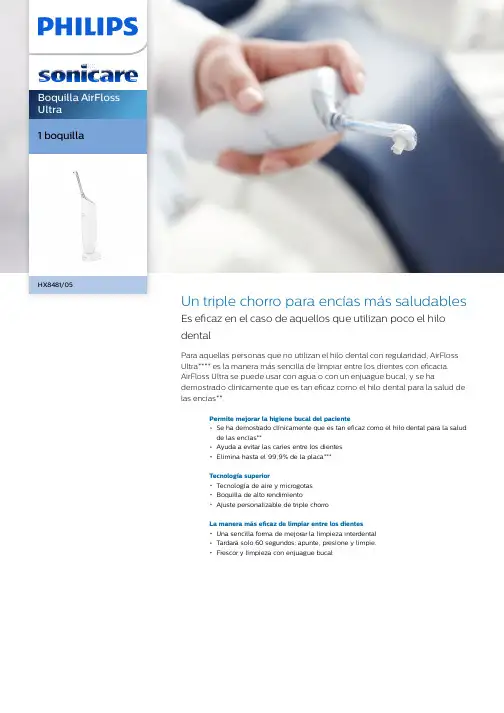
Boquilla AirFlossUltra1 boquillaHX8481/05Un triple chorro para encías más saludablesEs eficaz en el caso de aquellos que utilizan poco el hilodentalPara aquellas personas que no utilizan el hilo dental con regularidad, AirFlossUltra**** es la manera más sencilla de limpiar entre los dientes con eficacia.AirFloss Ultra se puede usar con agua o con un enjuague bucal, y se hademostrado clínicamente que es tan eficaz como el hilo dental para la salud delas encías**.Permite mejorar la higiene bucal del pacienteSe ha demostrado clínicamente que es tan eficaz como el hilo dental para la saludde las encías**Ayuda a evitar las caries entre los dientesElimina hasta el 99,9% de la placa***Tecnología superiorTecnología de aire y microgotasBoquilla de alto rendimientoAjuste personalizable de triple chorroLa manera más eficaz de limpiar entre los dientesUna sencilla forma de mejorar la limpieza interdentalTardará solo 60 segundos: apunte, presione y limpie.Frescor y limpieza con enjuague bucalDestacadosElimina hasta el 99,9% de la placaAirFloss Ultra elimina hasta el 99,9% de la placa de las zonas tratadas.***Tecnología de microgotas Nuestros resultados clínicamente probados se consiguen gracias a nuestra exclusivatecnología que combina aire y enjuague bucal o agua para limpiar de manera potente ysuave entre los dientes y a lo largo de la línea de las encías.Una sencilla forma de empezarLa limpieza interdental es muy importante para la salud bucal general. AirFloss ofrece una forma sencilla de limpiar más enprofundidad entre los dientes, lo que ayuda a crear un hábito saludable. Después de tres meses de uso del AirFloss, un 96% de las personas que no utilizaban el hilo dental de forma constante siguió usándolo cuatro o más días a la semana.Encías más sanasSe demostró clínicamente que Philips Sonicare AirFloss Ultra mejora la salud de las encías tanto como el hilo dental**. Ayuda a mejorar la salud de las encías en tan solo dos semanas.Limpieza en solo 60 segundosCon AirFloss Ultra, los pacientes solo tardarán 60 segundos al día en limpiar toda su boca.Solo deben seleccionar la frecuencia de descarga deseada (única, doble o triple) y mantener pulsado el botón de activación para emitir ráfagas de forma continua o pulsarlo y soltarlo para utilizar el modo de ráfaga manual.Frescor y limpieza con enjuague bucalLos pacientes pueden utilizarlo con enjuague bucal para disfrutar la experiencia de frescor definitiva y las ventajas antimicrobianas.Ayuda a evitar las caries interdentalesPhilips Sonicare AirFloss Ultra remueve suavemente el sarro que el cepillado noeliminó para evitar que se formen caries en los espacios interdentales de los pacientes.Boquilla de alto rendimientoLa nueva boquilla de alto rendimiento AirFloss Ultra amplifica la potencia de nuestratecnología de aire y microgotas para que sea más eficaz y eficiente que nunca.Personalización de triple chorroLa potente pulverización de AirFloss Ultra se puede personalizar según el gusto del paciente, con uno, dos o tres chorros en cada pulsación del botón de activación.EspecificacionesPiezas incluidasMango AirFloss Ultra: 1Boquilla AirFloss Ultra: 1Cargador: 1Diseño y terminaciónColor: GrisLimpiezaRendimiento: Elimina hasta el 99,9% de placa**Beneficios para la salud: Limpia toda la boca en 60 segundos, Mejora la salud de las encías en 2 semanas*Resultados clínicamente probados: Tan eficaz como el hilo dental, para mejorar la salud delas encías, para reducir la placa, para reducir elsangrado de las encíasAjustes personalizables: Chorro automático omanual, Uno, dos o tres chorros***Para obtener los mejores resultados:Sustituya la boquilla cada 6 mesesFácil de usarIndicador de batería: Los indicadores LED delmango muestran el nivel de cargaMango: Diseño delgado y ergonómicoDuración de la batería: 1-3 semanas*****Accesorio de boquilla: Se pone y se quitafácilmenteEspecificaciones técnicasBatería: RecargableTipo de batería: Iones de litioTiempo de carga: Carga completa en 24 horasAlimentaciónVoltaje: Cargador multivoltajeServicioGarantía: Garantía limitada de dos años* Cuando se utiliza en conjunto con un cepillo manual yenjuagues antibacteriales en pacientes con la gingivitisleve a moderada. AirFloss Ultra se diseñó para ayudara desarrollar una rutina de limpieza interdental diariasaludable en aquellas personas que utilizan el hilodental de forma inconstante. Para obtener másinformación, visite /airfloss/faq.* *** Las versiones de AirFloss Ultra y Pro son el mismoproducto, pero es posible que el nombre difiera segúnel país y el canal.* **** Según la configuración de chorro utilizada© 2020 Koninklijke Philips N.V. Todos los derechos reservados.Las especificaciones quedan sujetas a modificaciones sin previo aviso. Las marcas comerciales son propiedad de Koninklijke Philips N.V. o sus respectivos titulares.Fecha de publicación 2020‑03‑18Versión: 3.0.1EAN: 08 71010 38361 17 。

说明书改版形式:图文结合,上图下文,形象说明框架:1,安全注意事项2,产品组成1)包装内容:主机、适配器、安全绳、遥控器、清洁环、清洁布2)技术参数3)部件名称:产品每个按键部位介绍3,产品使用步骤:1)使用前检查:2)安装清洁布3)连接适配器与DC延长线4)连接安全绳5)喷清洁液6)产品工作:连接电源、打开电源开关,吸附、开始工作7)产品暂停8)结束工作4,维护保养:清洁布保养,机器主机5,灯效及提示音6,故障排除1.安全注意事项使用本产品前请仔细阅读此说明书。
请保存好说明书。
1.产品不能由8岁以下的儿童、身体或者精神上有障碍的人使用。
若需要使用,请在监护人的监督指导下进行。
请不要让儿童靠近处于工作状态的产品,或将产品作为玩具玩耍。
2.仅当室外温度在0度以上40度以下、无大风、无雨,空气干燥的情况下方可在室外使用此产品。
产品工作温度:0℃~40℃(32℉~104℉)。
产品储藏温度:-10℃~50℃(14℉~122℉)。
3.第一次使用前务必充电5小时左右,保证内置锂电池充满电(绿灯亮)后使用。
4.本产品在工作时,请始终保持产品处于通电状态。
产品内置锂电池仅用于维持产品在突然断电情况下、在限定时间内保持吸附在玻璃上不跌落,不作为正常工作供电。
5.使用前请检查安全绳是否破损,绳结是否松脱。
使用时系好安全绳,并将安全绳绑住屋内的固定物,以免发生危险。
6.本产品在使用过程中,请确保有人在旁看护,必要时可以为产品提供帮助。
7.请勿在无框玻璃,有弧度玻璃、破损缝隙及凹凸不平玻璃上使用本产品,以避免玻璃破碎、产品跌落等风险。
8.严禁在大面积潮湿或油性玻璃上使用,以避免产品打滑造成跌落的风险。
产品使用存放需远离热源或易燃物。
9.请勿将本产品放在水中或其他液体中,请勿直接对机器喷水,造成电击危险;禁止用潮湿的手触碰插头或产品。
10.高层户外使用本产品时,建议在楼下地面设置危险警示区,禁止人员靠近。
11.产品使用时需确保产品完全吸附在玻璃上方可放手,清洁完毕时先拿下机器再关闭电源。

波波腾娃娃机说明书
1. 首先,投币或插入游戏币,娃娃机会自动启动。
2. 然后,根据娃娃机上的摇杆或按键进行操控,使抓取器移动到目标位置上。
3. 当抓取器移动到目标位置上后,按下操作键,启动抓取器夹取娃娃。
4. 如果抓取器夹取的娃娃成功获得,娃娃机会自动将娃娃送出来。
如果没有成功,可以再次尝试直到抓取成功。
5. 如果需要结束游戏,可以按下结束按钮,娃娃机会自动停止。
注意事项:
1. 在游戏过程中,要注意观察时间和游戏币数量,避免花费过多的时间和钱。
2. 使用时要注意安全,不得将手伸进机器内部。
3. 不要在机器上进行摇晃或过于激烈的操作,以免对娃娃机造成损坏。
4. 在使用娃娃机时,需要尊重他人的游戏权益,不得占用过长时间或玩弄机器致使其他人无法使用。
5. 如果在游戏过程中遇到问题,应立即联系维修人员或管理员进行处理。
希望以上说明可以帮助您顺利地使用波波腾娃娃机。
玻妞新版说明书YKK standardization office【 YKK5AB- YKK08- YKK2C- YKK18】说明书改版形式:图文结合,上图下文,形象说明框架:1,安全注意事项2,产品组成1)包装内容:主机、适配器、安全绳、遥控器、清洁环、清洁布 2)技术参数3)部件名称:产品每个按键部位介绍3,产品使用步骤:1)使用前检查:2)安装清洁布3)连接适配器与DC延长线4)连接安全绳5)喷清洁液6)产品工作:连接电源、打开电源开关,吸附、开始工作7)产品暂停8)结束工作4,维护保养:清洁布保养,机器主机5,灯效及提示音6,故障排除1.安全注意事项使用本产品前请仔细阅读此说明书。
请保存好说明书。
1.产品不能由8岁以下的儿童、身体或者精神上有障碍的人使用。
若需要使用,请在监护人的监督指导下进行。
请不要让儿童靠近处于工作状态的产品,或将产品作为玩具玩耍。
2.仅当室外温度在0度以上40度以下、无大风、无雨,空气干燥的情况下方可在室外使用此产品。
产品工作温度:0℃~40℃(32℉~104℉)。
产品储藏温度:-10℃~50℃(14℉~122℉)。
3.第一次使用前务必充电5小时左右,保证内置锂电池充满电(绿灯亮)后使用。
4.本产品在工作时,请始终保持产品处于通电状态。
产品内置锂电池仅用于维持产品在突然断电情况下、在限定时间内保持吸附在玻璃上不跌落,不作为正常工作供电。
5.使用前请检查安全绳是否破损,绳结是否松脱。
使用时系好安全绳,并将安全绳绑住屋内的固定物,以免发生危险。
6.本产品在使用过程中,请确保有人在旁看护,必要时可以为产品提供帮助。
7.请勿在无框玻璃,有弧度玻璃、破损缝隙及凹凸不平玻璃上使用本产品,以避免玻璃破碎、产品跌落等风险。
8.严禁在大面积潮湿或油性玻璃上使用,以避免产品打滑造成跌落的风险。
产品使用存放需远离热源或易燃物。
9.请勿将本产品放在水中或其他液体中,请勿直接对机器喷水,造成电击危险;禁止用潮湿的手触碰插头或产品。
T H E S O U N T H A T C R E A T E S L E G E N D S‘63 VibroverbP/N 037307Your “new” ‘63 VIBROVERB amplifier is living proof of the quality and longevity of Fender amplifier designs.Fender first introduced the VIBROVERB in the early part of 1963. Unlike many of the other Fender amplifiers that were produced for years, this version of the VIBROVERB had a production life of less than 4 months. It is estimated that fewer than 600 VIBROVERB units were ever produced. This limited production is one of the reasons this amplifier has become highly sought after by vintage amp collectors. The VIBROVERB was the first Fender production model to have both reverb and vibrato as built-in “effects”.The original VIBROVERB shows Fender in a transitional period with amplifiers changing from tweed covering to brown “Tolex” and eventually to black “Tolex.” In the sum-mer and fall of 1963, Fender changed the speaker configu-ration of the VIBROVERB to a 15 inch speaker and the brown “Tolex” covering changed to black. The single 15 inch model is also fairly rare, but the 2-10 version is leg-endary.Fender’s ‘63 VIBROVERB re-issue amplifier is based on the original cosmetics, sound and circuit. Every effort was made to be true to the original.Several changes have been made for safety and reliability reasons. A printed circuit board is used rather that the phenolic “parts panel” of the sixties. A 3-prong line cord is required for safety reasons. Minor modifications to the cir-cuit took place since certain parts are no longer available, but every effort was made to keep the original circuit values and sound the same. We resisted the temptation to “improve” the amp with features found on later models like master volume, effects loop or channel switching. In order to improve reliability, a solid state rectifier was used rather than a 5AR4 tube. Since the ‘63 VIBROVERB uses a solid state rectifier, there is one less tube and tube socket than an original VIBROVERB. All internal circuit voltage values have been precisely matched to the new solid state rectifier to insure exact sonic reproduction and no alterations to the “vintage” sound. On the original model, the Reverb / Vibrato Footswitch connected to the unit via 2 RCA style jacks; this has been changed to a more reliable 1/4” jack. The reverb pan cables now connect more securely to the chassis also.The VIBROVERB is unique in Fender amplifier history by the implementation of its tone circuit. The VIBROVERB was the first and ONLY Fender amplifier to use this type of tone cir-cuit. The treble control is “tapped,” meaning it responds more like an active tone control allowing boost AND cut of high frequencies. Conventional Fender tone circuits pro-vide a small amount of tone shaping even in the “0” posi-tion, but if the VIBROVERB Treble Control is set to about “5”, the response is flat.The speakers used in the ‘63 VIBROVERB are reproductions of the original speakers made by the Oxford Speaker Company. When Fender started work on this project, Fender contacted Oxford who still had much of the original tooling and documentation of this 10 inch speaker from the early sixties.The power and output transformers used in the ‘63 VIBROVERB are built to the original specifications, which are still in the R&D engineering files at Fender’s office. The same “direct-coupled” oscillator circuit is used for generat-ing the vibrato. The reverb sound from the VIBROVERB is “warmer” than later Fender amps due to the unique reverb send and recovery circuit.The cosmetics of the ‘63 VIBROVERB incorporate the brown “Tolex” and “Ecru” grill cloth used in 1963. We have re-tooled the “flat” Fender logo and have added the original tilt-back legs found on so many Fender amps through the sixties and seventies.It is suggested that you read this manual thoroughly to understand all the features and functions of your new amplifier. The purchase of a Fender amplifier will provide years of musical enjoyment and the ‘63 VIBROVERB helps keep the Fender legend going strong.WARNING:TO REDUCE THE RISK OF FIRE OR SHOCK HAZARD, DO NOT EXPOSE AMPLIFIER TO RAIN OR MOISTURE!‘63 VIBROVERB FRONT PANEL FUNCTIONSNORMAL CHANNEL INPUTS - Plug-in connection for instruments. Input 1 provides 6 dB more gain that input 2. The NORMAL CHANNEL is affected by the VIBRATO feature only. The REVERB feature does not affect the NORMAL CHANNEL.NORMAL CHANNEL VOLUME CONTROL - Adjusts the overall loudness of the NORMAL CHANNEL.TREBLE CONTROL -Adjusts the amount of high fre-quency boost (accentuation) or cut (attenuation) in the NORMAL CHANNEL.BASS CONTROL -Adjusts the amount of low frequency boost or cut in the NORMAL CHANNEL.BRIGHT CHANNEL INPUTS - Plug-in connection for instruments. The BRIGHT CHANNEL provides extra treble boost, especially at low volume settings. Input 1 provides 6 dB more gain that input 2. The BRIGHT CHANNEL is affected by both the REVERB and VIBRATO features.BRIGHT CHANNEL VOLUME CONTROL - Adjusts the overall loudness of the BRIGHT CHANNEL.TREBLE CONTROL - Adjusts the amount of high fre-quency boost or cut in the BRIGHT CHANNEL.BASS CONTROL - Adjusts the amount of low frequency boost or cut in the BRIGHT CHANNEL.REVERB CONTROL - Adjusts the amount of reverberat-ed signal that is mixed in with the original, dry signal. Turning the control full counter-clockwise turns the REVERB feature off. The REVERB feature can also be turned on and off using the footswitch. Note that the REVERB feature does not affect the NORMAL CHAN-NEL.VIBRATO SPEED CONTROL - Adjusts the speed of the VIBRATO feature.A,B.C. D. E. F,G.H. I. J. K.L.VIBRATO SWITCH - Push on, push off switch that turnsthe VIBRATO feature on and off.REVERB SWITCH - Push on, push off switch that turns the REVERB feature on and off.‘63 VIBROVERB FOOTSWITCH FUNCTIONSVIBRATO INTENSITY CONTROL -Adjusts the intensityof the VIBRATO feature. Turning the control full counter-clockwise turns the VIBRATO feature off. The VIBRATO feature can also be turned on and off using the footswitch.PILOT LAMP - When the lamp is illuminated, the ‘63VIBROVERB is receiving power. Should the lamp burn out, turn off the power, unscrew the red jewel and replace the lamp with a type T47 light bulb.M.A.B.N.‘63 VIBROVERB REAR PANEL FUNCTIONSFUSE - The fuse is in the AC supply of the amplifier and will help to protect the amplifier and operator in the event of an electrical fault. If a fuse blows, it should only be replaced with a fuse in accordance with the listing at the fuse holder. If the amplifier repeatedly blows fuses, it should be checked out by a qualified technician. UNDER NO CIRCUMSTANCES should a fuse of a different type, higher current rating, or a fuse bypass be used, as this could damage the equipment and present a serious safety hazard.GROUND SWITCH - The GROUND SWITCH is not functional, and is there to preserve the original appearance of the amplifier. The switch is not present in 100V, 230V, and 240V units.POWER SWITCH - This switch turns the AC power ON and OFF. When the switch is OFF, the amplifier is completely shut down.STANDBY SWITCH - This switch turns the amplifier on and off. In the STANDBY position, the amplifier is off; however, power is applied to the tube filaments so as to eliminate warm-up time. Use of this feature during short breaks versus using the POWER SWITCH will increase tube life.MAIN SPEAKER JACK - Plug-in connection for speak-ers. This jack must always be used as the primary connection to speakers.EXTERNAL SPEAKER JACK - Plug-in connection for an external speaker. This jack is wired in parallel with the MAIN SPEAKER JACK, and must only be used in con-junction with the MAIN SPEAKER JACK. Should the EXTERNAL SPEAKER JACK be used without also using the MAIN SPEAKER JACK, there will be no sound. Note that the amplifier is optimized for a 4 ohm speaker load, and that the speakers in the cabinet are wired for 4 ohms. Should a total load of more or less than 4 ohms be used, the amplifier will not put out its maximum power output before distortion occurs.FOOTSWITCH JACK - Plug-in connection for the footswitch. The footswitch allows you to turn the VIBRATO and REVERB features on and off without having to operate the controls on the front panel. NOTE: The VIBRATO and REVERB features will oper-ate without plugging in the footswitch.A.B. C. D.E. F.G.LINE CORDYour amplifier is equipped with a grounding type supply cord to reduce the possibility of shock due to electrical fault. Be sure to connect it to a grounded receptacle. DO NOT ALTER THE AC PLUG.TUBESThe ‘63 VIBROVERB tube complement consists of two Fender Special Design 6L6WGC/5881’s (part number 039214), five Fender Special Design 12AX7A’s (part num-ber 013341), and one Fender Special Design 12AT7 (part number 023531). Fender’s Special Design Tubes provide optimum performance in this amplifier. For best results, replace with Fender original equipment tubes only. Tube location is printed on the tube label, inside the cabinet.TOLEX COVERING CAREThe exclusive Fender Tolex covering on your cabinet is of the same material that was used on the original VIBROVERB. A very light soapy solution on a sponge may be used to remove dirt and residue that may accumulate in the grain. Be careful not to let liquid come in contact with operating surfaces. DO NOT have the amplifier plugged into a power outlet when cleaning.If the amp is set up but does not function, check the following items:•Is the amp power cord properly plugged into an electrical outlet?•Is there power at the outlet?•Is the fuse blown?•Are the speakers properly connected to the amplifier?•Is the amp on standby?•Is the amplifier volume control turned up above “three”?•Is the volume control on the instrument turned up?•Is your instrument properly plugged into the amplifier?(Eliminate any effects pedals and try another guitar cord.)If, after checking all of the above, the system is not performing correctly, consult your Fender Service Center.PART NUMBER:120V21-7200100V21-7270230V21-7260230V UK21-7240230V NORDIC21-7280240V AUSTRALIA21-7230DIMENSIONS:Height:19-3/8” (49.2 cm).Width:25” (63.5 cm).Depth:8-5/8” (21.9 cm).WEIGHT:46lbs (21kg).POWER OUTPUT:40 watts R.M.S. minimum into 4 ohms.OUTPUT IMPEDANCE: 4 ohms.INPUT IMPEDANCE:Input 1, both channels: 1M ohms.Input 2, both channels: 136k ohms.FEATURES:Tube generated power amp Vibrato in both channels, Reverb in the Bright Channel.Tilt-back legs.POWER REQUIREMENTS:100VAC - 50/60 Hz, 270 watts.120VAC - 60 Hz, 270 watts.230VAC - 50 Hz, 270 watts.240VAC - 50 Hz, 270 watts.SPEAKER COMPLEMENT:(2) 10” Oxford Speaker Company speakers with 7DF paper conesand surrounds, 1-1/4” voice coils, and kraft paper coil formers likethe original Vibroverb speakers (part number 037076).SOUND:Legendary.WARNING: NO USER SERVICEABLE PARTS INSIDE. REFER SERVICING TO QUALIFIED PERSONNEL ONLY.A PRODUCT OF:FENDER MUSICAL INSTRUMENTS CORP.,CORONA, CA 91720。
Kit de solutionsd'allaitementSCD281/00L'allaitement facilitéAccessoires d'allaitement AventTirez votre lait avec plus de confort, conservez-le, donnez-le à votre bébé et protégez vos mamelons grâce au kit de solutions d'allaitement Philips Avent.TirerTire-lait manuel avec coussin masseurConserverDisques d’étanchéitéDonnerBiberons conçus pour atténuer le risque de coliques (cliniquement prouvé)AssistanceCrème mamelons sensiblesKit de solutions d'allaitementSCD281/00Points fortsCaractéristiquesTire-lait manuelLes situations de stress ou d'urgence peuvent rendre l'utilisation du tire-lait plus difficile et peuvent aussi affecter votre lactation. Il est important de vous sentir à l'aise et détendue.Notre tire-lait manuel a été conçuspécialement pour vous offrir un meilleur confort lorsque vous utilisez l'appareil.Biberons cliniquement testésSystème anti-coliques unique composé d'une tétine Philips Avent et d'une bagued'adaptation permettant à l'air de pénétrerdans le biberon et pas dans l'estomac de bébéafin de faciliter la digestion.*Crème mamelons sensiblesHypoallergénique, aussi bien pour maman que pour bébé. Protège et nourrit les mamelons secs ou sensibles. Facile à appliquer. Inutile d'enlever la crème avant la tétée.Disques d’étanchéitéConvertissent tous les biberons Philips Avent en récipients de conservation pour lait.Pays d'origine UEInclusTire-lait manuel: 1 Pièce(s)Biberon Classic 125 ml: 3 Pièce(s)Biberon classique 260 ml: 2 Pièce(s)Tétine extra-souple débit nouveau-né:2 Pièce(s)Tétine extra-souple débit lent: 2 Pièce(s)Pack de transport pour tétines, nouveau-né:1 Pièce(s)Disque d'étanchéité pour la conservation du lait: 6 Pièce(s)Crème mamelons sensibles: 1 Pièce(s)Coussinet d'allaitement jetable: 40 Pièce(s)Goupillon pour biberon et tétine: 1 Pièce(s)DVD Guide de l'allaitement maternel:1 Pièce(s)Étapes de développement Étapes: 0-6 mois* * Une étude clinique a montré qu’à l’âge de2 semaines, les bébés nourris avec un biberon Avent étaient moins irritables que ceux nourris avec un biberon concurrent. (Étude menée en 2008 parl'Institute of Child Health (Institut de la santé infantile),Londres.)© 2019 Koninklijke Philips N.V .Tous droits réservés.Les caractéristiques sont sujettes àmodification sans préavis. Les marques commerciales sont lapropriété de Koninklijke Philips N.V .ou de leurs détenteurs respectifs.Date de publication 2019‑06‑24Version: 1.2.1。
说明书改版形式:图文结合,上图下文,形象说明框架: 1 ,安全注意事项2,产品组成1)包装内容:主机、适配器、安全绳、遥控器、清洁环、清洁布2)技术参数3)部件名称:产品每个按键部位介绍3 ,产品使用步骤:1)使用前检查:2)安装清洁布3)连接适配器与 DC 延长线4)连接安全绳5)喷清洁液6)产品工作:连接电源、打开电源开关,吸附、开始工作7)产品暂停8)结束工作4,维护保养:清洁布保养,机器主机5,灯效及提示音6,故障排除1.安全注意事项使用本产品前请仔细阅读此说明书。
请保存好说明书。
1. 产品不能由8 岁以下的儿童、身体或者精神上有障碍的人使用。
护人的监督指导下进行。
请不要让儿童靠近处于工作状态的产品,若需要使用,请在监或将产品作为玩具玩耍。
2.仅当室外温度在 0 度以上 40 度以下、无大风、无雨,空气干燥的情况下方可在室外使用此产品。
产品工作温度: 0 ℃ ~40 ℃ (32 ℉ ~104 ℉ )。
产品储藏温度:-10 ℃ ~50 ℃(14 ℉ ~122 ℉ )。
3.第一次使用前务必充电 5 小时左右,保证内置锂电池充满电(绿灯亮)后使用。
4. 本产品在工作时,请始终保持产品处于通电状态。
产品内置锂电池仅用于维持产品在突然断电情况下、在限定时间内保持吸附在玻璃上不跌落,不作为正常工作供电。
5.使用前请检查安全绳是否破损,绳結是否松脱。
使用时系好安全绳,并将安全绳绑住屋內的固定物,以免发生危险。
6.本产品在使用过程中,请确保有人在旁看护,必要时可以为产品提供帮助。
7. 请勿在无框玻璃,有弧度玻璃、破损缝隙及凹凸不平玻璃上使用本产品,以避免玻璃破碎、产品跌落等风险。
8. 严禁在大面积潮湿或油性玻璃上使用,以避免产品打滑造成跌落的风险。
产品使用存放需远离热源或易燃物。
9. 请勿将本产品放在水中或其他液体中,请勿直接对机器喷水,造成电击危险;禁止用潮湿的手触碰插头或产品。
10.高层户外使用本产品时,建议在楼下地面设置危险警示区,禁止人员靠近。
11.产品使用时需确保产品完全吸附在玻璃上方可放手,清洁完毕时先拿下机器再关闭电源。
12.请按照说明书的指示使用产品,仅使用制造商推荐或销售的附件;仅使用制造商专配的原装可充电电池及适配器。
13.请小心使用电源线、电源延长线避免其损坏。
禁止利用电源线拖拽、提拉产品或将电源线当做提手;禁止在使用过程中关紧玻璃窗夹住电源线或在电源线上安放物品。
14.在维护或清理产品前必须先将插头从电源插座拔出;电池需有专业人员更换。
15.请勿将头发、衣角、手指与身体任何部分靠近产品开口或转动零件。
16.请依照本手册的指示使用产品。
因不当使用导致的任何损失及伤害,本公司概不负责。
2.产品组成2.1 机器及所含配件(每个部件的图片)主机(本身自带清洁环和一对清洁布)适配器电源线遥控器带电池( AAA )*2安全绳清洁布(图片)清洁环 *2DC 延长线说明书2.2 技术参数产品尺寸295mm x 148mm x 120mm (長寬高 )产品重量930g输入电压100~240VAC, 50Hz~60Hz输出电压24V/3.75A功耗80W安全绳長度 4.5 米抗拉强度 :150Kgf電池Li-Po, 4x3.7 V擦拭速度 4 分钟可擦拭 1 平方米最大工作范围高度:6 米宽度:5 米*因产品持续改善的需要,本公司保留对产品进行的任何技术、设计变更权利。
解释权归本公司所有。
2.3 主要部件名称主机遥控器从当前位置先向上 /左/ 右3.产品使用3.1 使用前注意请在面积大于35*35cm的有框玻璃上使用(图片上所标数字改一下)请先充电 5 小时激活UPS 电池(图片上机器改为玻妞机器人的图片)严禁在边框厚度(玻璃面到边框面的高度)使用前请检查清洁环与清洁轮是否扣紧,小于 5mm的有框玻璃上使用清洁布是否套好窗户前方有不可移动障碍物(挂钩、家具等)时,机器会碰撞感触后退回,建议手动指挥机器避开障碍物。
当产品在水平玻璃面上工作时,应使用遥控器手动模式来控制产品运行。
本产品不能在倒置和超过90 度角的情况下使用。
建议搭配玻妞机器人专用清洁液使用,使用非专配的清洁液可能导致清洁效果不佳。
3.2 安装清洁环、清洁布改为:确保将清洁环的六个卡扣全部卡在清洁轮的凹槽3.3 连接适配器与DC 延长线 (这里把电源线接口那边也加进去)* 按需使用延长线可根据实际距离和玻璃大小,使用延长线增加长度,每根延长线为4m 。
注意产品在户外使用时,不建议使用 1 根以上安全绳。
3.6 产品工作( 1)连接电源(图片)产品需插电使用,通电后适配器灯亮起,产品电源指示灯亮起。
(电源灯满电是绿色,未充满是橙色)( 2)连接安全绳(图片不太合适,希望重新拍)使用产品擦拭玻璃内侧和外侧时,都需要将安全绳系牢在室内固定位置,建议多次缠绕打结系紧。
产品吊端安全绳需检查是否松脱。
松脱需重新系紧。
( 3)打开电源开关(图片)(指示灯的顺序不对)打开电源按键按下“?” , 产品正面中间的工作灯蓝灯亮起,底部蓝灯同时亮起,开机成功。
( * 注:充电时请勿打开电源开关)( 4)吸附(图片)将玻妞机器人放置到玻璃中心位置或尽量远离窗户边框,带机器完全吸附后,即可松手。
( 5)开始工作(图片)通过遥控器模式键启动机器Ok 键四周的方向键为手动按键,选择所需方向按键按下即可,无需长按。
户外使用遥控器时,机器左右方向是相对的,即选择向左机器会向右移动。
*注意:产品在使用过程中出现红灯闪烁报警,请参考【故障排查】部分,查看可能出现的原因及解决方法。
3.7产品暂停产品在使用过程中如果需要切换路径模式或者从自动模式切换手动模式,均需先按暂停键,再选择您需要的模式对应按键。
产品已擦完整个窗户,但无法自动停止时,请按“ stop ”键停止运作。
3.8结束工作(1)取下产品(图片)清洁完毕后,可先取下机器,再关闭电源。
户外清洁完毕,如果机器不在手边,可以用手动模式方向按键指挥机器移动到手边,再取下机器关闭电源。
(2)关闭电源(图片)打开电源按键按下“Ο” ,工作指示灯(蓝灯)熄灭,机器仅剩电源指示灯亮。
(3)解开安全绳(图片)(4)断开电源(图片)4.维护保养*清理清洁布与底部组件时,请拔下电源,关闭主机。
4.1 清洗清洁布取下清洁布,在 40 ℃以下的清水中清洗,请勿使用漂白剂,不可烘干、熨烫、干洗,自然晾干后再使用。
4.2请勿直接使用清洗后的清洁布,避免产品在工作过程中打滑良好的维护保养,有利于延长清洁布使用寿命。
请您爱惜使用。
电池保养第一次使用前,为了激活内置锂电池,需充电 5 小时左右请使用机器原装的变压器。
使用其它类型的电源线或变压器会导致故障或危险。
长期不使用机器,建议每月给机器充电一次,用以保养电池。
每次充电每次使用机器需先充电,电源灯变成绿色后再使用。
5. 灯效及提示音2 小时左右。
指示灯判断橙灯亮电池充电中绿灯亮电池充饱电蓝灯常亮机器工作灯,开机后工作灯亮起蓝灯闪烁正常,工作中检测运行环境红灯闪烁,持续报警无电源输入,请检查电源线路。
红灯闪一次,哔一声请按照【故障排除】排查原因蓝灯常闪,橙灯亮电池电压过低,连续充电8 小时后无改善,为电池故障,请联系原购买商家或当地经销商送修。
红灯闪烁蓝灯闪错误码数硬件有问题,请联系原购买商家或当地经销商送修。
6.故障排除序号问题描述可能原因解决方法电池电压过低或者电池使用前充电 5 小时以上,待充饱电(绿产品开机不运故障灯亮)后再使用。
1(蓝灯闪烁,橙灯亮)如果充电 8 小时以上还是产品无运转,行电池故障,联系售后服务人员更换。
硬件问题电池故障或者其他硬件故障请联系售后(蓝灯闪烁,红灯闪烁)服务人员。
产品不能吸附真空马达故障或者其他请联系售后服务人员。
2硬件故障玻璃产品开机,未连接电源连接电源使用即可,若连接电源后仍报或电源中断警,需检查:(红灯闪烁,持续报警) 1.连接适配器,插上电源,检查适配器上绿灯是否亮起,亮起正常,不亮请购买新适配器。
2.去掉电源延长线,直接用适配器配套电源线插入机器电源孔,看机器上电源灯是否亮起,亮起正常,不亮请联系售后服务人员。
产品运行中,负压不足 1.检查清洁布是否套好,是否套匀,可(红灯闪一下,提示音更换新清洁布套好;产品红灯闪烁哔一声) 2.检查清洁环是否扣紧,清洁环需与清洁轮扣紧。
3报警产品运行中,下轮摆动 1.根据具体环境进行测试喷玻妞专用一下。
玻璃水,喷 3-4 下;不喷干擦;多喷(红灯闪一下,提示音5-6 下从而找到合适的湿度配合玻妞哔一声)机器人工作。
2.启动机器全自动模式按键时,请离窗框一段距离放置机器,避免机器判断出错。
产品运行中,遇到不明 1.遥控机器到安全位置,或以安全绳轻障碍,红灯报警轻拉回机器。
拉安全绳时,应尽量贴近玻璃避免掉落;2.排除门窗上的障碍物;3.检查清洁环是否卡紧。
QA常见问题Q1.如何擦净玻璃步骤 1: 先干擦。
第一次擦拭,必须使用“干擦" ( 不喷任何水 ),先清除玻璃表面的风沙。
如果先喷一些水 (清洁剂 )在清洁布或玻璃上,水(清洁剂 )将会跟脏污混合在一起导致整片玻璃看起来很脏,擦拭结果将会很差。
(如果脏污较多时可将两片清洁布都喷玻妞专用玻璃水,将顽固的脏污去除,可适当多喷一些3-4下)步骤 2:更换干净清洁布,上部清洁轮保持干净且干燥,下部清洁轮喷一点清洁剂(1~2喷即可),不可全湿,全湿的清洁布会影响机器的运行。
(如果第一次的结果还是很脏可将两片布都喷湿也可以适当多喷3-4 下)Q2.清洁后,玻璃表面残留圆形轮印清洁布太脏,请更换干净之清洁布再擦拭一次,或者多次擦拭。
Q3. 玻璃清洁后,在夜间灯光照射时有弧形痕迹擦拭方法:第一次擦拭,请用干净清洁布清除风沙。
第二次擦拭,请更换干净清洁布,上部清洁轮保持干净且干燥,下部清洁轮喷一点清洁剂或酒精(1~2喷即可),不可全湿,可消除弧形痕迹。
可视情况进行第三次干擦,效果更佳。
Q4.爬升时打滑而爬不上去,有可能的原因:摩擦力太小,可向清洁布喷少许玻妞专用玻璃水3-4下或者1-2下。
视玻璃的面积大小和当时的环境湿度大小自行掌握。
注意:贴纸、隔热贴纸或雾面贴纸的摩擦系数比较低。
Q5.机器行走不顺,有可能的原因:(1)清洁布太脏,请更换干净之清洁布。
(2)玻璃表面有不同的区域 (玻璃区、贴纸区、隔热贴纸区或雾面贴区),请在单一区域使用。
(3)清洁轮螺丝松脱,请锁紧。
(4 )清洁轮中心裂开。
Q6. 按向上自动清洁模式时,无法顺利侦测窗户上缘:(1 )可向清洁布喷适量玻妞专用玻璃水,增大清洁布与玻璃的摩擦力。
(2 )按遥控器按键,再按使得玻妞机器人继续向上工作。
Q7. 向下工作时在没有全部擦完的情况下停止:(1 )玻妞机器人自身错误的侦测导致的,改用或自动清洁模式继续工作。