DAAS音频测试系统操作手册
- 格式:pdf
- 大小:591.46 KB
- 文档页数:44
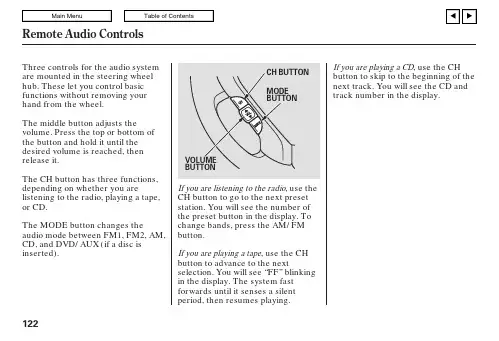
If you are playing a CD ,use the CHbutton to skip to the beginning of the next track.You will see the CD and track number in the display.Three controls for the audio system are mounted in the steering wheel hub.These let you control basic functions without removing your hand from the wheel.The middle button adjusts the volume.Press the top or bottom of the button and hold it until the desired volume is reached,then release it.The CH button has three functions,depending on whether you arelistening to the radio,playing a tape,or CD.The MODE button changes theaudio mode between FM1,FM2,AM,CD,and DVD/AUX (if a disc is inserted).Remote Audio Controls122If your vehicle’s battery is discon-nected or goes dead,the audio system will disable itself.If thishappens,you will see ‘‘CODE’’in the frequency display the next time you turn on the e the preset buttons to enter the five-digit code.The code is on the radio code card included in your Owner’s Manual kit.When it is entered correctly,the radio will start playing.If you make a mistake entering the code,do not start over;complete the five-digit sequence,then enter the correct code.You have ten tries to enter the correct code.If you are unsuccessful in ten attempts,you must then leave the system on for 1hour before trying again.If the code card is lost,a dealer can access your code with the your radio’s serial number.To access the serial number,turn the radio on.It must display ‘‘CODE’’,then turn the radio off.Push the preset 1,preset 6,and power buttons at the same time,then quickly release.If you lose the card,you must obtain the code number from a dealer.To do this,you will need the system’s serial number.You will have to store your favorite stations in the preset buttons after the system begins working.Your original settings were lost when the power was disconnected.Your vehicle’s audio system will disable itself if it is disconnected from electrical power for any reason.To make it work again,you must enter a specific five-digit code in the preset buttons.Because there are hundreds of number combinations possible from five-digits,making the system work without knowing the exact code is nearly impossible.You should have received a card that lists your audio system code number and serial number.It is best to store this card in a safe place at home.In addition,you should write the audio system’s serial number in this owner’s manual.Radio Theft ProtectionFeatures123On EX,and EX-LmodelsPress and hold the CLOCK (SCAN/RPT)button.Change the hours by pressing the H (preset 4)button until the numbers advance to the desired time.Change the minutes by pressing the M (preset 5)button until the numbers advance to the desired time.When you are finished,release the CLOCK button.If your vehicle’s battery isdisconnected or goes dead,you will need to set the clock.You can quickly set the time to the nearest hour.If the displayed time is before the half hour,pressing and holding the clock button,then pressing the RESET (preset 6)button sets the clock back to the previous hour.If the displayed time is after the half hour,the clock sets forward to the beginning of the next hour.For example:1:06will reset to 1:001:52will reset to 2:00The right display shows the time when the ignition is in theACCESSORY (I)or ON (II)position.Press and hold the SET (TUNE)button until the numbers flash.Change the hours by pressing the H ()button until the numbers advance to the desired time.Change the minutes by pressing the M ()button until the numbers advance to the desired time.When you arefinished,press the SET button again.LX modelSetting the Clock124EX,and EX-Lmodels。
音频设备调试技术手册一、前言音频设备调试是确保音频系统正常运行的重要步骤。
本手册旨在介绍音频设备调试的基本原理和技术要点,帮助用户快速准确地完成调试工作。
二、准备工作在开始调试之前,需要准备以下工具和设备:1. 音频发生器:用于产生特定频率和信号形式的音频信号。
2. 音频测量设备:如示波器、频谱分析仪等,用于准确测量音频信号的参数。
3. 扬声器或耳机:用于测试音频设备输出效果。
三、连接与配置1. 连接音频设备与发生器:使用合适的音频线缆将音频发生器与音频设备连接。
确保连接稳固可靠。
2. 配置发生器参数:根据实际需要,设置发生器的频率、幅度、波形等参数。
3. 连接音频测量设备:将音频测量设备与需要测量的信号源相连。
四、调试步骤1. 信号源设置:根据需求设置音频发生器输出的信号参数,包括频率、幅度、波形等。
2. 信号传输测试:将音频信号从发生器经过音频设备传输至音频测量设备,通过测量设备观察信号传输过程中是否存在损耗、失真或干扰等问题。
3. 频率响应测试:使用频谱分析仪等设备对不同频率的音频信号进行测试,观察音频设备在不同频率下的响应情况。
4. 音量平衡测试:通过调节音频设备的增益和平衡参数,确保多声道音频的音量平衡和定位效果。
5. 降噪测试:使用噪声发生器模拟环境噪声,观察音频设备的降噪效果。
6. 回声测试:使用回声测试仪等设备进行回声测试,确保音频设备在不同场地均能正常工作。
7. 故障排除:根据实际测试结果,分析并解决音频设备可能存在的问题,如信号丢失、噪音过大等。
五、调试技巧和注意事项1. 选择合适的测量设备和工具,确保测量结果准确可靠。
2. 在调试过程中,注意保持测试环境的安静和稳定,避免外界干扰对测试结果产生影响。
3. 在进行维修和调试时,务必断开电源,以确保安全操作。
4. 若遇到无法解决的问题,可以查阅设备的操作手册或咨询相关技术支持。
六、总结本手册介绍了音频设备调试的基本原理、步骤和注意事项。
前言[数位音响分析系统](Digital Audio Analyser System, DAAS 3L+)是德国admengineering 公司(位于Nordhorn)所发展与制作的.合法使用者可以无限次使用DAAS 3L+所附的软体,并且容许自行拷贝一份当作[备份]软体,仅限自己使用. 除此之外,此软体、使用手册、与硬体等之其它拷贝或以任何形式复制,均属违法,将依法追诉. 使用手册或内含之资讯必须获得adm engineering公司或RCM Akustik 公司之书面许可,才能转载或复印.adm engineering公司与RCM Akustik公司并不保证本使用手册或所附之软体毫无瑕疵. 欢迎使用者提供修正意见,若有任何缺失,本公司将尽快修正.使用手册里所提及之公司名称与商标品牌等均受国际法保护,即使未特别声明.MS-DOS and WINDOWS © Microsoft CorporationDR-DOS © Digital Research IBM PC、XT、AT、PC-DOS © IBM(Inter National Business Machines)1 概述1-1.前言DAAS(数位音讯分析系统Digital Audio Analyser System)之发展目的在于制造一个能够利用个人电脑功能又售价合理的频率响应度测试仪器, 从取样、类比/树位转换、到计算评估技术等, 此系统逐渐发展成目前的多功能形式DAAS 3L.尽管讯号取样有很多种分析方法, 然而对于使用者而言, 测试值比讯号本身更加重要. 换言之, 扬声器或扩大机的设计师并不需要了解数字讯号评估技术, 因为每一项测试均可依照指定的程序而获得测试结果. 每一测试的所有重要参数均已经有最佳化之设定. 凡是想进一步利用此系统者, 可以更改系统参数, 尝试其它领域之运用,例如频谱分析与示波器功能等.新的DAAS 3L包含许多重要而实用的功能:●利用[数位/类比转换器]与[类比/数位转换器]产生讯号与执行测试。
歌诗德HI-FI产品DAC-X10音频解码器目录简介2安装3硬件准备3软件安装3配置功能菜单设置9多功能操作选择按键9主界面10设置默认设备Windows XP 11Window Vista/Windows 7 13简介DAC-X10音频解码器是深圳歌诗德电子为音乐发烧友设计的功能强大、性能卓越的HI-FI立体声音频解码器产品。
它使用了自主研发的基于CPLD的主控芯片,操作方便,使用灵活,音质出众,为了您更有效的了解和使用本产品,请仔细阅读本用户手册。
本立体声解码器为客户提供了丰富的数字输入接口和高性能模拟输出接口,以及灵活多样的控制能力。
具体功能如下:●最高24 Bit/192kHz规格的光纤\RCA同轴\AES专业数字音频接口●最高24 Bit/384kHz规格的基于XMOS事件处理器的USB 2.0高速异步方案接口●可控制输出电平的高性能线路输出●WDM播放接口支持●ASIO播放接口支持规格参数●电源输入:AC115\230V 50\60Hz;功耗<30W●RCA输出电平:2.5V rms @ 0dBFS●XLR输出电平:5V rms @ 0dBFS●外形尺寸:313*190*70 长*宽*高(不含突出部分)安装硬件准备本立体声音频解码器采用精密电子元件制造,对静电敏感,同时,产品内未包含可供维修的备件,因此,请不要随意打开产品机壳,以免触电或造成新的故障。
●将解码器从包装盒中取出,除去包装袋。
●如果是在中国境内,请使用附带的标准电源线将本机连接至电源。
●使用适当的连接线将音源与本机连接。
●使用适当的连接线将本机与功放、有源箱或者耳机放大器连接。
●打开电源,调节至需要的输入源以及适当的音量,开始欣赏音乐。
软件安装放入光盘,或者直接运行我们传输到您的电脑当中的XMOS USB AUDIO DRV.exe文件,启动安装界面。
示例为Windows Xp系统下安装v1.61.0版驱动过程,其他系统可能稍有不同,请以实际为准。
音频系统(一)音系统操作指南1、音响设备开、关机顺序应按由前到后顺序开机,即由音源设备,音频处理设备,信号切换设备(高清播放机,机顶盒,DVD,调音台等)到音频功率放大器。
关机时顺序相反,应先关功放。
这样操作可以防止开、关机对设备的冲击,防止烧毁功放和扬声器。
2、常用音响设备介绍(1)调音台基本结构均可分为以下三个部分:1)输入部分(由话筒及录音设备线路输入到调音台);2)输出部分(由调音台输出到录音设备);3)监测部分(用表头、音箱、耳机监听所有信号);从话筒卡农插座到推子,称之为一“路”或一个“通道”。
所有的信号经分路输入,然后被增益、均衡、音量推予、声像和辅助部分控制,最后从右边输出。
在每一路背面都可找到Input(输入)口,模拟输入一般分为卡农XLR和大二芯TRS两种,话筒插口一般都有幻象供电,在台子上可以找到幻象电源标志为+48V。
每一个通道都有一种或几种规格的信号输入口,用于连接系统中的录音机、音源、合成器等的音频输出口,或者插上动圈、电容、无线话筒等。
信号输入插口分为低阻平衡输入(LO—Z卡侬)及高阻不平衡输入(HI—Z二芯)。
一般的音响设备的接法采用不平衡式,信号“+”、“-”的其中一端和信号线的屏蔽层公用。
例如:一芯屏蔽线,芯线是信号“+”,屏蔽线是信号“-”和地线。
这比没有屏蔽的平行线的感应噪声要少,属于筒易型不完全屏蔽。
专业音响设备的输入输出都采用平衡式两芯信号线,芯线信号分“+”、“-”传输,另外再接屏蔽线,“+”、“-”使用独立的地线,插头使用卡侬XLR插头。
和这些输入口紧连的通常是一个调节旋钮,称之为增益钮(gain),是用来调整信号输入量的,即当信号太强时对其削减,太弱时则对其提升,根据不同的接插形式增益自动识别调整响应电平范围,增益旋钮是作为声音输入调音台的第一个关口,调整适当,即可保证调音台下一级的处理电路能接收到充分且“干净”的信号。
增益下面有一个80HZ以下切除按钮,用于降低低频噪声和人声应用中阻断80HZ以下无用频率。
深圳阳光丽声仪器设备有限公司深圳市音之侣机电有限公司www sunvoice cn com email 138****6201163com 138****6201075529593393075589472581808.-. :@.手机: 电话:- 传真:--******************************************郑重申明:DAAS公司只提供英文版光盘使用操作手册,没有提供中文版本手册及印刷品. 此中文说明书为本公司翻译,版权为其所有,任何其他公司不得抄袭翻印.公 司 简 介本公司是专业电声测量领域的先导者。
本公司代理国内外各类电声测量仪器及音响、分频器开发设计软件,产品种类齐全;公司成立多年来,包括港、台商在内的众多客户(如松下、TCL王牌、惠阳东亚集团、东莞美隆、深圳隆光等),对我们公司的产品及售后服务给予了很高的评价。
我们已获准成为美国LMS,MLSSA,德国DAAS,ATB,Loudsoft,台湾阳光,意大利CLIO等公司的大陆代理商。
因为有我们美国分部的全力支持,故我们在价格及技术支持方面具有绝对优势。
******************************************DAAS4Pro 硬件安装图示:红白黄接线头按照位置顺序连接,请勿插错************************************************************************************ DAAS4Pro QC简易操作说明一:首先将DAAS卡插入电脑主机,然后安装驱动程序和测试软件.安装完毕后请接好电脑主机与DAAS专用功放之间的所有连接线缆并打开功放电源.(请注意,在以后进行测试操作时一定要先打开功放电源再打开测试软件,此点十分重要).当你装完DAAS卡的驱动后在你的电脑屏幕右下角会出现一个这样的图标,请双击它会出现下图:备注:此项设置是首次安装完驱动软件后必须要进行的,此设置只需进行一次.二:进入测试界面,首先双击桌面DAAS快捷图标,第一次会出现如下图所示的提示: 2:点击此处 ******************************************点击OK 进入下一画面,请按照图上的步骤操作:会出现下图:1:首先点击此处 ******************************************然后点击再按Esc 退出测试程序之后再重新进入测试程序,就会听到功放中的继电器切换几次,这是系统在检测电脑与功放之间的连接是否正常.如果一切正常就可进入下一步的操作.三:重新双击桌面上的DAAS 快捷图标会进入测试界面,我们首先调节测试电压,如下图所示:当选择好合适的电压后,我们开始进行下一步操作. ******************************************首先选择测试项目,我们先测试频响,如下图:接着点击F1会出现如下界面:选择F1******************************************还是选择F1开始接着选择F1点击OK******************************************选择F1点击F1出现下图所示的测试曲线,然后点击F5 ******************************************选择想要保存的路径和文件名称(路径和文件名称请按需要自己设定).保存完毕后请点击F7出现如下画面,再选择F9点击此处保存曲线******************************************出现如下图后请按照需要进行选择我们选择F1手绘上下限文件,会出现下图点击此处F1手绘上下限F2载入上下限F3存储上下限F4删除上下限******************************************点击此处用鼠标左键首先选择上限的起始位置,之后延样品曲线走势连续点击即可绘出上限(此处注意,选择F1手绘上下限文件时一定要先绘上限),之后点击鼠标右键会出现如下画面:继续选择此处 ******************************************用相同方法绘出下限,如下图:点F7,再F9,得出下图:出现如下图所示后选择路径,保存文件.(注意保存路径一定要和样品曲线的路径一致,即要在同一文件夹)选择F3保存上下限文件******************************************2.再点击OK ******************************************出现下图后先选择Quality Control(QC 品管控制)然后点击F1或者踩脚踏开关则开始QC测试,如下为测试结果图 ******************************************出现如下图所示画面后此时就会出现你所要的结果曲线,现在请点F5保存曲线,如下图,选择自己想要保存的文件名称和路径保存 ******************************************方法与频响上下限绘制方法一样再选择F1绘制上下限公差 ******************************************绘制完毕后出现如下图所示画面:如下图所示先选择F9,再选择F3保存上下限公差文件出现如下图所示后选择路径,保存文件.(注意保存路径一定要和样品曲线的路径一致,即要在同一文件夹)2,再选择F3******************************************然后进行QC测试,方法与频响QC测试一致.下图为频响,阻抗QC测试完毕后的画面: ******************************************(1)更改显示频率范围:如下框中先输入起始频率后点击ok ,再输入截至频率:.(2)要在同一画面显示多条频响曲线或者频响和阻抗曲线同时显示在同一1.在测试出结果后点击这里的F7 ******************************************画面,可以先将测试的曲线保存,然后测试另外一个频响曲线后在画面上点击File-Load Curve(载入曲线),选择刚才保存的文件名则可将刚才保存的曲线调入同一画面. ******************************************手动设置DAAS4系统功放输出电压/电平(1) 若被测试扬声器的阻抗为8欧姆,则在1M1W 的测试距离功放输出应该为8开根号=2.83V 来测试,麦克风和被测试扬声器的距离为1M(2) DAAS4输出电压/电平单位只有dB 没有V ,因此要经过换算,2V=22dB, 2.83V =19dB,179mV=43dB下图:出现如下画面,(3) 回到测试软件界面,测试频响曲线,麦克风和被测试扬声备注:若不用手动设置方法,可点选此软件自动换算设置,让软件自动换算成1M1W 测试结果,只更改这里被测试喇叭阻抗数值即可。
3-6.示波器利用[示波器](Oscilloscope)功能,时间宽度与暂态讯息(长达2.5秒左右,频率范围达20KHZ)可显示出来,亦可列印之。
所选之测试讯号如同[示波器]一般同频显示出来。
在主功能选项里,按[F7]选示波器功能。
然后在[F1]至[F10]当中设定测试参数。
按[F2]可设定输入灵敏度,麦克风输入是±1Pa与±8Pa,或者高电平输入为±0.2V、±2V与±20V 。
当使用DAAS测试讯号之际,其输出电平可按[F3]设定,或者利用扩大机之音量钮来设定。
时间范围(点数)可按[F4 Time+]或[F9 Time-]变更之(与48KHZ 取样时,之少为5ms,最大为2.7secs,使用更低的取样率时,最大可达22secs)。
取样率(每秒之点数)可按[F10]从48KHZ改变至6KHZ,如此会在频谱分析之际,增加八倍测试时间与频率解析度。
按[F1]开始测试。
测试会一再的重复,直到按[ESC]键为止,或者按[F2]暂停。
于暂停之际,按[F1]即可继续测试。
在暂停模式里,可按[F4 Print]执行打印。
利用[F2]与[F3]可选择特定的频段进行扩展与压缩之显示。
[F6]、[F7]、[F8]与[F9]分别用于移动、显示与列印。
其中[F7]与[F8]是移动一点,[F6]与[F9]是移动半点。
亦可利用箭头键([←]、[→]、[Ctrl]+[←]或[Ctrl]+[→])。
[讯息盒] 会将比例与讯号位置显示放大。
按[F5]可在所选定之讯号范围执行频谱分析。
按[F2]可延着曲线移动[标线],同时读出频率值及其振幅。
按[F5]可选定评监视窗,可用的视窗包括:□ Square(用于暂态)。
□ Hamm(一般用途)。
□ Blackman□ Kaiser(B=10.056,側瓣衰减大约100dB)。
□ Flat Top(用于精确设定振幅)。
然后用[F6]、[F7]、[F8]或[F9]变更之。
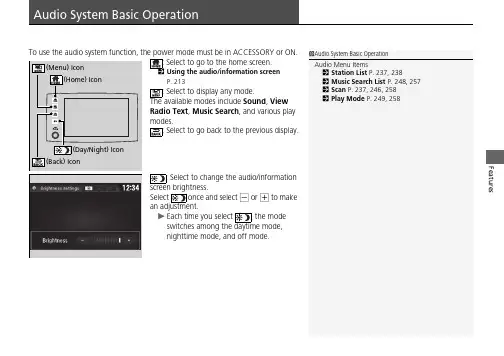
FeaturesUsing the audio/information screen P.213: Select to display any mode.The available modes include Sound , View Radio Text , Music Search , and various play modes.: Select to go back to the previous display.: Select to change the audio/information screen brightness.Select once and select - or + to make an adjustment.u Each time you select , the mode switches among the daytime mode, nighttime mode, and off mode.1Audio System Basic OperationAudio Menu Items2Station List P.237, 2382Music Search List P.248, 2572Scan P.237, 246, 2582Play Mode P.249, 258uu Audio System Basic Operation u Audio/Information ScreenFeatures Audio/Information ScreenDisplays the audio status and wallpaper. From this display, you can go to various setup options.■Using the buttonPress the (display) button to change the display.■Switching the DisplayContinueduu Audio System Basic Operation u Audio/Information ScreenFeatures■Using the audio/information screen■PhoneDisplays the HFL information.2Bluetooth ® HandsFreeLink ® P.3301Using the audio/information screenTouchscreen Operation•Use simple gestures - including touching, swiping,and scrolling - to operate certain audio functions.•Some items may be grayed out during driving to reduce the potential for distraction.•You can select them when the vehicle is stopped or use voice commands.•Wearing gloves may limit or prevent touchscreen response.•You can use the microfiber cleaning cloth included in your owner’s kit to remove dust or fingerprints from the touchscreen.You can change the touchscreen sensitivity setting.2Customized Features P.299uu Audio System Basic Operation u Audio/Information ScreenFeatures ■InfoDisplays Trip Computer, Voice Info, Clock/Wallpaper and System/DeviceInformation.Trip Computer:•Current Drive tab: Displays the current trip information.•History of Trip A tab: Displays information for the three previous drives. Theinformation is stored every time you reset Trip A.To delete the history manually, select Delete History on the History of Trip Atab. The confirmation message appears on the screen, then select Yes.Voice Info: Displays the all commands list.Clock/Wallpaper: Displays the clock and wallpaper.System/Device Information:•System Info: Displays the software version of the audio system.•USB Info: Displays the memory usage of the USB device.■AudioDisplays the current audio information.■SettingsEnters the customizing menu screen.2Customized Features P.299■Navigation*Displays the navigation screen.2Refer to the Navigation System Manual1InfoWhen you select Info Top from the customizesettings, displays Trip Computer or Clock/Wallpaper.2Customized Features P.299*Not available on all modelsuu Audio System Basic Operation u Audio/Information ScreenContinued Features■HondaLinkDisplays the HondaLink® screen.2HondaLink® P.261■Apple CarPlay/Android AutoDisplays the Apple CarPlay or Android Auto screen.2Apple CarPlay P.2692Android Auto TM P.273■Truck Bed Audio*Displays the Truck Bed Audio System screen.2Truck Bed Audio System* P.277*Not available on all modelsuu Audio System Basic Operation u Audio/Information ScreenFeatures1.2.u The screen switches to the customizationscreen.3.Drag and drop the icon to where you wantit to be.4.Select OK.u The screen will return to the homescreen.■Changing the Home Screen Icon Layout1Changing the Home Screen Icon LayoutIt is not possible to change the position of theicon.Continueduu Audio System Basic Operation u Audio/Information ScreenFeaturesYou can change, store, and delete the wallpaper on the audio/information screen.■Import wallpaperYou can import up to five images for wallpaper from a USB flash drive.1.Connect the USB flash drive to the USB port.2USB Ports P.2052.Select Settings .3.Select Clock/Info .4.Select Clock/Wallpaper Type , then open the Wallpaper tab.5.Select Add New .u The picture name is displayed on the list.6.Select a desired picture.u The preview is displayed on the left side on the screen.7.Select Start Import to save the data.u The display will return to the wallpaper list.■Wallpaper Setup1Wallpaper SetupThe wallpaper you set up on Clock/Wallpaper Type cannot be displayed on the multi-information display.•When importing wallpaper files, the image must be in the USB flash drive’s root directory.Images in a folder cannot be imported.•The file name must be fewer than 255 characters.•The file format of the image that can be imported is BMP (bmp) or JPEG (jpg).•The individual file size limit is 5 MB.•The maximum image size is 4,096 × 4,096 pixels. If the image size is less than 800 × 480 pixels, the image is displayed in the middle of the screen with the extra area appearing in black.•If the USB flash drive does not have any pictures,the No files detectedmessage appears.uu Audio System Basic Operation u Audio/Information ScreenFeatures ■Select wallpaper1.Select Settings.2.Select Clock/Info.3.Select Clock/Wallpaper Type, then open the Wallpaper tab.u The screen changes to the wallpaper list.4.Select a desired wallpaper.u The preview is displayed on the left side on the screen.u The pop-up menu appears on the screen.5.Select Set.u The display will return to the wallpaper list.■1.2..3.Select .4.Select Clock/Wallpaper.■Delete wallpaper1.Select Settings.2.Select Clock/Info.3.Select Clock/Wallpaper Type, then open the Wallpaper tab.u The screen changes to the wallpaper list.4.Select a wallpaper that you want to delete.u The preview is displayed on the left side on the screen.u The pop-up menu appears on the screen.5.Select Delete.u A confirmation message appears on the screen.6.Select Yes to delete completely.u The display will return to the wallpaper list.1Wallpaper SetupFrom the pop-up menu, select Preview to see apreview at full-size screen.To go back to the previous screen, select OK, orselect .When the file size is large, it takes a while to bepreviewed.To delete all wallpapers you add, select Delete All,then Yes.Continueduu Audio System Basic Operation u Audio/Information ScreenFeatures■To move to the next screenSelecting or , or swiping the screen left or right changes to the next screen.■Home Screen1Home ScreenThe home screen has 5 pages (fixed). You cannot add any more pages.Swipeuu Audio System Basic Operation u Audio/Information ScreenFeatures ■To use apps or widgets1.2.u screen appears.3.Select the app or widget you want to use.Preinstalled app list:•Browser: Displays the web browser utilizedby smartphone and Wi-Fi connection.•Calculator: Displays Calculator.•Downloads: Displays the data downloadedfrom the web browser and so on.•Install USB: Check with a Honda dealer forapps that are available for installation.•Search: Displays various retrieval screens.•Settings: Displays the Android settingscreen.1To use apps or widgetsSelect and hold a selected app or widget to add thatapp’s or widget’s shortcut on the home screen.Pre-installed apps may not start up normally. If thisoccurs, you need to reset the system.2Defaulting All the Settings P.323If you perform Factory Data Reset, it may reset allthe settings to their factory default.2Defaulting All the Settings P.323In case those apps still do not startup normally evenafter Factory Data Reset, contact an authorizedHonda dealer.There is a possibility that a browser is shut down inthe situation of the use. In that situation, the screenwill return to before the browser startup.Do not install apps other than those confirmed by aHonda dealer. Installation of unauthorized apps mayintroduce data corruption risks to your vehicle’sinformation and your privacy.You can delete user installed apps by the followingprocedure.1.Select .2.Select Settings.3.Select System.4.Select the Others tab.5.Select Detail Information.6.Select an app that you want to delete.7.Select Delete.Pre-installed apps cannot be deleted.uu Audio System Basic Operation u Audio/Information ScreenContinued Features■To add app or widget icons on the home screen1.2.3.screen.u The pop-up menu appears on the screen.4.Select Add App or Add Widget.u The Apps/Widgets screen appears.Select and hold.uu Audio System Basic Operation u Audio/Information ScreenFeatures5.Select and hold an app or widget icon youwant to add.u The screen switches to the customizationscreen.6.Drag and drop the icon to where you wantit to be.7.Select OK.u The screen will return to the homescreen.Select and hold.Drag and drop.uu Audio System Basic Operation u Audio/Information ScreenContinued Features■To move icons on the home screenYou can change location on the home screen.1.Select and hold an icon.u The screen switches to the customizationscreen.2.Drag and drop the icon to where you wantit to be.3.Select OK.u The screen will return to the homescreen.Select and hold.Drag and drop.uu Audio System Basic Operation u Audio/Information ScreenFeatures ■To remove icons on the home screenYou can delete the icons on the home screen.1.Select and hold an icon.u The screen switches to the customizationscreen.2.Drag and drop the icon you want to removeto the trash icon.u The icon is removed from the homescreen.3.Select OK.u The screen will return to the homescreen.1To remove icons on the home screenYou cannot delete the Phone, Info, Audio,Settings, Navigation*, HondaLink, SmartphoneConnection, and Truck Bed Audio* icons.Apps or widgets will not be deleted by deleting theicon on the home screen.Select and hold.Drag and drop totrash icon.*Not available on all modelsuu Audio System Basic Operation u Audio/Information ScreenContinuedFeatures1.Swipe down from the top of the screen.u The status area appears.2.Select an item to see the details.3.Select or swipe up from the bottom of the screen to close the area.■Status AreaSwipeuu Audio System Basic Operation u Audio/Information ScreenFeatures1.2.3.Select Stop.u The display will return to the app list.■Closing Apps1Closing AppsIf you leave the apps used open in the background,some apps may stop operating properly next timeusing them.If this happens close unused apps.To close all apps on the system, select Stop All, thenYes.You cannot close the HondaLink® and Garmin* apps. *Not available on all modelsContinueduu Audio System Basic Operation u Audio/Information ScreenFeaturesSome of the audio system’s apps can be updated wirelessly when connected via Wi-Fi, or Bluetooth ® in conjunction with the HondaLink ® app installed on a compatible iOS or Android device. If an update is available, the audio system beeps and a notification is displayed at the top of the screen with the respective app’s update icon.■To update an app:1.From the top of the screen, swipe down to see the messages.2.Select the software update notification from the list.■Updating Apps1Updating AppsThe wireless updates are for the apps on the audio system only.To update compatible apps on your iPhone orAndroid phone, please visit the App Store or GooglePlay Store, respectively.uu Audio System Basic Operation u Audio/Information ScreenFeatures 3.Select Download.4.Select OK.uu Audio System Basic Operation u Adjusting the SoundFeaturesAdjusting the Sound1.2..3.Select .4.Select Sound .Select a tab from the following choices:•BAS-TRE : Bass, Treble •FAD-BAL : Fader, Balance•SUBW */CTR-SUBW *: Center *, Subwoofer •SVC (Speed Volume Compensation):Sets the amount of volume increase.1Adjusting the SoundThe Speed Volume Compensation (SVC) has four modes: Off , Low , Mid , and High .SVC adjusts the volume level based on the vehicle speed. As you go faster, audio volume increases. As you slow down, audio volume decreases.You can also adjust the sound by the following procedure.1.Select .2..3.Select Audio .4.Select Sound .When the Truck Bed Audio system is on, only the BAS-TRE tab is selectable.Models with Truck Bed Audio System*Not available on all modelsuu Audio System Basic Operation u Display SetupFeatures Display SetupYou can change the brightness or color theme of the audio/information screen.1.2..3.SelectSystem.4.Select the Display tab.5.Select Display Settings.6.Select the setting you want.7.Select OK.1.2..3.Select System.4.Select the Display tab.5.Select Background Color.6.Select the setting you want.7.Select OK.■Changing the Screen Brightness1Changing the Screen BrightnessYou can change the Contrast and Black Levelsettings in the same manner.■Changing the Screen’s Color Themeuu Audio System Basic Operation u Display Setup Features Select the current source icon, then select an icon on the source list to switch the audio source.Certain manual functions are disabled or inoperable while the vehicle is in motion.You cannot select a grayed-out option until the vehicle is stopped.■Selecting an Audio Source■Limitations for Manual Operation Source List Icons。
DAAS3LTDAAS测试仪应注意的事项1.主机放置位置通风较好。
2.电源电压稳定,有良好地线。
3.测试主机尽量不要移动、撞击。
4.连接线时,请认真参考《使用说明书》。
本机器主要投诉故障:1.主机发热死机;主要是主机通风不良、测试环境温度过高。
2.烧测试卡;连线时连错。
3.找不到测试卡;频繁移动主机,以致测试卡松动。
4.无法测试;连机线接触不良。
5.无法打开测试程序;不小心删除测试程序中的执行文件。
6.机器速度变慢;超过半年未清除主机内灰尘,以致主机散热不良。
7.测试曲线锯齿波增多;测试环境变得恶劣,外界噪音太大,测试制具未做防震动措施。
The items that the DAAS test instrumentshould notice1. The host places the position well ventilated better.2. The power supply electric voltage is stable, wireding goodly.3. Test the host and do not move, bump the shot as far as possible.4. While linking the line, please consult hard 《 the usage manual 》 . This machine the main hurl tells the breakdown:1. The host has fever to crash;Is mainly host bad-ventilated, the test environment temperature lead high.2. Burn to test the card;The hour of on-line connect wrong.3. Can not find to test the card;Multifarious ambulation host, with the result that the test card loosens to move.4. Can't test;Connect the machine line get in touch with badly.5. Can't open to test the procedure;Delete to test the performance document in the procedure carelessly.6. The machine speed become slowly;Exceed the half a year don't the clearance dust inside the host, with the result that the host spreads the heat bad.7. Test the curve teeth of a saw wave increase;Test the environment become bad, the outside noise is too big, test to make to have to did not do the quakeproof to move the measure.音量-+喇叭仿真耳测试耳机、喇叭频率响应步骤将8V、36V开关至OFF位置,40dB、20dB开关至40dB位置。
DAAS Version 3L+ 测试仪器讲议项目:零. DAAS工作方式 (4)壹. 使用这套测试仪器需具备那些器材 (5)1.1 计算机一套器材如下 (5)1.2 测试仪器一套器材如下 (6)贰. 如何组装测试仪器及进入测试系统 (7)2.1 安装测试卡 (7)2.2 安装软件 (8)2.3 进入DAAS3L测试仪器 (8)参. DAAS各项测试系统功能及使用 (9)3.1 频率响应测试 (9)3.1.1 扬声器之频率响应测试 (10)3.1.1.1. 自由音场修正 (13)3.1.1.2. 相位响应曲线 (17)3.1.1.3. 阶梯响应曲线 (18)3.1.1.4. 功能项 (19)3.2 阻抗测试 (20)3.3 参数测试 (22)3.4 谐波失真 (25)3.4.3.1 单频率谐波失真测试 (26)3.4.3.2 多频率谐波失真测试 (27)3.4.3.3 互调失真测试 (28)3.5 残响时间测试 (29)3.6 准位测试 (31)3.7 示波器测试 (33)3.8 频谱分析仪 (35)3.9 测试讯号 (37)零. DAAS工作方式DAAS(数字音讯分析系统Digital Audio Analyser System)之发展目的在于制造一个能够利用个人计算机功能又售价合理的频率响应测试仪器。
从取样、模拟/数字转换、到计算评估技术等,此系统逐渐发展成目前的多功能型式DAAS 3 L。
新的DAAS 3 L包含许多重要而实用的功能:●利用16位「数字/模拟转换器」与「模拟/数字转换器」产生讯号与执行测试。
●以「可变频率分辨率」量测频率与阻抗。
●计算频率与阻抗之相位时,能够自动延迟修正。
●计算「梯形响应」与「瀑布频谱」。
●频率响应曲线之自由音场修正●几乎任何频率均可进行失真测试。
●评估频率与失真之关系。
●利用可变频率量测「互调失真」。
●计算Thiele Small参数(扬声器参数),包括当量容积。
DAAS32 数字音频分析系统中文操作手册A:安装1:把电脑主机打开,找到一条黑色的ISA 槽;把DAAS32 测试卡小心插好,上好固定螺丝;然后装好机盖.2:把电脑接好,装好WIN98 操作系统及所有驱动程序;3:把DAAS32 驱动光盘放到光驱(X:\)里;4:双击X:\ DAASDRIVER\DAAS32 文件夹里的setup.exe;然后一路next,ok!5:安装好后,单击开始菜单\程序\DAAS32;打开DAAS32 文件夹,把里面的DAAS32.EXE 的快捷方式拖到桌面上;双击运行DAAS32;6:第一次运行DAAS32,系统要求输入系列号,按键盘输入系列号,回车便OK!系列号八位,随卡驱动光盘附有.7:运行的界面B:系统设置1:重要注意软件安装好后,系统参数已经自动设置完好,可以正常使用!一般不要动Options 菜单!如果设置有误,系统工作不正常!万一设置有误,系统工作不正常,只能重新安装驱动程序!2:界面设置,如下单击In1,点2.0V;单击Out,输入12;单击DUT,输入测试物的名称;单击SN,输入测试物的系列号;DUT,SN 不输入任何东西也行;3:DAAS32 共同设置单击Options 菜单下的General Options 子菜单,弹出DAAS32 General Options 设置对话框,按图设置;或者按Default;再按OK 完成.4:频响测试设置单击Options 菜单下的Options Frequency response 子菜单,弹DAAS32 Frequency response measurements 设置对话框, 按图设置;或者按Default;再按OK 完成.5:阻抗测试设置单击Options 菜单下的Options Impedance measurement 子菜单,弹出DAAS32 Options Impedance&TSP measurement 设置对话框, 按图设置;或者按Default;再按OK 完成.6:频谱分析设置单击Options 菜单下的Options Spectrum analyzer 子菜单,弹出DAAS32 Options Spectrum analyzer 设置对话框, 按图设置;或者按Default;再按OK完成.7:系统参数设置单击Options 菜单下的System Options 子菜单,弹出DAAS32 System Parameters 设置对话框, 按图设置;或者按Default;再按OK 完成.C:测试应用1:功放,周边等电-电产品的频响测试a:单击Measurements(测试)菜单;b:单击Frequency Response(频率响应)菜单;c:单击跳出的对话框的第二项(电系统),或者按F2 键;d:如下图接线,输入输出短接,按F1 开始参考测试;e:看到如下图的频谱(不能过小过大)后,点(按)F1 确认;f:把测试物接入系统,接入合适的假负载,选好合适量程,按F1 测试;g:看到显示的频谱正确(不能过大过小)后,按(点)F1 确认;h:系统便显示被测试物的频响曲线,按上下键可以上下移动曲线;i:按相应菜单可以进行相应操作,按ctrl+F1 可以快速重复测试;k:按F2 显示相位曲线,按F1 重复测试;l:按F1 重复测试时;按In1 可以改变量程------a:单击Measurements(测试)菜单;选择第一项(F1)进行喇叭测试;b:按图接线,注意功放返回的信号线不能接地,避免地线环路;c:按F1 开始参考测试;d:看到正确地频谱后(不能过大过小),按F1 确认;e:接入测试话筒,按F1 开始测试;f:看到正确的频谱后(不能过大过小),按F1 确认;g;系统便显示被测试物的频响曲线,按上下键可以上下移动曲线;h:按F1 重复测试,按ctrl+F1 快速重复,按F2 显示相位曲线;3:单频失真测试a:单击Distortion(失真)菜单,选择第一项进行单频点测试;b:按图接线,接好假负载,避免地线环路;c:按F4 选择测试频率;d:按OUT 选择合适的信号输出,或调节被测物电位器大小;按F1 测试e:看到正确的频谱后(不能过大过小),按F1 确认;f:系统会显示失真频谱及2,3,4,5 次谐波;g:按F2 显示总谐波失真(THD)及6,7,8,9 次谐波失真,按F1 重复测试a:单击Distortion(失真)菜单,选择第二项进行多频曲线测试;b:按F4 选择测试频率,输入低端频率;c:输入高端频率;d:输入测试点数,数字越大,时间越长;e:按图接线,接好假负载,注意地线环路,选择合适电平及量程;f:按F1 开始测试,耐心等待;g:看到显示正确的频谱后,按F1 确认;h:系统便显示被测物的失真曲线,有THD 及各次谐波失真曲线;i:按F2 选择显示各次谐波失真曲线;按F1 重复测试.5:单击Distortion(失真)菜单,选择第三项进行大小失真曲线测试;6:单击Distortion(失真)菜单,选择第四项进行互调失真测试;6:单击Distortion(失真)菜单,选择第五项进行差频失真测试;6:单击Distortion(失真)菜单,选择第六项进行瞬态互调失真测试;a:单击Measurments(测试)菜单,选择第二项进行阻抗曲线测试;b:把阻抗线接上系统,红的接OUT,黑的接IN,测试夹保持开路;c:按F6 输入阻抗线串联电阻值(用数字表量);精确到小数点后一位;d:输入电阻值按OK 确认,按F1 开始参考测试,e:系统显示正确的频谱后按F1 确认;f:把被测物接入测试夹(把红黑测试夹分别夹到喇叭正负端子),按F1 开始测试;g:看到系统显示返回的信号频谱后,按F1 确认;h:系统便显示被测物的阻抗曲线,按F1 重复测试;i 按F2 显示被测物的相位曲线(红色线),然后按F1 退出相位显示状态;j:按F7 显示被测物的阻抗的最大最小值;k:按F1 准备下一次测试;a:单击Measurments(测试)菜单的第二项,进入阻抗曲线测试状态;略);c:输入阻抗线串联的电阻值,按F1 确认;d:保持阻抗线测试夹开路,按F1 开始参考测试;e:看到系统显示返回的信号频谱后,按F1 确认;f:按In1 把输入量程设定为20V 档,以防测小电容时输入过载;按OK 确认;g:把被测物(电容)端子夹上,按F1 开始测试;h:看到系统显示返回的信号频谱后,按F1 确认;i:系统便显示被测物(电容)的阻抗曲线;j:按F8 显示被测物(电容)的电容值,单位微发(uF);系统显示不很正常(碘)------ufa:在刚才电容测试状态按F1 重复测试,把被测物换成电阻,按F1 开始测试;b:看到系统显示返回的信号频谱后按F1 确认;c:系统便显示被测物(电阻)的阻抗曲线;可以直接读出各频率下的电阻值;d:按F7 显示阻抗的最大最小值;a:由上面测试电阻的状态按F1;把被测物(电阻)换为电感,按F1 开始测试;b:看到系统显示返回的信号频谱后,按F1 确认;c:系统便显示被测物(电感)的阻抗曲线;d:按F8 显示电感量,单位为微亨(uH);a:单击Measurments(测试)菜单的第三项,进入Thiele Small Parameter(T/S 参数)测试状态;b:把阻抗线接入系统;c:按F6 输入阻抗线串联的电阻值,OK 确认;d:把阻抗线测试端保持开路,按F1 开始参考测试;e:看到系统显示返回的信号频谱后,按F1 确认;f:把喇叭正负端子分别接到阻抗线的红黑夹子;按F1 开始测试;g:看到系统显示返回的信号频谱后,按F1 确认;h:系统显示被测物的阻抗,相位曲线,并要求确认喇叭直流电阻,按OK 确认即可;i:系统显示部分的T/S 参数,按F2 接着VAS(等效体积)测试;测试;k:看到系统显示返回的信号频谱后,按F1 确认;确认;m:系统提示输入所加的橡皮泥的重量,输入后按OK 确认;n:系统显示被测物(喇叭)的完整T/S 参数值;按F6 可以存储,按F7 可以输出参数.a:实时频谱分析的信号一般采用白噪音信号,WN8192 和WN16384;b:采用WN8192 的设置,如上图,按Options 菜单,选择第四项频谱分析设置;认;。
Windows-XP DAAS PRO Windows-ME DAAS32\3L【DAAS使用说明书】DAAS测试仪应注意的事项1. 主机放置位置通风较好。
2. 电源电压稳定,有良好地线。
3. 测试主机尽量不要移动、撞击。
4. 连接线时,请认真参考《使用说明书》。
本机器主要投诉故障:1. 主机发热死机;主要是主机通风不良、测试环境温度过高。
2. 烧测试卡;连线时连错。
3. 找不到测试卡;频繁移动主机,以致测试卡松动。
4. 无法测试;连机线接触不良。
5. 无法打开测试程序;不小心删除测试程序中的执行文件。
6. 机器速度变慢;超过半年未清除主机内灰尘,以致主机散热不良,以及多年未重装系统,使其它备份文件占用内存。
7.测试曲线锯齿波增多;测试环境变得恶劣,外界噪音太大,测试制具未做防震动措施,测试位置不佳。
内置功放功能指示DAAS测试仪故障类型及问题解决办法1:*** INTERNAL ERROR7 calculation abort ***n to correct Check the connections and measuring structure and repeat the measuring pay attentiosingnals see examples in the manual!内部错误演算结束检查测量連接结构和重复输出测量,注意校正信号,查看被测产品。
【解决问题之方法】发现这样情况往往是探针接触、屏蔽不良,因该改善探针锐度使之接触良好和屏蔽,还有就是功能项设定不当。
【某电子厂故障】表现故障为:测试时常出现如上故障,出现故障的麦克风,一般为断路的麦克风,以及接触不良的麦克风,经查是屏蔽不良造成的,主要表现在测试曲线未接麦克风时,应该是看不见任何曲线的,但此时表现为很杂乱的曲线,用手接触屏蔽线测试时,未看见很杂乱的曲线。
最后确定造成此故障现象应该是电源线杂乱、又由于测试机上方有日光灯,旁边有试音功放、风扇与测试仪共用电源。
AUDIO AND CONNECTIVITYLearn how to operate the vehicle’s audio system.Basic Audio OperationConnect audio devices and operate buttons and displays for the audio system. n USB PortInstall the iPod® USB connector or the USB flash drive to the front USB port.Models with Color AudioThe USB port (1.0A) is for playing audio files on a USB flash drive and connecting a cellular phone andcharging device. AUDIO AND CONNECTIVITYn Accessory Power SocketThere is an accessory power socket in the front console panel. It can be used when the vehicle is ON or in ACCESSORY Mode.Open the cover to use it.Do not insert an automotive type cigarette lighter element. This can overheat the power socket.n Audio Remote ControlsYou can operate certain functions of the audio system using the steeringwheel controls.Volume Bar (+/-):Press the +/- at the ends of the bar to adjust the volume.Up/Down Arrows:Press to cycle through the available audio modes.n Adjusting the SoundModels with Color AudioPress the sound button, and rotate to scroll through the following choices:AUDIO AND CONNECTIVITY•Bass •Middle •Treble •Fader •Balance •Speed-sensitive Volume CompensationColor Audio SystemUse the buttons to control the color audio system.*1 - If equipped AUDIO AND CONNECTIVITYWi-Fi Connection*1FM/AM RadioPlay FM or AM radio stations.Models with Color AudioAuto when conditions allow you to do so safely. See your Owner’s Manual at (U.S.) or myhonda.ca (Canada) for further license and warranty terms.*1 - If equippediPod®Play and operate an iPod®*14 through the vehicle’s audio system. Connect your device to the USB port (see USB Port).Models with Color Audio*14 - iPod and iPhone are trademarks of Apple, Inc.n Searching for MusicModels with Color AudioUse the selector knob to search for tracks stored on the iPod.1.Press the selector knob to displaythe iPod® music list.2.Rotate the selector knob to select acategory.3.Press the selector knob to display alist of items in the category.4.Rotate the selector knob to selectan item, then pres the selector knob.Press and rotate the selector knobrepeatedly until the desired item youwant to listen to is displayed. AUDIO AND CONNECTIVITYAUDIO AND CONNECTIVITYPandora®*13Your audio system allows you to listen to music from the Pandora® app on a compatible smartphone. This function is available when the phone is paired and connected to the vehicle’s Bluetooth® HandsFreeLink® system, or with an iPhone®, you can connect using your USB cable to the USB port.*13 - US models only, if equippedUSB Flash DriveYour audio system reads and plays sound files on a USB flash drive in either MP3, WMA, or format. Connect your USB flash drive to the USB port .Models with Color AudioApplicable laws may prohibit the operation of handheld electronic devices while operating a vehicle. Launch streaming audio on your phone only when it is safe to do so.n Searching for MusicModels with Color Audio1.Press the selector knob to display afolder list.2.Rotate the selector knob to select afolder.3.Press the selector knob to display alist of files in that folder.4.Rotate the selector knob to select afile, then press the selector knob.Bluetooth ®AudioPlay streaming or stored audio from your compatible phone when it is paired to Bluetooth ® HandsFreeLink ® (see Pairing a Phone). Visit (US)to check phone compatibility. Canada customers can phone (855)-490-7351 for any HandsFreeLink ® related inquiry. Standard data rates apply with your phone service provider.Models with Color AudioAUDIO AND CONNECTIVITYApplicable laws may prohibit the operation of handheld electronic devices while operating a vehicle. Launch streaming audio on your phone only when safe to do so.。
音频测试操作指导书一. 测试目的:测试手机的音频指标是否符合标准。
二.测试设备:综合测试仪R&S CMU200音频分析仪R&S UPL16头胸模拟器B&K HATS测试头B&K 4602B人工耳B&K Type 1、Type 3.2H、Type3.3人工嘴B&K 4227调节放大器B&K 2690功率放大器B&K 2716C手机2 台,电池2 块三.手持式音频测试操作步骤1. 设置放大器B&K 2690 (Microphone supply)为31.6mV/P;2. 设置功率放大器B&K 2716C (Transformer)放大倍数为0;进行CDMA音频测试时,Power amplifier放大倍数为6;3. GSM测试人工耳选择TYPE1 或TYPE3.2;CDMA测试人工耳TYPE3.2。
GSM&WCDMA测试设备连接图PS:UPL的输入端通过放大器B&K 2690与人工耳连接;UPL的输出端通过功率放大器B&K 2716C与人工嘴连接。
CDMA测试设备连接图PS:UPL的输入端通过放大器B&K 2690与人工耳连接;UPL的输出端通过功率放大器B&K 2716C与人工嘴连接。
3. UPL开机,进入手动测试界面,按F3(外部键盘)进入自动测试开始界面。
手机开机后,与CMU建立连接,将手机的Microphone 对准人工嘴,手机的Receiver 用橡皮泥粘在人工耳上,密封好防止漏音。
1) 用外部键盘敲入以下命令进入GSM/WCDMA音频测试程序●Shell●C:\3GPP\exit *一定是在C:\3GPP目录下●Load”3GPP_tst●Run2) 用外部键盘敲入以下命令进入CDMA音频测试程序●Shell●C:\3GPP\exit *一定是在C:\3GPP目录下●Load”CDMA_tst●Run4. UPL屏幕下方出现下面显示5. 按F6或按对应在仪器下方的软键,出现下面界面,选择测试用的相应的人工耳型号;6.1)GSM/WCDMA音频测试时,出现下面界面,按F6,手机与CMU建立通话并设置CMU为Bit StreamHandset low(GSM) , Channel 62, PCL 12,或V oice Speechcodec low (WCDMA);进入测试程序,屏幕上出现下面界面和提示:F5为退出,F6~F11选择测试项,F12下一页F6~F10选择测试项,F12下一页F6~F8为校准项2)CDMA音频测试时,也会出现以上类似界面,CMU设置1st Service Class 为Speech Service,Service Cfg Speech Service→ Service Option3→ V oice Code→ 8K enhanced low。
DAAS 测试方法解析F1 Freq Res p 测试频响曲线F2 Impedance 阻况曲线F3 Thiele small 测试扬声器单体参数F4 Harm dist 失真测量F5 RT60 延时混响测试F6 Level 声压电平测试F7 Scope 示波器F8 Spectrum 扫频仪F9 Play Signal 信号发生器F10 Options 系统设定F1 Frep respF1 测试扬声器F2 测试放大器F3 测试麦克风F4 声---声对比F5 调出一条频响曲线资料F1 测试扬声器F1 0.2VF2 2VF3 20VF4 Use last 使用先前测试结果F5 Load 调出一个预存的测试数据F9 Out Att 调整信号输出大小F10 Sample rate 设定取样频率及测量范围.F10 Sample rate 设定取样频率及测量范围F1 64KHZ 27HZ~26667HZF2 48KHZ 20HZ~20000HZF3 6KHZ 3HZ~ 2500HZF1Repat 重做F2Freetield 自由音场校正(F2、F3、F7、F8调整座标F4、F5、F9、F10 水平垂直方向缩放F6 显示ETC结果) F3Phase 相位特性(F3 minmal phase 最小相位换算F4 Print 图形打印F5 输出CAD数据F6 、F7 缩入座标F9 延迟特性)F4 Print 打印图形F5 Load/save 调出储存的图形F6 W aterfall 显示瀑布图F7 阶梯响应计算F8 Displ range 调整图形座标及分辨率(F1 Setup Frepueney axis 调整水平显示范围F2 Setup magni tude axis 调整纵向分辨率)F9 Quick Repeat快速重测F10 Functions 其它功能设定(F1 Export curve 储存当前测试曲线F2 Correct distance Loudspeaker ___mic 手动修正扬声器与麦克风之距离F3 Mask load /save/Import/new 品管功能键F4 Smoofh 平滑键F5 Measure Impedance 在频响菜单中测试阻况曲线F6 Compine with near field meas 低频测试时曲线结合功能)一、测曲线:F1-F1-F3-F1-F2-F1 按2输入型号(或双击左上面机种型号位置) F4保存F9快递测试二、测参数:退出曲线图,不接喇叭F3-F1回车(低频扫描)-接上喇叭F1-F1测完后按F1输入直流阻-空格,然后加上负载F2-F1测完后按F1输入喇叭直径mm,回车,再输入负载重量g,回车,F4保存确定。