用友U8软件系统管理操作流程
- 格式:ppt
- 大小:1.62 MB
- 文档页数:30
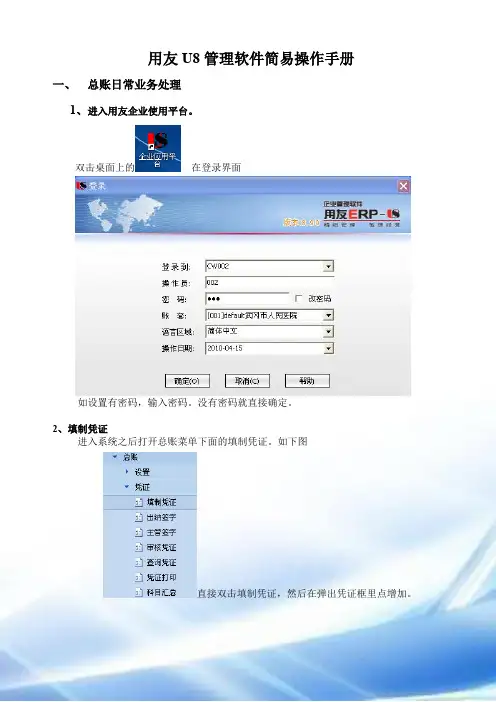
用友U8管理软件简易操作手册一、总账日常业务处理1、进入用友企业使用平台。
双击桌面上的在登录界面如设置有密码,输入密码。
没有密码就直接确定。
2、填制凭证进入系统之后打开总账菜单下面的填制凭证。
如下图直接双击填制凭证,然后在弹出凭证框里点增加。
制单日期可以根据业务情况直接修改,输入附单据数数(可以不输),凭证摘要(在后面的可以选择常用摘要),选择科目直接选择(不知道可以选按F2或点击后面的),如果科目为往来科目则要输入往来单位名称,可以直接选择或在《供应商》《客户》处输入往来单位名称的任意一个名称然后再点将自动模糊过滤。
如果往来单位为新增加的单位则在选择的框中点“编辑”选中往来单位的分类然后点增加输入往来单位的编号和简称,然后点保存。
增加好之后退出返回单位列表。
确定往来单位后确定或双击单位名称。
输入借贷方金额,凭证完后如需继续作按增加自动保存,按保存也可,再按增加。
3.修改凭证没有审核的凭证直接在填制凭证上面直接修改,改完之后按保存。
(审核、记帐了凭证不可以修改,如需修改必须先取消记帐、取消审核)。
4.作废删除凭证只有没有审核、记帐的凭证才可以删除。
在“填制凭证”第二个菜单“制单”下面有一个“作废\恢复”,先作废,然后再到“制单”下面“整理凭证”,这样这张凭证才被彻底删除。
5.审核凭证双击凭证里的审核凭证菜单,需用具有审核权限而且不是制单人进入审核凭证才能审核(制单单人不能审核自己做的凭证)选择月份,确定。
再确定。
直接点击“审核”或在第二个“审核”菜单下的“成批审核”6.取消审核如上所述,在“成批审核”下面有一个“成批取消审核”,只有没有记帐的凭证才可以取消审核。
7.主管签字同审核凭证操作一样只是在选择凭证菜单的时候为主管签字8.凭证记账所有审核过的凭证才可以记帐,未审核的凭证不能记账,在“总帐——凭证——记账”然后按照提示一步一步往下按,最后提示记帐完成。
9.取消记帐在“总帐”—“期末”—“对帐”菜单按“Ctrl+H”系统会提示“恢复记帐前状态已被激活”。

用友软件u8系统用户操作手册(UFIDA U8 system user manual)UFIDA U8 system user manualI. system managementMain function:Reconciliation of sets of management, including the establishment, modification, backup, recovery, and delete accounting data.Unified management of the annual accounts, including the establishment, transfer, clear annual data, last year the data backup and restore the annual account data.Conduct unified planning, management and maintenance of operators and their rights.Clear the documents, lock, clear the abnormal tasks in time, etc..UFIDA Software default, the only system administrator for Admin, the initial password is empty. (suggest to reset the password)(1) how to set up accounts?The starting procedure UF ERP-U8 system service system management system (Admin operator) to determine the registration menu "account set menu set to enter the relevant account information (including account opening name, unit name, date, accounting system, accounting industry level dataaccuracy and length, etc.)(two) how do I set up an operator?Register with Admin, login, system management (i. e., the first 8 operations), permissions menuThe user adds input operator information (including operator code, name, password) to increase (increase here, confirm save)(three) how to set operator permissionsLogin system management with Admin identity (ibid.) "permission" menu permission first select the permissions set of account and accounting year, and then select the user to modify the authorization (i.e. in the relevant operation authority before me your attention, "+")If you want to set a user account manager, can be directly in the "tick" Account Supervisor(four) how to backup the accounting data?The system provides two backup modes: automatic backup and manual backupI. automatic backup: first, build a new folder on the local hard disk. The folder name is set as "UF automatic backup"". Then register with Admin, login system management (ditto), system menu"Auto backup plan" and "increase" input automatic plan number, automatic program name, the "frequency" for a week, "days" and "start time" is set according to the actual situation of the unit, "days" set for 7 days have already established a good selection of UF automatic backup folderThe last hit tick account and annual to choose the backup, click Add.Two, manual backup: first, on the local hard drive to build a new folder, folder name is set as "year + month + day manual backup", such as "20060925 manual backup."". Then take the Admin identity login system management (ditto) "account set menu" output "to choose the backup account check the system will automatically compress the process, wait a moment," select the backup "select just established" 20060925 manual backup "folder, click" confirm "" hard disk backup completed. "Ok. Finally, find the "20060925 manual backup" folder, and you will find two files, which show that manual backup is successful.Two, enterprise portal(1) basic setting1, operation methodRegister with operator as login, login, UF, U8 enterprise portal settings (enterprise portal, lower left), basic files2, special reminderThe content of the basic archives should be set according to the actual situation, not every item should be set up."Customer classification" refers to the unit in the day-to-day operation of the customer classification, and its classification standards are generally based on unit statistics need. So is the supplier classification. When setting, you must set the category and then set the file. If the customer is not selected when the account is set up, the supplier classification is not entered.In the setting of accounting subjects, if a subject chooses auxiliary accounting, then the subject does not need to set down subordinate detailed subjects, and the relevant detailed items are set in the corresponding basic setting. If the account receivable account, if the choice of auxiliary accounting "customer contact", then the subject of the relevant details should be set in the customer file.account setup is complete, or in new cash, bank subordinate subjects, such as the need to specify the cash bank accounts and cash flow based subjects, procedures for enterprise accounting archives portal settings specified to edit the specified subjects.When the initial balance is entered, the initial balance of the enterprise portal business ledger is set at the beginning of the entry periodIf a subject counts for quantity and foreign currency, the amount of the initial period and the balance of the foreigncurrency should be entered at the beginning of the entry period, and the amount of the local currency must be entered first, and then the amount of foreign currency balance will be entered.Non final course (data column is yellow), the balance is automatically calculated according to the balance of detail items.Red balance minus input?.The initial balance at the end of the certificate is read-only and cannot be modified.After the initial entry, the trial balance is made and the daily work can be done after the balance.(two) daily operation2.1 fill in the certificate1. document number: the system defaults automatically in chronological order. If you do not need the system automatic number, please hand number.Need to write the document number manual (mainly in vouchers, prompt whether vouchers off, "select" no "case), click the [[settings]] - GL - [options], click the" Edit "," modify system number "to" manual ", finally ok. This option can be modified at any time.2. if the subjects set the auxiliary accounting attribute, inthe fill in the certificate when the system will automatically prompt supplementary information, such as departments, individual projects, customers, suppliers, such as the number of. The auxiliary information entered will be displayed in the notes below the document.3. if you want to give up the unfinished entry input, according to the "line" button or the [Ctrl+D] key to delete the current entries.4. if you fill in the certificate used by the subjects for cash flow in the end of this article subjects recorded entries after the specified project cash flow of the entries as required. A conditional entry can be specified as a plurality of cash flow items, but the total amount must be consistent with the amount of entries. For the cash flow of the subject is not specified, such as specifying the project cash flow, in a record amount of input, click "flow" button, will pop up the cash flow of the specified window, ask you to enter the condition entries corresponding to the project cash flow.5. modify and delete documents5.1 modify the certificate must be modified in the "window" to fill in the certificate.In 5.2 after the lack of follow-up treatment, signed audit, directly find the need to modify the document can be modified.5.3, after the audit found the error, need to modify, cancel the audit directly, return 5.1 to modify.5.4, after accounting errors found, you need to modify, you need to cancel the account, cancel the audit and other operations, return 5.1 to modify.5.5, after checkout found errors, need to modify, you need to cancel the bill, cancel the account, cancel the audit and other operations, return 5.1 to modify.5.6 documents need to delete, in the "fill in the certificate" window, click on the [] - [single / recovery] will certificate void void. Click again [to make a copy of the document], select the month, click [OK]. At this point, the system will appear "whether the collation document broken" prompt window. If you need to retain the certificate number, select "no" and "yes", then the system automatically fills the document number.Note: the account must be final; the sum and the sum are not null; the scarlet letter is represented by "-". The cost of subjects, such as financial expenses in subjects, fill in the certificate, must be done in the debit, debit or debit (click on the blue and scarlet letter on the keyboard "-"). Otherwise, the number of reports is uneven.2.2 audit voucherNote: the audit and not made is the same person; leaflets or batch audit audit; cancel the audit by the audit can only cancel the signature signature; a certificate cannot be audited, modify, delete, cancel the audit is only the sign before they can modify or delete.2.3 billingShow the accounting report, for example, you want to pay the vouchers, some documents are not audited or not signed by the cashier, belong to the vouchers can not be accounted for, you can modify the prompt, and then billing. The following interface appears.When the progress bar is complete, the system will pop up and the account will be completed.2.4 period profit and loss carry over definition and transfer generation1. define period profit and loss carry over: click the [transfer definition] under the main menu [end of the system] and click [period gain / loss] to enter this function. Screen display [duration gain / loss setting] interface. At this time, in the "current profit account", enter the profit account for this year, click [determine], define the completion.2. period profit and loss carry over: click "transfer generation" under the system main menu [End], click [period profit and loss carry over] enter this function. The right window shows the [transfer generation] interface. Click [Select], then the system will automatically generate the certificate. At this time, you need to review and record this voucher.Note: the gains and losses during the transfer, check to do thismonth's daily business vouchers are accounting, if not accounting vouchers, in turn, the system will automatically prompt, if have accounting, can be carried forward.2.5 checkoutClick the checkout at the system main menu [end of the month] to enter this function. The screen shows the checkout wizard one - select the checkout month. Click the checkout monthClick "next",The screen display checkout wizard two checks the booksThe button in the "reconciliation", to check the system in checking accounts, in the reconciliation process, according to the "stop" button to suspend reconciliation, reconciliation is completed, click "next", the screen display checkout wizard three monthly report:Reconciliation is completed, click "next", the screen display checkout wizard three monthly report:If you need to print, click "print" to print monthly report. Click "next", the screen display four to complete the checkout checkout WizardIf you meet the requirements of the system will check, check, according to the "checkout" button to complete the work this month.If the bill does not meet the requirements, the system will not check out, appear belowClick "next", see the work report to find the reasons, revised again to check out.Note: checked the month can not fill in the certificate; there is no accounting voucher in the bill not; data backup advice before closing, to ensure the security of the data.2.6 cancellation of account and cancellation of accountA cancel the checkout: in the checkout wizard, you can select the month when you want to cancel the checkout, while holding the [Ctrl+Shift+F6] key on the keyboardB. cancel billing: in the reconciliation interface, while pressing the < Ctrl + H > key on the keyboard, the display / hidden menu will restore the status menu before loggingPress the < Ctrl + H > key before the certificate menu Press < Ctrl + H > after the keyChoose to return to the state at the beginning of the month? UFO report operationI. Introduction of basic concepts of UFIDA reporting system1, the system provides three major reports automatically fetching function: balance sheet, income statement, cash flow statement.2, report editing status: there are two kinds, one is "data" state; one is "format" state (report window left bottom) display.Format: mainly used for report format design, in the format of the state of the operation of this report, all tables and pages have an effect. In the format state, you can't do data entry, calculation and other operations. In this state, you can only see the report format, and all the report data are hidden.Data: mainly used for reporting data processing, through the fetch formula to take out the ledger data, in this state, used to manage the data of the report, such as input, audit data, increase or delete table, and other functions.Formats and data states can be transformed from one another to another3, table page: a UFO report can accommodate up to 9999 table pages, the table page in the "data" status can be increased or deleted, each table page data can be different.Two. Daily operation1., in the local hard disk new "UF report" folder, and then according to account sets and months to establish sub folder, easy to report storage.When 2. or three big reports need to be taken, click on the file above the window of the report window "open" to find the folder where the report is located, and select the folder you want to fetch.3. in the data status, you can automatically fetch from the ledger from the data above the key window - keyword entry - as follows.Take the number from the account: first, in the "data" status, enter the key word, enter units and date, date and other informationTo determine whether the system pop-up prompt retry, point "yes", starting from the system account access4 insert / append / delete table pageIn the data status, click "Edit" - insert "table" page, and others can refer to this method.Note: 1., after each time you take the data, you should pay attention to the preservation, so that next month can be built on the basis of the last few months. At this time you can add or insert a new tableTake the number 2. cash flow statement, need to be adjusted totake the number of system time month, for example: take the data of October, the bottom right - click the computer time, then there will be a window will be changed to October to january.。

用友软件帐表操作流程第一章系统管理部份(建帐流程)一、增加用户①点击鼠标左键打开开始菜单——指向用友ER P-U8——指向系统服务——指向系统管理——点击系统菜单——点击注册——操作员输入:Admin——点击确定按钮——点击权限菜单——点击用户——点击增加按钮打开增加用户对话框——输入用户编号(可自行设置位数)——输入用户姓名——输入用户口令——确认口令——点击增加按钮后退出用户即增加完成。
②角色管理仍在系统管理权限菜单中点击角色——点击增加按钮打开增加角色对话框——输入角色编码(可自行设置位数)——输入角色名称——点击增加按钮后退出二、建立新帐套仍在系统管理界面点击帐套——点击建立打开帐套信息对话框——输入帐套号及帐套名称(注意:帐套号不能与已存帐套号重复!)——选择会计启用期间——点击下一步按钮——输入单位信息——点击下一步按钮——选择核算类型(一经确定不可更改!)——设置基础信息是否分类——点击完成按钮——设置分类编码方案——设置数据精度(小数点位数)——创建帐套完成——启用系统(也可在企业门户中基本信息启用系统)三、设置权限1.设置用户明细权限:仍在系统管理界面点击权限——点击权限打开用户权限对话框——在画面右上角选择所需帐套——在左边选择所需操作员——点击修改按钮打开增加调整权限对话框——在所需附权产品分类前打勾(或在产品分类节点下级明细权限上打勾)——按确定按钮即可。
2.设置帐套主管:仍在系统管理界面点击权限——点击权限打开用户权限对话框——在画面右上角选择所需帐套——在帐套主管选择框中打“√”后确定即可。
3.设置角色权限(同第一点和第二点)第二章系统管理部份(帐套日常维护)一、帐套备份(画面中输出即为备份)①仍在系统管理界面点击帐套——点击输出打开帐套输出对话框——选择所需输出帐套——点击确定按钮——系统将自动处理压缩及拷贝进程——选择要备份的目标盘——选择所要备份的目标文件夹并双击打开该文件夹——按确定按钮即完成备份。

用友U8软件的使用流程概述用友U8软件是一款专业的企业管理软件,广泛应用于各行各业。
它提供了一整套的解决方案,包括财务、人力资源管理、供应链管理等功能。
本文将介绍用友U8软件的使用流程。
安装和初始化1.下载用友U8软件安装包并双击运行。
2.点击“安装”按钮开始安装过程。
3.安装完成后,打开软件,进入初始化界面。
4.根据系统提示,填写相关信息,如企业名称、财务年度等。
5.点击“初始化”按钮,等待初始化过程完成。
登录和权限设置1.打开用友U8软件,进入登录界面。
2.输入用户名和密码进行登录。
如果是首次登录,需要创建管理员账号。
3.登录成功后,进入主界面。
4.根据需要,点击“设置”按钮,进行权限设置。
可以设置不同用户的访问权限,以控制各部门的操作范围。
基础数据设置1.在菜单栏中找到“基础数据”选项,点击进入。
2.在基础数据界面,可以设置公司信息、部门信息、员工信息等。
3.点击“新建”按钮,填写相关信息,点击“保存”按钮进行保存。
业务操作财务管理1.在菜单栏中找到“财务管理”选项,点击进入。
2.在财务管理界面,可以进行一些财务操作,如录入凭证、查询科目余额等。
3.点击“凭证录入”按钮,填写凭证信息,点击“保存”按钮进行保存。
4.点击“科目余额查询”按钮,选择查询条件,点击“查询”按钮进行查询。
人力资源管理1.在菜单栏中找到“人力资源管理”选项,点击进入。
2.在人力资源管理界面,可以进行员工管理、薪资管理等操作。
3.点击“员工管理”按钮,可以添加、修改员工信息。
4.点击“薪资管理”按钮,可以进行薪资核算、薪资发放等操作。
供应链管理1.在菜单栏中找到“供应链管理”选项,点击进入。
2.在供应链管理界面,可以进行采购管理、销售管理等操作。
3.点击“采购管理”按钮,可以进行采购订单的创建、审核等操作。
4.点击“销售管理”按钮,可以进行销售订单的创建、发货等操作。
报表查询1.在菜单栏中找到“报表查询”选项,点击进入。
用友U8基本操作手册一、系统登录打开用友 U8 软件,在登录界面输入用户名和密码。
用户名一般由系统管理员提前设置好,密码则是您自己设定并牢记的。
输入完成后,点击“登录”按钮即可进入系统。
二、基础档案设置1、部门档案依次点击“基础设置” “机构人员” “部门档案”,进入部门档案设置界面。
点击“增加”按钮,输入部门编码和部门名称等信息,然后点击“保存”。
2、人员档案在“基础设置” “机构人员” “人员档案”中进行人员信息的录入。
包括人员编码、姓名、所属部门等。
3、客户档案选择“基础设置” “客商信息” “客户档案”,点击“增加”录入客户的相关信息,如客户编码、名称、地址、联系方式等。
4、供应商档案同样在“客商信息”中,找到“供应商档案”进行类似的操作来录入供应商的信息。
三、财务模块操作1、总账(1)凭证录入点击“财务会计” “总账” “凭证” “填制凭证”,选择凭证类别,然后依次输入日期、摘要、科目、金额等信息。
(2)凭证审核审核人员登录系统,在“凭证” “审核凭证”中对已录入的凭证进行审核。
(3)记账审核通过的凭证可以进行记账操作,点击“记账”按钮即可。
2、应收款管理(1)应收单据处理包括录入销售发票、其他应收单等。
(2)收款单据处理登记收到的款项。
(3)核销处理将收款与应收款进行核销。
3、应付款管理与应收款管理类似,对应付单据、付款单据进行处理和核销。
四、供应链模块操作1、采购管理(1)采购订单在“采购管理”中录入采购订单,包括供应商、采购物品、数量、价格等。
(2)采购到货货物到达后进行到货登记。
(3)采购入库验收合格的货物办理入库手续。
2、销售管理(1)销售订单录入客户的销售订单信息。
(2)发货单根据销售订单生成发货单。
(3)销售出库发货后进行销售出库操作。
3、库存管理(1)入库业务除了采购入库,还包括其他入库,如盘盈入库等。
(2)出库业务如销售出库、材料领用出库等。
(3)库存盘点定期对库存进行盘点,调整库存数量。
第一部分系统管理内容提要:1、建立本单位帐套;2、增加、修改、删除操作员;3、操作员赋权(帐套主管权限和一般操作员权限);4、系统管理中刷新操作、清除异常任务操作、清除单据锁定操作;5、上机日志;6、帐套数据备份和恢复;7、年度帐数据的备份和恢复;8、新建年度帐和年度帐结转。
重点掌握:1、建立本单位帐套;2、增加、修改、删除操作员;3、操作员赋权(帐套主管权限和一般操作员权限);4、帐套数据备份和恢复;5、年度帐数据的备份和恢复(一定明白两种备份的区别);6、系统管理中刷新操作、清除异常任务操作、清除单据锁定操作一、建立本单位帐套点击“开始 程序->U8管理软件->系统服务->系统管理”进入系统管理窗口,点击“系统->注册”,选择系统管理员用户Admin,密码为空,(讲解如何修改系统管理员密码及系统管理员在U8软件中的意义),确定进入。
点击“帐套->建立”开始建立帐套:第一步:录入帐套号、帐套名称、帐套路径(采用系统默认路径即可),帐套启用期间;第二步:录入单位名称和简称,其他字段根据需要录入;第三步:选择企业类型、行业类型;选择帐套主管;“是否按照行业性质预置会计科目”,选择是,则系统预置该行业会计科目(一级会计科目);选择否,则系统不预置会计科目,会计科目档案为空,完全有用户录入自己单位的会计科目。
第四步:客户、供应商、存货是否分类;是否有外币核算业务。
点击“完成”第五步:确定分类编码方案(现在可以不做,在后面基础设置中具体确定);“确定”。
第六步:确定数据精度(现在可以不做,在后面基础设置中具体确定);“确定”本单位创建帐套成功了。
二、操作员管理及操作员赋权:点击“权限->操作员”。
增加操作员(可以设置操作员的密码),修改操作员,删除操作员点击“权限->权限”:1、设置本单位帐套主管的权限:选择本单位帐套、选择帐套年度、选定操作员,然后帐套主管打勾。

标准用友GRP-U8 卫生财务管理软件操作步骤目录1、系统初始化 (4)1.1、建立账套 (4)1.2、软件登录 (6)1.3、系统管理和基础数据管理 (8)2、账务处理 (15)2.1、账套参数 (15)2.2、凭证管理 (15)2.3、账表及查账 (17)2.4、期初录入 (19)2.5、期末处理 (19)3、电子报表 (21)3.1、表样编辑 (21)3.2、报表使用 (22)4、工资管理 (23)4.1、基础设置 (23)4.2、工资数据编辑 (25)4.3、银行代发 (26)4.4、工资发放表打印 (28)4.5、工资凭证生成 (29)4.6、工资系统结账 (31)5、全面预算 (32)5.1、账套参数设置 (32)5.2、编制预算方案 (33)6、成本核算 (34)6.1、分摊设置 (34)6.2、成本项目设置 (35)6.3、部服务项目设置 (38)6.4、分摊参数设置 (39)6.5、分摊设置 (45)6.6、成本分摊计算 (47)6.7、成本分摊报表 (50)7、出纳管理 (54)7.1、基础设置 (54)7.2、期初余额 (56)7.3、单据录入 (56)7.4、结转、反结账、反记账 (57)8、固定资产 (58)8.1、资产配置 (58)8.2、资产变动、处理 (59)8.3、计提折旧 (60)8.4、生成凭证 (62)8.4、月末结账 (66)文档说明:◆本手册是根据使用操作进行编写,主要目的在于描述主要业务的操作,如需某些详细的操作方法、步骤,请结合阅读用友软件中相对应的帮助或使用手册;◆【】表示菜单或系统功能;◆不同角色操作员根据业务查阅不同章节;◆“注:”表示注释或注意事项。
1、系统初始化1.1、建立账套(1)、【开始→程序→用友GRP-U8卫生财务管理软件(C版)→后台管理工具】,打开后台数据管理工具,输入数据库用户及密码出现后台操作界面:点击【新建账套】,出现如图:账套号和单位代码是唯一的,建议使用3位数(如001,002),一般一个单位下都使用同一个单位。

U8用友管理软件操作手册
一、系统安装
安装U8用友管理软件服务器端和客户端一样。
可以将安装盘放入光驱,系统直接开始启动安装程序,或者运行SETUP程
序,进入如下界面:
(图1)
选择(图1)中的采购管理、总帐系统、应收款管理、应付款管理、工资管理、现金流量表、UFO报表(如上图所示),然后单击开始安装.以下各步骤采用系统默认值即可。
安装完毕以后,将软件加密狗插入打印机并行端口。
二、客户端连接到服务器端
系统安装完毕以后,运行系统服务中的远程配置,如下图所示:
(图2)
得到如下界面:
(图3)
在当前文本框中,输入服务器的机器名称:DBUFSERVER,单击选择确定,完成服务器的远程配置.
三、服务器端系统管理部分的系统设置
四、客户端会计系统的初始化设置
注册进入总帐系统,如下图所示:
(图4)
在上图中选择帐套、会计年度、用户名、密码,单击确定,进入总帐系统。
(1)、设置外币汇率,在系统初始化中,单击外币汇率,如下图:
(图5)
在上图中,输入币符、币名按确认后,输入汇率.
(2)、设置凭证类别
目前我们采用收、付、转的形式。
如下图:
(图6) (3)、设置部门编码
(图7)
(4)、设置客户类别和供应商类别
(图8)
(图9)
(5)、录入供应商资料、客户资料、职员档案
(图10)
(图11)
(图12)(6)、设置会计科目,如下图:
(图13)
(7)、输入期初余额
(图14)。

用友GRP_U8管理软件操作手册目录一.软件登陆步骤 (2)二.会计科目的增加与使用 (3)三.期初余额录入 (5)四.填制凭证 (7)五.审核凭证 (12)六.记账 (13)七.凭证打印 (14)八.自动转账 (15)九.结账 (16)十.反结账 (21)十一.取消记账 (22)十二.取消审核 (23)十三.凭证删除 (25)十四.还原作废凭证 (26)十五.账表查询 (27)十六.电子报表 (28)十七.账簿打印 (30)一.软件登陆步骤1.如何登录U8行政事业内控管理软件登录系统首先要双击桌面上的“U8行政事业内控管理软件”图标。
如下图:双击“U8行政事业内控管理软件”图标后,进入到登录界面,如下图:选择确认好,帐套.业务日期,操作员,并输入正确口令后,按“确认”按钮进入账套;进入账套后界面如下:二.会计科目的增加与使用1.如何增加会计科目增加明细科目:把鼠标移动到“基础数据管理”选项上,然后点击“建立会计科目”如图所示:2.选择想要增加明细科目的一级科目,然后点击“增加”按钮例如想在“银行存款”下增加一个明细科目“中国银行”如图所示:输入完科目代码和科目名称,如想继续在“银行存款”下面增“明细科目”点击“增加”按钮,系统会自动列出下一明细科目的科目代码3.增加项目资料:【基础数据管理|公共|项目资料】录入项目代码和项目名称保存即可。
三.期初余额录入1.如何录入“期初余额”---将鼠标移动到“账务处理”选项上,然后点击“期初余额装入”选项2.弹出“选择科目范围”直接点击确定即可3.点击科目后面对应的“年初余额”输入年初数即可。
4.所有科目年初余额输入完成,可以点击“试算”按钮,如果试算平衡即为正常,点击“保存”按钮即可,然后选择“退出”按钮退出期初余额装入界面。
如试算不平衡,需要重新核对期初数,检查录入数据的正确性。
如图所示:四.填制凭证如何填制凭证将鼠标移动到“账务处理”选项,选择“编制凭证”进入“编制凭证”页面后,根据要求去填制凭证内容。
GRP-U8凭证处理流程1.登陆系统双击桌面上的【GRP-U8管理软件】快捷方式,弹出用户登录对话框,输入用户名称和密码,点击【确认】,然后弹出设定单位帐套对话框,选择对应的单位及帐套,点击【确定】进入系统。
2、会计科目设置操作方法:【基础数据管理】-【建立会计科目】,如图:说明:1、根据主管局统一管理的需要,所属单位不允许自行增加一级科目,对于本单位用的往来类科目,需要自行设置。
有些科目后如存在【辅项信息】,则不需要添加明细科目,只需要在对应的辅助核算中添输入科目代码,规则按“科目分级确定”加即可。
2、收入和支出类科目不允许明细。
3.填制凭证单击左侧【账务处理】→凭证管理后的【编制凭证】,进入填制凭证,录入凭证后,点击【保存】或者按CTRL+S保存凭证。
3.审核凭证审核凭证分为两种方式,一种是在凭证箱中批量审核,一种是打开每张凭证,一张张的审核。
A.在凭证箱中批量审核凭证(1)点击【账务处理】→【凭证处理】,打开凭证箱界面,选择【未审核】页签。
(2)选择审核相记录(如果全选的话,可以点击右键,选择【全选】功能)(3)选择好需要审核的记录后,点击【审核】按钮(4)在弹出的凭证审核界面,先选择【审核范围】,在这如果审核范围选择的是“所有未审核凭证”和“当前凭证”的话,那么在(2)中选择的记录就没有作用,只有选择的是“已选凭证”系统审核的才是(2)中选择的凭证,最后点击【开始】按钮,开始审核凭证。
(5)在凭证审核的过程中,如果需要终止审核操作,那么点击【终止】按钮,停止审核凭证。
(6)最后审核完成,点击【完成】按钮,完成审核的操作B.在凭证编制界面审核凭证(这里只能一张张的审核,不能批量审核)(1)点击【账务处理】→【凭证处理】,打开凭证箱界面,在【未审核】页签下选择需要审核的记录,双击打开凭证内容。
(2)在打开的凭证内容界面,点击审核按钮(3)审核完成后,界面的【审核】按钮置灰,如果需审核下一张,直接点击【下张】按钮4.记账凭证记账凭证也和审核凭证一样,有两种方式,一种是在凭证箱中批量记账,一种是打开每张凭证,一张张的记账。
用友U8财务软件使用流程及技巧一、公共问题1、如何添加操作人员和设置操作人员权限系统管理——权限——用户系统管理——权限——权限2、如何控制操作人员的数据权限企业应用平台——设置——数据权限3、帐套如何进行输出系统管理——账套——输出;4、帐套如何进行引入开始——程序——用友ERP-U8——系统管理——操作员admin——密码791121——账套——引入——**账套引入完成5、如何解除工作站点锁定判断标准:全部的客户端已经退出,仍然提示:站点[***]正在运行功能[*******],互斥任务[****]申请不成功。
造成的原因:a、客户端出现非法操作死机、b、网络故障或由于hub暂时断电造成网络瞬间不通畅、c、断电锁定的目的: 最大限度地保护财务数据不被丢失解决办法:企业管理器——Microsoft sql servers——sqlserver组————数据库——ufsystem——表——ua-task——点右键选择打开表——返回所有行——找到相应的客户端删除或者企业管理器——Microsoft sql servers——sql server组————数据库——ufsystem——表——ua-task——点右键选择打开表——返回所有行——在工具栏中选择sql按钮——在空白放款中输入:Select *From ua_taskWhere(cacc_id=’***’)在工具栏中选择“!”按钮——删除显示的数据6、如何解除单据的锁定判断标准:全部的客户端已经退出,仍然提示:“***”供应商/客户已被锁定,互斥任务申请不成功。
解决办法:系统管理——视图——清除单据锁定——删除工作站的所有锁定——选择相应的单据——删除7、如何设置自定义项企业应用平台——设置——其他——自定义项中进行设置需要对会计科目制定自定义项的,首先需要在自定义项——单据头上增加自定义项目,需要添加档案的,在自定义项档案中增加档案,然后在财务——会计科目中的菜单项中找到定义,就可以指定自定义项目;8、如何增加备查科目企业应用平台——设置——其他——自定义表结构中进行设置,设置完成后,在财务——备查科目设置中进行指定;9、如何修改单据的格式企业应用平台——设置——单据格式设置中选择对应得单据进行修改即可10、在客商档案中发现有两个名称其实是一个单位怎么进行处理企业应用平台——设置——客商信息——供应商档案中进行并户处理。
用友U8系统管理1:系统概述1.1 系统简介用友U8系统是用友公司开发的一款集成的企业管理系统,旨在帮助企业实现全面高效的业务管理。
1.2 系统特点- 高度模块化:用友U8系统包含多个模块,如财务、采购、销售、库存等,可以根据实际需求选择使用。
- 强大的功能:用友U8系统提供全面的业务功能,覆盖企业运营的各个方面,从财务管理到人力资源管理。
- 灵活的配置:用友U8系统可根据企业的特点和需求进行定制配置,以适应不同行业、不同规模的企业。
- 安全可靠:用友U8系统采用严格的权限控制机制,确保企业数据的安全和保密性。
2:系统安装与配置2.1 系统硬件要求- 服务器要求:建议使用高性能的服务器设备,至少具备多核处理器和大容量内存。
- 客户端要求:使用常见的PC或笔记本电脑即可满足运行用友U8系统的需要。
2.2 系统软件要求- 操作系统:推荐使用Windows Server操作系统,如Windows Server 2016/2019:- 数据库:支持多种数据库,如SQL Server、Oracle、MySQL 等,具体版本要求请参考官方文档。
2.3 系统安装步骤- 步骤1:根据官方提供的安装文件,将用友U8系统安装到服务器上。
- 步骤2:根据安装向导,配置系统的基本信息,如数据库连接、服务器地址等。
- 步骤3:根据实际需求选择需要安装的模块,并进行相应的配置。
- 步骤4:完成系统安装后,进行必要的系统测试,确保系统能正常运行。
3:系统管理3.1 用户管理- 用户创建:管理员通过系统管理界面创建用户账号,并设置相应的权限。
- 用户权限管理:管理员可以根据需要,对用户的权限进行设置和调整。
- 用户密码重置:管理员可以重置用户的密码,以便用户重新登录系统。
3.2 角色管理- 角色创建:管理员通过系统管理界面创建角色,并设置相应的权限和功能。
- 角色权限管理:管理员可以根据企业部门和岗位的需求,设置角色的权限范围。