APMS客户端安装说明
- 格式:doc
- 大小:534.50 KB
- 文档页数:5
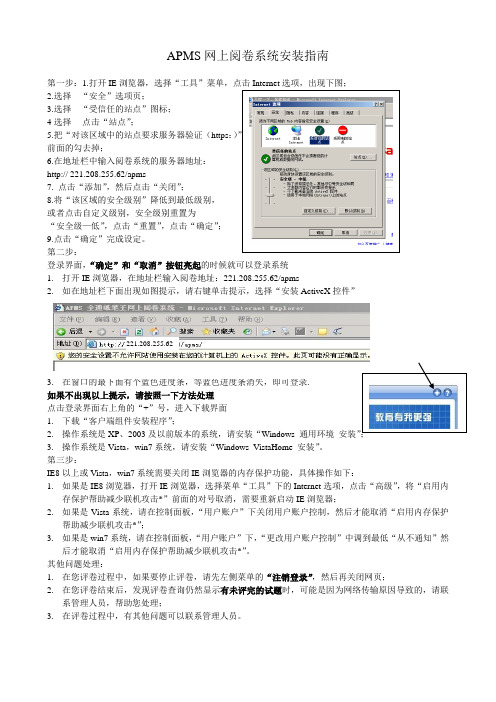
APMS网上阅卷系统安装指南第一步:1.打开IE2.选择“安全”选项页;3.选择“受信任的站点”图标;4选择点击“站点”;5.把“对该区域中的站点要求服务器验证(https:)”前面的勾去掉;6.在地址栏中输入阅卷系统的服务器地址:http:// 221.208.255.62/apms7. 点击“添加”,然后点击“关闭”;8.将“该区域的安全级别”降低到最低级别,或者点击自定义级别,安全级别重置为“安全级—低”,点击“重置”,点击“确定”;9.点击“确定”完成设定。
第二步:登录界面,“确定”和“取消”按钮亮起的时候就可以登录系统1.打开IE浏览器,在地址栏输入阅卷地址:221.208.255.62/apms2.如在地址栏下面出现如图提示,请右键单击提示,选择“安装ActiveX控件”221.208.255.623.在窗口的最下面有个蓝色进度条,等蓝色进度条消失,即可登录.安装”;3.操作系统是Vista,win7系统,请安装“Windows_VistaHome_安装”。
第三步:IE8以上或Vista,win7系统需要关闭IE浏览器的内存保护功能,具体操作如下:1.如果是IE8浏览器,打开IE浏览器,选择菜单“工具”下的Internet选项,点击“高级”,将“启用内存保护帮助减少联机攻击*”前面的对号取消,需要重新启动IE浏览器;2.如果是Vista系统,请在控制面板,“用户账户”下关闭用户账户控制,然后才能取消“启用内存保护帮助减少联机攻击*”;3.如果是win7系统,请在控制面板,“用户账户”下,“更改用户账户控制”中调到最低“从不通知”然后才能取消“启用内存保护帮助减少联机攻击*”。
其他问题处理:1.在您评卷过程中,如果要停止评卷,请先左侧菜单的“注销登录”,然后再关闭网页;2.在您评卷结束后,发现评卷查询仍然显示有未评完的试题时,可能是因为网络传输原因导致的,请联系管理人员,帮助您处理;3.在评卷过程中,有其他问题可以联系管理人员。
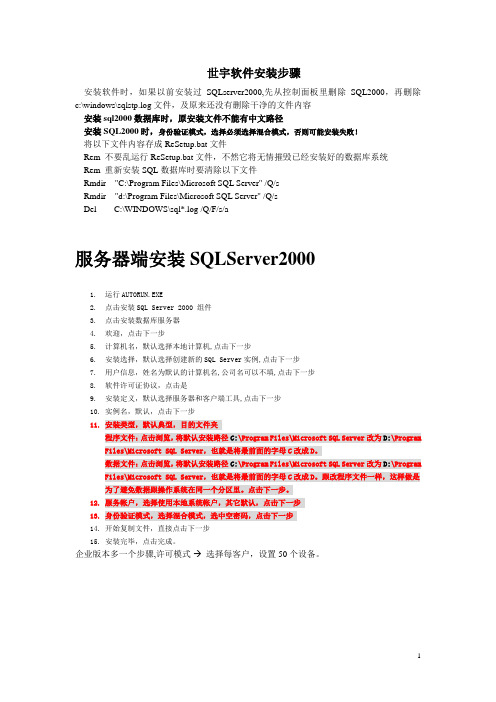
世宇软件安装步骤安装软件时,如果以前安装过SQLserver2000,先从控制面板里删除SQL2000,再删除c:\windows\sqlstp.log文件,及原来还没有删除干净的文件内容安装sql2000数据库时,原安装文件不能有中文路径安装SQL2000时,身份验证模式,选择必须选择混合模式,否则可能安装失败!将以下文件内容存成ReSetup.bat文件Rem 不要乱运行ReSetup.bat文件,不然它将无情摧毁已经安装好的数据库系统Rem 重新安装SQL数据库时要清除以下文件Rmdir "C:\Program Files\Microsoft SQL Server" /Q/sRmdir "d:\Program Files\Microsoft SQL Server" /Q/sDel C:\WINDOWS\sql*.log /Q/F/s/a服务器端安装SQLServer20001.运行AUTORUN.EXE2.点击安装SQL Server 2000 组件3.点击安装数据库服务器4.欢迎,点击下一步5.计算机名,默认选择本地计算机,点击下一步6.安装选择,默认选择创建新的SQL Server实例,点击下一步7.用户信息,姓名为默认的计算机名,公司名可以不填,点击下一步8.软件许可证协议,点击是9.安装定义,默认选择服务器和客户端工具,点击下一步10.实例名,默认,点击下一步11.安装类型,默认典型,目的文件夹程序文件:点击浏览,将默认安装路径C:\Program Files\Microsoft SQL Server改为D:\Program Files\Microsoft SQL Server,也就是将最前面的字母C改成D。
数据文件:点击浏览,将默认安装路径C:\Program Files\Microsoft SQL Server改为D:\Program Files\Microsoft SQL Server,也就是将最前面的字母C改成D。
第一部分目录规化1、磁盘要求①、磁盘文件系统格式必须采用NTFS格式,(FAT32格式,当文件数量多后数据会丢失)②、足够大的磁盘存储空间(说明:一般有10G的独立存储空间即可)磁盘转化NTFS格式的方法:方法1:备份原盘数据,直接选择NTFS格式化盘符。
方法2:运行命令convert X:/fs:ntfs,X命令为盘代表为扫描数据存储的盘符。
2、目录结构规化新建几个文件夹,命名为(TXT 文件、模版、图像、名册)存放数据说明:TXT 文件:存放扫描识别系统 ScanProII 导出的*.txt 文件。
模版:存放各科目的扫描模版,扩展名为 *.IRO 文件。
图像:存放各科目的图像文件,如(语文,英语,数学)等。
名册:存放学生名册,扩展名为*.xls。
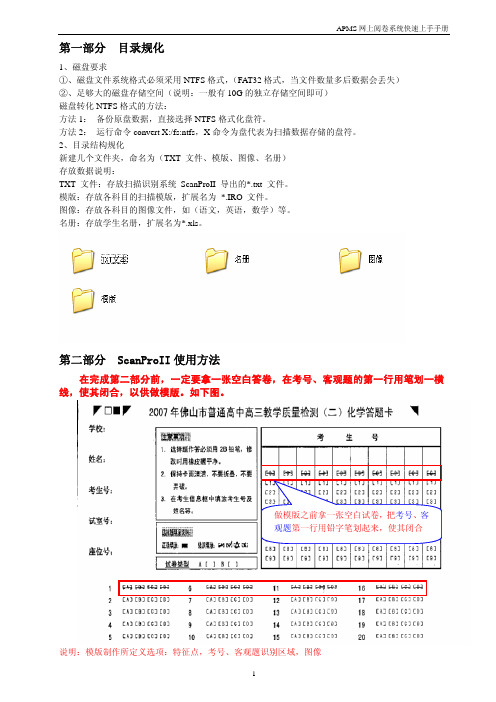
第二部分 ScanProII使用方法在完成第二部分前,一定要拿一张空白答卷,在考号、客观题的第一行用笔划一横线,使其闭合,以供做模版。
如下图。
做模版之前拿一张空白试卷,把考号、客观题第一行用铅字笔划起来,使其闭合说明:模版制作所定义选项:特征点,考号、客观题识别区域,图像1、扫描仪设置在打开模版设计器时—>工具—>扫描仪选项,1.1点击下拉框,选择扫描仪驱动类型,如图1.2点击选择源选择相应的扫描仪硬件型号,1.3点击设置,按确定2、扫描模板制作2.1新建模板文件打开SCANPRO II 模板设计器点击“新建模版文件” 例如选择纸张尺寸为A3,如果是扫A4的纸张,则在纸张尺寸中选择A4尺寸,点“下一步”,将“扫描仪设置界面”,点击“导入图像”调出扫描界面后,选择相应的用户首选项 如A3ISIS会调出已设置好的参数。
A3ISIS点击确定,模版答卷扫进去后,出现“TScanPro:继续扫描吗?”点击取消。
点击确定,此时答卷只是一张A3,无需页码,如果是有两张或多张A3时,在左上角的特征点处将有所不同,做模版需要定义特征点,考号、客观题识别区域,图像四个部份2.2定义特征点点“特征点工具”将A3答卷上的四个三角形画上,三个亦可。

1、双击APMServ5.2.6.exe把文件释放到自己所需要的位置,默认会自动建立一个APMServ5.2.6目录;
2、进入APMServ5.2.6目录,双击APMServ.exe执行程序,修改界面中Apache端口、MySQL 端口为自己所需要的端口,同时选择MySQL的版本;
3、[建立虚拟主机]点击上界面右侧的虚拟主机,这里需要填写:虚拟主机名虚网页文件根目录保存虚拟主机重启Apache;
4、填写后保存虚拟主机重启Apache 是设置生效;
5、点击启动APMServ查看状态,如下图所示说明服务器启动成功;
6查看phpinfo
重要:其他配制文件位置
php.ini —修改位置在X:\APMServ5.1.2\PHP\php.ini-dist '配置PHP
My.ini —修改位置在X:\APMServ5.1.2\MySQL5.1\f-template '配置MYSQL httpd.conf —修改位置在X:\APMServ5.1.2\Apache2\conf\f '配置APACHE vhost.conf —修改位置在X:\APMServ5.1.2\Apache2\conf\vhost.conf '配置虚拟主机。

Active Message服务端与客户端部署说明书目录一、AM服务器的部署 (4)1. AM服务器部署流程图 (4)2. AM服务器安装 (5)2.1. 运行AM的Setup程序 (5)2.2. 安装完成后,在桌面会有图标: (6)3. AM服务器注册 (6)3.1 AM服务器端登录 (6)3.2 获取机器码 (6)3.2 获取序列号 (7)4. 服务器相关配置 (8)4.1消息中转路径设置 (8)4.2 数据库换成Sqlserver 设置 (9)4.3 其它 (10)5. 单位、部门及所属用户的建立 (11)5.1新建用户 (11)5.2 创建单位 (13)5.3 创建部门 (14)5.4 在部门下添加下属用户 (14)二、AM客户端的部署 (15)1. AM客户端安装 (15)2. AM客户端的登录 (18)三、AM常见问题及解决方案 (20)1.AM服务不能正常启动 (20)原因1、AM服务没有正常注册 (20)原因2、序列号有问题 (21)原因3、AMS文件不存在 (23)原因4、AM服务器端口有冲突或被别的程序占用 (23)2 AM服务未自动启动 (24)3. AM客户端安装过程中提示出错 (25)4. AM客户端登录后,系统没有任何反应 (25)5. AM客户端登录后,系统提示未知错误 (25)6. AM客户端发送消息,提示服务器内部错误 (27)7. AM客户端新易发功能不能正常使用 (28)AM 服务端与客户端部署说明书一、AM服务器的部署1. AM服务器部署流程图2. AM服务器安装2.1. 运行AM的Setup程序2.2. 安装完成后,在桌面会有图标:3. AM服务器注册3.1 AM服务器端登录双击AM服务器图标,启动AM服务器端程序“人员模型”,点击“确定“即可。
(默认的用户名为sa,密码为空)3.2 获取机器码进入系统后,点击菜单,如下图所示:弹出下图所示:在这个界面中,用户可以获取本服务器的机器码3.2 获取序列号正式购买用户:请将机器码,粘贴到email或传真发给恒创公司,恒创公司收到机器码后,根据用户购买的用户数进行算号。

附件1即时通信系统客户端安装操作手册一、下载客户端安装包1.打开浏览器,输入http://10.27.126.168:8012网址;2.点击网页的“下装客户端安装程序”,即可下载客户端安装包,如下图:二、安装客户端1.双击运行rtxclient2019formal.exe客户端安装包文件;2.阅读说明安装,点击下一步,跳过引导页;3.仔细阅读RTX的许可协议说明,确认后,点击我同意,跳过许可协议页;4.选择安装路径,点击下一步,按安装按钮;5.耐心等待几分钟(时间长短以系统性能而定);6.出现安装完成页面,按完成按钮,完成客户端软件的安装操作。
三、安装Ukey驱动程序(已安装并使用过Ukey的用户可以跳过此步)1.打开浏览器,输入pc网址,在弹出的网页中点击控件下载指南;2.在弹出的网页中,点击中国**USBKey用户工具下载;3.解压USBKey_tool.zip压缩包,在安装USBKey 驱动前,首先将360安全卫士、瑞星、金山等软件完全退出;4.双击CNPC USBKeyUserTool 3.4.1.1.exe安装包;5.打开,进入中国**USBKey用户工具,选择“软件设置”选项,在“运行设置”下添加pc,单击“应用”完成。
四、登录腾讯通RTX客户端1.打开IE浏览器,点击浏览器工具下拉菜单的Internet 选项;2.在Internet选项框中,点击安全,选择可信站点,左键点击站点;3.在可信站点框中,在“将该网站添加到区域”的地址栏中把https://pc输入进去并点击添加。
4.插入UKey,自动弹出网页pc(如果没有自动弹出,则打开浏览器,输入pc),点击登录,弹出ping码框,输入ping码口令,进入中国**集中身份管理与统一认证服务平台。
5.在中国**集中身份管理与统一认证服务平台中,在“已映射信息系统”中会出现“即时通信系统“图标,点击图标就能直接登录RTX客户端。
五、修改完善个人资料1.登录RTX后,选择“文件-个人设置”;2. 完善“基本资料”、“联系方式”等信息,特别是邮箱、电话等相关信息,以便其他用户查找沟通。
客户端安装后B版设置说明下载客户端登陆http://10.223.6.15:81/csj/下载GRIS_6.1.0.8_Client.CAB文件将其解压到当前文件夹一、客户端安装步骤1、选择客户端所在的文件夹GRIS_6.1.0.8_Client.CAB(新下载的客户端解压后文件夹名为GRIS_6.1.0.8_Client.CAB——名字对管控安装操作方法没有影响)2、双击文件夹以后选择如下图所示的“FT_reg”的图标;3、双击“FT_reg”图标后出现出下图所示的界面;4、在“注册工具”界面点击“客户端路径”选择客户端所在的文件夹,即:GRIS_6.1.0.8_Client.CAB文件夹后点击“确定”如下图;5、在“功能列表”项中选择“单目录注册”、在“注册选项”中选择“客户端”,设置以后的界面如下6、当所有设置如上图所示正确设置后点击上图中的“处理”按钮,注册需要等待30s的时间,在出现如下界面后点击“退出”即完成客户单的安装。
二、客户端相关设置步骤说明财务管控B版的访问地址为/YGFMISWeb,(网址一定严格要求大小写区分)在访问前需要进行相关设置,具体设置步骤如下:1、打开浏览器,选择“工具”菜单中的“Internet选项…”如下图2、点击“Internet选项…”后出现如下界面;3、在该界面选择“安全”按钮→“受信任的站点”→“站点”4、在下图中的界面中输入/YGFMISWeb后,点击“添加”5、在点击“添加”按钮后确认/YGFMISWeb 站点加入下图所示界面后点击确定注:同样把http://10.223.*.*加入受信站点,否则无法自动更新;6、接下来界面显示为第3步所示的界面,在该界面点击“该区域安全级别(L)”下的“自定义级别(C)”按钮,在下图所以的界面中把所有“ActiveX控件和插件”下的选项都改选“启用”按钮,然后点击“确定”按钮后点击“确定”按钮退出‘Internet 选项’选项卡即可。
SAM客户端安装配置指导
1、从ftp://172.16.100.2的“上网客户端软件下载”文件夹中将上网客户端“Ruijie
Supplicant2.56.exe”下载至本地。
2、在本机上找到上网客户端,双击安装客户端。
如下图
3、出现安装提示后点击“下一步”,如下图:
4、接受许可证协议,选择“是”
5、选择安装程序的位置
6、选择程序文件夹。
点击“下一步”开始安装
7、点击“完成”结束安装过程
8、安装完成后,会提示要重新启动计算机,请重新启动计算机
9、重新启动完计算机后,在桌面上双击客户端的快捷方式,如下图:
10、点击“设置”
11、将“认证模式设置”更改为“使用Ruijie私有组播地址发送认证请求”后,点击“确定”完成更改。
11、部分Windows XP及以上系统需要对系统配置作出更改
12、在本地连接属性窗口中,点击“验证”选项
13、将“启用此风络的IEEE 802.1x验证”选项前面的勾去掉,然后点击“确定”完成修改
14、运行上网客户端,输入用户名,密码后,点击“连接”,进行认证,认证通过后,即可上网。
Software Installation Guide NOTE:Read the entire Software Installation Guide before usingthe APM for Windows software.SAFETY CONSIDERATIONSInstalling and servicing heating equipment can be hazardous due togas and electrical components.Only trained and qualified servicepersonnel should install,repair,or service heating equipment.Untrained personnel can perform basic maintenance functions suchas cleaning coils,or cleaning and replacing filters.All otheroperations should be performed by trained service personnel.When working on heating equipment,observe precautions inliterature,on tags,and on labels attached to or shipped with theunit,and other safety precautions that may apply.Follow all safety codes.In the United States,follow all safetycodes including the National Fuel Gas Code(NFGC)NFPA54/ANSI Z223.1--2006.In Canada,refer to the National Standardof Canada Natural Gas and Propane Installation Codes(NSCNGPIC),CAN/CSA149.1--05.Wear safety glasses and work gloves.Have a fire extinguisheravailable during start--up,adjustment procedures,and service calls.Recognize safety information.This is the safety--alert symbolWhen you see this symbol on the furnace and in instructions ormanuals,be alert to the potential for personal injury. Understand the signal words DANGER,WARNING,CAUTION,and NOTE.The words DANGER,WARNING,and CAUTION are used with the safety--alert symbol.DANGER identifies themost serious hazards which will result in severe personal injury or death.WARNING signifies hazards which could result in personal injury or death.CAUTION is used to identify unsafe practices which would result in minor personal injury,or product and property damage.NOTE is used to highlight suggestions which will result in enhanced installation,reliability,or operation.INTRODUCTIONThe Advanced Product Monitor--APM(Furnace Version)is asoftware package that can be used for sales demonstrations, training,and to start--up and troubleshoot Variable Speed Furnaces.APM(Furnace Version)has been tested and approved for use on furnace control boards P/N HK42FZ001,HK42FZ002, CESO130004--00,HK42FZ003,HK42FZ012,HK42FZ021, HK42FZ022,HK42FZ024,HK42FZ026,and HK42FZ031. Because the Advanced Product Monitor runs on a portable laptop PC,it can be carried anywhere to provide the service technician with local access to any Variable Speed Furnace.The Advanced Product Monitor enables a service technician to perform the following tasks:S Monitor furnace parameters.S Save furnace parameters to disk.S Data Log furnace parameters.S Force the furnace into high fire.(All Boards except P/NHK42FZ021,HK42FZ022,HK42FZ024,HK42FZ026,&HK42FZ031)S Force the furnace into low fire.(Board P/N HK42FZ003&HK42FZ012only)S Review the entire furnace fault history.S Review the recent faults in furnace fault history.S Review the last fault that occurred.(Board P/N HK42FZ003, HK42FZ012,HK42FZ021,HK42FZ022,HK42FZ024,HK42FZ026,&HK42FZ031only)S Display troubleshooting information for each fault code.S Save the furnace fault history to disk.S Clear the furnace fault history.S Review the furnace statistics.S Save the furnace statistics to disk.The Advanced Product Monitor has the following NEW capabilities:S Supports new Step--Modulating furnaces.S Supports SPP gas--fired units with ABCD User Interface Connections.S Can be spliced into any ABCD User Interface Connection point. This allows furnace troubleshooting at the outdoor unit.The Advanced Product Monitor is designed for ease of operation.It utilizes menus,special function keys,plain language prompts, and standardized screen format.If you have a PC,or are considering purchasing a PC,the following general requirements should apply:S PC using Pentium233or higher microprocessor.PCs with486 to Pentium200microprocessor’s will work but the ABCDconnector to the User Interface must be disconnected.S At least16Mb(or more)of system memory.S At least6Mb(or more)of free hard drive storage space.S3.5”floppy drive or CD--ROM drive.S Windows95,98,ME,NT,2000,XP or Vista.S RS232port.Adapter required for USB only computers.S VGA display.Included with the Advanced Product Monitor is a B&B RS485 adapter and an interface cable that will connect any of the following furnace control boards P/N HK42FZ003,HK42FZ012, HK42FZ021,HK42FZ022,HK42FZ024,HK42FZ026,& HK42FZ031to a PC.This cable has3stripped and tinned leads on one end and three separate connections on the other end.The stripped leads connect to the B&B RS485adapter.The WHITE housing connects to furnace control P/N HK42FZ003or HK42FZ012at the3--pin communication connector PL--6.The GREEN ABCD PLUG housing connects to furnace control HK42FZ021,HK42FZ022,HK42FZ024,HK42FZ026or HK42FZ031at the4--pin ABCD connector PL7.The GREEN ABCD RECEPTACLE housing in combination with the GREEN ABCD PLUG housing allows you to splice in the APM at any ABCD User Interface connection point except for the one at the User Interface.This allows you to check the furnace from the outdoor unit.NOTE:You will need an APM adapter harness to connect the interface cable to first generation furnace control boards P/N HK42FZ001,HK42FZ002,or CESO130004.These adapter harnesses were distributed years ago and are no longer available. This installation guide has the following sections:I.INSTALL RS232/485ADAPTERII.INSTALLING APM SOFTWAREIII.CONNECTING FURNACE TO PCIV.RUNNING APMV.PALM PILOT APM VERSIONVI.WINDOWS MOBILE5APM VERSIONI.INSTALL RS232/485ADAPTERIn order to interface the Advanced Product Monitor to the variable speed furnace a B&B RS485adapter(B&B485SD9TB)is supplied in the APM kit.ing the B&B converterPlug the B&B RS485adapter into the serial port of your PC. NOTE:If your PC has a25pin connector,an DB25F--DB9M adapter will be required.This standard adapter is available online or at some retail outlets.NOTE:If your PC has only USB connections,a USB to RS--232 adapter will be required.These adapters are available online or at most retail outlets that also sell computers.Reference Appendix A in the APM manual installed on the CD for a list of websites that have compatible adapters.The APM manual is located in the Manual folder.You will need to install the USB serial driver that comes with your USB to RS--232adapter prior to hardware installation.The B&B RS485adapter has a terminal block with5terminals. You will need to connect the interface cable to the terminal block on the B&B RS485adapter.Follow the instructions below to connect the interface cable to the B&B RS485adapter terminal block.(See Fig.1).1.Insert the BLACK wire into the terminal labeled TD(A)onthe B&B RS485adapter and tighten the screw.2.Insert the GREEN wire into the terminal labeled TD(B)onthe B&B RS485adapter and tighten the screw.3.Insert the WHITE wire into the terminal labeled GND onthe B&B RS485adapter and tighten the screw.4.Route wire tie through holes in circuit board portion ofB&B RS485adapter and tighten around cable to providestrain relief.NOTE:The terminals labeled GND and+12V are generally not used because most PCs supply power to the serial port.In the event your PC does not supply power to the serial port you will need to supply external power to the B&B RS485adapter using a12VDC power supply or a9volt transistor battery.II.INSTALLING APM SOFTWAREIn the instructions that follow,it is assumed that the E:drive letter corresponds to the computer’s CD--ROM drive and that the A: drive letter corresponds to the computer’s floppy drive.If this is not the case,please modify the instructions accordingly for your computer’s drive letters.B.Creating Floppy Disk Install SetIf you are installing the APM software onto a computer that does not have a CD--ROM drive,you must first create the floppy disk images.The APM CD--ROM contains compressed self--extracting floppy disk images of the APM install program that need to be copied to4blank,IBM formatted,1.44Mb,3.5”floppy disks.In order to create the floppy disk images,you will need to use a computer that has both a CD--ROM drive and a floppy disk drive. To create the floppy disk images and extract them to the target computer’s hard drive,follow these steps:1.Start windows and insert the APM CD into your CD--ROMdrive.The APM installation routine should automaticallylaunch.Click Cancel to stop the installation.2.Click on the Start button at the bottom left corner and se-lect Run...from the resulting menu.Type E:\mkfloppy A:E:in the text field of the resulting Run dialog then click theOK button.3.When prompted,insert a blank,IBM--formatted,1.44Mbfloppy disk into the computer’s floppy drive and press theEnter key.When the copy has completed,eject the floppydisk and label it APM Disk1of4.4.Insert another blank,IBM--formatted,1.44Mb floppy diskinto the computer’s floppy drive and press the Enter key.When the copy has completed,eject the floppy disk and la-bel it APM Disk2of4.5.Repeat this methodology until all4disk images are created.6.To extract these files to a computer without a CD--ROMdrive insert APM Disk1of4into the A:drive and click onthe Start button at the bottom left corner and select Run...from the resulting menu.Type A:\apm.exe in the text fieldof the resulting Run dialog then click the OK button.Thesefiles will be extracted to a temporary folder namedC:\apmtemp.7.When prompted insert each APM disk until all the com-pressed files are extracted.C.Installing APMBefore you can run the APM program,you must install it.If your computer does not have a CD--ROM drive,you need to create floppy disk images and extract them to the target computer’s hard drive by following the instructions in the previous section.The following instructions apply whether you are installing from the CD--ROM or the extracted files loaded on a computer’s hard drive using floppy disk images.To install the APM software follow these steps:1.Start windows and insert the APM CD into your CD--ROMdrive.The APM installation routine should automaticallylaunch.If it does not automatically launch click on the Startbutton at the bottom left corner and select Run...from theresulting menu.Type E:\setup in the text field of theresult-ing Run dialog then click the OK button.If your computer does not have a CD--ROM and you ex-tracted the floppy disk images to computer’s hard drive thenclick on the Start button at the bottom left corner and selectRun...from the resulting menu.Type C:\apmtemp\setupin the text field of the resulting Run dialog then click theOK button.2.Click Next and follow the on--screen instructions.3.Choose a destination location for the software.The setupprogram will automatically install the APM program in thefolder shown in the window,or you may select anotherfolder.Make your selection and click Next.NOTE:When installing in Windows Vista change the default folder to C:\APM\.Windows Vista prevents programs from writing to any file located in the Program Files folder.If the APM program is installed in the default folder the APM program will not be able to data log or save any views to file.In addition you will have to select the proper COM port every time the APM program is started.4.If you would like to change any selections click on the<Back button,otherwise click on the Install button.5.Once the installation is complete,click on the Finish but-ton.6.Upon successful completion,the installation program willput two new icons on the e the APM icon tolaunch the APM application.The APM Output Files foldericon is the location in which any files created by the APMapplication are stored.III.CONNECTING FURNACE TO PCThe interface cable is connected between the furnace control and the B&B RS485adapter as shown in Fig.1.The GREEN ABCD PLUG housing connects to furnace control HK42FZ021, HK42FZ022,HK42FZ024,or HK42FZ026at the4--pin ABCD connector PL7.The GREEN ABCD RECEPTACLE housing in combination with the GREEN ABCD PLUG housing allows you to splice in the APM at any ABCD User Interface connection point except for the one at the User Interface.The WHITE housing is an alternate connector that connects to furnace control P/N HK42FZ003or HK42FZ012at the3pin communication connector PL6.NOTE:You will need an APM adapter harness to connect the interface cable to first generation furnace control boards P/N HK42FZ001,HK42FZ002,or CESO130004.These adapter harnesses were distributed years ago and are no longer available. The following steps should be performed when connecting the inter-face cable and B&B RS485adapter between the furnace control P/N HK42FZ021,HK42FZ022,HK42FZ024,or HK42FZ026and PC:1.Turn off power at main disconnect.2.Remove access doors.3.Route the interface cable to the furnace control.4.Connect GREEN ABCD PLUG housing on the interfacecable to the furnace board4--pin ABCD connector PL7justbehind the model plug on the lower left side of the furnaceboard.See Fig.1for location.If a User Interface connectionis currently connected to the4--pin ABCD connector PL7disconnect it and plug it into the GREEN ABCDRECEPTACLE housing on the interface cable and thenconnect the GREEN ABCD PLUG housing on the interfacecable to the furnace board4--pin ABCD connector PL7.5.Reinstall access panel and door.6.Connect the opposite end of the furnace cable to the B&Bconverter as shown in Fig.1.7.Turn on electrical power and wait10seconds before run-ning the APM software.CONNECT TO COMPUTER SERIAL PORTB&B RS485 ADAPTER485SD9TBD A08241Fig.1--Furnace ControlIV.RUNNING APMThis section gives you a quick tour of the Advanced Product Monitor so you can start using it right away.To run the Advanced Product Monitor follow these steps:1.Start windows.2.Double--click on the icon labeled APM on your desktop.3.If everything is connected properly the computer willprompt you to enter the serial number of the unit(1to10characters)and click the OK button.NOTE:It may take as long as30seconds before the computer prompts you to enter the serial number.When prompted at least one character must be entered.In addition a name can be given instead of a serial number.See the example shown in Fig.2,where ”thisunit”isentered:A08242 Fig.2--Serial Number ExampleIf the screen shown in Fig.3appears,check your wiring,connector orientation,and whether the board is powered.If OK change your COM port because your PC may already be using COM1for a modem.If you are still having problems you may need to power the RS485adapter.Refer to the last NOTE in SectionI.A08243 Fig.3--Communications Failure Dialog4.After entering the serial number the screen shown in Fig.4should appear when using furnace control board P/NHK42FZ021,HK42FZ022,HK42FZ024,or HK42FZ026.Similar screens will appear with oldercontrols.A08244Fig.4--Screen Image—To monitor the system,click on the System Status tab.—To review the furnace fault codes and error messages,click on the Fault History tab.—To review the furnace statistics,click on the Statisticstab.—To exit the program,select File |Exit from the menu bar.NOTE :To take full advantage of the APM software features,please refer to the APM manual installed on the CD.It is located in the Manual folder.V .PALM PILOT APM VERSIONIncluded on the APM for Windows CD is a Palm Pilot version of the plete instructions are located in the palmAPM folder.VI.WINDOWS MOBILE 5APM VERSIONIncluded on the APM for Windows CD is a Windows Mobile 5version of the plete instructions are located in the winmobileAPM folder.Copyright 2010CAC /BDP D 7310W.Morris St.D Indianapolis,IN 46231Printed in U.S.A.Edition Date:09/10Manufacturer reserves the right tochange,at any time,specifications and designs without notice and without obligations.Catalog No:IIKKGASD0301APM002Replaces:IIKKGASD0301APM001。
客户端插件安装电脑第一次登陆APMS系统时候,在输入网址后,都会有提示信息要求安装插件,按照提示直接安装便可,当安装不了时,可参照下列经验:XP系统:1核对电脑时间为当前时间;2在IE:工具-IE选项-安全:受信任的站点,增加信任站点,降低安装级别;TIP:以上操作过后还是不行,可以尝试更换其他浏览器。
WIN7/WIN8系统:方案一:阅卷系统需要安装插件才能阅卷,win7系统相对win2003和xp多了很多权限限制和安全控制,阅卷前的需要对IE进行一些相应设置才能正常阅卷。
具体步骤如下:1、在IE上右键选择“以管理员身份执行”菜单选项,打开IE的工具– Internet选项–高级,将“启用内存保护帮助减少联机攻击”的勾选去掉,点击应用按钮;2、切换到“安全”页,选择信任站点,将阅卷系统的地址添加入安全站点,将安全级别适当调低,点击确定按钮;3、地址栏输入阅卷地址,安装好插件登录系统。
除了阅卷系统升级新版本仍需要“以管理员身份运行”打开IE重新下载插件外,以后都直接打开IE登录即可,不用再“以管理员身份运行”。
以上步骤1如果以“管理员身份执行”在Internet选项高级页看不到“启用内存保护帮助减少联机攻击”选项或呈灰色不能修改,那win7系统应该都是家庭普通版的,功能和权限是最低的,需要再特别操作:进入控制面板(进入后右上角查看方式切换到大图标)——点击“用户账户”——打开“更改用户账户控制设置”——拖动左面滑块至底端(从不通知)处,电脑重新启动,打开IE8或IE9,从菜单处依次打开工具——Internet选项——高级——然后“启用内存保护帮助减少联机攻击”的“√”就可以去除了。
方案二:如果方案一因各种权限或系统版本原因在主页无法自动安装阅卷插件的,可尝试手动安装,具体步骤是:打开阅卷系统主页,点击右上角‘+’号图标,如图:然后会弹出窗口,按下图红框里的提示操作:方案三:如果方案一与方案二均不能进行正常的网页上的阅卷工作,还可以通过下载评卷客户端进行阅卷工作,具体操作:打开阅卷系统主页,点击右上角‘+’号图标,按照弹出窗口里第二项“评卷客户端”的提示下载,下载后解压直接运行即可登录进入评卷,如图:TIP:以上操作过后还是不行,可以尝试更换其他浏览器。