openstack安装手册
- 格式:pdf
- 大小:152.95 KB
- 文档页数:20

OpenStackrocky版安装步骤,参考官⽹步骤Centos建议最低配置:控制节点:1个处理器,4 GB内存和5 GB存储计算节点:1个处理器,2 GB内存和10 GB存储⼀,环境准备:以下区分数据库密码和openstack⽤户密码,可⾃⾏替换密码 描述RABBIT_PASS RabbitMQ⽤户openstack的密码123456 数据库root的密码KEYSTONE_DBPASS keystone的数据库密码GLANCE_DBPASS glance的数据库密码NOVA_DBPASS nova的数据库密码PLACEMENT_DBPASS placement的数据库密码NEUTRON_DBPASS neutron的数据库密码DASH_DBPASS DASH的数据库密码CINDER_DBPASS cinder的数据库密码ADMIN_PASS admin⽤户密码myuser_PASS myuser⽤户密码GLANCE_PASS glance⽤户的密码NOVA_PASS nova⽤户的密码PLACEMENT_PASS placement⽤户的密码NEUTRON_PASS neutron⽤户的密码METADATA_SECRET 元数据代理的密码CINDER_PASS cinder⽤户的密码1.1⽹络环境1.1.1控制节点配置第⼀个接⼝作为管理接⼝:IP地址:10.0.0.11⽹络掩码:255.255.255.0默认⽹关:10.0.0.1提供程序接⼝使⽤特殊配置,但未分配IP地址。
将第⼆个接⼝配置为提供程序接⼝:替换INTERFACE_NAME为实际的接⼝名称。
例如, eth1或ens224。
vi /etc/sysconfig/network-scripts/ifcfg-INTERFACE_NAMEDEVICE=INTERFACE_NAMETYPE=EthernetONBOOT=“yes”BOOTPROTO=“none”将控制节点的主机名设置为controller。
本帖最后由cryboy2001 于2014-08-15 14:52 编辑目录1、云计算与openstack介绍传统的信息中心云计算介绍openstack介绍物理架构2、openstack架构3、安装openstack方法4、使用openstack5、openstack配置文件6、管理openstack7、详解openstack计算资源池存储资源池网络资源池Glance镜像资源池前端界面Keystone认证管理(不管会不会写完,象openstack一样,先把框架搞大点)一、云计算与openstack介绍1、传统的信息中心。
当然下面画的很简单(自己画的),如果加上多个出口、设备冗余、线路冗余、服务器集群就会复杂。
云计算就是用虚拟技术实现以下功能,如果理解了下面的网络功能,要理解openstack会很简单的,在openstack中都有与下面图中对应的模块。
缺点:1、部署应用时间长,工作量大,至少几个月2、资源利用率,有的服务器资源不够用,有的服务器大量资源浪费。
2、管理复杂3、扩展麻烦,灵活性差。
等等,这些也是云计算的优点。
2、云计算介绍云计算(Cloud Computing )是网格计算(Grid Computing )、分布式计算(Distributed Computing )、并行计算(Parallel Computing )、效用计算(Utility Computing )、网络存储(Network Storage Technologies )、虚拟化(Virtualization )、负载均衡(Load Balance )等传统计算机技术(如以上图)和网络技术发展融合的产物。
个人理解:把一堆功能小的设备,整合成一大个功能强大设备,再把这个强大的设备划分成小设备,然后按你的需要买给你。
公用云(Public Cloud)、私有云(Private Cloud)、混合云(Hybrid Cloud)云计算解决方案:VMware vSphere、微软云计算解决方案、亚马逊AWS、OpenStack 等等3、openstack介绍OpenStack是一个NASA和Rackspace2010年6月合作成立的,以Apache许可证授权,并且是一个自由软件和开放源代码项目。

3.7RHEV、KVM虚拟化3.7.1 RHEV安装RHEV 虚拟环境由RHEV-H (虚拟服务器)和RHEV-M(管理平台)组成。
RHEV-H安装在裸机上。
RHEV-M安装在redhat linux6.3上,要求4G以上内存。
RHEV3.1版本开始,RHEV-M 安装在linux系统平台。
RHEV3.0版本,只支持windows平台。
1、安装RHEV-H2、安装RHEV-M管理端(1)rhev3.1目录下的内容上传到/root/目录下:(2)配置yum源#cd /etc/yum.repos.d#vi local.repo[rhev]name=Red Hat Enterprise Virtualizationbaseurl=file:///root/rhev3.1enabled=1gpgcheck=1gpgkey=file:///etc/pki/rpm-gpg/RPM-GPG-KEY-redhat-release(3)安装RHEV-M# yum install rhevm rhevm-reports(4)配置RHEV-M# rhevm-setup在配置过程中,需要输入admin、数据等密码,建议的输入的密码全部相同。
(5)IE访问测试(6)配置报表# rhevm-reports-setup在登录界面选择“Reports Portal”,(默认用户为rhevm-admin,密码是安装时输入的密码)3、RHEV-M管理界面疑问2:RHEV-M、ESXi均无法继承到openstack,除非vmware和redhat开发api疑问3:Pureflex的FSM中不是内置了SCE功能吗,如果Pureflex算P团队的单,FSM 应该内置一个安装SCE云平台的虚拟机。
疑问4:KVM的正版授权。
3.7.2 KVM安装1、重新驱动虚拟机测试物理主机:32C+64GB虚拟机1:8C+32GB虚拟机2:8C+16GB虚拟机3:8C+16GB同时重启三台虚拟机,发现物理主机内存使用率100%后,使用部分swap分区。

花了几天时间尝试在VMWare Workstation的Ubuntu虚拟机中安装OpenStack,多次失败,最后还是用DevStack安装成功,这里记录一下最后总结的安装步骤和一些问题的解决方法。
创建虚拟机创建虚拟机时的一些注意事项:1.虚拟机的Type选择Custom,以自己定制一些选项;2.“Install from”选择“I will install operating system later”,这样能够自己控制Ubuntu的安装过程;3.Guest operating system选择Linux,V ersion选择“Ubuntu 64-bit”(64位虚拟机需要硬件支持;如果无法创建64位虚拟机,请选择Ubuntu);4.“Network connection”选择“Use bridged networking”,这样虚拟机将连接到你的物理网络,方便管理;其余的设置使用默认项就可以。
安装Ubuntu Server 12.10安装镜像下载从/download/server下载安装镜像,这里需要的是Ubuntu Server版本,而不是Desktop版本;如果能够用BT下载,建议到/download/desktop/alternative-downloads 下载.torrent种子进行下载,速度会比直接HTTP下载快;如果需要安装64位的Ubuntu,请下载ubuntu-12.10-server-amd64.iso,否则请下载ubuntu-12.10-server-i386.iso。
安装Ubuntu Server1.回到VMWare Workstation中,编辑在上一步中创建的虚拟机的属性,在Hardware列表中选中“CD/DVD”,在右侧设置中确认选中了“Connect at power on”,在“Connection”中选中“Use ISO image file:”,点击“Browse…”选择上一部下载的ISO镜像文件,点击OK保存设置。
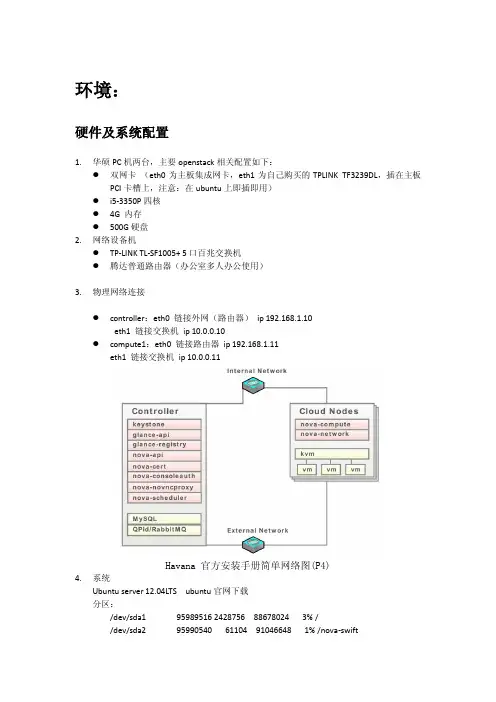
环境:硬件及系统配置1.华硕PC机两台,主要openstack相关配置如下:●双网卡(eth0为主板集成网卡,eth1为自己购买的TPLINK TF3239DL,插在主板PCI卡槽上,注意:在ubuntu上即插即用)●i5-3350P四核●4G 内存●500G 硬盘2.网络设备机●TP-LINK TL-SF1005+ 5口百兆交换机●腾达普通路由器(办公室多人办公使用)3.物理网络连接●controller:eth0 链接外网(路由器)ip 192.168.1.10eth1 链接交换机ip 10.0.0.10●compute1:eth0 链接路由器ip 192.168.1.11eth1 链接交换机ip 10.0.0.11Havana 官方安装手册简单网络图(P4)4.系统Ubuntu server 12.04LTS ubuntu官网下载分区:/dev/sda1 95989516 2428756 88678024 3% //dev/sda2 95990540 61104 91046648 1% /nova-swift/dev/sda5 95989516 61104 91045676 1% /nova-volume/dev/sda6 139798464 60956 132629464 1% /home其中/dev/sda3为swap交换分区(要大于内存两倍,负责机器无法进入自动休眠,现在内存为4G,可能远远不够,因此暂时设置为50G)安装前准备网络配置/etc/network/interfaces1.控制节点controller:auto loiface lo inet loopback# The primary network interface#auto eth0#iface eth0 inet dhcp# Internal Networkauto eth1iface eth1 inet staticaddress 10.0.0.10netmask 255.255.255.0# External Networkauto eth0iface eth0 inet staticaddress 192.168.1.10netmask 255.255.255.0gateway 192.168.1.1dns-nameservers 192.168.1.1计算节点compute1:auto loiface lo inet loopback# The primary network interface#auto eth0#iface eth0 inet dhcp# Internal Networkauto eth1iface eth1 inet staticaddress 10.0.0.11netmask 255.255.255.0# External Networkauto eth0iface eth0 inet staticaddress 192.168.1.11netmask 255.255.255.0gateway 192.168.1.1dns-nameservers 192.168.1.12.重启网络# /etc/init.d/networking restart更改主机名字1./etc/hostname中修改为controller2.为实现各机器间的互联配置在controller和所有节点配置vi /etc/hosts127.0.0.1 localhost10.0.0.10 controller 注意不是:192.168.1.10 controller10.0.0.11 compute1 注意不是:192.168.1.11 compute13.重启,执行hostname 看修改是否生效安装Network Time Protocol (NTP)所有节点执行:# apt-get install ntp获取用于service的密码在执行数据库、消息服务器配置时,为了安全需要用到随机密码,同时使用该随机密码,使用连通这些服务:root@controller:/home/server1# openssl rand -hex 10a8aedb272ddb43cc3b62数据库mysql安装控制节点安装1.安装mysql-server 和python库文件# apt-get install python-mysqldb mysql-server2.修改配置:/etc/mysql/f[mysqld]bind-address = 10.0.0.10 (controller ip)3.重启mysql:# service mysql restart4.如果是新安装mysql删除匿名用户:# mysql_secure_installationnote:This command presents a number of options for you to secure your database installation. Respond yesto all prompts unless you have a good reason to do otherwise.计算节点安装所有计算节点安装python-mysqldb mysql-client#apt-get install python-mysqldb mysql-client安装havana架构所有节点:1. 安装ubuntu Havana 架构:# apt-get install python-software-properties# add-apt-repository cloud-archive:havana2. 更新源,升级系统# apt-get update && apt-get dist-upgrade# reboot消息服务controller节点安装:1.安装rabbitmq# apt-get install rabbitmq-server2.rabbitmq 安装时默认密码账户guest/guest不安全所以修改密码# rabbitmqctl change_password guest RABBIT_PASS环境变量文件env.sh 注意source该文件export OS_USERNAME=adminexport OS_PASSWORD=ADMIN_PASSexport OS_TENANT_NAME=adminexport OS_AUTH_URL=http://controller:35357/v2.0export OS_AUTH_URL=http://controller:5000/v2.0export OS_SERVER_TOKEN= d42bb2198d68afa0ca33身份认证服务keystone用于创建管理服务、租户等,每一个项目都要在keystone当中备案。
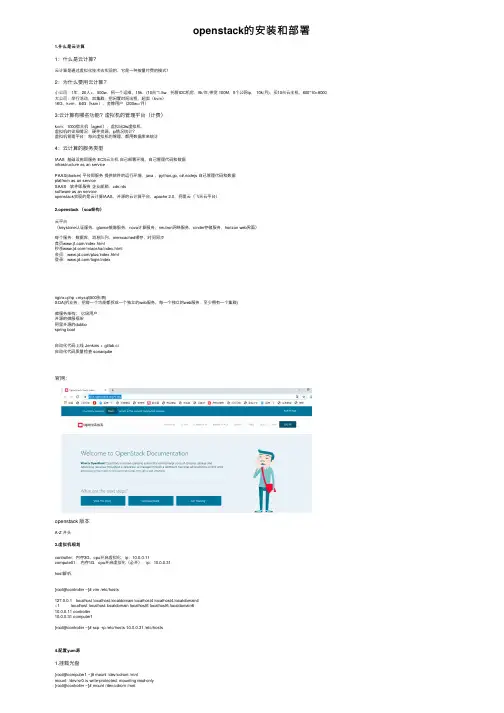
openstack的安装和部署1.什么是云计算1:什么是云计算?云计算是通过虚拟化技术去实现的,它是⼀种按量付费的模式!2:为什么要⽤云计算?⼩公司:1年,20⼈+,500w,招⼀个运维,15k,(10台*1.5w,托管IDC机房,8k/年,带宽 100M,5个公⽹ip, 10k/⽉), 买10台云主机,600*10=6000⼤公司:举⾏活动,加集群,把闲置时间出租,超卖(kvm)16G,kvm,64G(ksm),⾦牌⽤户(200w+/⽉)3:云计算有哪些功能?虚拟机的管理平台(计费)kvm:1000宿主机(agent),虚拟出2w虚拟机,虚拟机的详细情况:硬件资源,ip情况统计?虚拟机管理平台:每台虚拟机的管理,都⽤数据库来统计4:云计算的服务类型IAAS 基础设施即服务 ECS云主机⾃⼰部署环境,⾃⼰管理代码和数据infrastructure as an servicePAAS(docker) 平台即服务提供软件的运⾏环境,java ,python,go, c#,nodejs ⾃⼰管理代码和数据platfrom as an serviceSAAS 软件即服务企业邮箱,cdn,rdssoftware as an serviceopenstack实现的是云计算IAAS,开源的云计算平台,apache 2.0,阿⾥云(飞天云平台)2.openstack (soa架构)云平台(keystone认证服务,glance镜像服务,nova计算服务,neutron⽹络服务,cinder存储服务,horizon web界⾯)每个服务:数据库,消息队列,memcached缓存,时间同步⾸页/index.html秒杀/miaosha/index.html会员:/plus/index.html登录:/login/indexnginx+php +mysql(500张表)SOA(拆业务,把每⼀个功能都拆成⼀个独⽴的web服务,每⼀个独⽴的web服务,⾄少拥有⼀个集群)微服务架构:亿级⽤户开源的微服框架阿⾥开源的dubbospring boot⾃动化代码上线 Jenkins + gitlab ci⾃动化代码质量检查 sonarqube官⽹:openstack 版本A-Z 开头3.虚拟机规划controller:内存3G,cpu开启虚拟化,ip:10.0.0.11compute01:内存1G,cpu开启虚拟化(必开),ip:10.0.0.31host解析,[root@controller ~]# vim /etc/hosts127.0.0.1 localhost localhost.localdomain localhost4 localhost4.localdomain4::1 localhost localhost.localdomain localhost6 localhost6.localdomain610.0.0.11 controller10.0.0.31 computer1[root@controller ~]# scp -rp /etc/hosts 10.0.0.31 /etc/hosts4.配置yum源1.挂载光盘[root@computer1 ~]# mount /dev/cdrom /mntmount: /dev/sr0 is write-protected, mounting read-only[root@controller ~]# mount /dev/cdrom /mntmount: /dev/sr0 is write-protected, mounting read-only#查看(如果有内容代表挂载成功)[root@computer1 ~]# ll /mnttotal 686-rw-rw-r-- 1 root root 14 Nov 26 2018 CentOS_BuildTagdrwxr-xr-x 3 root root 2048 Nov 26 2018 EFI-rw-rw-r-- 1 root root 227 Aug 30 2017 EULA-rw-rw-r-- 1 root root 18009 Dec 10 2015 GPLdrwxr-xr-x 3 root root 2048 Nov 26 2018 imagesdrwxr-xr-x 2 root root 2048 Nov 26 2018 isolinuxdrwxr-xr-x 2 root root 2048 Nov 26 2018 LiveOSdrwxrwxr-x 2 root root 663552 Nov 26 2018 Packagesdrwxrwxr-x 2 root root 4096 Nov 26 2018 repodata-rw-rw-r-- 1 root root 1690 Dec 10 2015 RPM-GPG-KEY-CentOS-7-rw-rw-r-- 1 root root 1690 Dec 10 2015 RPM-GPG-KEY-CentOS-Testing-7-r--r--r-- 1 root root 2883 Nov 26 2018 TRANS.TBL[root@controller ~]# scp -rp openstack_rpm.tar.gz 10.0.0.31:/optrz 上传openstack_rpm.tar.gz到/opt,并解压⽣成repo配置⽂件root@controller opt]# vim/etc/yum.repos.d/local.repo[local]name=localbaseurl=file:///mntgpgcheck=0[openstack]name=openstackbaseurl=file:///opt/repogpgcheck=0root@controller opt]#echo 'mount /dev/cdrom /mnt' >>/etc/rc.localroot@controller opt]# chmod +x /etc/rc.d/rc.local[root@controller opt]# scp -rp /etc/yum.repos.d/local.repo 10.0.0.31:/etc/yum.repos.d/local.repo [root@computer1 opt]# vim /etc/yum.repos.d/local.repo[root@computer1 opt]# echo 'mount /dev/cdrom /mnt' >>/etc/rc.local[root@computer1 opt]# chmod +x /etc/rc.d/rc.local#注意:两台都要配2.安装基础服务在所有节点上执⾏:a:时间同步[root@controller opt]# yum install -y chrony[root@computer1 opt]# yum install -y chrony#编辑控制节点配置⽂件[root@controller opt]# vim /etc/chrony.conf1.将 server iburst 改成server iburst另三⾏删掉2.将 #allow 192.168.0.0/1改成allow 10.0.0.0/24#重启服务[root@controller opt]# vim /etc/chrony.confsystemctl restart chronyd#编辑计算节点[root@computer1 opt]# vim /etc/chrony.conf将 server iburst 改成server 10.0.0.11 iburst另三⾏删掉[root@computer1 opt]# systemctl restart chronyd5.安装openstack客户端和openstack-selinux1.在所有节点上执⾏[root@control ~]# yum install python-openstackclient openstack-selinux -y[root@computer1 ~]# yum install python-openstackclient openstack-selinux -y查看官⽅⽂档6.安装数据库以及安全初始化2.仅控制节点执⾏:[root@control ~]# yum install mariadb mariadb-server python2-PyMySQL -y在官⽅⽂档上有https:///mitaka/zh_CN/install-guide-obs/environment-sql-database.html3.创建并编辑 /etc/f.d/f[root@control ~]# cat /etc/f.d/f[mysqld]bind-address = 10.0.0.11 # 值为控制节点的管理⽹络IP地址以使得其它节点可以通过管理⽹络访问数据库default-storage-engine = innodb #默认存储引擎innodb_file_per_table #为每个表独⽴表空间⽂件max_connections = 4096 #最⼤连接数collation-server = utf8_general_ci # 默认字符集character-set-server = utf84.启动mariadb 并加⼊开机⾃启[root@control ~]# systemctl start mariadb[root@control ~]# systemctl enable mariadb5. 为了保证数据库服务的安全性,运⾏[root@control ~]# mysql_secure_installation ⼀定要执⾏要不然后⾯时间同步会有坑脚本。
项目一 OpenStack安装云计算技术OpenStack云计算平台能力CAPACITY 要求了解云计算的概念、架构和模式,以及主流的云计算平台了解OpenStack项目,调查OpenStack的应用情况理解OpenStack的架构,了解OpenStack的物理部署了解OpenStack部署工具,掌握OpenStack的快捷安装方法内容导航CONTENTS任务一了解云计算任务二了解OpenStack项目任务三理解OpenStack架构任务四部署与安装OpenStack任务说明01OPTION02OPTION03OPTION了解OpenStack部署拓扑了解OpenStack部署工具准备OpenStack安装环境04OPTION使用Packstack安装器安装OpenStack知识引入•什么是虚拟化•虚拟化是云计算的基础。
•虚拟化是指计算元件在虚拟的而不是真实的硬件基础上运行。
•虚拟化将物理资源转变为具有可管理性的逻辑资源,以消除物理结构之间的隔离,将物理资源融为一个整体。
虚拟化是一种简化管理和优化资源的解决方案。
知识引入•什么是云计算•云(Cloud)是网络、互联网的一种比喻说法。
•云计算是提供虚拟化资源的模式。
•云计算提供的是IT资源租用服务。
•云计算是IT系统架构不断发展的产物。
知识引入•云计算架构知识引入云计算部署模式公有云(Public Cloud)私有云(Private Cloud )混合云(Hybrid Cloud )知识引入•裸金属云•裸金属云(Bare Metal Cloud)是一种提供物理服务器服务的云产品。
•裸金属云没有虚拟机管理程序(Hypervisor)。
•裸金属云支持的处理器ØIntelØPOWERØARMØGPUØFPGA•随着容器技术的兴起,物理服务器正成为更多用户的选择。
•Amazon 公司的AWS(Amazon Web Services )•Microsoft 公司的Azure •阿里云(AliCloud )了解商用云计算平台任务实现11项目一 OpenStack安装任务一 了解云计算开源云计算平台OpenStack OpenNebula Eucalyptus CloudStack任务实现项目一 OpenStack安装12 内容导航CONTENTS任务一了解云计算任务二了解OpenStack项目任务三理解OpenStack架构任务四部署与安装OpenStack任务说明01OPTION 02OPTION 03OPTION 了解OpenStack的概念了解OpenStack项目的组成了解OpenStack版本演变04OPTION 了解OpenStack基金会与社区05OPTION 调查OpenStack的应用情况知识引入•什么是OpenStack•OpenStack是一系列开源软件项目的组合。
openstack(kilo版)安装配置文档写在前面:本文档所有指令在拷贝的时候注意空格和换行,由于文档的排版原因可能会出现自动换行等误差。
一、实验环境物理机器上的3台虚拟机分别模拟控制节点、网络节点、计算节点。
采用VMware虚拟机管理软件,首先建立一个模板,在上面安装第五部分所涉及到的基本组件,分别克隆出3台虚拟机作为控制、网络、计算节点。
虚拟机操作系统为Ubuntu 14.04.3,openstack版本为kilo版。
所需各部分组件均采用apt-get自动安装。
二、openstack的两种常用上网方式1、在官方文档的三个网卡基础上,我们使用第四个网卡上网(NAT 方式或桥接方式均可)。
另外三个网卡采用host-only方式。
2、使用管理网络上网。
本文采用第二种方式对网络进行配置,即将管理网络根据自己的网络环境配置成可上网的IP地址段(NAT和host-only均可)。
由于对第一种方式进行尝试时最终会遇到ping不通外网的情况,所以不建议尝试。
具体可见/thread-13508-1-1.html三、各节点的网络配置各节点建立好以后,根据openstack-install-guide-apt-kilo官方文档对各节点进行网络配置。
本例采用OpenStack Networking (neutron)方式进行网络配置。
使用OpenStack网络(neutron)的架构样例中,需要一个控制节点、一个网络节点以及至少一个计算节点。
控制节点包含一个在管理网络上的网络接口。
网络节点在包含一个在管理网络上的网络接口,一个在实例隧道网络上的网络接口和一个在外部网络上的网络接口。
计算节点包含一个在管理网络上的网络接口和一个在实例隧道网络上的接口。
所以此时需要在虚拟机管理界面添加虚拟网络,由于采用第二部分提到的第二种方式(即管理网络上网),所以网络分配如下:◆管理网络使用 192.168.109.0/24 带有网关 192.168.109.2◆实例隧道网络使用 10.0.1.0/24 无网关◆外部通道网络使用192.168.109.0/24 带有网关192.168.109.2首先需要配置管理网络采用NAT方式上网:VMware默认VMnet8为NAT模式,打开系统的网络适配器设置,可以看到VMnet8的网络配置信息,如下图:这个ip地址,因个人而异,也就是说不同网络,不同环境,这个ip变化的概率是很大的。

用户手册用户手册简介硬件确认下载并安装Fuel制作安装介质安装Fuel主控节点在安装时变更PXE网络参数Fuel 步骤网络设置步骤PXE设定DNS 和主机名NTP时间同步Root 密码Shell登录Fuel 登录退出步骤启动Fuel主控节点启动节点服务器安装Fuel插件概览认证安装步骤创建一新的OpenStack环境启动向导以创建新的环境修改Fuel密码接受统计信息收集环境命名和选择发行版高可用 (HA)或非高可用模式Hypervisor网络服务Cinder和Glance后端存储相关项目创建环境完成配置用户环境增加节点到你的环境为每个节点服务器分配一个或多个角色磁盘分区网络设置Neutron 网络设置Nova-network 设置设置网卡绑定(网卡聚合)在服务器中将逻辑网络和物理网络映射验证网络设置项Horizon访问权限Provision Method环境中所包含的服务常用设置为环境设置调试级别选择计算节点的调度器选择镜像格式公共密钥为目标节点设置初始的内核参数配置系统日志Mellanox Neutron组件存储重置Zabbix密码部署变更在Web用户界面停止部署在部署后重置环境下一步部署后检查优点运行部署后检查当一个测试失败了做什么额外的检查平台测试描述安装Sahara从早期版本升级或更新从Fuel早期版本升级Role operationsRole object使用Fuel命令行介绍基本使用命令行参考在命令行中的首字母缩写代表什么发布网络配置环境节点节点组Roles operations配置部署变更和设置Fuel密码Fuel插件命令行VMware集成注意事项部署vCenter为vCenter创建环境和选择发行版为vCenter选择vCenter Hypervisor为vCenter选择网络服务为vCenter选择Cinder和Glance的后端vCenter相关项目完成你的vCenter环境创建为vCenter配置你的环境为每个节点服务器分配一个或多个角色网络设置设置VMware 选项卡vCenterNova-Computes网络Glance安装Fuel主控节点到vSpere下载Mirantis OpenStack ISO上传镜像到vCenter数据存储创建一个vCenter端口组网络创建虚拟机并挂载ISO挂载Mirantis OpenStack ISO在vSpher中安装和启动Fuel主控节点验证Fuel是从ESXi启动的Downloading Ubuntu packagesSeparate Mirantis OpenStack and Linux packages用户手册简介这个手册提供使用 Fuel Master 节点和图形化 Fuel 界面部署一个 Mirantis OpenStack 环境的指南。

openstack安装配置手册目录一、控制节点系统及环境安装 (1)1:准备光盘 (1)2:安装OS (1)3:设置root权限 (1)4:设置网络 (1)5:安装bridge (2);6:设置NTP () (2)7:设置Iscsi (2)8:安装rabbitmq (2)二:安装mysql和创建相关数据库 (2)1:安装mysql (2)2:安装phpmyadmin (2)3:创建数据库 (2)三:安装和配置keystone (2)¥1:安装keystone (2)2:配置keystone (2)创建服务 (2)3:验证安装 (2)四:安装和配置glance (2)1:安装软件 (2)2:配置/etc/glance/ (2)3:设置/etc/glance/ (2)¥4:配置/etc/glance/ (2)5:配置/etc/glance/ (2)6:同步数据库 (2)7:验证glance服务是否正常 (2)8:下载镜像并上传 (2)五:安装配置nova (2)1:安装nova相关组件 (2)2:配置/etc/nova/ (2)(3:配置/etc/nova/ (2)4:停止和重启nova相关服务 (2)5:同步数据库 (2)6:检查nova服务 (2)六:安装和配置Dashbaord (2)1:安装dashbaord (2)2:配置/etc/openstack-dashboard/ (2)3:重启服务 (2)]Appendix A: 使用nova-volume (2)Appendix B: glance使用swift存储镜像 (2)Appendix C: 多计算节点配置 (2)一、控制节点系统及环境安装1:准备光盘:安装OS服务器是两块硬盘,将一个单独的分区专门给nova-volume使用(nova-volume一般不用)。
系统最小化安装,只需要安装ssh server就可以。
装完系统后。
apt-get updateapt-get upgrade更新源里的包,更新系统。

OpenStack是一套用来管理虚拟机的平台软件。
它不是一个单一的软件,而是集成了很多个组件用来协同合作。
简单的来说,譬如有十台服务器,在VMware的情况下,我们在每台服务器上安装esx或者esxi,然后装一台vcenter,在vcenter的管理界面里把十台服务器的esx通过域名或者ip加入,就能在vcenter里面统一管理。
类似的,红帽也有virsh 这种管理虚拟机的程序。
在这里我不介绍其他的云平台的管理软件,只是介绍如何从技术角度来使用OpenStack。
如果要作为生产环境的话,你还需要考虑更多,譬如架构,网络拓扑,存储的方式,节点的分布等等。
在本篇文章里,我将介绍采用ec2兼容认证的方式。
所有组件安装在一台controller 上。
关键字定义控制端:类似vcenter的管理系统。
节点:类似安装了esx的服务器。
nova组件:安装在节点上,让节点能按照控制端的命令来操作节点上的虚拟机或者存储。
glance组件:用来管理镜像。
环境准备ubuntu 11.10,服务器双网卡步骤安装完基本的操作系统后$ sudo apt-get update$ sudo apt-get upgrade$ sudo apt-get install bridge-utils #安装网桥软件配置网络接口在这里我的架构是eth0连接了外网,即我們可以访问的网口。
eth1做了网桥,和节点之间通过一个交换机连接。
这样的好处是,内部节点和控制器的流量都走br100的交换机,而不会影响虚拟机上的应用使用的网络。
$ sudo vi /etc/network/interfacesauto eth0iface eth0 inet staticaddress 192.168.200.21netmask 255.255.255.0network 192.168.200.0broadcast 192.168.200.255gateway 192.168.200.10auto br100iface br100 inet staticbridge_ports eth1bridge_stp offbridge_maxwait 0bridge_fd 0address 10.200.200.2netmask 255.255.255.0$ sudo /etc/init.d/networking restart初期准备工作做好,接下来就是要安装关于nova,glance等组件$ sudo apt-get install -y rabbitmq-server #安装MQ消息組件$ sudo apt-get install -y python-greenlet python-mysqldb #安装Python dependencies 接下来安装各个nova组件及依赖$ sudo apt-get install nova-volume nova-vncproxy nova-apinova-ajax-console-proxy$ sudo apt-get install nova-doc nova-scheduler nova-objectstore$ sudo apt-get install nova-network nova-compute$ sudo apt-get install glance安装euca2ools和unzip$ sudo apt-get install -y euca2ools unzip接下来我们安装数据库,这裡我选择了MySQL,其实个人觉得PostgreSQL更好。
OpenStack安装手册目录OpenStack安装手册 (1)一、安装环境 (4)1、示例架构 (4)2、网络 (4)3、安全 (5)4、主机网络配置 (5)5、NTP (7)6、安装OpenStack包 (9)7、安装数据库 (10)8、消息队列 (11)9、缓存令牌 (12)二、认证服务 (12)在控制节点上配置。
(13)1、前提条件 (13)配置Apache服务器 (15)3、创建一个域、项目、用户和角色 (16)4、验证操作 (17)1、前提条件 (20)2、安装并配置组件 (22)5、验证操作 (24)四、计算服务 (25)1、安装和配置控制节点 (25)∙安装并配置组件 (26)∙完成安装 (30)3、安装并配置计算节点 (30)∙安装并配置组件 (30)∙验证操作 (33)一、安装环境1、示例架构根据官方文档,本文架构采用一个控制节点和一个计算节点。
(The example architecture requires at least twonodes (hosts) to launch a basic virtual machine or instance. )控制节点运行认证服务、镜像服务、计算服务的管理部分、网络服务的管理部分、各种网络代理以及Dashboard,还包括一些基础服务如数据库、消息队列以及NTP。
计算节点上运行计算服务中管理实例的管理程序部分。
默认情况下,计算服务使用KVM。
还运行网络代理服务,用来连接实例和虚拟网络以及通过安全组给实例提供防火墙服务。
2、网络∙公有网络公有网络选项以尽可能简单的方式通过layer-2(网桥/交换机)服务以及VLAN网络的分割来部署OpenStack网络服务。
实际上,它将虚拟网络桥接到物理网络,并依靠物理网络基础设施提供layer-3服务(路由)。
另外,DHCP服务为实例提供IP地址。
∙私有网络私有网络选项扩展了公有网络选项,增加了layer-3(路由)服务,使用VXLAN类似的方式。
翻译说明:由于名词和软件指令、脚本容易混淆,,导致无法与实际安装配置环境对应,本文会尽量不去翻译这些内容。
实际上,直接看原文,至少对照原文学习和操作,会避免很多因翻译产生的问题。
光头猪猪1.OpenStack基本安装简介如果你想利用Ubuntu 12.04 LTS (使用 Ubuntu Cloud Archive)来部署OpenStack Folsom平台用于开发测试,本文会为你提供帮助。
我们将完成一套三节点的安装,包括一个控制器、一个网络节点和一个计算节点。
当然,你也可以按你的需要安装尽可能多的计算节点。
对于希望安装测试基础平台的OpenStack初学者,本文会成为一个良好的开始。
Architecture一个标准的Quantum安装包括多达四个物理上分离的数据中心网络:• 管理网络。
用于OpenStack组件之间的内部通信。
在此网络上的IP地址应仅在数据中心内部可达。
• 数据网络。
用于所部署的云内部的虚拟机数据通信。
该网络的IP地址分配需求取决于使用中的Quan tum 插件。
• 外部网络。
用在某些部署方案中提供可访问Internet的虚拟机。
此网络上的IP地址应对Internet上的任何人都可达。
• API网络。
向租户公开所有OpenStack Api,包括Quantum API。
此网络上的IP地址应对Internet上的任何人都可达。
本网络可能和外部网络是同一个网络,因为你可以划分整个IP地址分配范围的一部分在外部网络建立一个Quantum子网。
必要条件您需要至少3台装好Ubuntu 12.04 (LTS)的计算机(虚拟或物理)。
表1.1结构和节点信息控制器节点简介控制器节点将提供:• Databases (with MySQL)• Queues (with RabbitMQ)• Keystone• Glance• Nova (without nova-compute)• Cinder• Quantum Server (with Open-vSwitch plugin)• Dashboard (with Horizon)公共服务操作系统1.使用此参数安装Ubuntu:• Time zone :UTC• Hostname :folsom-controller• Packages :OpenSSH-Server操作系统安装完成后,重新启动服务器。
花了几天时间尝试在VMWare Workstation的Ubuntu虚拟机中安装OpenStack,多次失败,最后还是用DevStack安装成功,这里记录一下最后总结的安装步骤和一些问题的解决方法。
创建虚拟机创建虚拟机时的一些注意事项:1.虚拟机的Type选择Custom,以自己定制一些选项;2.“Install from”选择“I will install operating system later”,这样能够自己控制Ubuntu的安装过程;operating system选择Linux,Version选择“Ubuntu 64-bit”(64位虚拟机需要硬件支持;如果无法创建64位虚拟机,请选择Ubuntu);4.“Network connection”选择“Use bridged networking”,这样虚拟机将连接到你的物理网络,方便管理;其余的设置使用默认项就可以。
安装Ubuntu Server安装镜像下载从下载安装镜像,这里需要的是Ubuntu Server版本,而不是Desktop版本;如果能够用BT下载,建议到下载.torrent种子进行下载,速度会比直接HTTP下载快;如果需要安装64位的Ubuntu,请下载,否则请下载。
安装Ubuntu Server1.回到VMWare Workstation中,编辑在上一步中创建的虚拟机的属性,在Hardware列表中选中“CD/DVD”,在右侧设置中确认选中了“Connect at power on”,在“Connection”中选中“Use ISO image file:”,点击“Browse…”选择上一部下载的ISO镜像文件,点击OK保存设置。
2.启动虚拟机,将开始执行Ubuntu的安装过程;修改安装源并更新;在安装过程中默认使用了来自的安装源,建议修改为国内的安装源,我使用的是网易的安装源,在下载安装时基本可以达到全速;2.执行如下命令,备份然后修改配置:sudo cp /etc/apt/ /etc/apt/ sed -i 's/' /etc/apt/3.修改完成后,执行以下命令更新安装sudo apt-get updatesudo apt-get upgrade安装VMTools:sudo apt-get install -y gcc make用DevStack安装OpenStack1.安装Git(DevStack的代码是使用Git进行管理的,需要用Git获取);sudo apt-get install git2.使用Git获取最新的DevStack代码:cd ~git clone apt-get install python-setuptools2.安装netaddr模块sudo easy_install netaddr3.安装pytzpytz是Python的一个用于时区处理的模块,DevStack安装过程中会尝试去SourceForge下载安装,但由于某些原因始终无法下载成功,因此需要手工安装。
《openstack4j中文使用手册》一、引言在当前信息技术快速发展的时代,云计算已经成为企业和个人获取弹性、稳定和高性能计算资源的关键途径。
而OpenStack作为一种开源的云计算评台,提供了丰富的API接口和功能,为用户提供了便利的云计算解决方案。
而本文将为您提供OpenStack4j中文使用手册,帮助您更好地掌握这一强大工具的使用方法和技巧。
二、初识OpenStack4jOpenStack4j是OpenStack官方提供的Java SDK,用于简化OpenStack服务的使用和管理。
它为Java开发者提供了一套简洁而强大的API接口,可以帮助开发者快速地集成和使用OpenStack服务。
相比原生的OpenStack API,OpenStack4j提供了更加友好和便利的方法和工具,使开发者能够更加高效地管理和使用OpenStack服务。
三、基本使用方法1. 引入依赖在使用OpenStack4j之前,首先需要在项目中引入相应的依赖。
可以通过Maven或Gradle等方式引入OpenStack4j的相关依赖,以便在项目中使用OpenStack4j提供的API接口。
2. 配置认证信息在使用OpenStack4j时,需要先配置OpenStack的认证信息,包括认证URL、用户名、密码等。
这些认证信息将用于建立与OpenStack 服务的连接,以便进行后续的操作和管理。
3. 创建连接通过OpenStack4j提供的API,可以轻松地创建与OpenStack服务的连接,并进行认证、授权等操作。
开发者可以通过OpenStack4j提供的方法,快速地建立与OpenStack服务的连接,从而方便地管理和使用OpenStack的各种功能和资源。
四、进阶使用技巧1. 资源管理OpenStack4j提供了丰富的资源管理接口,可以帮助开发者轻松地管理OpenStack中的各种资源,包括虚拟机、网络、存储等。
开发者可以通过OpenStack4j提供的API,实现对这些资源的创建、删除、更新等操作,从而更好地管理和利用OpenStack的资源。
OpenStack用户手册云平台的使用,主要是以租户和用户登录dashboard来实现。
要想管理和使用云平台,首先要明白云平台的租户用户的概念:租户:租户也就是云平台资源的权限,配额,及用户等若干对象的集合.可以给一个租户赋予若干资源,一定的权限,以及若干用户。
租户就好像是一个部门,或者项目组的抽象。
其实,在云平台里租户也叫project(项目).用户:用户就是云平台资源的管理者和使用者。
从使用云平台的角度来讲,主要有两种类型的用户,超级管理员(admin),及普通用户.admin是云平台默认就有的,主要负责云平台的资源管理,包括建立租户用户,分配资源权限等,就好像是公司负责人,或者是项目的总负责人。
普通用户就是云平台资源的实际使用者,好像是部门的员工,或者是项目组成员。
有了关于租户用户以后,还得有租户用户的一些资源和环境,如网络,镜像,云主机类型,等就可以生成云主机了。
下面就以Dashboard的方式来依次讲解,如何管理和使用云平台。
1。
1登陆Dashboard搭建好OpenStack云计算平台后,可以访问http://controller_IP/dashboard,来对云平台进行管理和使用。
在本使用手册中,control_IP为10。
0.15.11,因此,访问http://10.0.15。
11/dashboard,界面如下图所示:输入用户名和密码,本云平台的用户名为admin,密码假设是password,登陆成功后进入主页面,如下图所示:因为admin具有管理员权限,所以登陆成功后会自动进入“Admin”(管理员)管理界面。
如果是普通用户,则(项目)界面。
普通用户看不到Admin管理界面。
如果进入的是“Admin"管理界面,点击“Project"会直接进入“Project”即也可进入项目界面,如下图所示:1.2 租户用户的管理进入管理员管理界面,点击左列的“Identity”下的“Projects"选项,即可进入租户管理界面,如下图所示:点击右上方的“Create Project"按钮,界面如下图所示:在对应的文本框填写租户名字及相关描述,还可以点击“Project Members”标签,选择用户作为租户成员,点击“Quota"标签,设置租户的资源配额。
11 添加遥测模块目录遥测模块 121安装和配置控制节点 122配置计算服务 125配置镜像服务 127配置块儿存储服务 127配置对象存储服务 128遥测安装的检测 129下一步 130遥测提供了一个监控和计量OpenStack的一个框架,这也被称为测云仪项目。
遥测模块遥测模块可以实现如下的功能:有效地调整与OpenStack服务相关的测量数据。
收集监控通知发送事件和计量数据的服务。
将收集到的数据发送到不同的数据存储块儿和消息队列中。
在收集中断定义规则的数据时创建警报。
这个遥测模块包含以下组件:计算代理(测云仪-代理-计算)运行在每个计算节点上,对这些节点的利用情况进行调查。
在将来可能有其他类型的代理,现在的重点是创建计算代理。
中心代理(测云仪中枢代理)运行在一个中枢管理服务器上,并对资源利用进行调查统计,这里的资源不把实例或计算节点绑定在一起。
多个代理可以开始规模服务水平。
通知代理(测云仪的通知代理)运行在一个中枢管理服务器上,从消息队列中得到消息,从而来构建事件和计量数据。
收集者(测云仪收集者)运行在一个中枢管理服务器上,分派收集遥测数据到数据仓储里面或者对外部消费者的数据不做修改。
报警评估(测云仪的报警评估)运行在一个或多个中枢管理服务器上决定那些火灾警报,这里的火灾警报是因为在一个滑动的时间窗口上跨越了一个阙值所做出的相关统计。
警报通知(测云仪警报通知)运行在一个或多个中枢管理服务器上并允许警报设置基于阈值评估样本的集合。
API服务器(测云仪的API)运行在一个或多个中央管理服务器上,并提供访问数据存储的数据。
这些服务通过使用OpenStack消息总线进行通信。
只有收集器和API 服务器访问数据存储。
安装和配置控制器节点本节描述了在控制器节点上如何安装和配置遥测模块、测云仪的代号。
这个遥测模块使用独立的代理从你环境的每一个OpenStack中收集测量值。
配置的先决条件在你安装和配置遥测模块之前,你必须先安装MongoDB,创建一个MongoDB数据库、服务凭证和API端点。
1. OpenStack Basic InstallTable of ContentsIntroduction (1)Architecture (2)Requirements (2)Controller Node (3)Introduction (3)Common services (3)Keystone (5)Glance (7)Nova (7)Cinder (10)Quantum (10)Dashboard (Horizon) (11)Network Node (11)Introduction (11)Common services (12)Network Services (13)Virtual Networking (14)Compute Node (15)Introduction (15)Common services (15)Hypervisor (16)Nova (17)Quantum (19)Create your first VM (20)Conclusion (20)IntroductionThis document helps anyone who wants to deploy OpenStack Folsom for developmentpurposes with Ubuntu 12.04 LTS (using the Ubuntu Cloud Archive).We are going to install a three-node setup with one controller, one network and onecompute node.Of course, you can setup as many computes nodes as you want. This document is a goodstart for beginners in OpenStack who want to install a testing infrastructure.ArchitectureA standard Quantum setup has up to four distinct physical data center networks:•Management network. Used for internal communication between OpenStackcomponents. The IP addresses on this network should be reachable only within the datacenter.•Data network. Used for VM data communication within the cloud deployment. The IPaddressing requirements of this network depend on the Quantum plugin in use.•External network. Used to provide VMs with Internet access in some deploymentscenarios. The IP addresses on this network should be reachable by anyone on theInternet.•API network. Exposes all OpenStack APIs, including the Quantum API, to tenants. The IPaddresses on this network should be reachable by anyone on the Internet. This may bethe same network as the external network, as it is possible to create a quantum subnetfor the external network that uses IP allocation ranges to use only less than the full rangeof IP addresses in an IP block.RequirementsYou need at least three machines (virtual or physical) with Ubuntu 12.04 (LTS) installed.Table 1.1. Architecture and node informationcontroller network compute Hostname folsom-controller folsom-network folsom-computeServices MySQL, RabbitMQ, Nova,Cinder, Glance, Keystone,Quantum Quantum-L3-agent,Quantum-DHCP-agent,Quantum Agent with Open-vSwitchnova-compute, KVM, nova-api, Quantum Agent withOpen-vSwitchMinimum number of disks211External + API network7.7.7.7/247.7.7.8/24-Management network192.168.0.1/24192.168.0.2/24192.168.0.3/24Data network-10.10.10.1/2410.10.10.2/24Total number of NIC232 Controller NodeIntroductionThe Controller node will provide :•Databases (with MySQL)•Queues (with RabbitMQ)•Keystone•Glance•Nova (without nova-compute)•Cinder•Quantum Server (with Open-vSwitch plugin)•Dashboard (with Horizon)Common servicesOperating System1.Install Ubuntu with this parameters :•Time zone : UTC•Hostname : folsom-controller•Packages : OpenSSH-ServerAfter OS Installation, reboot the server.2.Since Ubuntu 12.04 LTS has OpenStack Essex by default, we are going to use the UbuntuCloud Archive for Folsom :apt-get install ubuntu-cloud-keyringEdit /etc/apt/sources.list.d/cloud-archive.list :deb /ubuntu precise-updates/folsommainUpgrade the system (and reboot if you need) :apt-get update && apt-get upgrade3.Configure the network :•Edit /etc/network/interfaces file :# Management Networkauto eth0iface eth0 inet staticaddress 192.168.0.1netmask 255.255.255.0gateway 192.168.0.254dns-nameservers 8.8.8.8# API + Public Networkauto eth1iface eth1 inet staticaddress 7.7.7.7netmask 255.255.255.0•Edit /etc/sysctl.conf :net.ipv4.conf.all.rp_filter = 0net.ipv4.conf.default.rp_filter = 0Then, restart network service :service networking restart•Edit the /etc/hosts file and add folsom-controller, folsom-network and folsom-compute hostnames with correct IP.4.Install Configure NTP :•Install the package :apt-get install -y ntp•Configure /etc/ntp.conf file :server iburstserver 127.127.1.0fudge 127.127.1.0 stratum 10•Restart the service :service ntp restartMySQL Database Service1.Install the packages :apt-get install mysql-server python-mysqldb2.Allow connection from the network :sed -i 's/127.0.0.1/0.0.0.0/g' /etc/mysql/f3.Restart the service :service mysql restart4.Create Databases, Users, Rights :mysql -u root -ppassword <<EOFCREATE DATABASE nova;GRANT ALL PRIVILEGES ON nova.* TO 'nova'@'localhost' \IDENTIFIED BY 'password';GRANT ALL PRIVILEGES ON nova.* TO 'nova'@'192.168.0.1' \IDENTIFIED BY 'password';GRANT ALL PRIVILEGES ON nova.* TO 'nova'@'192.168.0.2' \IDENTIFIED BY 'password';GRANT ALL PRIVILEGES ON nova.* TO 'nova'@'192.168.0.3' \IDENTIFIED BY 'password';CREATE DATABASE cinder;GRANT ALL PRIVILEGES ON cinder.* TO 'cinder'@'localhost' \IDENTIFIED BY 'password';CREATE DATABASE glance;GRANT ALL PRIVILEGES ON glance.* TO 'glance'@'localhost' \IDENTIFIED BY 'password';CREATE DATABASE keystone;GRANT ALL PRIVILEGES ON keystone.* TO 'keystone'@'localhost' \IDENTIFIED BY 'password';CREATE DATABASE quantum;GRANT ALL PRIVILEGES ON quantum.* TO 'quantum'@'localhost' \IDENTIFIED BY 'password';GRANT ALL PRIVILEGES ON quantum.* TO 'quantum'@'192.168.0.2' \IDENTIFIED BY 'password';GRANT ALL PRIVILEGES ON quantum.* TO 'quantum'@'192.168.0.3' \IDENTIFIED BY 'password';FLUSH PRIVILEGES;EOFRabbitMQ Messaging Service1.Install the packages :apt-get install rabbitmq-server2.Change the default password :rabbitmqctl change_password guest passwordKeystone1.Install the packages :apt-get install keystone python-keystone python-keystoneclient2.Edit /etc/keystone/keystone.conf :[DEFAULT]admin_token = passwordbind_host = 0.0.0.0public_port = 5000admin_port = 35357compute_port = 8774verbose = Truedebug = Truelog_file = keystone.loglog_dir = /var/log/keystonelog_config = /etc/keystone/logging.conf[sql]connection = mysql://keystone:password@localhost:3306/keystoneidle_timeout = 200[identity]driver = keystone.identity.backends.sql.Identity[catalog]driver = keystone.catalog.backends.sql.Catalog(...)3.Restart Keystone and create the tables in the database :service keystone restartkeystone-manage db_sync4.Load environment variables :•Create novarc file :export OS_TENANT_NAME=adminexport OS_USERNAME=adminexport OS_PASSWORD=passwordexport OS_AUTH_URL="http://localhost:5000/v2.0/"export SERVICE_ENDPOINT="http://localhost:35357/v2.0"export SERVICE_TOKEN=password•Export the variables :source novarcecho "source novarc">>.bashrc5.Download the data script and fill Keystone database with data (users, tenants, services) :./keystone-data.sh6.Download the endpoint script and create the endpoints (for projects) :./keystone-endpoints.shIf an IP address of the management network on the controller node is different from this example, please use the following:./keystone-endpoints.sh -K <ip address of the management network>Glance1.Install the packages :apt-get install glance glance-api python-glanceclient glance-common2.Configure Glance :•Edit /etc/glance/glance-api.conf and /etc/glance/glance-registry.conf files andmodify :sql_connection = mysql://glance:password@localhost/glanceadmin_tenant_name = serviceadmin_user = glanceadmin_password = passwordFor glance-api.conf, modify :notifier_strategy = rabbitrabbit_password = password•Restart Glance services :service glance-api restart && service glance-registry restart•Create Glance tables into the database :glance-manage db_sync•Download and import Ubuntu 12.04 LTS UEC Image :glance image-create \--location /releases/12.04/release/ubuntu-12.04-server-cloudimg-amd64-disk1.img \--is-public true --disk-format qcow2 --container-format bare --name"Ubuntu"•Check if the image has been introduced in the index :glance image-list+--------------------------------------+--------+-------------+------------------+-----------+--------+| ID | Name | Disk Format | ContainerFormat | Size | Status |+--------------------------------------+--------+-------------+------------------+-----------+--------+| 0d2664d3-cda9-4937-95b2-909ecf8ea362 | Ubuntu | qcow2 | bare| 233701376 | active |+--------------------------------------+--------+-------------+------------------+-----------+--------+•You can also install Glance Replicator (new in Folsom). More informations about ithere.Nova1.Install the packages :apt-get install nova-api nova-cert nova-common \nova-scheduler python-nova python-novaclient nova-consoleauth novnc \ nova-novncproxy2.Configure Nova :•Edit /etc/nova/api-paste.ini file and modify :admin_tenant_name = serviceadmin_user = novaadmin_password = passwordSince we are going to use Cinder for volumes, we should also delete each partconcerning "nova-volume" :============================================================[composite:osapi_volume]use = call:nova.api.openstack.urlmap:urlmap_factory/: osvolumeversions/v1: openstack_volume_api_v1========================================================================================================================[composite:openstack_volume_api_v1]use = call:nova.api.auth:pipeline_factorynoauth = faultwrap sizelimit noauth ratelimit osapi_volume_app_v1keystone = faultwrap sizelimit authtoken keystonecontext ratelimitosapi_volume_app_v1keystone_nolimit = faultwrap sizelimit authtoken keystonecontextosapi_volume_app_v1========================================================================================================================[app:osapi_volume_app_v1]paste.app_factory = nova.api.openstack.volume:APIRouter.factory========================================================================================================================[pipeline:osvolumeversions]pipeline = faultwrap osvolumeversionapp[app:osvolumeversionapp]paste.app_factory = nova.api.openstack.volume.versions:Versions.factory ============================================================•Edit /etc/nova/nova.conf file and modify :[DEFAULT]# MySQL Connection #sql_connection=mysql://nova:password@192.168.0.1/nova# nova-scheduler #rabbit_password=passwordscheduler_driver=nova.scheduler.simple.SimpleScheduler# nova-api #cc_host=192.168.0.1auth_strategy=keystones3_host=192.168.0.1ec2_host=192.168.0.1nova_url=http://192.168.0.1:8774/v1.1/ec2_url=http://192.168.0.1:8773/services/Cloudkeystone_ec2_url=http://192.168.0.1:5000/v2.0/ec2tokensapi_paste_config=/etc/nova/api-paste.iniallow_admin_api=trueuse_deprecated_auth=falseec2_private_dns_show_ip=Truedmz_cidr=169.254.169.254/32ec2_dmz_host=192.168.0.1metadata_host=192.168.0.1metadata_listen=0.0.0.0enabled_apis=ec2,osapi_compute,metadata# Networking #network_api_class=work.quantumv2.api.APIquantum_url=http://192.168.0.1:9696quantum_auth_strategy=keystonequantum_admin_tenant_name=servicequantum_admin_username=quantumquantum_admin_password=passwordquantum_admin_auth_url=http://192.168.0.1:35357/v2.0libvirt_vif_driver=nova.virt.libvirt.vif.LibvirtHybridOVSBridgeDriver linuxnet_interface_driver=work.linux_net.LinuxOVSInterfaceDriver firewall_driver=nova.virt.libvirt.firewall.IptablesFirewallDriver# Cinder #volume_api_class=nova.volume.cinder.API# Glance #glance_api_servers=192.168.0.1:9292image_service=nova.image.glance.GlanceImageService# novnc #novnc_enable=truenovncproxy_base_url=http://192.168.0.1:6080/vnc_auto.htmlvncserver_proxyclient_address=127.0.0.1vncserver_listen=0.0.0.0# Misc #logdir=/var/log/novastate_path=/var/lib/novalock_path=/var/lock/novaroot_helper=sudo nova-rootwrap /etc/nova/rootwrap.confverbose=true•Create Nova tables into the database :nova-manage db sync•Restart Nova services :service nova-api restartservice nova-cert restartservice nova-consoleauth restartservice nova-scheduler restartservice nova-novncproxy restartCinder1.Install the packages :apt-get install -y cinder-api cinder-scheduler cinder-volume iscsitarget \open-iscsi iscsitarget-dkms python-cinderclient linux-headers-`uname -r`2.Since there is a bug in tgtadm, we have to modify /etc/tgt/targets.conf :# include /etc/tgt/conf.d/*.confinclude /etc/tgt/conf.d/cinder_tgt.conf3.Configure & start the iSCSI services :sed -i 's/false/true/g' /etc/default/iscsitargetservice iscsitarget startservice open-iscsi start4.Configure Cinder :•Edit /etc/cinder/cinder.conf file and modify :[DEFAULT]sql_connection = mysql://cinder:password@localhost:3306/cinderrabbit_password = password•Edit /etc/cinder/api-paste.ini file and modify :admin_tenant_name = serviceadmin_user = cinderadmin_password = password•Create the volume (on the second disk) :fdisk /dev/sdb[Create a Linux partition]pvcreate /dev/sdb1vgcreate cinder-volumes /dev/sdb1•Create Cinder tables into the database :cinder-manage db sync•Restart the services :service cinder-api restartservice cinder-scheduler restartservice cinder-volume restartQuantum1.Install the packages :apt-get install quantum-server2.Configure Quantum services :•Edit /etc/quantum/quantum.conf file and modify :core_plugin = \quantum.plugins.openvswitch.ovs_quantum_plugin.OVSQuantumPluginV2auth_strategy = keystonefake_rabbit = Falserabbit_password = password•Edit /etc/quantum/plugins/openvswitch/ovs_quantum_plugin.ini file and modify : [DATABASE]sql_connection = mysql://quantum:password@localhost:3306/quantum[OVS]tenant_network_type = gretunnel_id_ranges = 1:1000enable_tunneling = TrueNoteIt's more handy to choose tunnel mode since you don't have to configureyour physical switches for VLANs.•Edit /etc/quantum/api-paste.ini file and modify :admin_tenant_name = serviceadmin_user = quantumadmin_password = password3.Start the services :service quantum-server restartDashboard (Horizon)Install the packages :apt-get install apache2 libapache2-mod-wsgi openstack-dashboard \memcached python-memcacheOpenStack Dashboard is now available at http://<controller_node>/horizon. We can loginwith admin / password credentials or demo / password.Network NodeIntroductionThe Network node will provide :•Virtual Bridging (Open-vSwitch + Quantum Agent) with tunneling•DHCP Server (Quantum DHCP Agent)•Virtual Routing (Quantum L3 Agent)Common servicesOperating System1.Install Ubuntu with this parameters :•Time zone : UTC•Hostname : folsom-network•Packages : OpenSSH-ServerAfter OS Installation, reboot the server.2.Since Ubuntu 12.04 LTS has OpenStack Essex by default, we are going to use CloudArchives for Folsom :apt-get install ubuntu-cloud-keyringEdit /etc/apt/sources.list.d/cloud-archive.list :deb /ubuntu precise-updates/folsommainUpgrade the system (and reboot if you need) :apt-get update && apt-get upgrade3.Configure the network :•Edit /etc/network/interfaces file :# Management Networkauto eth0iface eth0 inet staticaddress 192.168.0.2netmask 255.255.255.0gateway 192.168.0.254dns-nameservers 8.8.8.8# Data Networkauto eth1iface eth1 inet staticaddress 10.10.10.1netmask 255.255.255.0# Public Bridgeauto eth2iface eth2 inet manualup ifconfig $IFACE 0.0.0.0 upup ip link set $IFACE promisc ondown ifconfig $IFACE down•Edit /etc/sysctl.conf :net.ipv4.ip_forward=1net.ipv4.conf.all.rp_filter = 0net.ipv4.conf.default.rp_filter = 0Then, restart network service :service networking restart•Edit the /etc/hosts file and add folsom-controller, folsom-network and folsom-compute hostnames with correct IP.4.Install Configure NTP :•Install the package :apt-get install -y ntp•Configure /etc/ntp.conf file :server 192.168.0.1•Restart the service :service ntp restartNetwork ServicesOpen-vSwitch1.Install the packages :apt-get install quantum-plugin-openvswitch-agent \quantum-dhcp-agent quantum-l3-agent2.Start Open vSwitch:service openvswitch-switch start3.Create Virtual Bridging :ovs-vsctl add-br br-intovs-vsctl add-br br-exovs-vsctl add-port br-ex eth2ip link set up br-exQuantumConfigure Quantum services :•Edit /etc/quantum/l3_agent.ini file and modify :auth_url = http://192.168.0.1:35357/v2.0admin_tenant_name = serviceadmin_user = quantumadmin_password = passwordmetadata_ip = 192.168.0.1use_namespaces = False•Edit /etc/quantum/api-paste.ini file and modify :auth_host = 192.168.0.1admin_tenant_name = serviceadmin_user = quantumadmin_password = password•Edit /etc/quantum/quantum.conf file and modify :core_plugin = \quantum.plugins.openvswitch.ovs_quantum_plugin.OVSQuantumPluginV2auth_strategy = keystonefake_rabbit = Falserabbit_host = 192.168.0.1rabbit_password = password•Edit /etc/quantum/plugins/openvswitch/ovs_quantum_plugin.ini file and modify : [DATABASE]sql_connection = mysql://quantum:password@192.168.0.1:3306/quantum[OVS]tenant_network_type = gretunnel_id_ranges = 1:1000enable_tunneling = Trueintegration_bridge = br-inttunnel_bridge = br-tunlocal_ip = 10.10.10.1NoteIt's more handy to choose tunnel mode since you don't have to configureyour physical switches for VLANs.•Edit /etc/quantum/dhcp_agent.ini file and add :use_namespaces = FalseStart the services :service quantum-plugin-openvswitch-agent startservice quantum-dhcp-agent restartservice quantum-l3-agent restartVirtual NetworkingCreate Virtual Networking1.Load environment variables :•Create novarc file :export OS_TENANT_NAME=adminexport OS_USERNAME=adminexport OS_PASSWORD=passwordexport OS_AUTH_URL="http://192.168.0.1:5000/v2.0/"export SERVICE_ENDPOINT="http://192.168.0.1:35357/v2.0"export SERVICE_TOKEN=password•Export the variables :source novarcecho "source novarc">>.bashrc2.Download the Quantum script. We are using the "Per-tenant Routers with PrivateNetworks" use-case.3.Edit the script belong your networking (public network, floatings IP).4.Execute the script.L3 Configuration•Copy the external network ID :quantum net-list•Edit /etc/quantum/l3_agent.ini and paste the ID :gateway_external_network_id = ID•Copy the provider router ID :quantum router-list•Edit /etc/quantum/l3_agent.ini and paste the ID :router_id = ID•Restart L3 Agent :service quantum-l3-agent restartCompute NodeIntroductionThe Compute node will provide :•Hypervisor (KVM)•nova-compute•Quantum OVS AgentCommon services1.Install Ubuntu with this parameters :•Time zone : UTC•Hostname : folsom-compute•Packages : OpenSSH-ServerAfter OS Installation, reboot the server .2.Since Ubuntu 12.04 LTS has OpenStack Essex by default, we are going to use CloudArchives for Folsom :apt-get install ubuntu-cloud-keyringEdit /etc/apt/sources.list.d/cloud-archive.list :deb /ubuntu precise-updates/folsommainUpgrade the system (and reboot if you need) :apt-get update && apt-get upgrade3.Configure the network :•Edit /etc/network/interfaces file :# Management Networkauto eth0iface eth0 inet staticaddress 192.168.0.3netmask 255.255.255.0gateway 192.168.0.254dns-nameservers 8.8.8.8# Data Networkauto eth1iface eth1 inet staticaddress 10.10.10.2netmask 255.255.255.0•Edit /etc/sysctl.conf :net.ipv4.conf.all.rp_filter = 0net.ipv4.conf.default.rp_filter = 0Then, restart network service :service networking restart•Edit the /etc/hosts file and add folsom-controller, folsom-network and folsom-compute hostnames with correct IP.4.Install & Configure NTP :•Install the package :apt-get install -y ntp•Configure /etc/ntp.conf file :server 192.168.0.1•Restart the service :service ntp restartHypervisor1.Install the packages that we need :apt-get install -y kvm libvirt-bin pm-utils2.Configure libvirt :•Edit /etc/libvirt/qemu.conf file and add :cgroup_device_acl = ["/dev/null", "/dev/full", "/dev/zero","/dev/random", "/dev/urandom","/dev/ptmx", "/dev/kvm", "/dev/kqemu","/dev/rtc", "/dev/hpet", "/dev/net/tun"]•Disable KVM default virtual bridge to avoid any confusion :virsh net-destroy defaultvirsh net-undefine default•Allow Live Migrations :Edit /etc/libvirt/libvirtd.conf file :listen_tls = 0listen_tcp = 1auth_tcp = "none"Modify libvirtd_opts variable in /etc/init/libvirt-bin.conf file :env libvirtd_opts="-d -l"Edit /etc/default/libvirt-bin file :libvirtd_opts="-d -l"3.Restart libvirt :service libvirt-bin restartNova1.Install the packages :apt-get install nova-compute-kvm2.Configure Nova :•Edit /etc/nova/api-paste.ini file and modify :admin_tenant_name = serviceadmin_user = novaadmin_password = password•Edit /etc/nova/nova-compute.conf file and modify :[DEFAULT]libvirt_type=kvmlibvirt_ovs_bridge=br-intlibvirt_vif_type=ethernetlibvirt_vif_driver=nova.virt.libvirt.vif.LibvirtHybridOVSBridgeDriverlibvirt_use_virtio_for_bridges=True•Edit /etc/nova/nova.conf file and modify :[DEFAULT]# MySQL Connection #sql_connection=mysql://nova:password@192.168.0.1/nova# nova-scheduler #rabbit_host=192.168.0.1rabbit_password=passwordscheduler_driver=nova.scheduler.simple.SimpleScheduler# nova-api #cc_host=192.168.0.1auth_strategy=keystones3_host=192.168.0.1ec2_host=192.168.0.1nova_url=http://192.168.0.1:8774/v1.1/ec2_url=http://192.168.0.1:8773/services/Cloudkeystone_ec2_url=http://192.168.0.1:5000/v2.0/ec2tokensapi_paste_config=/etc/nova/api-paste.iniallow_admin_api=trueuse_deprecated_auth=falseec2_private_dns_show_ip=Truedmz_cidr=169.254.169.254/32ec2_dmz_host=192.168.0.1metadata_host=192.168.0.1metadata_listen=0.0.0.0enabled_apis=metadata# Networking #network_api_class=work.quantumv2.api.APIquantum_url=http://192.168.0.1:9696quantum_auth_strategy=keystonequantum_admin_tenant_name=servicequantum_admin_username=quantumquantum_admin_password=passwordquantum_admin_auth_url=http://192.168.0.1:35357/v2.0libvirt_vif_driver=nova.virt.libvirt.vif.LibvirtHybridOVSBridgeDriver linuxnet_interface_driver=work.linux_net.LinuxOVSInterfaceDriver firewall_driver=nova.virt.libvirt.firewall.IptablesFirewallDriver# Compute #compute_driver=libvirt.LibvirtDriverconnection_type=libvirt# Cinder #volume_api_class=nova.volume.cinder.API# Glance #glance_api_servers=192.168.0.1:9292image_service=nova.image.glance.GlanceImageService# novnc #novnc_enable=truenovncproxy_base_url=http://192.168.0.1:6080/vnc_auto.htmlvncserver_proxyclient_address=127.0.0.1vncserver_listen=0.0.0.0# Misc #logdir=/var/log/novastate_path=/var/lib/novalock_path=/var/lock/novaroot_helper=sudo nova-rootwrap /etc/nova/rootwrap.confverbose=true•Restart Nova services :service nova-api-metadata restartservice nova-compute restartQuantumOpen vSwitch1.Install the packages:apt-get install -y openvswitch-switch2.Start Open vSwitch serviceservice openvswitch-switch start3.Configure Virtual Bridgingovs-vsctl add-br br-intQuantum1.Install the packages :apt-get install -y quantum-plugin-openvswitch-agent2.Edit /etc/quantum/quantum.conf file and modify :core_plugin = \quantum.plugins.openvswitch.ovs_quantum_plugin.OVSQuantumPluginV2auth_strategy = keystonefake_rabbit = Falserabbit_host = 192.168.0.1rabbit_password = password3.Edit /etc/quantum/plugins/openvswitch/ovs_quantum_plugin.ini file and modify :[DATABASE]sql_connection = mysql://quantum:password@192.168.0.1:3306/quantum[OVS]tenant_network_type = gretunnel_id_ranges = 1:1000integration_bridge = br-inttunnel_bridge = br-tunlocal_ip = 10.10.10.2enable_tunneling = True4.Start the Agent :service quantum-plugin-openvswitch-agent restartCreate your first VM1.You can now use OpenStack API or the Dashboard to manage your own IaaS :http://192.168.0.1/horizon with demo / password credentials.2.Edit the security group "Default" to allow ICMP and SSH.3.Create a personal keypair.4.In the Dashboard, go to "Instances" and click "Launch Instance" for spawning a new VM.5.Since Horizon does not manage L3 in Folsom release, we have to configure floating IPfrom Quantum CLI (using demo tenant). To do that, you need to get the ext_net ID andthe port_id of your VM :quantum net-list -- --router:external Truequantum port-list -- --device_id <vm-uuid>6.Now, we are going to create a floating-IP attached to the virtual port of our VM androuted to the external network :quantum floatingip-create --port_id <port_id> <ext_net_id>7.That's it! You should be able to ping your VM using floating IP. ConclusionWe have built a basic architecture for advanced testing purpose. This kind of architectureis close to the production, without High Availability (HA) and some services such as thosefor running OpenStack Object Storage. You can of course add as many compute nodes asyou want. If you need more specific help, please read the official documentation of eachproject or write a post to an OpenStack mailing list.。