智能终端系统软件用户手册
- 格式:docx
- 大小:4.14 MB
- 文档页数:12
移动终端管理系统(管理平台)使用说明书国家统计局2014年9月目录1 登录 (4)2 区划管理(本调查不需要此操作) (5)2.1区划 (5)2.2普查小区下载(略) (5)3 上传管理(本调查不需要此操作) (6)3.1上传应用 (6)3.2 文件、地图、底册与制度包上传管理 (9)4 推送管理(如上级无通知要求,则本调查不需要此操作) (11)4.1应用分发 (11)4.2 文件、地图、底册、制度包推送管理 (14)5 消息管理 (16)6 推送统计(本调查不需要此操作) (17)7 终端管理 (18)8 用户管理 (19)概述为了配合以移动终端设备为终端和载体的数据采集任务,提高数据采集的整体质量,开发了移动终端管理系统。
本系统将对国家统计局移动终端数据采集设备从运行状态、数据推送和软件安装(卸载)等情况进行统一管理;以支撑第三次全国经济普查和国家统计局利用移动终端的数据统计工作。
移动终端管理系统简称MDM系统,主要实现由管理员对移动设备(手机,PDA)等的远程管理。
本系统与数据采集程序紧密结合,对操作系统为安卓的智能终端进行管理。
管理内容主要包括对设备的注册、注销管理、PDA的安全管理、推送管理等。
本系统有两个部分组成,一是安装在PDA上的移动终端管理客户端程序(简称MDM 客户端程序),另外一个是部署在服务器上,各级管理员根据权限进行管理和使用的移动终端管理平台(简称MDM平台)。
本手册主要介绍移动终端管理系统管理平台端的各项功能。
移动终端管理客户端程序各项功能见《移动终端管理系统(客户端程序)使用说明书》。
1 登录管理员使用移动终端管理系统时,需要通过登录验证用户身份。
目前系统中已生成到区县级的各级管理员用户,用户名规则为本地地址码(省级两位地址码,地市级4位地址码,区县级6位地址码),初始密码请向各级管理员获取,第一次登录后请及时修改密码。
1、在IE浏览器里输入域名https://219.235.129.237 登录MDM管理平台,由于采用https方式访问,如果浏览器弹出如下提示时,点击“继续浏览此网站”即可。
智能终端管理系统安装手册第一章 安装说明1.1 简介本文档详细介绍了曦帆桌面管理系统的安装过程。
通过文字注解和步骤截图,让用户快速掌握安装过程。
1.2 部署结构(推荐)二级分行(地市1)数据服务器……二级分行(地市N )数据服务器网点网点中继服务器……网点网点中继服务器……一级分行(省)……数据库服务器管理服务器1数据服务器管理服务器M管理服务器2备注:●省一级分行a) 管理服务器:如果按照推荐的管理服务器配置,则部署的管理服务器数量=XPe 终端总数/3000,一台管理服务器可以管理若干个二级分行(地市) b) 数据库服务器:1个c) 数据服务器:1个,用于存储省一级分行的软件安装包、文件和镜像等数据。
● 二级分行:每个二级分行建议部署一个数据服务器,减轻省行数据服务器负载。
●网点:由分行决定是否部署中继服务器,如果不部署中继服务器,则不能实现以下功能。
a)远程唤醒(远程开机)。
b)镜像抓取与还原。
c)如果网点是ADSL拨号连接外网,则不能管理网点中的终端。
d)下载数据分流1.3 系统环境类型数量(台)服务器软硬件配置备注管理服务器XPe终端总数/ 3000 【软件环境】(1)操作系统:Suse 10.0 企业版【硬件配置】(1)CPU:英特尔® 至强®5500 系列以上,四核双路,2颗CPU,主频 2.50 GHz以上,总线主频率1.0GHz以上(2)缓存:16MB(2)内存:类型为DDRIII,内存大小>= 16G(3)硬盘:SAS类型,硬盘空间大小>=73G(1)如果分行提供服务器低于此硬件配置,会影响管理的终端数量和响应性能,可能需要通过增加管理服务器数量,才能满足管理要求。
数据库服务器1 【软件环境】(1)操作系统:Suse 10.0 企业版(2)数据库:支持Sybase 15.01企业版【硬件配置】(1)CPU:英特尔® 至强®5500 系列以上,四核双路,2颗CPU,主频 2.50 GHz以上,总线主频率1.0GHz以上(1)如果分行提供服务器低于此硬件配置,会影响系统的响应性能。
LZ8713C使用手册厦门蓝斯通信有限公司Xiamen lenz communication co.,ltdMarch,2011图2-1 LZ8713C外观指示灯LZ8713C系列产品终端外观可见3个指示灯,颜色为红、绿两种,代表的含义和所状态如下表:指示颜色含义状态说明1秒1次,(0.25秒亮,0.75秒灭) 处于AT态,正在进行网络附着拨号/ppp握手图2-4分叉线和航空头分叉线操作屏操作屏用途广泛,可用来显示设备状态,查看设备程序版本和配置信息,修改配置文件,查看接收调度信息,拨号通话,切换报站线路,调节音量,采集站点等。
图2-5 旧版司机操作屏和新操作屏2.4.5 TTS音箱喊话器图2-6 TTS小音箱和喊话器图2-7 485串口线为视频摄像头供电,可同时为4路摄像头供电。
图2-8 视频电源线图2-9 拾音线图2-10 视频延长线图2-11 视频延长线图2-15摄像头接法拾音器与拾音器线的接法如下图所示:图2-18分叉线接操作屏和TTS音箱第三章终端配置LZ8713C系列视频终端产品出厂前都经过我司技术人员的升级、配置和严格测试,最后到达客户手中。
所以,您收到的我司产品都是已配置完成。
若无特殊功能,无需修改配置或稍做修改便可使用。
LZ8713C系列视频终端产品,根据功能需求的不同,配置文件也有所区别。
一般配置文件包含下图3-1配置文件如果无报站功能要求,在配置设备时,报站文件和站点采集文件可以删除。
如无通话功能要求,在配置设备时,可以去除配置文件通信号码。
总之,配置文件的大小可根据功能的多少调整。
如果客图3-2 操作屏查看配置LZ8713C视频设备与电脑相连。
修改电脑图3-3 修改IP视频设备启动完成后,在浏览器中打开192.168.0.1图3-4 WEB首页选择页面左侧的“配置文件”菜单,可以点击查看“基本配置”、“系统配置”、“视频配置图3-5基本配置图3-6系统配置图3-7视频配置图3-8 操作屏修改配置选择要修改的选项,输入相应信息,按“菜单”键完成修改并保存,按“重、手机号、GPS中心IP和端口等少量配置信息。
ZTM480272S43-0xxx智能串口显示终端广州周立功单片机发展有限公司1. 概述广州周立功单片机发展有限公司针对TFT应用需求而开发的智能显示终端系列产品,集成TFT控制器,具有软硬件设计简单、高性能及高可靠性等特点,为8位、16位及32位MCU的GUI设计提供了良好的解决方案。
用户系统只需要通过串口与显示终端进行通信,给终端发送相关的操作指令,即可实现与windows相媲美的人机界面。
ZTM480272S43系列串口屏拥有宽屏幕、高亮度、低功耗的优越性能,且使用简单,操作方便,是显示屏终端的最佳选择之一。
ZTM480272S43系列串口屏集成了4.3寸触摸真彩屏、简易串口指令控制功能于一身,内置中英字库,支持大容量存储图片数据,为用户提供更为多样性、实用性的显示终端平台。
产品实物如图1.1和图1.2所示。
图1.1 产品实物——正面图1.2 产品实物——背面1.1 产品特点z串行接口通信,完成显示屏终端操作控制;z显示屏终端供电电压范围为4.5V~6.5V;z工作温度范围可达-20℃~+70℃;z65K真彩色TFT液晶屏显示;z40MB字库存储空间,内置8个中英标准字库,并可扩展用户字库;z大容量存储图片数据空间,最多可以管理65535张图片;z支持触摸操作控制;[1]z支持矩阵键盘操作控制;[2]z支持实时时钟,万年历功能;[3]z支持背光亮度,背光亮度可以软件调节100级;z图形界面显示操作,上位机完成图形开发;z兼容多种控制器操作控制,只需串口通信即可,如8051,A VR,ARM7,Cortex-M0/M3,ARM9等;z下载速度最高可达800000bps,出厂默认设置为115200bps。
注:[1] 扩展功能具有TP功能的串口屏才支持扩展触摸功能;[2] 扩展功能具有KB功能的串口屏才支持扩展键盘功能;[3] 扩展功能具有RTC功能的串口屏才支持扩展实时时钟功能。
1.2 产品使用说明详细使用说明请参考《智能串口显示终端指令集》。

小鱼易连视频会议终端NE60使用手册小鱼易连NE60终端(以下简称“小鱼”),是一款基于互联网的智能视频会议终端,可实现用户高质量的视频沟通与协作。
它具有创新的一体化设计,相比于传统的视频通讯设备,具有小巧便携、高度集成的特点,适用于个人桌面、办公室、中小型会议室等不同场景。
本文档将详细介绍小鱼易连NE60视频会议终端的规格参数、主要功能以及相关操作,为使用该产品的用户提供帮助和指南。
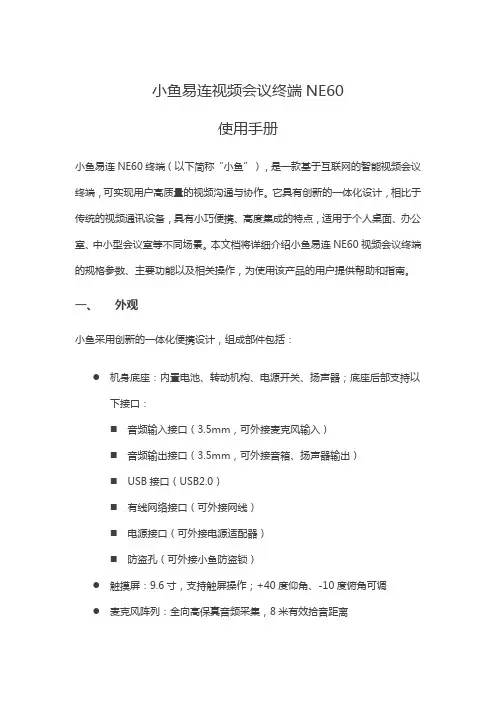
一、外观小鱼采用创新的一体化便携设计,组成部件包括:●机身底座:内置电池、转动机构、电源开关、扬声器;底座后部支持以下接口:⏹音频输入接口(3.5mm,可外接麦克风输入)⏹音频输出接口(3.5mm,可外接音箱、扬声器输出)⏹USB接口(USB2.0)⏹有线网络接口(可外接网线)⏹电源接口(可外接电源适配器)⏹防盗孔(可外接小鱼防盗锁)●触摸屏:9.6寸,支持触屏操作;+40度仰角、-10度俯角可调●麦克风阵列:全向高保真音频采集,8米有效拾音距离●摄像头:⏹1080p高清摄像,95度超宽视角;+25度仰角、-13度俯角可调⏹支持手动开关,用户可通过旋转开关来开启/关闭摄像头;⏹支持外接防眩光滤镜配件二、快速安装用户可按如下步骤完成小鱼的初次安装与开关机:1.接通电源,长按电源开关按钮。
2.选择语言,目前支持简体中文、繁体中文、英语三个语言版本。
3.连接网络a)推荐使用网线连接有线网络b)若没有有线网络,也可连接Wi-Fi无线网络。
使用Wi-Fi无线网络,可能会由于干扰或信号不好,造成通话质量下降。
建议优先连接5.8GHzWi-Fi无线网络。
4.成功接入网络后,小鱼将自动连接服务器,并完成激活。
系统自动分配小鱼号,显示在小鱼屏幕主界面的上方(小鱼号可用于呼叫、预约会议等功能)。
5.关机/重启操作:开机状态下,长按电源按钮,弹出关机/重启对话框,选择【关机】或【重启】,即可进行关机/重启操作。
6.开机过程中,电源开关处的状态指示灯将显示小鱼的运行状态,具体如下:三、主界面开机后,进入小鱼主界面如下图所示:主页面区域显示及功能说明:●状态栏区域:⏹小鱼名称:用于终端的识别,方便从通讯录查找与呼叫⏹小鱼号:终端之间可通过小鱼号进行呼叫⏹网络状态:显示当前使用的网络,wifi/有线/4G,及网络信号强度⏹电池电量:显示电池的电量,并显示正在充电的连接提示●中央区域分为两部分:上方显示时间、日期、本地天气,下方为应用入口。
![VMS智能网络视频终端监控软件说明[1]](https://uimg.taocdn.com/36e18377561252d380eb6e20.webp)
VMS智能网络视频终端监控软件使用说明使用手册Version 2.0第一章免责声明 (3)第二章产品简介 (3)第三章运行环境 (4)第四章软件安装 (4)第五章VMS使用方法 (5)一、登录与退出 (5)二、界面基本功能 (6)三、添加摄像机 (8)四、软件设置 (9)基本设定 (9)通道设置 (10)事件设置 (11)录像计划 (12)用户管理 (12)音频广播 (13)系统日志 (14)转发 (14)五、转发视频流的访问 (15)六、录像与回放 (17)第六章常见问题解答 (20)第一章免责声明感谢您选择金联视讯(Alinking)的网络视频监控产品!VMS是一款具有版权的软件,受法律保护,您可以在法律条件允许情况下分发、安装、使用,但严禁对该软件进行反向工程及破解等行为,金联视讯保留对此行为进行法律起诉的权利。
VMS属于免费软件,您在使用该软件过程中产生的任何结果和不可预期后果,金联视讯无任何责任。
您使用VMS所记录的视频和画面请依照当地法律进行保存与分发、传播,如果您采用违法途径或传播法律禁止的画面、视频,均与金联视讯无任何连带关系。
本文中所提及的其他企业产品及商标所有权,均归属于其各自相对应企业。
第二章产品简介VMS软件是一款专业网络摄像机监控软件,该软件可对应金联视讯(Alinking)全系列网络摄像机。
具有监视、控制、设置、集中录像存储、分组循环显示,语音群组呼叫、视频流转发等功能,并可支持多个显示器同时进行监控预览。
VMS软件最多支持64路视频同时显示及存储,在不同配置的控制主机上可优化显示效能,节约资源,达到监视及存储目的。
同時,VMS软件支持视频流媒体分发功能,可以减轻设备端带宽负载。
VMS体积小巧、功能强大,是您组建中小型监控系统的理想的管理软件平台。
第三章运行环境硬件环境:CPU: Intel P IV 2.0G 或以上级别内存: 512Mb 或以上级别硬盘: 80G 及以上级别显卡: 显存容量32Mb或以上级别的基础或独立显卡网卡: 10/100 base T或以上软件环境:操作系统: Windows XP浏览器: Internet Explorer 5.0或以上第四章软件安装您将从产品光盘或通过网络下载,获得VMS安装文件(独立可执行文件),在确认您的电脑软硬件配置符合本说明第二章的条件下,并保证VMS软件获得渠道为产品光盘或金联视讯官方网站,否则将有可能对您的计算机安全造成隐患。
台区智能融合终端用户安装指导手册一、编制目的为了保证台区智能融合终端项目顺利实施及工程施工按期完成,有效指导施工人员的设备安装,以求优质、安全、高效、低耗完成施工任务,确保安装到达最佳效果。
二、编制依据GB/T18857-2008配电线路带电作业技术导则Q/GDW 520-2010 1 0kV 架空配电线路带电作业管理规范GB17622-2008带电作业用绝缘手套GB/T13035-2008带电作业用绝缘绳索GB/T12168-2006带电作业用遮蔽罩GB/T13034-2008带电作业用绝缘滑车DL/T803-2002 带电作业用绝缘毯DL 778—2001 带电作业用绝缘袖套DL/1125-2009 带电作业用绝缘服DL/975-2005带电作业用防机械刺穿手套DL/T676-1999带电作业绝缘鞋(靴)通用技术条件GB/T18037-2008带电作业工具基本技术要求与设计导则DL/T972-2005带电作业工具、装置和设备的质量保证导则DL/T976-2005带电作业工具、装置和设备预防性试验规程DL/T854-2004带电作业用绝缘斗臂车的保养维护及在使用中的试验GB18269-2008交流1kv、直流1.5kv及以下电压带电作业用绝缘手工工具国家电网2007-751《带电作业工作管理规定》国家电网公司电业安全工作规程(电力线路部分)国家电网公司现场标准化作业指导书编制导则配电自动化技术导则国家电网公司配电自动化功能规范配电自动化建设改造技术规定运维管理规范配电自动化系统(主站、总线、平台)技术规范书电监安全【2006】34号电力二次系统安全防护总体方案国家电力监管委员会第5号令电力二次系统安全防护规定国家电网生配电【2009】124号生产管理系统配网业务需求功能规范(2009版)国家电网生配电【2009】196号配电自动化试点建设与改造技术原则GB/T 13729 远动终端通用技术条件GB 50173 电器装置安装工程35kV及以下架空电力线路施工及验收规范DL/T 5161 电器装置安装工程质量检验及评定规程三、物料准备智能融合终端现场前,需要提前准备安装所需的设备、耗材,以便于设备正常安装,具体安装设备及耗材见表1。
瘦客户机HT1100 用户使用手册文档版本01发布日期2022-09-07目录1 概述 (3)1.1 产品简介 (3)1.2 产品特点 (4)2 产品配置 (5)2.1 硬件配置 (5)2.2 外观及接口 (6)3 其他规格 (9)3.1 其他规格 (9)4 基本使用 (10)4.1 开关机、重启 (10)4.2 主页面 (12)4.3 系统设置 (13)5 华为云客户端 (19)5.1 服务器配置 (19)5.2 连接云桌面 (20)5.3 管理账号 (21)6 结束语 (22)1 概述1.1 产品简介瘦客户机HT1100是华为云桌面服务配套的智能接入终端,集成了华为Workspace云客户端,满足您对多媒体娱乐、办公、学习、游戏等需求。
配套智能终端管理系统,可以有效地管理远程终端。
该产品主要应用于轻量OA办公、企业办公、电子教室等领域;采用四核ARM 架构A53处理器,4K高清显示输出,整机平均功耗小于5W,全面兼容适配华为云办公,OA 办公体验流畅,尽享云端多媒体更高、更快新体验。
主要应用于轻量OA办公、企业办公、电子教室等相关场景。
1.2 产品特点小巧机身,成熟稳重时尚设计,高品质材质,既玲珑精致又稳重大方,支持背挂、平放放置。
丰富好用,接口齐全最大USB3.0*1、USB2.0*4、RJ45*1、3.5mm耳机孔*1,HDMI*1,让外设接入,不再两难。
摆脱线束,随时连接双频WiFi,2.4G/5Gz双频WiFi,更快更稳定,解放办公空间环保静音,绿色节能超低功耗,无风扇设计,节能绿色又环保软硬一体,开箱即用软硬件一体化设计,预装华为Workspace云客户端,开箱即用2 产品配置2.1 硬件配置HT1100的主要硬件配置如下:项目描述CPU ARM Cortex-A53 四核1.8GHzGPU Mali G31 MP2内存2GB LPDDR4存储8GB eMMC视频输出接口1*HDMI,最大支持4096*2160@ 60hz音频接口1*Audio in & out 3.5mm 4段USB接口1*USB3.0,4*USB2.0有线网络1*10M/100M/1000M RJ45WIFI Wi-Fi 5蓝牙Bluetooth 5.0安全锁孔1*Kensington标准操作系统Android 9.0桌面云协议HDP协议管理系统创维智能终端管理系统散热方式无风扇功耗≤4.5W电源输入12V DC IN2.2 外观及接口1、背板接口功能背板接口图1 USB2.0 USB2.0接口,连接USB设备(最大电流0.5A)2 HDMI OUT 连接显示器3 LAN口RJ45 1000M网口,用于网络连接4 电源接口电源接口,用于连接电源5 Reset 复位按键2、面板接口面板接口图1 电源指示灯电源指示灯,开机蓝色,关机红色2 音频耳机孔 3.5mm 4段音频耳机孔3 USB3.0 USB3.0接口,连接USB设备4 USB2.0 USB2.0接口,连接USB设备3、侧面接口右侧面左侧面1 Kensington锁孔用于连接Kensington锁2 USB2.0 USB2.0接口,用于连接U盘等USB设备3 USB2.0 USB2.0接口,用于连接U盘等USB设备4、顶部接口1 电源开关电源开关按键,短按开关机3 其他规格3.1 其他规格项目描述外壳颜色深灰色材质塑料裸机尺寸110mm(W)*110mm(D)*26mm(H)安装方式VESA安装标准,桌面平放、悬挂、显示器背挂、壁挂配件电源、壁挂件;工作温度0℃~45℃存储温度-20℃~70℃工作湿度<90% 无凝结存储湿度<95% 无凝结执行标准GB4943.1-20114 基本使用4.1 开关机、重启4.1.1 开机连接电源适配器,按电源按键,HT1100 开机。
智能终端操作手册咨询热线:96599●欢迎您使用智能终端手册目录一、简介 (1)二、注意事项 (1)三、安装指南 (2)3.1 设备接口说明: (2)3.2 设备连接示意图 (3)3.3 智能卡使用说明 (3)3.4 遥控器使用说明 (4)3.4.1.按键说明 (4)3.4.2 学习型遥控器的学习方法: (6)四、产品功能介绍 (7)4.1电视直播 (8)4.2互动电视 (13)4.3 TV生活 (13)4.4 Net影院 (16)4.5 视频通讯 (19)4.6 应用天地 (21)4.7 我的电视 (22)五、故障现象及排除 (26)六、安广分公司的营业厅 (28)七、清单 (29)一、简介安广智能终端致力于打造智能数字生活。
提供丰富的内容,舒适的用户体验。
高清直播:提供高清直播服务,在客厅享受高清影院。
TV生活:在这里可以体验到把商店搬回家的感觉,足不出户的逛各大商店、4S店,以及提供便户的查询服务。
Net影院:海量的电影,电视剧、动漫,综艺;聚合互联网丰富的内容,为您提供高清家庭影院般的享受。
可视电话:与亲朋好友面对面的交流,及时分享家的感觉。
应用天地:各种应用与游戏应有尽有,打造数字娱乐的生活。
内置WIFI:为家庭提供无线网络服务。
互动电视:想看就看,想点就点,海量高清片库。
二、注意事项●插入或拔出电源线时,勿用湿手。
●勿将重物放于电源线上或放置于本机上。
智能卡保护为防止造成智能卡损坏以及可能出现解密不正常的情况,请注意下列事项。
●开启智能终端电源前,请先插好智能卡。
●智能终端在工作状态下,请勿插拔智能卡。
安全放置●勿将本机放置于有强烈机械振动、多尘和潮湿的地方●勿将本机靠近热源或者使用保温材料包裹;●机体四周应有足够的空隙,以便通风散热。
其它事项●若长时间不用或机体破裂时,请拔掉电源插座。
●清洁之前请从插座上拔掉电源插头,用干布清洁外表面,勿将液体、喷雾剂或其它物品流入机内,否则可能发生严重损害。
RFR900Smart Terminal Arrayusermanual BLUEBIRD version 1.0About this manualRFR900 provides high quality features for a smart terminal using Bl uebird’s creative ideas and technological expertise. This user manual is designed to help users use the device effectively.•Please read this manual carefully before using the device for safe and proper use.•This device may only be used in countries where it is sold.•The components and colors of this device in this manual may differ from the actual product.•Features and specifications are subject to change without prior notice.•Content may vary by device’s software version or by service provider or carrier.•Application and features may vary by country or region.•Certain features of this device may have performance issues due to user environment, programs in use, or peripheral device usage. Bluebird is not liable for any issue caused by applications or accessories from any provider other than Bluebird.•Modifying the device’s operating system or installing software from unknown sources may cause device malfunction or data loss. Improper or unauthorized use of the device is a violation of Bluebird license agreement and void your one-year limited warranty. CopyrightCopyright © 1995-2016 Bluebird Inc. All rights reserved.Bluebird Inc. is the designer and manufacturer of Pidion handheld mobiles.This manual and the programs in this device are protected under international copyright laws, and may not be copied, distributed, translated, or removed by any means.About this manual 12 About this manualTrademarksBLUEBIRD is an emerging global brand, striving to lead the market in performance and mobility. Their products represent reliability, innovation, and innovative technology.BLUEBIRD is a registered trademark from the global brand of Bluebird Inc. and is copyright protected.• Pidion and stylized Pidion Logo are registered trademarks and symbols of Bluebird Inc. • Qualcomm® IZat™ is a registered tr ademark of Qualcomm Atheros, Inc. • Adobe® is a registered trademark of Adobe Systems Inc. • Bluetooth® is a registered trademark of Bluetooth SIG, Inc. • Wi-Fi® is a registered trademark of the Wi-Fi Alliance.• All other trademarks and copyright are the property of their respective owners.User’s guidanceOverview 3OverviewPackage ComponentsThe package includes:RFR900 deviceBatteryMicro USB cableOptional accessories: Protection film, adapter plug (220 V), Power adapter for direct charging, 1-slot cradle, 1-slot cradle power adapter, 4-slot cradle, 4-slot cradle power adapter, vehicle charger, user manualTo purchase optional accessories, contact your sales representative.You can download your user manual from . However, the paper version may be available for some regions.4 OverviewYour DeviceFrontBackOverview 5BatteryRFR900 uses a 3,500 mAh Lithium-ion rechargeable battery. Install the provided battery before starting to charge the device.Installing the Battery1 Turn the battery lock counterclockwise to unlock the battery cover.2 Use the notch and lift the battery cover. Remove the cover completely.When removing the battery cover, be careful not to damage your fingernail. Do not try to pull the battery cover excessively. It may damage the cover.3 Insert the battery. Make sure the gold contacts are aligned.4 Replace the cover. Insert the bottom of the cover first and then press around theedge of the cover until it clicks into place.5 Turn the battery lock clockwise to lock the battery cover.Removing the Battery1 Remove the battery cover as described in Installing the Battery on page 11.2 Use the notches at the top of the battery to pull out.Before removing the battery, turn off the power. If not, it may damage the device.CAUTIONCAUTION6 OverviewCharging the BatteryCharge the device first when using the device for the first time or have not used it for a long time. The device can be charged with a charger or a cradle. You can also charge the battery by connecting it to your computer with the provided micro USB cable.When the battery is low, the device will emit a sound and display a low power message. When it is charging, the charging lamp will show red light. When the battery is fully charged, it will turn to green light.The charging status will also show on the lock screen.To charge with the chargerPlug the micro 5-pin end of the charger into the multipurpose jack of the device. Connect the USB cable of the charger with power adapter. Plug the charger into a power outlet.When the battery is extremely low on power, the device may not turn on. Charge the device enough and try to turn it on again. You can use the device while charging. But it may take longer time to charge the device fully.Connect the charger properly; it may damage the device.The device may heat up. If it gets hotter than usual, stop charging.Do not remove the battery before disconnecting the charger. It may damage the device.To charge with thecradlePlace the device on the cradle as illustrated below. Connect the power adapter with the cradle, and plug it into a power outlet.You can also take out the battery from the device and charge it separately on a cradle.CAUTIONDevice SpecificationsDevice Specifications 7TroubleshootingThe battery does not charge properly.•Ensure that your device and the charging cable is connected and the LED lamp isworking properly.•If the battery does not charge completely, it may be dead or defective. Replace a battery with new one. (The warranty period for battery replacement is six months.)The battery life got shorter.When you use network data or peripheral device such as wireless LAN or Bluetooth that require more power, your device may use more battery than usual. If it happens for an extended period of time, your battery may be dead. Then replace it with a new battery.I dropped the device in the water.Turn off the device and take out the battery. Place the device and battery in a dry place. Let them dry completely for a considerable period of time, and turn it back on. If it does not turn back on, contact our service center.My device gets too hot to touch.It is normal to get warm if receiving poor signal, performing intense workload, or battery is charging. It should not last if you stop using the device for a certain amount of time. If the problem continues, contact the manufacturer for persistent or extreme heat. It may result in a burst battery or fire.How do I get the repair service?You can contact your local sales representative or can send the device via a delivery service to the headquarter in Korea. When sending the package, make sure you pay for the shipping fee in advance. When the repair is finished, headquarter will cover the shipping cost.8TroubleshootingSafety and HandlingWARNINGPlease read this safety and handling information carefully. Failure to follow the information provided may result in fire, electric shock, or other property damage or bodily injuriesGeneral precautionsThese simple guidelines will help you for operating your device properly, maintaining it safe, and experience satisfactory services.Device•To not scratch the device’s touchscreen. Use you r finger or only compatible pen. Never use an actual pen, or any other sharp object on the touchscreen.•Do not press power button on the device if the device is wet or do not touch adapter or power cord with wet hands. There is risk of electric shock.•Do not use your device at an explosive danger zone.•Although this device is very sturdy, do not drop, hit, bend, or sit on it on purpose. It can be broken.•Do not remodel, take apart, or repair the device. Contact to your customer service center. If not the case, you will not be able to get your free repair service.•Do not attempt to modify your hardware or software. It may cause device malfunction and void your warranty.•You may not be able to use this wireless device in the basement or certain places in buildings where the signal is weak, or on open fields or in skyscraper or tall buildings where there is no signal.•Backup the data and information from your device. Your data such as ringtones, text or voice message, characters may be erased during the repair or upgrade.•Do not paint your device. It can damage your screen or your device’s exterior. Also, the paint can peel off and it triggers allergies. If there is allergic reaction, please seek medical attention.•In case your device is wet, do not put your device in heaters, microwaves, etc. to dry. There is a risk of explosion or it can be the cause of malfunction.•Keep the device away from children.•Avoid using or storing this device in too high or too low temperature. This device is designed to work in temperature between 0°C and 50°C (32°F and 122°F), and humidity between 5% and 95%.•Do not expose your device to direct sunlight such as on the dashboard of a car for extended periods of time.•Avoid wet, dusty, or damp place for storing your device.•Do not keep the device close to the vents of air conditioning. Corrosion within the device may occur due to dew condensation from dramatic changes in temperature.Safety and Handling 9Battery and charging•Improper battery use may cause fire, explosion, or other hazard.•If the battery is taken apart by impact, applied heat, submersion, or hole-drilling, there is a risk of a dangerous explosion. Keep away from children and animals.•Do not make any improper contact on battery contact pin with necklaces, coins or any electric conductors. Do not give any impact with sharp objects. There is a risk of explosion.•Use only the approved battery and charger. Using incompatible battery or charger may cause device malfunction, or other damages such as fire.•When you are not using the device for a long period, take out the battery and keep the device and the battery in a dry, cool place. Also, charge the battery once a year. If you keep it without charging for a long time, it may cause device malfunction.Distraction•Using your device may distract you and cause serious injuries and damages. For example, avoid talking on the phone or texting while driving or riding a bicycle. It is strictly prohibited by laws in some jurisdictions. If you are in an unavoidable situation, stop your vehicle or use hand-free kit.Frequency interference•This wireless device may cause radio frequency interference, so do not use the device or turn on Airplane mode when prohibited.•The device emits electromagnetic fields. It may interfere with your medical devices.•Do not place credit cards, phone cards, bankbook, and tickets next to the device. The magnetic forces of the device can damage the information of listed item.FCC compliance informationThis device complies with Part 15 of the FCC`s Rules. Operation is subject to the following two Conditions:1 This device may not cause harmful interference, and2 This device must accept ant interference received, including interference thatmay cause undesirable operation.This device complies with part 15 of the FCC Rules. Operation is subject to the condition that this device does not cause harmful interference.End users cannot modify this transmitter device. Any Unauthorized modification could void the user’s authority to operate this device.10Safety and HandlingThis device was tested for typical body-worn operations with the back of the handset kept 0.39 inches (1cm) between the user’s body and the back of the handset.To comply with FCC RF exposure requirements, the handset must be kept 0.39 inches (1cm) from the body without any reference to a particular side or edge.Any beltclips, holsters, and similar accessories containing metallic components may not be used.Body-worn accessories that cannot maintain 0.39 inches (1cm) separation distance between the user's body and the handset, and have not been tested for typical body-worn operations may not comply with FCC RF exposure limits and should be avoided. Part 15.105 (B)This equipment has been tested and found to comply with the limits for a Class B digital device, pursuant to part 15 of the FCC Rules. These limits are designed to provide reasonable protection against harmful interference in a residential installation. This equipment generates, uses and can radiate radio frequency energy and, if not installed and used in accordance with the instructions, may cause harmful interference to radio communications, However, there is no guarantee that interference will not occur in a particular installation. If this equipment does cause harmful interference to radio or television reception, which can be determined by turning the equipment off and on, the user is encouraged to try to correct the interference by one or more of the following measures:•Reorient or relocate the receiving antenna.•Increase the separation between the equipment and receiver.•Connect the equipment into an outlet on a circuit different from that to which the receiver is connected.•Consult the dealer or an experienced radio/TV technician for help.Modifications not expressly approved by the manufacturer could void the us er’s authority to operated the equipment under FCC rules.Safety and Handling 1112 Safety and HandlingIEC 60417-6044Do not listen to sound at high volume for long periods. It may cause hearingdamage. Also, only use compatible receiver, headphones, or earpieceswith your device.CEHereby, Bluebird Inc. declares that this RFR900 is in compliance with the essential requirements and other relevant provisions of directive 1999/5/EC.To comply with CE RF exposure requirements, the handset must be kept 0.59 inches (1.5cm) from the body without any reference to a particular side or edge.Any beltclips, holsters, and similar accessories containing metallic components may not be used.Body-worn accessories that cannot maintain 0.59 inches (1.5cm) separation distance between the user's body and the handset, and have not been tested for typical body-worn operations may not comply with CE RF exposure limits and should be avoided. European Union (EU) Waste of Electrical andElectronic Equipment (WEEE) d irectiveAccording to the European Union’s WEEE directive, this symbol meansthat products sold into EU countries must dispose electrical device and/or its battery separately from household waste. Disposing of the deviceseparately will help conserve resources and energy and contribute to humanhealth and environment protection.Customers or end-users in EU countries should contact their localequipment supplier representative or service centre for information aboutthe waste collection system in their country.Warranty and SupportWarranty certificateThank you for purchasing a product from Bluebird Inc.•If a circumstance arises where you lose a receipt or the certificate of guarantee, then the term of guarantee will be calculated 3 months (certified by the number of the manufacture, a certificate of inspection) after the date of manufacture.•In case of accessories such as batteries, only those that match the sales list managed by the service center will be eligible for customer service.•A repair or an exchange of batteries that does not match the sales list of the service center due to the carelessness of the customer will be fully charged.Warranty information•Bluebird Inc. (hereinafter referred to as Bluebird) provides the warranty service for its products in compliance with the regulations on compensation for damage of customer.•Upon receiving a notification on a defect of its product within the range of warranty during the warranty period, Bluebird will repair or replace the defective product according to its warranty policy.•If the defective product within the range of warranty is not repairable or replaceable, Bluebird shall refund the purchasing price within a designated period from the date of receiving a notice of defect.•Bluebird assumes no responsibility for repairing, replacement or refund until it receives the defective product from the customer. The replacement shall be equivalent to a new product in the aspect of performance.•Warranty of Bluebird is valid in the countries where the Bluebird products are distributed by Bluebird. (Contract for additional warranty service like field service)•Bluebird products may contain the recycled products, components or materials equivalent to new products in the aspect of performance.•This warranty is applied to software products only when the programming commands are not executed. Bluebird does not guarantee interruption- free or error-free performance.Warranty and Support 1314 Warranty and SupportCustomer supportBefore asking for after-sales service, please back up the data from the terminal. We do not back up data from the products received in the Customer Care Center. Therefore, we assume no responsibility for loss/deletion of data.Customers service centerSSang-young IT Twin tower, B703531, Dunchon-daero, Jungwon-guSeongnam-si, Gyeonggi-doSouth Korea 462-727• Fax: +82-2-548-0870• Email:*********************.kr• Hours: 9:30 a.m. - 6:30 p.m. (GMT Time: +9 Hours)The center is closed on Saturdays, Sundays, and Korean national holidaysRegistering for After-Sales Service• We receive the products for after-sales service through mail, delivery service and hand carry only in principle.• If you bought the product from any party other than the authorized dealer, you need to register the product before asking for after-sales service.• Please enclose an evidence of purchasing or the receipt to the product for after-sales service.• Please enclose the name, telephone number, address and symptom for prompt service. • You can ask for after-sales service through the dealer or the Customer Care Center in the head office.• Do not intentionally damage the label on the product.• Damaged label may result in a disadvantage to the customer.• When you return the product to Bluebird for service, please put the product in a protective box.• Warranty will not be provided for any damage occurring during delivery. We recommend you to use the box and protective cover supplied with the product.• Make sure to deliver the product in a safe way. Bluebird assumes no responsibility for loss of the product during delivery.Charged services• If it is not a default, it will be charged when requesting for after-sales service. - Service request due to inappropriate use of the customer- Loss of a PIN numberIMPORTANTWarranty and Support 15- Use of programs that might effect the program (over-clock, forceful changes in the input of the system, personal developments)• Default due to a mistake on the part of the customer- Default due to inappropriate or careless use of the product (dropping, submersion under water, shock, damage, unreasonable operations, etc)- Default due to a repair or unauthorized technician- Default caused intentionally or by carelessness of the customer- Default due to the use of fraudulent parts or components• Other cases- Default due to nature (fire, damage due to sea wind, flood damage, etc.)- Expendable parts have exhausted there life (batteries, antenna, or other component parts).• Regulations of treatment after charged serviceIf the same default occurs on the part that had been repaired within a 2 months( 60 days) period, it will be provided with free of charge repair service.There will be no returning of good repayment upon the following situation:• Removal of the sealing of the product if it had been sealed.• If the product has been damaged due to careless use by the customer or due to a natural disaster (floods, rain, fire, etc.).• Loss of product or other components (CD, diskette, manual, connecting cables, etc). • Damage to the product after 10 days of purchase, the product will either be exchanged or provided with after-sales service (note, returning of goods or repayment is not allowed).User ManualBLUEBIRD Copyright (C) 2016 Bluebird Inc. All rights reserved www.mypid i 。
中国电信天翼宽带WiFi客户端用户使用手册(Windows Phone7版)V1.4中国电信集团公司2012.3目录1.文档说明 (1)2.概述 (1)3.下载和安装客户端 (1)4.客户端连接功能 (1)4.1.宽带帐号登录 (3)4.2.时长卡帐号登录 (3)4.3.手机帐号登录 (4)5.客户端退出 (5)6.免费体验 (6)7.帐号设置 (7)8.购买 (7)9.地图 (8)9.1.用户定位 (8)9.2.热点详情 (8)10.推荐 (9)11.帮助 (10)12.版本升级 (11)13.关于... (12)14.建议反馈 (13)15.快捷键功能 (13)1. 文档说明文档适用范围:基于Windows Phone7.0及以上操作系统的智能终端(phone)。
2. 概述中国电信天翼宽带WiFi客户端是针对中国电信天翼宽带WiFi(指SSID为ChinaNet的中国电信无线信号)业务定制开发的拨号客户端软件。
该软件直接安装在以WindowsPhone7.0及以上操作系统的智能终端上,在拥有天翼宽带WiFi的网络环境下,输入帐号和密码即可连接网络。
您可以在咖啡厅、酒店、机场、学校等部署中国电信天翼宽带WiFi的网络环境下方便快捷的连接并使用网络。
3. 下载和安装客户端通过Windows Phone7操作系统的手机终端登录到Marketplace中,输入查询条件“天翼宽带WiFi客户端”即可搜索到对应用客户端,下载后根据提示安装即可。
还可通过个人PC登录互联网,搜索天翼宽带WiFi客户端下载站点(请选择正规站点下载),选择Windows Phone7客户端V1.4版本后下载,再通过安装软件进行客户端的安装。
4. 客户端连接功能客户端连接成功有几个必要的条件:1、智能终端有WiFi接入模块;2、周围有ChinaNet信号,信号质量良好,智能终端能够搜索到并能获取正确的IP地址和DNS;3、上网帐号有效;4、使用的终端型号包含在目前适配的终端型号中如何使用客户端连接到网络,操作提示如下:●在手机功能界面中,选择设置并进入●选择设置中的WLAN选项并打开●在中国电信WiFi热点区域,选择ChinaNet信号,并进行连接●连接上天翼宽带WiFi网络信号后,退出设置●选择天翼宽带WiFi客户端并打开4.1. 宽带帐号登录宽带帐号是指中国电信普通WLAN用户、无线宽带套餐用户、e8、e9尊享用户。
移动终端管理系统(管理平台)使用说明书国家统计局2014年9月目录1 登录 (4)2 区划管理(本调查不需要此操作) (5)2.1区划 (5)2.2普查小区下载(略) (5)3 上传管理(本调查不需要此操作) (6)3.1上传应用 (6)3.2 文件、地图、底册与制度包上传管理 (9)4 推送管理(如上级无通知要求,则本调查不需要此操作) (11)4.1应用分发 (11)4.2 文件、地图、底册、制度包推送管理 (14)5 消息管理 (16)6 推送统计(本调查不需要此操作) (17)7 终端管理 (18)8 用户管理 (19)概述为了配合以移动终端设备为终端和载体的数据采集任务,提高数据采集的整体质量,开发了移动终端管理系统。
本系统将对国家统计局移动终端数据采集设备从运行状态、数据推送和软件安装(卸载)等情况进行统一管理;以支撑第三次全国经济普查和国家统计局利用移动终端的数据统计工作。
移动终端管理系统简称MDM系统,主要实现由管理员对移动设备(手机,PDA)等的远程管理。
本系统与数据采集程序紧密结合,对操作系统为安卓的智能终端进行管理。
管理内容主要包括对设备的注册、注销管理、PDA的安全管理、推送管理等。
本系统有两个部分组成,一是安装在PDA上的移动终端管理客户端程序(简称MDM 客户端程序),另外一个是部署在服务器上,各级管理员根据权限进行管理和使用的移动终端管理平台(简称MDM平台)。
本手册主要介绍移动终端管理系统管理平台端的各项功能。
移动终端管理客户端程序各项功能见《移动终端管理系统(客户端程序)使用说明书》。
1 登录管理员使用移动终端管理系统时,需要通过登录验证用户身份。
目前系统中已生成到区县级的各级管理员用户,用户名规则为本地地址码(省级两位地址码,地市级4位地址码,区县级6位地址码),初始密码请向各级管理员获取,第一次登录后请及时修改密码。
1、在IE浏览器里输入域名https://219.235.129.237 登录MDM管理平台,由于采用https方式访问,如果浏览器弹出如下提示时,点击“继续浏览此网站”即可。
MDM移动智能终端系统管理员操作手册登录篇:1.首先登录,选择远程桌面APP2.在地址栏中输入“10.1.7.1”,点击连接3.输入用户名:Administrator,密码:1qaz@WSX(密码区分大小写)后进入远程桌面系统4.在桌面系统上找到“趋势科技移动安全”程序,双击进入该程序5.进入程序后输入用户名:root,密码:mobilesecurity,点击登录,即可登录进入操作页面6.成功登陆后显示的界面操作篇查看越狱、root违规设备和处理操作1.点击控制台,选择合规,界面会显示当前注册设备状态信息2.在“移动设备越狱版状态摘要”中可以选择非越狱版和越狱版设备,点击即可查看当前设备的完整信息,3.显示的图表可以查找分行相应的越狱用户4.如需对相应违规设备进行处理,首先找到相应违规越狱、root的用户设备,勾选删除5.将已越狱、root设备上的MDM程序进行卸载,IOS用户需要在设备中选择设置—通用—描述文件,将有关移动智能终端管理的描述文件同时删除6.将设备进行刷机恢复7.重新注册安装MDM程序即可对添加分组、添加用户的操作1.选择设备,点击添加组2.输入需要添加组的名称,选择组策略,点击确定科技完成添加组3.选择设备,点击邀请用户,可选“邀请单个用户”和“批量邀请”4.选择“邀请单个用户”,可邀请少量用户,输入相应需注册人电话号码、电子邮件、用户名后选择行组,点击保存即可完成单次邀请,如需添加少量邀请,点击“操作+”,输入其他需邀请用户后,点击保存即可完成少量邀请5.选择“批量邀请”,可一次性邀请大量用户,输入需注册人电话号码、电子邮件、用户名、组名,每段间隔用英文的逗号“,”分开,末尾用英文的分号“;”分开,点击验证,在无报错的情况下点击保存即可完成批量邀请对设备信息进行检索的操作1.选择设备,点击程序右侧的“高级搜索”2.可以在搜索界面中输入相应检索信息进行检索在应用商店添加应用程序操作1.选择应用程序商店2.可在IOS系统或Android系统选择添加添加应用3.在界面中选择浏览,添加需导入添加或更新的程序,点击继续即可4.选择管理类别,可以添加应用程序类组5.双击应用程序,即可编辑应用程序名称,可以进行更改图标,程序分类至类组,描述和选择屏幕截图等操作对已注册设备的查看、管理、编辑重命名操作1.点击设备,选择需查看设备分组,找到相应设备2.找到设备所属分行,看分级目录下找到相应设备,不仅可以看到设备状态信息,也可对该设备进行“编辑”,“删除”,“密码重置”,“远程锁定”、“远程删除”等操作3.点击编辑,可以修改电话号码,电子邮件,设备名称和选择分组,编辑后选择保存即可4.编辑电话号码时不能重复,如有重复,会出现报警错误提示,提示后只能再次编辑该用户信息(解决方法:电话重复时可选择不进行修改,只修改其他设备信息即可)功能介绍篇查询维护1.点击控制台,选择健康,可查看设备健康状态信息2.向下拉可查看策略更新状态和病毒库更新状态3.点击清单可查看操作系统版本汇总4.点击防护可查看恶意信息排行策略介绍1.点击策略,选择需查看的策略组,可以查看完整的策略信息2.Wi-fi策略3.Exchange ActiveSync策略4.VPN策略5.全局HTTP代理策略6.证书策略7.恶意软件防护策略8.垃圾信息阻止策略9.电话过滤策略10.防火墙策略11.Web威胁防护策略12.加密和密码策略13.功能锁定策略14.合规策略15.应用程序管理16.应用程序监控策略17.批量购买计划策略管理功能1.点击管理,可以查看管理功能2.选择“更新”,可以查看系统更新明细信息3.选择“管理员账户管理”,可以创建超级管理员,调整管理员角色4.选择“设备注册设置”,可以调整身份验证和设备验证信息,也可以自定义使用条款和设置代理安装5.选择“证书管理”,可以添加或删除系统信任证书6.选择“命令队列管理”,可以查看设备7.选择“数据库设置”,可管理服务器地址、用户名、密码和数据库名称信息8.选择“通信服务器设置”,可对通信服务器和IOS、Android设置进行相关调置9.选择“Active Directory设置”,可以配置系统活动目录10.选择“管理服务器设置”,可设置管理服务器IP和端口号11.选择“Exchange服务器集成”,可监控Microsoft Exchange服务器设备,实现控制访问12.选择“移动安全配置和验证”,双击可以快速进入相应配置页面,目前可选择进行配置数据库设置、下载和配置通信服务器设置、配置身份验证设置、配置IOS设备、配置通知和报告设置,从而实现快速调配的目的13.选择“产品使用授权”,可以查看使用授权时间信息.。
“小神探”点检信息处理终端系统用户手册目录1概述 (2)2系统总体描述 (2)2.1产品系统描述 (2)2.2系统功能一览 (2)3功能详细描述 (3)3.1开机后主界面 (3)3.2点检实施 (3)3.2.1 路线选择 (4)3.2.2 员工选择 (4)3.2.3 触碰ID (5)3.2.4 启停设置 (6)3.2.5 结果输入 (7)3.3数据通信 (11)3.3.1 通信设置 (12)3.3.2 通信 (12)3.4数据查询 (15)3.4.1 点检结果 (16)3.4.2 异常查询 (19)3.4.3 漏检统计 (20)3.4.4 到位统计 (21)3.4.5 其它 (21)3.4.6 ID位置选择 (24)3.5临时测量 (24)3.5.1 温度测量 (25)3.5.2 振动测量 (25)3.5.3 测量结果 (30)3.6高级功能 (34)3.6.1 工具 (34)3.6.2 系统 (38)1 概述“小神探”点检信息处理终端是上海鸣志自主研发的新一代点检仪(以下简称点检终端),成功的结合了普通点检仪的数据采集、数据测量以及上位机软件的数据分析功能,使得点检员在现场也能够查询历史记录并根据当前数据进行分析,及时维护好设备。
2 系统总体描述2.1 产品系统描述2.2 系统功能一览3 功能详细描述3.1 开机后主界面主界面由三部分组成:标题栏、主菜单以及信息栏。
上方的标题栏:显示时间、日期、电池电量等信息;正中的主菜单:包括“点检实施”、“数据通信”、“数据查询”、“临时测量”、“高级功能”五个子菜单;下方的信息栏:显示快捷键信息和输入法面板;快捷键:1—点检实施、2—数据通信、3—数据查询、4—临时测量、5—高级功能。
界面键盘操作:系统中所有界面除通过点笔操作外均支持键盘操作。
通过“R”键可以返回上一个操作界面;通过“F1”键可以在各“信息框”和“按钮”间进行焦点切换。
当按钮获得焦点时,会显示被“按下”的样子,这个时候按“OK”键即可完成相应的操作,如图:(“下一步”按钮获得焦点)列表键盘操作:列表中数据行的选中可通过方向键(向上和向下)进行,同时也可通过“OK”键对当前活动行进行选中或取消选中,如图:3.2 点检实施此模块主要是执行常规点检和其他任务:常规点检根据制订的常规点检计划进行数据结果采集,并将结果保存到点检终端的数据库中,支持启停点、主控点的设置。
智能家居系统使用手册第一章:概述 (3)1.1 产品简介 (3)1.2 功能特点 (4)1.2.1 系统集成度高 (4)1.2.2 远程控制 (4)1.2.3 智能联动 (4)1.2.4 安全保障 (4)1.2.5 节能环保 (4)1.2.6 个性化定制 (4)1.2.7 系统兼容性强 (4)1.2.8 易于安装与维护 (4)第二章:系统安装与配置 (4)2.1 硬件安装 (4)2.1.1 准备工作 (4)2.1.2 安装流程 (5)2.2 软件配置 (5)2.2.1 准备工作 (5)2.2.2 配置流程 (5)2.3 网络连接 (6)2.3.1 硬件连接 (6)2.3.2 软件连接 (6)第三章:用户注册与登录 (6)3.1 用户注册 (6)3.1.1 注册流程 (6)3.1.2 注意事项 (6)3.2 用户登录 (6)3.2.1 登录流程 (6)3.2.2 注意事项 (7)3.3 密码找回 (7)3.3.1 找回流程 (7)3.3.2 注意事项 (7)第四章:设备管理 (7)4.1 设备添加 (7)4.1.1 添加设备前准备 (7)4.1.2 添加设备步骤 (7)4.1.3 注意事项 (7)4.2 设备编辑 (8)4.2.1 设备名称修改 (8)4.2.2 设备位置修改 (8)4.2.3 注意事项 (8)4.3 设备删除 (8)4.3.1 删除设备步骤 (8)4.3.2 注意事项 (8)第五章:场景设置 (8)5.1 场景创建 (8)5.1.1 进入场景设置界面 (8)5.1.2 创建新场景 (9)5.1.3 设置场景名称 (9)5.1.4 选择触发条件 (9)5.1.5 设置执行任务 (9)5.1.6 保存场景 (9)5.2 场景编辑 (9)5.2.1 选择场景 (9)5.2.2 修改场景名称 (9)5.2.3 修改触发条件 (9)5.2.4 修改执行任务 (9)5.2.5 保存修改 (9)5.3 场景删除 (9)5.3.1 选择场景 (9)5.3.2 删除场景 (9)5.3.3 确认删除 (10)第六章:智能联动 (10)6.1 联动规则设置 (10)6.1.1 概述 (10)6.1.2 设置步骤 (10)6.1.3 注意事项 (10)6.2 联动任务管理 (10)6.2.1 概述 (10)6.2.2 管理步骤 (10)6.2.3 注意事项 (11)6.3 联动任务执行 (11)6.3.1 概述 (11)6.3.2 执行过程 (11)6.3.3 注意事项 (11)第七章:远程控制 (11)7.1 手机端控制 (11)7.1.1 控制界面 (11)7.1.2 控制操作 (11)7.1.3 注意事项 (12)7.2 语音控制 (12)7.2.1 语音功能 (12)7.2.2 使用方法 (12)7.2.3 注意事项 (12)7.3 其他远程控制方式 (12)7.3.1 通过网页控制 (12)7.3.2 通过智能家居平台控制 (12)7.3.3 通过智能家居控制器控制 (12)第八章:安全与隐私 (13)8.1 数据加密 (13)8.1.1 加密算法 (13)8.1.2 加密流程 (13)8.2 用户权限设置 (13)8.2.1 用户权限分级 (13)8.2.2 权限设置与修改 (13)8.2.3 权限验证与审核 (14)8.3 防护措施 (14)8.3.1 网络防护 (14)8.3.2 设备防护 (14)8.3.3 数据防护 (14)第九章:故障排查与维护 (14)9.1 常见问题排查 (14)9.1.1 系统无法连接 (14)9.1.2 设备无法控制 (14)9.1.3 系统响应速度慢 (15)9.1.4 系统提示错误信息 (15)9.2 硬件维护 (15)9.2.1 定期检查设备连接 (15)9.2.2 设备清洁 (15)9.2.3 设备更换 (15)9.3 软件升级 (15)9.3.1 检查软件版本 (15)9.3.2 软件升级操作 (15)9.3.3 升级后的检查 (15)第十章:售后服务与支持 (16)10.1 售后服务政策 (16)10.2 客户服务联系方式 (16)10.3 技术支持与更新 (16)第一章:概述1.1 产品简介本智能家居系统是一款集成度高、操作简便、功能全面的家居自动化解决方案。
家庭物联智能终端系统软件
用户手册
一、系统简介
家庭物联智能终端系统软件基于虚拟化技术的云服务基础设施,以多样化的家庭终端为载体,通过整合与智能终端的信息交互,实现用户对家居设备的远程管理,同时生活信息服务功能可以第一时间收到有利于生活的消息,提高用户的生活质量。
二、系统功能
1.登录界面
『账号』通过网关设备的标签信息获得;
『密码』初始值为账号的后六位字符;
『登陆』验证账号和密码,进入主界面;
『演示』创建虚拟数据,进入主界面;
2.1灯光控制
进入主界面,点击图标,进入智能主家居界面。
点击灯光可以对灯光进行控制。
是对所有灯的开关进行控制。
点击图标可以选择对房间
里灯光进行控制。
键可以选择要控制灯光的地点。
点击图标可以窗帘的开、关、暂停进行控制。
2.2电器插座
点击进入电器插座控制界面。
此界面中可以选择对电视、电暖、电器的控制和各个房间的插座进行控制。
2.3空调控制
点击图标,进行对各个房间空调的开、关、模式、风量、温度进行控制。
2.4新风系统
新风系统是对风速的控制。
3.视频监视功能
点击安防,进行视频监视。
点击图标可以进行摄像头的设置。
4.停车库安防功能
点击,进入安防界面。
点击添加停车库防区。
默认四个防区,分别为:紧急防区、防区2、防区3、防区4,可更名,可添加。
其中“紧急防区”不可更名,且默认的4个防区不可删除。
5.安防功能
点击,可以对防区的配置进行修改。
点击下方的““按钮,在弹出报警电话配置界面中,点击“添加”,输入手机号码,保存即可。
点击设置为总撤防,所有防区的图标显示为。
6.娱乐功能
具有电子相册、mp3、mp4、影像留言、计算器、时钟、闹铃、影视娱乐、拍照等人性功能。
7.电梯功能
进入主界面。
点击进入电梯呼叫模式。
上楼点图标,下楼点图标。
如果是有客人来访可以点击图标。
8.其它功能
进行系统设置,系统会自动报故障。
9社会服务功能
进入主页,会出现社会服务功能。
可以进行购物、交费、天气设置。