Installshield12应用教程
- 格式:doc
- 大小:515.50 KB
- 文档页数:15
InstallShield 12 制作安装包全过程演示前言 (1)一、InstallShield 12 的下载、安装以及注册 (1)二、利用IS提供的向导完成一些安装包制作的基本工作 (4)三、进入Installation Designer对安装包进行详细设置 (6)四、修改IS脚本实现初始化MySQL以及安装包逻辑控制 (13)结束语 (14)附件1 (15)附件2 (23)前言近期一个项目对打包有如下需求,鉴于VS2005打包工具实现有些困难,于是在波澜壮阔的网络海洋里找到了InstallShield 12(后面用IS代替) 制作安装包,基本可以满足所有需求,于是广泛找资料,广泛help文档,最后终于将其搞定,又鉴于网上关于IS 的中英文资料都少之又少,哈哈,其实前面在做J2EE 相关方面的东东,所以感觉C#啊,IS啊什么的都资料太少,所以现在想把自己的制作过程写下来,希望可以给以后能用到此工具的同事提供个参考。
XXXX打包需求:1.将ActiveX插件安装到客户机器,并注册,卸载时反注册。
2.将客户端、应用服务器、数据库服务器制作成可选的安装方式。
3.初始化MySQL数据库。
4.安装程序所需的运行环境.net framework 2.0。
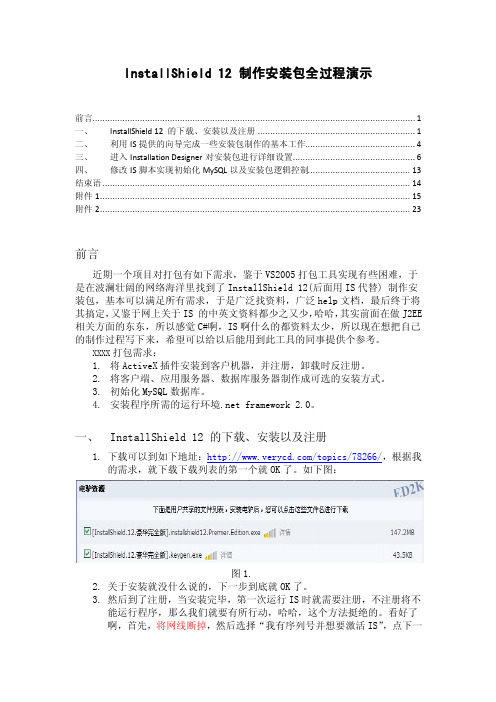
一、InstallShield 12 的下载、安装以及注册1.下载可以到如下地址:/topics/78266/,根据我的需求,就下载下载列表的第一个就OK了。
如下图:图1.2.关于安装就没什么说的,下一步到底就OK了。
3.然后到了注册,当安装完毕,第一次运行IS时就需要注册,不注册将不能运行程序,那么我们就要有所行动,哈哈,这个方法挺绝的。
看好了啊,首先,将网线断掉,然后选择“我有序列号并想要激活IS”,点下一步,如下图:图2.然后在输入序列号框内全部输入“1”,点击下一步,如下图:图3.然后IS会试图连接服务器以获取回应,但是由于网络断了,所以将连接失败,并且跳转回刚才输入序列号的那个页面,然后我们选择通过电子邮件激活,点击下一步,如下图:图4.之后在弹出的页面中复制对话框中的激活请求的所有号码,如图所示:图5.接着运行KeyGen.exe。

InstallShield 为软件发行方提供领先的安装程序解决方案,能够制作强大可靠的Windows Installer(MSI)、InstallScript 的安装程序。
软件发行方在应用程序开发上投入了大量的时间和精力,他们同时也需要最新的安装程序,使用InstallShield ,能够支持当今的最新技术。
在软件失败问题中,有28%是同安装和配置错误相关的。
然而,许多软件发行方依然在使用着已经过时的安装程序制作工具。
InstallShield一贯支持当今的最新技术和工业标准,支持MSI 3.1, IIS 6.0, Oracle, RPM以及试用和购买功能等,为您制作可靠的安装程序.安装说明:安装完成后,断开网线(或用防火墙软件)运行InstallShield,弹出激活窗口,选择“我有序列号并想要激活InstallShield12”点击“下一步”,在序号处输入任何数字,点击“下一步”,然后选择“通过电子邮件激活”,运行Keygen,将激活请求码拷贝到Keygen,点击“Generate”按钮,然后将生成的激活响应码拷贝到安装程序中,点击下一步即可激活成功。
(一定确保运行Keygen时InstallShield在运行状态)产品特性根据IBM的自主计算(Autonomic Computing)调查,程序失败中有28%同安装和配置错误相关。
然而,许多软件发行方依然在使用着已经过时的安装程序制作工具,这增加了软件的安装错误,从而使帮助呼叫更加频繁,降低了生产力。
InstallShield一贯支持最新的技术和工业标准,使您可以制作更加可靠的安装程序,有效提高了软件的安装成功率。
支持最新技术支持以下最新技术——新发布的Microsoft Visual Studio 2005, .NET 2.0 ,SQL Server 2005,Microsoft’s recent MSI 3.1、IIS 6.0、DIFx 2.0和第三方对象(如DirectX, Crystal Reports, WMI),令软件发行者始终同最新技术相同步,可以非常方便的向其程序中添加对最新技术的支持。

InstallShield安装包制作指南Install Shield 安装包制作指南⽬录1 Install Shield简介 (4)2 Install Shield 安装 (4)2.1 下载安装 (4)2.2 安装步骤 (5)3 Install Shield界⾯说明 (11)3.1 Install Shield IDE界⾯ (11)3.2 Visual Studio 2010集成界⾯ (13)4 InstallShield安装包制作 (15)4.1 选择安装包类型 (15)4.2 创建MIS安装程序 (15)4.2.1 新建MIS安装项⽬ (15)4.2.2 Project Assistance (16)4.2.3 配置应⽤程序信息(Application Information) (18)4.2.4 配置安装环境需求(Installation Requirement) (19)4.2.5 指定安装包结构(Installation Architecture) (20)4.2.6 添加安装⽬标⽂件(Application Files) (20)4.2.7 创建应⽤程序快捷⽅式(Application Shortcuts) (21)4.2.8 编辑注册表项(Application Register) (22)4.2.9 选择安装向导界⾯(Installation Interview) (23)4.2.10 选择安装程序语⾔⽀持(Installation Localization) (23)5 编译⽣成安装包 (24)6 安装制作⾼级篇 (25)6.1 软件组件集成打包 (25)6.2 集成数据库安装 (26)6.2.1 SQL脚本⽅式 (26)6.2.2 数据库⽂件⽅式 (30)6.3 修改程序配置⽂件 (31)6.4 Installation Designer⾼级应⽤ (32)6.4.1 配置安装包媒体格式 (32)1 Install Shield简介由FLEXEAR SOFTWARE公司出品的专业安装程序制作软件,为软件发⾏商提供了⼀个强⼤且灵活的解决⽅案,通过它,可以制作Windows平台和跨平台的安装程序封装软件,让软件可以在不同操作系统平台下正常安装使⽤。

目录前言 (2)第一章集成开发环境 (3)第二章 INSTALLSHIELD基本操作 (4)2.1.创建工程 (4)2.2.通过 PROJECT ASSISTANT(工程助手)来设计工程。
(8)2.3.安装包发布 (19)第三章 INTALLSHIELD脚本语言 (23)3.1脚本语言介绍 (23)3.2实例一:注册表的处理 (25)3.3实例二:安装前执行,运行其他的软件安装。
(28)第四章其他的安装包制作工具 (30)4.1 INSTALLAWARE (30)4.2 WISE (31)4.3 ADVANCED INSTALLER (33)4.4工具比较 (33)前言InstallShield是基于Windows平台的为软件发行方提供领先的基于windows的安装程序解决方案,能够制作强大可靠的Windows Installer(MSI)、InstallScript以及跨平台的安装程序,是安装工具领域事实上的标准,已经成为安全安装软件的标准解决方案,。
在下面的内容当中,将以10HMITOOL项目实例讲解InstallShield的使用方法,使用的版本为InstallShield2008。
第一章集成开发环境InstallShield除了本身的开发环境外,还为vs2005提供了辅助功能,开发人员可以直接在vs2005环境中创建InstallShield工程,具体操作如下:1.选择开始菜单->所有程序->Macrovision->InstallShield 2008 for Visual Studio 2005图1-1 运行InstallShield 2008 for Visual Studio 2005首次运行会出现如下的向导界面:在这里介绍了所有工程类型,用户可以根据自己的需要选择工程类型。
图1-2 首次进入第二章 InstallShield基本操作2.1.创建工程开始创建工程,打开[File]->New->Project,或Ctrl+Shift+Na. Project type 选择InstallShield 2008 Projectsb. 根据我们项目的需要,Templates 选择InstallScript MSI Projectc. 输入工程名称和本地路径abc图2-1创建工程点击“OK”后,10HMITOOL安装包工程就建立了。


1.安装和部署2.下载InstallShield3.注册后方可进行下载(邮箱一定要填写正确的,以便可以正常接收到激活码)4.登录注册时写的邮箱,找到激活码5.安装,选择第一个并输入邮箱中的注册码即可6.安装成功后即可创建打包程序7.创建成功的项目展示8.默认展示欢迎界面,也可以双击“Project Assistant”进入到欢迎界面9.单击第一个选项卡“Application Information”,按照上面的填写。
10.单击“General Information”进入进行更改语言为中文简体常见问题:问:生成出错,提示"The English (United States) translation for string identifier IDS_SHORTCUT_DISPLAY_NAME1 includes characters that are not available on code page 1252."答:InstallShield安装语言默认为English (United States),当安装路径或文件名包含中文时生成项目会出错并显示上述错误信息,将安装语言设置为简体中文即可解决。
在"Application Information"步骤界面左侧找到"GeneralInformation"并打开,将"Setup Language"设置为"Chinese (Simplified):中文(简体)"即可。
11. 第二选项卡“Installation Requirements”,选择部署的目标环境和必须组件。
12. 第三选项卡“Installation Architecture”,这里不用设置。
13. 第四选项卡“Application Files”,添加生成的类库和exe可执行程序。
【教程】InstallShield使⽤完全教程InstallShieldInstallshield是⼀个强⼤和易于使⽤,⽤于解决Windows软件安装包开发的制作⼯具。
⽤它可以以传统MSI⽅式和虚拟格式,⾃动化地封装、捆绑和包装你的产品。
IntallShield能使你的⽤户在决定何时何地何⽅式管理和部署你的应⽤程序时,得到⼀个最时尚舒畅的安装体验。
是Microsoft Windows平台上应⽤程序安装打包领域,使⽤最⼴泛和市场认可度最⾼的⼀款安装打包⼯具软件,⽀持Windows(客户版本及服务器版本),Web服务和移动设备。
对于软件开发⼈员来说,Installshield是⼀个⾮常优秀的⼯具,⽤来打包⾃⼰的应该程序,刚好今天想打包⾃⼰的⽹络电视,所以写个使⽤教程。
①下载Installshield⽹上下载的也⽐较多,破解版的也多,如果有需要的,可以留下邮箱②新建⼯程打开Installshield 2010 Premier Edition,新建⼀个Installscript MSI Project,这种被称之为半脚本程序,因为兼具Basic Project基本类型和Installscript Project全脚本类型两者的优点,我⽐较喜欢⽤。
像我这样需求的,既要⽤到Wizard的便利,⼜想写⼀点脚本来实现⼀点⾃定义操作的,就⽐较适合⽤这种类型啦。
选择类型为Windows Installer | InstallScript MSI Projcet,输⼊⼯程名,指定⼯程所在的⽂件夹。
③配置⼯程界⾯会切换到Project Assistant,我们先从这⾥开始把⼯程的基本组件和基本⽂件建⽴好。
在Project Assistant界⾯的底部,会有⼀个引导动作条,在建⽴该⼯程的基本结构和⽂件时,我们都将在此界⾯进⾏操作,下⽂都将以“引导条”来指代这个引导动作条。
❶点击引导条上的Application Information这⾥输⼊:公司名,公司名将会出现在Setup.exe的注解中软件名,将会出现在安装过程的左上⾓标题栏上版本号,⾃⼰⽐较⽅便地知道⾃⼰在编译哪个版本的软件公司⽹址,如果该公司没有⽹址呢?⽽且这⾥有点bug,好像默认的值总是会报⼀个String_ID1为空的错误,⾃⼰输⼊⼀个⽹址就不会报错。
Installshield使用1 说明(适用范围)1.1IS各工程介绍IS将安装工程根据工程的特点分了几大类:InstallScript ;Windows Installer;Universal installer。
其中,Universal这个比较好理解,大概就是用来做跨平台的安装程序。
InstallScript 和Windows Installer的区别,我到是一直不是很清楚,大概意思就是如果你使用InstallScript模式是使用脚本来驱动安装界面,使用Windows Installer则主要是使用操作系统自带的安装服务来驱动安装。
在每个大类里面有划分了不同的小类。
这里请参考IS帮助中的说明。
2 COMMON篇之InstallScript Porject2.1使用向导做一个简单的安装包2.1.1了解你要安装的程序首先你要清楚,你的程序所需要的运行环境要求。
这个安装包例子中,我们要打包这样一个系统:主程序是LearnQClient.exe,rtcdll.dll,ImageOle.dll,dxmrtp.dll,dsoframer.ocx,config.ini,许可协议.txt;它运行时需要读取当前目录下的config.ini,由于这个程序是用VC开发的,所以还需要运行的机器上有vc的运行库。
具备了这个环境,LearnQClient.exe程序才能正常运行起来。
这就要求我们做好的安装程序安装时要将LearnQClient.exe,rtcdll.dll,ImageOle.dll, dxmrtp.dll,dsoframer.ocx,config.ini拷贝到指定的安装目录,也可将ImageOle.dll,dsoframer.ocx拷贝到当前系统的系统目录(windows9x中系统目录是windows/system;windows 2000/xp的系统目录是system32)。
同时要实现安装的时候将VC6的运行库安装到目标机器上;其中帮助文件是可选择安装的。
Installshield 12 中文系列教程之 Installscript 项目(一)×××××××××××××××××××××××××××××××××××××××××××××××声明:本文为《打包技术网》原创,请保留此声明并注明出处,仅供网友学习使用,勿用于商业用途。
作者:棒槌_007联系方式:QQ 113984419 MAIL:bangchui_007.说明:本人E文实在一般,文中有翻译不准确的地方,请各位见谅。
×××××××××××××××××××××××××××××××××××××××××××××××这个部分通过带领你使用InstallShield新建,编译,运行来增强一个使用安装脚本的安装程序。
这个教程划分了一些列的步骤。
在第一步后“第一步:建立,编译,测试项目”其他的步骤能够按照任意的顺序单独的运行,所以你可以集中注意力在这个部分的相关的容上。
installshield12InstallShield 12: A Comprehensive GuideIntroductionInstallShield 12 is a powerful software installation tool used by developers to package and distribute their applications. It provides a user-friendly interface and a wide range of features that make the installation process efficient and effective. In this document, we will explore the various aspects of InstallShield 12, including its installation, features, and best practices.1. Installation of InstallShield 121.1 System RequirementsBefore installing InstallShield 12, it is important to ensure that your system meets the minimum requirements. These requirements typically include the operating system, CPU, memory, and disk space. Carefully review the documentation provided by Flexera, the developer of InstallShield 12, to ensure compatibility.1.2 Installation ProcessTo install InstallShield 12, follow these steps:Step 1: Download the installation package from the official Flexera website.Step 2: Double-click on the downloaded file to start the installation wizard.Step 3: Follow the on-screen instructions to complete the installation process.Step 4: Once the installation is complete, launch InstallShield 12 and proceed to explore its features.2. Overview of InstallShield 122.1 User InterfaceInstallShield 12 offers a user-friendly interface that allows developers to easily navigate through its various features and functionalities. The interface is designed to provide a seamless experience, with intuitive menus and toolbars to streamline the packaging process.2.2 FeaturesInstallShield 12 offers a wide range of features that enhance the software packaging and distribution process. Some of the key features include:2.2.1 Project AssistantThe Project Assistant feature provides a step-by-step wizard that guides developers through the creation of a new InstallShield project. It helps define the project settings, select installation requirements, and configure various options before proceeding to the actual packaging process.2.2.2 Packaging OptionsInstallShield 12 supports various packaging options to suit different deployment scenarios. It allows developers to create traditional installations, web-based installations, or installations for specific platforms, such as Windows or macOS. Developers can also create silent installations or installations with user interaction based on their specific needs.2.2.3 Customization and LocalizationInstallShield 12 provides extensive customization options, allowing developers to tailor the installation experience to meet specific requirements. This includes options tocustomize the installation screens, dialogs, and messages to match the branding and user experience of the company or application. It also supports localization, allowing developers to create multilingual installations for global distribution.2.2.4 Scripting and AutomationInstallShield 12 supports scripting languages such as InstallScript and PowerShell, allowing developers to automate the installation process and perform custom actions during installation. This feature provides flexibility and enables integration with other tools and systems.2.2.5 Validation and Error HandlingInstallShield 12 offers comprehensive validation and error handling capabilities. It ensures that all necessary prerequisites are met before proceeding with the installation and provides error messages and log files for troubleshooting purposes.3. Best Practices for Using InstallShield 123.1 Planning and OrganizationBefore starting the packaging process, it is essential to plan and organize the installation requirements, dependencies,and customization needs. This includes defining the target audience, understanding the deployment environment, and documenting the installation steps.3.2 Testing and DebuggingThoroughly test the installation package in different deployment scenarios to ensure its integrity and functionality. Identify and resolve any issues or conflicts that may arise during installation. Debugging tools and logging features within InstallShield 12 can help identify and troubleshoot problems quickly.3.3 Documentation and User SupportProvide clear and concise documentation to assist end-users during the installation process. This includes step-by-step instructions, troubleshooting tips, and frequently asked questions. Consider creating a dedicated support channel to address any queries or issues that users may encounter.3.4 Update and MaintenanceRegularly update and maintain the installation package to address any security vulnerabilities, compatibility issues, or feature enhancements. Keep track of the latest softwareupdates and patches provided by Flexera to ensure that your installations remain up to date.ConclusionInstallShield 12 is a robust software installation tool that simplifies the packaging and distribution of applications. It offers a user-friendly interface, extensive customization options, and a wide range of features to cater to various deployment scenarios. By following best practices and utilizing the capabilities of InstallShield 12, developers can ensure that their installations are efficient, reliable, and user-friendly.。
Installshield应用教程说明:阅读对象:本文档主要是对《installshield11.5简明试用教程》的补充,算是一个高手进阶吧,前面讲过的不再重复。
版本:文中例子使用的是IS12,适用于IS10以上。
目的:前段时间,工作中需要把公司的产品做一个安装程序,于是接触使用IS,不过在网上根本找不到IS的相关中文教程(~!本人英语不太好)。
最后通过网上找到的零碎的教程,结合帮助文档和在一些朋友的帮助下,熟练掌握了IS,并将公司产品做成一键式安装,本文就是以这个为实例。
强调:《installshield11.5简明试用教程》是在网上下载的,不是作者原创。
作者信息:木禾1.安装前执行 (2)2.安装到指定位置 (3)3.添加数据库及数据 (3)4.其他 (8)5参考脚本 (10)这里先说说实例的具体要求,再在后面逐个去解决这些问题,以说明IS各菜单功能。
这是一个J2EE构架的的系统,安装到服务器上使用。
安装机器必备JDK,所以需要安装JDK;然后系统使用Tomcat服务器,所以需要安装Tomcat;然后安装主程序,这个过程其实就是把程序文件夹拷贝到Tomcat的wabapps文件夹下;然后安装数据库和初始数据(MS SQL自行安装),最后在程序文件夹和桌面创建快捷方式。
一.安装前执行,要求先自动安装JDK和Tomcat。
切换到InstallationDesigner,加入JDK和Tomcat的安装程序。
编辑脚本使安装执行后,先提示安装JDK,在安装Tomcat,以下是脚本片段(图片有些模糊,文档最后附有例子的全部脚本供参考)第15-20行,控制执行JDK安装,第22-26,安装Tomcat。
二。
安装到指定路径,把文件夹复制到Tomcat的wabapps文件夹下。
以上代码图片中,第29-34行,执行这一操作。
先从注册表读取tomcat的安装路径,在把文件夹复制到Tomcat的wabapps目录下。
三。
安装数据库及数据这是直接把数据库转化成脚本,如果已有数据库脚本,只要右键——>New一个,再Import script files。
选择数据库和登录的验证方式。
选择数据库并给脚本命名(名字无所谓)这上面几个选项应该看的懂吧,选择需要到处哪些表。
数据库有原始数据需要也写入脚本的话,就选上Recoeds这里就是选数据库中主外键之类的,当然要选了。
这里设置安装安装过程中的提示,和脚本出现错误了是据需执行还是退出。
四。
其他●快捷方式Target默认是指向机器内的一个绝对地址,可以把Internet Shortcut设置成YES,就可以在Target内设置网址指向地址。
●2对话框设置可以选择安装程序,对话框的样式。
这里也可以自由编辑对话框。
生成安装程序的模式建议选上Sigle Executable,可以把所有的封装到一个exe文件内。
五。
参考脚本//============================================================ ===============//// File Name: Setup.rul//// Description: Blank setup main script file//// Comments: Blank setup is an empty setup project. If you want to// create a new project via. step-by step instructions use the// Project Assistant.////============================================================ ===============// Included header files ----------------------------------------------------#include "ifx.h"//---------------------------------------------------------------------------// OnFirstUIBefore//// First Install UI Sequence - Before Move Data//// The OnFirstUIBefore event is called by OnShowUI when the setup is// running in first install mode. By default this event displays UI allowing// the end user to specify installation parameters.//// Note: This event will not be called automatically in a// program...endprogram style setup.//---------------------------------------------------------------------------function OnFirstUIBefore()number nResult, nLevel, nSize, nSetupType, nvSize, nType;string szTitle, szMsg, szOpt1, szOpt2, szLicenseFile;string szName, szCompany, szTargetPath, szDir, szFeatures, szTargetdir;string szJDK, svTomcat, szKey ;BOOL bLicenseAccepted;beginnSetupType = COMPLETE;szDir = TARGETDIR;szName = "";szCompany = "";bLicenseAccepted = FALSE;szKey = "";nType = 0;svTomcat = "";szJDK = "";// Beginning of UI SequenceDlg_Start:nResult = 0;Dlg_SdWelcome:szTitle = "";szMsg = "";//{{IS_SCRIPT_TAG(Dlg_SdWelcome)nResult = SdWelcome( szTitle, szMsg );//}}IS_SCRIPT_TAG(Dlg_SdWelcome)if (nResult = BACK) goto Dlg_Start;Dlg_SdLicense2:szTitle = "";szOpt1 = "";szOpt2 = "";//{{IS_SCRIPT_TAG(License_File_Path)szLicenseFile = SUPPORTDIR ^ "License.rtf";//}}IS_SCRIPT_TAG(License_File_Path)//{{IS_SCRIPT_TAG(Dlg_SdLicense2)// nResult = SdLicense2Rtf( szTitle, szOpt1, szOpt2, szLicenseFile, bLicenseAccepted );//}}IS_SCRIPT_TAG(Dlg_SdLicense2)if (nResult = BACK) thengoto Dlg_SdWelcome;elsebLicenseAccepted = TRUE;endif;Dlg_SdRegisterUser:szMsg = "";szTitle = "";//{{IS_SCRIPT_TAG(Dlg_SdRegisterUser)nResult = SdRegisterUser( szTitle, szMsg, szName, szCompany );//}}IS_SCRIPT_TAG(Dlg_SdRegisterUser)if (nResult = BACK) goto Dlg_SdLicense2;Dlg_SetupType2:szTitle = "";szMsg = "";//{{IS_SCRIPT_TAG(Dlg_SetupType2)// nResult = SetupType2( szTitle, szMsg, "", nSetupType, 0 );//}}IS_SCRIPT_TAG(Dlg_SetupType2)if (nResult = BACK) thengoto Dlg_SdRegisterUser;elsenSetupType = nResult;if (nSetupType != CUSTOM) thenszTargetPath = TARGETDIR;nSize = 0;FeatureCompareSizeRequired( MEDIA, szTargetPath, nSize );if (nSize != 0) thenMessageBox( szSdStr_NotEnoughSpace, WARNING );goto Dlg_SetupType2;endif;endif;endif;Dlg_SdAskDestPath2:if ((nResult = BACK) && (nSetupType != CUSTOM)) goto Dlg_SetupType2;szTitle = "";szMsg = "";if (nSetupType = CUSTOM) then//{{IS_SCRIPT_TAG(Dlg_SdAskDestPath2)// nResult = SdAskDestPath2( szTitle, szMsg, szDir );//}}IS_SCRIPT_TAG(Dlg_SdAskDestPath2)TARGETDIR = szDir;endif;if (nResult = BACK) goto Dlg_SetupType2;Dlg_SdFeatureTree:if ((nResult = BACK) && (nSetupType != CUSTOM)) goto Dlg_SdAskDestPath2;szTitle = "";szMsg = "";szTargetdir = TARGETDIR;szFeatures = "";nLevel = 2;if (nSetupType = CUSTOM) then//{{IS_SCRIPT_TAG(Dlg_SdFeatureTree)// nResult = SdFeatureTree( szTitle, szMsg, szTargetdir, szFeatures, nLevel );//}}IS_SCRIPT_TAG(Dlg_SdFeatureTree)if (nResult = BACK) goto Dlg_SdAskDestPath2;endif;// Display a message box that shows the information icon.MessageBox ("接下来系统将安装JDK,\n如果系统在安装的过程中提示已经安装则取消即可。