magento中文操作手册
- 格式:docx
- 大小:23.22 KB
- 文档页数:13
Magento设计人员专业名词(Magento Design Terminologies)为了能够更好的理解本设计人员中文手册,熟悉一下Magento系统中的设计方面的术语是很关键的。
术语的这一章介绍可能对于你来说是比较新的概念,因此,您可以利用这段时间彻底的读通他们。
但最重要的,如果你不能充分把握这些概念,不要灰心,所有这些新名词-本章仅仅向你介绍一次,在后面的章节会对这些简单的定义进一步深入研究和扩大。
这一章介绍的术语包括:网站和网店(Website and Store)Magento中的一个网站(Website)是一些共享相同的客户、订单信息和购物车信息的商店(Store)的集合。
Store是一些Store View的集合。
这些都是比较笼统的概念,我们在确立个别特别需要的网店时用这些概念可以很好的建立。
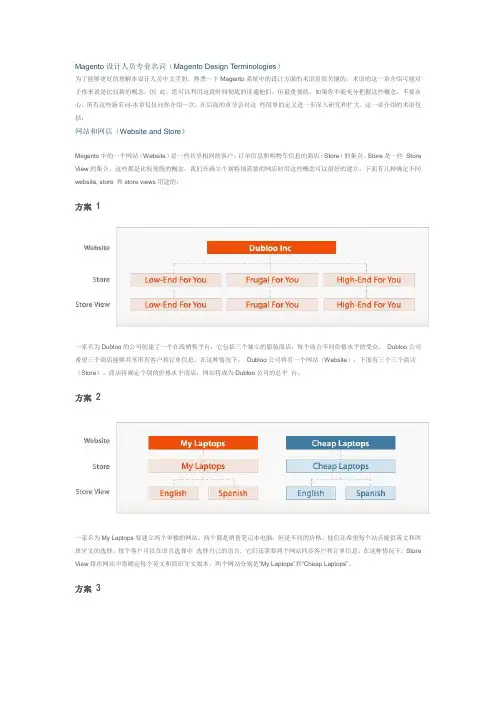
下面有几种确定不同website, store 和store views用途的:方案 1一家名为Dubloo的公司创建了一个在线销售平台,它包括三个独立的服装商店,每个迎合不同价格水平的受众。
Dubloo公司希望三个商店能够共享所有客户和订单信息。
在这种情况下,Dubloo公司将有一个网站(Website),下面有三个三个商店(Store)。
商店将确定个别的价格水平商店,网站将成为Dubloo公司的总平台。
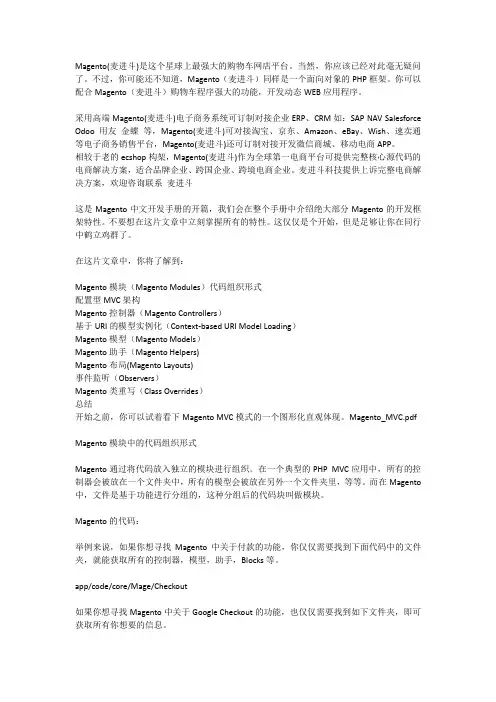
方案 2一家名为My Laptops要建立两个单独的网站,两个都是销售笔记本电脑,但是不同的价格。
他们还希望每个站点提供英文和西班牙文的选择,每个客户可以在语言选择中选择自己的语言。
它们还需要两个网站同步客户和订单信息。
在这种情况下,Store View将在网站中将确定每个英文和西班牙文版本。
两个网站分别是―My Laptops‖和―Cheap Laptops‖。
方案 3一家名为Bongo's Instruments想创建一个在线的销售网点。
没有其他分支店,Bongo's Instruments就是是商店以及网站。
Magento(麦进斗)是这个星球上最强大的购物车网店平台。
当然,你应该已经对此毫无疑问了。
不过,你可能还不知道,Magento(麦进斗)同样是一个面向对象的PHP框架。
你可以配合Magento(麦进斗)购物车程序强大的功能,开发动态WEB应用程序。
采用高端Magento(麦进斗)电子商务系统可订制对接企业ERP、CRM如:SAP NAV Salesforce Odoo 用友金蝶等,Magento(麦进斗)可对接淘宝、京东、Amazon、eBay、Wish、速卖通等电子商务销售平台,Magento(麦进斗)还可订制对接开发微信商城、移动电商APP。
相较于老的ecshop构架,Magento(麦进斗)作为全球第一电商平台可提供完整核心源代码的电商解决方案,适合品牌企业、跨国企业、跨境电商企业。
麦进斗科技提供上诉完整电商解决方案,欢迎咨询联系麦进斗这是Magento中文开发手册的开篇,我们会在整个手册中介绍绝大部分Magento的开发框架特性。
不要想在这片文章中立刻掌握所有的特性。
这仅仅是个开始,但是足够让你在同行中鹤立鸡群了。
在这片文章中,你将了解到:Magento模块(Magento Modules)代码组织形式配置型MVC架构Magento控制器(Magento Controllers)基于URI的模型实例化(Context-based URI Model Loading)Magento模型(Magento Models)Magento助手(Magento Helpers)Magento布局(Magento Layouts)事件监听(Observers)Magento类重写(Class Overrides)总结开始之前,你可以试着看下Magento MVC模式的一个图形化直观体现。
Magento_MVC.pdfMagento模块中的代码组织形式Magento通过将代码放入独立的模块进行组织。
在一个典型的PHP MVC应用中,所有的控制器会被放在一个文件夹中,所有的模型会被放在另外一个文件夹里,等等。

Last update: 2020/05/26 14:26magento_2:login_as_customer https:///docs/doku.php?id=magento_2:login_as_customer For more details see how the Login as Customer for Magento 2 extension works.Guide for Login as Customer for Magento 2Use the special button to login as any existing customer just in one click. Grant permissions to sub-admin users to login as customer, as well as monitor the login attempts on the special grid.Fast login to any customer's accountView all login attempts in the logProvide permissions to sub-admin users to login as customerConfigurationTo adjust general module settings, navigate to Stores → Configuration → Amasty Extensions →Login as Customer.Expand the General tab.Open Customer`s Account in the New Tab - if set to `Yes`, the customer account page will be open in a new tab of your browser, otherwise, it will be open in a current tab.Allow Selecting Store View to Login - if a customer accounts shared per website, for logging you will be able to choose only those store views of the website this customer is associated with.Please note that this setting depends on the `Account Sharing Options` (Store - Configuration -Customers - Customer Configuration).2020/05/26 14:263/7Guide for Login as Customer for Magento 2 How to Login as CustomerTo login as any existing customer, please, go to Customers → All Customers and select the required one from the grid. Then, click the Select link. In the dropdown, choose the Login as Customer option to proceed to the user's dashboard on the frontend.Last update: 2020/05/26 14:26magento_2:login_as_customer https:///docs/doku.php?id=magento_2:login_as_customerAlternatively, you can select the required customer from the grid. Then, hit the Login as Customer button in the account to automatically login to the user's account.2020/05/26 14:265/7Guide for Login as Customer for Magento 2When you have multiple store views the customer is assigned to, than you may need to select the required one to login.Login as Customer LogTo see all the login as customer attempts, please, go to Reports → Login as Customer Log.Last update: 2020/05/26 14:26magento_2:login_as_customer https:///docs/doku.php?id=magento_2:login_as_customerOn the grid you can see all login attempts with the detailed information about them.Login as Customer PermissionsStore admin can distribute a permission to login as customer to sub-admin users.Please, go to System → User Roles and select the role you want to grant permission. Switch to the Role Resources tab. Optionally, switch the Resource Access option to Custom.You can enable or disable the following role resources:Customers → Amasty Login as Customer → Login as Customer PermissionCustomers → Amasty Login as Customer → Login GridFind out how to install the Login as Customer extension via Composer.Rate the user guide2020/05/26 14:267/7Guide for Login as Customer for Magento 2(Details)0 visitor votes0 visitor votes0 visitor votes0 visitor votes。

MEGENTO系统功能目录一、会员中心.................................................................................................................... 错误!未指定书签。
二、多网站、多语言、多货币功能................................................................................ 错误!未指定书签。
三、分类排序.................................................................................................................... 错误!未指定书签。
四、搜索功能.................................................................................................................... 错误!未指定书签。
五、产品............................................................................................................................ 错误!未指定书签。
六、购物车........................................................................................................................ 错误!未指定书签。
七、结账流程.................................................................................................................... 错误!未指定书签。
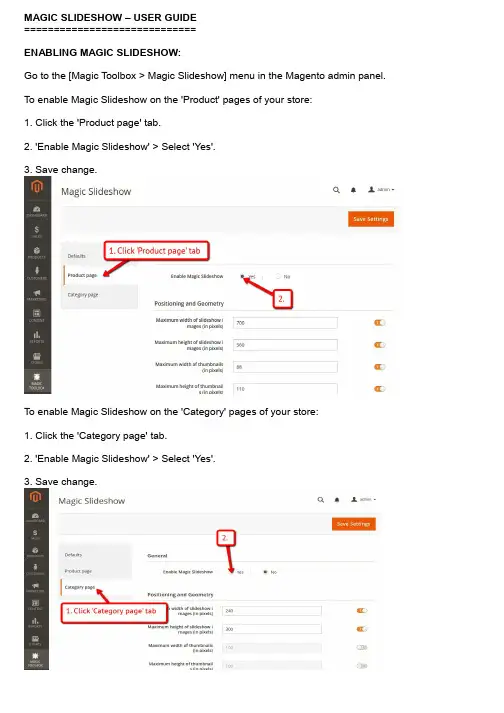
MAGIC SLIDESHOW – USER GUIDE=============================ENABLING MAGIC SLIDESHOW:Go to the [Magic Toolbox > Magic Slideshow] menu in the Magento admin panel. To enable Magic Slideshow on the 'Product' pages of your store:1. Click the 'Product page' tab.2. 'Enable Magic Slideshow' > Select 'Yes'.3. Save change.To enable Magic Slideshow on the 'Category' pages of your store:1. Click the 'Category page' tab.2. 'Enable Magic Slideshow' > Select 'Yes'.3. Save change.CUSTOMIZING:Customize Magic Slideshow settings to suit your needs - go to the [Magic Toolbox > Magic Slideshow] menu in the Magento admin panel.For customizations to only apply to Product pages, make all changes on the 'Product page' tab:For customizations to only apply to Category pages, make all changes on the 'Category page' tab:If you would like customizations to apply to both Product and Category pages, make changes on the 'Defaults' tab:HOME PAGE CAROUSEL:There is no dedicated home page settings page for Magento 2 but you can still create an amazing slider on the homepage of your store using HTML.In your home page content area or template, create a div with a class of MagicSlideshow. Slideshows can have as many images as you want. Here is a slideshow of 7 images, each linking to a URL:<div class="MagicSlideshow"><a href="/page-1/"><img src="example1.jpg"/></a><a href="/page-2/"><img src="example2.jpg"/></a><a href="/page-3/"><img src="example3.jpg"/></a><a href="/page-4/"><img src="example4.jpg"/></a><a href="/page-5/"><img src="example5.jpg"/></a><a href="/page-6/"><img src="example6.jpg"/></a><a href="/page-7/"><img src="example7.jpg"/></a></div>。
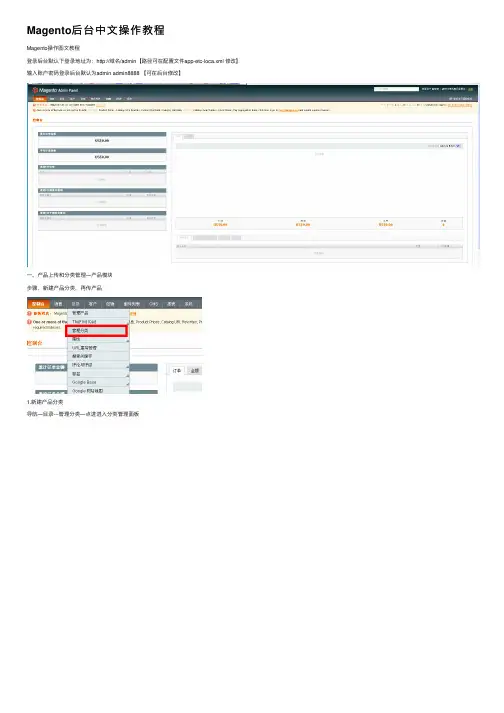
Magento后台中⽂操作教程Magento操作图⽂教程登录后台默认下登录地址为:http://域名/admin【路径可在配置⽂件app-etc-loca.xml 修改】输⼊账户密码登录后台默认为admin admin8888 【可在后台修改】⼀、产品上传和分类管理—产品模块步骤,新建产品分类,再传产品1.新建产品分类导航—⽬录---管理分类—点进进⼊分类管理⾯板中⽂英⽂default category 是总⽬录,在新建分类的时候要先点击选中该分类,【所有产品分类都属于这个⽬录下】然后在点击添加⼦⽬录默认下,我们只需要填写基本信息即可说明:/doc/871712d45022aaea998f0faa.html * 必填项⽬,分类名2.in Active: 是否在前台显⽰3.Description: 分类描述,可填写可不填写,填写可丰富⽹站内容、利于客户了解该产品以及利于SEO关键字密度:如下图4.image:分类图⽚:可浏览从本地导⼊分类图⽚,效果举例如下:5.Page Title:可以⾃⼰定义⽹页标题显⽰的⽂字,利于SEO优化,举例如下6.Meta Keywords:关键字,⽹页前台不显⽰,利于SEO优化7.Meta Description:描述,利于SEO优化8.Include in Navigation Menu:是否显⽰在导航,这个具体跟模板设计有关系,如果模板是程序指定显⽰内容,那么该功能⽆效,如果导航默认为推荐的产品分类,那么该选项有效其他红⾊框选中模块默认,暂时不⽤理会。
然后点击右上⾓的保存分类中⽂英⽂OK,⼀个名为Handbags的分类已经建⽴好了,(0)该分类下⽬前0个产品接下来,我们重新点击选中Default Category(0) 新建⼏个主分类、接下来,新建⼦分类⿏标单击选中Handbags分类,点击添加⼦⽬录填写⼦分类的分类信息,红⾊星号为必填选项,其他可填可不填然后右上⾓点击保存分类继续添加⼦⽬录,当然,我们还可以新建三级⼦⽬录,步骤⼀样。
USER MANUAL INVOICE PDF GENERATOR PRO-Magento 2 -SET UP IN MAGENTOAfter the install you need to go to the System Configuration area in Magento to enable the module and to enable the email attachments.User Permission SettingsTo set up user permissions, go to System > Permissions > User Roles. If the user can print out the standard Magento PDF invoice he will be able to the same with the custom one from our extension.PDF Print-outs uses Stores -> Settings -> Configurations -> PDF Print-outsDefault permission settings give the Admin access to all Eadesigndev_Invoicepdfgenerator settings. For users with limited roles, you will need to add them (the same as standard Magento).HOW TO USEUsing EaDesign Invoice PDF Generator Pro the admin user can print PDF files with customized printout layouts.The admin user can use the template system from our extension to customize the PDF design in the same way he can customize the email templates. That is a big plus because the store owner can do that for each store.How to start to use the Invoice PDF Generator ProFirst of all you need to know that the Invoice PDF Generator Pro uses the same system to process the template variables and data from the template.1.So, you can go to Marketing -> Email Templates and copytemplate body in area body of PDF templates.2.Select the New Invoice tab from the list to have access to thecontent3.Copy all from the box4.Go to EaDesign -> Manage PDF Templates5.Add a new template from the "Add new template" button. Thiswill prompt you with a set of fields.6.To use it, you need to enable the template in order - Enabletemplate;7.For the current store make the template as default - Defaulttemplate;On the template body tab you can find the source (invoice) you need to load the variables for. This is the actual invoice id, 1 for the first invoice created but you can use the one you need.Using the template variables you can achieve any design and configuration. As you can see in the next 2 images there are a lot of variables to choose from.What are the buttons for?1. Source Variables button contains variables which arestandards Magento for the current entity;2.Standard Variables button contains variables which are thesame as transactional email variables;3.Source Barcode Variables button contains barcode variables.You have a lot of barcodes types but you must to check what barcode you want first;4.Source Depend Variables button contains depend variablesthat check if the value is 0 then return nothing;5.Source Currency Variables button contains currency variables,all the values that contain numbers;6.Source Items Variables button contains variables only foritems, and you can use them only between“##productlist_start##” and “##productlist_end##”. Outside from this area are not recognized.7.Order Items Variables button contains variables only for orderitems and also available between “##productlist_start##” and “##productlist_end##”.8.Customer Variables button contains variables for customerwith all the information about them.9.Order Variables button contains variables only for order type.This is an example for the Depend values variables generated on our development system for the invoice number 1.This is an example for the Currency values variables generated onour development system for the invoice number 1.In CSS section you can create styles for the html like "h1 {color:red;} h2 {color:blue}", it’s not necessary to use the style tag. In the body you can the html you copied from the email templates.In Settings are used to shape the template as you need. The "Template file name" can be made from variables as long as they are ok for file naming {{var invoice.increment_id}}-{{var invoice.id}}-file-invoice. You can modify the orientation of page as landscape or portrait and also the format.In Magento 2 you can localize your template using the trans directive. {{trans "Thank you for your order from %store_name." store_name=$store.getFrontendName()}}{{trans "Once your package ships we will send you a tracking number."}}Using this module you are able to modify the Invoice PDF as you desire using your html and css knowledge only. The extension has multiple features as follows:change the Magento Invoice PDF to meet your needs;add custom CSS to your template to further personalize the PDF;add templates for each store with different design and features;change the file name of the PDF file using variables.。

powered byMagento (v2.0.x - v2.1) - Mercado Pago ModuleTable of ContentsMagento (v2.0.x - v2.1) - Mercado Pago Module (2)Features (3)Wizard Installation (Magento Component Manager) (4)Manual Installation (FTP) (5)Configuration (6)Custom Checkout Payment Solution: (7)Standard Checkout Payment Solution: (9)Mercado Envios (11)FeaturesCheckout options right for your business: We offer two checkout methods that make it easy to securely accept payments from anyone, anywhere.Custom CheckoutOffer a checkout fully customized to your brand experience with our simple-to-use payments API.•Seamless integration— no coding required, unless you want to.•Full control of buying experience.•Store buyer’s card for fast checkout.•Accept tickets in addition to cards.•Accept Mercado Pago's discount coupons.•Improve conversion rate.Available for Argentina, Brazil, Colombia, Mexico, Peru and VenezuelaStandard CheckoutGreat for merchants who want to get going quickly and easily.•Easy website integration— no coding required.•Limited control of buying experience— display Checkout window as redirect, modal or iframe.•Store buyer’s card for fast checkout.•Accept tickets, bank transfer and account money in addition to cards.•Accept Mercado Pago's discount coupons.Available for Argentina, Brazil, Chile, Colombia, Mexico, Peru and Venezuela Shipment integrationThis feature allows to setup and integrate with Mercado Envios shipment method as another shipment option for customers. It includes the possibility to print the shipping label directly from the Magento Admin Panel. Free shipping is also available. Available for Argentina, Brazil and Mexico only with Standard CheckoutWizard Installation (Magento Component Manager)1.Log in to the Magento Admin as an administrator.2.Click System > Web Setup Wizard. The following page displays.3.Click System Configuration.4.If you haven’t already done so, enter your authentication keys in the providedfields.The following figure shows an example if you have already entered your keys.5.Click Save Config.6.Click Component Manager and continue with Manage your components.To upgrade Magento system software instead, see Run System Upgrade.Manual Installation (FTP)1.Copy the folder app/code/MercadoPago to the Magento root installation.Make sure to keep the Magento folders structure intact.2.Enable modules from console.o bin/magento module:enable MercadoPago_Coreo bin/magento module:enable MercadoPago_MercadoEnvios Then update magento with new modules:o bin/magento setup:upgradeConfiguration1.Go to Stores > Configuration > Sales > Payment Methods. Select MercadoPago – Global Configuration.2.Set your Country to the same where your account was created on, and saveconfig. Note: If you change the Country where your account was created you need save configuration in order to refresh the excluded payment methods.3.Other general configurations:o Category of your store: Sets up the category of the store.o Choose the status of approved orders: Sets up the order status when payments are approved.o Choose the status of refunded orders: Sets up the order status when payments are refunded.o Choose the status when payment is pending: Sets up the order status when payments are pending.o Choose the status when client open a mediation: Sets up the order status when client opens a mediation.o Choose the status when payment was reject: Sets up the order status when payments are rejected.o Choose the status when payment was canceled: Sets up the order status when payments are canceled.o Choose the status when payment was chargeback: Sets up the order status when payments are chargeback.o Logs: Enables/disables system logs.o Debug Mode: If enabled, displays the raw response from the API instead of a friendly message.Custom Checkout Payment Solution:1.Go to Stores > Configuration > Sales > Payment Methods.Select Mercado Pago - Custom Checkout.2.Set your Public Key and Access Token. In order to get them check thefollowing links according to the country you are operating in:o Argentina: https:///mla/account/credentialso Brazil: https:///mlb/account/credentialso Chile: https:///mlc/herramientas/aplicacioneso Colombia: https:///mco/account/credentialso Mexico: https:///mlm/account/credentialso Venezuela: https:///mlv/account/credentialso Peru: https:///mpe/account/credentialsIf you want to enable credit card solution, check the configurations under Checkout Custom – Credit Card:•Enabled: Enables/disables this payment solution.•Payment Title: Sets the payment title.•Statement Descriptor: Sets the label as the customer will see the charge for amount in his/her bill.•Binary Mode: When set to true, the payment can only be approved or rejected. Otherwise in_process status is added.•Banner Checkout: Sets the URL for the banner image in the payment method selection in the checkout process.•Checkout Position: The position of the payment solution in the checkout process.•Marketing - Coupon Mercado Pago: Enables/disables the coupon form.If you want to enable ticket solution, check the configurations under Checkout Custom - Ticket:•Enabled: Enables/disables this payment solution.•Payment Title: Sets the payment title.•Banner Checkout: Sets the URL for the banner image in the payment method selection in the checkout process.•Checkout Position: The position of the payment solution in the checkout process.•Marketing - Coupon Mercado Pago: Enables/disables the coupon form.Standard Checkout Payment Solution:1.Go to Stores > Configuration > Sales > Payment Methods.Select Mercado Pago - Classic Checkout.2.Enable the solution and set your Client Id and Client Secret.Get them in the following address:o Argentina: https:///mla/herramientas/aplicacion eso Brazil: https:///mlb/ferramentas/aplicacoeso Chile: https:///mlc/herramientas/aplicacioneso Colombia: https:///mco/herramientas/aplicacion eso Mexico: https:///mlm/herramientas/aplicacioneso Venezuela: https:///mlv/herramientas/aplicacio neso Peru: https:///mpe/herramientas/aplicaciones3.Check the additional configurations:o Payment Title: Sets the payment title.o Banner Checkout: Sets the URL for the banner image in the payment method selection in the checkout process.o Checkout Position: The position of the payment solution in the checkout process.o Type Checkout: Sets the type of checkout, the options are:§Iframe: Opens a Magento URL with a iframe as the content.§Redirect: Redirects to Mercado Pago URL.§Lightbox: Similar to Iframe option but opens a lightbox instead of an iframe.11Mercado EnviosIn order to setup Mercado Envios follow these instructions:1. Setup Mercado Pago Standard Checkout following these instructions.2. Go to Sales > Configuration > Sales > Shipping Methods > Mercado Envios.3. Setup the plugin:•Enabled: Enables/disables this Mercado Envios solution.•Title: Sets up the shipping method label displayed in the shipping section in checkout process.•Product attributes mapping: Maps the system attributes with the dimensions and weight. Also allows to set up the attribute unit.•Available shipping methods: Sets up the shipping options visible in the checkout process.•Free Method: Sets up the method to use as free shipping.•Free Shipping with Minimum Order Amount: Enables/disables the order minimum for free shipping to be available.•Show method if not applicable: If enabled, the shipping method is displayed when it's not available.•Displayed Error Message: Sets up the text to be displayed when the shipping method is not available.•Debug Mode: If enabled, displays the raw response from the API instead of a friendly message.•Sort order: Sets up the sort order to be displayed in the shipping step in checkout process.。
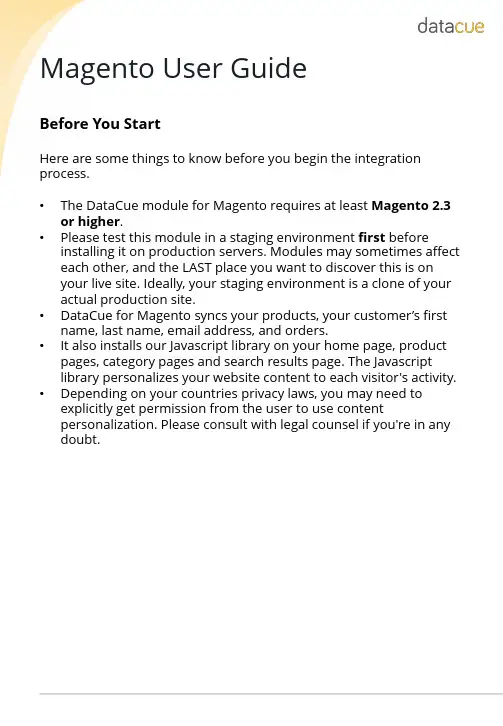
Magento User GuideBefore You StartHere are some things to know before you begin the integration process.•The DataCue module for Magento requires at least Magento 2.3 or higher.•Please test this module in a staging environment first before installing it on production servers. Modules may sometimes affect each other, and the LAST place you want to discover this is onyour live site. Ideally, your staging environment is a clone of your actual production site.•DataCue for Magento syncs your products, your customer’s first name, last name, email address, and orders.•It also installs our Javascript library on your home page, product pages, category pages and search results page. The Javascriptlibrary personalizes your website content to each visitor's activity.•Depending on your countries privacy laws, you may need to explicitly get permission from the user to use contentpersonalization. Please consult with legal counsel if you're in any doubt.•Installing the module1.Install the DataCue extension package for Magento2.Go to the root directory of your Magento installation.3.Run the following commands4.Optional but recommended stepsInstalling the module5. Login to your Magento store's admin panel. You will find a link called DataCue Settings under the Marketing section. Click on it.6.Enter your API key and API secret (you can find it on your dashboard) and press Save. Depending on the size of your store the sync process can take a few mins to a few hours. Make sure that you have created an account with DataCue, cick here.Add recommendationsBanners1.Upload a fixed banner that all your visitors see. Make sure it has a publiclyaccessible URL, you'll need it later.2.If you're unsure, pick a banner to highlight your most popular collection or apromotion. Ensure the image has an aspect ratio of 5:3 (recommended size is 1200 x 720 px). Learn more about static banners here.3.Click Content on your left side bar.4.Pick a Block thats in your home page, or directly go to your home pageunder Pages. Click on Edit.5.Click on the Insert Widget button.6.In widget type selector, choose DataCue Banner, fill in Banner Image withthe URL from step 1 and enter the link for that banner under Banner Link.7.Click Insert Widget and then save the current page or block.8.You should see the banner image that you uploaded on your home page.9.The default layout DataCue uses for your banners shows 2 dynamic bannersand 1 static banner on one row. You can customize this by going to Settings > Banners in your DataCue dashboard. Read more about it here.10.Want to build your own custom layout?read this.Changing your static banner later1.Upload a new image to your server and copy the URL. Ensure the image hasan aspect ratio of 5:3 (recommended size is 1200 x 720 px). Update the link for the static banner if necessary.2.Edit the block or page where you inserted the banner widget. Edit the imageURL to the new image you uploaded and and change the link to the banner as appropriateAdd recommendations1.Click Content on your left side bar.2.Pick a Block or Page corresponding to the page you want to insert therecommendations.3.Click on the Insert Widget button and choose Datacue Products.Pick All and save your changes.4.As soon as product recommendations are ready, you will start seeing themon your site.Match widgets to your themeDataCue's product carousels have a default design which will need some adjustments to match the look/feel of your store. This is really important so nothing looks out of place.Test modeThe first thing you should do is set DataCue into test mode. In test mode, you can pick a list of user accounts as test users. To see the recommendations, you have to sign in as a test user to your store. All other visitors don't see any changes. This is very helpful to play with the design till you're happy with the look/feel. You will need to know a little CSS to match the design, so there are two options1. Let us help you (recommended)When you sign up, we'll get in touch with you and offer to help you with setting up your store.2. Do it yourselfFeel free to reach out if you need any help.Disable or Uninstall the moduleWhen you deactivate and delete DataCue for Magento, we remove all changes made to your store including the Javascript. We also immediately stop syncing any changes to your store data with DataCue. To deactivate DataCue for Magento, follow these steps.1.Go to the root directory of Magento.2.You may need to change file permissions or ownership of the generated filesafter the uninstallation.3.Confirm the module is now deleted.E-commerce personalisation for everyone ******************************@DataCueCo。
Magento PluginInstallation and Use GuideContentInstallation Using Composer2 Configuration3Using the Features7 To Process Payments7To Process Pre-authorizations8To Process Refunds10To Manage Subscription Plans11To Manage Card Tokens121.Installation Using ComposerTo install our plugin you only can:1.Run the c omposer require worldnettps/payment-gateway c ommand from your CLI, or;2.Add the dependency“worldnettps/payment-gateway”:“1.0.0”to the“r equire”section ofyour c omposer.json file(root folder of your Magento application)and run the commandcomposer updateon your CLI.FIGURE - Configuration File (Dependencies) - composer.json2.ConfigurationTo configure the plugin you need to navigate to the configuration page:➔STORES > CONFIGURATION > SALES > PAYMENT METHODSFIGURE - Payment Method Configuration - Part 1FIGURE - Payment Method Configuration - Part 2Expand the payment method W orldnetTPS payment e lement and provide the following details.●Enabled: Yes or No. If Yes, this payment method is going to be available for customers.●Payment Action:○Authorize Only:if you use this action,you are going to need to complete theauthorization later on.○Authorize and Capture: This action does not require later completion.●Integration Type:○XML: accepts payment within the e-commerce application premises.○HPP:redirects the customer to a safe PCI compliant webpage to enter the carddetails and perform the payment.●Transaction Type:Depends on the integration type.For more details,searchTRANSACTIONTYPE f ield in:○For XML:https:///doku.php?id=developer:api_specification:xml_payment_features.○For HPP:https:///doku.php?id=developer:api_specification:hpp_payment_features.●Dynamic Descriptor:dynamic descriptor to be used by your acquirer as the identifyingname of a purchase appearing on the monthly cardholder’s credit card statement.●Account Type: Test or Live.●Gateway URL HPP:URL endpoint to which provides the payment integration for thisintegration type. Preferably, mark the “U se system value” option.●Gateway URL XML:URL endpoint to which provides the payment integration for thisintegration type. Preferably, mark the “U se system value” option.●<Test/Live>Primary Currency:Currency to be used.Based on the currency(s)allowedto the terminal indicated by the following Terminal ID.●<Test/Live> Primary Terminal ID: Terminal identification.●<Test/Live>Primary Shared Secret:Terminal secret.Defined on setup.It can bechanged by the merchant using the Merchant SelfCare System.●<Test/Live>Primary Multicurrency:Yes or No.Defines if the terminal is multi-currencyor not.●<Test/Live>Secondary Currency:Currency to be used.Based on the currency(s)allowed to the terminal indicated by the following Terminal ID.●<Test/Live> Secondary Terminal ID: Terminal identification.●<Test/Live>Secondary Shared Secret:Terminal secret.Defined on setup.It can bechanged by the merchant using the Merchant SelfCare System.●<Test/Live>Secondary Multicurrency:Yes or No.Defines if the terminal ismulti-currency or not.●<Test/Live>Third Currency:Currency to be used.Based on the currency(s)allowed tothe terminal indicated by the following Terminal ID.●<Test/Live> Third Terminal ID: Terminal identification.●<Test/Live>Third Shared Secret:Terminal secret.Defined on setup.It can be changedby the merchant using the Merchant SelfCare System.●<Test/Live>Third Multicurrency:Yes or No.Defines if the terminal is multi-currency ornot.●New Order Status:Status for new orders.Verify Magento’s status configurationinstructions to add new options to this list.●Sort Order:Modifying this will change the display order of the payment method if morethan one is available (lower is higher with 0 being displayed on top).●Debug: Yes or No. To activate the debug mode of your e-commerce application.●Email Customer: Yes or No. If yes, the receipt is going to be sent by e-mail to customers.●Merchant’s Email: Merchant’s support e-mail for contact and complaints.●Credit Card Types:Allowed card brands which can be used to accept card payments bythe account. Limited by the terminal used to provide the integration.●Payment From Application Countries: All or Specific List.●Payment From Specific Countries:When selected a specific list,let’s you choose whichcountries.●Minimum Order Total: Minimum order amount to be able to use this payment method.●Maximum Order Total: Maximum order amount to be able to use this payment method.After defining these settings, you can start using the features.ing the FeaturesTo Process PaymentsThe payment processing allows you(O RDERS>Create New Order)and your customers(C heckout) to create new orders and send them to the payment gateway for processing.FIGURE - Payment/ PurchaseThe result can be verified in S ALES > OPERATIONS > TRANSACTIONS.FIGURE - TransactionsTo Process Pre-authorizationsThe difference between processing payments or pre-authorizations depends on the P aymentAction c onfigured in the payment method.In case you configured A uthorize Only,all of the payments generated from your e-commerceplatform will be Pre-authorizations,which requires you to go to each order and“C omplete”thembefore the payment is properly ready for settlement(when you are going to receive the actualpayment in your merchant account). To do that you are going to access:1.SALES > ORDERS >[S elect an Order by clicking on V iew]2.[A t the page top select I nvoice]3.[A t the page bottom, go to I nvoice Totals]4.[I n A mount s elect C apture Online] > Submit InvoiceFIGURE - Complete Pre-authThe default configuration of our plugin is Pre-auth+Completion,so If during configuration youdidn’t explicitly selected P ayment Action as A uthorize and Capture,most likely you are going toneed to complete/ submit each invoice after authorization is confirmed.To Process RefundsThere are cases where you might need to refund a specific purchase for a customer,and in thiscase, you can also use your e-commerce. For this you need to go to:1.SALES > ORDERS > [S elect a successful Order by clicking on V iew]2.[S elect I nvoicestab and choose an I nvoiceby clicking in V iew]3.[S elect C redit Memos] > [I n Refund Totals section, page bottom, enter Amount] > RefundFIGURE - Refund Payment (Credit Memo)To Manage Subscription PlansIf you desire to create a payment plan for your customers,you can use this feature.We call thisfunctionality S tored Subscription.Additionally,any stored subscription you configure is going to be presented to the customerswhen they select to pay using our payment method (see the first feature of this section).All the stored subscriptions and subscriptions“signed”by your customers will be available inSALES>WORLDNETTPS SUBSCRIPTION.You are going to be able to edit or delete them ifdesired.FIGURE - Stored Subscription (Plans)FIGURE - Customers’ SubscriptionsTo Manage Card TokensWhen a customer pays a purchase using our payment method,the plugin gives an option to storethat card as a token.All the tokens generated are presented in S ALES>WORLDNETTPS SECURECARD.Here you cansee the token associated with customers and delete then,when necessary or required by yourcustomers.FIGURE - Customers’ TokensFor more details on our solutions and questions regarding the use of our platform,please contactour Sales team.。
Leroy Merlin Integration for Magento 2 User Manualby CedCommerce Products Documentation1. Overview (3)2. Extension Installation (3)3. Configuration Settings (4)4. Manage Profile (10)4.1. Add New Profile (10)4.2. Edit Existing Profile (13)4.3. Submit Actions in Bulk on Profiles (15)5. Manage Products (17)6. Manage Orders (19)7. View Failed Orders (21)8. Leroy Merlin Feed (22)9. Cron Logs (24)10. Activity Logs (25)11. Help and Support (26)1. OverviewLeroy Merlin marketplace a French marketplace famous for home and gardening equipment. It serves in countries like Europe, Asia, Africa, and South America. Leroy Merlin has a customer base of 300 million household customers with a turnover in 2015 of 17.9 billion euros and 3.6% annual growth.Leroy Merlin integration for Magento 2 interacts with the Leroy Merlin stores to integrate the synchronized product listing between the Magento store and the Leroy Merlin marketplace, and hence, saves your time from listing products one-by-one.Key Features:Profile Based Product Upload: The integration facilitates you to create a profile and map the category and attributes to the Magento store. Then, after assigning the products to the profile, you can easilyupload products on Leroy Merlin.Synchronised Inventory: You need not update the inventory every time manually; instead it issynchronized automatically at regular intervals of time. Also, inventory status and inventory stock areupdated.Bulk Upload System: You have the flexibility to upload any number of products on the Leroy Merlinmarketplace using the bulk product upload feature.Notifications: You will receive emails immediately when a new order is created.Rejected Products Notification: If any product gets rejected from the Leroy Merlin due to invalid data, then its information is fetched from the automatic synchronized requests along with the error due to which it is rejected.Real-Time Synchronisation: Easily access real-time reports of order and inventory data to reduce errors and prevent over and under-selling.Streamline Order Processing: Automate the entire sales and purchase of the order process end-to-end with this extension. It also aggregates high volumes of orders from all channels.Product Management: Create products manually with this integration, upload items via CSV or import data from other marketplaces and also easily fix data issues2. Extension InstallationTo install the extension,1.1. Upload and Extract the Leroy Merlin package file inside the app/code/Ced/ directory and add the belowline in Magento root composer.json file autoload psr-4(please check the screenshot)“LeroymerlinSdk\\”: “app/code/Ced/Leroymerlin/leroymerlin-sdk/src/”2.Run the below command from Magento root-composer dumpphp bin/magento setup:upgradephp bin/magento setup:di:compilephp bin/magento setup:static-content:deploy -fphp bin/magento index:reindexphp bin/magento cache:cleanphp bin/magento cache:flush3. Configuration SettingsTo set up the configuration settings,1.Go to the Magento 2 Admin panel.2.On the left navigation bar, click the Leroy Merlin Integration menu.The menu appears as shown in the following figure:3.Click on Configuration.The Configuration page appears as shown in the following figure:4.In the right panel, click the Leroy Merlin Seller/Developer Settings tab.The Leroy Merlin Seller/Developer Settings tab is expanded and the relevant fields appear as shown inthe following figure:5.Under Leroy Merlin Seller/Developer Settings, do the following steps:In the Enabled list, select the Yes option.In the Mode list, select the LIVE option.In the Default Service Url list, select the Live API URL option.In the Api Key box, enter the API Key value copied from the Leroy Merlin seller account.In the Select Store list, select the required store.In Debug Mode, select Yes if you want the log to be created.6.Scroll down to the Leroy Merlin Product Settings tab, and then click the tab.The Leroy Merlin Product Settings tab is expanded and the expanded section appears as shown in the following figure:7.Under Leroy Merlin Products Settings, do the following steps:Click the Leroy Merlin Price Settings tab.The Leroy Merlin Price Settings tab is expanded and the section appears as shown in thefollowing figure:Under Leroy Merlin Price Settings, do the following step:In the Product Price list, select one of the following options:Increase by Fixed Price: If selected, then the Modify by Fix Price field appears.Increase by Fixed Percentage: If selected, then the Modify by Percentage Pricefield appears.Enter the numeric value to increase the price of the Leroy Merlin, product price bythe entered value % of Magento 2 price.For Example,Magento 2 price + 5% of Magento 2 price.Magento 2 Price = 100Select Increase By Fixed Percentage optionModify by Percentage Price = 5100 + 5% of 100 = 100 + 5 = 105Thus, Leroy Merlin Product Price = 105Decrease by Fixed Price: If selected, then the Modify by Fix Price field appears.Decrease by Fixed Percentage: If selected, then the Modifyby Percentage Pricefield appears.Enter the numeric value to decrease the price of the Leroy Merlin product price by the entered value % of Magento 2 priceFor Example,Magento 2 price – 5% of Magento 2 price.Magento 2 Price = 100Select Decrease By Fixed Percentage optionModify by Fix Price = 5100 – 5% of 100 = 100 – 5 = 95Thus, Leroy Merlin Product Price = 95Click the Leroy Merlin Inventory Settings tab.The Leroy Merlin Inventory Settings tab is expanded and the section appears as shown in the following figure:Under the Leroy Merlin Inventory Settings tab, do the following steps:In the Set Inventory on Basis of Threshold list, select the Enable option ifrequired to set the inventory based on a threshold.Note: Only when the admin selects Enable, the other fields appear. Threshold Inventory is the minimum count of an item that the store owner wants tokeep in stock.In the Inventory Threshold Value box, enter the required value.In the Send Inventory for Lesser Than Threshold Case box, enter the requiredvalue.In the Send Inventory for Greater Than Threshold Case box, enter the required value.In Use MSI, select Yes if you want to use multiple inventories.Click on Other Product Settings. The tab is expanded as:Under Other Product Settings do the following steps:In Attributes to Skip Validation, select the attributes from the list for skippingvalidation.In Parents Product Info., select the attributes to configure from parent product.In Merge Parent Product Images, select Yes to merge parent images.In Upload Config as Simple, select Yes if you want to upload simple products.8.Scroll down to the Leroy Merlin Order Settings tab, and then click the tab.The tab is expanded and the section appears as shown in the following figure:9.Under Leroy Merlin Order Settings, do the following steps:In the Leroy Merlin Order Id Prefix box, enter the required order Id prefix.In the Order Notification Email box, enter the required email Id.In Auto Accept Order, select Yes to accept orders automatically.In Hold Order Until Shipping, select Yes to hold till it is shipped.In the Enable Default Customer list, select the Yes option to enable the default customer.In Default Customer Email, enter the mail id of the customer.In Refund Order on Leroy Merlin, select Yes for the order refund.In Refund Reason For Leroymerlin, select the reason for orders refund.In Carrier Mapping, map the Magento carrier with Leroymerlin Carrier and tracking carrier.10.. Scroll down to the Leroy Merlin Cron Settings tab, and then click the tab.The tab is expanded and the section appears as:11.Under Leroy Merlin Cron Settings, do the following steps:In Order Cron, select Enable to enable the order to fetch through crons.In Order Sync Cron, select enable for syncing orders.In Inventory/Price Cron, select Enable to sync inventory and price.In Feed Cron, select Enable to sync feed.In Full Offer Sync Cron, select Enable to sync the full offer.In Order Shipment Cron, select Enable to ship Magento orders automatically.12.Click the Save Config button to save the entered values.4. Manage ProfileTo manage profile, you can perform the following actions:Add a new profileEdit Existing profileSubmit Actions in bulk4.1. Add New ProfileTo add a new profile,1.Go to the Magento 2 Admin panel.2.On the left navigation bar, click the Leroy Merlin Integration menu.The menu appears as shown in the following figure:3.Click Profile Manager.The Manage Profile page appears as shown in the following figure:The Add New Profile page appears as shown in the following figure:5.In the right panel, under General Information, do the following steps:In the Profile Code box, enter a profile code.Note: It is only for the internal use. Use the unique profile code with no spaces. Start with small letters.In the Profile Name box, enter the name of the profile.Note: Use the unique name to identify the profile.In the Profile Status list, select Enabled to enable the profile.Note: The Disabled option disables the profile6.In the left navigation panel, click the Store Categories menu. In the right panel, the section appearswhere you need to select store categories as shown in the following figure:7.Click on L eroy Merlin Category from the left menu and the section will appear as:8.Select the category and depending on it child categories will appear further from where you may choosethe needed ones.9.Click the Save button.The profile gets created and listed on the Manage Profile page4.2. Edit Existing ProfileTo edit the existing profile,1.Go to the Magento 2 Admin panel.2.On the left navigation bar, click the Leroy Merlin Integration menu.The menu appears as shown in the following figure:3.Click Profile Manager.The Manage Profile page appears as shown in the following figure:4.Scroll down to the required profile row.5.In the Action column of the respective row, click the Edit link.6.The profile editing page appears.Do the required changes and click on Save.4.3. Submit Actions in Bulk on ProfilesTo submit the selected action on the selected profiles in Bulk,1.Go to the Magento 2 Admin panel.2.On the left navigation bar, click the Leroy Merlin Integration menu.The menu appears as shown in the following figure:3.Click Profile Manager.The Manage Profile page appears as shown in the following figure:4.On this page, all the available profiles are listed.5.To delete the selected profiles, do the following steps:Select the profiles those are no more required.Click the Arrow button next to the Actions field.The Actions list appear as shown in the following figure:Click the Delete option.A confirmation dialog box appears.Click the OK button.The selected profiles are deleted.To disable the selected profiles, do the following steps:Select the required profiles.Click the Arrow button next to the Actions field.The Actions list appear as shown in the following figure:Click the Disable option.The selected profiles are disabled.To enable the selected profiles, do the following steps:Select the required profiles.Click the Arrow button next to the Actions field.The Actions list appear as shown in the following figure:Click the Enable option.The selected profiles are enabled.5. Manage ProductsTo manage products,1.Go to the Magento 2 Admin panel.2.On the left navigation bar, click the Leroy Merlin Integration menu.The menu appears as shown in the following figure:3.Click on Product Listing.The Product Listing page appears as shown below:4.To edit a product, click on the Edit button in the Actions column.You can now do the required edit in the product details.5.To validate a product, click on the Validate button in the Actions column.The selected product will be validated.To submit bulk actions on products,1.In the Actions list, click the arrow button.A list appears as shown in the figure:2.Select the checkboxes associated with the required products.3.To validate products, click on the Validate Products. Selected Products will be validated.4.To upload products, click on Upload Product(s), selected products will be uploaded.5.To update the inventory and price, click on Update Inventory & Price. The price and inventory will beupdated for selected products.6.To upload products with offers, click on Upload Product with Offer, the selected products will beuploaded along with offers.7.To mark products as inactive, click on Inactive(OutOfStock) on Leroymerlin.6. Manage OrdersTo fetch and view new orders,1.Go to the Magento 2 Admin panel.2.On the left navigation bar, click the Leroy Merlin Integration menu.The menu appears as shown in the following figure:3.Click Order Listing.The Order List page appears as shown in the following figure:4.Click the Fetch Leroy Merlin Orders button.If the order is imported successfully then, a new record is found in the Orders Grid table.Note:Orders are automatically imported through CRON in every 10 minutes.Whenever the latest orders are imported from Leroy Merlin, a Notification appears inthe notification area of the Admin panel for those orders and they are Auto-Acknowledged as soonas they are imported in the Magento 2 store admin panel.If no Order is imported, then check the Failed orders listed on the Leroy Merlin Failed Orderpage.Order is auto-rejected on Leroy Merlin in the following conditions:When Leroy Merlin Product SKU does not exist in Magento 2 store.When Product is Out of Stock in Magento 2 store.When a product is disabled in Magento 2 store.To perform Actions in bulk on Orders,1.To delete orders, select the orders and then click on Delete Orders under the Actions menu.The selected orders will be deleted.2.To synchronise orders, select the orders and then click on Sync Orders under the Actions menu.The selected orders will be acknowledged.3.To mark orders as shipped, select the orders and then click on Mark as Shipped under theActions menu.The selected orders will be marked shipped.7. View Failed OrdersTo view failed orders,1.Go to the Magento 2 Admin panel.2.On the left navigation bar, click the Leroy Merlin Integration menu.The menu appears as shown in the following figure:3.Click Failed Orders.The Failed Order page appears as shown in the following figure:4.This page displays the failed orders with the order id and the reason for the failure.8. Leroy Merlin FeedTo view and manage the product feeds,1.Go to the Magento 2 Admin panel.2.On the left navigation bar, click the Leroy Merlin Integration menu.The menu appears as shown in the following figure:3.Click Feeds.The Feeds page appears as shown in the following figure:4.The page displays the Leroy Merlin feeds.9. Cron LogsTo view Cron Details,1.Go to the Magento 2 Admin panel.2.On the left navigation bar, click the Leroy Merlin Integration menu.The menu appears as shown in the following figure:3.Click Cron Logs.The Cron page appears as shown in the following figure:4.To delete all the cron logs, click the Truncate button.10. Activity LogsTo view Activity details,1.Go to the Magento 2 Admin panel.2.On the left navigation bar, click the Leroy Merlin Integration menu.The menu appears as shown in the following figure:3.Click on Activity Logs.The Activity Log grid appears as:4.The activity details are displayed on this page along with the message.11. Help and SupportTo view Help and Support,1.Go to the Magento 2 Admin panel.2.On the left navigation bar, click the Leroy Merlin Integration menu.The menu appears as shown in the following figure:3.Click Help and Support.The Help and Support page appears as shown in the following:4.You can connect with us via Call, Ticket, Email or Skype chat for any assistance.。
magento使用手册一、简介Magento是一款强大的开源电子商务平台,提供了丰富的功能和灵活的定制选项,帮助商家建立和管理在线商店。
本使用手册将为您介绍Magento的基本使用和操作方法。
二、安装与配置1. 下载Magento安装包并解压到您的服务器。
2. 创建一个数据库,并将Magento与数据库进行连接。
3. 配置您的商店信息,包括商店名称、网址、货币等。
4. 安装所需的扩展和插件,以增强您的商店功能。
三、后台管理1. 登录后台管理界面。
2. 管理商品目录,包括添加、编辑和删除商品。
3. 配置支付和物流方式,以便客户可以完成购买。
4. 创建和管理客户账户,包括查看订单和处理退款等操作。
5. 使用营销工具进行促销活动,如优惠券、特价商品等。
6. 查看销售报告和统计数据,以便了解商店运营情况。
四、前台展示1. 自定义商店外观和布局,以符合您的品牌形象。
2. 优化商品详情页面,提高客户购买转化率。
3. 创建博客或新闻页面,与客户互动并增加网站流量。
4. 集成社交媒体分享功能,扩大您的商店影响力。
5. 提供多语言支持,吸引不同国家和地区的客户。
6. 确保网站在不同设备上的兼容性,提高用户体验。
五、安全与性能优化1. 定期备份您的数据和文件,以防意外丢失。
2. 使用SSL证书加密传输数据,确保客户信息安全。
3. 优化图片和代码,提高网站加载速度。
4. 使用缓存机制减少服务器负载,提高网站性能。
5. 定期更新Magento版本和插件,以修复潜在的安全漏洞。
6. 配置防火墙和安全插件,防止恶意攻击和入侵。
六、总结与支持本使用手册为您提供了Magento的基本使用和操作方法。
然而,Magento的功能和定制选项非常丰富,可能需要进一步的学习和实践才能充分掌握。
我们建议您参考官方文档和社区资源,以获取更详细的信息和支持。
Payment Pages - User GuideVersion: 1.1Published: 9 January 2020Payment Pages1.Configure the extension1.Sign in to the Magento administration area.2.Click “Stores” from the options at the admin menu, and then click “Configuration”..3.On the page that loads, collapse “Sales” tab and then select “Payment Methods” on the left sidemenu.4.After that open “OTHER PAYMENT METHODS” section, scroll down and click the “Configure”button for “Secure Trading” method, then collapse “ Payment Pages” section.5.This expands to show two options: “Required settings” and “Optional settings”.2.Required settingsClick “R equired Settings”. This expands to show settings you can configure.2.1 EndpointThe EU gateway currently has the endpoint as , whereas the US gateway will contain the endpoint of .2.2 Test environmentThis field helps you to more easily switch between live and test configuration.2.3 Site ReferenceYou must enter your unique site reference in the “Site Reference” field.When setting up the Magento extension for the first time, it is strongly recommended that your test site reference (e.g. “test_site12345”) is specified. This allows you to test payments to our test bank to ensure your implementation works as expected.When you are ready to go live, you change this to be your live site reference (e.g. “site24680”). (see section 2.2)2.4 Perform Back-Office Operations (recommended)Enable Back-Office Operations to handle capture, cancel or refund transaction in Magento Admin. 2.4.1 Web Services UsernameEnter the webservices username which you had registered to perform Back-Office Operation (see section 2.4)2.4.2 Web services PasswordEnter the webservices username which you had registered to perform Back-Office Operation (see section 2.4)Ensure the “Enabled” field is set to “Yes”.3.Optional Settings3.1 Display settings3.1.1 TitleThe name of this payment method shown to your customers.3.1.2 DescriptionThe description of this payment method shown to your customers.3.1.3 Use IframeEnabling this option will make the Payment Pages load in an HTML iframe element. Using an iframe in combination with parent/child CSS allows you to make it appear as if the Payment Pages are part of your own website.3.1.4 Iframe HeightThe height of the iframe. Enter one or more numbers followed by "px" or "%".3.1.5 Iframe WidthThe width of the iframe. Enter one or more numbers followed by "px" or "%".3.2 Payment pages version settings3.2.1 VersionThe version number is used to change the type of styling used when rendering the Payment Pages.If you are using custom CSS and JS, and would like to upgrade from version 1 to version 2, you will need to click h ereand follow the instructions.3.2.2 ST ProfileThe ST Profile refers to a set of custom HTML files that will be loaded by the Payment Pages instead of the default HTML files used by Secure Trading. These HTML file must be uploaded to the MyST File Manager. See the Payment Pages documentation for more information.3.2.3 Skip Choice PageEnabling this will let your customers select their payment type (Visa etc.) on your website rather than on the Payment Pages.3.3 Other settings3.3.1 Applicable CountriesThis payment method can be enabled for all countries or for a specified subset of countries.3.3.2 Payment ActionEnabling authorize only payments will set the settlestatus of the order to 2. This means the payment will be suspended in the Secure Trading system and will not be captured by your acquiring bank. Then the Admin have to manually create invoice.If Authorize & Capture is set, you should set value for settle status and settle due date. This means the invoice will be created after paying successful.3.3.3 Settle status:This is the settle status that will be applied to this transaction. This should normally be set to 0. It depends on Payment Action (Authorize & Capture is set).3.3.4 Settle Due Date:The settle due date is the day that funds held against your customers' account will be acquired.4.Cron scheduling4.1 How cron worksCancelling orders older than 3 hours that are still in the “Payment Pages” status. These orders aremost-likely abandoned and cancelling them releases the stock reserved, allowing purchase by new customers. This runs every fifteen minutes.And if the pending orders are canceled, they will be added a comment like the below picture:4.2 View logTo view cron log, open Magento_Root_Directory/var/log/securetrading/paymentpage.log file.The log file point out that there are how many orders have been cancelled and print their Increment Id.5.Perform a test payment1.Add an item(s) to your cart and proceed to checkout.2.Register/sign in as appropriate and fill out billing and shipping information.3.If the extension has been configured correctly, it will appear as a payment option in your store(name and description dependent on your configuration settings)4.Select SecureTrading Payment Pages method5.Confirm your order by clicking “Place Order”.6.You will now be redirected to the Payment Pages. By default, this will be shown in an iframewithin your Magento store.If you change iFrame configuration, it is set to No, you will be redirected directly toSecureTrading Payment Pages.7.Providing the test card details you entered were for an authorised response, you will be showna success message. If you entered declining test card details, an error message will be shown,and you’ll be allowed to try different payment details.6.Payment Action Types1.“A uthorize and Capture” – Secure Trading sends a request for payment authorisation, and thefunds will be captured in a subsequent settlement run (normally within 24 hours).After the customers paid successfully, Invoice will be created, the merchant can refund (create credit memo). If the funds have not been settled yet, the transaction will be canceled.Otherwise, it will be refunded.2.“A uthorize only” – Secure Trading sends a request for payment authorisation, but the funds willnot be captured without further action from the merchant.After the customers paid successfully, the merchant have to click Invoice button to create anInvoice and send a request to capture the funds.Moreover, the merchant can cancel/void the order. Then the transaction will be canceled.7.Create an InvoiceIf the payment action is set to “Authorize Only”, the merchant must create Invoice manually.When the merchant create an Invoice, a request will be sent to change the settle status from “2” to “0” or “1”.1.In Order detail page, click Invoice button.2. A new invoice page will be loaded, check and edit its information. After that, scroll down to thebottom, select Capture Online and submit Invoice.3.Performing this action will allow funds to be captured by the acquiring bank (usually occurswithin 24 hours). Once an invoice has been generated for an order, it is not possible to cancel it.Instead, you will need to process a “Credit Memo” (refund).4.Remember that if you don't choose Capture Online, the request will not be sent and then thetransaction will not be updated the settle status (It is still suspended).8.Create an Online Credit MemoThe merchant can create credit memo only when the invoice has been created.8.1 Create an Online Credit MemoThis action will update the transaction in SecureTrading’s system.1.When an invoice has been generated, on Order detail page, click Invoices tab in Order Viewsection.2.After that, select which invoice you want to refund.3.When the invoice detail page is shown, click Credit Memo button on the action bar.4.The merchant will be redirected to a new credit memo page, scroll down and take a look at theRefund Totals section. The merchant can input the Adjustment Fee for a Partial Refund, if they don't adjust to this field, it means a Full Refund will be executed.5.Do not input value for Adjustment Refund, because the total amount should be less than orequal with the captured amount.6.Back to Order detail page, scroll down to the Comment section.If the transaction has not been settled yet, it will be canceled instead of being refunded. And a comment will be added to order (We voided the transaction because it has not settled yet.). 9.Cancel an OrderThe merchant can perform this action only when the order has not invoiced (Authorize Only action).1.Select an order which has not invoiced.2.Click Cancel button on the Action bar.3.Confirm this action.4.Now the order in Magento and the transaction in SecureTrading’s system have been canceled.10.MOTOWhen the merchant receive order from customer via Mail/Telephone. They have to place order in Magento Admin. To start, please follow these steps below:1.Login to Admin, go to Sales -> Orders.2.Click Create New Order button.3.Select/Create the customer who has sent an order request.4.Input order information provided by that customer.5.After adjusting the cart, scroll down to Payment and shipping information section, selectSecureTrading - STPP method.6.Select Shipping method and submit order.7.When the order has been submitted, if Use Iframe configuration is enabled, the merchant willbe redirected to Magento Admin page with SecureTrading iFrame. Otherwise, they will beredirected directly to SecureTrading payment website.8.After paying successfully, the merchant will be redirected to Order Listing page.11.Declined TransactionIf your transaction has been declined, a comment will be added to order. .To see the comment, go to Order Detail page, scroll down to the bottom of the page:。
Landing Pagesfor Magento 2User GuideVersion 1.0Table of ContentsI) Introduction (2)II) Where to Find Extension (3)1. General Settings (5)2. Permalink Settings (7)3. Menu Bar (8)III) Landing Page Listing (11)IV) Landing Page Edit Page (16)1. General (18)2. Search Engine Optimization (19)3. Landing Pages in Websites (21)4. Landing Pages Available (22)5. Landing Pages Conditions (23)5.1 Set Up Conditions (23)5.2 Preview (26)6. Landing Page Builder (28)6.1 Templates (29)6.2 Elements (31)6.2.1 Landing Pages Blocks (31)6.2.2 Product Conditions (38)V) Support (48)I) IntroductionIf you’re looking for a tool to create highly converting Magento 2 landing pages for your marketing campaigns, our L anding Pages w on’t let you down. The extension makes building landing pages easier, faster and more enjoyable with all features needed to optimize every aspect of your pages.●Easy to use with visual drag & drop interface●Support flexible conditions to add products●15+ elements●Come with 4 pre-made templates●Fully control responsive design●Make landing pages SEO-friendly●Compatible with M agezon Page Builder●Integrate with optional pluginsII) Where to Find ExtensionAfter installing the extension, navigate to S tores > Settings > Configurations:or M agezon > Magezon Landing Pages > Configurations:In the left panel, span M AGEZON EXTENSIONS and click L anding Pages. In the right section, there are 3 tabs:1. General Settings●View Current Version of the extension.●Enable Module: choose Yes/No to enable/disable the extension.●Show Breadcrumbs for Landing Pages: b y default we set to Yes. Untick thecheckbox ‘Use system value’ to edit this option. If you choose Yes, the breadcrumb will be displayed on each landing page like this:If No, the breadcrumbs will be hidden:2. Permalink Settings* Please untick ‘Use system value’ to edit each field.●Landing Page Route: specify landing page route.●Url Suffix: specify landing page’s URL suffix.For example, one of your landing pages has this URL:https:///landingpages/summer-sale.html.l andingpages is the Landing Page Route and .html is the Url Suffix. s ummer-sale is the URL key that is different for each landing page.3. Menu Bar* Please untick ‘Use system value’ to edit each field.●Show Landing Pages on Main Menu: select Yes/No to show/hide the landingpages’ drop-down on the main menu. In the drop-down menu, there will be a list of landing pages.●Main Title: enter title for the landing pages’ drop-down on the main menu.●Sort Order: arrange landing pages’ titles in the drop-down in specific order:+ Entity Ascending: arrange landing pages’ titles in the drop-down by ID inascending order.+ Entity Descending: arrange landing pages’ titles in the drop-down by ID indescending order.+ Title Ascending: arrange landing pages’ titles in the drop-down in ascendingalphabetical order:+ Title Descending: arrange landing pages’ titles in the drop-down in descendingalphabetical order:+ Created At Ascending: arrange landing pages’ titles in the drop-down by created time in ascending order.+ Created At Descending: arrange landing pages’ titles in the drop-down bycreated time in descending order.III) Landing Page Listing- Go to M agezon > Magezon Landing Pages > Pages and you’ll reach the landing page listing:- There is a grid containing all existing landing pages:●ID: identifier of the landing page.●Title: title of the landing page.●URL Key: path of the landing page inside your store view. This is where your pagewill be on the site.●Store View: stores on which the landing page is displayed.●Status: whether the landing page is enabled or disabled.●Page Available: whether the landing page is during the active time period or not.●Created time: when the landing page is created.●Modified time: when the landing is last modified.●Action: list the actions available for the landing page:+Edit the landing page.+Delete the landing page.+View the landing page on the frontend.- To view all columns of the grid, click C olumns drop-down above the grid. Tick the checkboxes of columns that you want to be visible in the grid. Untick the checkboxes ofcolumns that you want to be invisible in the grid:- You can export the grid data to CSV or Excel XML files:- Tick the checkboxes of corresponding landing pages in the first column, then click Actions drop-down above the grid to Delete, Disable, Enable or inline Edit these landingpages:- You can filter landing pages by ID, Created time, Modified time, Store View, Title, URL Key, and Status.- Click Landing Pages drop-down on the top left corner and you’ll see the followingoptions:●Add New Page: add a new landing page.●Manage Landing Pages: go to the l anding page listing page.●Configurations: access the extension’s c onfiguration.Please note that you can find this drop-down list in the l anding page edit page as well.- To a dd a new landing page, click the A dd New Landing Page b utton on the top-right corner and you will be redirected to the landing page’s edit page.IV) Landing Page Edit PageThe edit page will open when you create, edit, or duplicate a landing page.On the top of the edit page, you’ll see the following buttons:●Back: return to the l anding page listing.●Delete: delete the landing page.●View: view the landing page on the frontend.●Reset: reset all settings to the last save.●Save:+ S ave: save the landing page and stay on the page.+ S ave & Duplicate: save the landing page and duplicate it.+ S ave & Close: save the landing and return to the landing page listing.The edit page consists of 6 sections as follows:1. General●Enable Page: enable or disable the landing page. If the landing page is disabled, itwon’t be accessible on the frontend.●Include in Menu: if Yes, the landing page will be included in the m enu bar.●Page Title: set the main title of the page (h1 tag).2. Search Engine OptimizationIn this section, you can configure the SEO of the landing page:●URL key: set the URL key of the landing page. Please make sure that it is uniqueand not used by another landing page.●Meta title: set the content of the title tag.●Meta Keywords: set the content of the meta keywords tag.●Meta Description: set the content of the meta description.●Default Robots: include 4 options:+ INDEX, FOLLOW+ NOINDEX, FOLLOW+ INDEX, NOFOLLOW+ NOINDEX, NOFOLLOW* i ndex means that a web page should be indexed by search engines and therefore should be shown on the search engine’s result pages. n oindex means that a web page shouldn’t be indexed by search engines and therefore shouldn’t be shown on the search engine’s result pages.* f ollow means that search engines spiders should follow the links on that page. n ofollow means that search engines spiders shouldn’t follow the links on that page.3. Landing Pages in WebsitesIn this section, you can specify particular store views for the landing page to display.4. Landing Pages AvailableIn this section, you can decide the time period during which the landing page is available.5. Landing Pages ConditionsIn this section, you will specify which products will be displayed on the landing page.5.1 Set Up ConditionsIn the first part, you will define conditions based on existing product attributes. To display all products, leave the conditions part blank.●Click ALL and choose either “ALL” or “ANY.” Click TRUE and choose either “TRUE”or “FALSE.”●Click the Add (green plus) button at the beginning of the condition line to add acondition. Select an attribute on which to base the condition, such as a conditionscombination or a product attribute.+ Conditions Combination: choose to allow you to create an additional set of“All/Any” and “True/False” conditions inside the existing set.+ Product Attributes: the product attributes in this drop-down is dependent on the setup of the attribute on your site. In the list under Product Attribute, choose theattribute that you want to use as the basis of the condition. For this example, theselected condition is “Category”.The selected condition displays in the statement, followed by two more bold links. The options differ depending on the product attribute you select.Once you set the attribute, it cannot be changed. To change the attribute, you must delete the line and add the new attribute. You can delete a condition line by clicking the Delete (red cross) button at the end of the line.●Click i s and choose the comparison operator that describes the condition forproducts to meet. For this example, the comparison operator is “is.” The availableoptions depend on the attribute selected in the previous step.●Click …and choose the attribute value upon which the condition is based. Theoptions displayed depend on the attribute’s setup. You may be asked to select anoption from a drop-down, or you may need to enter text or numerical values for the condition. For this example, you should enter category IDs or select categories for a chooser.The condition in this example looks like this:It means any products belonging to the categories with ID 3,4,5 and 6 will be displayed on the landing page. You can add more condition lines to further narrow your eligible products.5.2 PreviewClick the P review P roducts button under the conditions part to preview products that will be displayed on the landing page.●Store: narrow the products that meet the conditions you set above to thosebelonging to a specific store view.●Sort Order: order the products by the following criteria:After selecting an option, click the S ort button and the products below will be sorted based on the chosen criteria.6. Landing Page BuilderThis section contains a visual editor that allows you to create content for your landing page.The landing page’s builder interface was developed on a core builder based on which we built all of our builder extensions. The core builder includes elements and settings which the builder extensions have in common. For details, please visit h ere.In this guide, we’ll focus on elements and settings that are specific to the Landing Page extension.6.1 TemplatesOn the top bar of the builder section, click this icon (see the image below) to view allpre-built landing page templates in a popup window:Click the dropdown icon to preview a template. Click the plus icon to apply a template. The applied template will be displayed in the builder section and you can edit it:6.2 Elements6.2.1 Landing Pages BlocksThis element allows you to display specific blocks on your landing page:- Block’s title settings:●Title: specify a title for the block.●Specify T itle Color.●Set T itle Alignment t o Left,Center o r Right.●Set T itle Tag to h1, h2, h3, h4, h5 or h6 tag.●Show Line: if Yes, there will be a line next to the block’s title. When you turn it on,you’ll see other 3 fields:+Line Position: set the position of the line to Center or Bottom.>> Center:>> Bottom:+Specify L ine Color.+Specify L ine Width.- Click the A dd button to add a specific block. Then select the block you want to add from Block Name drop-down list. There are 4 blocks to choose from:●Nav Filter: insert the block of layered navigation.●Content List Products:insert the list of products that satisfy the conditions youset in L anding Pages Conditions. These products can be filtered by the Nav Filterblock.●Nav Product Compare: insert Compare Products block.●Nav Product Wishlist: insert My Wish List block.+You can add multiple blocks by clicking the A dd button. Click the recycle bin icon to delete the block.6.2.2 Product ConditionsThis element allows you to insert products that satisfy the conditions you set in the Landing Pages Conditions section. However, please note that these products cannot be filtered by the layered navigation added by Landing Pages Blocks element.- G eneral tab:●Widget Title: enter title for the product block.●Specify T itle Color.●Set T itle Alignment t o Left,Center o r Right.●Set T itle Tag to h1, h2, h3, h4, h5 or h6 tag.●Show Line: if Yes, there will be a line next to the block’s title. When you turn it on,you’ll see other 3 fields:+Line Position: set the position of the line to Center or Bottom.+Specify L ine Color a nd L ine Width.●Widget Description: enter description for the product block.●Set D escription Color.>> Frontend:●Total Items: set the number of products that will be displayed.●Display Style: come with 2 options:+ Show all: means all products are visible. For example, if we set T otal Items to 10 and choose this option, the frontend will be like:+ Pagination: display product in a carousel. If you choose this option, you will customize the following settings:➢Items per page : the number of products per slide. ➢Carousel Options :❖Auto Play: if Yes, the carousel will auto play.❖Pause on Mouse Hover : if Yes, the carousel will stop sliding when you hover over it.❖Auto Play Timeout : the time between the end of one slide change animation and the beginning of the next one.For example, we set T otal Items to 10 and I tems per pageto 5, here is the frontend:- G rid Options tab: specify how many columns there are in the product grid for different screen sizes.●For example, if we set D esktop to 5 columns:+ With Show All option, the product grid has 5 columns on desktop:+ With Pagination option, the product grid in each slide has 5 columns on desktop:●If we set D esktop to 3 columns:+ With Show All option, the product grid has 3 columns on desktop:+ With Pagination option, the product grid in each slide has 3 columns on desktop:Dot Navigation: if Yes, the dot navigation will be visible in the product carousel (withPagination option).- P roduct Options tab: allow you to show or hide certain product attributes including Name, Price, Image, Review, Add to Cart button, Short Description, Wishlist Link, Compare Link, Swatches (for configurable products).●Equal Height: if Yes, each product has equal height.●Padding: the space between the product block to its border. Learn more aboutpadding h ere.●Background Color: set background color for the product block.●Specify the H eight of the background.For Single Image, Button, Social Icons, Google Maps, Countdown and Search Form elements, please check in this d ocument.V) SupportIf you have any questions or need any support, feel free to contact us by following ways. We will get back to you within 24 hours since you submit your support request.●Submit c ontact form.●Email us at s******************.●Submit a t icket.●Contact us through S kype:*******************.●Contact us via live chat on our website: .。
Magento Extension User GuideTarget the right customers, with the right message, at the right time. Drip takes the gold mine of customer data in your Magento store and enables personalized, relevant, revenue-driving marketing campaigns.With Drip + Magento, you can capture lost sales, make product recommendations, collect product reviews, and more -- all to build b etter relationships, e nable m ore sales, and g row your business.●Cart Abandonment:Capture lost revenue from customers who haveabandoned their cart.●Browse Abandonment: T rack the products customers view to tailor emailcontent and drive purchase behavior.●Re-engagement: B ring customers who haven’t purchased recently back toyour store.●Welcome Series: T rigger a series of emails to new customers introducing themto your brand and your products.●Customer Service Survey: A sk customers who have recently interacted withyour brand for feedback.●Product Review: P roduct reviews create valuable social proof for yourproducts. Trigger emails to customers asking for a review.●Social Share: W ord-of-mouth is your best marketing. Ask your customers toshare a of photo with your product on their social media account.●Next Sell: R ecommend an adjacent or complementary product after acustomer completes a purchase.●Replenishment: W hen a customer purchases a product that needsreplenishment, automatically follow up to prompt a repurchase.Installation InstructionsTo install Drip’s Magento extension, l og in to your Drip account and:1.Click the three dots in the upper-right of the screen ().2.Navigate to I ntegrations, then click E commerce on the left.3.Click M agento. From there, follow the on-screen instructions.。
Magento中文用户手册目录2010年3月7日12:54•Magento介绍•概览•什么是Magento•Magento的元素和专业术语•Magento的程序架构•Magento入门•概览•Magento的系统需求•Magento下载•Magento安装和配置•Magento后台控制面板介绍•建立目录•概览•产品目录概念总览•设置默认项•创建分类•分类中添加产品•定制分类页面的外观•在分类页面中使用静态区块•属性•创建属性•管理属性集•产品•设定配置和属性•创建简单产品•创建可配置产品•创建分组产品•相关产品,推荐销售,交叉销售•产品比较功能•层级导航•产品级别制定外观•库存管理•产品批量更新•URL重写•为销售做准备•结账流程•本地化设置•税收设置•发货选项•发货设置•发货方法•收款•支付方法和PayPal账号•Google Checkout•促销,市场营销和内容页•顾客个性化•收藏夹•产品比较功能•最近浏览/比较的产品•新产品•RSS订阅•层次性定价•目录定价规则•购物车定价规则•简报•静态区块•着陆页•投票•搜索大纲及重定向•快速搜索•高级搜索•客户•客户默认选项•联系选项及电子邮件•创建新客户•客户用户组•批量更新客户•客户账号的前台及后台功能•在线客户•报表及分析•报表•报表快速预览•分析•订单管理•概览•新建订单•销售订单选项•管理及修改订单•用户生成内容•评级和评论•标签•通过电子邮件给朋友推荐产品•Magento升级•概览•使用magento connect升级Magento•MEC 多店面多IP网店系统•多店多IP关键价值及功能•旧网站数据迁移服务•magento与各类购物车比较•Magento介绍和优缺点•OSCommerce介绍和优缺点•OSC Max, CRE Loaded, Zen Cart和X-Cart介绍和优缺点•FreeWay和Virtuemart介绍和优缺点Magento介绍2010年3月7日0:23概览在阅读手册中详细介绍Magento之前,让我们先大概介绍一下Magento这个项目。