Webdynproforabap入门教程
- 格式:ppt
- 大小:934.00 KB
- 文档页数:25

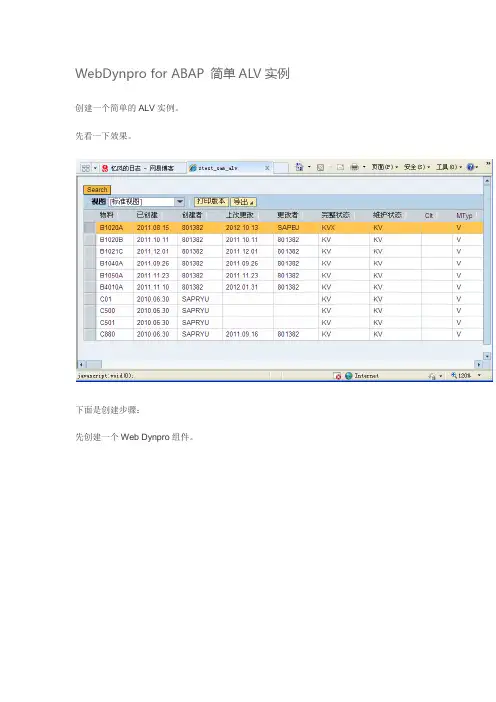
WebDynpro for ABAP 简单ALV实例创建一个简单的ALV实例。
先看一下效果。
下面是创建步骤:先创建一个Web Dynpro组件。
添加ALV组件在COMPONENTCONTROLLER 的Properties中添加ALV组件。
在View中添加两个控件,一个Button一个ViewContainerUIElement。
设置VCU_ALV设置Button的Text和事件onAction。
添加Context页面加载时绑定ALV控件DATA: dyn_node TYPE REF TO if_wd_context_node.dyn_node = wd_context->get_child_node( name = 'LT_MARA' ). DATA: lo_interfacecontroller type ref to iwci_salv_wd_table.lo_interfacecontroller = wd_this->wd_cpifc_alv( ).lo_interfacecontroller->set_data( dyn_node ).点击Search按钮时显示数据。
DATA lo_nd_lt_mara TYPE REF TO if_wd_context_node.DATA lt_lt_mara TYPE wd_this->Elements_lt_mara.* navigate from <CONTEXT> to <LT_MARA> via lead selectionlo_nd_lt_mara = wd_context->get_child_node( name = wd_this->wdctx_lt_mara ).* @TODO handle non existant child* IF lo_nd_lt_mara IS INITIAL.* ENDIF.** @TODO compute values** e.g. call a model function*SELECT * INTO TABLE lt_lt_mara FROM MARA UP TO 50 ROWS.lo_nd_lt_mara->bind_table( new_items = lt_lt_mara set_initial_elements = abap_true ). 然后保存激活各项。

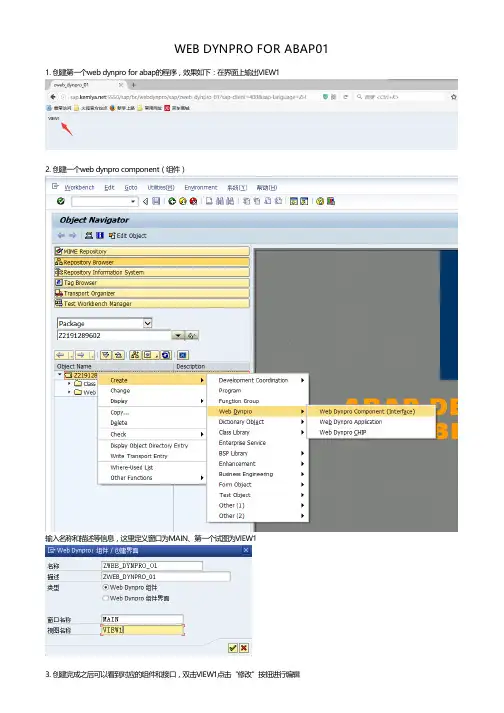
WEB DYNPRO FOR ABAP01 1. 创建第一个web dynpro for abap的程序,效果如下:在界面上输出VIEW1
2. 创建一个web dynpro component(组件)
输入名称和描述等信息,这里定义窗口为MAIN、第一个试图为VIEW1
3. 创建完成之后可以看到对应的组件和接口,双击VIEW1点击“修改”按钮进行编辑
可以使用拖拽方法在界面上创建元素,这里使用INSERT ELEMENT方法
在界面上创建一个TEXT_VIEW元素
修改property中的text,改为view1
4. 创建一个web dynpro application
输入application名称和描述
创建完成之后保存,我们可以获得一个url地址
5. 打开游览器,输入刚才的url地址,输入gui的账号、密码和客户端
登陆后就可以看到我们创建的web页面了。
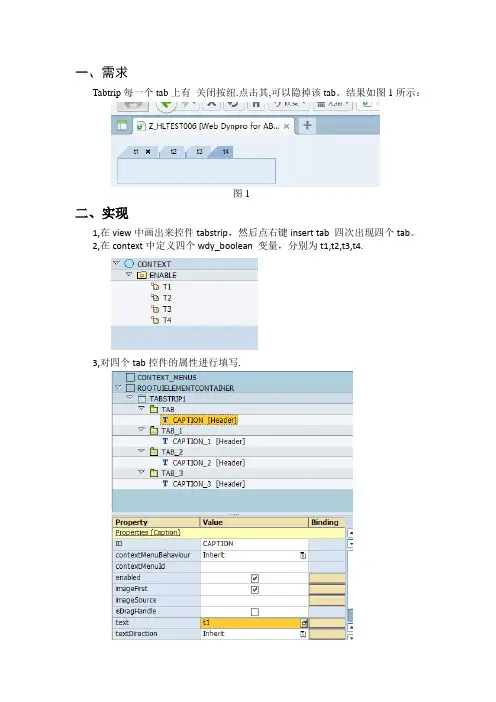
一、需求Tabtrip每一个tab上有关闭按纽.点击其,可以隐掉该tab。
结果如图1所示:图1二、实现1,在view中画出来控件tabstrip,然后点右键insert tab 四次出现四个tab。
2,在context中定义四个wdy_boolean 变量,分别为t1,t2,t3,t4.3,对四个tab控件的属性进行填写.4,点击tab属性visible的binding按钮,让其分别于context的变量进行绑定。
5,填写tabstrip属性,其中事件onClose的栏位中写一个on_close方法,6,双击on_close,进入代码编辑器,代码如下:method ONACTIONON_CLOSE .data: lo_Node type ref to If_Wd_Context_Node,lo_Elem type ref to If_Wd_Context_Element,ls_context type wd_this->element_ENABLE,lw_name type string.lw_name = wdevent->GET_string( 'TAB' ).* nodelo_Node = wd_Context->get_Child_Node( Name = 'ENABLE' ).* get attributelo_Node->get_Static_Attributes( importing Static_Attributes = ls_context ).IF lw_name cs'TAB '.clear:ls_context-T1.ELSEIF lw_name cs'TAB_1'.clear:ls_context-T2.ELSEIF lw_name cs'TAB_2'.clear:ls_context-T3.ELSEIF lw_name cs'TAB_3'.clear:ls_context-T4.ENDIF.* bind structurelo_Node->bind_structure( new_item = ls_context SET_INITIAL_ELEMENTS = abap_true ).endmethod.method WDDOINIT .data: lo_Node type ref to If_Wd_Context_Node,lo_Elem type ref to If_Wd_Context_Element,ls_context type wd_this->element_ENABLE.* nodelo_Node = wd_Context->get_Child_Node( Name = 'ENABLE' ).* get attributelo_Node->get_Static_Attributes( importing Static_Attributes = ls_co ntext ).ls_context-T1 = abap_true.ls_context-T2 = abap_true.ls_context-T3 = abap_true.ls_context-T4 = abap_true.* bind structurelo_Node->bind_structure( new_item = ls_context SET_INITIAL_ELEMENTS = abap_true ).endmethod.8,激活程序。
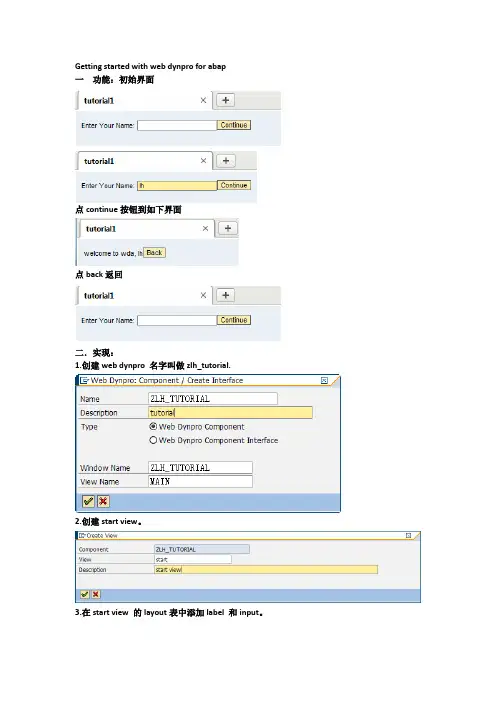
Getting started with web dynpro for abap一功能:初始界面点continue按钮到如下界面点back返回二.实现:1.创建web dynpro名字叫做zlh_tutorial.2.创建start view。
3.在start view 的layout表中添加label 和input。
4.在label的属性中添加如下:5.添加一个按钮,text属性设置为continue,添加onaction事件。
6.在inbound plugs表中添加如下:7.创建main node如下:8.创建name attribute。
9.将input值和name绑定:10.创建result view ,添加text1 类型为textview,button text属性为back。
11.在result view的context中添加如下node 和attribute:12将text1的text属性和name绑定13.在button中添加事件back。
14.在inbound plugs中添加如下:15在COMPONENTCONTROLLER中添加main node和name attribute,将start view中的main 和COMPONENTCONTROLLER中的main绑定。
16.在result的WDDOMODIFYVIEW中添加以下代码:method WDDOMODIFYVIEW.DATA lo_nd_main TYPE REF TO if_wd_context_node.DATA lo_el_main TYPE REF TO if_wd_context_element.DATA ls_main TYPE wd_this->Element_main.DATA lv_name TYPE wd_this->Element_main-name.* navigate from <CONTEXT> to <MAIN> via lead selectionlo_nd_main = wd_context->get_child_node( name = wd_this->wdctx_main ).* @TODO handle non existant child* IF lo_nd_main IS INITIAL.* ENDIF.* get element via lead selectionlo_el_main = lo_nd_main->get_element( ).* @TODO handle not set lead selectionIF lo_el_main IS INITIAL.ENDIF.* get single attributelo_el_main->get_attribute(EXPORTINGname = `NAME`IMPORTINGvalue = lv_name ).concatenate'welcome to wda,' lv_name into lv_nameseparated by space.lo_el_main->set_attribute(exportingname = 'Name'value = lv_name).endmethod.17.在ONACTIONBACK 中添加以下代码:method ONACTIONBACK .DATA lo_nd_main TYPE REF TO if_wd_context_node.DATA lo_el_main TYPE REF TO if_wd_context_element.DATA ls_main TYPE wd_this->Element_main.DATA lv_name TYPE wd_this->Element_main-name.* navigate from <CONTEXT> to <MAIN> via lead selectionlo_nd_main = wd_context->get_child_node( name = wd_this->wdctx_ma in ).* @TODO handle non existant child* IF lo_nd_main IS INITIAL.* ENDIF.* get element via lead selectionlo_el_main = lo_nd_main->get_element( ). * @TODO handle not set lead selection IF lo_el_main IS INITIAL.ENDIF.* get single attributelo_el_main->get_attribute(EXPORTINGname = `NAME`IMPORTINGvalue = lv_name ).CLEAR LV_NAME.lo_el_main->set_attribute(exportingname = 'Name'value = lv_name).wd_this->fire_tostart_plg().endmethod.18. 将result和start view拖到窗口。

一、WebDynpro For ABAP 基础
本节中主要记录WebDynpro For ABAP的基础操作.如各种UI Elment的使用,Context的使用等.
本节所涉及知识,主要集中于标准教材NET310.
案例一:WebDynpro环境准备
一:需求
如果我们的SAP没有与Portal进行集成,那么需要我们进行相关的配置,这样才能访问我们的WD Application.
特别是我们自己随便找了一个SAP开发机,我们又无法通过WD自动生成的URL进行访问写成的WD,这时候,我们就需要配置WebDynpro浏览环境
如下面的例子:
使用该URL进行访问:
当我们配置完成后,我们可以访问该WD Application了.
二.实现
1. 原理
SAP Notes: 1088717
https://websmp230.sap-
ag.de/sap(bD16aCZjPTAwMQ==)/bc/bsp/spn/sapnotes/index2.htm?numm=1088717
2. 操作: 激活Service
Transaction Code:SICF
默认,执行F8:
然后对应上的原理,进行激活相关的service:星号表示激活该节点下的所有服务。
2. 操作: 添加local hosts
文件路径: C:\WINDOWS\system32\drivers\etc
对上面的文件以notepad打开:
追加一行: 9.121.12.117
Note
# 上面一行中,前面的IP是你的SAP服务器的IP,如果是本机,可以试成127.0.0.1 ; 这里我的系统是:
# 后面一行,是你假想的一个域名格式。
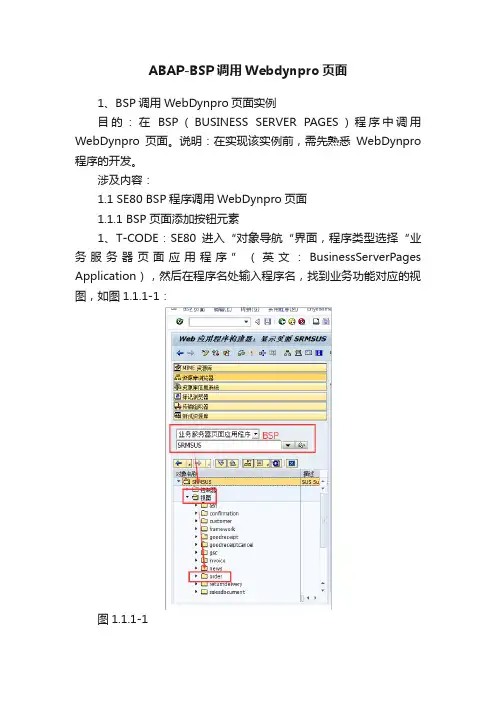
ABAP-BSP调用Webdynpro页面
1、BSP调用WebDynpro页面实例
目的:在BSP(BUSINESS SERVER PAGES)程序中调用WebDynpro页面。
说明:在实现该实例前,需先熟悉WebDynpro 程序的开发。
涉及内容:
1.1 SE80 BSP程序调用WebDynpro页面
1.1.1 BSP页面添加按钮元素
1、T-CODE:SE80进入“对象导航“界面,程序类型选择“业务服务器页面应用程序”(英文:BusinessServerPages Application),然后在程序名处输入程序名,找到业务功能对应的视图,如图1.1.1-1:
图1.1.1-1
说明:
a、本练习对采购订单进行更改。
2、找到要添加WebDynpro页面的BSP视图页面,然后双击进入页面代码中,并将代码更改为可编辑状态,如图1.1.1-2:
图1.1.1-2
3、在BSP页面需要添加按钮的位置处添加按钮代码,如图1.1.1-3:
图1.1.1-3
说明:
a、代码如下:。
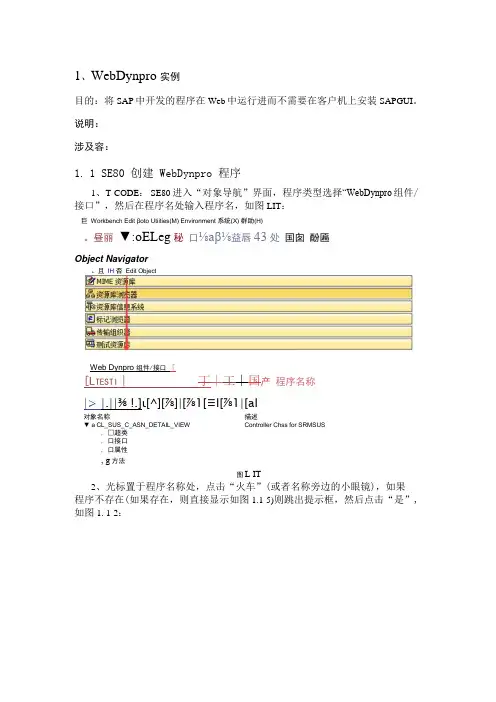
1、WebDynpro 实例目的:将SAP中开发的程序在Web中运行进而不需要在客户机上安装SAPGUI。
说明:涉及容:1.1 SE80 创建 WebDynpro 程序1、T-CODE: SE80进入“对象导航”界面,程序类型选择“WebDynpro组件/ 接口”,然后在程序名处输入程序名,如图LIT:巨Workbench Edit βoto Utiities(M) Environment 系统(X) 群助(H)。
昼丽▼:oELeg秘口⅛aβ⅛益唇43处国囱酚匾Object Navigator。
且IH 否Edit ObjectWeb Dynpro 组件/接口「[L TESTI∣丁∣工∣国产程序名称∣> ∣.∣∣⅜ !.]ι[^][⅞]∣[⅞1[≡l[⅞1∣[al对象名称描述▼ a CL_SUS_C_ASN_DETAIL_VIEW Controller Chss for SRMSUS, □超类, 口接口, 口属性, g方法图L IT2、光标置于程序名称处,点击“火车”(或者名称旁边的小眼镜),如果程序不存在(如果存在,则直接显示如图1.1-5)则跳出提示框,然后点击“是”,如图1. 1-2:Object NavigatorR 。
邕目 ⅛Edit Object 曲MIME 资源库 ―j 品资源库浏览券靠资源后信息翩e! g )标记浏览器! I⅛传输组织器1 [Web Dy 叩r°组件/接口_」❷We b Dynpro 组件/接口 Z_TEST1不存在是否创建对象 |Z_TEST1 3 ?▼ 6 CL_SUS_C_ASN_DETAIL_vW图L ・3图测试奥源座 ©蝌 Web Dynpro 笫件/接口包口口圆囱।国【 是 1 s l χ 方类口性比 超接属亡 图 1.1-23、输入程序描述,选择类型, 接更改,然后打钩,如图1.1-3: 窗口名称及视图名称会自动带出来,可以直 © Web Dynpro :组件/创建界面 ×4、选择“包”(或存于本地对象),然后点击保存,如图图1.1-4图中也可以查询系统标准的或自定义的页格式。
Contents at a GlanceIntroduction (13)1On the Development of Web-Based Applications (23)2WD4A Fra mework (37)3Developin g WD4A A pplications (95)4Multi-Component Applications (185)5Dynamic Component Applications (225)6Reusi ng WD4A Com ponents (261)7Integratin g WD4A Ap plications (293)A Classes and Interfaces (317)B Bibliography (353)C The Author (354)Index (355)Contents Introduction (13)1231.1Mainframe and Client Server Systems (24)1.2Business Server Pages (27)1.3Web Dynpro Framework (29)1.4Web Dynpro for ABAP for Future Use (35)2372.1Web Dynpro Explorer (37)2.1.1View Elements (39)2.1.2View Designer (41)2.1.3“Hello World“ (43)2.2Relationships Between Application and Component (51)2.3Visual Parts (53)2.3.1Interface Views and Plugs (53)2.3.2View Layout (56)2.3.3Windows (60)2.4View Controller and View Context (61)2.4.1Context Property Cardinality (63)2.4.2Singleton and Lead Selection Context Properties (66)2.4.3Supply Function Method (70)2.4.4Sample Applications (71)2.5Controllers and Controller Methods (78)2.5.1Hook Methods (80)2.5.2Instance Methods (82)2.5.3Event Handler Methods (82)2.5.4Fire Methods (83)2.5.5Additional Information About Context (84)2.6Navigation, Inbound Plugs, and Outbound Plugs (87)2.7Phase Model (91)3953.1Transferring Parameters from a URI (95)3.1.1Reading and Displaying Parameters (96)3.1.2Controlling the Navigation Via Parameters (98)7Contents83.2Influencing the Request/Response Cycle (103)3.2.1Automatic Triggering of Requests (104)3.2.2Automatic Triggering of Requests withUser Interaction (106)3.2.3Automatic Forwarding (109)3.3Implementation of Selection Options (111)3.3.1Using Dropdown Lists (112)3.3.2Using Radio Buttons (121)3.4Presentation of Tree Structures (125)3.4.1Sequential Building of Tree Structures (126)3.4.2Recursive Tree Structures (131)3.5User Guidance per RoadMap and Messages (137)3.5.1Structure of the RoadMap Application (138)3.5.2Message Handling (148)3.6Presenting Tables (152)3.6.1Table Output and Row Selection (152)3.6.2Selection of Single or Multiple Rows (157)3.6.3Changing Single Cells Using Variants (159)3.7Calling Popup Windows (163)3.7.1Message Popups (164)3.7.2Query Popups (166)3.7.3Popups with Navigation (168)3.8Using Input Helps (171)3.9Internationalization (172)3.9.1Online Text Repository (173)3.9.2Assistance Class (175)3.10Customization, Configuration, Personalization (176)3.10.1Implicit and Explicit Configurations (177)3.10.2Configuring Components and Applications (177)41854.1 A Model of Layer Separation (185)4.1.1Strict Separation (187)4.1.2Light Separation (188)4.1.3Strict versus Light Separation (189)4.1.4MVC Concepts in the WD4A Framework (190)4.2Defining WD4A Component Usages (192)4.2.1Embedding Windows of Used Components (194)4.2.2Calling Methods of Used Components (195)4.2.3Triggering Cross-Component Events (196)4.2.4External Context Access Using Direct Mapping (197)4.2.5External Context Access Using Reverse Mapping (198)Contents4.3Componentizing an Application (200)4.3.1Structure of the Sample Application (201)4.3.2Implementing the Components (202)4.3.3Result of Componentization (218)4.3.4Redesigning the Sample Application (218)4.3.5Overview of Used Components andSample Applications (224)52255.1Types of Dynamic Changes (225)5.1.1Dynamic Modification of the Properties (226)5.1.2Dynamic Modification of the UI Hierarchy (229)5.1.3Dynamic Binding of Properties (234)5.1.4Dynamic Modification of the Context (235)5.1.5Dynamic Modification of Action Assignments (236)5.2Dynamic Programming—A Sample Application (237)5.2.1Dynamic Display of Address Data (237)5.2.2Creating Business Partners (241)5.2.3Metadata for the Address Formats (242)5.2.4Implementation and Layout of the Component (246)62616.1Comparing Classes and Components (261)6.2ALV Component SALV_WD_TABLE (263)6.2.1Using the ALV Component (264)6.2.2Accessing the ALV Configuration Model (267)6.3OVS Component WDR_OVS (270)6.4SO Component WDR_SELECT_OPTIONS (275)6.5Developing Input-Help Components (282)6.5.1Implementation of the Input-Help Component (283)6.5.2Using the Input-Help Component (286)6.6Enhancements of Components (288)72937.1Integration into the SAP NetWeaver Portal (293)7.1.1Triggering Portal Events (294)7.1.2Registration to Portal Events (295)7.2Graphical Display of Data (297)7.2.1Using the BusinessGraphics View Element (299)7.2.2Connecting the Data Source (303)9Contents107.3Interactive Forms Via Adobe Integration (308)7.3.1System Requirements for Interactive Forms (309)7.3.2Scenario for Using Interactive Forms (309)7.3.3Using the InteractiveForm View Element (311)317A.1Component (317)A.1.1IF_WD_COMPONENT (317)A.1.2IF_WD_COMPONENT_USAGE (320)A.1.3IF_WD_COMPONENT_USAGE_GROUP (324)A.1.4IF_WD_PERSONALIZATION (325)A.2Context (326)A.2.1IF_WD_CONTEXT (326)A.2.2IF_WD_CONTEXT_NODE (328)A.2.3IF_WD_CONTEXT_NODE_INFO (329)A.2.4IF_WD_CONTEXT_ELEMENT (332)A.2.5CL_WD_CONTEXT_SERVICES (332)A.3View (335)A.3.1IF_WD_ACTION (335)A.3.2IF_WD_VIEW (336)A.3.3IF_WD_VIEW_CONTROLLER (337)A.3.4IF_WD_VIEW_ELEMENT (338)A.3.5IF_WD_VALIDATION (338)A.4Window (339)A.4.1IF_WD_WINDOW (339)A.4.2IF_WD_WINDOW_CONTROLLER (341)A.5Integration (341)A.5.1CL_WDR_PORTAL_OBNWEB_SERVICE (341)A.5.2IF_WD_PORTAL_INTEGRATION (342)A.5.3CL_WD_ADOBE_SERVICES (342)A.6Application (342)A.6.1IF_WD_APPLICATION (342)A.7Other (343)A.7.1IF_WD_CONTROLLER (343)A.7.2IF_WD_MESSAGE_MANAGER (344)A.7.3IF_WD_NAVIGATION_SERVICES (346)A.7.4CL_WD_CUSTOM_EVENT (348)A.7.5CL_WD_RUNTIME_SERVICES (348)A.7.6CL_WD_UTILITIES (349)Contents353354 Index (355)11IntroductionAfter you have read this book and implemented the examples and scenarios, you will have ample knowledge to implement the new SAP user interface strategy based on the WD4A (Web Dynpro for ABAP) framework. The goal of this book is to create a foundation that can be used with the SAP Help Por-tal () and the SAP Developer Network () to meet the requirements and challenges of new projects regarding Web Dynpro for ABAP and to find a solution whenever questions arrise.The WD4A framework enables you to use different methods for solving a problem. For example, program fragments can be created either manually or by using a code wizard. The layout can be designed by adding view elements to the UI tree, or by using Drag&Drop in the layout preview. For this reason, the procedures presented in this book use rather basic and easy-to-compre-hend methods; however, there may be a specific design procedure for which a different control sequence is used and is not mentioned here. It's up to you to use your intuition and curiousity to find other solutions, and in so doing, enhance the knowledge that you will gain in this book.AudienceThis book is intended for ABAP application developers who are familiar with the ABAP Development Workbench and the user interface development methods available, and who now want to implement business processes and their user interaction based on the WD4A framework.This book will help you to better support users, and it will help you with problems that can arise during the migration to the WD4A framework, for example, the separation of business and presentation logic while observing the Model View Controller (MVC) concept, or addressing component-based reuse-focused software development. This book will discuss general con-cepts for designing and developing web-based systems and specifically detail their specifications when they are implemented within the WD4A frame-work.Before and while this book was being written, there existed great communi-cation between the first application developers using the WD4A framework and the groups responsible for the design and implementation of the frame-work. Therefore, new ideas and suggestions for enhancing and extending the13IntroductionWD4A framework reached the responsible departments very quickly. It is assumed that the WD4A framework will be continuously developed and extended by new functionalities. Therefore, this book should encourage you to discover these new features, to test them, and, ultimately, to integrate the growing library of view elements in your applications.If you already gained some experience in developing web applications based on Java Server Pages (JSP), Business Server Pages (BSP), or other technolo-gies, you might be surprised at the restrictive handling of the WD4A frame-work when it comes to the manual integration of JavaScript. This restriction was introduced in order to enable the WD4A applications to support emerg-ing client technologies that don't use JavaScript for client-side flow control.PrerequisitesBecause the WD4A framework was developed completely in ABAP Objects, you will encounter object-oriented concepts throughout the implementa-tion. Therefore, a sound knowledge of object-oriented ABAP programming is integral for understanding the topics discussed in this book; we cannot go into detail regarding the concepts of object-oriented programming and its implementation in ABAP Objects.1You should be familiar with handling classes and interfaces in ABAP Objects and with the most common ABAP language items. WD4A applications inte-grate a number of technologies like HTTP, HTML, CSS, XML, and client-side scripting. These are not specific to the WD4A framework, but are the foun-dation for every other web application. The objective of the WD4A frame-work development is to encapsulate the complex and specific details and connections of these technologies so that they will eventually become trans-parent to you and you can then completely focus on implementing the pro-gram logic.To reproduce the examples given in this book, you can download a test ver-sion of SAP NetWeaver Application Server ABAP from the SAP Developer Network () that can be installed locally on your PC. In the Downloads•SAP Evaluation Software•Web AS area, navigate to the Sneak Preview SAP NetWeaver 04s—Full ABAP Edition with Web Dynpro for1Whenever it makes sense, publications and sources that provide additional useful informa-tion for specific areas will be referenced. SAP PRESS, in particular, offers a wide range of literature in this respect (). Additional references are listed in the bibliography (see Appendix B).14IntroductionABAP package. For detailed information about the installation process and system requirements, go to the Installation Guide file.To better understand the WD4A framework, you should be at least some-what familiar with the following topics:̈Communication processes in HTTP or HTTP request/response cycles̈Particularities of programming within distributed development environ-ments̈Differences between client-side and server-side scripting̈Purpose and use of design patterns in programmingThe parameters to be used for designing layouts are based on Cascading Style Sheets (CSS) standards. It is therefore helpful to have a certain overview of CSS language items and units.StructureFor most developers, the actual implementation is the quickest way to become familiar with a new technology. The structure of this book is there-fore based on using simple examples and scenarios in the introductory sec-tions to illustrate the concepts. By our first presenting the architecture of the WD4A framework, you'll be introduced to the most important steps of com-ponent and application development. ABAP Objects constructs belong to the essential part of a WD4A application so that another focus should also be on the presentation and discussion of program fragments that can be used to solve problems.̈Chapter 1deals with some particularities regarding the design and the development of web-based applications. Based on the functionalities of the BSP technology and its predecessors, you will get to know the charac-teristics and advantages of the WD4A framework. The present status and the concepts behind it will be closely examined. When developing WD4A applications, the component is the most important part; WD4A applica-tions can be composed of one or more components. The component-based software development therefore facilitates reuse and reduces devel-opment costs.̈Chapter 2 introduces you to the WD4A development environment, the Web Dynpro Explorer that is integrated in the Object Navigator. First, you learn about the immediately visible parts, such as the component control-ler, view, window and application. Then, when you have the knowledge15Introduction16necessary to create your first simple components, you learn how to design a simple, structured view, and embed it in a window.Using three differently structured “Hello World“ applications, you get your first insight into using the context, the data binding, the view ele-ment properties, and the implementation of supply function methods, fol-lowed by the other parts of the framework. These include the functions of the inbound and outbound plugs, the functions of the actions and their event handler methods, the parts of the context and of the framework controller methods. The framework controller methods are called at dif-ferent times in the phase model of the WD4A framework and form a kind of user exit of the framework that enables you to influence the program-matic process.̈Chapter 3 builds on your newly acquired abilities and knowledge in order to help you develop more complex components based on the available view elements. By implementing scenarios that might be familiar to you from web applications based on other technologies (e.g., periodic polling of the web browser, automatic forwarding, etc.), additional relationships are shown that exist within the WD4A framework among component, window, and view elements.Whereas the components created and described so far used only simple view elements like the TextView view element, this chapter introduces important view elements contained in the view element library of the WD4A framework and describes their function. Dropdown lists and radio buttons are different with regard to their usage, but they are based on the same concepts with regard to their implementation and handling in the WD4A framework. They are discussed using example applications. Addi-tionally, you learn how to output messages about the user via the message manager. The most complex and most commonly used view element when visualizing business data is the Table element. For this element, we'll show you display formats and properties and discuss the handling of cell variants. This chapter also provides procedures for implementing pop-ups and using the RoadMap and Tree elements. It concludes with a list of the input help concepts implemented in the WD4A framework.̈Chapter 4 deals with the concepts required for developing multi-compo-nent applications. Examples whose structure is based on the Model View Controller concept are developed. The layout is defined separately from the business logic, and the data provision for the view can be imple-mented in methods of the view controller. The view controller therefore also controls the view. Based on this concept, even more complex applica-Introductiontions can be separated into different components: UI components that organize the arrangement of view elements. The main component or con-troller component is responsible for instantiating the use and its lifetime;the model component is responsible for data storage and program logic.The various components communicate by using context and events that are accessible via their interfaces.When implementing the componentization, the context, as a data con-tainer, and its mapping types are the central parts. Context data can be defined in the component, in the view, and in the window controller. By defining the context nodes as interfaces, mapping components can access and change the data of other components. The concept of direct and reverse context mappings is described in this context.̈During the design phase of complex WD4A applications, requirements that change program processes and layout structures at runtime can emerge. To be able to consider these requirements when developing com-ponents, the WD4A framework enables the dynamic programming of components. The concepts that pertain to the ability to program dynami-cally will be described in Chapter 5. You'll learn how you can add view elements to the UI hierarchy of the layout definition at runtime and thereby dynamically influence their properties. We will also show you how context node attributes can be added and the properties of dynami-cally created view elements can be bound against them. For action-trigger-ing view elements like the Button element, actions can also be defined at runtime in dynamic programming, which then trigger event handler methods generated by the WD4A framework.These concepts of dynamic programming will be illustrated in an example application: business partner addresses will be presented in the client under consideration of the format used in the respective country. Because parts of the address and their arrangement can be different from country to country, the arrangement of the view elements will be created dynam-ically at runtime. Additionally, parameters are determined from the address data at runtime. These parameters can be dynamically generated to enable the localization of the respective business partner via Google Map, by using a Uniform Resource Identifier (URI).̈In Chapter 6, the concepts already presented are extended for reuse in the WD4A framework. By reusing existing components, current resources can be used more efficiently. The idea of reusability of software modules has been examined, propagated, and applied for many years. Accelerated17Introduction18development cycles and cost reduction are two main reasons for further promoting these concepts.The WD4A framework now enables you to build component-based busi-ness applications from the user interface and to structure them in a reus-able way. Based on the componentization described in Chapter 4, this chapter will show you how to implement the use of the ABAP List Viewer (ALV) component, the object value selector component, the select options component, and the user-specific development of input-help components. For the tabular presentation of data, the ALV component provides exten-sive personalization and configuration options that are described in detail. Input helps support the user when editing forms. Simple input helps based on the ABAP Dictionary can be implemented very quickly by select-ing the context attribute type. For more complex selection scenarios, they can be implemented in a component to be available to other WD4A appli-cations.̈Chapter 7 finally deals with the integration possibilities of WD4A applica-tions. These include the integration in the SAP NetWeaver Portal and the resulting possibilities for implementing client-side eventing. Using the SAP NetWeaver Portal, scenarios are enabled by integrating applications that are based on other web technologies. This enlarges the integration potential in heterogeneous system landscapes.The integration of business graphics in WD4A components enables the presentation of charts and geographic map material. In this context, you can anticipate default implementation steps. From different chart types and chart rendering methods—comparable to those given in Microsoft Excel—you can select the display format that best meets your needs. We will present the numerous possibilities with an example that uses the Goo-gle Web APIs service as a data source. You will also get to know a scenario that shows the integration of the Adobe Document Service in the WD4A framework, which enables the creation of interactive PDF forms that can be edited both online and offline.ConventionsThe WD4A framework uses the term context for describing structured data storage within the controller. The main parts of the context are context nodes and context attributes. From the names of context nodes and context attributes, along with some extensions, the WD4A framework generates the names of the type definitions and interfaces. The length of these names,Introductionhowever, is limited to 30 characters. You should keep this in mind when selecting the names of context nodes and context attributes. For example, creating a context node named EXAMPLE_NODE in the V_DEFAULT view results in the type definition if_v_default=>element_example_node being stored in an interface. The total length to be observed results from the element_ and example_node parts. Therefore, the part of the type definition following the => character combination cannot exceed a maximum of 30 characters.To unify the IDs and to better distinguish the individual view elements, as far as they are mentioned in this book, we will identify them using the prefixes shown in Table 1.BusinessGraphics BGR_*BGR_SALESButton BTN_*BTN_SAVEButtonRow BTR_*BTR_DETAILSCaption CPT_*CPT_COLUMN DropDownByIndex DDI_*DDI_COUNTRY DropDownByKey DDK_*DDK_REGIONFileUpload FUD_*FUD_CONTRACTGroup GRP_*GRP_FORMHorizontalGutter HOG_*HOG_ROADMAPInputField INP_*INP_NAMEInteractiveForm IFO_*IFO_CUSTOMSLabel LBL_*LBL_INPUTLinkToAction LTA_*LTA_SEARCHLinkToURL LTU_*LTU_VENDORRadioButton RBT_*RBT_MALE RadioButtonGroupByIndex RBI_*RBI_GENDER RadioButtonGroupByKey RBK_*RBK_TYPRoadMap RMP_*RMP_DIMENSIONS RoadMapStep STP_*STP_DIMENSIONTable TBL_*TBL_ADDRESSTextEdit TXE_*TXE_INFOTable 1 Prefixes of Used View Element IDs19IntroductionTextView TXV_*TXV_INTROTimedTrigger TTR_*TTR_NOTIFY TransparentContainer TCO_*TCO_TABLETray TRY_*TRY_FORMTree TRE_*TRE_SIMPLETreeNodeType TNT_*TNT_FOLDERTreeItemType TIT_*TIT_FILE ViewContainerUIElement VCU_*VCU_ROADMAPTable 1 Prefixes of Used View Element IDs (cont.)For component elements, the prefixes listed in Table 2 are selected.Window W_*W_DEFAULTView V_*V_DEFAULTInbound-Plug IP_*IP_STARTOutbound-Plug OP_*OP_EXITTable 2 Prefixes of Component ElementsFor distinguishing different parts within the components, the font style con-ventions shown in Table 3 are used:View element TextViewView element ID TXV_INTROProperty textProperty value header1Context node CONTENTContext attribute MANDTTable 3 Identification of Component Parts20IntroductionController attribute mv_*, ms_*, mt_*, mr_*Controller actions DO_SET_COUNTERTable 3 Identification of Component Parts (cont.)Additionally, the WD4A framework contains the reserved keywords from Table 4.CONTROLLER CONTROLLER_NAME COMMAND COMPONENT EVENT EVENT_NAMEF_APPL_CLASS F_ROOT_INFO F_ROOT_NODEFIRST_INIT PLUG PARAMETERSRESULT VIEW VIEW_NAMETable 4 Reserved Keywords in the WD4A FrameworkThe names of components and applications used in this book have the prefix ZEXP_*. All components and applications described in the following chapters and sections and using this prefix are available for download in two formats on the web pages of the book under or www.sap-press.de/1214 respectively. You can either load the examples as a transport into your installation of the SAP NetWeaver Application Server ABAP, or implement them manually using screenshots and ABAP statements in TXT format.In some of the screenshots, German user interface elements appear. Where these words are referred to in the text, we have provided the English trans-lation in parentheses.AcknowledgementWhen compiling the contents of this book—already during the development phase of the WD4A framework—I had the great advantage to gain insights into the design, to cooperate on additional functionalities, and to build up the necessary expertise in this environment thanks to independent web projects (based on previous SAP technologies).21IntroductionWhenever I had to become familiar with areas that were still unknown to me, I could rely on the knowledge of the respective SAP experts. Without their valuable support, this book would not have been possible.I would like to thank Rüdiger Kretschmer, Brian McKellar, and Dirk Feeken for their suggestions and tips regarding Web Dynpro. When I was working on the technical details and specific scenarios, I could always rely on the direct feedback of Regina Breuer, Thomas Szuecs, Ariane Buster, Uwe Klinger, Aiga Uhrig, Klaus Ziegler, Stefanie Mayer, and Heidi von Geisau—thank you all, and may you continue having great ideas and fun developing! For their time spent reviewing the material, their tips regarding the contents and the structure, I would particularly like to thank Regina Breuer, Uwe Klinger, Thomas Szuecs, Thomas Weiss, and especially my editor Stefan Proksch. When I was reviewing and designing specific scenarios and exam-ples, I got great support from Nestor Sosa, Thorsten Kampp, and Dirk Jen-nerjahn. My biggest thank you, however, goes to Claudia for her love, sup-port, and understanding for the enormous amount of time that is taken up by such a project.Additionally, I could always rely on the WD4A forum in the SAP Developer Network (SDN) when I was compiling the topics and contents. The forum, which was only accessible to SAP-internal users until the official market launch of the WD4A framework, gave me a detailed insight into the devel-opers' questions and problems that arose during their adjustment to the new UI technology. Predicated on this basis, I could design parts of this book, compose individual subject areas, and develop examples from the scenarios described therein.In this way, even before the first version of the WD4A framework to be released to the market was finalized (Release SAP NetWeaver 2004s), I could draw on the extensive experience and procedures of application developers during the making of this book, and hopefully pass on their wisdom in a sen-sible way.22In this chapter, we'll take a closer look at the development of WD4A(Web Dynpro for ABAP) applications. Our goal here is to clarify thecoherences that exist within a component among component control-ler, view controller, and window controller. To do this, we'll intro-duce several typical web scenarios, as well as a number of more com-plex view elements, for presenting tree structures and tables, forexample.3Developing W D4A Applications3.1Transferring Parameters from a URIParameters and their values that are part of the Uniform Resource Identifier's (URI) query component can be attached to the URI of an application or website to be called. The query component can be used in many ways. Two potential scenarios are the transfer of data between two applications that call each other or the control of actions on the server.The WD4A framework implements the transfer of parameter value pairs in the URI's query component as follows:[parameter_name]=[parameter_value]The first parameter pair is attached to the URI using the ? character; all other parameter pairs are separated by the & character. Otherwise, the restrictions for query components listed in RFC 23961 apply; reserved characters are ;, /, , :, @, &, =, +, ,, and $. A URI with two parameter value pairs could therefore have the following format:/search?hl=com&q=webdynpro1RFCs (requests for comments) deal with standards as well as advanced ideas, concepts, and descriptions about the Internet.95。
web dynpro for abap基础知识(1)空闲在家开始学习sap课程NET310 abap web dynpro。
想学这个课程是因为Alex 说,现在对web dynpro for abap的需求会越来越大。
想到到他搞sap已经十几年了,先相信他这一判断。
这个课程以BC400和BC401(abap objects)为基础。
BC400没有完整的学过,BC401也没学过。
看了前几个单元,先纸上谈兵一番,总结一下关于wda(web dynpro for abap)的基础知识。
web dynpro for abap采用了MVC的设计方法。
一个web dynpro component包括window,views和component controller。
window和view主要和UI有关。
windows只是一种容器,在一个component内一个window可以包含任意多个view,而component controller只有一个。
如果一个component不需要view,那么windows也就相应无需存在了。
一个web dynpro component可以与一个URL关联,通过浏览器来访问,或者作为另一个web dynpro component的sub-component供调用。
web dynpro component的controller分为四类:component controller:这种类型的controller在一个web dynpro component内只存在一个,并且没有visual interface。
custom controller:这类controller是可选的,用于封装component controller的sub-function。
view controller:每一个view都有一个对应的view controller,负责与视图有关的逻辑,如检查用户的输入和处理user action。
About the T utorialSAP Web Dynpro is a standard SAP UI technology to develop web applications using graphical tools and development environment integrated with ABAP workbench. The use of graphical tools reduces the implementation effort and helps maintain components in ABAP workbench.This tutorial explains the key concepts of Web Dynpro with relevant screenshots for better understanding.AudienceThis tutorial is designed for all those who want to learn the basics of SAP Web Dynpro and advance in the field of software development.PrerequisitesBasic knowledge of ABAP is a must to understand this tutorial. Understanding the Model-View-Controller (MVC) model and having experience in web applications is a plus. Disclaimer & CopyrightCopyright 2018 by Tutorials Point (I) Pvt. Ltd.All the content and graphics published in this e-book are the property of Tutorials Point (I) Pvt. Ltd. The user of this e-book is prohibited to reuse, retain, copy, distribute or republish any contents or a part of contents of this e-book in any manner without written consent of the publisher.We strive to update the contents of our website and tutorials as timely and as precisely as possible, however, the contents may contain inaccuracies or errors. Tutorials Point (I) Pvt. Ltd. provides no guarantee regarding the accuracy, timeliness or completeness of our website or its contents including this tutorial. If you discover any errors on our website or inthistutorial,******************************************.iT able of ContentsAbout the Tutorial (i)Audience (i)Prerequisites (i)Disclaimer & Copyright (i)Table of Contents .................................................................................................................................. i i 1.WEB DYNPRO ─ OVERVIE W (1)Key Benefits of Using Web Dynpro (2)2.WEB DYNPRO ─ CONFIGU RATION & INTEGRATION (3)Internet Communication Manager (3)Internet Communication Framework (4)Layout Editor in View Designer (5)3.WEB DYNPRO ─ ARCHITE CTURE (6)Metadata (6)Graphical Tools (6)4.WEB DYNPRO ─ NAVIGAT ION (8)How to Create a New View? (10)5.WEB DYNPRO ─ COMPONE NT (11)View (11)Navigation Links and Plug In (12)View Set (12)Web Dynpro Window (13)iiBinding User Interface Elements (16)7.WEB DYNPRO ─ EVENT & ACTIONS (18)8.WEB DYNPRO ─ APPLICA TION (20)9.WEB DYNPRO ─ URL OF AN APPLICATION (21)10.WEB DYNPRO ─ CREATIN G AN APPLICATION (23)How to Create a View and Assign It to a Window? (26)How to Create a View Context for MAINVIEW? (31)How to Create a Web Dynpro Application? (38)Calling a Web Dynpro Application (40)11.WEB DYNPRO ─ COMPONE NT INTERFACES (41)Creating a Web Dynpro Component Interface Definition (41)12.WEB DYNPRO ─ FACELES S COMPONENTS (44)How to Create a Faceless Component? (44)13.WEB DYNPRO ─ ASSISTA NCE CLASS (46)14.WEB DYNPRO ─ SERVICE CALL IN AN APPLICATION (47)15.WEB DYNPRO ─ USING A SERVICE CALL (54)16.WEB DYNPRO ─ DEBUGGI NG AN APPLICATION (55)How to Start the Debugging Process? (55)17.WEB DYNPRO ─ VERSION MANAGEMENT (57)How to Perform Version Comparison? (58)18.WEB DYNPRO ─ MESSAGE S (60)iii20.WEB DYNPRO ─ PERSONA LIZATION & CONFIGURATION (63)Configuration of Application (63)How to Start Component Configurator? (63)Delta Handling in Personalization (64)21.WEB DYNPRO ─ PORTAL INTEGRATION (65)22.WEB DYNPRO ─ INTEGRA TE WDA IN PORTAL (66)23.WEB DYNPRO ─ INTERAC TIVE FORMS (70)How to Create Web Dynpro Application Using Forms? (70)Inserting Forms Using Scenarios (71)How to Insert an Interactive Form? (71)24.WEB DYNPRO ─ SAP LIS T VIEWER (ALV) (72)How to Create an ALV? (72)Using Filters in ALV Output (80)25.WEB DYNPRO ─ ADMINIS TRATION (81)Trace Tool (81)ICM Tracing (83)HTTP Browser Tracing (84)26.WEB DYNPRO ─ MONITOR ING AN APPLICATION (85)ivSAP Web Dynpro Web Dynpro is a standard SAP UI technology that allows you to develop web applicationsusing graphical tools and development environment integrated with ABAP workbench. Using graphical tools reduces the implementation effort and you can better reuse andmaintain components in ABAP workbench.To access Web Dynpro runtime environment and graphical tools in ABAP workbench, you can use Transaction code: SE801.SAP Web DynproKey Benefits of Using Web DynproFollowing are the key benefits of using Web Dynpro for developers in ABAP environment: ∙You can easily maintain and reuse the components for development.∙Less implementation time with the use of graphical tools.∙You can easily change the layout and navigation using graphical tools.∙Easy structure changes.∙With the use of data binding, you can use automatic data transport.∙Ease of integration in ABAP environment.Web Dynpro ABAP is the same as Web Dynpro Java and supports the same set of functions for the application development.2.SAP Web DynproOnce you install ABAP application server, it is necessary to configure it properly for application development.To find the details about ABAP configuration, you can go to SAP Reference IMG -> SAP NetWeaver -> Application ServerIf you are using SAP Solman, you can check this configuration by going to T-Code: SOLAR_LIBRARY.To use Web Dynpro with ABAP application development, you have to make additional configuration for web Dynpro programming.Internet Communication ManagerYou need to set HTTP/HTTPS in ICM service. A service contains following different components:∙Service/Port∙Protocol used in service HTTP/HTTPS∙Processing timeout∙Keep alive timeout∙Service status: Active/inactiveYou can choose Go To -> Service to create, delete, activate or deactivate services. To display the ICM server cache statistics, choose Goto ->StatisticsInternet Communication FrameworkYou should activate the Internet Communication Framework (ICF) service. You can activate this service by going to SPRO -> SAP Reference IMG -> SAP NetWeaver -> Application Server -> Internet Communication Framework -> Activate HTTP service When you install Application server ABAP, all ICF services are in inactive state. You can maintain ICF services using T-code: SICF under ICF tree.You can activate ICF service in the following ways:∙Using the menu option, Service/Host -> Activate∙Using the context menu and choosing Activate Service.Layout Editor in View DesignerYou should activate all the services in SICF for Web Dynpro ABAP to use the layout editor in the view designer.Single Sign OnYou should set SSO on the relevant host.FQDNYou should use fully qualified domain names FQDN and short forms should be avoided.3.SAP Web DynproWeb Dynpro is an ABAP environment for web development and is based on the Model View Controller (MVC) concept of UI programming. It is available for both Java and ABAP as per the platform, and supports similar functions.Web Dynpro has the following features:∙Separation of display and business logic∙Easy change in the layout with the use of graphical tools∙No platform dependency of interfacesFollowing are the key concepts as part of Web Dynpro architecture:MetadataWeb Dynpro provides you with an environment for the development of web-based applications and you can use graphical tools to define web Dynpro application in the form of metadata in application development. You can also define your own events; however, event handling should be defined in a separate code and that has to be executed when an event is triggered.The user interface in Web Dynpro application consists of small elements defined by using Web Dynpro tools. You can also change or enhance the user interface by changing these elements at run time or integrate the elements again.Graphical T oolsThere are a wide range of graphical Web Dynpro tools that you can use to generate web-based applications. You don’t need to create source code for this. Following are the key features of graphical tools in Web Dynpro application:∙Define properties of user interface elements∙Data flow∙User interface layoutFor all these properties, you can use graphical tools without creating a source code.SAP Web DynproBusiness and Application LogicWeb Dynpro allows you to run your application on the front-end and the back-end system can be accessed using service locally or via a remote connection. Your user interface is maintained in Dynpro application and persistent logic runs in the back-end system.You can connect Web Dynpro application to the back-end system using an adaptive RFC service or by calling a web service.MVC Programming ModelWeb Dynpro applications are based on MVC model:Model: This allows the access to back end data in a Web Dynpro application.View: This is used to ensure the representation of data in a web browser.Controller: This is used to control communication between Model and View where it takes input from the users and gets the processes data from the model and displays the data in the browser.4.SAP Web DynproIn Web Dynpro application, you can navigate from one view to the other view using plugs. Run T-code: SE 80 and create a simple Web Dynpro component:We have created a Web Dynpro component with two nodes and two views.VIEW_DISPLAY displays the output in a tabular format and VIEW_MAIN performs search parameters. In VIEW_MAIN you have configured the search layout and VIEW_DISPLAY contains the display layout.In VIEW_MAIN you have configured inbound plugs IN_MAIN and OUT_FROM_MAIN as outbound plugs. Similarly, create an inbound and outbound plugs for VIEW_DISPLAY.How to Create a New View?Step 1: Click the component in object tree and go to the context menu as shown in the following screenshot:Step 2: Enter view name and click on tick mark.End of ebook previewIf you liked what you saw…Buy it from our store @ https://。