油漆喷枪使用说明书精编版
- 格式:doc
- 大小:30.10 KB
- 文档页数:7

油漆喷枪操作流程一、准备工作在进行油漆喷枪操作之前,需要进行以下准备工作:1. 确定工作区域:选择一个通风良好且没有易燃物品的区域作为工作场所。
2. 检查油漆喷枪:确保油漆喷枪处于良好工作状态,检查喷嘴、触发器以及其他部件是否完好无损。
3. 准备油漆:根据需要选择合适的油漆,并进行必要的搅拌和稀释处理。
4. 准备喷涂物体:将需要喷涂的物体进行清洁和打磨,确保表面光滑、干燥、无尘和无油脂等污渍。
二、设置喷枪和调整参数1. 设置喷枪:将喷枪连接到喷涂设备,确保连接稳固且紧固。
2. 调整喷枪参数:根据油漆的类型和所需喷涂效果,调整喷涂压力、喷枪距离、喷嘴孔径等参数。
通常情况下,较粘稠的油漆需要较高的喷涂压力和较大的喷嘴孔径。
三、开始喷涂1. 均匀喷涂基层:首先以均匀的动作,从物体的顶部开始,从左到右或者从上到下的方向进行连续均匀喷涂。
保持喷枪与物体表面的距离大约为20-30厘米,避免过近或过远。
2. 控制喷涂时机:在喷涂过程中,要掌握好喷涂的时机和速度,避免过度喷涂或喷涂不均匀。
动作要连续、流畅,并保持相同的速度和距离。
3. 重叠喷涂:为了确保均匀覆盖和避免漏涂,每次喷涂过程中,应该将前一次喷涂的50%覆盖到下一次喷涂中,即要有一定的重叠区域。
4. 喷涂多层:如果需要增加油漆的厚度或者改变颜色,可以进行多层喷涂。
在上一层干燥后,通过类似的方式进行下一层的喷涂工作。
四、完成喷涂工作1. 关闭喷枪:在完成喷涂工作后,首先关闭喷涂设备,然后将喷漆材料和残渣进行清洁处理。
2. 清洁喷枪:拆解喷枪,将其部件进行清洗。
使用适当的溶剂清洁内部和外部的零件,确保所有油漆残渣都被清除。
检查喷嘴是否堵塞,如有需要进行更换。
3. 存储喷枪:将已清洁的喷枪进行干燥,并妥善存放在干净、干燥、通风的地方,避免受潮或损坏。
总结:油漆喷枪操作流程需要严格按照技术要求进行,以确保工作效果和安全性。
在进行喷涂作业之前,准备工作、设置喷枪和调整参数是关键步骤。

喷枪的用法
喷枪主要用于喷涂工作,例如喷涂汽车、家具、建筑物等表面。
以下是喷枪的基本使用方法:
1. 准备工作:首先,确保喷涂区域没有杂质和灰尘。
然后检查喷枪的喷嘴和喷头是否干净,以免堵塞。
2. 调整喷枪:根据需要,调整喷枪的喷嘴尺寸和压力。
较大的喷嘴可用于喷涂大面积,较小的喷嘴则适用于精细喷涂。
3. 稀释涂料:将涂料倒入喷枪的杯子中,并根据需要稀释。
使用恰当的稀释剂,按照涂料制造商的建议进行稀释。
4. 尝试喷涂:在实际喷涂之前,可以先在纸板或废料上进行尝试。
这样可以确保喷涂效果和喷涂量的准确性。
5. 喷涂技巧:将喷枪保持与表面平行,并与表面保持适当距离(通常为6至8英寸)。
均匀地移动喷枪,确保涂料均匀分布在表面上。
6. 多次喷涂:对于某些涂料,可能需要多次喷涂以获得所需效果。
在每次喷涂之间,应等待涂料完全干燥。
7. 清洁喷枪:在使用完毕后,务必彻底清洁喷枪。
将残留的涂料倒掉,然后用稀释剂清洗喷枪的各个部分,直至液体变清澈为止。
请注意,这只是一个简单的喷枪使用指南,具体的使用方法可能会因喷涂材料和设备型号的不同而有所变化。
在使用喷枪之前,请阅读和遵守相关的安全指南和设备说明。
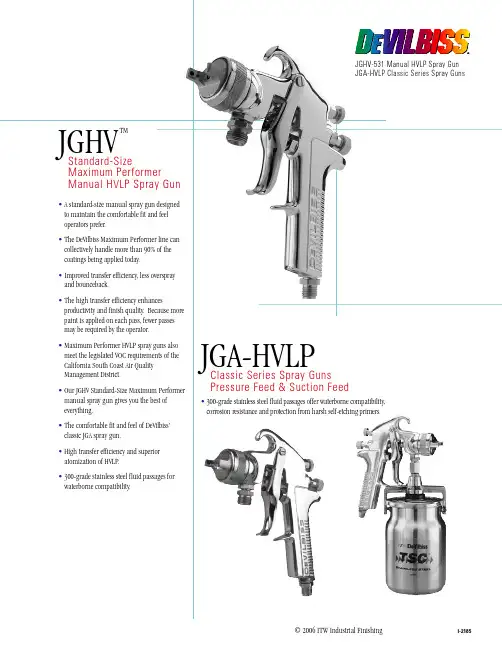
Maximum Perf o rmer Manual HVLP Spray GunI-2185J G H V-531 Manual HVLP Spray Gun JGA-HVLP Classic Series Spray GunsA standard-size manual spray gun designed to maintain the comfortable fit and feel The DeVilbiss Maximum Performer line can collectively handle more than 90% of the Improved transfer efficiency, less overspray The high transfer efficiency enhancesproductivity and finish quality. Because more paint is applied on each pass, fewer passes corrosion resistance and protection from harsh self-etching primers.© 2006 ITW Industrial FinishingJGA-HVLPOrdering InformationThe JGHV Standard-Size Maximum Performer manual spray gun isavailable with the following air cap and fluid tip set-ups, factory assembled for immediate delivery.A c c e s s o r i e s•Remote CupsTwo-quart remote cups are available in aluminum (KB-555) or stainless steel ( K B - 5 4 5 - S S ) .•Attached Cups*One-quart attached cups are available in aluminum with Te f l o n ®l i n i n g(TLC-576) or stainless steel (TSC-591).*Note: KK-4980 regulator control kit is required for use with these cups and must be ordered separately.•Additional AccessoriesHose assemblies, air control regulators, air cap test kits, gun and hose cleaning equipment and other accessories also are available.Technical Specifications:B o d y : . . . . . . . . . . . . . . . . . . . . . . . . . . . . . . . . . . . . . . . . . . . . . . . . . .Drop forged aluminum Weight: . . . . . . . . . . . . . . . . . . . . . . . . . . . . . . . . . . . . . . . . . . . . . .20.8 oz (599 gr)Air Inlet: . . . . . . . . . . . . . . . . . . . . . . . . . . . . . . . . . . . . . . . . . . . .100 psi (7 bar) max., 1/4" NPS (M)Fluid Inlet: . . . . . . . . . . . . . . . . . . . . . . . . . . . . . . . . . . . . . . . .100 psi (7 bar) max., 3/8" NPS (M)Fluid Passages: . . . . . . . . . . . . . . . . . . . . . . . . . . . . . . . . .Stainless steel Feed Type: . . . . . . . . . . . . . . . . . . . . . . . . . . . . . . . . . . . . . . . . .Pressure Feed (Material Supply)Service Bulletin: . . . . . . . . . . . . . . . . . . . . . . . . . . . . . . . .S B - 2 - 2 4 6Gun Repair Kit: . . . . . . . . . . . . . . . . . . . . . . . . . . . . . . . . .K K - 4 9 8 7 - 2Air Caps—Patterns & ApplicationsAir Typical Pattern Typical Cap #Size & Shape*Application33A 9" long, tapered ends Most common finishing materialssimilar to #30 air cap up to 12 oz./min.46MP 11" long, straight-sided Low VOC material similar to #704 air cap 12 to 16 oz./min.83MP13" long, straight-sided Low VOC material similar to #765 air cap17 oz./min. & aboveOrdering InformationThe Classic Series JGA-HVLP spray guns are available with the following air cap and fluid tip set-ups, factory-assembled for immediate delivery.A c c e s s o r i e sPressure Feed•Two-quart remote cups are available in aluminum (KB-555) or stainless steel ( K B -5 4 5 - S S ) .•One-quart attached cups* are available in aluminum with Te f l o n ®lining (TLC-576)or stainless steel (TSC-591).* Note: KK-4980 regulator control kit isrequired for use with these cups and must be ordered separately.•Hose assemblies, air control regulators,gun and hose cleaning equipment and other accessories also are available.•303-grade lapped tip and needle set J G A - 4 0 5 6 - F X .Suction Feed•One-quart paint cups available in Te f l o n ®-lined aluminum (TLC-555),a l u m i n u m (TGC-545) and stainless steel (TSC-595).•One-pint aluminum cup (TGC-536)i salso a v a i l a b l e .•Hose assemblies, air control regulators,gun and hose cleaning equipment andother accessories also are available.Technical SpecificationsPressure FeedSuction FeedB o d y :. . . . . . . . . . . . . . . . . . . . . . . . . . . . . . . . .Drop forged aluminum Drop forged aluminum Weight: . . . . . . . . . . . . . . . . . . . . . . . . . . . . .20.4 oz (578 gr)21.4 oz (608 gr)Air Inlet: . . . . . . . . . . . . . . . . . . . . . . . . . . .100 psi (7 bar) max.,100 psi (7 bar) max.,1/4" NPS (M)1/4" NPS (M)Fluid Inlet: . . . . . . . . . . . . . . . . . . . . . . .3/8" NPS (M)3/8" NPS (M)Fluid Passages:. . . . . . . . . . . . . . . . .300 grade stainless steel 300 grade stainless steel Feed Type: . . . . . . . . . . . . . . . . . . . . . . . .Pressure feed Suction feed (Material Supply)Air Cap: . . . . . . . . . . . . . . . . . . . . . . . . . . . .9 85 7Service Bulletin: . . . . . . . . . . . . . .S B - 2 - 1 8 7S B - 2 - 2 4 8Gun Repair Kit:. . . . . . . . . . . . . . . .K K - 4 9 8 7 - 2K K - 4 9 8 7 - 2Pressure Feed Part No.J G A - 5 1 0 - 9 8 F X *Suction Feed Part No.J G A - 5 1 0 - 5 7 D E *J G A - 5 1 0 - 5 7 D *JGHVTMS t a n d a rd - S i z e Maximum Perf o rmer Manual HVLP Spray GunJGA-HVLPClassic Series Spray Guns P re s s u re Feed & Suction FeedJGA-HVLP Application Guide*Actual pattern length dependent upon fluid tip ID, fluid flow rate, viscosity,air pressure and fan pressure.*Cup not included; order separately.These guns with fluid tip and needle can be ordered separately without air cup and retaining ring: JGA-510-D (Suction Feed)JGA-510-FX (Pressure Feed)•Maximum 8 oz./min. fluid flow.•Lower solids coatings.•Medium to high V.O.C. coatings (4.0-5.0 lbs./gal.)•Smaller compressors – 3 h.p. is usually s u f f i c i e n t .•Requires only 11 CFM at 10 PSI air cap p r e s s u r e .•Class "B" finish quality requirements.Air Caps—Patterns & ApplicationsAir Cap #Pattern Size*Typical Application•Feed Type57 10 – 11"Low Solids: Enamels, Lacquers,Suction Feed (22 cfm)Stains, Sealers, Primers D (.086)DE (.070)9 81 1 - 1 /2 ”Low Solids: Enamels, Lacquers,Pressure Feed (11 cfm)Stains, Sealers, PrimersFX (.042)*Spray pattern size dependent upon type of feed, material viscosity and air cap pressure.• Up to 24 seconds, #4 Ford Cup.PTFE PTFE PTFEL Detail Ref. No 18 – Two piece packing+Tapered edge faces out towards packing nut.Fluid Packing NutFluid Needle+Inner Teflon PieceOuter U.H.M.W.P o l y. PieceChart 1 Fluid Tips (Nozzles) and Needles•A quantity of necessary parts is included in Gun Repair Kit KK-4987-2andshould be kept on hand for service convenience.20-25 ft. lbs.✚Apply QH-130 (Loctite #242 med. strength blue)sealing compound on threads.Chart 2 Air Cap & Baffle Combinations*For use with 46MP air cap.**For use with 83MP air cap.Note:Do not use AV-1 gasket with this spray gun.11•13•14•15•16•12•Torque to15 ft. lbs.Air InletNipple1/4 NPS (M)✚2425•22JGHV Parts List+ Inner PTFE PieceITW Industrial Finishing D e V i l b i s s195 Internationale Blvd.Glendale Heights, IL 601396 3 0 - 2 3 7 - 5 0 0 0Fax 630-237-5011w w w . d e v i l b i s s . c omInd. Parts Model No.Description RequiredRef.JGA-HVLP Classic Series Spray Gun#Ref. Nos. 3 and 29 include an AV-1 Copper Gasket, which is NOT used with JGA-510.• A quantity of necessary parts is included in Repair Kit KK-4987-2for complete gunrepair and should be kept on hand for service convenience.▲For more limited repair, Soft Parts Kit KK-5034is also available(includes items 10, 13, 17, and 26).L Detail Ref. No 18 – Two piece packing +Tapered edge faces out towards packing nut.Fluid Packing NutFluid NeedleJ G V-463 Packing Assembly+Inner Teflon Piece Outer U.H.M.W.P o l y. PieceNPS (M)Apply QH-130 (Loctite #242 med. strength blue)sealing compound on threads.Apply 1771019123626•28•29•3334242516•4•14•13•12•11•Air Inlet Nipple 1/4 NPS (M)(Torque to 15 ft. lbs.)JGA-HVLP Parts List ( c o n t i n u e d )Chart 1 Fluid Tips (Nozzles) and Needles (Matched Set)+ Inner PTFE Piece。
喷枪使用说明书一、介绍喷枪是一种常见的喷涂设备,广泛应用于涂料施工、汽车喷漆、家具制造等行业。
本使用说明书将详细介绍如何正确使用喷枪,以确保安全和高效的操作。
二、安全注意事项在使用喷枪之前,请务必遵循以下安全注意事项:1. 仔细阅读和理解本使用说明书,并确保了解相关使用规范。
2. 在操作喷枪时,请戴上合适的防护手套、面具和安全眼镜。
3. 保持工作区域清洁,并确保有良好的通风条件。
4. 在操作喷枪之前,请检查设备的连接部件是否紧固。
5. 操作喷枪时,请确保周围没有易燃或易爆物品。
6. 当喷枪不在使用时,请关闭气源并放置在安全位置。
三、喷枪的组成部分1. 喷枪手柄:用来控制涂料喷射。
2. 喷枪嘴口:涂料从这里喷出。
3. 涂料杯:用来存放喷涂涂料。
4. 压力控制按钮:用来调节喷涂压力。
5. 涂料调节旋钮:用来调节喷涂涂料的流量和喷涂效果。
四、喷枪的操作步骤1. 准备工作:将喷枪与喷枪压缩机连接,并确保连接紧固。
同时,检查喷枪的气源和涂料杯,确保其正常工作。
2. 调节气压:根据需要,使用喷枪上的压力控制按钮调节喷枪的气压。
3. 调节喷涂效果:使用涂料调节旋钮来调节喷涂涂料的流量和喷涂效果。
根据需要,可以适当调整喷嘴口的大小。
4. 进行喷涂:将喷枪对准需要喷涂的物体,并将喷涂涂料均匀地喷在表面上。
喷涂时需保持适当的距离和速度,以确保涂料均匀覆盖整个表面。
5. 喷涂结束:完成喷涂后,关闭气源,清洁喷枪。
将没有用完的涂料倒掉,并清洗涂料杯和喷嘴口。
五、保养与维护1. 每次使用完喷枪后,都应该进行清洁和保养。
使用清洁剂和刷子清洗涂料杯和喷嘴口,确保其干净无污染。
2. 定期检查喷枪的连接部件是否紧固,是否有损坏或磨损的部件,如有需要及时更换。
3. 使用时应避免将喷枪接触到尖锐物体,以免造成损坏或划伤。
4. 喷枪不使用时,应放置在干燥通风的地方,避免阳光直射或潮湿环境,以防止生锈和损坏。
六、常见问题及解决方法1. 喷枪喷出的涂料不均匀怎么办?可以通过调节喷枪的气压和涂料流量来解决这个问题。
喷枪喷漆枪的使用方法
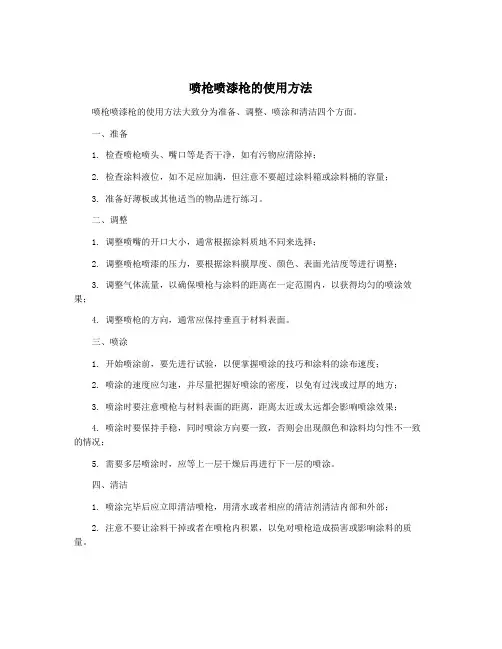
喷枪喷漆枪的使用方法大致分为准备、调整、喷涂和清洁四个方面。
一、准备
1. 检查喷枪喷头、嘴口等是否干净,如有污物应清除掉;
2. 检查涂料液位,如不足应加满,但注意不要超过涂料箱或涂料桶的容量;
3. 准备好薄板或其他适当的物品进行练习。
二、调整
1. 调整喷嘴的开口大小,通常根据涂料质地不同来选择;
2. 调整喷枪喷漆的压力,要根据涂料膜厚度、颜色、表面光洁度等进行调整;
3. 调整气体流量,以确保喷枪与涂料的距离在一定范围内,以获得均匀的喷涂效果;
4. 调整喷枪的方向,通常应保持垂直于材料表面。
三、喷涂
1. 开始喷涂前,要先进行试验,以便掌握喷涂的技巧和涂料的涂布速度;
2. 喷涂的速度应匀速,并尽量把握好喷涂的密度,以免有过浅或过厚的地方;
3. 喷涂时要注意喷枪与材料表面的距离,距离太近或太远都会影响喷涂效果;
4. 喷涂时要保持手稳,同时喷涂方向要一致,否则会出现颜色和涂料均匀性不一致的情况;
5. 需要多层喷涂时,应等上一层干燥后再进行下一层的喷涂。
四、清洁
1. 喷涂完毕后应立即清洁喷枪,用清水或者相应的清洁剂清洁内部和外部;
2. 注意不要让涂料干掉或者在喷枪内积累,以免对喷枪造成损害或影响涂料的质量。
通过以上四个方面的准备、调整、喷涂和清洁,就可以使用喷枪喷涂出高质量的涂布效果,并且可以对喷漆枪进行有效的维护和保养,以保证喷涂质量和延长喷漆枪的使用寿命。
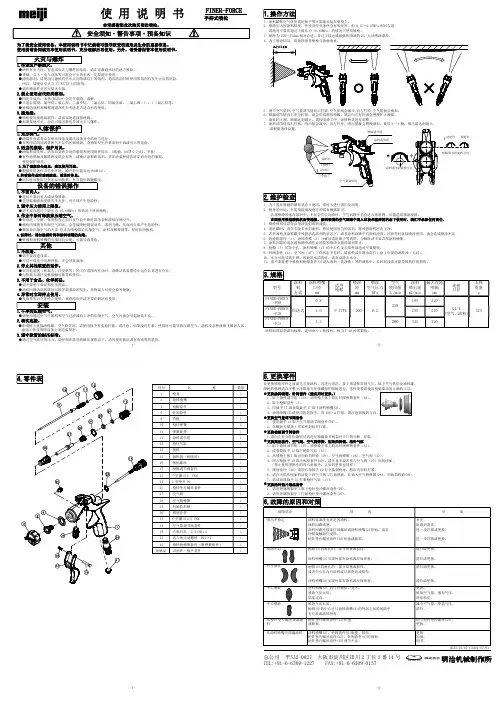
000为了能安全使用设备,本使用说明书中记载着可能导致受伤或危及生命的重要信息。
使用前请务阅读完本使用说明书,充分理解后再使用。
另外,请妥善保管本使用说明书。
●涂料有引火性,有造成火灾与爆炸的危险。
请在宽敞通风好的地方喷涂。
●香烟、点火・电气设备等可能会引火的东西一定要避开使用。
●清洗溶剂,请使用与涂料的引火点同等或以上的溶剂。
通常清洗时所使用的溶剂有发生火灾的危险, 所以,请使用引火点37.8℃以上的溶剂。
●请在喷涂作业区安装灭火器。
2.禁止使用卤代烃类溶剂。
●因化学反应,本体(铝部分)会发生裂缝、溶解。
●不适合溶剂:氯甲烷、氯乙烷、二氯甲烷、二氯乙烷、四氯化碳、三氯乙烯、1.1.1三氯乙烷等。
●特殊的涂料和稀释剂请在充分考虑是否适合后再使用。
3.接地线。
●喷枪使用接地线软管,请切实地连接接地线。
●涂装作业请务必在喷房设备及通风设备齐全的地方进行。
●在密闭的房间或者换气不足的区域喷涂,会增加发生有机溶剂中毒或引火的危险。
2.适当的服装、保护用具。
●涂装和清洗时,请务必穿着合适的服装和使用保护用具。
(眼镜、面罩G-7-04、手套)●有些涂料触及眼睛和皮肤会有害。
请确认涂料和溶剂,并在涂装和清洗时穿着合适的服装, 使用保护用具。
3.为了健康安全起见,建议使用耳塞。
●根据使用条件及作业环境,躁声值可能高达80dB(A)。
4.若喷涂作业时感到疲惫,请及时休息。
●绝对不要对着人或动物喷涂。
●会导致眼睛和皮肤发生炎症,对人体产生危险性。
2.遵守压力使用上限值。
●请不要在超过上限压力(0.69MPa)的情况下使用喷枪。
3.作业中断时释放掉压缩空气。
●在清洗、分解、保养检查之前以及作业中断时请务必释放掉压缩空气。
●喷枪内残留有压缩空气的话,会导致喷枪错误动作、溶剂飞溅,从而对人体产生危险性。
●释放掉压缩空气的方法:停止向喷枪供给压缩空气、涂料及稀释剂等,轻轻扣动扳机。
4.保养时,请勿触碰针阀和涂料喷嘴的尖端。
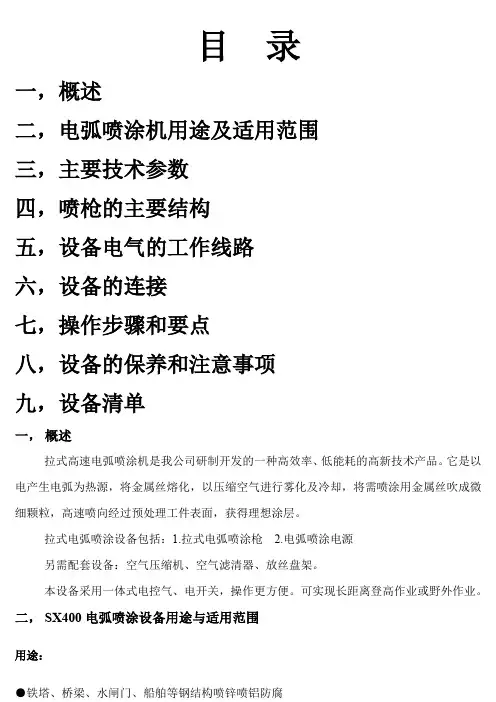
目录一,概述二,电弧喷涂机用途及适用范围三,主要技术参数四,喷枪的主要结构五,设备电气的工作线路六,设备的连接七,操作步骤和要点八,设备的保养和注意事项九,设备清单一,概述拉式高速电弧喷涂机是我公司研制开发的一种高效率、低能耗的高新技术产品。
它是以电产生电弧为热源,将金属丝熔化,以压缩空气进行雾化及冷却,将需喷涂用金属丝吹成微细颗粒,高速喷向经过预处理工件表面,获得理想涂层。
拉式电弧喷涂设备包括:1.拉式电弧喷涂枪 2.电弧喷涂电源另需配套设备:空气压缩机、空气滤清器、放丝盘架。
本设备采用一体式电控气、电开关,操作更方便。
可实现长距离登高作业或野外作业。
二,SX400电弧喷涂设备用途与适用范围用途:●铁塔、桥梁、水闸门、船舶等钢结构喷锌喷铝防腐●造纸烘缸、印刷辊、曲轴等工件表面磨损的喷涂修复●电容、电瓷行业的电极喷涂等。
适用范围:该类电弧喷涂机可喷的材料如:锌,铝,铅锡合金,铜,炭钢,不锈钢等。
三,主要技术参数1.喷枪的主要参数2.电源的主要参数重量:278KG左右其它参数特点:1.适用拉式或Array推式电弧喷枪.2.该电源将喷枪工况控制、送丝调速、气体管路集于一身,是理想的电弧喷涂专用设备。
3.控制与操作特别简单,只要拨动喷枪上的开关即可实现与远端的电源开关的同步控制。
四、拉式喷枪的主要结构(图一)1.喷头组件:它是汇集气、电的独立单元组件,由下列主要元件组成:A、弧光罩:起遮蔽弧光作用,在130度范围内弧光不向操作者照射。
B、前导管组件:采用导电性能好的耐磨材料制成,它起到使两根线材迫交的导向作用,也是磨损更换零件之一,一般情况下,更换时只需换导管端头铜制件(连接咀)即可。
C、调节空气帽采用陶瓷材料制成,其外径为:M39*1.5螺纹可作轴向自由调节。
一般可调节到二线交汇点到空气帽平面之距离为1-3毫米(见示意图),如二线交点在空气帽内,则会产生爆鸣和“涂层积口”如二线交点远离空气帽平面,则产生的涂层较粗。
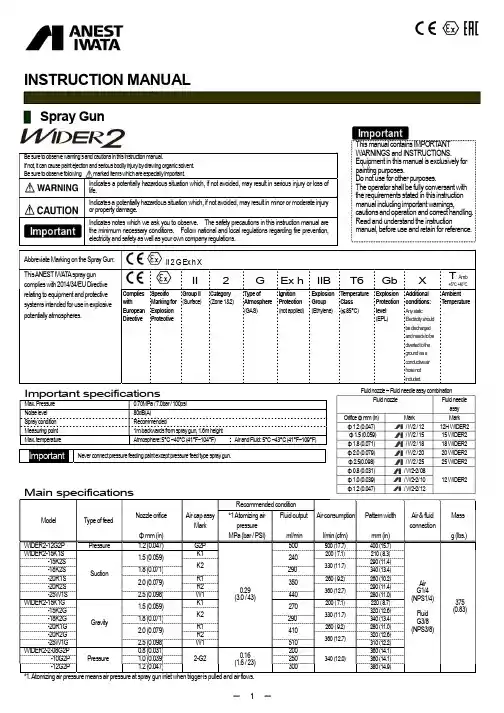
INSTRUCTION MANUALSpray GunBe sure to observe warning s and cauti o ns i n this instructi o n manual.If not, it can cause paint ejecti o n and serious bodily i n jury by drawi n g organic solvent. Be sure to observe fol l owing marked items which are especially importantIndicates a potentially hazardous situation which, if not avoided, may result in serious injury or loss of life.Indicates a potentially hazardous situation which, if not avoided, may result in minor or moderate injury or property damage.Indicates notes which we ask you to observe. The safety precautions in this instruction manual are the minimum necessary conditions. Follow national and local regulations regarding fire prevention, electricity and safety as well as your own company regulations.Abbreviate Marking on the Spray Gun: II 2 G Ex h XThis ANEST IWAT A spray gun complies with 2014/34/EU Directive relating to equipment and protective systems intended for use in explosive potentially atmospheres.II2G Ex h IIB T6Gb XT Amb+5°C +40°CComplies with European DirectiveSpecific Marking for Explosion ProtectiveGroup II (Surface) Category (Zone 1&2)Type of Atmosphere(GAS)Ignition Protection (not applied) Explosion Group (Ethylene) Temperature Class ( 85°C) Explosion Protection level (EPL) Additional conditions:Any staticElectricity shouldbe dischargedand needs to be diverted to the ground via a conductive air hose not included.Ambient Temperature Important specificationsMax. Pressure 0.70MPa / 7.0bar / 100psi Noise level 80dB(A)Spray condi t i o n RecommendedMeasuri n g point 1m backwards from spray gun, 1.6m height Max. temperatureAtmosphere: 5°C ~40°C (41°F~104°F)Air and Fl u id: 5°C ~43°C (41°F~109°F)ImportantNever connect pressure feedi n g pai n t except pressure feed type spray gun.500500 (17.7)400 (15.7)WIDER2-15K1S K1200 ( 7.1)210 ( 8.3)-15K2S290 (11.4)-18K2S 1.8 (0.071)290340 (13.4)-20R1S R1260 ( 9.2)260 (10.2)-20R2S R2290 (11.4)-25W1S 2.5(0.098)W1440280 (11.0)WIDER2-15K1G K1200 ( 7.1)220 ( 8.7)-15K2G320 (12.6)-18K2G 1.8 (0.071)290340 (13.4)-20R1G R1260 ( 9.2)280 (11.0)-20R2G R2320 (12.6)-25W1G 2.5(0.098)W1510310 (12.2)WIDER2-2-08G2P 0.8 (0.031)200360 (14.1)-10G2P 1.0 (0.039)250360 (14.1)-12G2P 1.2 (0.047)300380 (14.9)This manual contains IMPORTANT WARNINGS and INSTRUCTIONS. Equipment in this manual is exclusively for painting purposes.Do not use for other purposes.The operator shall be fully conversant with the requirements stated in this instruction manual including important warnings,cautions and operation and correct handling.Read and understand the instructionmanual, before use and retain for reference.Fluid nozzl e – Fl u id needle assy combi n ationFluid nozzl e Fluid needl eassyOrifice mm (i n )Mark Mark1.2 (0.047)/ W2 / 12 12H WIDER2 1.5 (0.059) / W2 / 15 15 WIDER2 1.8 (0.071) / W2 / 18 18 WIDER2 2.0 (0.079) / W2 / 20 20 WIDER2 2.5(0.098) / W2 / 25 25 WIDER20.8 (0.031)/ W2-2/ 0812 WIDER2 1.0 (0.039) / W2-2/ 10 1.2 (0.047) / W2-2/ 12Fire and explosion1.Spark and open flames are strictly prohibited. Paints can be highly flammable and can cause fire.Avoid any ignition sources such as smoking, open flames, electrical goods, etc.2.Never use the following HALOGENA TED HYDROCARBON SOLVENTSwhich can cause cracks or dissolution on spray gun body (aluminum) by chemical reaction.unsuitable solvents methyl chloride, dichloromethane, 1.2-dichloroethane,carbon tetrachloride, trichloroethylene, 1.1.1-trichloroethane (Be sure that all fluids and solvents are compatible with spray gun parts. We are ready to supply a material list used in the product)3.Securely ground spray gun by using air hose with built-in ground wire. Ground wire : Less than 1M . Check the earth stability periodically.If not, insufficient grounding can cause fire and explosion due to static electric sparking.Improper use of equipment1.Never point spray gun toward people or animal.If done, it can cause inflammation of eyes and skin or bodily injury.2.Never exceed maximum operating pressure andmaximum operating Temperature.3.Be sure to release air and fluid pressures before cleaning, disassembling or servicing.If not, remaining pressure can cause bodily injury due to improper operation or scattering cleaning liquid. In order to release pressure, first stop supply of compressed air, fluid and thinner to spray gun.Then remove trigger toward you.4.Tip of fluid needle assy and tip of fluid nozzle has a sharp point.Do not touch the tip of fluid needle and the tip of fluid nozzle during maintenance for the protection of the human body.Protection of human body1 Use in a well-ventilated site by using spray booth.If not, poor ventilation can cause organic solvent poisoning and catch fire. 2 Always wear protective gear safety glasses, mask, gloves .If not, cleaning liquid, etc., can cause inflammation of eyes and skin. If you feel something wrong with eyes or skin, immediately see a doctor. 3 Wear earplugs if necessary.Noise level can exceed 80dB(A), depending on operating conditions and painting site4 If operators pull the trigger many times during operation, it may cause carpal tunnel syndrome.Be sure to take a rest if you feel tired.Other precautions1.Never alter this spray gun.If done, it can cause insufficient performance and failure.2.Enter working areas of other equipment (robots, reciprocators, etc.) after machines are turned off. If not, contact with them can cause injury.3.Never spray foods or chemicals through this spray gun.If done, it can cause accident by corrosion of fluid passages or adversely affect health by mixed foreign matter.4.If something goes wrong, immediately stop operation and find the cause. Do not use again until you have solved the problem.Use clean air filtered through air dryer and air filter.First release air and pressure fully according to item No. 3 of “Improper use of equipment” of WARNING on page 2. Only an experienced person who is fully conversant with the equipment can do maintenance and inspection. Use neutral cleaner:pH value shall be 6 to 8, otherwise could cause corrosion.Never use commercial or otherparts instead of ANEST IWATA original spareparts.Incomplete cleaning can fail pattern shape and uniform particles.Fluid (Gravity)Fluid nippleFluid(Suction / Pressure)AirAir nippl eSpray PatternFlutteringCrescentInclinedSplitHeavy CenterSpitDirt, damage, wear on seatLoose fluid needle adj. knobWear on needle springInsufficient tighteningDirt or damage on seatFluid needle assy does not return due to packing set too tightFluid needle assy does not return due to paint buildup on fluid needleCloggedInsufficient tighteningDirt or damage on seatWear on air valve springRecommended paint viscosity differs according to paint property and painting conditions. 14 to 25 sec. / Ford cup#4 is recommendable.Keep fluid output as small as possible to the extent that the job will not be hindered. It will lead to better finishing with fine atomization.The spray gun should be held so that it is perpendicular to the surface of the work piece at all times.3176, Shinyoshida-cho, Kohoku-ku, Y okohama, 223-8501, JapanManual No. T950-01 Code No. 03014430200 250 mm (7.9 9.8 i n )Residual riskList of residual risks requiring protection measures by machine users (Abbreviated Name: List of Residual Risks)Product model: " Spray gun :WIDER1 / WIDER2"2019/5/29 CreateANEST IWATA CorporationBe sure to read and understand the instruction manual before using the product. This document is a reference material in the instruction manual and must not be used with only an understanding of the contents of this document.1 "degree of hazard" is classified and described according to the following definitionsDANGER Contents that are likely to cause death or serious injury if protection measures are not implemented. WARNING Contents that may cause death or serious injury if protection measures are not implemented.CAUTIONContents that may cause minor injury if protection measures are not implemented2 The symbol shown as "Location on machinery" is the number of the machine section on the Residual Risk Map of the Product. See Residual Risk Map for specific points on the machinery.No.Operatio nal Phase Works Qualifications and Training required for the workLocation on the machinery *2Harm Degree *1 Type of HarmProtective measure protective measure performed by themachinery userInstruction Manual Referenced page 1 Use Preparation workDuring workA Warning A wrong connection between the air joint and the paint joint may cause paint to spout from an unexpected place and hit the operator.T o provide personal protective equipmentP22 UseAllB Warning Ignition and fire caused by static electricity Use of a hose with a ground and confirmation of ground P2 3 Use and mainten ance During work, decompositi on and rinse Default Warning Organic solvents, etc., may come into contact with the eyes and skin, causing irritation.T o provide personal protective equipment P2 4 Use During work C Warning T enosynovitis due to repeated pulling of the triggerModerate rest P2 5 Use All Default Warning Fire, electrical appliances, etc. ignite, and fire generatings.Strict ban on the use of fire P2 6 UsePreparationworkDuring workDefault WarningSupply at specified pressure or higher, paint spouts from unexpected places, hitting human body or eyes, blindness T o provide personal protective equipment P27 Use and mainten ancePreparation workDuring workDefault WarningThe product is modified, parts other than genuine parts are used, and an unexpected failure or accident generatings.No modification Use of genuine partsP28 Use PreparationworkDuring workDefault Warning The patient stayed in a location where noise such as blowing air was generated for a long time, resulting in hearing loss. Use of earplugs is recommended. P29 Use and mainten ance During work, decompositi on and rinse Default WarningOrganic solvent poisoning Due to inhale of solvent and paint mistT o provide personal protective equipmentWork in painting booths, etc. P210 Use and mainten ance Preparation work During workA Warning If the hoses are triad to be disconnected under pressurized condition, paint, cleaning liquid, air, etc. are spouted out and injured.T o provide personal protective equipmentRemove residual pressure P211Mainten ancePreparation workDCautionNeedle valve piercing with sharp cornersT o provide personal protective equipmentP2Residual riskNo.R003-00 Code No.03014490。
汽车修理厂喷漆设备操作说明书【汽车修理厂喷漆设备操作说明书】一操作前准备在开始操作喷漆设备之前,请确保已完成以下准备工作:1. 检查设备:仔细检查喷漆设备,确保设备完好无损,无任何故障或泄漏现象。
2. 确认环境:确保喷漆环境通风良好,并且没有易燃物或其他危险品。
二材料准备在进行喷漆操作前,需要准备以下材料:1. 汽车漆料:根据客户需求,准备相应颜色和型号的汽车漆料。
2. 溶剂:选择适合的溶剂用于稀释漆料。
3. 防护材料:戴上手套、护目镜、口罩等防护用品,以防止漆料对身体造成损害。
4. 喷漆模板或带纸:根据需要准备喷漆模板或喷漆带纸,以避免喷漆过程中涂在不需要喷漆的部位。
三操作步骤1. 清洁车身:使用清洁剂彻底清洁车辆表面,确保车身干净无尘。
2. 研磨处理:对于有划痕或瑕疵的部分,使用砂纸进行研磨处理,使表面光滑平整。
3. 遮盖部位:使用喷漆模板或喷漆带纸将不需要喷漆的部位进行遮盖,确保只有需要喷漆的区域暴露出来。
4. 搅拌漆料:搅拌汽车漆料,确保颜色均匀。
5. 稀释漆料:根据需要将漆料稀释到适当的浓度,以便于喷涂操作。
6. 准备喷枪:将喷枪组装好,调整好压力和喷嘴大小,确保喷涂效果良好。
7. 测试喷涂:在空白纸上先进行测试喷涂,以确保喷涂均匀、稳定。
8. 喷涂车身:根据需要,以均匀稳定的动作对车身进行喷涂,避免重叠或积聚。
9. 涂层干燥:等待喷涂的涂层完全干燥,确保不会被意外碰触或受到污染。
10. 进行更多涂层:如果需要喷涂多层漆料,请在每层涂层干燥后,进行下一层的喷涂操作。
四操作注意事项1. 安全第一:在操作喷漆设备时,务必戴好相关的防护用品,避免对身体的伤害。
2. 防火防爆:操作喷漆设备时,周围不应有易燃物品,并确保设备正常无泄漏,以防止意外火灾或爆炸。
3. 良好通风:喷漆操作应在通风良好的环境下进行,以避免有害气体对操作人员的危害。
4. 喷涂均匀:在喷涂过程中,要保持稳定的手势和均匀的力度,避免出现喷涂不均匀的情况。
油漆喷涂枪操作说明一、引言油漆喷涂枪是一种常用的喷涂工具,广泛应用于建筑、汽车维修、家具制造等领域。
本文旨在向操作人员提供关于油漆喷涂枪的操作指南,帮助他们正确、安全地使用喷涂枪,以确保工作的高质量和高效率。
二、工具准备在开始使用油漆喷涂枪之前,我们需要进行一些工具准备工作。
具体步骤如下:1. 确保工作区域整洁干净,无杂物和易燃物。
准备好工作台和所需材料,例如油漆、溶剂等。
2. 检查喷涂枪的出气口、喷嘴、喷气帽等部件是否完好。
确保连接处密封良好,无松动。
3. 准备好个人防护装备,包括手套、口罩、护目镜等。
这些装备能够有效保护您的安全。
三、操作步骤1. 装卸容器首先,我们需要装卸油漆喷涂枪的容器。
具体步骤如下:(1)拧下容器的盖子,将油漆倒入容器内部。
注意不要超过容器的最大容量标识线。
(2)将容器旋入喷涂枪的底部。
确保旋紧容器,以防止泄漏。
2. 调整喷涂枪的参数在开始喷涂之前,我们需要根据实际需求调整喷涂枪的参数。
具体步骤如下:(1)调整喷涂枪的压力。
通常,喷涂枪上会有一个调节旋钮,根据需要将其旋转到适当的位置。
(2)调整喷枪的喷嘴。
喷嘴的大小和形状会影响喷涂效果。
选择合适的喷嘴,根据需要进行更换,并确保喷嘴固定牢固。
(3)根据涂料的稠度和喷涂效果,调整喷涂枪的喷漆量和喷涂速度。
3. 进行喷涂操作当以上准备工作完成后,我们可以开始喷涂操作了。
具体步骤如下:(1)保持合适的喷涂距离。
通常,在工作表面上保持10-30厘米的距离,以获得最佳的喷涂效果。
(2)扣动喷涂枪的扳机,开始喷涂。
注意保持均匀的手臂运动,以避免涂层不均匀或出现滴落情况。
(3)根据需要,可以进行多次喷涂,以达到所需的涂层厚度。
4. 操作完成与清洁当喷涂操作完成后,我们需要进行喷涂枪的清洁与保养。
具体步骤如下:(1)将喷涂枪的容器取下,并且将容器内的残留涂料倒掉。
(2)用清洁溶剂将容器内的残留涂料清洗干净。
注意不要用力碰撞或刮擦容器,以免损坏。
汽车厂喷漆设备使用说明书使用说明书1. 引言汽车厂喷漆设备使用说明书是为了帮助操作人员正确、安全地操作喷漆设备而编写的。
本说明书将详细介绍设备的组成部分、操作方法、维护保养以及常见故障处理等内容,以确保设备的正常运行和使用者的安全。
2. 设备概述2.1 喷漆设备主要由喷涂枪、压缩空气供应系统、喷漆室和过滤系统等组成。
每个部件的功能和作用如下:2.1.1 喷涂枪:可调节喷漆的压力和喷涂方式,确保涂层均匀、稳定。
2.1.2 压缩空气供应系统:提供稳定的压缩空气,用于驱动喷漆枪喷涂。
2.1.3 喷漆室:提供一个相对封闭的空间,以避免外界灰尘、污染物进入喷涂区域。
2.1.4 过滤系统:过滤空气中的杂质和颗粒物,确保喷涂过程中的空气质量。
3. 操作方法3.1 准备工作在操作喷漆设备之前,必须进行以下准备工作:3.1.1 检查喷漆设备是否正常运行,确保喷涂枪、压缩空气供应系统和过滤系统等部件无故障。
3.1.2 检查喷涂枪和喷漆室内是否有异物,确保喷涂环境清洁。
3.1.3 穿戴个人防护装备,包括安全眼镜、手套、口罩和防护服等,以确保人身安全。
3.2 喷涂操作3.2.1 调节喷涂枪:根据需要,调节喷涂枪的喷漆压力和喷涂模式。
可根据实际情况选择喷漆方式,如喷涂角度和喷涂距离等。
3.2.2 喷涂准备:将喷涂颜料装入喷涂枪的涂料容器中,并调节出涂料流量。
在喷涂前,必须将喷涂枪对准待喷涂的部位。
3.2.3 喷涂操作:按下喷涂枪的扳机,使颜料喷射出来。
在喷涂过程中,应保持稳定的喷涂速度和均匀的喷涂压力。
3.2.4 喷涂完成:喷涂完成后,释放喷涂枪的扳机,并清洁喷涂枪和喷漆室内的残留颜料。
4. 维护保养4.1 日常清洁:每日使用结束后,必须清洁喷涂枪、喷漆室以及过滤系统等设备部件,以确保设备长期使用。
4.2 定期维护:定期检查设备的各个部件,如喷涂枪的喷漆孔、过滤系统的滤芯等。
如发现故障或损坏,及时进行修理或更换。
5. 常见故障处理5.1 喷涂效果不佳:可能是喷涂枪的压力不足,需要调节喷涂枪的喷涂压力。
可用材料包括建筑涂料、油漆、屋顶涂料及低档涂料. 未获准用于爆炸性环境或危险(分类)场所。
仅供专业使用。
型号说明最大工作压力16U277 / 16U277V GH1017es 基础型 / 先锋1000 磅/平方英寸(6.9 兆帕,69 巴)16U278 / 16U278V GH2570es 基础型 / 先锋2500 磅/平方英寸(17.2 兆帕,172 巴)16U279 / 16U279V GH733es 基础型 / 先锋4000 磅/平方英寸(27.6 兆帕,276 巴)16U280 / 16U280V GH5040es 基础型 / 先锋5000 磅/平方英寸(34.5兆帕,345巴)16U285 / 16U285V GH933es 基础型 / 先锋7250 磅/平方英寸(50.0 兆帕,500 巴)16U281 / 16U281V GH933 基础型 / 先锋7250 磅/平方英寸(50.0 兆帕,500 巴)17B484 / 17B484VGH933es 基础型 / 先锋7250 磅/平方英寸(50.0 兆帕,500 巴)332368EZH操作GH ™ 系列大型喷涂机目录警告 . . . . . . . . . . . . . . . . . . . . 3部件辨认 . . . . . . . . . . . . . . . . . . 5提升说明 . . . . . . . . . . . . . . . . . . 6泄压步骤 . . . . . . . . . . . . . . . . . . 7接地 . . . . . . . . . . . . . . . . . . . . 7设置 . . . . . . . . . . . . . . . . . . . . 8起动 . . . . . . . . . . . . . . . . . . . . 9 SwitchTip 喷嘴及护罩 . . . . . . . . . . .11清除喷嘴堵塞物 . . . . . . . . . . . . . .11喷涂 . . . . . . . . . . . . . . . . . . . . 12清洗 . . . . . . . . . . . . . . . . . . . . 13故障排除 . . . . . . . . . . . . . . . . . . 15技术数据 . . . . . . . . . . . . . . . . . . 17 Graco Standard Warranty . . . . . . . . . . 242332368E警告警告以下为针对本设备的设置、使用、接地、维护及修理的警告。
Mini HVLPPaint Spray GunUserManual8059851Technical Specifications• Model: 8059851• Air pressure: 30-80 PSI • Nozzle diameter: 1.4 mm • Type of feed: Gravity • Air consumption: 5 CFM• Pattern width: 7-1/2" (190 mm)• Paint capacity: 3.5 ozOperation1.Suggested air pressure is 30-80 PSI2.Recommended paint viscosity differs according to paint properties and painting conditions.e the lowest possible fluid output that produces an adequate paint coverage. Finer atomization leads to a better finish.4.Maintain a distance of 6-8" from the gun to the workpiece.5.The gun should be held so that it is perpendicular to the surface of the workpiece at all times. Move the gun in a straight and horizontal line.Arcing the gun results in an uneven paint finish.Coating w i l l b e l i g h t a t t h i s p o i n tCoating w i l l b eheavy at t h i s p o i n t S t a r t strokeEnd of strokeP u l l t r i g g e rRelease t r i g g e rCoating should be even and wet when sprayingIncorrect method Correct methodMaintenance1.Pour remaining paint into another container and then clean paint passage and air cap. Spray a small amount of thinner to clean paint passages. Incomplete cleaning will cause adverse pattern shapes and particles to appear on your work. Promptly clean components after use.2.Clean other sections with a brush and cloth soaked with thinner.3.Clean paint passages fully before disassembly.4.Remove the fluid nozzle after removing the fluid needle set or while keeping fluid needle pulled in order to protect seat section.5.While keeping fluid needle set inserted, tighten fluid needle packing set by hand. Then tighten gradually with a wrench. Adjust the packing set while pulling the trigger and watching the movement of the fluid needle set since over-tightening will strip the thread, causing leakage.6.Turn the spread adjustment knob counterclockwise to fully open it, then tighten the spread adjustment guide into the gun body.Parts List1Fluid adjustment screw 2Fluid adjustment knob 3O-ring4Washer5O-ring6Washer7Switch spring8Air inlet valve assembly 9Switch knob10Switch washer11Lock screw12Nut13Air cap washer14Atomization15Nut housing16Fluid nozzle17Fluid nozzle washer18Bolt19Compressed spring20Needle washer21Trigger level I 22Trigger level II23Trigger24Snap retainer25Snap retainer26Container cover27Container28Filter29Fluid inlet joint30Fluid needle31Fluid needle spring32Joint33Paint adjustment knob 34Screw35Paint adjustment joint 36Pattern adjustment screw 37O-ring38O-ring39Snap retainer40Pattern adjustment knob 41O-ring42Air inlet jointTroubleshootingSymptomIntermittent spray• Presence of air in the paint circuit• Material residue in the holes obstructs the pas-sage of material • The nozzle is dirty or malfunctioning• The atomization cap is dirty or damaged • Submerge the head in solvent • Clean and open all closed holes with a jet of compressed air or a toothpick.• Do not use pointed metal objects, or you may deform the hole of the head part.• Material builds up on the outside of fluid nozzle tip or center hole or partially clogged nozzle orifice.• Loose fluid nozzle• Clean the head and the nozzle • Make sure that the centering between the two is precise • Check that the tip of the pin is not ruined• Replace the nozzle and the head• Atomization of air pressure is too high • Material too thin• Reduce the quantity of air and increase the flow of paint.• The flow of paint is greater than the pressure and quantity of air supplied.• Fluid passage is clogged with dirt• Air holes in the cover are blocked• Fluid needle stroke is too short• Clean the head and the nozzle • Make sure that the paint is not too dense and dilute if necessary• Remove obstructions • Adjust fluid needle stroke• Tighten the nozzle using the wrench provided.• Make sure that the tank is not empty.• Check that the connecting hole is not obstructed.• Tighten the gland screw or replace the gasket if worn Pattern archedUneven patternThe center of the pattern is too narrowPoor atomization.Spray concentrated into the centreLittle to no paint outputProblemSolution。
油漆喷枪使用说明书它是我们在喷涂施工中的主要操作设备,根据取料方式以分为三种:虹吸式、重力式和压送式。
因除对嘴式喷枪外,不论是其它虹吸式还是重力式都可以很方便的改为压送式,所以我们一般只把喷枪分为两种:虹吸式和重力式。
1.虹吸式喷枪(虹吸式喷枪外部结构如下图)虹吸式喷枪又分为对嘴式和扁嘴式两种。
对嘴式喷枪一般重量较轻,仅0.5公斤左右,贮料罐容量小,工作压力一般在0.274~0.345兆帕,喷涂时喷雾呈圆形,喷嘴与工件物面间距150~250毫米,仅适用于小工件的喷涂作业,所以又俗称小喷枪。
扁嘴式喷枪相应要重一些,约1公斤,贮料罐容量较大,喷涂气压一般控制在0.35~0.50兆帕,喷涂间距较大,约在250~350毫米,属于大型喷枪。
喷涂时喷雾由旋转螺冒调节控制,可呈圆形、扇形或圆锥形(旋紧),喷涂时应根据被涂物表面形状和施工现场情况而调整喷雾形态。
2.压下式喷枪压下式喷枪又称重力式喷枪,其构造和工作原理基本上与扁嘴式喷枪相同,只是贮料罐上方,涂料靠重力作用自行流入枪膛,并随压缩空气喷射在工件上。
贮料罐装在上方,即使涂料较少,亦可充分得到利用,这是它的优点。
但枪体重心上移,如装满涂料,重量较大,不便于枪体运作,且涂料又易溢出,影响操作。
3.压送式喷枪压送式喷枪其构造和工作原理基本上与压下式喷枪和虹吸式的扁嘴喷枪一样,其喷枪本身就是由扁嘴喷枪改造而成,不同的只是供料方式不一样而已,扁嘴式喷枪由贮料罐供料,压送式喷枪采用输漆泵供料。
4.常用喷枪的内部结构及各种控制阀门的作用①.枪头扁嘴(旋转螺母)枪头扁嘴主要是用来控制喷涂漆雾的形状和方向。
枪头扁嘴与枪身呈垂直或平行时,漆雾方向与枪头扁嘴的方向相反,漆雾呈扇形。
枪头扁嘴与枪身呈45°角交差时,漆雾呈圆形,角度变小或增大时,漆雾由圆形向椭圆变化,至180°角时变成扇形。
②.漆雾面积调节阀漆雾面积调节阀又称扇面调节阀,它在枪体的右上方,流量调节阀的上面。
喷枪喷漆枪的使用方法喷枪喷漆枪是一种常见的喷涂工具,广泛应用于汽车修理、家具制作、建筑装饰等行业。
正确的使用方法不仅可以提高工作效率,还可以确保喷涂效果。
下面将介绍喷枪喷漆枪的使用方法,希望能对您有所帮助。
1. 准备工作。
在使用喷枪喷漆枪之前,首先要进行准备工作。
确保喷枪和喷漆枪的清洁和维护,检查喷枪的喷嘴和气嘴是否完好,喷漆枪的压力调节是否正常。
另外,还需要准备好所需的喷漆材料,包括底漆、面漆、稀释剂等。
在进行喷涂作业时,还需要做好防护措施,包括戴口罩、手套、护目镜等。
2. 调节喷枪喷漆枪。
在开始喷涂之前,需要根据喷漆的粘度和喷涂的要求来调节喷枪喷漆枪。
首先是调节喷漆的粘度,如果喷漆太稠,会导致堵塞喷嘴,喷漆太稀则会造成喷漆不均匀。
其次是调节喷枪的喷射模式和压力,根据喷漆的颗粒大小和喷涂的面积来调节。
通过调节喷枪的压力和喷射模式,可以确保喷漆的均匀性和质量。
3. 喷涂技巧。
在进行喷涂作业时,需要注意一些喷涂技巧,以确保喷漆的效果。
首先是喷漆的距离和角度,一般来说,喷漆的距离应该保持在20-30厘米,喷漆的角度要与喷涂的表面垂直,这样可以确保喷漆均匀。
其次是喷漆的速度和力度,喷漆的速度要均匀,力度要适中,避免出现漏喷或者喷涂过厚。
另外,还需要注意喷漆的重叠度,避免出现漏喷或者重喷的情况。
4. 喷漆后的处理。
在完成喷漆作业后,需要进行相应的处理工作。
首先是清洁喷枪喷漆枪,将喷枪和喷漆枪的残留物清洗干净,以免影响下次的使用。
其次是等待喷漆干燥,根据喷漆的种类和环境温度来确定干燥的时间。
最后是进行喷漆的抛光和修饰,以提高喷漆的光泽度和质感。
总结。
喷枪喷漆枪的使用方法并不复杂,但需要注意一些细节和技巧。
正确的准备工作、调节喷枪、喷涂技巧和喷漆后的处理,可以确保喷漆的效果和质量。
希望通过本文的介绍,您能更加熟练地掌握喷枪喷漆枪的使用方法,提高工作效率和喷涂质量。
喷漆枪的使用方法English:To use a paint sprayer, first, you need to choose the appropriate type of paint and dilute it according to the manufacturer's instructions. Then, ensure that the surface to be painted is clean, dry, and free of any dust or debris. Next, adjust the spray pattern and pressure onthe sprayer to suit the specific project and desired finish. When ready, hold the sprayer at a consistent distance from the surface and apply the paint using smooth, overlapping strokes to achieve even coverage. It's important to keep the sprayer moving at a steady pace to prevent drips or uneven application. After finishing the job, clean the sprayer thoroughly by following the manufacturer's cleaning instructions to maintain its performance and longevity.中文翻译:要使用喷漆枪,首先需要选择适当类型的油漆,并根据制造商的说明稀释。
然后,确保要喷涂的表面干净、干燥,并且没有灰尘或杂质。
油漆喷枪使用说明书
它是我们在喷涂施工中的主要操作设备,根据取料方式以分为三种:虹吸式、重力式和压送式。
因除对嘴式喷枪外,不论是其它虹吸式还是重力式都可以很方便的改为压送式,所以我们一般只把喷枪分为两种:虹吸式和重力式。
1.虹吸式喷枪(虹吸式喷枪外部结构如下图)虹吸式喷枪又分为对嘴式和扁嘴式两种。
对嘴式喷枪一般重量较轻,仅0.5公斤左右,贮料罐容量小,工作压力一般在0.274~0.345兆帕,喷涂时喷雾呈圆形,喷嘴与工件物面间距150~250毫米,仅适用于小工件的喷涂作业,所以又俗称小喷枪。
扁嘴式喷枪相应要重一些,约1公斤,贮料罐容量较大,喷涂气压一般控制在0.35~0.50兆帕,喷涂间距较大,约在250~350毫米,属于大型喷枪。
喷涂时喷雾由旋转螺冒调节控制,可呈圆形、扇形或圆锥形(旋紧),喷涂时应根据被涂物表面形状和施工现场情况而调整喷雾形态。
2.压下式喷枪压下式喷枪又称重力式喷枪,其构造和工作原理基本上与扁嘴式喷枪相同,只是贮料罐上方,涂料靠重力作用自行流入枪膛,并随压缩空气喷射在工件上。
贮料罐装在上方,即使涂料较少,亦可充分得到利用,这是它的优点。
但枪体重心上移,如装满涂料,重量较大,不便于枪体运作,且涂料又易溢出,影响操作。
3.压送式喷枪
压送式喷枪其构造和工作原理基本上与压下式喷枪和虹吸式的扁嘴喷枪一样,其喷枪本身就是由扁嘴喷枪改造而成,不同的只是供
料方式不一样而已,扁嘴式喷枪由贮料罐供料,压送式喷枪采用输漆泵供料。
4.常用喷枪的内部结构及各种控制阀门的作用
①.枪头扁嘴(旋转螺母)枪头扁嘴主要是用来控制喷涂漆雾的形状和方向。
枪头扁嘴与枪身呈垂直或平行时,漆雾方向与枪头扁嘴的方向相反,漆雾呈扇形。
枪头扁嘴与枪身呈45°角交差时,漆雾呈圆形,角度变小或增大时,漆雾由圆形向椭圆变化,至180°角时变成扇形。
②.漆雾面积调节阀漆雾面积调节阀又称扇面调节阀,它在枪体的右上方,流量调节阀的上面。
漆雾面积调节阀的主要作用是用来控制漆雾在工件上的施工面积和漆膜的均匀。
漆雾面积调节阀向左旋转漆雾面积喷涂面积增大,向右旋转漆雾喷涂面积变小,旋紧时喷涂漆雾呈圆形。
③. 流量调节阀流量调节阀全名为涂料流量调节阀,以称顶针限动螺杆,它在枪体的右上方,扇面调节阀的下面。
流量调节阀是喷涂是用控制涂料喷出的大小,调节喷涂面积和漆膜的厚度、流平。
流量调节阀向左旋转出漆量变大,一次性喷涂膜变厚,喷涂面积增大;向右旋转出漆变小,一次性喷涂面积减小,漆膜变薄;旋紧时无涂料喷出。
④.空气压力调节阀空气压力调节阀以称喷涂空气控制阀,它在枪体的下方,气管连接处的旁边。
空气压力调节阀向左旋转,喷涂压力增大,喷涂距离变远,出漆量、喷涂面积同时应该跟着增加,否
则漆雾反弹严重,并会使漆膜变暗无光;向右旋转喷涂压力变小,喷涂距离缩短,出漆量、喷涂面积同时应该跟着减小,否则漆膜会产生大面积流挂;旋紧时无空气。
四.喷涂操作工艺
先将涂料用配套的稀释剂稀释、调均,配成适于喷涂所需的粘度,用100~150目的过滤布(过滤网)除去杂质后,装喷枪的进贮罐并旋紧盖子(或装进输漆泵的涂料罐或桶中)接好喷枪,接好油水分离器和空气压缩机各部件之间的连接气管,开动空气压缩机,使气压达到喷涂操作所要求的气压值后,扣动喷枪扳机,漆雾就立即喷出,放开扳机,出漆嘴和空气道口即分别被顶针堵住。
旋转顶针限动螺杆(流量调节阀),调节顶针伸出长度,可控制涂料的喷出量。
旋转漆雾面积调节阀,可调节喷出漆雾的散开面积。
旋转枪头的的旋转螺母,可调节喷出漆雾的形状。
调节枪体下方的空气压力调节阀,可调节喷涂压力。
对嘴式喷枪喷涂漆雾为圆形,出漆量调节阀是贮料罐上口的锥形螺母,向右旋转出漆量增大,向左旋转出漆量减小。
喷涂面积为出漆口上方的出气锥形螺母,向右旋转出喷涂面积增大,向左旋转喷涂面积减小。
喷涂气压调节螺杆在枪的后方,向右旋转喷涂气压减小,向左旋转喷涂气压增大。
对嘴式喷枪对平面物体进行喷涂时,应顺着物面纵向一行紧接一行连续喷涂,而且后一道喷出的漆雾要覆盖前一道涂层的一半或1/3,以保证漆膜的连续性和流平。
扁嘴式喷枪喷涂时应根据工件表面的造型即时调整喷出漆雾的形状、喷涂气压、涂料流量,以适应被
涂物面的状态:在喷涂施工时一般采用从内至外,由上到下的顺序进行喷涂,并且后一道喷出的漆雾要能覆盖前一道涂层的1/3左右,以保证漆膜的连续性和厚度一致。
喷涂垂直物面时,漆雾应呈竖扇形,沿横向喷涂;喷涂水平物面时,漆雾可呈竖扇形,也可呈横扇形,先横向喷涂,再纵向喷涂,打一“十”字,喷涂窄形物面时,可将漆雾调成圆锥形,沿物面喷涂;喷涂图案,应选用小型压式喷枪进行施工。
此外,因涂料的干燥性能不一样,喷涂施工的要求也不相同,慢干型涂料(如醇酸树脂涂料)喷涂时气压要小一些,一般控制气压在0.30~0.45兆帕;喷嘴离物面要远一些,一般间距为300~500毫米,而且走枪的速度要快一些,一般枪速控制在2.5~4.0米/秒,避免涂料流挂或流淌,而且要等前一道涂膜表干后,才能进行后一道的喷涂;快干型涂料(硝基漆)则每次可连续喷涂2~5遍,一次横向一次竖向交替进行,最后一次再顺着物面纵向喷涂。
五.喷枪的维修与保养
1. 喷枪的日常维护
a. 操作以前以及清洗或维修工作之后,必须确保所有部件都已紧固;
b. 在安装空气软管以前,须确保喷枪手柄下部的空气接口洁净;
c. 气源必须使用干燥无尘的普通压缩空气,严禁使用氧气和任何易燃气体,以免造成意外伤害;
d. 要使用喷枪说明书规定的气压,绝对不可超过规定的气压,以免喷枪部件的损坏和引起爆炸,一般常用喷枪标准气压为2.5~5.0
兆帕;
e. 每次工作完毕,一定要将空气管与喷枪分开;
f. 每次施工作业结束后,应立即用溶剂将喷枪各部分及其配套设备清洗干净,再把喷枪拆成零件,用溶剂浸泡并刷洗干净,特别是出气孔、顶针和出漆口要清洗干净,但不能用金属丝捅洗。
g. 不要把整支喷枪长时间浸泡在清洗液或稀释剂中,这样会使密封圈硬化,并破坏润滑效果;
h. 拆、装时要仔细,不可损坏零件,顶针用其垫圈等更不能损坏,然后用柔软湿棉布擦干收存;
i. 在使用喷枪进行施工时,不要佩戴戒指、耳环、项链和手链等装饰品;
j. 任何时候都不可以将枪口面对任何人(包括自己),装涂料时请勿扣动扳机;
k. 在任何情况之下,都不可拉扯空气软管或输漆软管来移动被连接的工具或设备;
l. 不可任意改变喷枪的原有设计、结构用功能组合;
m. 当发现工具漏气的时候,请不要使用它,并通知维护人员进行检修;
n. 要时常清理工作区域,避免由于场地环境不干净引起怕人身伤害;
2.喷枪的日常保养
a.为防止液体喷嘴或顶针损坏,务必在安装或卸下时扣紧扳机,
或卸下流量调节阀以解除弹簧对顶针的压力;
b. 喷枪一般采用特殊抗静电材料制造,但要避免产生静电;
c. 喷枪不能采用干布和清洁纸擦拭,擦拭喷枪可能产生静电,如果向某一接地物体放电,可能产生易燃的火花,导致溶剂蒸气燃烧。
如果需要在危险区域进行手工清洁,只能采用湿布或抗静电抹布;
d. 清洁涂料通道时,应将贮料罐中多余的涂料倒出或退出输漆管中残余涂料,然后用配套稀释剂或专用清洗液进行清洗;
e. 用湿布擦拭喷枪外表,切勿将喷枪完全浸入任何溶剂或清洗液中,因为这会损坏喷枪的润滑剂和密封垫圈,从而缩短喷枪的使用寿命。
六.喷枪常见故障的解决方法(喷枪常见故障发生部位见下图)。