交换机和路由器配置基本命令
- 格式:doc
- 大小:18.50 KB
- 文档页数:2
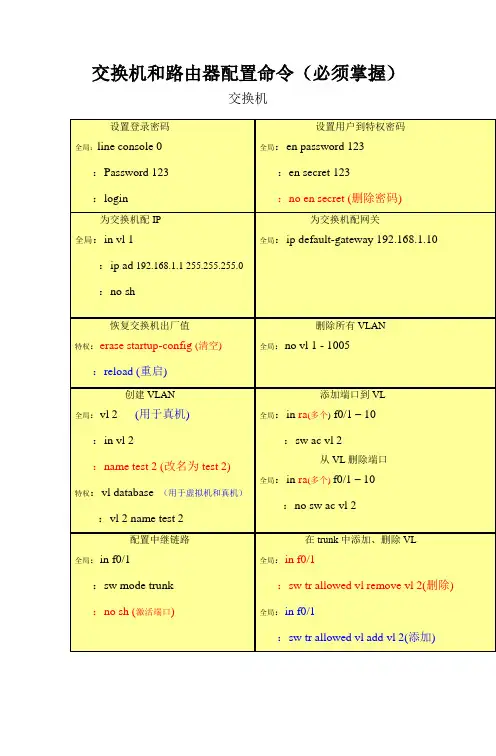
交换机和路由器配置命令(必须掌握)交换机设置登录密码全局:line console 0:Password 123:login设置用户到特权密码全局:en password 123:en secret 123:no en secret (删除密码)为交换机配IP全局:in vl 1:ip ad 192.168.1.1 255.255.255.0:no sh为交换机配网关全局:ip default-gateway 192.168.1.10恢复交换机出厂值特权:erase startup-config (清空):reload (重启)删除所有VLAN 全局:no vl 1 - 1005创建VLAN全局:vl 2 (用于真机):in vl 2:name test 2 (改名为test 2)特权:vl database (用于虚拟机和真机):vl 2 name test 2添加端口到VL 全局:in ra(多个) f0/1 – 10:sw ac vl 2从VL删除端口全局:in ra(多个)f0/1 – 10:no sw ac vl 2配置中继链路全局:in f0/1:sw mode trunk:no sh (激活端口)在trunk中添加、删除VL全局:in f0/1:sw tr allowed vl remove vl 2(删除) 全局:in f0/1:sw tr allowed vl add vl 2(添加)路由器以上命令是我认为学交换机和路由器必须要掌握的。
先就为大家收集这么多了,希望大家能好好学习。
当中可能会存在错误,如果大家发现请及时通知我。
谢谢~!SIT806——无敌精英班 班长留给路由器接口配IP全局:in f0/1:ip ad 192.168.2.2 255.255.255.0 :no sh配置单臂路由全局:in f0/0.1:encapsulation dot1q 1(VL1) :ip ad 192.168.1.1 255.255.255.0查看路由表特权:sh ip route关闭路由全局:no ip routing添加逻辑端口全局:int loopback 0配置默认路由全局:ip route 0.0.0.0 0.0.0.0 address(下一跳IP)配置静态路由 全局:ip route 192.168.1.0 255.255.255.0 192.168.2.1配置动态路由全局:router rip:network 172.25.0.0(所有直连网段)RIP V2的配置全局:router rip:version 2:no auto-summary (关闭汇总)设置远程管理全局:line vty 0 4(允许0到4,五个用户登录):login:pawwword 123全局:enable password 123。

1、switch>:用户模式——能查看版本信息2、在用户模式下输入enable会进特权模式——它能保存、修改、删除这一系列的配置switch>enable→switch#:特权模式,下面有一些命令就在此命令下完成:①、删除vlan的文件配置:delete flash:vlan.dat②、删除vlan中的配置文件:erase startup-config③、查看vlan配置文件是否被删除及vlan的是否创建:show vlan④、重新启动交换机:reload⑤、查看当前交换机的配置:show running-config⑥、保存对交换机所配置的内容,即是保存在Nvram:copy running-configstartup-config⑦、检查Nvram的内容:show startup-config⑧、检查虚拟接口 vlan的特征:show interface vlan 1⑨、查看接口IP的属性:show ip interface vlan 1⑩、查看cisco的信息:show version⑪、查看交换机所用快速以太网接口的默认属性:show interface fastethernet 0/18⑫、查看闪存目录中的内容:show flash 或dir flash3、在特权模式下输入configure terninal后会进入全局模式,一切的配置必须在此模式中进行配置Switch#configure terninal→switchp(config)#:全局模式①、配置路由器设备的名字:switch(config)#hostname + 交换机的名字②、配置进入特权模式的密码,即使能密码:switch(config)#enable password +密码③、配置非明文密码:switch(config)#enable secret + 密码4、为交换机配置console口①、进入现成配置模式,即进入console口:switch(config)# line console 0②、设置密码(重新启动时需要此密码):switch(config-line)#password + 密码③、允许登录:switch(config-line)#login5、配置远程登录的密码:①、首先要配置使能密码②、允许让几个人登录:switch(config)#line vty 0 4(即允许五个登录)③、设置密码:switch(config-line)#password + 密码④、允许远程登录:switchp(config-line)#login6、在全局模式下的有关命令①对所有密码进行加密:switch(config)#service password-encryption②、不解析错误的命令:switch(config)#no ip domain-lookup7、创建vlan(2—1001,注vlan 1既不可以创建,也不可以删除)①、创建vlan :vlan + 要创建vlan的值②、给vlan取名:switch(config-vlan)#name + 名字(此步可以不要)③、把PC与交换机相连的端口添加到相应的vlan中:a、Switch(config)#interface + 端口b、Switch(config-if)#switchport access vlan + 相应vlan的值④、需要传递多个vlan信息就要打中继口,即trunka、switch(config)#interface + 交换机另一端口b、switch(config-if)#switchport mode trunk8、传统vlan 的通信(1)、router的配置①、为接口配置IP地址(该IP是相应vlan的PC网关)②、激活端口:no shutdown(2)、switch的配置①、创建vlan,将PC端口划入相应vlan②、将switch与router相连的端口划入相应的vlan(3) 、PC的配置:就是给PC配置IP,注PC的默认网关与router的IP相同,网关相同9、单臂路由实现vlan的通信(1)router配置①、添加子接口:interface f0/0.1(此处有多少个vlan就添加多少个子接口)②、将子接口封装到相应的vlan:encapsulation dot + 相应vlan的值③、将子接口配置IP:ip add +ip地址 + 子网掩码④、激活物理接口:no shutdown(2)、switch的配置①、创建 vlan,交PC的端口划入到相应vlan②、与router相连的端口打trunk(3)、配置PC的IP9、三层交换(1)、配置三层交换①、启用三层交换:(config)#ip routing②、创建vlan:(config)# vlan + 要创建vlan的值③、把相应的vlan配置IPa、指定一个vlan:(config)#interface vlan + vlan相应的值c、配置IP:(config-if)#ip add + ip + 子网掩码(2)、配置switch①、每个交换机创建vlan②、把端口划分到相应的vlan中③、打中继口(trunk)Show命令1、show version 这个命令可以查看IOS版本号,已启动时间,Flash中的IOS 的文件名,router里面共有什么端口,寄存器的值等等。

华为路由器交换机常用命令一、设备管理命令1.登录管理命令- ssh [ip地质] -p [端口号]:通过SSH协议登录设备。
- telnet [ip地质]:通过Telnet协议登录设备。
- logout:退出设备。
2.用户管理命令- display current-configuration:显示当前设备配置信息。
- save:保存当前配置。
- undo save:取消保存的配置。
- super:切换到超级用户模式。
- user-interface console 0:配置控制台终端的参数。
- user-interface vty 0 4:配置远程登录终端的参数。
3.设备操作命令- reboot:重启设备。
- reset saved-configuration:恢复出厂配置。
- display version:显示设备的硬件和软件版本信息。
- display device:显示设备的基本信息。
- display interface[接口名称]:显示指定接口信息。
- display ip routing-table:显示IP路由表信息。
二、网络配置命令1.IP配置命令- interface [接口名称]:进入指定接口。
- ip address [IP地质] [子网掩码]:配置接口IP地质。
- undo ip address:取消接口IP地质配置。
- ip route-static [目标网络] [子网掩码] [下一跳地质]:配置静态路由。
- undo ip route-static [目标网络] [子网掩码] [下一跳地质]:取消静态路由配置。
2.VLAN配置命令- vlan [VLAN ID]:创建指定VLAN。
- quit:退出VLAN配置模式。
- interface vlan [VLAN ID]:进入指定VLAN接口。
- ip address [IP地质] [子网掩码]:为VLAN接口配置IP地质。


多厂商的基本配置一、思科路由:a\ IP基本配置:Router>enRouter#conf tRouter(config)#hostname SPOTO-DX-R1SPOTO-DX-R1(config)#SPOTO-DX-R1(config)#interface f0/1SPOTO-DX-R1(config-if)#ip address 192.168.166.254 255.255.255.0 SPOTO-DX-R1(config-if)#no shutdownSPOTO-DX-R1(config-if)#exitb\路由配置:SPOTO-DX-R1(config)#router ospf 100SPOTO-DX-R1(config-router)#router-id 21.25.97.5SPOTO-DX-R1(config-router)#network 192.168.166.0 0.0.0.255 area 0 SPOTO-DX-R1(config-router)#network 21.25.97.5 0.0.0.0 area 0 SPOTO-DX-R1(config-router)#exitc\远程管理:SPOTO-DX-R1(config)#enable password espotor1SPOTO-DX-R1(config)#service password-encryptionSPOTO-DX-R1(config)#line vty 0 4SPOTO-DX-R1(config-line)#password tspotor1SPOTO-DX-R1(config-line)#loginSPOTO-DX-R1(config-line)#exitd\查看信息:SPOTO-DX-R1#show versionSPOTO-DX-R1#show ip interface briefSPOTO-DX-R1#show interfaceSPOTO-DX-R1#show ip route ospfSPOTO-DX-R1#show running-config交换:a\Access配置:switch>enableswitch#confi tswitch(config)#hostname SPOTO-S1SPOTO-S1(config)#vlan 10SPOTO-S1(config-vlan)#name vlan10SPOTO-S1(config-vlan)#exit% Applying VLAN changes may take few minutes. Please wait... SPOTO-S1(config)#interface vlan 10SPOTO-S1(config-if)#ip address 192.168.166.252 255.255.255.0 SPOTO-S1(config-if)#interface f0/3SPOTO-S1(config-if)#switchport mode accesSPOTO-S1(config-if)#switchport access vlan 10b\Trunk 配置:SPOTO-S1(config-if)#interface f0/24SPOTO-S1(config-if)#switchport trunk encapsulation dot1q SPOTO-S1(config-if)#switchport mode trunkSPOTO-S1(config-if)#switchporttrunk allowed vlan XSPOTO-S1(config-if)#exit二、华为路由:a\ IP基本配置:<Quidway>system view[Quidway]sysname SPOTO-YD-R2[SPOTO-YD-R2]super password espotor2[SPOTO-YD-R2]interface ethernet 0[SPOTO-YD-R2-Ethernet0]ip address 192.168.2.254 255.255.255.0 [SPOTO-YD-R2-Ethernet0]undo shutdown[SPOTO-YD-R2-Ethernet0]quitb\路由配置:[SPOTO-YD-R2]router id x.x.x.x[SPOTO-YD-R2]interface ethernaet 0[SPOTO-YD-R2-ethernet0]ospf enable area 0.0.0.0[SPOTO-YD-R2-ospf]quit[SPOTO-YD-R2]ospf enable[SPOTO-YD-R2-ospf]import-route direct[SPOTO-YD-R2-ospf]network 192.168.2.0 0.0.0.255c\远程管理:[SPOTO-YD-R2] user-interface vty 0 4[SPOTO-YD-R2-ui-vty0-4]authentication-mode password[SPOTO-YD-R2-ui-vty0-4]set authentication-mode password simpletspotor2 [SPOTO-YD-R2-ui-vty0-4]user privilege level 3[SPOTO-YD-R2-ui-vty0-4]quitd\查看信息:[SPOTO-YD-R2]display version[SPOTO-YD-R2]display interface[SPOTO-YD-R2]display ip route[SPOTO-YD-R2]display current-configuration[SPOTO-YD-R2]display history交换:a\Access配置:[SPOTO-S2]vlan 10[SPOTO-S2-vlan10]quit[SPOTO-S2]interface ethernet 0/1[SPOTO-S2-Ethernet0/1]port link-type access [SPOTO-S2-Ethernet0/1]port access vlan 10 [SPOTO-S2-Ethernet0/1]quitb\Trunk配置:[SPOTO-S2]interface ethernet 0/2[SPOTO-S2-Ethernet0/2]port link-type trunk [SPOTO-S2-Ethernet0/2]port trunk permit vlan 10 [SPOTO-S2-Ethernet0/2]port trunk pvid vlan X [SPOTO-S2-Ethernet0/2]quit三、华三H3C路由:a\ IP基本配置:<H3C>system view[H3C]sysname SPOTO-R[SPOTO-R]interface GigabitEthernet 1/0/1[SPOTO-R-GigabitEthernet1/0/1]ip address192.168.166.254 24[SPOTO-R-GigabitEthernet1/0/1]undo shutdown[SPOTO-R-GigabitEthernet1/0/1]quitb\路由配置:[SPOTO-R]ospf 12[SPOTO-R-ospf-12]area 0[SPOTO-R-ospf-12-area-0.0.0.0]network 192.168.166.0 0.0.0.255[SPOTO-R-ospf-12-area-0.0.0.0]silent-interface gi 0/0[SPOTO-R-ospf-12]import-routestatitc\远程管理:[SPOTO-R]super password simple espotor \\明文密码,密文可用cipher替代simple [SPOTO-R]user-interface vty 0 4[SPOTO-R-ui-vty0-4]authentication-mode password[SPOTO-R-ui-vty0-4]set authentication password tspotor[SPOTO-R-ui-vty0-4]user privilege level 3[SPOTO-R-ui-vty0-4]quit[SPOTO-R]telnet server enabled\查看信息:dirdisplay versiondisplay vlandisplay current-configurationdisplay ip routedisplay usersdisplay interface交换:a\Access配置:[SPOTO-S]vlan 10[SPOTO-S-vlan10]port e 0/1[SPOTO-S-vlan10]quit[SPOTO-S]interface ethernet 0/1[SPOTO-S-Ethernet0/1]port link-type access [SPOTO-S-Ethernet0/1]port access vlan 10b\Trunk配置:[SPOTO-S-Ethernet0/1]port link-type trunk [SPOTO-S-Ethernet0/1]port trunk permit vlan 10 [SPOTO-S-Ethernet0/1]port trunk pvid vlan 1四、锐捷路由:a\ IP基本配置:Router >enableRouter#configure terminalRouter(config)#interface f0/1Router(config-if)#ip address 192.168.166.253 255.255.255.0 Router(config-if)#no shutdownb\路由配置:Router(config)#router ospf 1Router(config-router)#network 192.168.166.0 0.0.0.255 area 0 Router(config-router)#endc\远程管理:Router(config)#enable password espotor1Router(config)#service password-encryptionRouter(config)#line vty 0 4Router(config-line)#password tspotor1Router(config-line)#loginRouter(config-line)#exitd\查看信息:show versionshow ip interface briefshow interface fa0/1show running-configshow ip route交换:a\Access配置:switch>enableswitch#confi tswitch(config)#hostname S1S1(config)#S1(config)#vlan 10S1(config-vlan)#name vlan10S1(config-vlan)#exitS1(config)#interface vlan 10S1(config-if)#ip address 192.168.166.252 255.255.255.0 S1(config-if)#interface f0/3S1(config-if)#switchport mode accessS1(config-if)#switchport access vlan 10b\Trunk配置:S1(config)#interface e0/2S1(config-if)#switchport mode trunk五、Juniper路由:a\ IP基本配置:root@%cliroot>editEntering configuration mode[edit]root#set system host-name SPOTO-Junos[edit]root#commitcommitcomplete[edit]root@SPOTO-Junos#edit interface[edit interface]root@SPOTO-Junos#setem0 unit 0 family inet address 192.168.166.252/24[edit interface]root@SPOTO-Junos#setlo0 unit 0 family inet address 21.99.67.55/32[edit interface]root@SPOTO-Junos#exit[edit]root@SPOTO-Junos#commitb\路由配置:root@SPOTO-Junos#set logical-routers r1 protocols ospf area 0 interface em0 [edit]root@SPOTO-Junos#c\远程管理:[edit]root@SPOTO-Junos#edit system login[edit system login]root@SPOTO-Junos#setuser kiss class super-user authentication plan-text-password Newpassword:Retypenew password:[edit system login]root@SPOTO-Junos#top[edit]root@SPOTO-Junos#edit system services[edit system services]root@SPOTO-Junos#setssh protocol-version v2[edit system services]root@SPOTO-Junos#commitcommitcomplete[edit system services]root@SPOTO-Junos#settelnetd\查看信息:root@SPOTO-Junos>showversionroot@SPOTO-Junos>showroute terseroot@SPOTO-Junos>showconfigurationroot@SPOTO-Junos#showlogical-routersroot@SPOTO-Junos#showinterfaces交换:a\Access配置:[edit]root@SPOTO-Junos#set vlans vlan10 vlan id 10[edit]root@SPOTO-Junos#set interface fe-0/1 unit 0 family Ethernet-switching port-mode access [edit]root@SPOTO-Junos#set interface fe-0/1 unit 0 family Ethernet-switching vlan members 10 b\Trunk配置:[edit]root@SPOTO-Junos#set interface fe-0/1 unit 0 family ethernet-switching port-mode trunk [edit]root@SPOTO-Junos#set interface fe-0/1 unit 0 family ethernet-switching vlan members all六、迈普路由:a\ IP基本配置:Router>enableRouter#configure terminalRouter(config)#hostname MaipuMaipu(config)#interface fastethernet0Maipu(config-if-fastethernet0)#ip add 192.168.2.252 255.255.255.0 b\路由配置:Maipu(config)#router ospf 100Maipu(config-router)#network 192.168.2.0 0.0.0.255 area 0c\远程管理:Maipu(config)#aaa new-modelMaipu(config)#aaa authentication login default local enable none Maipu(config)#user SPOTO password 0 espotoMaipu(config)#line vty 0 4Maipu(config-line)#login locald\查看信息:Maipu#show versionMaipu#show ip routeMaipu#show interfaceMaipu#show cpuMaipu#show memoryMaiou#show running-config交换:a\Access配置:Maipu(config)#vlan 801Maipu(config-vlan801)#exitMaipu(config)#port 0/0/2Maipu(config-port-0/0/2)#port access vlan 801Maipu(config-port-0/0/2)#port-type nnib\Trunk配置:Maipu(config)#interface ethernet1/0/1Maipu(config-if-ethernet1/0/1)#switchport mode trunk Maipu(config-if-ethernet1/0/1)#exit七、Redback路由:a\ IP基本配置:[local]SE800>enable[local]SE800#configuration[local]SE800(config)#context local[local]SE800(config-ctx)#interface toSPOTO-R1[local]SE800(config-if)#ip add 21.98.65.21/30[local]SE800(config-if)#commit[local]SE800(config)#port ethernet 1/1[local]SE800(config-port)#no auto-negotiate[local]SE800(config-port)#no shutdown[local]SE800(config-port)#bind interface toSPOTO-R1 local[local]SE800(config-port)#commitb\路由配置:[local]SE800(config)#context local[local]SE800(config-ctx)#router-id x.x.x.x[local]SE800(config-ctx)#interface lp1 loopback[local]SE800(config-if)#ip address x.x.x.x/32[local]SE800(config-if)#ip source-address snmp syslog[local]SE800(config-ctx)#router ospf 1[local]SE800(config-ospf)#auto-cost reference-bandwidth 80000 [local]SE800(config-ospf)#log-neighbor-up-down[local]SE800(config-ospf)#area 0.0.0.0[local]SE800(config-ospf-area)#interface toSPOTO-R1[local]SE800(config-ospf-interface)#network-type point-to-point [[local]SE800(config-ospf)#redistribute connected metric 20metric-type 1 c\远程管理:[local]SE800(config)#system hostname SPOTO-R[local]SPOTO-R(config)#context local[local]SPOTO-R(config-ctx)#enable password espotor[local]SPOTO-R(config-ctx)#service ssh[local]SPOTO-R(config-ctx)#administrator SPOTO password se800pt [local]SPOTO-R(config-admin)privil start 10[local]SPOTO-R(config-admin)privil max 15ip access-list admin-acldescription This is a sample access control list seq 10 permit ip host 192.168.166.55seq 20 permit ip host 172.16.10.122sep 30 permit ip host 172.16.10.77sep 40 deny ip anyadmin-access-group admin-acl ind\查看信息:show subscribersshow cirsho clocksho vershow releasesho sub summ allshow hardware detailcontext localshow confi八、中兴路由:a\ IP基本配置:interface create ip to-r2 address-netmask 120.190.1.1/16port et.1.2interface create ip to-r3 address-netmask 130.1.1.1/16 portet.1.3b\路由配置:ip add route 202.1.0.0/16 gateway 120.90.1.2ospf startospf create area 140.1.0.0ospf create area backboneospf set ase-default cost 4ospf add interface 140.1.1.1 to-area 140.1.0.0ospf add interface 140.1.2.1 to-area 140.1.0.0ip-router policy create ospf-export-destinationospfExpDstType1 type 1 metric 1 c\远程管理:create user administratorlogin pass administratorline-vty timeout 60d\查看信息:system show active-config?交换:a\Access配置:set vlan 10 add port 1-23 untagset port 1-23 pvid 10b\Trunk配置:set vlan 1-10 add port 24 tag。

交换机路由器命令大全(结合配置实例)交换机路由器命令大全(结合配置实例)交换机和路由器是计算机网络中常用的网络设备,用于实现数据包的转发和路由选择。
在实际应用中,我们需要使用命令来配置交换机和路由器的各项参数。
本文将给出交换机和路由器常用命令的大全,并结合实际配置示例进行说明。
一、交换机命令1. 查看交换机基本信息查看交换机型号、固件版本、序列号等基本信息:show version2. 配置交换机端口设置交换机接口的速率、全双工模式等参数:interface interface_namespeed speed_valueduplex {full | half}3. 查看交换机端口状态查看交换机端口的连接状态、速率、工作模式等信息:show interfaces status4. 配置交换机VLAN创建VLAN和端口关联,实现VLAN的隔离和管理:vlan vlan_idname vlan_nameinterface interface_name5. 查看交换机MAC表显示交换机学习到的MAC地址和对应的端口:show mac-address-table6. 配置交换机链路聚合将多个物理端口绑定为一个逻辑端口,提高带宽和冗余性:interface port-channel channel_numberdescription description_textswitchport mode trunk/access7. 交换机Spanning Tree配置配置交换机的Spanning Tree协议参数,避免网络环路:spanning-tree vlan vlan_idpriority priority_value二、路由器命令1. 查看路由表显示路由器的路由表,包括直连路由、静态路由和动态路由表项:show ip route2. 配置静态路由手动配置路由器的静态路由表,指定目的网络和下一跳信息:ip route destination_network subnet_mask next_hop_ip3. 配置路由器接口配置路由器的接口参数,包括IP地址、子网掩码、描述等:interface interface_nameip address ip_address subnet_maskdescription description_text4. 配置路由器OSPF协议配置路由器之间的OSPF动态路由协议,实现网络的动态路由选择:router ospf process_idnetwork network_address wildcard_mask area area_number5. 配置路由器ACL配置路由器的访问控制列表,用于控制数据包的流量:access-list access_list_number permit/deny source destination6. 配置路由器NAT配置路由器的网络地址转换功能,实现内网与外网的互通:interface interface_nameip nat inside/outside三、配置实例1. 配置交换机端口接口GigabitEthernet0/1配置为100Mbps全双工模式:interface GigabitEthernet0/1speed 100duplex full2. 配置交换机VLAN创建VLAN10,将接口GigabitEthernet0/1划分到VLAN10:vlan 10name VLAN10interface GigabitEthernet0/13. 配置路由器接口将接口GigabitEthernet0/0配置为192.168.1.1/24的IP地址:interface GigabitEthernet0/0ip address 192.168.1.1 255.255.255.0description LAN interface4. 配置静态路由配置路由器的静态路由表,将目的网络192.168.2.0/24指向下一跳192.168.1.2:ip route 192.168.2.0 255.255.255.0 192.168.1.25. 配置路由器ACL设置访问控制列表,允许源IP地址为192.168.1.0/24的流量通过:access-list 1 permit 192.168.1.0 0.0.0.2556. 配置路由器NAT设置路由器的NAT,将内部接口GigabitEthernet0/1地址转换为公网地址:interface GigabitEthernet0/1ip nat inside以上是交换机和路由器常用命令的大全以及配置实例。
交换机路由器命令大全(结合配置实例)一交换机命令switch: ;ROM状态,路由器是rommon>hostname> ;用户模式hostname# ;特权模式hostname(config)# ;全局配置模式hostname(config-if)# ;接口状态switch>enable ;进入特权模式交换机口令设置:switch#config terminal ;进入全局配置模式switch(config)#hostname ;设置交换机的主机名switch(config)#enable secret xxx ;设置特权加密口令switch(config)#enable password xxa ;设置特权非密口令switch(config)#line console 0 ;进入控制台口switch(config-line)#line vty 0 4 ;进入虚拟终端switch(config-line)#login ;允许登录switch(config-line)#password xx ;设置登录口令xxswitch#exit ;返回命令交换机VLAN设置:switch#vlan database ;进入VLAN设置switch(vlan)#vlan 2 ;建VLAN 2switch(vlan)#no vlan 2 ;删vlan 2switch(config)#int f0/1 ;进入端口1switch(config-if)#switchport access vlan 2 ;当前端口加入vlan 2 switch(config-if)#switchport mode trunk ;设置为干线switch(config-if)#switchport trunk allowed vlan 1,2 ;设置允许的vlan switch(config-if)#switchport trunk encap dot1q ;设置vlan 中继switch(config)#vtp domain ;设置发vtp域名switch(config)#vtp password ;设置发vtp密码switch(config)#vtp mode server ;设置发vtp模式switch(config)#vtp mode client ;设置发vtp模式switch(config)#interface vlan 1 ;进入vlan 1switch(config-if)#ip address ;设置IP地址switch(config)#ip default-gateway ;设置默认网关switch#dir flash: ;查看闪存交换机显示命令:switch#write ;保存配置信息switch#show vtp ;查看vtp配置信息switch#show run ;查看当前配置信息switch#show vlan ;查看vlan配置信息switch#show interface ;查看端口信息switch#show int f0/0 ;查看指定端口信息二、路由器命令路由器显示命令:router#show run ;显示配置信息router#show interface ;显示接口信息router#show ip route ;显示路由信息router#show cdp nei ;显示邻居信息router#reload ;重新起动路由器口令设置:router>enable ;进入特权模式router#config terminal ;进入全局配置模式router(config)#hostname ;设置交换机的主机名router(config)#enable secret xxx ;设置特权加密口令router(config)#enable password xxb ;设置特权非密口令router(config)#line console 0 ;进入控制台口router(config-line)#line vty 0 4 ;进入虚拟终端router(config-line)#login ;要求口令验证router(config-line)#password xx ;设置登录口令xxrouter(config)#(Ctrl+z) ;返回特权模式router#exit ;返回命令路由器配置:router(config)#int s0/0 ;进入Serail接口router(config-if)#no shutdown ;激活当前接口router(config-if)#clock rate 64000 ;设置同步时钟router(config-if)#ip address ;设置IP地址router(config-if)#ip address second ;设置第二个IProuter(config-if)#int f0/0.1 ;进入子接口router(config-subif.1)#ip address ;设置子接口IProuter(config-subif.1)#encapsulation dot1q ;绑定vlan中继协议router(config)#config-register 0x2142 ;跳过配置文件router(config)#config-register 0x2102 ;正常使用配置文件router#reload ;重新引导静态路由:ip route ;命令格式router(config)#ip route 2.0.0.0 255.0.0.0 1.1.1.2 ;静态路由举例router(config)#ip route 0.0.0.0 0.0.0.0 1.1.1.2 ;默认路由举例动态路由:router(config)#ip routing ;启动路由转发router(config)#router rip;启动RIP路由协议。
华三交换机-路由器配置命令华三交换机-路由器配置命令第一章:登录华三交换机-路由器1. 使用浏览器登录:a. 打开浏览器;b. 在地址栏中输入交换机-路由器的IP地址;c. 输入正确的用户名和密码;d. 单击登录按钮。
2. 使用命令行登录:a. 打开命令提示符或终端窗口;b. 输入telnet或ssh命令,后跟交换机-路由器的IP地址;c. 输入正确的用户名和密码;d. 按下回车键登录。
第二章:基本配置1. 设置主机名:hostname [主机名]2. 设置登录密码:enable password [密码]3. 配置管理接口:interface [接口]ip address [IP地址] [子网掩码] 4. 配置默认网关:ip default-gateway [默认网关]第三章:VLAN(虚拟局域网)配置1. 创建VLAN:vlan [VLAN号]name [VLAN名称]2. 配置端口―VLAN关联:interface [端口]switchport mode accessswitchport access vlan [VLAN号] 3. 配置交换机端口为Trunk口:interface [端口]switchport mode trunk第四章:路由配置1. 静态路由配置:ip route [目标网络] [目标子网掩码] [下一跳IP地址] 2. OSPF(开放最短路径优先)配置:router ospf [进程号]network [网络地址] [通配符] area [区域号]3. BGP(边界网关协议)配置:router bgp [自治系统号]neighbor [对等体IP地址] remote-as [对等体自治系统号]第五章:安全配置1. 配置SSH(安全外壳协议):crypto key generate rsaip ssh server enable2. 配置访问控制列表(ACL):ip access-list [ACL名称]permit/deny [源IP地址] [目标IP地址] [协议]第六章:性能优化配置1. 配置端口速率限制:interface [端口]bandwidth [带宽]2. 配置端口链路聚合(LACP):interface port-channel [聚合组号]channel-group [组号] mode active3. 配置端口流量控制:interface [端口]storm-control [选项]附件:本文档涉及的附件可在[link]。

一、拿到一台新的华为设备,我们首先要进行本地配置,比如配置密码,开启远程控制,配置用户设置权限等。
系统默认是没有开启telnet远程的,很多配置是需要我们在本地配置中开启的。
下面我们讲解华为设备的安全登录设置。
注:我们使用的是华为ensp模拟器进行讲解。
1.1、不同网络设备的需求和工作模式互不相同,其具体配置方法也会有较大的不同。
但所有的交换机/路由器都有一些共同的部分,可以把这些部分作为基本的模板用于最初的配置。
配置图如下:1、在路由器AR1设置本地登录用户视图(console端口)登录密码<Huawei>system-view //进入系统视图[Huawei]user-interface console 0//进入用户视图[Huawei-ui-console0]authentication-mode password //配置用户视图密码,最长16位Please configure the login password (maximum length 16):wltx //输入密码wltx[Huawei-ui-console0]set authentication password cipher 123 //修改用户视图验证密码,可跟56位密文[Huawei-ui-console0]return //回到用户视图,如前面的是<Huawei>,说明回到了用户视图。
<Huawei>save//保存配置The current configuration will be written to the device.Are you sure to continue? (y/n)[n]:y //按y确认保存<Huawei>quit //退出Configuration console exit please press any key to log onLogin authenticationPassword: //再次登录用户视图需要输入密码此时登录则需要输入密码才能进入用户视图,如果要取消安全认证,则执行以下命令。

交换机和路由器基本配置交换机和路由器基本配置一、前言本文档旨在提供交换机和路由器的基本配置指南,以帮助用户了解如何正确配置和管理网络设备。
本文档详细介绍了每个章节的配置步骤和注意事项,方便用户按照指南进行操作。
二、硬件准备1·确保交换机和路由器已正确安装,并连接到电源和网络线路。
2·确保有正确的管理权限和凭据来访问设备。
三、交换机基本配置1·连接到交换机a·使用串口或网络线缆将计算机连接到交换机的管理端口。
b·配置计算机的IP地质,确保与交换机的管理接口在同一网络段。
2·登录交换机a·打开SSH(Secure Shell)客户端,并输入交换机的管理IP地质。
b·使用正确的用户名和密码登录交换机。
3·配置基本参数a·配置交换机的主机名,确保唯一性并易于识别。
b·配置管理VLAN,以便远程管理设备。
c·配置SNMP(Simple Network Management Protocol)参数,以实现对交换机的监控和管理。
4·创建和配置VLANa·创建VLAN并指定相应的VLAN ID。
b·将端口分配给相应的VLAN。
c·配置VLAN接口的IP地质,以实现不同VLAN之间的通信。
5·配置STP(Spanning Tree Protocol)a·启用STP机制,以防止网络环路导致的数据包洪泛。
b·配置根桥和边界端口,以优化网络拓扑。
6·配置端口安全a·配置端口安全以限制与特定MAC地质相关联的设备的接入。
b·配置端口安全阈值,以控制允许接入的设备数量。
7·配置QoS(Quality of Service)a·配置QoS以实现对网络流量的优先级分类和限制。
b·配置流量控制策略,以保证重要数据的传输质量。
使用的是cisco网络设备操作系统命令,其他厂商设备应该相差不远,实验使用的设备时cisco catalyst1912交换机和cisco 2621路由器。
终端的IP配置命令:Ipconfig /ip IP地址子网掩码;Ipconfig /dg 网关IP常用的交换机的配置命令:交换机工作在OSI 模型的第二层(数据链路层), 地址学习, 转发过滤, 消除循环是交换机的三个主要功能。
有三种模式,“>”用户模式,“#”特权模式,“(CONFIG)#”全局模式.从用户模式进入特权模式:enable从特权模式进入全局模式:configure terminal,在特权模式下输入disable或者exit 回到用户模式,其他模式类似。
从全局模式进入端口模式:interface e0/1。
switch: ;ROM状态,路由器是rommon>hostname> ;用户模式hostname# ;特权模式hostname(config)# ;全局配置模式hostname(config-if)# ;接口状态用户模式(>)下:可以查看一些基本的配置信息。
特权模式(#)下:show ip 查看交换机的IP地址。
Show interface 查看所有端口的配置信息show interfaces Ethernet 0/1 查看E0/1口的信息Show interface e0/1 查看e0/1端口的配置信息。
show version 查看系统硬件的配置,软件版本号等。
show port ;(CatOS)显示每个端口的简要信息(号、VLAN、双工、…)show interface ;(IOS)show trunk ;(CatOS)显示中继信息(模式、封装、允许端口、剪裁、…)show interface trunk ;(IOS)show spantree 45 ;(CatOS)显示端口的STP模式、类型、状态、速端口、…) show spanning-tree 45 ;(IOS)Show running-config (show running也可以)查看当前正在运行的配置信息全局模式//配置模式((config)#):设置交换机名:hostname[交换机名]如:hostname switch1设置交换机的IP地址:ip address [ip address ][netmask]如ip address 172.16.0.1 255.255.0.0设置交换机的缺省网关:ip default-gatway [ip address]如:ip default-gatway 172.16.0.1设置密码enable password level [1-15] [passwork]1-15 表示级别,1表示设置登录时的密码,15设置进入全局模式的密码。
路由器与交换机配置一、交换机的基本配置1.配置enable口令、密码和主机名Switch>(用户执行模式提示符)Switch>enable(进入特权模式)Switch#(特权模式提示符)Switch#config terminal(进入配置模式)Switch(config)#enable password cisco(设置enable password为cisco) Switch(config)#enable secret cisco1(设置enable secret为sisco1) Switch(config)#hostname C2950(设置主机名为C2950)C2950(config)#end(退回到特权模式)C2950#2.配置交换机IP地址、默认网关、域名和域名服务器C2950(config)#ip address192.168.1.1255.255.255.0(设置交换机IP) C2950(config)#ip default-gateway192.168.1.254(设置默认网关) C2950(config)#ip domain-name (设置域名)C2950(config)#ip name-server200.0.0.1(设置域名服务器)C2950(config)#end3.配置交换机的端口属性C2950(config)#interface fastethernet0/1(进入接口0/1的配置模式) C2950(config-if)#speed?(查看speed命令的子命令)C2950(config-if)#speed100(设置该端口速率为100Mbps)C2950(config-if)#duplex?(查看duplex命令的子命令)C2950(config-if)#duplex full(设置该端口为全双工)C2950(config-if)#description TO_PC1(设置该端口描述为TO_PC1) C2950(config-if)#^Z(返回到特权模式,同end)C2950#show interface fastethernet0/1(查看端口0/1的配置结果) C2950#show interface fastethernet0/1status(查看端口0/1的状态) 4.配置和查看MAC地址表C2950(config)#mac-address-table?(查看mac-address-table的子命令)C2950(config)#mac-address-table aging-time100(设置超时时间为100s)C2950(config)#mac-address-table permanent0000.0c01.bbcc f0/3(加入永久地址)C2950(config)#mac-address-table restricted static0000.0c02.bbcc f0/3f0/7(加入静态地址)C2950(config)#endC2950#show mac-address-table(查看整个MAC地址表)C2950#clear mac-address-table restricted static(清除限制性地址)二、配置和管理VLAN1.VLAN基础知识VLAN技术:把物理上直接相连的网络从逻辑上划分为多个子网。
交换机路由器常用命令交换机和路由器是网络中非常重要的设备,熟练掌握它们的常用命令对于网络管理和故障排除至关重要。
下面为您介绍一些交换机和路由器常用的命令。
一、交换机常用命令1、`enable` 命令这个命令用于进入特权模式。
在特权模式下,可以执行更多高级的配置和管理操作。
2、`configure terminal` 命令输入此命令后,可以进入全局配置模式,对交换机的整体参数进行设置。
3、`interface` 命令通过`interface` 加上接口类型和编号,例如`interface ethernet0/1` ,可以进入特定接口的配置模式,对该接口的参数进行详细配置。
4、`vlan` 命令`vlan` 相关的命令用于创建、删除和配置 VLAN(虚拟局域网)。
比如`vlan 10` 创建 VLAN 10 ,`name VLAN10` 为 VLAN 10 命名。
5、`show vlan` 命令用于查看交换机上已创建的VLAN 信息,包括VLAN 编号、名称、端口成员等。
6、`show interfaces` 命令此命令可以查看交换机各个接口的状态、速率、双工模式等详细信息。
7、`port trunk allowpass vlan` 命令在配置 trunk 链路时,使用该命令允许特定的 VLAN 通过 trunk 链路。
8、`spanningtree` 命令用于配置生成树协议,防止网络环路。
例如`spanningtree moderstp` 可以设置生成树的模式为快速生成树。
二、路由器常用命令1、`enable` 命令同样用于进入特权模式。
2、`configure terminal` 命令进入全局配置模式。
3、`interface` 命令例如`interface fastethernet 0/0` ,进入特定的接口配置模式。
4、`ip address` 命令为接口配置 IP 地址,如`ip address 19216811 2552552550` 。
路由器和交换机命令大全路由器和交换机是计算机网络中常用的设备,它们在数据传输和网络管理中发挥着重要的作用。
掌握路由器和交换机的命令是网络管理和故障排除的基本要求。
本文将为您提供常见的路由器和交换机命令大全,以帮助您更好地理解和应用这些设备。
一、路由器命令1. show ip route:显示路由表中的所有路由信息。
2. show interfaces:显示接口的状态和统计信息。
3. show running-config:显示当前路由器的配置信息。
4. show version:显示路由器的硬件和软件版本信息。
5. configure terminal:进入全局配置模式。
6. interface interface-name:进入指定接口的配置模式。
7. ip address ip-address subnet-mask:为接口配置IP地址和子网掩码。
8. ip route destination-network subnet-mask next-hop:配置静态路由。
9. access-list access-list-number {deny | permit} source destination:配置访问控制列表。
10. clear arp-cache:清除路由器的ARP缓存。
11. debug {protocols | ip | interface}:启用某个调试功能来监控网络流量或接口状态。
二、交换机命令1. show interfaces:显示接口的状态和统计信息。
2. show mac-address-table:显示交换机的MAC地址表。
3. show running-config:显示当前交换机的配置信息。
4. show vlan:显示交换机的VLAN信息。
5. configure terminal:进入全局配置模式。
6. interface interface-name:进入指定接口的配置模式。
华为路由器、交换机配置命令大全华为路由器配置命令大全:一、登录华为路由器控制台1:使用PuTTY或其他SSH客户端登录到华为路由器:```ssh admin<路由器IP地址>```2:输入登录密码进行验证。
二、基本配置命令1:设置主机名:```sysname <主机名>```2:配置管理接口:```interface GigabitEthernet0/0/0ip address <IP地址> <子网掩码>```3:配置VLAN接口:```interface Vlanif <VLAN ID>ip address <IP地址> <子网掩码>```三、路由相关配置命令1:静态路由配置:```ip route-static <目标网络> <子网掩码> <下一跳地址> ```2:动态路由配置:```router ospf <进程ID>router-id <路由器ID>network <网络地址> <子网掩码> area <区域ID>3: BGP路由配置:```bgp <AS号码>router-id <路由器ID>peer <对端IP地址> as-number <对端AS号码>```四、安全配置命令1:配置防火墙规则:```acl number <ACL编号>rule <规则序号> permit source <源地址> destination <目的地址>rule <规则序号> deny source <源地址> destination <目的地址>```2:开启SSH服务:ssh server enable```3:配置AAA认证:```aaalocal-user <用户名> password irreversible-cipher <加密密码>authorization-attribute user-role network-admin```五、NAT配置命令1:配置静态NAT:```interface GigabitEthernet0/0/0nat outbound <内部接口> <外部接口>```2:配置动态NAT:nat address-group <地址组名>address <内部地址> <外部地址>```3:配置PAT:```interface GigabitEthernet0/0/0nat address-group <地址组名>```附件:1:示例配置文件(附件1)2:路由器接口图(附件2)法律名词及注释:1:主机名:路由器的标识名称。
准备工作:1)SecureCRT 软件(推荐使用8.0注册机版)2)console线一条,RS232转USB线一条(淘宝购买)RS232转USB线插在电脑上,打开设备管理(快捷键devmgmt.msc),就会有提示,用360驱动(或其他驱动软件)打上即可。
下图为驱动安装成功后的设备管理器界面(本人电脑系统为win10)。
注意:com口与电脑上USB口是对应的,接在另一个USB口,com口的序号会变化。
file:///C:/Users/Potter/AppData/Local/Temp/msohtmlclip1/01/clip_image 002.jpg3)电脑一台4)网络基础知识(OSI,IP,路由交换基础等)5)登陆设备 ( CLI命令行)设备-----Console—RS232-USB---电脑,打开SecureCRT软件file:///C:/Users/Potter/AppData/Local/Temp/msohtmlclip1/01/clip_image 004.jpg一,锐捷交换机 ( 和cisco命令类似)1,设备登陆Web登陆:192.168.1.1 admin/adminConsole密码:默认为空,如果不行试试ruijie / admin2,系统基本配置!enable //进入用户模式,华为H3C无对应命令clockset 10:00:00 3 17 2017 //clock set 小时:分:秒月日年!config //进入全局模式,对应华为H3C的syshostname xx //修改设备名称!3,配置vlan!config //进入全局模式vlan 10name xxx //创建一个vlan,并命名vlan 20name xxxexit!no vlan 10 //删除一个vlan!int range gi 0/2-4sw mo ac //配置多个接口为access模式sw ac vl 10 //配置多个接口加入vlan10exit!int range gi 0/5-8sw mo tr //配置多个接口为trunk 模式sw tr al vl al //配置trunk模式下,接口允许所有vlan(1-4094)通过sw tr na vl 20 //配置多个接口为trunk,并指定native vlan为20sw tr al vl remove xx //配置trunk模式下,接口不允许哪些vlan不通过sw tr al vl add xx //配置trunk模式下,接口添加哪些vlan 允许通过exit!!sh vlan //查看 vlan 信息,包括 vlan id、名称、状态、包括的接口!sh int gi 0/2 sw //查看接口 Gi 0/2 的 vlan 状态!4,配置接口!configint gi 0/1desxx / /给接口配置描述ip add 1.1.1.1 255.255.255.0 //路由口配置IP地址,交换口无法直接配置no sh!int vlan 10desxx//给SVI接口配置描述ip add 172.16.10.1 255.255.255.0 //创建SVI接口,一般为作为网关或管理地址!注意:SVI接口状态跟是否创建vlan,以及是否存在加入该vlan的up状态的接口。
en 进入特权模式
conf 进入全局配置模式
in s0 进入serial 0 端口配置
ip add xxx.xxx.xxx.xxx xxx.xxx.xxx.xxx 添加ip 地址和掩码,电信分配enca hdlc/ppp 捆绑链路协议hdlc 或者ppp
ip unn e0
exit 回到全局配置模式
in e0 进入以太接口配置
ip add xxx.xxx.xxx.xxx xxx.xxx.xxx.xxx 添加ip 地址和掩码,电信分配exit 回到全局配置模式
ip route 0.0.0.0 0.0.0.0 s 0 添加路由表
ena password 口令
write
exit
以上根据中国电信ddn 专线多数情况应用
普通用户模式
enable 转入特权用户模式
exit 退出配置
help 系统帮助简述
language 语言模式切换
ping 检查网络主机连接及主机是否可达
show 显示系统运行信息
telnet 远程登录功能
tracert 跟踪到目的地经过了哪些路由器
#? 特权用户模式
clear 清除各项统计信息
clock 管理系统时钟
configure 进入全局配置模式
debug 开启调试开关
disable 返回普通用户模式
download 下载新版本软件和配置文件
erase 擦除FLASH中的配置
exec-timeout 打开EXEC超时退出开关
exit 退出配置
first-config 设置或清除初次配置标志
help 系统帮助简述
language 语言模式切换
monitor 打开用户屏幕调试信息输出开关
no 关闭调试开关
ping 检查网络主机连接及主机是否可达
reboot 路由器重启
setup 配置路由器参数
show 显示系统运行信息
telnet 远程登录功能
tracert 跟踪到目的地经过了哪些路由器unmonitor 关闭用户屏幕调试信息输出开关
write 将当前配置参数保存至FLASH MEM中
全局配置模式
aaa-enable 使能配置AAA(认证,授权和计费) access-list 配置标准访问表
arp 设置静态ARP人口
chat-script 生成一个用在modem上的执行脚本custom-list 创建定制队列列表
dialer-list 创建dialer-list
dram-wait 设置DRAM等待状态
enable 修改ENABLE口令
exit 退出全局配置模式
firewall 配置防火墙状态
flow-interval 设置流量控制时间间隔
frame-relay 帧中继全局配置命令集
ftp-server FTP 服务器
help 系统帮助命令简述
host 添加主机名称和其IP地址
hostname 修改主机名
ifquelen 更改接口队列长度
interface 选择配置接口
ip 全局IP配置命令子集
ipx 全局IPX配置命令子集
loghost 设置日志主机IP地址
logic-channel 配置逻辑通道
login 启动EXEC登录验证
modem-timeout 设置
modem 超时时间
multilink 配置multilink 用户使用的接口
multilink-user配置multilink 用户使用的接口bnatserver 设置FTP,TELNET,WWW服务的IP地址no 关闭某些参数开关
priority-list 创建优先级队列列表
router 启动路由处理
settr 设置时间范围
snmp-server 修改SNMP参数
tcp 配置全局TCP参数
timerange 启动或关闭时间区域
user 为PPP验证向系统中加入用户
vpdn设置VPDN
vpdn-group 设置VPDN组
x25 X.25协议分组层。