DELL__存储和备份解决方案
- 格式:pdf
- 大小:1.46 MB
- 文档页数:33

Dell Compellent FS8600增强您的文件存储性能借助增强的Fluid文件系统v3 (FluidFS v3)和FS8600网络连接存储(NAS)设备,来帮助降低Dell Compellent Storage Center的总拥有成本。
∙借助真正的横向扩展体系结构,获得更高的性能,而只需当前市场领导产品近1/3的价格,从而实现高达494,000 SPEC OPS。
1∙通过透明地添加节点和自动实现负载平衡,随着FS8600系统的扩展线性扩展性能。
∙借助增强的协议支持(SMB 2.1、NFS v4),优化稳定性和并发连接可扩展性。
∙借助到Storage Center阵列的10 Gb iSCSI后端连接选项,提高灵活性。
∙将您的存储环境从1 GbE升级到10 GbE。
.实现任何主要存储解决方案中的最大机架单位密度∙借助策略驱动型可变块重复数据删除和压缩,将适用于统一存储和文件密集型工作负载所需的存储容量减少高达48 %2。
∙使用位于两个Dell Compellent Storage Center系统和Storage Center OS (SCOS) 6.x上的多达四台FS8600设备,在单个命名空间(容量是上一代FluidFS的两倍)中轻松管理高达2 PB3容量。
∙借助全面集成的企业存储管理器2014(适用于SAN和NAS管理的单个GUI),提高IT工作效率。
∙借助NAS精简配置,超额分配文件存储空间,并借助NAS池的物理容量,不受阻碍地扩展卷。
∙借助精简卷克隆,启用代码和工作流测试,防止出现非生产数据集。
轻松扩展∙在现有的存储基础架构中,扩展文件存储性能和容量。
FS8600配备FluidFS v3,可提供灵活的横向扩展NAS解决方案,帮助减少恼人且昂贵的断代升级需求。
通过在单个命名空间内管理一个高达2 PB3的文件系统,简化数据增长。
∙通过复制和压缩30天或更长时间内未被访问的数据,自动减少存储文件数据所需的容量。
DELL服务器RAID配置详细教程RAID(Redundant Array of Independent Disks)是一种数据存储技术,可以将多个硬盘组合在一起,提高数据存储性能和可靠性。
DELL服务器作为一种常见的企业级服务器,具有强大的性能和稳定性。
本文将详细介绍如何在DELL服务器上配置RAID,以实现数据备份和磁盘容量扩展的功能。
一、准备工作在开始配置RAID之前,首先需要准备好以下工作:1. 确认服务器型号和RAID卡型号:不同型号的服务器和RAID卡可能支持的RAID级别和配置方式有所不同,需要事先了解清楚。
2. 选择合适的硬盘:RAID技术要求多个硬盘来组成磁盘阵列,硬盘的容量和速度要相对一致,建议选择同一型号的硬盘。
3. 备份重要数据:在配置RAID之前,务必备份好服务器上的重要数据,以免配置过程中误操作导致数据丢失。
二、进入RAID配置界面1. 开机进入BIOS设置界面:通电启动服务器,在启动画面出现时按下相应的按键(通常是F2或Del键)进入BIOS设置界面。
2. 找到RAID配置选项:在BIOS设置界面中,定位到“RAID Configuration”或类似的选项,进入RAID配置界面。
三、创建RAID阵列1. 选择RAID级别:在RAID配置界面中,选择要创建的RAID级别,如RAID 0、RAID 1、RAID 5、RAID 10等,不同级别具有不同的特点和适用场景。
2. 选择硬盘:在RAID配置界面中,选择要加入RAID阵列的硬盘,根据需要选择合适数量的硬盘并添加到阵列中。
3. 配置RAID参数:根据实际需求配置RAID参数,如阵列名称、缓存策略、读写策略等。
4. 创建RAID阵列:确认配置无误后,选择“Create RAID Array”或类似选项,开始创建RAID阵列,等待进度条完成。
四、配置RAID管理1. 查看RAID阵列信息:创建完成后,可以查看RAID阵列的详细信息,包括阵列状态、可用容量、硬盘数量等。


数据表Dell Unity XT 全闪存存储阵列为多云世界而打造的理想存储产品要点•可扩展:2U 设计为您的投资提供了未来无忧保障;可扩展到 1500 个驱动器和16 PB 的原始容量,或 48 PB 的有效容量•强大:双插槽英特尔™ CPU,两个主动控制器,可提升性能和可用性•简单:使用直观、简便、基于 Web (HTML5) 的管理界面,在几分钟内完成安装和配置•高效:通过线内数据缩减(重复数据消除、压缩、零检测)保证 3:1 DRR,提供更有效的可用容量•多云:从多种云部署选项中进行选择,有助于简化 IT、降低成本和复杂性好处•投资保护:通过控制器在线就地升级,经济高效地扩展系统•整合:将混合工作负载(文件、数据块、vVol 数据)整合到单个阵列中•全包式软件:每个 Unity XT AFA 都配有全包式软件,让您可以轻松购买和拥有该产品。
•DevOps:利用免费 DevOps 插件技术扩展Unity XT AFA 操作•灵活性:作为物理设备、软件定义的虚拟设备部署,或包含在戴尔融合基础架构中•Metro Node:城域范围内真正的主动-主动同步复制。
精心设计以保证高性能Dell Unity XT 全闪存阵列 (AFA) 的起步配置是小巧的 2U 外形规格,采用为全闪存性能而设计的现代化体系结构。
Unity XT AFA 充分利用全新英特尔™双插槽处理器和大型控制器内存,与以前的 Dell Unity 型号相比,IOPS 性能翻倍。
此全闪存设计包括线性多核心扩展、针对数据块和文件的具有零检测能力的线内数据缩减、基于驱动器固件的零影响垃圾收集、可更大限度减少 IO 的写入合并、智能化耗损均衡功能,以及高达 15.36 TB 的高密度 SSD。
针对效率进行了优化通过线内压缩和重复数据消除,客户可以实现无需评估、有保障的 3:1 数据缩减率,从而在一定程度上抵消数据的增长。
用户可以应用此 DRR 来配置具有 80 个驱动器 3U 扩展存储模块和 15.36 TB SSD 的密集型 Unity XT AFA 基本型号,每个机架单元可高达 900 TBe。
Dell™ PowerVault™ Data Protection Solution Storage Expansion Guidew w w.d e l l.c o m|s u p p o r t.d e l l.c o mNotes, Notices, and CautionsNOTE: A NOTE indicates important information that helps you make better use of your computer.NOTICE: A NOTICE indicates either potential damage to hardware or loss of data and tells you how to avoid the problem.CAUTION: A CAUTION indicates a potential for property damage, personal injury, or death.____________________Information in this document is subject to change without notice.©2007Dell Inc.All rights reserved.Reproduction in any manner whatsoever without the written permission of Dell Inc. is strictly forbidden.Trademarks used in this text: Dell, the DELL logo, PowerEdge, PowerVault, and Dell OpenManage are trademarks of Dell Inc.; Intel is a registered trademarks of Intel Corporation; Microsoft, Windows, SQL Server,and Windows Server are either trademarks or registered trademarks of Microsoft Corporation in the United States and/or other countries.Other trademarks and trade names may be used in this document to refer to either the entities claiming the marks and names or their products. Dell Inc. disclaims any proprietary interest in trademarks and trade names other than its own.November 2007Rev. A00Contents1Introduction (5)2Expanding Disk Storage (7)Planning Additional Disk Storage (7)Estimating Additional Storage Requirements (7)RAID Adapter Considerations (9)Disk Size Selection and Considerations (9)Benefits of Hot Spares (10)Installing Dell OpenManage™Server Administrator (11)3Adding Physical Disks (13)Installing Internal Drives (13)Installing a RAID Adapter for External Storage (13)Installing an External Storage Enclosure (13)Installing Drives in the Storage Enclosure (14)4Configuring Virtual Disks for DPM (15)Configuring Virtual Disks and Hot Spareswith OMSA (15)Adding Available/Free Disks to DPM Storage Pool (19)Contents35Using Tape Drives and Librarieswith DPM (23)Supported Tape Drives and Libraries (23)Installing Tape Drives and Tape Libraries (23)Using DPM with Tape Drives and Libraries (23)6Other Documents and Resources (25)Microsoft Information (25)Dell Hardware Information (25)Dell Software Information (25)Index (27)4ContentsIntroduction 5IntroductionAdditional storage is needed when the backup requirements of your IT environment grow beyond the storage capacity of your Dell™ PowerVault™ Data Protection Solution. The storage is needed by Microsoft ® System Center Data Protection Manager (DPM) 2007 to accommodate the backup data of your protected systems. The following situations may require additional storage on the PowerVault Data Protection Solution:•Protecting additional systems •Protecting additional files on the protected system •Protecting additional applications (for example, SQL Server ™ 2005, Microsoft Exchange server, and Microsoft Office Sharepoint Server 2007)•Increasing the number of DPM recovery pointsSee "Expanding Disk Storage" on page 7 for the guidelines, procedures andtools to plan your disk expansion. NOTE:Prior to planning or deploying additional storage or tape devices on your system, review the Dell PowerVault Data Protection Solutions Information Update for the latest information.NOTE: For documents referenced in this guide, see the Dell PowerVault Protection Quick Reference Guide at .In addition to providing continuous disk-to-disk backup protection, DPM includes the ability to provide disk-to-tape and long-term tape archival of protected data. Attaching a PowerVault Data Protection Solution supported tape drive, autoloader or library augments the disk-to-disk protection."Using Tape Drives and Libraries with DPM" on page 23 outlines the steps needed to attach a supported tape drive to your system.Throughout this document, a running example illustrates the steps and tools used to accomplish the tasks within that section. The example scenario is based on a system administrator’s successfully deployed DP500 PowerVaultData Protection Solution with six configured internal disks. The DP500 is protecting the organization’s Exchange Server. The examples illustrate how the system administrator:•Expands the DPM storage pool•Adds additional external storage•Attaches a tape drive for long term archival6IntroductionExpanding Disk StorageThis section discusses how to:•Plan for storage expansion•Install the additional storage hardware on your system•Make the additional storage space available to DPMPlanning Additional Disk StorageAs your IT needs outgrow the internal storage standard with your PowerVault Data Protection Solution, additional disk drives are required. To meet those needs, develop a plan which considers the requirements for:•Estimating the additional DPM storage pool capacity•Determining the appropriate RAID adapter and RAID configuration •Determining whether to add disk drives internally or externally •Determining when the system can support hardware installation downtime•Using global hot spares•Installing Dell's systems management toolsEstimating Additional Storage RequirementsThe storage capacity must be estimated based on the size of the additional data sources to be protected and the number of recovery points retained on the DPM server. Refer to the “Allocating Space for Protection Groups” and “Planning the Storage Pool” sections of Planning a System Center Data Protection Manager 2007 Deployment for more info. These sections outline a methodology for estimating the storage requirements for DPM.Example: Storage Space EstimationIn this example, the server administrator is protecting two additional servers: •The first server contains a sales-tracking SQL database.•The second server is running Exchange Server.Expanding Disk Storage78Expanding Disk StorageThe total storage space in use for these two servers is 350GB. The system administrator must factor in an estimated storage space growth of 10 percent over the next four years resulting in approximately 500GB of data that must be protected.The "Allocating Space for Protection Groups" section in Planning a System Center Data Protection Manager 2007 Deployment describes the methodology DPM uses to allocate space requirements for protection groups. Using computations based on 500GB of protected data results in the following estimates:From the above example, five 250GB drives provide 1TB of usable storage space. In a RAID 5 configuration, the space equivalent of one physical disk stores parity data used to recover data in case of single disk failure.Approximately 250GB of the total disk space is dedicated to parity. The available space for DPM's data pool is four times 250GB, or 1TB total (Figure2-1). NOTE:The parity data is distributed across all of the physical disks. The total space used for parity equals one physical disk.Figure 2-1.Logical View of Disk Space Usage in a RAID 5 Group of N Physical DisksStorage space for the initial (replica) backup623GB Storage space for recovery points376GB Total additional DPM space (estimated)1TB 12N - 1N(Parity)RAID Adapter ConsiderationsPowerVault Data Protection Solutions include an internal Dell PERC-series RAID adapter that manages internal disk drives. Additional internal disk drives are managed by the internal controller.Some PowerVault Data Protection Solutions support external RAID adapters, such as the PERC 6/E, which can be used to manage disks in an external enclosure.NOTE: Refer to the Dell PowerVault Data Protection Solution Support Matrix for more information on supported RAID adapters for your system.RAID adapters combine a number of physical disks into a RAID disk group. The adapter then creates one or more virtual disks from the RAID group which the operating system and DPM use to store data. RAID 5 configurations only are recommended for use with DPM. In a DPM environment, RAID 5 provides the best cost, performance and reliability for this configuration type. Refer to the "Planning the Disk Configuration" section in Planning a System Center Data Protection Manager 2007 Deployment for additional details on RAID types.Example: Choosing a RAID AdapterIn our example, the system administrator's PowerVault DP500 has all six internal drives configured. The administrator adds additional storage using a PowerVault MD1000 Storage Enclosure to expand storage capacity. Attaching the MD1000 to the DP500 requires an external RAID controller. Using the Dell PowerVault Data Protection Solution Support Matrix information, the administrator chooses to install a PERC 6/E.Disk Size Selection and ConsiderationsWhen adding additional physical disks to your PowerVault Data Protection Solution, consider the following:•If adding internal disks to your data protection solution, make sure that there are at least three drive slots available to add at least three drives.RAID 5 virtual disks require a minimum of three physical disks.•If adding additional disks to an existing storage enclosure, ensure there are at least three drive slots available. Refer to the external storage enclosure’s Hardware Owner's Manual for detailed configuration rules.Expanding Disk Storage910Expanding Disk StorageNOTE: A maximum of eight physical disks within each RAID 5 disk group is recommended.NOTE:All disk drives added to a disk group should be the same size. When combining drives of dissimilar size for RAID 5, the size of the smallest drive will be used by each disk within that disk group. As a result, using a larger drive wastes its disk space. NOTE: It is not required to have the same size of disks in each of your RAID disk groups. For example, if your internal RAID disk group is made up of four 250GB drives, you could add an external RAID group made up of five 500GB disk drives.Figure 2-2.Dissimilar Disks in a RAID GroupBenefits of Hot SparesFor additional protection against a single disk failure, add a global hot spare to your RAID configuration. The physical disk assigned as a hot spareautomatically replaces the physical disk on which an error has been detected. The caveat to using a hot spare is that you lose a storage slot within thesystem or external storage enclosure that could have been used by a data disk. RAID 5 configurations protect against "single" disk failures. A hot spareprovides unattended and uninterrupted protection against an additional disk failure.There are two types of hot spares that can be allocated: global or dedicated. If you choose to implement a hot spare, global hot spares are recommended. Refer to the "Assign and Unassign Global Hot Spare" section of your Dell OpenManage Server Administrator User's Guide for more information on how to configure global hot spares.250GB 250GB 500GB 500GBwasted spacein RAID groupExpanding Disk Storage 11Installing Dell OpenManage™ Server AdministratorDell OpenManage™ Server Administrator (OMSA) must be installed on the DPM server to provide the following benefits:•Monitors the state of the system and storage subsystems •Provide alerts of failing components to avoid unplanned downtime•Creates and manages RAID 5 virtual disks NOTE:OMSA should be installed from the Dell Systems Console and Agent CD included with your system. For more details on installation procedures, refer to the "Installing Server Administrator" section of the Dell OpenManage ServerAdministrator User's Guide .NOTE: During the OMSA installation, if prompted, choose the StorageManagement option. This options installs features that help manage the PowerVault Data Protection Solution storage devices.The OMSA user guide and the OMSA application are located on the Dell Systems Console and Agent CD and can be downloaded from.12Expanding Disk StorageAdding Physical Disks 13Adding Physical DisksThis section describes the steps involved in adding physical storage to your PowerVault Data Protection Solution. It covers installing both the internaldrives and the external storage enclosures, such as the MD1000. NOTE: Before making any hardware changes to your system, you should back up your operating system drive.For PowerVault Data Protection Solution supported drives and externalstorage enclosures, refer to Dell PowerVault Data Protection Solution Support Matrix .Installing Internal DrivesRefer to the "Hard Drives" section of your Dell PowerVault Systems Hardware Owner's Manual to add additional disks.Installing a RAID Adapter for External StorageA RAID adapter with external ports is required to attach an external storage enclosure to your system. Refer to the Dell PowerVault Data ProtectionSolution Support Matrix for supported RAID adapters for your system. Follow the instructions in the applicable PowerEdge™ Expandable Raid Controller User's Guide to install the adapter in your system.Installing an External Storage EnclosureRefer to the applicable external storage enclosure’s Getting Started With Y our System document for instructions on how to unpack and setup your storage enclosure.Refer to your storage enclosure’s Hardware Owner's Manual to complete the installation of your storage enclosure.Installing Drives in the Storage EnclosureIf you need to add drives to an existing storage enclosure, refer to the "Removing and Installing Drives" section of the storage enclosure’s Hardware Owner's Manual.Example: Installing a Storage EnclosureThe system administrator adds an MD1000 storage enclosure containing five 250GB drives and a PERC 6/E adapter to the DP500 using the following steps:1Install OMSA (if not already installed) on the system.2Perform a full backup of the operating system.3Shut down the system and disconnect the power from the system.4Install the PERC 6/E adapter in the DP500.5Unpack and install the MD1000 following the instructions in the MD1000 Getting Started With Y our System document.6Cable the MD1000 to a port on the PERC 6/E adapter.7Install the drives in the MD1000 (if not already installed).8Power on the MD1000.9Power on the DP500.10Install the PERC 6/E drivers and update the adapter firmware (if necessary).11Using OMSA, verify the system and storage has been correctly configured. 14Adding Physical DisksConfiguring Virtual Disks for DPM For DPM to use additional hard disks, the disk drives must be configured into one or more RAID 5 virtual disks. Creation of the RAID virtual disks is accomplished using OpenManage Server Administrator (OMSA).Use these guidelines when configuring virtual disks:•Configure all DPM virtual disks as RAID Level 5.•RAID 5 virtual disks require a minimum of three physical disks.•RAID 5 virtual disks should have no more than eight disks (excluding the optional global hot spare).•Configure an optional global hot spare disk.•Ensure the size of each virtual disk does not exceed 1.8TB.•Any number of virtual disks can be created from the RAID disk group.•Virtual disks used by DPM must not contain formatted OS partitions.Configuring Virtual Disks and Hot Spares with OMSARefer to the “Storage Management Tasks” section of the Server Administrator User’s Guide to learn how to create virtual disks on the newly added physical disks. This section also provides instructions for creating optional global hot spares.Example: Using OMSA to Configure Virtual DisksThe server administrator uses OMSA to create a virtual disk from the five physical disks within the MD1000 that have been attached to the DP500 system. The series of steps below show how a system administrator would create the 1TB RAID 5 virtual disk needed by DPM’s storage pool to support the additional protected servers.Configuring Virtual Disks for DPM1516Configuring Virtual Disks for DPMFigure 4-1.OMSA Virtual Disk Wizard1Go to the storage management section of the OMSA virtual disk wizard.2Click Go to Create Virtual Disk Wizard .1Storage management 2Go to Create Virtual Disk Wizardoption 12Configuring Virtual Disks for DPM 17Figure 4-2.Virtual Disk Attributes3Select the RAID-5 option.4Enter the name of the virtual disk.5Enter the size of the virtual disk (1000 = 1TB).6Click Continue .1RAID type 2Virtual disk name3Virtual disk size 12318Configuring Virtual Disks for DPMFigure 4-3.Virtual Disk Summary7When the summary page appears, click Finish.Figure 4-4.Virtual Disk CreatedIn Figure4-4 above, the new virtual disk you added (Virtual Disk 2) is shown as ready.Adding Available/Free Disks to DPM Storage PoolTo use additional virtual disks created in the previous steps, they must be added to DPM’s storage pool. Virtual disks are added to DPM’s storage pool using the DPM Administrator console. Refer to the help within the DPM Administrator console or the “Adding Disks to the Storage Pool” section ofDeploying System Center Data Protection Manager 2007.NOTE: The DPM Administrator console refers to raw disks and virtual disks simply as “Disks.”Configuring Virtual Disks for DPM1920Configuring Virtual Disks for DPM Example: Adding Virtual Disks to DPM’s Storage PoolThe steps below shows how a systems administrator would add virtual disks to DPM’s storage pool.Figure 4-5.DPM Disk Management Screen 1Select the Management option.2Select the Disks tab.3Under Selected item , click Add .1Management option 2Disks tab 3Add virtual disk option 213Configuring Virtual Disks for DPM 21Figure 4-6.DPM Storage Pool Disk Selection4In the Add Disks to Storage Pool window, select the disks you want to add.5Click Add .Figure pleting DPM Storage Pool Disk Selection6Click OK .Figure 4-8.New Disk in DPM Storage PoolThe new disk now appears as part of the storage pool.22Configuring Virtual Disks for DPMUsing Tape Drives and Libraries with DPMThe PowerVault Data Protection Solution supports disk-to-tape backup of the protected systems and disk-to-disk-to-tape archival for long-term protection. Refer to the "Backup Solutions Combining Disk and Tape" section of Planning a System Center Data Protection Manager 2007 Deployment. To use these features, you need to attach a tape drive or a tape library to your solution.Supported Tape Drives and LibrariesRefer to the PowerVault Data Protection Solution Support Matrix for a list of supported tape drives, autoloaders and libraries.Installing Tape Drives and Tape LibrariesRefer to the tape drive or the tape library documentation to install and attach tape drives/tapes to your system. Install the necessary drivers and update device firmware, if necessary. Refer to the Dell PowerVault Compatibility Matrix at for up to date PowerVault device drivers and firmware supported on Microsoft Windows® 2003 x64.Using DPM with Tape Drives and LibrariesRefer to the "Configuring Tape Libraries" section of Deploying System Center Data Protection Manager 2007 to add the tape drives and libraries to DPM. Refer to the "Managing Tape Libraries" section of DPM 2007 Operations Guide for detailed information on how to manage tape libraries and stand-alone tape drives that are attached to the Microsoft System Center Data Protection Manager (DPM) 2007 server, including routine maintenance tasks.Using Tape Drives and Libraries with DPM2324Using Tape Drives and Libraries with DPMOther Documents and Resources Refer to the PowerVault Data Protection Solution Quick Reference Guide available at to locate the following documents and resources.Microsoft Information•Planning a System Center Data Protection Manager 2007 Deployment •Deploying System Center Data Protection Manager 2007•Microsoft System Center Data Protection Manager 2007 Operations Guide •System Center Data Protection Manager 2007 Administrator Console HelpDell Hardware Information•Dell PowerVault Systems Hardware Owner's Manual•Dell PowerVault Data Protection Solution Support Matrix•Dell PowerEdge™ Expandable Raid Controller 5/i and 5/E User's Guide •Dell PowerEdge Expandable Raid Controller 6/i and 6/E User's Guide •Dell PowerVault MD1000 Storage Enclosure Hardware Owner's Manual •Dell PowerVault MD1000 Getting Started GuideDell Software Information•Dell PowerVault Data Protection Solution Support Matrix•Dell OpenManage Server Administrator User's Guide•Dell Systems Console and Agent CD•Dell Systems Documentation CDOther Documents and Resources2526Other Documents and ResourcesIndexAadding available/free disks,19Ddisk storage,7DPM,15EExternal Storage Enclosure, installing,13Hhot spares,10OOMSA,15OpenManage ServerAdministrator,11Pphysical disks,13RRAID adapter,9RAID adapter, Installing forexternal storage,13Ttape drives and libraries,23Index2728Index。
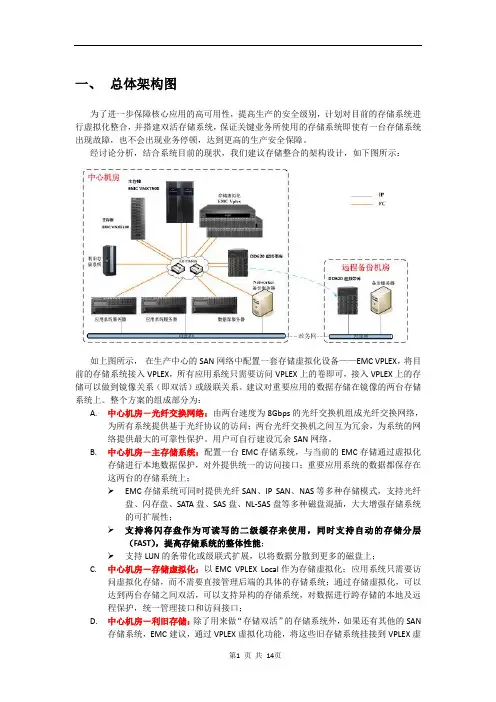
一、总体架构图为了进一步保障核心应用的高可用性,提高生产的安全级别,计划对目前的存储系统进行虚拟化整合,并搭建双活存储系统,保证关键业务所使用的存储系统即使有一台存储系统出现故障,也不会出现业务停顿,达到更高的生产安全保障。
经讨论分析,结合系统目前的现状,我们建议存储整合的架构设计,如下图所示:如上图所示,在生产中心的SAN网络中配置一套存储虚拟化设备——EMC VPLEX,将目前的存储系统接入VPLEX,所有应用系统只需要访问VPLEX上的卷即可,接入VPLEX上的存储可以做到镜像关系(即双活)或级联关系。
建议对重要应用的数据存储在镜像的两台存储系统上。
整个方案的组成部分为:A.中心机房-光纤交换网络:由两台速度为8Gbps的光纤交换机组成光纤交换网络,为所有系统提供基于光纤协议的访问;两台光纤交换机之间互为冗余,为系统的网络提供最大的可靠性保护。
用户可自行建设冗余SAN网络。
B.中心机房-主存储系统:配置一台EMC存储系统,与当前的EMC存储通过虚拟化存储进行本地数据保护,对外提供统一的访问接口;重要应用系统的数据都保存在这两台的存储系统上;➢EMC存储系统可同时提供光纤SAN、IP SAN、NAS等多种存储模式,支持光纤盘、闪存盘、SATA盘、SAS盘、NL-SAS盘等多种磁盘混插,大大增强存储系统的可扩展性;➢支持将闪存盘作为可读写的二级缓存来使用,同时支持自动的存储分层(FAST),提高存储系统的整体性能;➢支持LUN的条带化或级联式扩展,以将数据分散到更多的磁盘上;C.中心机房-存储虚拟化:以EMC VPLEX Local作为存储虚拟化;应用系统只需要访问虚拟化存储,而不需要直接管理后端的具体的存储系统;通过存储虚拟化,可以达到两台存储之间双活,可以支持异构的存储系统,对数据进行跨存储的本地及远程保护,统一管理接口和访问接口;D.中心机房-利旧存储:除了用来做“存储双活”的存储系统外,如果还有其他的SAN存储系统,EMC建议,通过VPLEX虚拟化功能,将这些旧存储系统挂接到VPLEX虚拟化存储中,加以利用;这些存储资源将作为存储资源池共享,按需使用;(注:挂接到VPLEX后端的其他存储品牌需要在VPLEX的兼容列表内。

Dell™ PowerVault™ MD3200和 MD3220 存储阵列部署指南注:“注”表示帮助您更好地使用计算机的重要信息。
警告:“注意”表示如果不遵循说明,就有可能损坏硬件或导致数据丢失。
警告:“警告”表示可能会造成财产损失、人身伤害甚至死亡。
____________________本说明文件中的信息如有更改,恕不另行通知。
© 2010 Dell Inc. 版权所有,翻印必究。
未经 Dell Inc. 书面许可,严禁以任何形式复制这些材料。
本文中使用的商标:Dell、DELL徽标、和 PowerVault 是 Dell Inc. 的商标;Intel和Pentium 是 Intel Corporation 在美国和其他国家/地区的注册商标;Microsoft、Windows、和Windows Server是 Microsoft Corporation 在美国和/或其他国家/地区的商标或注册商标;Red Hat和Red Hat Enterprise Linux是 Red Hat, Inc. 在美国和其他国家/地区的注册商标;SUSE是Novell, Inc.在美国和其他国家/地区的注册商标;VMware是 VMware, Inc. 在美国和/或其他辖区的注册商标或商标(“标志”);Citrix是 Citrix Systems, Inc. 和/或其多个子公司的商标,并且可能已在美国专利商标局及其他国家/地区注册。
本说明文件中可能使用其他商标和商品名称来指拥有相应商标和商品名称的公司或其产品。
Dell Inc. 对其他公司的商标和商品名称不拥有任何所有权。
2010 年 6 月 修订版 A00目录1简介 (5)系统要求 (5)Management Station 要求 (5)存储阵列简介 (6)2硬件安装 (7)存储设备配置规划 (7)关于存储阵列连接 (8)存储阵列布线 (8)冗余和非冗余配置 (8)单控制器配置 (9)双控制器配置 (12)PowerVault MD1200 系列扩展柜布线 (18)使用之前已配置的 PowerVault MD1200系列扩展柜进行扩充 (18)使用新的 PowerVault MD1200系列扩展柜进行扩充 (19)3软件安装 (21)在 iSCSI 型主机服务器上 (21)图形化安装(推荐) (22)控制台安装 (22)无提示安装 (23)格瞒34安装后任务 (25)验证存储阵列搜索 (26)初始设置任务 (26)5卸载软件 (29)从 Microsoft Windows 中卸载 (29)从 Linux 卸载 (30)A附录—负载均衡 (31)Windows 负载均衡策略 (31)带子集的循环 (31)带子集的最少队列深度 (31)修改 Windows Sever 2008的负载均衡策略 (32)在 Linux 中设置负载均衡策略 (32)4格瞒简介5简介本指南提供部署 Dell™ PowerVault™ MD3200 和MD3220 存储阵列的相关信息。
Dell FluidFS NAS Solutions NX3600/NX3610部署指南注、小心和警告: “注”表示可以帮助您更好地使用计算机的重要信息。
: “小心”表示可能会损坏硬件或导致数据丢失,并说明如何避免此类问题。
: “警告”表示可能会造成财产损失、人身伤害甚至死亡。
© 2013 Dell Inc.本文中使用的商标:Dell™、Dell 徽标、Dell Boomi™、Dell Precision ™、OptiPlex™、Latitude™、PowerEdge™、PowerVault™、PowerConnect™、OpenManage™、EqualLogic™、Compellent™、KACE™、FlexAddress™、Force10™和 Vostro™是 Dell 公司的商标。
Intel®、Pentium®、Xeon®、Core®和 Celeron®是 Intel 公司在美国和其他国家/地区的注册商标。
AMD®是 Advanced Micro Devices 公司的注册商标,AMD Opteron™、AMD Phenom™和 AMD Sempron™是 AMD (Advanced Micro Devices) 公司的商标。
Microsoft®、Windows®、Windows Server®、Internet Explorer®、MS-DOS®、Windows Vista®和 Active Directory®是微软公司在美国和/或其他国家/地区的商标或注册商标。
Red Hat®和 Red Hat® Enterprise Linux®是 Red Hat 公司在美国和/或其他国家/地区的注册商标。
Novell®和 SUSE®是 Novell 公司在美国和其他国家/地区的注册商标。
DELL服务器RAID配置详细教程在企业级的服务器环境中,RAID(独立磁盘冗余阵列)技术是保障数据安全和提高存储性能的重要手段。
DELL 服务器作为广泛使用的服务器品牌之一,其 RAID 配置具有一定的复杂性,但只要按照正确的步骤进行操作,就能顺利完成配置。
接下来,我将为您详细介绍DELL 服务器 RAID 配置的全过程。
首先,我们需要准备好以下工作:1、一台 DELL 服务器。
2、合适的硬盘,根据您的需求选择硬盘的类型、容量和数量。
3、确保您有管理员权限登录服务器的 BIOS 或管理工具。
进入服务器的 BIOS 或管理工具的方法因服务器型号而异。
通常,在服务器开机时,会有相应的提示信息,告知您按哪个键进入设置界面。
进入设置界面后,找到“RAID 配置”选项。
这可能在不同的菜单下,您需要耐心查找。
接下来,选择要创建 RAID 的硬盘。
您可以根据硬盘的容量、转速等属性来选择。
一般来说,如果您追求更高的性能,可以选择转速快的硬盘;如果更注重数据安全和容量,可以选择多块硬盘来创建 RAID 阵列。
在选择好硬盘后,开始创建 RAID 阵列。
DELL 服务器常见的RAID 级别有 RAID 0、RAID 1、RAID 5 和 RAID 6 等。
RAID 0 是将数据分散存储在多个硬盘上,以提高读写性能,但没有数据冗余,一旦其中一块硬盘损坏,所有数据都会丢失。
如果您对性能要求极高,且对数据安全性要求不高,可以选择 RAID 0。
RAID 1 则是通过将数据完全镜像到另一块硬盘上实现数据冗余,其写入性能相对较低,但读取性能较好,能提供很好的数据保护。
RAID 5 至少需要三块硬盘,它通过奇偶校验信息来实现数据冗余和容错,在保证一定性能的同时,提供了较好的数据安全性。
RAID 6 与 RAID 5 类似,但它可以容忍两块硬盘同时损坏,数据安全性更高,但写入性能相对略低。
选择好 RAID 级别后,需要设置阵列的一些参数,如条带大小等。
Dell EMC PowerVault MD3860f 系列存储阵列部署指南注意、小心和警告:“注意”表示帮助您更好地使用该产品的重要信息。
:“小心”表示可能会损坏硬件或导致数据丢失,并告诉您如何避免此类问题。
:“警告”表示可能会导致财产损失、人身伤害甚至死亡。
© 2012 - 2018 Dell Inc. 或其子公司。
保留所有权利Dell、EMC 和其他商标为 Dell Inc. 或其子公司的商标。
其他商标均为其各自所有者的商标。
章 1: 简介 (5)系统要求 (5)存储阵列简介 (5)相关说明文件 (6)章 2: 硬件安装 (7)规划存储配置 (7)连接存储阵列 (7)配置 Dell EMC MD 系列存储阵列的光纤通道 (8)在 SAN 连接的存储阵列上配置光纤通道 (8)您可能需要的其他信息 (8)安装支持的光纤通道 HBA (8)在主机服务器上安装光纤通道 HBA (8)使用光纤通道交换机分区 (9)全局通用名称分区 (10)交换机分区准则 (10)在光纤通道交换机硬件上设置分区 (10)存储阵列布线 (10)冗余和非冗余布线 (10)SAN 连接布线 (10)SAN 连接布线示例 (11)远程复制布线示例 (12)混合环境 (13)PowerVault MD3060e 扩展柜布线 (14)使用新的 PowerVault Md3060e 扩展柜进行扩展 (16)章 3: 安装 MD Storage Manager (18)安装主机总线适配器和驱动程序 (18)图形化安装(推荐) (19)控制台安装 (19)无提示安装 (19)在 Windows 中进行无提示安装 (19)在 Linux 中进行无提示安装 (20)启用高级功能(可选) (20)升级 PowerVault MD Storage Manager (20)章 4: 安装后任务 (21)验证存储阵列查找 (21)初始设置任务 (21)章 5: 卸载 MD Storage Manager (23)从 Windows 中卸载 MD Storage Manager (23)从 Windows Server GUI 版本卸载 MD Storage Manager (23)目录3从 Windows Server Core 版本卸载 MD Storage Manager (23)从 Linux 中卸载 MD Storage Manager (24)章 6: Load balancing(负载平衡) (25)负载均衡策略 (25)带子集的轮询 (25)最少队列深度 (25)最少路径权重 (25)在 Linux 中设置负载平衡策略 (25)在 VMware 中设置负载平衡策略 (26)章 7: 附录—使用 SFP 模块和光纤电缆 (27)SFP 模块使用指南 (27)安装 SFP 模块 (27)卸下 SFP 模块 (28)光纤电缆使用指南 (28)安装光纤通道电缆 (28)卸下光纤通道电缆 (29)章 8: 附录—硬件布线妥善做法 (30)处理静电敏感组件 (30)远程复制的主机布线 (30)布线以提高性能 (30)给电缆贴标签 (30)章 9: 获得帮助 (31)联系戴尔 (31)找到 Dell EMC 系统服务标签 (31)4目录1简介本指南提供关于部署 Dell EMC PowerVault MD3860f 存储阵列的信息。
Dell™ PowerVault™ NX1950 系统重要信息型号:EMU01注和注意注:“注”表示可以帮助您更好地使用计算机的重要信息。
注意:“注意”表示可能会损坏硬件或导致数据丢失,并告诉您如何避免此类问题。
____________________本说明文件中的信息如有更改,恕不另行通知。
©2006-2008Dell Inc.。
版权所有,翻印必究。
未经 Dell Inc. 书面许可,严禁以任何形式进行复制。
本文中使用的商标:Dell、DELL徽标、OpenManage和 PowerVault 是 Dell Inc. 的商标;Microsoft、Windows 和Windows Server是 Microsoft Corporation 在美国和/或其它国家和地区的商标或注册商标。
本说明文件中述及的其它商标和产品名称是指拥有相应商标和产品名称的公司或其制造的产品。
Dell Inc. 对其它公司的商标和产品名称不拥有任何所有权。
型号:EMU012008 年 2 月Rev. A06目录重要的系统信息 (5)安装和设置问题 (9)部署问题 (11)管理问题 (21)升级问题 (36)目录34目录本说明文件提供了有关安装在 Dell™ PowerVault™ NX1950 存储解决方案上的 Microsoft® Windows® Unified Data Storage Server 2003 操作系统的重要信息。
注:在此说明文件中,术语集成解决方案是指附带 PowerVault MD3000 存储阵列的 PowerVault NX1950 存储系统的配置。
术语网关解决方案是指 PowerVault NX1950 存储系统和 Dell|EMC 存储阵列的配置。
有关详情,请参阅系统附带的《安装指南》。
重要的系统信息表 1-1 说明了您可能会遇到的重要的系统问题以及针对这些问题的解决方法。
Dell PowerVault MD 存储阵列多功能、模块化、智能化数据管理戴尔的 独特之处:简化是我们的一贯理念我们致力于帮助您通过简化IT 来节省时间和资源。
恪守标准是我们的坚定承诺我们不依赖专有技术,而是构建基于标准的系统。
智能自动化我们的系统简单易用,可以让您的IT 团队解放出来,集中精力实施更重要的计划。
根据增长渐进扩展的模块化我们的存储解决方案是完全模块化的。
您只需购买您所需要的容量,然后随着数据存储需求的增长来增加容量。
简化ITDell PowerVault MD 3200/3600/1200系列存储阵列可以优化数据存储体系结构、确保数据可用性,进而简化IT 。
这样,就可以将宝贵的资源释放出来,有助于降低成本,并使创新成为日常行为。
为了满足您的特定业务需求,MD 3200/3600/1200系列存储阵列支持iSCSI 、光纤通道或SAS 技术。
Dell PowerVault MD 存储阵列经验证的MD 系列阵列,可提供持续的灵活性、可扩展性和价值PowerVault MD3600f 和MD3620f 阵列将光纤通道引入了MD 系列。
凭借每控制器四个8 Gb/s 端口,可提高数据密集型应用程序的吞吐量;同时,通过远程复制功能,可扩展业务连续性。
MD3600f 和MD3620f 秉承了经验证的MD 系列阵列一贯的向后兼容性。
通过MD1200或MD1220扩展盘柜,可以对MD3600系列阵列进行扩展,最多可支持64台主机和96个驱动器。
此外,多协议、多代式MD Storage Manager 软件提供简单直观的阵列管理界面,可实现卓越的灾难恢复与业务连续性平台。
超凡的整合与虚拟化基于iSCSI 的PowerVault MD3200i/MD3220i 和MD3600i/ MD3620i 系列存储区域网络(SAN)阵列可提供强大的系统功能、性能和灵活性,适用于存储整合与虚拟化部署。
MD3600i 系列采用紧凑的2U 外形规格,支持高带宽、 10 GbE 直接连接或SAN 连接以及多达64台主机;MD3200i 系列支持1 GbE 直接连接或SAN 连接以及多达32台物理服务器。