富士施乐1080使用说明书
- 格式:doc
- 大小:269.51 KB
- 文档页数:7
D125/D110/D95 Copier/Printer 用户操作实用手册富士施乐(中国)有限公司客户服务及支持部目录一.正确放置原稿---------------------4二. 复印1.简易复印步骤---------------------52. 常用的复印应用使用手送纸盘复印环保纸、厚纸、信封等非标准纸张---7复印双面文件--------------------9对图像进行缩放-------------------10将图像移位或自动居中----------------11消除副本四周阴影------------------13复印书刊----------------------14同时复印不同尺寸的原稿---------------15将文件进行分页/装订/打孔/工程图折纸--------16印制小册子或套印A3红头文件-------------17复印身份证等其它证件----------------18把多页文件复印到单页纸上--------------19自制大型海报--------------------20将一个图像重复多个印在单页纸上-----------21在文件中添加注释------------------22加附封面或套印A4红头文件--------------23制作C型、Z型折纸------------------24在副本文件中插入分隔页---------------25将不同设定的原稿集中起来进行复印----------26进行样本复印--------------------27储存常用的复印功能----------------28调用已储存的复印功能----------------29三. 打印1.基本打印步骤--------------------302. 常用的打印应用把多页文件打印到单页纸上--------------31打印小册子-------------------32打印封面页或套印红头文件-------------33设置喜好设定-------------------34机密打印或样本打印----------------35添加自定义尺寸纸张----------------37正确打印环保纸、厚纸、信封等非标准纸张------38设置打印首选项------------------39 3. 介质打印概况(选配)介质打印概况------------------40注意和限制事项-----------------41介质打印文件------------------42四. 扫描1. 扫描到信箱登记信箱----------------------43扫描到信箱-------------------44从信箱中提取扫描文件----------------452.用邮件接收扫描文件---------------473.把文件扫描到PC保存---------------484.把文件扫描到USB保存--------------495.把文件扫描到URL-----------------506.扫描(WSD保存)--来自PC------------517.扫描(WSD保存)--来自主机------------538.扫描输出文件格式----------------54五.计数器确认---------------------55六.确认消耗品的用量----------------56七.清除卡纸--------------------57八.控制面板的使用介绍---------------58一、正确放置原稿两种方法放置原稿--自动输稿器:单张,多张原稿。
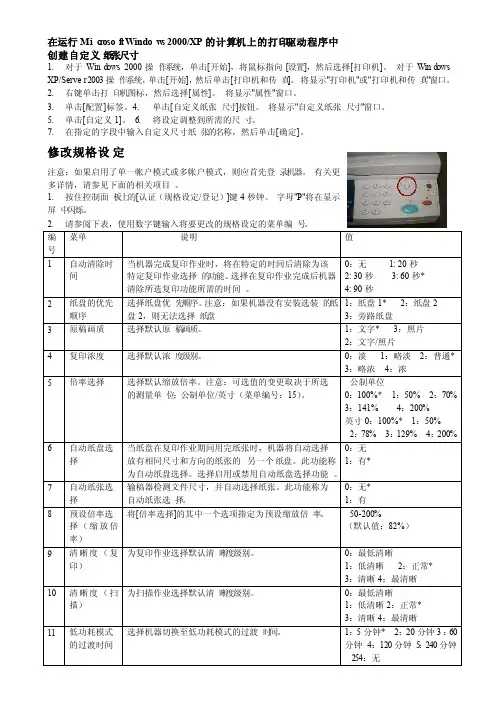
在运行Mic r osof t Window s 2000/XP的计算机上的打印驱动程序中创建自定义纸张尺寸1. 对于Wind ows 2000操作系统,单击[开始],将鼠标指向[设置],然后选择[打印机]。
对于Wind ows XP/Server 2003操作系统,单击[开始],然后单击[打印机和传真]。
将显示"打印机"或"打印机和传真"窗口。
2. 右键单击打印机图标,然后选择[属性]。
将显示"属性"窗口。
3. 单击[配置]标签。
4. 单击[自定义纸张尺寸]按钮。
将显示"自定义纸张尺寸"窗口。
5. 单击[自定义1]。
6. 将设定调整到所需的尺寸。
7. 在指定的字段中输入自定义尺寸纸张的名称,然后单击[确定]。
修改规格设定Array注意:如果启用了单一帐户模式或多帐户模式,则应首先登录机器。
有关更多详情,请参见下面的相关项目。
1. 按住控制面板上的[认证(规格设定/登记)]键4秒钟。
字母"P"将在显示屏中闪烁。
1. *:默认设定 2 按[启动]键确认选择。
2. 请参阅上表,使用数字键为要更改的规格设定输入新值。
3. 按[启动]键确认选择。
字母"P"将在显示屏中闪烁。
4. 重复步骤2,以进行更多的规格设定更改。
5. 按控制面板上的[认证(规格设定/登记)]键,以退出规格设定模式。
设置纸盘中纸张的尺寸和方向1. 按住控制面板上的[纸张选择]键4秒钟,直到机器进入纸张设定模式。
2. 按[纸张选择]键,直到所需的纸盘在机器示意图上亮起。
3. 按[显示切换]键以在下列纸张类型中滚动: 当测量单位为公制时更改顺序单位。
要进行更改,请更改规格设定菜单编号15。
有关更多详情,请参阅下面的相关项目。
施乐系列打印机使用说明关键信息项:1、打印机型号:____________________________2、打印速度:____________________________3、分辨率:____________________________4、纸张尺寸支持:____________________________5、墨盒类型:____________________________6、连接方式:____________________________7、打印功能:____________________________8、故障代码及解决方法:____________________________11 打印机概述施乐系列打印机是一款高性能的打印设备,具有多种先进功能,能够满足不同用户的打印需求。
111 打印机特点高速打印,提高工作效率。
高分辨率,保证打印质量清晰锐利。
支持多种纸张尺寸,适应不同文档要求。
12 安装与连接在使用打印机之前,需要进行正确的安装和连接。
121 硬件安装打开打印机包装,取出打印机主体和配件。
按照说明书的指示,安装墨盒或硒鼓。
连接电源线,确保打印机通电。
122 连接电脑可以通过 USB 数据线将打印机与电脑连接。
对于支持无线连接的型号,按照操作指南进行无线设置。
13 纸张装载131 选择合适的纸张根据打印任务的需求,选择合适的纸张类型,如普通纸、相纸、卡片纸等。
注意纸张的重量和厚度,以确保打印机能够正常进纸。
132 装载纸张打开打印机的纸盒。
调整纸张导板,使其与所选纸张的尺寸匹配。
将纸张整齐地放入纸盒中,注意不要超过纸盒的最大容量标识。
14 打印设置在进行打印操作之前,可以根据需要进行打印设置。
141 打印质量设置可以选择不同的打印质量,如标准、高质量、最佳等。
高质量打印会消耗更多的墨盒或硒鼓,但能获得更出色的打印效果。
142 纸张尺寸和方向设置在打印选项中,选择与实际纸张尺寸相符的选项。


User manualThe smallest high definition camera in the worldPrefaceThank you for purchasing our product, high definition digital camcorder, exquisite special sport design with multi-function.This user manual will give you full instruction of using the product, and also provide you information of the product in detail. Please read this manual carefully before using the product. Please keep this manual well. We hope our product could satisfy your need and wish to serve you for long-term.No further notice will be informed if technical specification or appearance of this product changed. SummaryThis high-tech mini HD camcorder is designed for the demand of the market. This product has the most electronic functions such as HD digital video, digital photo, USB data transfer, HDMI output…Large range of application, memorize every wonderful moment......Features●High Definition videos or photos●Lens: 5.0 mega pixel, CMOS●Video format: 1280×720, 30Fps, MOV●Photo format: 3200×2400 jpeg, 8.0 mega pixel.●Interface: USD2.0 / HDMI●HDMI Port: Support to display on high definition TV directly●High capacity Lithium-ion rechargeable battery●Support micro SD cardConfigurationA MODEB RESETC FAST FORWARDD FAST BACKWARDE RECORDF POWEROPERATING INSTRUCTION◆Charging the Battery1. Using the charger: One end of the USB cable connects the charger and another links to the USB port ofthe camcorder, camcorder light will flash when charging. After full charge, red light keeps on.2. Connect computer: Connecting the USB cable to computer could charge too, red indicator light flashwhen charging.◆Inserting &Taking out Storage Card( Micro SD card)1. Carefully insert the storage card into the card slot.2. To remove the card, push the card in lightly, and then release it, when the card is rebounded then pull itout.Note:1. Before using micro SD card. Please check whether it is locked;2. Please make sure micro SD card is oriented in the right direction. Inserting micro SDcard in the wrong direction might cause damage to the product and the micro SD card;3. If the card is not compatible with the product, it might not be read. In this case, take outthe card and insert it again, or change another micro SD card.◆Power onPress the POWER button slightly, red light on and off quickly then turn to blue, this device is powered on.◆Video mode1. This product automatically goes to video mode after it is powered on. The blue indicator light begins to light always.2. Press RECORD button to start taking video, the blue and red indicator light begin to bright always. Press RECORD button again to stop recording, the blue indicator light always on and red light off.◆Photo mode1. After power on this device, press the MODE button. The blue indicator light begins to flash always.2. Press RECORD button to take photo, the red light bright always and the blue light flash twice, And then enter to the standby mode again, the red light off and blue indicator light flash always.◆HDMI mode1. Connect the product to the TV or PC using HDMI line. Turn on the product to go to Video mode, then can see the frames which the same with the product’s lens. Press the Record button, It begin to take video. And can see the frames in the TV or PC immediately. Press the Record button can play the current video.2. Press the Mode button, enter into photo mode. Press the mode button again to enter into review mode. Press direction key forwards and backwards to review pictures and video taken.◆Review mode1. Turn on the product to go to Video mode. Press mode key to enter into Photo mode. And then press mode key to enter into Review mode. Press direction key forwards and backwards to review pictures or videos taken.2. User can press direction key to review taken pictures or videos. Press Record key to play the video in the TV. Press mode to exit.3. Delete While reviewing (reviewing pictures/video), press Mode key for 3 seconds, it will enter into setting mode. Press mode key to go to deleting display. Press the direction key to choose deleting option, press mode key to confirm.◆Setting mode1. Regardless of video/camera/review mode, press Mode key for 3 seconds to enter into setting mode. Pressing Mode key could enter each setting Menu (For detailed setting information, please refer to setting table).2. At any menu mode, pressing direction key will enable user to go to menu setting options to choose desired setting, then press Mode to confirm.3. At any mode or menu setting, press the record key can exit current setting to original mode.File storing◆USB Storage ModeIf had inserted micro SD card into product, after connect with computer, you can find two removable disks from “My computer” (one is internal storage, the other is external storage card); find the stored videos and pictures under “Removable hard disk/ DCIM/100MEDIA”, data can be saved, transferred, cut, copied and deleted through computer system.Tips:If the displayed picture is tagged with" ", then it is a video. Press Record key to play the video. Pressing Record key again it will come to pause. While playing video, you can use direction key to forward or backward playing. To exit playing mode, you have to press Record key to pause first, and then press direction key to go to the next file.◆Connecting product to TV or PC1. Connecting product to TV with an HDMI cable to review pictures and videos.2. Connecting product to PC with an HDMI cable to review pictures and videos. Functions of keysVideo ModePower Button Turn on or off the productRecord Button Take Video or Pause take videoMode Button Enter into photo modePhoto ModeRecord Button Take Video or Pause take videoMode Button Enter into review modeHDMI ModePower Button Turn on or off the productRecord Button Take Video or Pause take video or play video Mode Button Enter into photo mode/enter into review mode Forwards Next video or pictureBackwards Last video or pictureMode & Menu settingMode Menu SettingTaking Videos Size1280*720/848*480/640*480/320*240EV+0/-0.3/-0.7/-1/-1.3/-1.7/-2/+2.0/+1.7/+1.3/+1/+0.7/0.3 White B Auto/Sunny/Cloudy/Tungsten/FluorescentContrast Standard/Hard/SoftSharpness Standard/Hard/SoftEffect Vivid/monochrome/negative/sepia/art/offDuration No/15min/30min/45minRecycle No/1min/5min/10min/15min/20minPictures Size8M/5MEV+0/-0.3/-0.7/-1/-1.3/-1.7/-2/+2.0/+1.7/+1.3/+1/+0.7/0.3 Quality Fine/good/normalWhite B Auto/Sunny/Cloudy/Tungsten/FluorescentContrast Standard/Hard/SoftSharpness Standard/Hard/SoftEffect Off/Art/Sepia/Negative/ Monochrome/Vivid Selftimer No/YesBurst No/3pics/5picsTips:1.No drive is needed to be installed. U disc can only be used when the video camerais on.2. The TV and PC must have the HDMI port then the product can connect to it.Review Delete No/YesSlide Show No/1Second/3Second/5SecondSystem Volume0/1/2/3 (8)Language English/Japanese/Simplified Chinese/Chinese Traditional Date000 00 00Clock00:00Format Cancel/YesSys.reset No/YesAuto off Off/1minute/3minute/5minuteLight Freq50HZ/60HZVersion V.0000 00 0000SpecificationsSensor5M pixel CMOS sensorVideo Video format: 1280 * 720 30fps, MOV Photo Photo format: 3200 * 2400, jpeg Video output HDMI, support 720P output modeStorage Internal: 32MExternal: support 32GB (Max.)Interface: HDMI / USB2.0Battery500mAh lithium-ion rechargeable batteryWorking temperature-10℃ - 50℃Working humility 15% - 85%Product size: 108mm (L) * 28mm (W) * 18mm (H) (Approx.)Products weight36gTroubleshooting◆Cannot take pictures, videos and record voice?Please check if had inserted the micro SD already, and if this micro SD card have enough place.◆Images cannot be transferred to HDTV screen?Please make sure that HDMI cable is completely plugged into TV’S HDMI port. Please use the HDMI cable comes along with the HDDV.◆Pictures and videos taken are not clear?Please check whether lens is covered with any dirty. If so, clean the lens before using it.。
D125/D110/D95 Copier/Printer 用户操作实用手册富士施乐(中国)有限公司客户服务及支持部目录一.正确放置原稿---------------------4二. 复印1.简易复印步骤---------------------52. 常用的复印应用使用手送纸盘复印环保纸、厚纸、信封等非标准纸张---7复印双面文件--------------------9对图像进行缩放-------------------10将图像移位或自动居中----------------11消除副本四周阴影------------------13复印书刊----------------------14同时复印不同尺寸的原稿---------------15将文件进行分页/装订/打孔/工程图折纸--------16印制小册子或套印A3红头文件-------------17复印身份证等其它证件----------------18把多页文件复印到单页纸上--------------19自制大型海报--------------------20将一个图像重复多个印在单页纸上-----------21在文件中添加注释------------------22加附封面或套印A4红头文件--------------23制作C型、Z型折纸------------------24在副本文件中插入分隔页---------------25将不同设定的原稿集中起来进行复印----------26进行样本复印--------------------27储存常用的复印功能----------------28调用已储存的复印功能----------------29三. 打印1.基本打印步骤--------------------302. 常用的打印应用把多页文件打印到单页纸上--------------31打印小册子-------------------32打印封面页或套印红头文件-------------33设置喜好设定-------------------34机密打印或样本打印----------------35添加自定义尺寸纸张----------------37正确打印环保纸、厚纸、信封等非标准纸张------38设置打印首选项------------------39 3. 介质打印概况(选配)介质打印概况------------------40注意和限制事项-----------------41介质打印文件------------------42四. 扫描1. 扫描到信箱登记信箱----------------------43扫描到信箱-------------------44从信箱中提取扫描文件----------------452.用邮件接收扫描文件---------------473.把文件扫描到PC保存---------------484.把文件扫描到USB保存--------------495.把文件扫描到URL-----------------506.扫描(WSD保存)--来自PC------------517.扫描(WSD保存)--来自主机------------538.扫描输出文件格式----------------54五.计数器确认---------------------55六.确认消耗品的用量----------------56七.清除卡纸--------------------57八.控制面板的使用介绍---------------58一、正确放置原稿两种方法放置原稿--自动输稿器:单张,多张原稿。
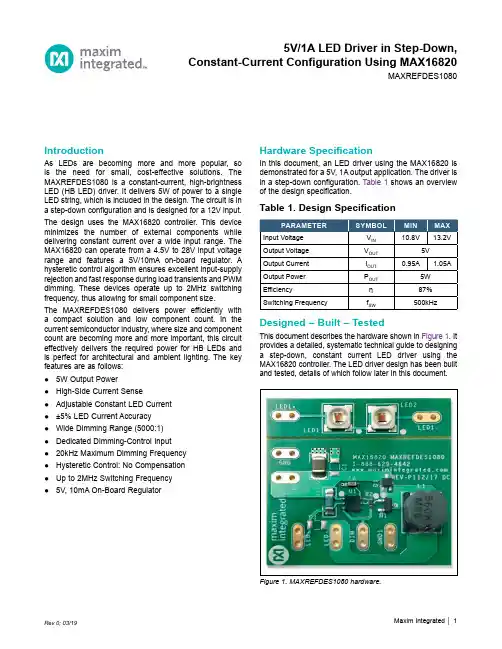
IntroductionAs LEDs are becoming more and more popular, so is the need for small, cost-effective solutions. The MAXREFDES1080 is a constant-current, high-brightness LED (HB LED) driver. It delivers 5W of power to a single LED string, which is included in the design. The circuit is in a step-down configuration and is designed for a 12V input. The design uses the MAX16820 controller. This device minimizes the number of external components while delivering constant current over a wide input range. The MAX16820 can operate from a 4.5V to 28V input voltage range and features a 5V/10mA on-board regulator. A hysteretic control algorithm ensures excellent input-supply rejection and fast response during load transients and PWM dimming. These devices operate up to 2MHz switching frequency, thus allowing for small component size.The MAXREFDES1080 delivers power efficiently with a compact solution and low component count. In the current semiconductor industry, where size and component count are becoming more and more important, this circuit effectively delivers the required power for HB LEDs and is perfect for architectural and ambient lighting. The key features are as follows:●5W Output Power●High-Side Current Sense●Adjustable Constant LED Current●±5% LED Current Accuracy●Wide Dimming Range (5000:1)●Dedicated Dimming-Control Input●20kHz Maximum Dimming Frequency●Hysteretic Control: No Compensation●Up to 2MHz Switching Frequency●5V, 10mA On-Board Regulator Hardware SpecificationIn this document, an LED driver using the MAX16820 is demonstrated for a 5V, 1A output application. The driver is in a step-down configuration. Table 1 shows an overview of the design specification.Table 1. Design SpecificationFigure 1. MAXREFDES1080 hardware.Designed – Built – TestedThis document describes the hardware shown in Figure 1. It provides a detailed, systematic technical guide to designing a step-down, constant current LED driver using the MAX16820 controller. The LED driver design has been built and tested, details of which follow later in this document.5V/1A LED Driver in Step-Down,Constant-Current Configuration Using MAX16820MAXREFDES1080Step-Down TopologyThe step-down converter, as seen in Figure 2, is the most commonly used type of switching regulator topology. A step-down converter steps down the voltage from input to output. Most conventional step-down converters consist of two switches (or a switch and a diode), an inductor, a capacitor, and a load (LEDs, in this case). The converter usually also requires a controller to regulate the output. This design uses the MAX16820.Transistor Switch ‘On’ PeriodWhen the transistor switch is on (t ON ), it supplies the output load with current. Initially current flow to the load is restricted, as energy is also being stored in the induc-tor. The current in the load and the charge on the output capacitor, therefore, build up relatively slow in comparison with the switch-on time of the MOSFET. During the ‘on’ period, there is a large voltage across the diode, which causes it to be reverse biased.Transistor Switch ‘Off’ PeriodWhen the transistor switch is off (t OFF ), the energy that had been stored in the inductor’s magnetic field is released. The voltage across the inductor is now in reverse polarity, and sufficient stored energy is available to maintain current flow while the transistor is open. The reverse polarity of the inductor allows current to flow in the circuit through the load and the diode, which is now forward biased. Oncethe inductor has been drained of the majority of its stored energy, the load voltage begins to fall. The charge stored in the output capacitor then becomes the main source of current. This leads to the ripple waveform seen in Figure 3.In this reference design, the circuit is modified to a reverse buck converter topology, as seen in Figure 4. This allows the circuit to operate off of a low-cost, n-channel MOSFET, which reduces BOM cost. The same basic theory is maintained in this topology, except the MOSFET and inductor come after the load.When the MOSFET Q1 is turned ON, current flows through the LEDs and inductor L1, and out through the MOSFET. Energy is stored in the magnetic field generated in the inductor. The current flowing through R SENSE is monitored by the MAX16820 at the CSN pin.Figure 2. Conventional step-down converter topology.Figure 3. Step-down converter waveforms.Figure 4. Reverse buck converter topology.When the MOSFET Q1 is turned OFF, the magnetic field in the inductor begins to collapse and the polarity of the inductor reverses. At the same time the inductor releases its remaining energy to the LEDs and the diode. This maintains constant current in the LEDs.In order to derive the duty cycle equation, first we look at t on , using:L di V Ldt=If integrated between 0 and t on :Lon L onI V Lt ∆=When the switch is on:V L = V IN – V OUTFill into the equation above:IN OUT ONLon(V V )t I L−=∆Now we look at t off , using:L diV Ldt=If integrated between 0 and t off :Lon L offI V Lt ∆=When the switch is off:V L = –V OUTFill into the equation above:OUT OFFLoff(V )t I L−=∆Because the average voltage across the inductor for an entire switching cycle is zero:ΔI Lon = –ΔI LoffFill in the equations above:IN OUT ON OUT OFFIN OUT OUT IN OUT OUT OUT OUT IN(V V )t (V )t L L (V V )DT (V )(1D)TV D V D V V DV D V −−=−−=−−−−=−=Design ProcedureNow that the principle operation of the buck regulator is understood, a practical design example can be illustrat-ed. The converter design process can be divided into three stages: power stage design, MAX16820 controller setup, and current regulation. This document is primarily concerned with the power stage design and the current setting. The design parameters in Table 2 will be used throughout.Step 1: Choosing Inductor L1In the MAXREFDES1080, the minimum inductor value for the circuit is the larger value of:IN LED LED LED LED3.33(V V )L 1.05I or 3.33(V )L 1.05I ×−=××=×L is calculated in μH.The inductor chosen for this design is 56μH.Step 2: Choosing R SENSE to Set theLED CurrentThe MAX16820 features a programmable LED current using a resistor connected between IN and CSN. Use the following equation to calculate the sense resistor:SNSHI SNSLO SENSE LED(V V )1R ()2I +Ω=Typically, V SNSHI = 210mV and V SNSLO = 190mV. For furtherdetails about V SNSHI and V SNSLO , see the Electrical Characteristics in the MAX16820 data sheet .The resistor chosen for this design is a 1%, 0.2Ω resistor.Table 2. Design ParametersStep 3: Determining the Switching FrequencyThe MAX16820 regulates the LED output current using an input comparator with hysteresis. As the current through the inductor ramps up and the voltage across the sense resistor reaches the upper threshold, the voltage at DRV goes low, turning off the external MOSFET. The MOSFET turns on again when the inductor current ramps down through the freewheeling diode until the voltage across the sense resistor equals the lower threshold. Use the following equation to determine the operating frequency:IN LED LED SENSE sw IN SNSHI SNSLO (V V )V R f V (V V )L−××=×−×Where V LED is the forward voltage drop across all LEDs in a string together, and f sw is the switching frequency.Step 4: MOSFET SelectionThe MAX16820’s gate driver is capable of sourcing 0.5A and sinking 1A of current. MOSFET selection is based on the maximum input operating voltage V IN , output current I LED , and operating switching frequency. For better effi-ciency, choose a MOSFET that has a higher breakdown voltage than the maximum input voltage, low R DS(ON), and low total charge. The MOSFET threshold voltage must be adequate if operated at the low end of the input-voltage operating range.The MOSFET chosen for this design is the Fairchild Semiconductor FDN359BN n-channel MOSFET.Design ResourcesDownload the complete set of Design Resources including the schematics, bill of materials, PCB layout, and test files.Step 5: Freewheeling Diode SelectionThe forward voltage of the freewheeling diode should be as low as possible for better efficiency. A Schottky diode is a good choice as long as the breakdown voltage is high enough to withstand the maximum operating voltage. The forward current rating of the diode must be at least equal to the maximum LED current.The diode chosen for this design is the Fairchild Semiconductor FBR130 Schottky diode.Step 6: LED Current RippleThe LED current ripple is equal to the inductor current rip-ple. In cases when a lower LED current ripple is needed, a capacitor can be placed across the LED terminals.Step 7: DIM InputThe MAX16820 allows dimming with a PWM signal at the DIM input. A logic level below 0.6V at DIM forces the MAX16820’s DRV output low, turning off the LED current. To turn the LED current on, the logic level at DIM must be at least 2.8V.NoteThe MAXREFDES1080 board is not thermally optimized for the LED components used.Revision HistoryMaxim Integrated cannot assume responsibility for use of any circuitry other than circuitry entirely embodied in a Maxim Integrated product. No circuit patent licenses are implied. Maxim Integrated reserves the right to change the circuitry and specifications without notice at any time. The parametric values (min and max limits) shown in the Electrical Characteristics table are guaranteed. Other parametric values quoted in this data sheet are provided for guidance.© 2019 Maxim Integrated Products, Inc. All rights reserved. Maxim Integrated and the Maxim Integrated logo are trademarks of Maxim Integrated Products, Inc., in the United States and other jurisdictions throughout the world. All other marks are the property of their respective owners.Maxim Integrated。

D125/D110/D95 Copier/Printer 用户操作实用手册富士施乐(中国)有限公司客户服务及支持部目录一.正确放置原稿---------------------4二. 复印1.简易复印步骤---------------------52. 常用的复印应用使用手送纸盘复印环保纸、厚纸、信封等非标准纸张---7复印双面文件--------------------9对图像进行缩放-------------------10将图像移位或自动居中----------------11消除副本四周阴影------------------13复印书刊----------------------14同时复印不同尺寸的原稿---------------15将文件进行分页/装订/打孔/工程图折纸--------16印制小册子或套印A3红头文件-------------17复印身份证等其它证件----------------18把多页文件复印到单页纸上--------------19自制大型海报--------------------20将一个图像重复多个印在单页纸上-----------21在文件中添加注释------------------22加附封面或套印A4红头文件--------------23制作C型、Z型折纸------------------24在副本文件中插入分隔页---------------25将不同设定的原稿集中起来进行复印----------26进行样本复印--------------------27储存常用的复印功能----------------28调用已储存的复印功能----------------29三. 打印1.基本打印步骤--------------------302. 常用的打印应用把多页文件打印到单页纸上--------------31打印小册子-------------------32打印封面页或套印红头文件-------------33设置喜好设定-------------------34机密打印或样本打印----------------35添加自定义尺寸纸张----------------37正确打印环保纸、厚纸、信封等非标准纸张------38设置打印首选项------------------39 3. 介质打印概况(选配)介质打印概况------------------40注意和限制事项-----------------41介质打印文件------------------42四. 扫描1. 扫描到信箱登记信箱----------------------43扫描到信箱-------------------44从信箱中提取扫描文件----------------452.用邮件接收扫描文件---------------473.把文件扫描到PC保存---------------484.把文件扫描到USB保存--------------495.把文件扫描到URL-----------------506.扫描(WSD保存)--来自PC------------517.扫描(WSD保存)--来自主机------------538.扫描输出文件格式----------------54五.计数器确认---------------------55六.确认消耗品的用量----------------56七.清除卡纸--------------------57八.控制面板的使用介绍---------------58一、正确放置原稿两种方法放置原稿--自动输稿器:单张,多张原稿。
ApeosPort/ DocuCentre 产品系列打印驱动程序安装说明书 (Windows® OS)标准打印机设置和自定义打印机设置是安装打印驱动程序的两种方法。
下面描述了在机器像计算机一样使用 TCP/IP 连接到子网的情况下,如何使用标准打印机设置安装打印驱动程序。
设置流程图:1.[机器] 检查机器的型号名称2.[机器] 检查机器的 IP 地址3.[PC] 下载打印驱动程序4.[PC] 安装打印驱动程序5.[PC] 从计算机发送打印作业注意:您需要使用您的计算机和机器操作。
[PC] 表示计算机操作,[机器] 表示机器操作。
[机器] 检查机器的型号名1.机器的型号名称显示在控制面板的前面。
[机器] 检查机器的 IP 地址1.按<机器确认(计数器确认)>按钮。
2.在 [机器状态/报告输出]屏幕上检查机器的 IP 地址。
重要说明:如果指定了 IPv6 地址,则不会显示 IPv4 地址。
在系统管理员模式,选择 [规格设定] > [网络设定] > [协议设置] > [TCP/IP - 网络设置],然后选择[确认/变更]。
请参阅 [IPv4 - IP 地址]。
3.选择[关闭]。
[PC] 下载打印驱动程序您可以通过以下两种方法中的任何一种方法获取打印驱动程序。
•从随机器一起提供的软件/ 产品手册中安装•从我们的官方网站下载。
()[PC] 安装打印驱动程序标准打印机设置和自定义打印机设置是安装打印驱动程序的两种方法。
下面描述了在机器像计算机一样使用 TCP/IP 连接到子网的情况下,如何使用标准打印机设置安装下载的PCL 打印驱动程序。
1.双击下载的 PCL 打印驱动程序。
2.确认软件许可协议,并单击[是]。
3.单击[开始安装]。
注意:如果出现如下‘User Account Control’对话框,选择[Yes]。
4.选择[自定义],并单击[下一步]。
5.选择[本地打印机],并单击[下一步]。
使用手冊- 適用於單機操作 -目錄重要的安全說明 (5)保護您的個人資料 (7)控制面板的說明 (8)使用液晶面板 (10)調整控制面板角度 (12)省電功能 (12)當關閉電源時 (13)電源故障後自動重新開機 (14)處理紙張和原稿選擇紙張 (16)放入紙張 (17)記憶卡的使用方法 (19)插入記憶卡 (19)移除記憶卡 (19)放置原稿 (21)自動進紙器 (ADF) (21)工作平台 (23)複印模式複印文件 (26)複製 / 修復相片 (28)複印模式選單清單 (31)相片模式列印相片 (34)使用各種版面配置列印 (36)列印格線紙 (38)列印相片賀卡 (40)從外部 USB 裝置進行列印 (43)備份資料至外部儲存裝置 (44)相片模式選單清單 (45)傳真模式連接電話線 (48)使用傳真專用的電話線路 (48)與電話裝置共用電話線路 (48)檢查傳真連線 (50)設定傳真功能 (51)設定快速撥號項目 (51)設定群組撥號項目 (52)建立標題資訊 (54)傳送傳真 (56)輸入或重撥傳真號碼 (56)使用快速撥號 / 群組撥號 (57)依次撥號發送 (58)在指定時間發送傳真 (60)透過連接的電話機發送傳真 (62)接收傳真 (63)自動接收傳真 (63)手動接收傳真 (65)輪詢接收傳真 (66)列印報告 (67)透過電腦發送傳真 (68)傳真模式選單清單 (69)掃描模式掃描至記憶卡 (72)掃描至電腦 (74)掃描模式選單清單 (75)設定模式 (維護)檢查墨水卡匣存量 (78)檢查和清潔印字頭 (79)校正印字頭 (81)設定 / 更改時間和區域 (83)透過數位相機列印 (85)設定選單清單 (87)解決方法錯誤訊息 (90)更換墨水卡匣 (91)清除夾紙 (94)夾紙 - 印表機內部 (1) (94)夾紙 - 印表機內部 (2) (98)夾紙 - 自動進紙器 (ADF) (99)夾紙 - 印表機內部 (3) (100)無法拉出紙匣 (103)列印品質 / 版面的問題 (105)傳真問題 (106)附錄 (107)2關於這本使用手冊當閱讀操作說明時,請遵守這些指導方針:w c Q R&警告:請務必小心遵守,以免身體受傷。
富士施乐数码打印机打印文件使用指导富士施乐数码打印机打印文件使用指导简介富士施乐是一家知名的数码打印机品牌,其产品质量和打印效果优秀。
本文档将为您提供富士施乐数码打印机打印文件的使用指导,帮助您快速上手并实现高质量的打印。
步骤一:准备打印文件,确保您已经准备好您需要打印的文件,并将其保存在电脑或其他存储设备上。
富士施乐数码打印机支持多种文件格式,包括但不限于以下常见文件格式:- Microsoft Word 文档 (.doc, .docx)- Adobe PDF 文件 (.pdf)- 图片文件 (.jpg, .png, .bmp)- PowerPoint 演示文稿 (.ppt, .pptx)步骤二:连接打印机将富士施乐数码打印机连接到您的电脑或其他设备上。
您可以使用USB线缆或通过Wi-Fi进行连接。
确保打印机与电源供应连接稳定,并且设备之间的连接正常。
步骤三:打开打印机驱动程序在您的电脑上打开打印机驱动程序。
通常,在您安装了富士施乐数码打印机的驱动程序后,您可以在桌面或开始菜单中找到相应的图标。
双击图标以打开驱动程序。
步骤四:选择打印文件在打印机驱动程序中,找到并选择您需要打印的文件。
您可以通过浏览文件系统或者选择最近使用的文件来定位文件。
一旦您找到了目标文件,单击选择并将其添加至打印队列。
步骤五:调整打印设置在打印机驱动程序中,您可以调整一些打印设置以满足您的需求。
以下是一些常见的设置选项:- 打印页面范围:选择打印整个文件或仅打印特定的页面范围。
- 打印质量:选择打印的质量水平,包括草稿、普通、高质量等选项。
- 纸张类型:选择适合您打印的文件的纸张类型,如普通纸、照片纸等。
- 布局:选择输出的页面布局,包括横向、纵向、多页打印等。
- 镜像打印:如果需要,您可以选择镜像打印文件,以适应一些特殊打印需求。
步骤六:开始打印完成所有设置后,单击打印机驱动程序中的\。
Copy guide(複印指南)快速複印1將原始文件載入自動送件器中(面朝上,短邊先進入自動送件器)或放在掃描器玻璃上(面朝下)。
請注意:請不要將明信片、相片、小東西、專用透明投影膠片、相紙或細薄材質(如雜誌剪報)載入自動送件器。
將這些物品放置在掃描器玻璃上。
2若要將文件載入「自動送件器」,請調整紙張導引夾。
3從印表機控制面板上,按下4若您已將文件放在掃描器玻璃上,請觸控Finish the Job(結束工作)來返回主畫面。
利用自動送件器複印1載入原始文件,載入時面朝上,短邊先進入自動送件器。
請注意:請不要將明信片、相片、小東西、專用透明投影膠片、相紙或細薄材質(如雜誌剪報)載入自動送件器。
將這些物品放置在掃描器玻璃上。
2調整紙張導引夾。
3在主畫面上,觸控Copy(複印),或利用鍵台輸入複印份數。
這時會出現複印畫面。
4請依需求情況修改複印設定。
5觸控Copy It(複印它)。
使用掃描器玻璃複印1將原始文件面朝下放在掃描器玻璃的左上角。
2在主畫面上,觸控Copy(複印),或利用鍵台輸入複印份數。
這時會出現複印畫面。
3請依需求情況修改複印設定。
4觸控Copy It(複印它)。
5如果您要掃描多頁,接著請將下一份文件放在掃描器玻璃上,然後觸控Scan the Next Page(掃描下一頁)。
6觸控Finish the Job(結束工作)返回主畫面。
暫停列印工作以製作複印文件若要暫停目前的列印工作,以製作複印文件:請注意:Job Interrupt(工作中斷)必須設定為 On(開),此功能才可以運作。
1將原始文件載入「自動送件器」中(面朝上,短邊先進入「自動送件器」),或放在掃描器玻璃面板上(面朝下)。
請注意:請不要將明信片、相片、小東西、專用透明投影膠片、相紙或細薄材質(如雜誌剪報)載入「自動送件器」。
將這些物件放在掃描器玻璃面板上。
2若要將文件載入「自動送件器」,請調整紙張導引夾。
3從印表機控制面板,按下4如果您要掃描多頁,接著請將下一份文件放在掃描器玻璃上,然後觸控Scan the Next Page(掃描下一頁)。
HFSSB/CWTRANSCEIVERV1.1Revise:2014-11-19Copyright©2014,XIEGU,Inc.AllRightsReservedX108O perating M anualXIEGU TECH目录前言 (3)一、整机设计指标参数 (5)二、设备说明 (6)2.1前面板部件说明 (6)2.2后面板说明 (6)2.3手咪按键说明 (6)三设备操作说明 (7)3.1屏幕显示信息说明 (7)3.2多功能菜单操作说明 (6)3.3开始使用你的X108 (7)3.4扩展接口连接 (10)3.5高级菜单设置 (11)四、套件的装配 (12)4.1准备工作 (12)4.2组装过程 (12)五一般问题排查 (19)六售后服务条例 (20)6.1保修条款 (20)6.2保修限制条款 (20)============================================================================================================修订记录:2014.10.15,V1.0版本,编制。
2014.11.19,V1.1版本,更新手咪功能说明,新增AUX口接线方式说明,更新系统设置菜单说明。
前言首先,请允许我代表我们团队,感谢您选择X108型短波收发信机。
这是一款小巧的无线电收发信机,我们把它定位为便携式机型,单手就可以拿起。
它可以满足您日常的基本使用需求,可以作为您的QRP主力机型,同样的,也适合作为HAM的第一款入门级短波收发信机。
今年,我们大力提升产品品质,从外观到内部电路设计,每一个环节都用心去做,切实考虑用户的需求,提升用户的使用感受,X108正是在这样一个大环境下诞生的一款性能优异的小机器。
我们希望它能给你带来惊喜、带来使用的快乐、带来不一样的感受。
我们也希望以此证明,中国造是值得信赖的!VY73!de BG8HT2014.08④①②③⑤一、整机设计指标参数基本参数频率范围:接收:0.5~30MHz(连续)发射:所有HAM频段工作模式:SSB(J3E)CW(A1A)AM(A3E)最小频率步进:1Hz天线阻抗:50Ω工作温度范围:-10℃~+60℃频率稳定度:±1.5ppm@开机5分钟,-10℃~+60℃(标配)±0.5ppm@开机5分钟,-10℃~+60℃(TCXO-M,选配)工作电压:12~14.5V DC电流参数:接收600mA发射7.5A Max整机尺寸:120*45*180(mm)[不包括旋钮、把手等突出]发射机参数发射功率:20W(@13.8V)调制方式:SSB平衡调制AM低电平调制杂散抑制度:≥40dBc载波抑制:≥45dBc选择性:SSB 2.4kHz(-6dB)CW500Hz(-6dB)接收机参数中频频率:10.7MHz接收灵敏度:0.2uV1.8~2.0MHz3.5~4.0MHz5.0~5.5MHz 7.0~7.3MHz 10.0~10.2MHz 14.0~14.5MHz 18.0~18.2MHz 21.0~21.6MHz 24.8~25.0MHz 28.0~28.8MHz0.5~30.0MHz(*)动态范围:优于95dBRIT频率微调范围:±1kHz音频输出:0.5W@8欧接收频段:二、设备说明2.1前面板部件说明1、电源开关/音量旋钮2、数字手咪插口3、显示屏4、多功能按键区5、频率旋钮6、UP按键7、DOWN按键2.2后面板说明1、天线接口2、外部音频输入/PTT接口3、音频输出接口4、手动/自动电报按键接口5、USB通信口6、直流电源接口7、接地端2.3手咪按键说明1、【LOCK按键】锁定主机按键、手咪按键/再次按下解除锁定2、【PTT按键】发射控制按键3、【上翻/下翻】频率的连续增、减/系统设置菜单下,上下条目的选择4、【收发指示灯】手咪操作指示灯5、【多功能数字按键】数字键盘区6、【FIL滤波器选择按键】内置滤波器选择7、【MODE模式选择按键】主机工作模式选择8、【功能指示灯】暂无指示9、【功能按键】暂无功能10、【MW按键】存储操作11、【V/M按键】频率/频道切换12、【XFC按键】VFO-A/VFO-B切换13、【CALL按键】暂无功能三设备操作说明3.1屏幕显示信息说明12341、前置放大器/前置衰减器当前状态2、当前设置频率信息3、当前VFO 状态、工作模式、滤波器带宽、异频收发状态、NB 状态4、CW 电键手/自状态、自动键码率信息56785、频道信息6、语音压缩比/主机输入电压7、本地时间8、多功能菜单91011121415139、接收场强表10、实时功率表11、设定功率值12、发射驻波表13、收发状态显示14、频率微调显示15、AGC 状态显示3.2多功能菜单操作说明【PRE】前置放大器开启/关闭【ATT】前置衰减器开启/关闭【MODE】工作模式选择,USB--LSB--CW--AM 【AGC】自动增益控制开启/速率选择【NB】噪音抑制器开启/控制深度选择【A/B】VFOA/VFOB切换【A=B】将VFOB的设置跟VFOA一致【SPLT】异频收发模式开启/关闭【RIT】频率微调开启/关闭【POW】发射功率设置【V/M】频率模式/频道模式切换【M>V】将当前频道设置参数赋予当前频率模式【MW】将当前频率模式设置参数存储进频道【MC】清除当前频道设置【BW】滤波器带宽选择【KEY】CW手动电键/自动电键模式选择【KSPD】自动键速率设置(必须设置速度后,才能使用自动键功能)【TIME】时钟设置【SQL】静噪设置【VCMP】语音压缩设置3.3开始使用你的X1083.3.1设置当前工作频率方法1:按动前面板上的UP/DN按键,移动频率步进位到需要的位,然后旋转频率旋钮,改变当前频率值。
Specifi cations13 14 12.auDocument Centre 336/286/236For detailed product specifi cations,optimum performance parameters & service clearances refer to Product Customer Expectation Document.Document Centre336/286/236Unquestionable Output Speed - printing & copying DC 336 DC 286 DC 236A4 (LEF) 33 ipm 28 ipm 23 ipm A317 ipm 15 ipm13 ipmNetwork PrintingProcessor Power PC 300 Mhz.Memory 256 MB (standard) / 20 GB (optional HDD)Interface 100Base-TX/10Base-T,Parallel Port (IEEE1284), USB 2.0Printer Languages PCL 6 & TIFF (Standard)/ Postscript 3, (Optional)Resolution1,200 x 1,200 dpiOperating Systems W indows 95, 98, Me, 2000, XP, NT 4.0,2003 Server, Mac OSProtocols Standard: TCP/IP, SMB, IPP ,Port 9100, EtherTalk , Optional: NetWare Network Printing Features Secure Print; Delay Print; Booklet Creation; Watermark; Banner Sheet (enable/disable); & more.CopyingFCOT A4 (LEF) 4.5 seconds or lessConcurrency Concurrent Scanning & Printing Resolution600 x 600 dpiCopy Pre-Collation Memory 128 MB (Standard) & 20 GB (optional HDD)Reduction/Enlargement 25% to 400% in 1% increments Sides (input:output) 1:1; 1:2; 2:2; 2:1Quantity1 to 999Internal Copy Auditron Standard (500 users)Foreign Device Interface Interface to 3Party access control devices (optional)Special Features Auto paper select; Auto tray switching; Job build;Covers insertion; Sample set.Network ScanningConcurrency Scan while the system is printing, copy or network print jobs.Input Speed 50 ipm (A4 LEF , 200 dpi)Resolutions R esolution B inary - 600 dpi, 400 dpi, 300 dpi, 200 dpi G rey - 400 dpi, 300 dpi, 200 dpi H alftone - 256 levels of Grey Maximum Scan area U p to A3 (297mm x 432mm)Network Protocol FTP via TCP/IP; SMB via TCP/IP (Network Scanning)Network Protocols S MTP, MIME encoded (Scan to E-mail) File Formats T IFF, JPEG, PDFDocument Management Fields One to six user-programmable metadata fi elds per scan job.Scan Destinations S can to network server, Scan to e-mail, & more.Directory Access C orporate address list via LDAP; Downloaded a ddress List (CSV fi le format)FacsimileTransmission Time Less than 3 seconds Transmission Speed 33.6 kbpsMemory 8 MB (standard) & 20GB (optional HDD) Dual AccessYesMultiple Lines (option) Maximum 3 lines CapabilityG3Speed Dials/Group Dials 500 destinations/50 groups (20 per group)Sending Document Size A4, B4, A3Data CompressionMH, MR, MMR, JBIGInternet FacsimileNetwork ProtocolSMTP; POP3 Sending Document Size A4, B4, A3Receiving Document SizeA4, B4, A3Scanning System/Supporting Format Flat bed scanning by CCD image sensorMH/MR/MMR/JBIG Scan Resolution Standard 200 x 100 dpi Fine 200 x 200 dpiSuper Fine 400 x 400 dpi, 600 x 600 dpi Paper Handling - DADFCapacity75 sheets Speed35 ipm Paper Sizes Sensed A5 - A3Weights 38 - 128 gsmPaper Handling - (Including 2 Tray Module)Capacity 500 sheets each (Trays 1 - 4) @ 80 gsm Paper Sizes A5 - A3Weights 60 - 105 gsm (Tray 1) 60 - 216 gsm (Trays 2-4)Paper Handling - Tandem Tray ModuleCapacity 2000 sheets Paper Sizes A4Weights 60 - 216 gsm (Trays 3-4)Paper Handling - Bypass TrayCapacity 95 sheetsSizes 100mm x 100mm - 305mm x 483mm Weights60 - 216 gsmStaple Finisher (Optional)Main Tray1,000 sheets (B5 - A3)Weights 64 to 105 gsmStaplingSingle or dual (50 sheets maximum)GeneralElectrical Requirements 220-240V, 10APower Consumption Low Power Mode 99 watts Running 623 watts / 1.92 KVA (max) Warm up Less than 25 seconds Dimensions 640 x 650 x 1114 mm (W x D x H)Weight 105 kgs (Including 2TM)Toner Yield (per cartridge) 25,000 per cartridge Drum Yield 60,000Key Optional AccessoriesHard Disk Drive 20GB (shared)2 Tray ModuleTandem Tray Module (HCF)Memory 128/256 MBPostscript Kit (Includes Netware)Network Scanning KitSecurity Kit (Image Overwrite)StandCentreWare Internet Services / Embedded Web Server (EWS)These are a wide array of tools to remotely configure the network settings, view status, manage & administer the device. Network administrators are also able to perform job queue management tasks through CentreWare Internet Services e.g. promote, delete, hold jobs to improve efficiency. Consumable status can also be viewed and administered using the EWS. It is indeed a powerful & effective tool for assisting administrators to support the office printing needs more efficiently.Network Authentication and AuditronNetwork Authentication enables administrators to manage and control users’ access to all network related functions performed on this device such as scan to FTP , scan to SMB, scan to e-mail etc. The built-in Network Auditron on the other hand can be used to control access & limit usage of the various machine functions such as printing, copying, faxing and scanning.NB. Auditron data can be also be downloaded as a CSV file with the help of the optional CentreWare EasyAdmin/Easy Operator tools.Document Centrean advancedoffice managementsolutionAdvanced Network SolutionsIn its most basic form the DC336/286/236 is a feature rich, easy to operate copier that can be optioned up to a comprehensive network system capable of copying, printing, faxing, scanning and e-mail. With the all-new DC336/286/236, Fuji Xerox delivers a complete office “manager” capable of meeting the office document production & workflow needs of small to large workgroups.The pre-configured DC336/286/236 ST has all the required SMARTS and functionality to become the perfect network “on & off ramp” for document production & workflow through a single secure space saving multifunction office peripheral. The pre-configured DC336/286/236 ST also offers substantial savings when compared to buying individual modules & accessories separately.Once installed, the full range of DC336/286/236 features can be accessed by anyone with a network connected PC and with its advanced networking capabilities, it offers businesses more control than ever before to maximise workgroup efficiency, monitor usage and control costs. The following features are particularly notable:Unparalleled Multifunction Concurrency:The new DC336/286/236 performs various tasks simultaneously, so whether users need to print, copy, fax, scan or e-mail, they can always access the function required – even while other jobs are being processed.Emulsion Aggregation (EA) TonerEmulsion Aggregation is a new process, which produces finer toner particles, uniform in size and shape. This enables the toner to be transferred to the paper quickly and produces a sharper image than conventional toners. Consequently, transfer is consistent, text is clearer, coverage is more even and image quality is higher. As an added benefit, EA Toner is also environmentally friendly. The manufacturing process cuts CO2 emissions up to 35%, toner consumption is reduced by up to 35% and toner wastage is cut by up to 65%.Kind to our Customers … When you purchase a Fuji Xerox product you are purchasing reliability not just efficiency. Our Online Support Assistant, together with our highly trained team of technicians, are on hand to handle any problems you may be experiencing with your device.As well as our Planet … Additionally, Fuji Xerox products conserve natural resources through designs that minimise wastage during manufacturing and use, maximise energy efficiency in your office, and work reliably with Fuji Xerox recycled paper.designed togrow withyour business needsBuilt for EnduranceDesigned to keep your business up and running, the remaining life of the CRUs (Customer Replaceable Units) on the Fuji Xerox Document Centre 336/286/236 can easily be viewed using the CentreWare Internet Services. The user-interface panel on the DC336/286/236 also displays a message when the consumables are running low and/or require replacement. The administrators can then easily replace the CRU that is running low, thereby effectively preventing downtime before it happens.Flexibility & ModularityThe Document Centre 336/286/236 is a space saving modular device that provides the flexibility to protect your investment through its ability to expand its capabilities to suit your growing document needs. It can be configured as an independent copier or upgraded to a comprehensive total document network system that can print, scan, copy and fax to meet the needs of every stage in the document creation and work processes of your business.The digital world is finally here – saving you time and money...Conventional toner suffers from screen dispersion because of particle size and uneven shape.EA Toner uniformity (shape and diameter)reproduces screens precisely without unwantedtoner dispersion.The Document Centre 336/286/236 opens the door to a new era in digital office multifunction peripherals...High Paper Capacity and great Document Finishing The Document Centre 336/286/236 can be configured with two additional optional A4 high capacity paper trays. These provide users with a high supply of the most common paper size thereby allowing longer periods of uninterrupted job runs.When combined with the optional advanced staple finisher capable of stapling up to 50 sheets, users can readily produce highly professional looking documents produced in atimely and efficient manner.smartscanning with intelligentfaxing and e-mailThe complete multitasking and digital document workflow manager...Box Job FlowThe DC336/286/236 takes the scan to mailbox workflow to yet another level with the help of the Box Job Flow feature. Users can simply register a series of processing and transfer locations beforehand as a box job flow, scanned/ fax-received documents in nominated mailboxes are then automatically executed according to the registered job flow. Destinations can be set for FTP/SMB, e-mail, fax and iFAX.Enhancing Scanning Workflow CapabilitiesUsers can enhance their scan to server workflow with the help of the optional CentreWare Scanning Services & OCR package consisting of PaperPort & Omnipage. This solution allows users to create searchable PDFs as well as converting the image into various other formats using a scan template set up on the UI of the scan module of DC336/286/236. The template can be set up to not only convert the image in a desired format but also perform other tasks of storage in a specific location and/or e-mail to a distribution list etc.Advanced Facsimile SolutionThe office facsimile is an important communication device in any business environment. Using industry standard G3 technology, the Document Centre 336/286/236 facsimile is capable of transmitting faxes at a speed of less than 3 seconds per page. As an added benefit, 2 additional fax lines can also be added to a fax enabled DC336/286/236 for sending and receiving faxes.PC / Hardcopy FaxingThe Document Centre 336/286/236 allows users to send faxes directly from any network connected PC thereby eliminating the need to print before faxing. It is also capable of faxing: A4 to A3 sized documents, Bound documents, Books, Objects and many many more …Internet Fax (iFAX)When configured with the optional iFax kit, the DC336/286/236 takes faxing to the next level.This cost saving feature stores or converts all incoming faxes into an electronic format to be e-mailed to the intended recipient(s). It also eliminates the need to wait at the fax machine for confidential faxes, reduces paper wastage and is ideal for cutting costs when sending international or interstate faxes.Advanced Network Scanning SolutionThe Document Centre 336/286/236 can be upgraded to include a scanning function capable of scanning documents at a rate of 50ipm (monochrome). Its standard duplexing features combined with up to 600dpi x 600dpi resolution also ensure crisp clear images ready for output.Scan to FTP / SMBDocuments scanned using the DC336/286/236 can be directly transferred to a designated directory on an FTP server using FTP protocol. Alternatively, users can also transfer their scanned images directly into the shared folder of any Windows client on the same network using SMB protocol.Scan to E-mail & File FormatsScanned documents can also be sent as attachments to any single or multiple nominated e-mail addresses within or outside the organisation. These attachments can be saved in a number of industry standard formats including PDF , TIFF , JPEG etc. Larger documents consisting of multiple pages can also be broken down and sent separately.Light Directory Access Protocol (LDAP)Whilst the DC336/286/236 is capable of storing e-mail addresses on board the device, it also supports LDAP , whereby users can access the internal corporate address book on the mail server and track the e-mail address of an intended recipient by simply searching for their name.Scan to MailboxThe DC336/286/236 is capable of scanning to designated mailboxes on the device. Users can retrieve scanned images/documents from their computer by using CentreWare Internet Services through the web browser.FTPSMBE-mailDocumentsThe Fuji Xerox Document Centre 336/286/236 ST complete with optional Office Finisher and optionalT andem Tray ModuleStandard Duplex Unit & Bypass Tray336/286/236Data Security KitFor absolute peace of mind on any data security concerns, the DC336/286/236 is available with an optional Data Security Kit. Upon installation of this kit, administrators can encrypt the information stored on the hard disk drive so that it cannot be accessed without authorization.Administrators can take the data security management to the next level with the overwrite & “zero clear” of the hard disk drive feature to eliminate any fears of Controller ArchitectureFuji Xerox’s “open architecture” controller design strategy allows for easy integration with third-party software solutions. The two unique software solutions co-developed by Fuji-Xerox and our strategic partners can provide users with extremely powerful new capabilities that can streamline fax communication workflows with easy integration with RightFax ® servers and also improve management of job accounting on the DC336/286/236 by integrating with Equitrac ® Job Accounting Software Systems.Tandem Tray ModuleMedia Identifi cation & Auto Tray SwitchingThe DC336/286/236 is capable of automatically identifying (and reproducing size for size) original paper sizes to be copied. It also ensures continued productivity by switching from one paper tray to another with a similar media confi guration (size & orientation) when the current selected tray runs out of paper.N-up / Repeat ImageUsing the N-up feature, users can copy more than one page on a single sheet. On the other hand, the Repeat Image feature allows for multiple, reduced size copies of the same image to be printed onto one sheet.Poster CreationThe DC336/286/236is also capable of creating poster-sized copies of a document. This is achieved by copying an enlarged image onto multiple sheets of paper, which are then assembled to create the original document as a large poster.AnnotationsWith the aid of the optional hard disk drive, the DC336/286/236 is capable of adding page numbers, date and predefi ned text stamps* onto copied documents as required by the user.* For text stamps printer kit is also required.the sophisticated documentprinting professionalPowerful technology taking you further...the easy to use yet versatilecopying solutionAdvanced Copying SolutionThe Document Centre 336/286/236 is an extremely feature rich copier that is very easy to use. Its fast First Copy Out Time of 4.5 seconds or less and 33ipm / 28ipm / 23ipm respective print speeds ensure continuous productivity in any business environment. Its versatility for printing on a wide variety of different media sizes, weights and types simultaneously also ensures the production of highly professional looking documents in-house.Intuitive User-InterfaceThe LCD touch screen user interface (UI) on the DC336/286/236 is extremely intuitive. First-time users will fi nd all features logically listed and experience no diffi culty navigating through the various screens. This improves their capacity to produce high quality output.Scan Once – Print ManyUsing digital technology, documents need only be scanned into the device’s memory once irrespective of the quantity of output sets required by the user. This ensures that the fi rst copy always looks as good as the last and also helps reduce the wear and tear of the machine.Scan AheadSaves time and increases workgroup effi ciency by allowing users to program and scan documents ahead for copying even whilst another job is in production.Job BuildUsers can divide a copy job into numerous segments and apply unique programming to each individual segment, thereby eliminating the need for manual collation.Covers InsertionFor highly professional looking documents front and back covers can also be inserted whilst building a copy job.Professional results with the capacity to handle a wider variety of paper stocks than ever before...Advanced Printing SolutionThe powerful 300MHz processor, 256 MB RAM and Network Interface Card (NIC) that are available as standard features on the printer module of the DC336/286/236, mean it is fully equipped to handle the heaviest of workloads.The DC336/286/236 is also capable of printing up to 33ipm / 28ipm / 23ipm respectively (A4 LEF). It raises the bar in image quality with print resolutions of up to 1,200 x 1,200 dpi and offers users a variety of value added features designed to reduce costs, increase effi ciency and maintain security. Some of its most notable features include:Print DriversThe DC336/286/236 is equipped with the extremely intuitive PCL6 printer driver as standard. The printer module also works seamlessly on various industry standard operating systems with printer drivers that are WHQL certifi ed.Secure PrintIn a business environment where the security of confi dential documents is a major concern, this feature provides peace of mind.The print job is ripped & spooled using the optional hard disk drive of the DC336/286/236. The user is then required to walk up to the DC336/286/236 and release the secure print job by entering the user nominated password. The user can decide if he/she wish to delete the secure print job or retain it on the hard disk drive forprinting again in the future.12341234123456782745standard with a tray-less duplex unit t of double sided printing without havinghelp decrease the consumption of paper & toner.Booklet CreationThe DC336/286/236 is also capable of creating signature booklet formats. The pages are printeddouble sided and placedin the correct order so that the document can be manually folded and stapled to form a booklet(s).Sample Print & WatermarksControls the wastage and costs associated with high volume printing by allowing the user to place a large job in a queue and print one sample set for proofi ng prior to proceeding with the entire job. Users can also set print text such as “Confi dential”, “Draft” etc as watermarks in the background of the document.Delayed PrintEnhances workplace effi ciency by allowing users to defer the printing of large/less important fi les to off peak times. It allows the user to specify the print time of a document anytime within twenty-four hours of sending the job to print from the user’s computer.Direct PrintAllows users to directly print PDF and TIFF fi les without using a printer driver. This feature uses Job Submission* utility available in CentreWare Internet Services to print PDF & TIFF fi les.* The DC336/286/236 must have the optional PostScript kit installed.。
在运行Microsoft Windows 2000/XP的计算机上的打印驱动程序中创建自定义纸张尺寸1. 对于Windows 2000操作系统,单击[开始],将鼠标指向[设置],然后选择[打印机]。
对于Windows XP/Server 2003操作系统,单击[开始],然后单击[打印机和传真]。
将显示"打印机"或"打印机和传真"窗口。
2. 右键单击打印机图标,然后选择[属性]。
将显示"属性"窗口。
3. 单击[配置]标签。
4. 单击[自定义纸张尺寸]按钮。
将显示"自定义纸张尺寸"窗口。
5. 单击[自定义1]。
6. 将设定调整到所需的尺寸。
7. 在指定的字段中输入自定义尺寸纸张的名称,然后单击[确定]。
修改规格设定注意:如果启用了单一帐户模式或多帐户模式,则应首先登录机器。
有关更多详情,请参见下面的相关项目。
1. 按住控制面板上的[认证(规格设定/登记)]键4秒钟。
字母"P"将在显示屏中闪烁。
编号菜单说明值1 自动清除时间当机器完成复印作业时,将在特定的时间后清除为该特定复印作业选择的功能。
选择在复印作业完成后机器清除所选复印功能所需的时间。
0:无1: 20秒2: 30秒3: 60秒*4: 90秒2 纸盘的优先顺序选择纸盘优先顺序。
注意:如果机器没有安装选装的纸盘2,则无法选择纸盘1:纸盘1* 2:纸盘23:旁路纸盘3 原稿画质选择默认原稿画质。
1:文字* 3:照片2:文字/照片4 复印浓度选择默认浓度级别。
0:淡1:略淡2:普通*3:略浓4:浓5 倍率选择选择默认缩放倍率。
注意:可选值的变更取决于所选的测量单位:公制单位/英寸(菜单编号:15)。
公制单位0:100%* 1:50% 2:70% 3:141% 4:200%英寸0:100%* 1:50%2:78% 3:129% 4:200%6 自动纸盘选择当纸盘在复印作业期间用完纸张时,机器将自动选择放有相同尺寸和方向的纸张的另一个纸盘。
此功能称为自动纸盘选择。
选择启用或禁用自动纸盘选择功能。
0:无1:有*7 自动纸张选择输稿器检测文件尺寸,并自动选择纸张。
此功能称为自动纸张选择。
0:无*1:有8 预设倍率选择(缩放倍率)将[倍率选择]的其中一个选项指定为预设缩放倍率。
50-200%(默认值:82%)9 清晰度(复印)为复印作业选择默认清晰度级别。
0:最低清晰1:低清晰2:正常*3:清晰4:最清晰10 清晰度(扫描)为扫描作业选择默认清晰度级别。
0:最低清晰1:低清晰2:正常*3:清晰4:最清晰11 低功耗模式的过渡时间选择机器切换至低功耗模式的过渡时间。
1:5分钟* 2:20分钟3:60分钟4:120分钟5:240分钟254:无12 睡眠模式的过渡时间选择机器在切换至低功耗模式后切换至睡眠模式的过渡时间。
0:0分钟1:5分钟*2:20分钟3:60分钟4:120分钟5:240分钟254:无13 去除底色(复印)机器将自动去除复印作业的原稿底色。
选择去除底色级别。
0:无1:1级2:2级*3:3级4:4级5:5级14 去除底色(扫描)机器将自动去除扫描作业的原稿底色。
选择去除底色级别。
注意:您还可在扫描驱动程序中选择是否启用此功能。
1:1级2:2级* 3:3级4:4级5:5级15 公制/英寸选择默认测量单位。
注意:默认情况下,测量单位为公制单位。
如果您具有英寸系列的文件,或如果需要在英寸系列的纸张上进行复印,请选择[1]或[2],以便将测量单位切换至英寸。
取决于机器的测量单位,输稿器可检测到的原稿尺寸会更改。
0:公制单位* 1:英寸13 2:英寸1416 [结束扫描]自动清除时间当在复印作业期间[结束扫描]键亮起时,如果未在特定的时间按下[结束扫描]键以指示原稿最后一页,则机器将自动恢复处理复印作业。
0:无1:20秒2:30秒3:60秒*4:90秒17 清除旁路纸盘卡纸后的等候时间在清除旁路纸盘中的卡纸后,机器将自动执行恢复处理过程。
指定在清除卡纸后,机器过多久才开始恢复其处理过程。
0 -60秒(默认值:8秒)18 复原位置当扫描用于复印或扫描作业的文档时,打开原稿盖将促使扫描仪托架处于就绪位置。
然而,如果您不按下<Start>键以在指定时间内启动作业,扫描仪托架将返回其默认位置。
指定托架在返回默认位置之前在就绪位置等待的时间。
0-60秒(默认值:7秒)22 感光鼓剩余使用寿命以百分比的形式显示感光鼓的剩余使用寿命。
23 总计打印计数器显示在所有帐户下制作的副本总数。
24 机器序列号显示机器序列号。
70 帐户模式选择机器帐户模式。
注意:当选择2(多帐户模式)时,请参阅"附加规格设定"。
有关更多详情,请参见下面的相关项目。
0:无帐户模式* 1:单一帐户模式2:多帐户模式200 Password 指定三位数的密码/机器管理员密码。
000-999(默认值:111)备注:1. *:默认设定 2 按[启动]键确认选择。
2. 请参阅上表,使用数字键为要更改的规格设定输入新值。
3. 按[启动]键确认选择。
字母"P"将在显示屏中闪烁。
4. 重复步骤2,以进行更多的规格设定更改。
5. 按控制面板上的[认证(规格设定/登记)]键,以退出规格设定模式。
设置纸盘中纸张的尺寸和方向1. 按住控制面板上的[纸张选择]键4秒钟,直到机器进入纸张设定模式。
2. 按[纸张选择]键,直到所需的纸盘在机器示意图上亮起。
3. 按[显示切换]键以在下列纸张类型中滚动:当测量单位为公制时更改顺序顺序出现在显示屏上的内容尺寸/放置方向1 A4L A4 / LEF2 A4 A4 / SEF3 b4 B4 / SEF4 b5L B5 / LEF5 b5 B5 / SEF6 C8 8开/SEF7 16L 16开/LEF8 16S 16开/SEF9 A5 A5 / SEF10 17 11 x 17英寸/ SEF11 14 8.5 x 14英寸/ SEF12 13 8.5 x 13英寸/ SEF13 11L 8.5 x 11英寸/ LEF14 11 8.5 x 11英寸/ SEF15 55 5.5 x 8.5英寸/ SEF16 A3 A3 / SEF当测量单位为英寸时更改顺序顺序出现在显示屏上的内容尺寸/放置方向1 11L 8.5 x 11英寸/LEF2 11 8.5 x 11英寸/SEF3 134 8.5 x 13.4英寸/SEF4 A3 A3 / SEF5 A4L A4 / LEF6 A4 A4 / SEF7 b4 B4 / SEF8 b5L B5 / LEF9 b5 B5 / SEF10 55 5.5 x 8.5英寸/SEF11 A5 A5 / SEF12 17 11 x 17英寸/SEF13 14 8.5 x 14英寸/SEF14 13 8.5 x 13英寸/SEF4. 注意:如果选择了纸盘1或纸盘2,A5和55将不会出现在显示屏上。
默认测量单位设为公制单位。
要进行更改,请更改规格设定菜单编号15。
有关更多详情,请参阅下面的相关项目。
5. 确定纸张的放置方向:如果纸张垂直放置,如下所示,则放置方向为LEF(长边送纸)。
如果纸张水平放置,如下所示,则放置方向为SEF(短边送纸)。
6按[启动]键确认纸张的尺寸和方向,退出纸张设定模式。
注意:当在旁路纸盘中为打印作业放置自定义尺寸的纸张时,不需要在控制面板上设置纸张尺寸。
尺寸不需要登记在打印驱动程序中。
自定义纸张尺寸不能用于复印作业。
扫描至计算机将图像从机器扫描至连接的计算机:1. 在机器上按[扫描]键。
2. 按[启动]键。
3. 计算机上将显示扫描向导。
单击[下一步]。
通过选择单选按钮,选择扫描是以黑白模式还是自定义方式进行。
4. 选择原稿的来源。
从[纸张来源]下拉框中选择输稿器或扫描玻璃。
单击[下一步]。
5. 对将要创建的文件命名。
从[选择文件格式]下拉框中选择文件类型。
6. 选择文件的保存位置。
例如,"图片收藏"或"桌面"。
单击[下一步]。
7. 选择要继续扫描或结束。
单击[下一步]。
单击[完成]。
更改纸张选择注意:默认纸盘是纸盘1。
如果要更改,请更改规格设定菜单编号2。
有关更多详情,请参见下面的相关项目。
1. 按控制面板上的[纸张选择]键直到所需纸盘在机器示意图中亮起,从以下选项中选择:o 纸盘1:使用放置在纸盘1中的纸张纸盘2:使用放置在纸盘2中的纸张注意:仅当机器装有选装的纸盘2时,此选项才可用。
o 旁路纸盘:使用放置在旁路纸盘中的纸张。
o 纸盘1和纸盘2(自动纸张选择):机器将自动选择放置在纸盘1或纸盘2中的纸张。
注意:仅当使用自动输稿器(ADF)并且机器装有选装的纸盘2时,此选项才可用。
2.使用数字键输入副本的份数。
3.按[启动]键,开始复印。
从稿台玻璃将副本分页1. 按控制面板左侧的[分页/不分页]键。
2. 使用数字键输入副本的份数。
3. 将要复印的第一张原稿正面朝下放在稿台玻璃上。
4. 按[启动]键,扫描第一张原稿。
5. 将下一张原稿正面朝下放在稿台玻璃上,并按[启动]键。
6. 当扫描完最后的原稿后,按[结束扫描]键开始复印。
机器将按照原稿放入ADF的相同顺序对多份副本进行分页。
按照纸叠的页顺序(111...,222...,333...,xxx...,)对副本进行分页:1. 将原稿正面朝上放入ADF。
2. 按控制面板左侧的[分页/不分页]键。
3. 使用数字键输入每页的副本份数。
4. 按[启动]键,开始复印。
使用稿台玻璃对单面原稿进行双面复印注意:仅当机器装有双面组件时,双面功能才可用。
1. 按控制面板左侧的[双面]键。
2. 使用数字键输入副本份数。
3. 将要复印的第一张原稿正面朝下放在稿台玻璃上。
4. 按[启动]键,扫描第一张原稿。
5. 将下一张原稿正面朝下放在稿台玻璃上,并按[启动]键开始复印。
使用自动输稿器(ADF)对单面原稿进行双面复印注意:仅当机器装有双面组件时,双面功能才可用。
1. 将原稿正面朝上放在ADF中。
2. 按控制面板左侧的[双面]键。
3. 使用数字键输入副本的份数。
4. 按[启动]键开始复印。
使用自定义倍率缩小/放大原稿1. 按[纸张选择]键选择合适的纸盘。
2. 使用[向上]和[向下]箭头键在50%到200%的范围内以1%为增量选择缩放倍率。
注意:按[向上]和[向下]箭头键将使当前选中的缩放倍率出现在显示屏上。
注意:下表列出用于参考的一些缩放倍率。
当对每种尺寸的纸张列出两种不同的缩放倍率时,请选择较小的缩放倍率,以让整个图像适合所选的纸张。
当选择较大的缩放倍率时,部分图像可能会缺失。