esxi 5.5安装配置手册
- 格式:doc
- 大小:22.24 MB
- 文档页数:26
Vmware ESXi 5.5.0安裝參考手冊軟體條件:Vmware ESXI 光碟一張,以Vmware ESXi 5.5.0為例。
一、Vmware ESXI安裝過程1、將 ESXi 安裝程式 CD/DVD 插入 CD/DVD-ROM ,或連接安裝程式 USB 快閃記憶體驅動器並重新開機。
將 BIOS 設置為從 CD-ROM 設備或 USB 快閃記憶體驅動器引導。
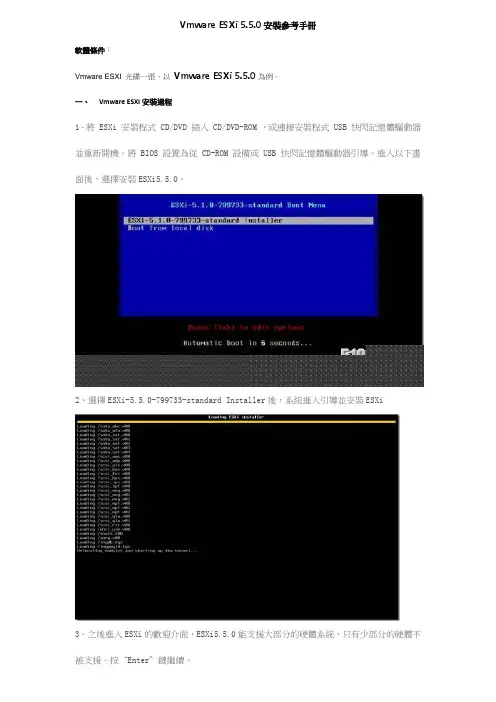
進入以下畫面後,選擇安裝ESXi5.5.0。
2、選擇ESXi-5.5.0-799733-standard Installer後,系統進入引導並安裝ESXi3、之後進入ESXi的歡迎介面,ESXi5.5.0能支援大部分的硬體系統,只有少部分的硬體不被支援。
按“Enter”鍵繼續。
4、在使用者授權使用協定頁面中,按“F11”鍵接收授權合約。
5、在“選擇磁片”頁面中,選擇要在其上安裝 ESXi 的位置,然後按 Enter。
6、選擇主機的鍵盤類型。
安裝後可在直接控制台中更改鍵盤類型。
7、輸入主機的root密碼。
可以將密碼留空,但為了確保第一次引導系統時的安全性,請輸入密碼。
安裝後可在直接控制台中更改密碼。
8、按F11鍵開始安裝。
9、ESXi正在安裝中。
10、安裝完成後,取出安裝 CD、DVD 或 USB 快閃記憶體驅動器。
按 Enter 重新開機。
11、安裝完成重啟後,Enter Reboot 重啟伺服器。
二.簡單設置ESXi 5.5.01、在ESXi5.5.0的控制台按F2鍵,在彈出的登錄介面裡輸入root的密碼。
2、此時進入ESXi 5.5.0的簡單設置介面,在此介面中選擇配置管理網路並按 Enter。
3、選擇 IP 配置並按 Enter。
4、選擇設置靜態 IP 位址和網路配置。
輸入 IP 位址、子網路遮罩和預設閘道器,然後按Enter。
5、設置完成IP位址後,接著進行DNS的設置,選擇DNS設置。
6、選擇設置靜態DNS位址和主機名稱,輸入 IP 位址和功能變數名稱,然後按 Enter。
【VMware虚拟化解决方案】配置和部署VMware ESXi5.5马博峰在安装ESXi5.5之前,需要对要对整个环境进行设计和规划,由于虚拟化涉及服务器技术、网络技术和存储技术等多项技术,所以虚拟化的架构设计涵盖了CPU的选型、网络的设计、共享存储的方式、虚拟化资源的需求和安装ESXI的模式等知识。
一个好的VMware vSphere安装设计方案决定着最终虚拟化的效果。
1、CPU的选型无论是采用X86服务器,还是采用机架式、塔式或者刀片式服务器,CPU的选择是至关重要的。
现在市场上主流的CPU是Intel公司和AMD公司产品,这两家公司的CPU 对虚拟化都有很好的支持,具体选择哪家的产品,我们需要根据实际情况而定。
一般安装ESXi需要一个64 位的CPU,而具体选择哪一款CPU还需要考虑许多其他的因素,其中最重要的一点就是虚拟化技术选项,具体来说就是是选择Intel 虚拟化技术(Intel VT) 的CPU还是选择AMD 虚拟化(AMD-V) 技术的CPU。
这时有的读者可能会奇怪了,为什么只能选择这两种技术的CPU呢?其实原因很简单,因为只有具有这两种技术的CPU才提供虚拟化功能。
但是有一点必须要注意,不是所有的Intel公司或AMD公司的CPU都能支持这项技术,一般来说这几年的新CPU都支持这项技术,所以对于想利用旧服务器来搭建虚拟化平台的,就必须仔细查看所选的CPU是否支持虚拟化技术。
另外在选择CPU时还有一点也很重要,就是所选的CPU要支持硬件强制实施的数据执行保护(DEP)技术,此项技术必须可用并且已启用。
具体地说就是,你必须启用Intel XD 位(执行禁用位)或AMD NX 位(无执行位)。
除此之外,一些新购买的服务器默认是不开启虚拟化Intel VT 或AMD-V技术的,需要在主板BIOS中开启虚拟化技术,可以利用检测功能来测试服务器的CPU是否支持虚拟化技术。
当满足CPU硬件需求后,接下来要做的就是对虚拟化上的虚拟机CPU资源做出统计,安装在物理计算机中的VMware vSphere拥有最多320个逻辑处理器。
实验3 EXSi的安装与配置1 实验目的1、了解ESXi的安装。
2、掌握ESXi的基本配置。
2 实验环境1、VMware Worksation。
2、ESXi安装光盘镜像。
3 实验原理或背景知识1、ESXi专为运行虚拟机、最大限度降低配置要求和简化部署而设计。
只需几分钟时间,客户便可完成从安装到运行虚拟机的全过程,特别是在下载并安装预配置虚拟设备的时候。
在VMware Virtual Appliance Marketplace 上有800多款为VMwarehypervisor 创建的虚拟设备,如今,ESXi已经实现了与Virtual ApplianceMarketplace的直接整合,使用户能够即刻下载并运行虚拟设备。
这为即插即用型软件的交付与安装提供了一种全新和极其简化的方式。
4 实验任务1、VMware ESXi 5.5安装;2、VMware ESXi 5.5配置。
5 实验步骤1.在VMware WorkStation中安装VMware ESXi5.5;2.将ESXi主机的密码设置为你的学号;3.将ESXi主机设置固定IPv4地址为:192.168.班号.学号后2位,设置默认网关为本机地址、设置DNS为8.8.8.8,关闭IPV6地址;4.为ESXi主机设置一个主机名,名称自定;5.开启ESXi的shell功能,并在shell中ping通同桌的ESXi主机;6.开启ESXi的SSH功能,并使用putty工具连接上ESXi主机。
6 实验总结简述在VMware Worksation中新建和修改虚拟机的配置一般步骤。

VMware ESXi 5.5的安装及设置详细步骤一、VMware ESXi 5.5安装1、将ESXi安装程序CD/DVD 插入CD/DVD-ROM 驱动器,或连接安装程序USB闪存驱动器并重新启动计算机。
将BIOS设置为从CD-ROM设备或USB闪存驱动器引导。
2、在引导过程中,可以看到主机的cpu和内存的基本信息。
3、在出现的第一个安装引导界面中,点击Enter,确定继续安装。
注意:在“选择磁盘”页面中,选择要在其上安装ESXi的驱动器,然后按Enter。
按F1 可获取所选磁盘的相关信息。
选择磁盘时,请勿依赖于列表中的磁盘顺序。
磁盘顺序由BIOS 确定,并可能顺序不当,连续添加、移除驱动器的系统可能会出现这种问题,如果选择的磁盘中包含数据,则将显示“确认磁盘选择”页面,如果在具有之前的ESXi 或ESX 安装或VMFS 数据存储的光盘上安装,该安装程序可提供多个选择。
如果选择的磁盘位于虚拟SAN 磁盘组中,则生成的安装将取决于磁盘类型和组大小。
如果选择的是SSD,则同一磁盘组中的SSD 和所有基础HDD 将被清除。
如果选择的是HDD,并且磁盘组有两个以上磁盘,则只有选定的HDD 才会被清除。
如果选择的是HDD 磁盘,并且磁盘组的磁盘不超过两个,则SSD 和选定的HDD 将被清除。
4、选择主机的键盘类型,安装后可在直接控制台中更改键盘类型。
5、输入主机的根密码,密码不能留空,但为了确保第一次引导系统时的安全性,请输入不小于7位数的密码,安装后可在直接控制台中更改密码,按F11键开始安装。
6、安装完成后,取出安装CD、DVD 或USB 闪存驱动器,按Enter键重新启动。
7、如果要执行新的安装,或选择覆盖现有VMFS 数据存储,则在重新引导操作过程中,会在主机磁盘上创建VFAT 暂存分区和VMFS 分区。
二、VMware ESXi 5.5设置VMware ESXi 5.5的控制台更加精简、高效、方便,管理员可以直接在VMware ESXi 5.5控制台界面中完成管理员密码的修改、控制台管理地址的设置与修改、VMware ESXi5控制台的相关操作,在VMwareESXi 5.5中,按F2键,输入管理员密码(在安装VMware ESXi 5.5时设置的密码),输入之后按Enter 键,讲进入系统设置对话框。
esxi 5.5 安装及配置手册VMware-VMvisor-Installer- 主服务器端软件VMware-viclient-all- 管理客户端(服务器需要通过这个管理)服务器的安装和配置:一、服务器安装在VMware Workstaion 的虚拟机上安装。
需要注意的是esxi 5.5内存要求4G、硬盘40G、CPU数2个第三步:选择第一项ESXI installer,按enter键(回车键)第二步:按enter键(回车键)第三步:按F11第四步:按enter键(回车键)第五步:输入管理员密码(至少7位)第六步:等待安装完成第七步:按enter键(回车键)重启第八步:按F2进入配置见面第九步:login name:root password: secxpen ,按enter键进入配置第十步:选择configure password 按enter键进入修改密码。
第十一步:输入新密码,按enter键确认第十二步:选择configure managerment network 按enter键进入网络管理第十三步:选择IP configuration 按enter键进入设置服务器IP地址第十四步:选择set static IP address and network configuration,输入IP地址,掩码,网关。
(按上下键可移动亮度条,按空格键可选择)第十五步:选择DNS configuration 按enter键进入设置DNS第十六步:输入DNS的地址,按enter键确认即可,然后按ESC键退出。
第十七步:按Y键应用刚才的设置第十八步:按ESC键退出然后可以在浏览器里面输入:.175用来下载客户端至此服务器的安装和配置全部完成。
下载并安装客户端管理客户端的安装:第一步:双击运行VMware-viclient-all-第二步:选择语言,点确定第三步:等待第四步:点下一步第五步:点下一步第六步:同意许可协议,点下一步第七步:用户名和单位随意输入,然后点下一步第八步:选择安装目录,然后点下一步第九步:点安装第十步:选同意许可,点安装(这一步可能没有,看安装环境是否已经安装.net framework3.0 sp1)第十一步:等待安装完成,点退出即可第十二步:等待安装完成,点完成至此客户端安装完成。
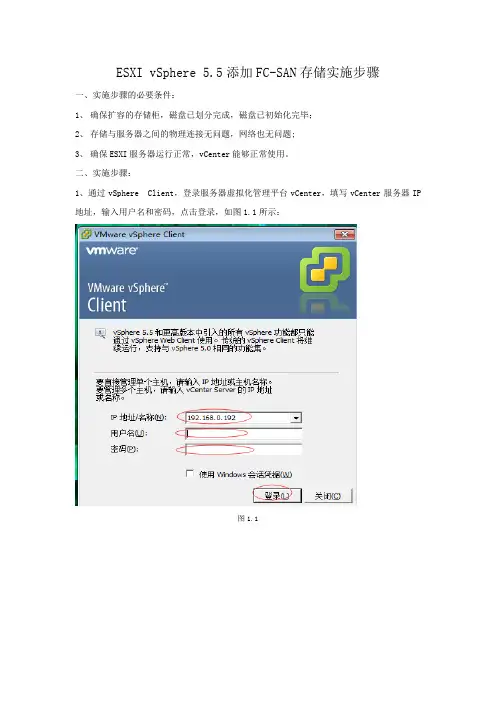
ESXI vSphere 5.5添加FC-SAN存储实施步骤一、实施步骤的必要条件:1、确保扩容的存储柜,磁盘已划分完成,磁盘已初始化完毕;2、存储与服务器之间的物理连接无问题,网络也无问题;3、确保ESXI服务器运行正常,vCenter能够正常使用。
二、实施步骤:1、通过vSphere Client,登录服务器虚拟化管理平台vCenter,填写vCenter服务器IP 地址,输入用户名和密码,点击登录,如图1.1所示:图1.12、登录vCenter后,选择群集中某一主机,选中配置,在“配置→存储器”中,单击“添加存储器”链接,如图1.2所示:图1.23、在“选择存储器类型”中选择“磁盘/LUN”,点击下一步,如图1.3所示:图1.34、在“选择磁盘/LUN”对话框中,在右侧会显示出当前可以添加的磁盘,并显示驱动器类型及容量,如图1.4所示,选择新增的磁盘。
图1.45、在“文件系统版本”对话框,选择“VMFS-5”文件系统,只有VMFS-5文件系统才支持2TB以上大小,如图1.5所示:图1.56、在“当前磁盘布局”对话框,显示了当前磁盘所有可用空间的情况,例如,当前硬盘为2.73TB,硬盘为空白,如图1.6所示。
图1.67、在“属性”对话框中,指定数据存储的属性,在“输入数据存储名称”文本框中,输入要添加的数据存储名称,该名称将会添加在当前ESXi主机中。
在有多台主机时,要为存储规划统一的名称。
规划可以有多种方式,一般我是使用主机名+存储名+序号。
例如,这是在第2台ESXi主机上添加的第一个本地存储,则可以将名称命名为esx02-d1,如图1.7所示。
图1.78、添加存储之后,在“配置→存储器”右侧可以看到添加的存储,如图1.8所示。
图1.8ESXI vSphere 5.5添加FC-SAN存储实施步骤到此结束。
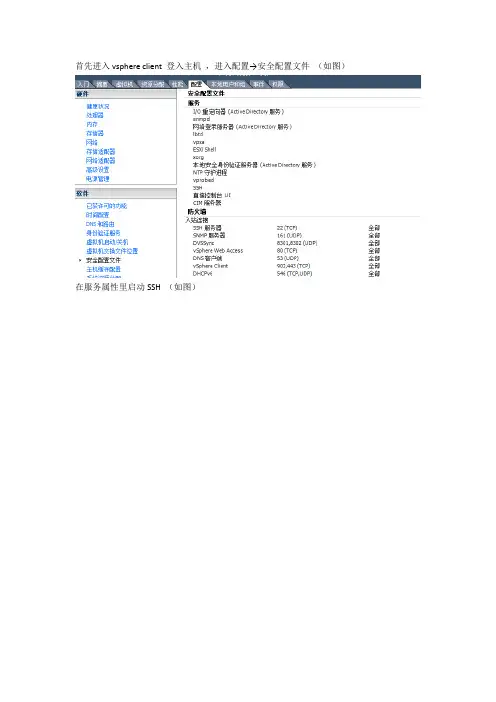
首先进入vsphere client 登入主机,进入配置→安全配置文件(如图)
在服务属性里启动SSH (如图)
完成以后在用像wincap这种FTP软件把驱动文件上传入系统的tmp文件下
然后SSH远程登录,输入esxcli software vib install –v /tmp/***(驱动文件名)运行OK
退出维护模式,重启主机。
1、将ESXI的SSH打开,用VCL连接到ESXI,在配置---安全配置---SSH---打开ssh
2、将下载的文件用winscp(Secure CRT工具也可以)传到esxi的/tmp下,我下的这个版本是vib
3、安装,用ssh工具login到esxi的控制台,安装时注意要加全路径,否则报错
esxcli software vibinstall -v
/tmp/lpfc-10.2.340.18-1OEM.550.0.0.1331820.x86_64.vib
4、安装完成后重启即可
执行以下命令进入维护模式并允许安装第三方包
# esxcli system maintenanceMode set -e true -t 0
# esxcli software acceptance set --level=CommunitySupported。
VMware ESXi 5.5 – 6.5 Host Configuration Rapid EqualLogic Configuration SeriesImplementation GuideSeptember 2017RevisionsDocument conventionsThe information in this publication is provided “as is.” Dell Inc. makes no representations or warranties of any kind with respect to the information in this publication, and specifically disclaims implied warranties of merchantability or fitness for a particular purpose.Use, copying, and distribution of any software described in this publication requires an applicable software license.© 2012 - 2017 Dell Inc. or its subsidiaries. All Rights Reserved. Dell, EMC, Dell EMC and other trademarks are trademarks of Dell Inc. or its subsidiaries. Other trademarks may be trademarks of their respective owners.Dell believes the information in this document is accurate as of its publication date. The information is subject to change without notice.1 PrerequisitesBefore proceeding:∙Ensure that ESXi 5.5, 6.0, or 6.5 is installed on the host server.∙Update the ESXi 5.5, 6.0, or 6.5 host by applying all VMware patches. The recommended method is to patch the ESXi host using VMware vCenter® Update Manager.∙Ensure that the latest PS Series array firmware is installed. To download PS Series firmware and instructions, visit https:// (login required).∙Review Best Practices for Implementing VMware vSphere in a Dell PS Series Storage Environment to ensure proper configuration for your environment.The information in this document was confirmed using ESXi 6.5 Update 1 (build 5969303) installed on thehost and PS Series firmware version 9.1.2.2 Enable flow control on iSCSI NICsThe following procedure requires physical or remote SSH access to the server. Refer to VMware KB article101790 for more information on using the ESXi console in Tech Support Mode.1. At the ESXi console, type: esxcli nic pauseParams list2. The available NICs, support for pause parameters, and each NICs RX and TX pause parametersetting are among the information displayed.3. Determine which vnmics are assigned to adapters used for SAN connectivity, and confirm both PasueRX and Pause TX are set to true.4. If RX and TX are shown as true, proceed to section 3, as no further action is needed.If one or both are showing false, execute the following steps:a. At the ESXi console, type: vi /etc/rc.local.d/local.shb. Type the letter o (lowercase) to append a new line to the file.c. Type: ethtool --pause vmnic# tx on rx on (substitute the # that corresponds to theNICs connected to the SAN identified in the steps above) and press [Enter].Repeat this for each NIC that is connected to the SAN before proceeding to the next step.5. Press [Esc] and type the following::wq6. Press [Enter] to save the file.7. Restart the system to apply the changes.For more information, refer to VMware KB article 1013413.3 Configure additional security access for ESXi 6.01. To enable SSH access to the ESXi host using the vSphere Web Client, select Host > Manage in theNavigator pane, then select TSM-SSH in the Services tab, and click Start.2. Connect to the ESXi host using an SSH utilty.a. Type the command:openssl x509 -sha1 -in /etc/vmware/ssl/rui.crt -noout –fingerprintb. Copy the output immediately following SHA1 Fingerprint=c. Exit the SSH session/utility.3. From the vSphere CLI command prompt, change to the directory:C:\Program Files (x86)\VMware\VMware vSphere CLI\Perl\apps\general4. Type the command:credstore_admin.pl add –server ESXi host IP address --thumbprint outputcopied from item 2b aboveFor more information, refer to VMware KB article 2108416.4 Install and configure the Multipathing Extension Module1. To place the ESXi host in Maintenance Mode, right-click the ESXi host from vSphere Web client andselect Enter Maintenance mode.2. From the vCLI command prompt, change to the directory where the Multipathing Extension Module(MEM) was unzipped.3. Type the following command:setup.pl --install --server=ESXi host IP address --bundle=bundle filename (bundle file name refers to the zip file, such as dell-eql-mem-esx6-1.5.0.437336.zip).4. When prompted, log in as root with the correct password. The installation process may take severalminutes.5. When setup is complete, it displays: Clean install was successful.6. Reboot the ESXi host.After the ESXi host has rebooted, type the following command in the vSphere CLI command prompt:setup.pl --configure --server=ESXi host IP address7. Enter the username and password when prompted.8. Provide the following answers to the configuration wizard questions:a. For the switch type, press [Enter] to select vSwitch (the default).b. For the vSwitch name, press [Enter] to accept the default value.c. To identify the NICs, enter the vmnic name that will handle the iSCSI traffic, separated by aspace. For example: vmnic4 vmnic59. Enter the IP addresses for each vmnic.10. Enter the netmask.11. Enter the MTU size of 9000.12. Select the default prefix by pressing [Enter].13. Enter the VLanID to be used for the iSCSI Portgroup (default is 0).14. Select the default for the [SW] SW iSCSI or HW iSCSI request by pressing [Enter].15. If prompted, answer yes to enable the iSCSI initiator.16. Enter the PS group IP address.17. Press [Enter] to deactivate CHAP.18. Answer yes to apply Dell EqualLogic Best Practice settings.19. Answer yes to proceed with the configuration.20. Upon completion of configuration, remove the ESXi host from Maintenance Mode by right-clicking theESXi host from vSphere Web client and selecting Exit Maintenance mode.5 Connecting to volumes1. From the vSphere ESXi Embedded Host client, in the Navigator area, select Storage > Adapters >iSCSI Software Adapter, and click Configure iSCSI at the top of the Adpaters area.2. Copy the iSCSI initiator name found in the Name & alias field and proceed to the next step.The next screenshot illustrates how to use the iSCSI initiator name to limit iSCSI access at theEqualLogic Group Manager. The use of CHAP to limit iSCSI access, as described in Best Practicesfor Implementing VMware vSphere in a Dell PS Series Storage Environment is the best practice, andcan be required in larger environments.3. Select the access type that allows to Define one or more basic access points.4. Click Yes to allow simultaneous access to this volume from more than one iSCSI initiator.5. Click Add, and in the New Basic Access Point window, specify the type of access you plan to use(CHAP, initiator name, or IP address).6. In the vSphere ESXi Embedded Host client, select Storage > Adapters > iSCSI Software Adapter,and click Rescan at the top of the Adpaters area7. Change from the Adapters tab to the Devices tab and confirm the new EQLOGIC iSCSI Disk devicewith the correct size is displayed.6 Creating a datastore1. From the vSphere ESXi Embedded Host client, on the Storage > Devices tab, click New datastore.2. In the New datastore wizard, provide a name for the new datastore and click Next.3. Select the appropriate available device from which to create the new datastore and click Next.4. Select the partitioning layout and file system version from the drop-down lists and click Next.5. Confirm the summary information and click Finish to complete the New Datastore wizard.6. Click Yes to confirm the warning message.11 VMware ESXi 5.5 –6.5 Host Configuration | Rapid EqualLogic Configuration Series | Implementation Guide | REC4004。

目录ESXI 5.5的安装及RAID的配置_________________________________________ 1 1RAID磁盘阵列介绍_______________________________________________ 1 1.1RAID简介: _______________________________________________________ 1 1.2RAID-0(等量模式):性能最佳 _______________________________________ 2 1.3RAID-1(镜像模式,mirror):完整备份________________________________ 2 1.4RAID 0+1,RAID 1+0: _________________________________________________ 3 1.5RAID 5:性能与数据备份的均衡考虑 __________________________________ 4 1.6磁盘阵列的优点:__________________________________________________ 5 2软RAID和RAID卡的安装及配置____________________________________ 5 2.1软RAID的配置____________________________________________________ 5 2.2RAID卡的安装及配置 ______________________________________________ 10 3ESXI的安装 _____________________________________________________ 18 4附:ESXI 6.0.0镜像的制作________________________________________ 21ESXI5.5的安装及RAID的配置1RAID磁盘阵列介绍1.1 RAID简介:磁盘阵列的英文全名是RedundantArrays of Inexpensive Disks(RAID),即容错廉价磁盘阵列。
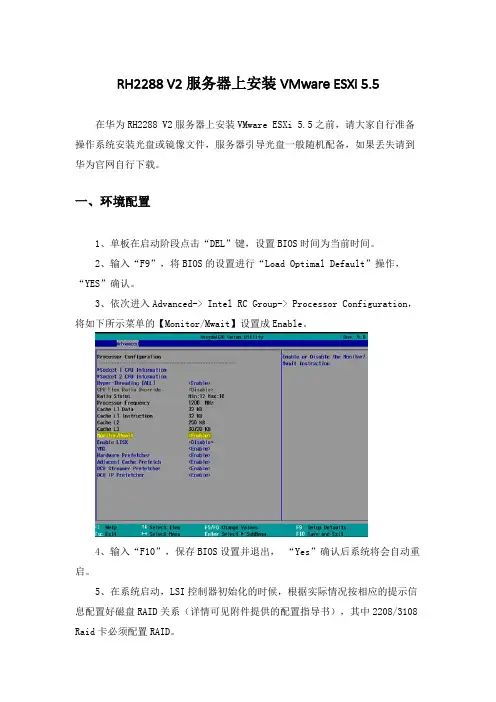
RH2288 V2服务器上安装VMware ESXi 5.5在华为RH2288 V2服务器上安装VMware ESXi 5.5之前,请大家自行准备操作系统安装光盘或镜像文件,服务器引导光盘一般随机配备,如果丢失请到华为官网自行下载。
一、环境配置1、单板在启动阶段点击“DEL”键,设置BIOS时间为当前时间。
2、输入“F9”,将BIOS的设置进行“Load Optimal Default”操作,“YES”确认。
3、依次进入Advanced-> Intel RC Group-> Processor Configuration,将如下所示菜单的【Monitor/Mwait】设置成Enable。
4、输入“F10”,保存BIOS设置并退出,“Yes”确认后系统将会自动重启。
5、在系统启动,LSI控制器初始化的时候,根据实际情况按相应的提示信息配置好磁盘RAID关系(详情可见附件提供的配置指导书),其中2208/3108 Raid卡必须配置RAID。
1)如果是LSI SAS2308、3008控制器,按下“Ctrl+C”,进入2308、3008 SAS控制器的setup菜单,配置好磁盘raid2)如果是LSI SAS2208控制器,按下“Ctrl+H”,进入2208 SAS控制器的setup菜单,配置好磁盘raid,使用LSI 2208卡,硬盘必须配置RAID。
3)如果是LSI SAS3108控制器,按下“Ctrl+R”,进入3108 SAS控制器的setup菜单,配置好磁盘raid,使用LSI 3108卡,硬盘必须配置RAID。
二、系统安装1、将安装的ISO 的光盘放入虚拟光驱,重新启动服务器单板,在POST阶段点击“F11”键,在弹出的对话框中,选择从HUAWEI DVD_ROM 光驱起动,如图2-1,然后“Enter”确认。
2、使用standard Installer选项启动,进入安装3、欢迎界面,选择 Continue 下"Entert"键4、接受使用许可并安装。
VMware vCenter Server安装配置记录1.安装vCenter Server 的前提条件安装vCenter Server之前,确保系统满足最低硬件和软件需求,vCenter Server需要数据库的支持,可根据部署规模选择不同的部署方式,对于小规模部署使用Microsoft SQL 2008 Express实例即可,对于较大规模的部署建议安装企业版数据库,VMware支持多种数据库类型,数据库可以与vCenter Server安装在同一台机器上,也可以分开部署。
硬件方法要求:至少2个2.0GHz CPU,Intel或者AMD处理器,4GB内存。
软件方面要求:Windows Server 2008或以上版本的64位操作系统2.安装配置环境:本文档中vCenter Server 5.5应用和数据库分开部署,安装虚拟机Win2008R2-DB部署SQL数据库,虚拟机Win2008R2-VC部署vCenter Server应用。
3.安装Win2008R2-DB数据库服务器3.1需要用到的安装包:Win2008R2 64位操作系统安装光盘SQL Server 2008 R2安装包3.2.安装一台虚拟机,操作系统为Win2008R2 64位,计算机命名为:Win2008R2-DB,具体步骤此处省略3.3为Win2008R2-DBDB虚拟机安装SQL Server2008R2程序。
手动创建一个数据库vCenter_db,用于vCenter Server应用程序连接,具体步骤此处省略。
4.安装Win2008R2-VC服务器4.1需要用到的安装包Win2008R2 64位操作系统安装光盘SQL Server 2008 R2安装包中的sqlncli.msiVMware-VIMSetup-all-5.5.0-1312299.iso4.2 安装vCenter Server服务器需要满足的条件安装vCenter Server 5.5的虚拟机一定要安装Win2008R2 64位操作系统,要不然在安装时会提示:此处理器类型不支持该安装程序包。
H3C-R4900-G2服务器部署VmwareESXi5.5.0Update3安装指导H3C-R4900-G2服务器部署Vmware ESXi 5.5.0 Update3安装指导爱睡觉的叮当猫编辑于2018年1⽉24⽇⽬录1、前⾔ (1)2、准备⼯作 (1)2.1、通过HDM登陆服务器 (1)2.2、通过HDM挂载OS镜像⽂件 (5)2.3、获取RAID卡驱动⽂件 (9)2.4、配置BIOS启动模式 (9)2.5、配置RAID (11)3、安装步骤 (11)3.1、制作集成了RAID卡驱动程序的OS镜像⽂件 (11)3.2、安装OS (12)4、结语 (20)1、前⾔现有H3C-R900-G2服务器安装Vmware ESXi 5.5.0 Update3时,提⽰找不到硬盘。
后咨询官⽅4000电话得知需要在镜像安装包中补打vmware-esxi-drivers-scsi驱动⽂件。
为⽅便后续⼯作的开展,本⼈将安装过程记录并编辑成⽂档,有不妥之处请批评指正。
2、准备⼯作2.1、通过HDM登陆服务器(1) 在浏览器中输⼊HDM管理IP地址(格式为http://HDM_ip_address,本⽂中以http://192.168.0.2为例),回车后进⼊图 2-1所⽰的登录界⾯。
图2-1 登录HDM Web 界⾯(2) (可选)单击界⾯右下⽅“选择语⾔”链接,选择 HDM 界⾯语⾔。
HDM ⽀持简体中⽂和英语两种界⾯语⾔,缺省语⾔与浏览器语⾔相同。
(3) 在登录框中输⼊⽤户名和密码(缺省⽤户名为 admin,缺省密码为 Password@_)后,单击<登录>按钮,进⼊ HDM Web 界⾯⾸页。
(4) 在HDM Web界⾯中,单击[远程控制/远程控制台]菜单项,进⼊远程控制台界⾯,如图 2-2 所⽰。
图2-2 远程控制台界⾯(5) 单击按钮,弹出服务器远程控制台,如图2-3 所⽰。
图2-3 启动远程控制台(6) 单击远程控制台右上⾓的按钮,启动服务器,服务器完成初始化后进⼊启动选择界⾯,如图2-4 所⽰。
Freenas9.1.1 安装及配置一、安装FreeNAS是一个基于FreeBSD的开源网络存储系统,支持iSCSI、NFS等共享协议,通过Web页面进行管理,安装FreeNAS最小需要2G硬盘。
我所用的VMware10虚拟机进行安装的。
1、虚拟机的搭建虚拟机的安装等过程在这里就不再赘述了。
下一步选择软件,下一步选择虚拟机的位置,下一步选择磁盘的大下,一般情况下,磁盘的大小为20g,其他默认就ok完成虚拟机的配置,接下来就是安装过程了。
虚拟机的最新版本下载:/9.1.1/RELEASE/x64/FreeNAS-9.1.1-RELEASE-x64.iso 安装过程:刻录安装镜像到光盘,服务器设置光驱启动,成功引导后会出现如下安装界面直接回车,出现下面的界面默认选择1 Install/Upgrade #安装/升级Ok 回车选择系统安装硬盘 #这里只有一个硬盘Ok 回车安装前警告提醒Yes系统正在安装中系统安装完成,拿出安装光盘,重新系统。
默认Ok 出现下面的界面:选择3 Reboot System #重启系统Ok 重启之后进入下面的界面:界面说明:1)配置网络接口:提供了一个配置向导来配置系统的网络接口。
2)配置链路聚合:允许你创建一个新的链路聚合或删除现有的链路聚合。
3)配置VLAN接口:用于创建或删除VLAN接口。
4)配置默认路由:用来设置默认网关的IPv4或IPv6。
出现提示时,输入默认网关的IP地址。
5)配置静态路由:将提示为目标的网络和网关的IP地址。
重新进入这个选项,你需要添加的每个路由。
6)配置DNS,会提示输入第一个DNS服务器的IP地址,要输入多个DNS服务器,按回车键输入下一个。
7)复位WEBGUI的登录凭据:如果您无法登录到图形化的管理界面,选择此选项。
它会重置系统不要求用户名和密码登录。
一旦你进入GUI,请立即设置管理用户名和密码,8)重置到出厂默认设置:如果你想删除所有的配置管理GUI中所做的更改,请选择此选项。
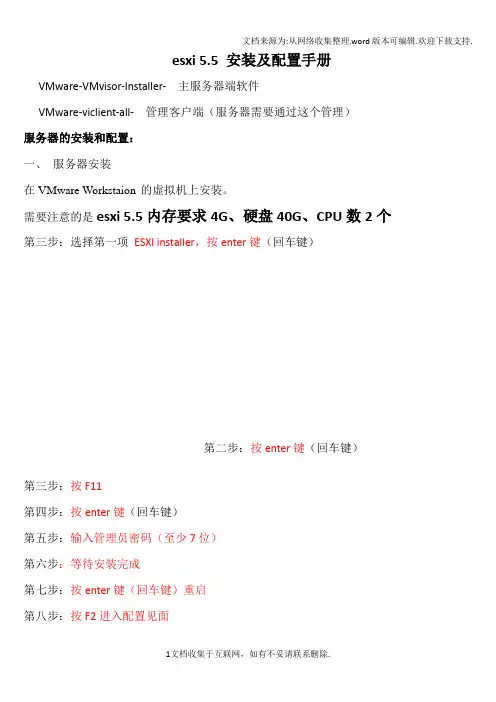
esxi 5.5 安装及配置手册
VMware-VMvisor-Installer-5.5.0-1331820.x86_64.iso 主服务器端软件
VMware-viclient-all-5.5.0-1281650.exe 管理客户端(服务器需要通过这个管理)服务器的安装和配置:
一、服务器安装
在VMware Workstaion 的虚拟机上安装。
需要注意的是esxi 5.5内存要求4G、硬盘40G、CPU数2个
第三步:选择第一项ESXI installer,按enter键(回车键)
第二步:按enter键(回车键)
第三步:按F11
第四步:按enter键(回车键)
第五步:输入管理员密码(至少7位)
第六步:等待安装完成
第七步:按enter键(回车键)重启
第八步:按F2进入配置见面
第九步:login name:root password: secxpen ,按enter键进入配置
第十步:选择configure password 按enter键进入修改密码。
第十一步:输入新密码,按enter键确认
第十二步:选择configure managerment network 按enter键进入网络管理
第十三步:选择IP configuration 按enter键进入设置服务器IP地址
第十四步:选择set static IP address and network configuration,输入IP地址,掩码,网关。
(按上下键可移动亮度条,按空格键可选择)
第十五步:选择DNS configuration 按enter键进入设置DNS
第十六步:输入DNS的地址,按enter键确认即可,然后按ESC键退出。
第十七步:按Y键应用刚才的设置
第十八步:按ESC键退出
然后可以在浏览器里面输入:https://192.168.100.175用来下载客户端
至此服务器的安装和配置全部完成。
下载并安装客户端
管理客户端的安装:
第一步:双击运行VMware-viclient-all-5.5.0-1281650.exe
第二步:选择语言,点确定
第三步:等待
第四步:点下一步
第五步:点下一步
第六步:同意许可协议,点下一步
第七步:用户名和单位随意输入,然后点下一步
第八步:选择安装目录,然后点下一步
第九步:点安装
framework3.0 sp1)
第十一步:等待安装完成,点退出即可
第十二步:等待安装完成,点完成
虚拟机转换工具安装:
第一步:双击运行VMware-viclient-all-5.5.0-1281650.exe
第二步:选择安装语言,点确定
第三步:等待
第四步:点下一步
第五步:点下一步
第六步:选择同意许可协议,然后点下一步
第七步:选择安装目录,点下一步
第八步:选择本地安装,点下一步
第九步:点安装
第十步:等待
第十一步:点击完成即可
然后在客户端登录服务器
至此esxi 5.5服务和客户端安装完成。