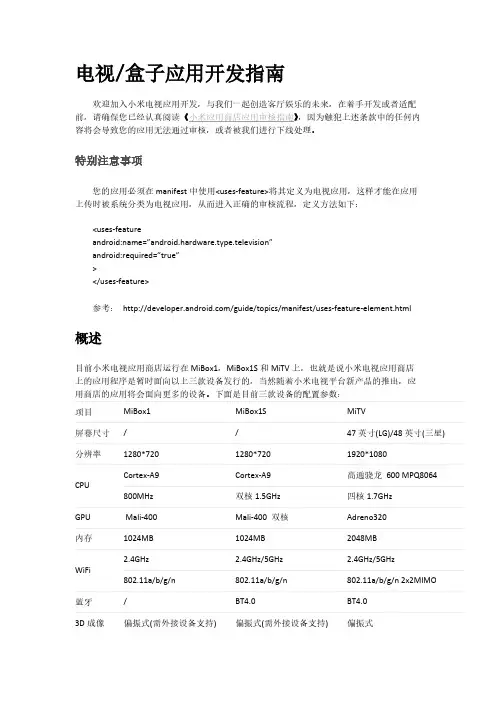
BOS开发指南_应用框架
- 格式:pdf
- 大小:587.38 KB
- 文档页数:26
VLC Android/iOS开发指南1.环境配置、源代码获取及编译2.截图功能扩展3.录像功能扩展4.vlc目录结构分析5.重要配置参数6.Android Release7.资料1.配置环境、获取源代码及编译A) Android•环境配置a)使用virtualbox安装ubuntu-32bit虚拟机,详情见7资料b)安装基本工具:sudo apt-get install ant autoconf automake autopoint libtool gawk gcc g++ pkg-config cmake patch subversion gitc)下载Android SDK,链接:/sdk/index.htmld)下载Android NDK,链接:/tools/sdk/ndk/index.htmle)下载java-linux-32bit,链接:/otn-pub/java/jdk/7/jdk-7-linux-i586.tar.gzf)解压并配置Android SDK和NDK环境变量打开命令行终端mv jdk-7-linux-i586.tar.gz ~tar zxvf jdk-7-linux-i586.tar.gzmv android-sdk.tar.gz ~tar zxvf android-sdk.tar.gz android-sdkmv android-ndk.tar.gz ~tar zxvf android-ndk.tar.gz android-ndkgedit ~/.bashrcexport JA V A_HOME=~/jdk1.7.0export JRE_HOME=${JA V A_HOME}/jreexport CLASSPATH=${JA V A_HOME}/binexport ANDROID_SDK=~/android-sdkexport ANDROID_NDK=~/android-ndkexport PATH=$ANDROID_SDK/tools:$ANDROID_SDK/platform-tools:$ ANDROID_NDK:$JA V A_HOME/bin:$PATH保存,并退出gedit•获取源代码重新开发一个命令行终端git clone git:///vlc-ports/android.git•编译cd androidexport ANDROID_ABI=armeabi # 编译armv5版本或者export ANDROID_ABI=armeabi-v7a# 编译armv7a版本sh compile.sh release如果你按照步骤做的话,最后将在android/vlc-android/libs 目录下生成armeabi目录或者armeabi-v7a目录把armeabi目录及android/vlc-android/src/org/videolan/libvlc 目录组合使用,就可以调用vlc作为播放器,具体实现请参考android/vlc-android/src目录B) iOS•环境配置a)下载xcode 5.2,并安装,详情见7 资料b)安装Command Line Tools打开xcode,在菜单> Xcode > Preferences > Downloads在Components列表中,安装Command Line Toolsc)安装git,详见:/install-git-on-mac/63/•获取源代码打开命令行终端git clone git:///vlc-ports/ios.git•编译cd iossh compileVLCforiOS.sh编译结束之后,将会在目录下ios/ImportedSources/VLCKit/build/Release-iphoneos生成对应的VLC SDK,包括头文件和libMobileVLCKit.a关于如何使用的问题,请使用xcode打开ios/VLC for ios.xcodeproj搜索对应的代码学习2.截图功能扩展编译的环境是ubuntu 12.04,要安装好java,配置好环境变量,按照/AndroidCompile配置好,就可以编译了。
XTB 用法指南一、简介XTB,全称XToolBox,是一个功能强大的桌面应用程序开发框架。
它允许开发者创建出高效且用户友好的桌面应用程序,以满足各种复杂的业务需求。
本文档将详细介绍XTB的基本用法,包括安装、配置、基本操作和高级功能等内容。
二、XTB 的安装与配置1. 安装:首先,你需要从官方网站下载XTB的安装包。
然后,按照提示进行安装即可。
2. 配置:安装完成后,你需要对XTB进行基本的配置。
这包括设置数据库连接、配置应用的基本信息等。
三、XTB 的基本操作1. 创建项目:在XTB中,你可以创建新的项目来开发你的应用程序。
在创建项目时,你需要选择项目的类型、名称、路径等信息。
2. 添加组件:在项目中,你可以添加各种组件来满足你的需求。
XTB提供了丰富的组件库,包括数据访问组件、界面组件、业务逻辑组件等。
3. 设计界面:在XTB中,你可以使用可视化的方式来设计应用程序的界面。
你可以通过拖拽组件、设置属性等方式来设计界面。
4. 编写代码:在XTB中,你可以使用XTBS(XTB的脚本语言)来编写代码。
XTBS 是一种简单易学的脚本语言,它支持面向对象编程、事件驱动编程等特性。
5. 运行和调试:在XTB中,你可以直接运行和调试你的应用程序。
你可以通过菜单命令、工具栏按钮等方式来运行和调试应用程序。
四、XTB 的高级功能1. 数据库操作:XTB提供了强大的数据库操作功能。
你可以通过XTB的数据访问组件来进行数据库的增删改查操作。
2. 多线程编程:XTB支持多线程编程。
你可以通过XTB的业务逻辑组件来实现多线程的功能。
3. 网络编程:XTB支持网络编程。
你可以通过XTB的网络组件来实现网络通信的功能。
4. 安全控制:XTB提供了安全控制功能。
你可以通过XTB的安全组件来实现用户认证、权限控制等功能。
五、结语XTB是一个功能强大的桌面应用程序开发框架,它可以帮助开发者快速开发出高效且用户友好的应用程序。
密级状态:绝密( ) 秘密( ) 内部资料( ) 公开( √)Rockchip BOX显示模块开发指南(技术研发部,电视事业部)版本历史目录1. 概述 (4)2. RK3066/RK3188 (5)2.1输入源 (5)2.2内核配置 (6)3. 配置UI分辨率 (8)1. 概述本文档介绍如何配置显示输出,适用于RK3188&RK3066 R-Box Android4.4.2 SDK。
2. RK3066/RK31882.1 输入源RK3066/RK3188拥有两个LCDC,可以分别与不同的显示设备连接。
Box的默认配置里,LCDC1与HDMI连接,LCDC0与TV Encoder(RK1000)连接,如下图示。
Dongle场景下只使用了一个LCDC,与HDMI相连。
默认RK3066 LCDC0连接到HDMI;RK3188 LCDC1连接到HDMI。
内核中定义了结构体struct rkdisplay_platform_data用于配置每个设备的输入源及控制信息。
每个显示设备可以在board-rk30-box.c(RK3066)和board-rk3188-box.c(RK3188)定义各自的属性,以RK3188 HDMI为例,其属性如下为:static struct rkdisplay_platform_data hdmi_data = {.property = DISPLAY_MAIN, //主显示设备或副显示设备.video_source = DISPLAY_SOURCE_LCDC1, //输入源为LCDC1.io_pwr_pin = INV ALID_GPIO, //电源控制GPIO.io_reset_pin = RK30_PIN3_PB2, //复位GPIO};注意:●RK3066只对外封装了LCDC0接口,所以除了HDMI之外的设备只能与LCDC0连接;RK3066的HDMI在驱动中当LCDC1使能时选择LCDC1作为输入源,LCDC1不使能时选择LCDC0,不能通过配置该结构体定义输入源。


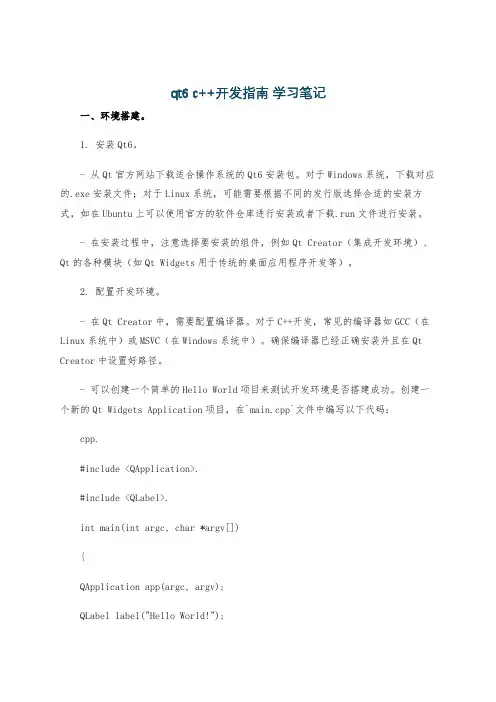
qt6 c++开发指南学习笔记一、环境搭建。
1. 安装Qt6。
- 从Qt官方网站下载适合操作系统的Qt6安装包。
对于Windows系统,下载对应的.exe安装文件;对于Linux系统,可能需要根据不同的发行版选择合适的安装方式,如在Ubuntu上可以使用官方的软件仓库进行安装或者下载.run文件进行安装。
- 在安装过程中,注意选择要安装的组件,例如Qt Creator(集成开发环境)、Qt的各种模块(如Qt Widgets用于传统的桌面应用程序开发等)。
2. 配置开发环境。
- 在Qt Creator中,需要配置编译器。
对于C++开发,常见的编译器如GCC(在Linux系统中)或MSVC(在Windows系统中)。
确保编译器已经正确安装并且在Qt Creator中设置好路径。
- 可以创建一个简单的Hello World项目来测试开发环境是否搭建成功。
创建一个新的Qt Widgets Application项目,在`main.cpp`文件中编写以下代码:cpp.#include <QApplication>.#include <QLabel>.int main(int argc, char *argv[]){QApplication app(argc, argv);QLabel label("Hello World!");label.show();return app.exec();}- 编译并运行这个项目,如果能看到一个显示“Hello World!”的窗口弹出,说明环境搭建成功。
二、Qt基础概念。
1. 信号与槽机制。
- 信号(Signal)是对象发出的通知,表示某个事件发生了。
例如,当一个按钮被点击时,它会发出`clicked`信号。
信号的定义在类中使用`signals`关键字。
例如,在`QPushButton`类中定义了`clicked`信号:cpp.class QPushButton : public QAbstractButton.{Q_OBJECT.signals:void clicked(bool checked = false);// 其他信号定义。
5分钟OpenBox配置指南如果你厌倦了gnome,kde这样的复杂桌⾯环境, 可以尝试下openbox这个轻量级的DE.最⼤的优点就是占⽤资源少, 运⾏效率⾼.安装所需软件openbox: 最基本桌⾯环境, 必须的slim : 轻量级图形登录管理器, 可以替代gdm/kdmtint2 : 提供下⾯板wbar : 提供⼀个dockfeh : 设置壁纸obconf : openbox的图形化设置⼯具obmenu : openbox的图形化菜单编辑⼯具tint2conf: tint2的图形化设置⼯具wbarconf: wbar的图形化设置⼯具lxappearance: lxde的外观设置⼯具, 可同样⽤于openbox, 设置主题, 窗⼝字体等.pcmanfm: ⽂件管理⼯具obmixer: 托盘区⾳量图标nm-applet: ⽹络连接管理器scrot : 截屏⼯具除openbox是必须的外, 其它软件均有替代品. 可以在熟悉之后⾃由更换.1. 安装openbox相关软件各⼤发⾏版源中应该都有, 这⾥以archlinux为例pacman -S openbox slim tint2 wbar feh obconf obmenu tint2conflxappearance pcmanfm scrot#以下需要从aur安装, 可以⽤yaourtwbarconf obmixer2. 修改/etc/inittab在最下⽅的引导⼯具中, 注释掉gdm/kdm语句, 并取消slim语句注释改完如下所⽰#x:5:respawn:/usr/sbin/gdm -nodaemon#x:5:respawn:/usr/bin/kdm -nodaemonx:5:respawn:/usr/bin/slim >/dev/null 2>&13. 修改~/.xinitrc, 加⼊这⼀句exec openbox-session复制代码以便开机启动openbox进程注: 在同⼀台机上, gdm/kdm/openbox环境是可以并存的. 由引导器决定到底启动哪个DE.2,3⼆步的⽬的就是在保留gnome/kde环境的前提下, 引导openbox.同理, 如果你⼜想切回gnome/kde环境⼜该怎么做呢?很简单, 只要把2,3⼆步反向操作下就可以了, 即注释掉slim和openbox-session⼆句,并取消gdm/kdm的注释即可. 这也是为什么推荐⽤slim的原因, 和原有的环境保持分离.4. 创建~/.config/openbox/autostart.shopenbox启动时, 默认会执⾏这个脚本, 所以可以把要启动的程序都写在这⾥注意, 安装时不会⾃动创建这个⽂件, 需要⾃⼰⼿动创建内容如下nm-applet&tint2&(sleep 2 && wbar)&ibus-daemon -rxd&(sleep 2 && obmixer)&feh --bg-scale picture.jpgwbar, obmixer都要先等⼏秒再启动, 否则可能会有意想不到的错误. 个⼈经验,也许你不⽤等待也会⼀切正常, ⾃⾏选择吧.4. 重启电脑, 以便加载openbox环境5. 输⼊帐号密码后, 你就可以看到openbox环境了, 是不是太简洁了?没关系, 现在可以使⽤各个图形化设置⼯具了.openbox的配置⽂件主要有⼆个,分别是~/.config/openbox/rc.xml和~/.config/openbox/menu.xml.前者可以由obconf更改, 后者可由obmenu更改注意:obconf不能⾃定义rc.xml中的快捷键部分, 这⾥需要⾃⾏添加obconf: 虽然可改项很多, 但实际上并没有多少要改的,默认即可obmenu: 在桌⾯右键时, 会弹出⼀个菜单. obmenu就是⾃定义这个菜单的lxappearance: 相对来说, 这个可能更适合⼤多数⽤户, 选择窗⼝主题, ⿏标主题等等.tint2conf: ⾃定义tint2⾯板wbar-conf: ⾃定义wbar6. 附⼏个配置a. rc.xml中的”显⽰桌⾯”快捷键设置, 这⾥⽤的windows+d1. <keybind key=”W-d”>2. <action name=”ToggleShowDesktop”/>3. </keybind>b. rc.xml中的”截屏”快捷键, 截取当前窗⼝, ctrl+Print Screen1. <keybind key=”C-Print”>2. <action name=”Execute”>3. <command>scrot -s “/home/allblue/pictures/scrot/cut-%m.%d-%H%M%S.png”</command>4. </action>5. </keybind>全屏载取, Print Screen1. <keybind key=”Print”>2. <action name=”Execute”>3. <command>scrot “/home/allblue/pictures/scrot/screen-%m.%d-%H%M%S.png”</command>4. </action>5. </keybind>c. rc.xml多媒体快捷键设置⾳量放⼤1. <keybind key=”XF86AudioRaiseVolume”>2. <action name=”Execute”>3. <command>amixer set Master 5%+ unmute</command>4. </action>5. </keybind>静⾳1. <keybind key=”XF86AudioMute”>2. <action name=”Execute”>3. <command>amixer set Master toggle</command>4. </action>5. </keybind>打开主页1. <keybind key=”XF86HomePage”>2. <action name=”Execute”>3. <command>firefox</command>4. </action>5. </keybind>多媒体快捷键配的难点主要在于确定该键位的表⽰名称, ⼤多数名称都是通⽤的.XF86AudioPlay 多媒体播放XF86AudioPause 多媒体暂停XF86AudioMute 静⾳XF86AudioRaiseVolume 增⼤⾳量XF86AudioLowerVolume 降低⾳量XF86HomePage 浏览器打开主页XF86Mail 邮件XF86Sleep 休眠XF86Calculator 计算器d. ⼀个随机壁纸脚本, 有bash和python⼆种写法. 可以任选⼀个放到crontab⾥, 实现壁纸定时更换bash写法#!/bin/bash#set -xdir_wallpaper="/home/allblue/pictures/wallpapers"cd"$dir_wallpaper"#du⽐ls更适合列出⼦⽂件路径, 只要删出⾏⾸的⼤⼩与空格, 就可得到⼦⽂件的完整相对路径.pic=$(du-a . |sed-r's/^[0-9]+//'|sed-r's/^[ \t]+//g'|sed-n-r'/png|jpg|jpeg/Ip'| shuf |head -1)echo""dateecho"$pic"if[-f"$pic"]; then#crontab运⾏时,需指定DISPLAY变量DISPLAY=:0 feh --bg-center"$pic"&killall wbar#wbar默认会以英⽂环境启动, 需指定LANG变量env LANG=zh_CN.UTF-8 DISPLAY=:0 wbar --pos top-left --isize 35 --zoomf 1.8 --jumpf 1 --bpress&··fipython写法#!/usr/bin/python#encoding=utf-8import osimport randomdef filepath(v,fdir):h=os.path.abspath(fdir)if os.path.isdir(h):for subdir in os.listdir(h):filepath(v,os.path.join(h,subdir))else:v.append(h)#print(h)········if __name__ == "__main__":sdir="/home/allblue/pictures/wallpapers"u=[]filepath(u,sdir)item=""item=random.choice(u)#print(item)if item.split(".")[-1].lower() == "jpeg"or item.split(".")[-1].lower() == "jpg"or item.split(".")[-1].lower() == "png" :item = '"'+item+'"'cmd="DISPLAY=:0 feh --bg-center "+item+" &"os.system(cmd)os.system("killall wbar")os.system("env LANG=zh_CN.UTF-8 DISPLAY=:0 wbar --pos top-left --isize 35 --zoomf 1.8 --jumpf 1 --bpress & ")。
深入浅出java swing程序设计-概述说明以及解释1.引言1.1 概述Java Swing是一种用于构建图形用户界面(Graphical User Interface,简称GUI)的Java库。
它为开发人员提供了丰富的组件和布局管理器,可以轻松创建具有各种功能和样式的交互式应用程序。
Java Swing的出现填补了Java原生GUI工具包的不足,为开发人员提供了更多的自定义和灵活性。
与AWT(Abstract Window Toolkit)相比,Swing提供了更多的组件和界面控件,同时具备更好的跨平台性。
Java Swing不仅仅是一个图形用户界面库,它还提供了一整套用于处理用户输入、图形绘制、多媒体展示等功能的类和工具。
开发人员可以利用这些工具快速构建具有丰富交互性的应用程序。
本文将深入浅出地介绍Java Swing程序设计的基本概念和技巧。
我们将从Swing的组件和布局开始,逐步展示如何创建简单且功能强大的用户界面。
通过学习本文,读者将能够掌握Java Swing的核心知识,并能够利用这些知识开发出符合自己需求的应用程序。
本文的目的是帮助读者快速上手Java Swing,了解其基本概念和使用方法。
同时,我们也将展望Java Swing的未来发展,探讨其在现代应用程序开发中的重要性和应用前景。
在接下来的正文部分,我们将详细介绍Java Swing的基本概念,包括组件、事件、布局等内容。
同时,我们还将给出一些实际的例子,以便读者更好地理解和应用所学知识。
总之,本文将从大纲所列的各个方面对Java Swing进行深入浅出的探讨,旨在帮助读者全面了解和掌握Java Swing程序设计的基本技巧和应用方法。
希望读者能够通过本文的学习,具备自主开发Java Swing应用程序的能力,并能在实际项目中灵活应用所学知识。
1.2 文章结构本文主要以深入浅出的方式介绍Java Swing程序设计。
文章分为引言、正文和结论三个部分,每个部分有相应的小节。
密级状态:绝密()秘密()内部资料()公开(√)Rockchip BOX以太网开发指南(技术研发部,电视事业部)文件状态:[]草稿[√]正式发布[]正在修改文件标识:Rockchip BOX以太网开发指南当前版本: 2.2作者:陈智完成日期:2014-09-25审核:审核日期:版本历史版本号作者修改日期修改说明v0.1陈智2014-03-15创建文件v2.0陈智2014-09-15增加对RK3288/RK3128/RK3036配置的说明v2.1陈智2014-09-25 1.修改第2章关于PHY芯片驱动的描述2.修改2.2.3及2.2.5中对RMII时钟的配置V2.2胡卫国2015-0309 1.增加GMAC问题排查部分目录1概述 (5)2以太网PHY芯片 (6)2.1接口 (6)2.2K ERNEL配置 (7)2.2.1RK3066 (7)2.2.2RK3188 (9)2.2.3RK3288 (9)2.2.4RK3036 (14)2.2.5RK3128 (15)3USB以太网卡芯片 (16)3.1K ERNEL配置 (16)3.2MAC地址烧写 (16)3.3字节对齐问题 (16)4ANDROID接口 (19)4.1A NDROID4.24.4(A NDROID5.0之前版本) (19)4.2A NDROID5.0 (20)5以太网常见问题排查 (22)5.13.10版本K ERNEL部分 (22)5.1.1phy寄存器读写调试 (22)5.1.2PHY配置 (22)5.1.3以太网无法正常工作 (23)5.1.4USB以太网异常排查 (27)6附录 (31)6.1已验证以太网PHY芯片列表 (31)6.2已验证USB以太网卡芯片列表 (31)1概述本文基于Rockchip BOX SDK进行描述。
将在第2章和第3章中针对RMII/RGMII 接口芯片和USB以太网两种类型芯片在SDK上的配置做详细的描述,第4章介绍以太网在Android上的相关调用接口。
移动应用开发的技术框架与架构设计随着智能手机的普及和移动互联网的发展,移动应用市场不断扩大,移动应用开发也成为了当下最热门的技术领域之一。
在移动应用开发中,技术框架和架构设计是非常重要的,它们能够显著影响应用的性能和用户体验。
一、技术框架在移动应用开发中,技术框架是应用程序开发的基本框架,包括应用程序的结构、模块、组件以及界面等。
技术框架能够提供应用程序的通用性、稳定性和可扩展性,同时也能够提高开发效率,减少开发成本。
常用的移动应用技术框架有以下几种。
1. 原生应用框架原生应用框架是针对特定操作系统的应用程序开发框架,例如iOS的Cocoa Touch框架和Android的Android SDK框架。
原生应用框架具备良好的性能和用户体验,但需要针对不同平台开发多个版本,开发成本较高。
2. 沙盒应用框架沙盒应用框架是在原生应用框架基础上开发的安全性更高的应用程序框架,例如iOS的Swift和Objective-C框架。
沙盒应用框架在保证用户数据安全的前提下,也能够提供较高的应用性能和用户体验。
3. H5应用框架H5应用框架是基于Web技术开发的应用程序框架,具有跨平台性和可扩展性优势。
常用的H5应用框架有React Native、Ionic 和Flutter等。
这些框架能够实现应用程序的原生化开发,提高了应用的性能和用户体验,同时也减少了开发成本。
二、架构设计架构设计是移动应用开发的重要环节,它能够确保应用程序的稳定性、可扩展性和安全性,提高应用的用户体验。
移动应用架构设计主要包括以下几个方面。
1. 数据存储与管理移动应用需要处理众多的数据,而架构设计需要为数据存储和管理提供一套完整的解决方案。
一般来说,移动应用的数据管理分为本地数据存储和云端数据存储。
本地数据存储主要是指对用户的设置、应用数据和用户数据等进行本地存储;云端数据存储是指将数据存储到云服务器上,以实现数据共享和备份。
2. 安全性设计移动应用的安全性设计是非常重要的,这涉及应用程序的数据安全、用户隐私保护和网络安全等方面。
Python桌面应用程序开发的常用框架有哪些在当今的软件开发领域,Python 因其简洁易学、功能强大而备受开发者青睐。
当涉及到 Python 桌面应用程序的开发时,有一些常用的框架能够为开发者提供便利和高效的开发体验。
首先,不得不提到的是 Tkinter 框架。
Tkinter 是 Python 标准库中的一部分,这意味着无需额外安装即可使用。
它为创建基本的图形用户界面(GUI)提供了简单而直接的方法。
对于初学者来说,Tkinter 是一个很好的入门选择,因为其语法相对简单,容易理解和掌握。
通过Tkinter,我们可以创建窗口、按钮、文本框、菜单等常见的GUI 元素。
虽然它可能在功能和外观上相对较为基础,但对于一些小型的、功能不太复杂的桌面应用程序,Tkinter 足以胜任。
接下来是 PyQt 框架。
PyQt 是一个功能强大且成熟的框架,它基于著名的 Qt 库。
Qt 本身在跨平台应用开发中具有广泛的应用和良好的声誉。
PyQt 提供了丰富的控件和布局选项,能够创建出非常美观和复杂的用户界面。
它支持多种操作系统,包括 Windows、Mac 和 Linux,这使得开发的应用程序具有很好的跨平台性。
此外,PyQt 还提供了信号与槽机制,这是一种强大的通信方式,方便不同组件之间的交互。
WxPython 也是一个值得关注的框架。
它是一个开源的跨平台 GUI框架,提供了丰富的控件和功能。
WxPython 强调的是自然和直观的编程风格,其 API 设计相对较为简洁。
它在处理各种操作系统的外观和感觉方面表现出色,能够使开发的应用程序在不同平台上呈现出与本地应用相似的外观和行为。
Kivy 是一个用于创建多点触控应用程序的创新框架。
它不仅支持传统的桌面操作系统,还适用于移动平台,如 Android 和 iOS。
Kivy 采用了声明式的编程风格,通过使用 kv 语言来描述用户界面,这使得界面设计和逻辑分离,提高了代码的可读性和可维护性。
Box2D v 2.2.0用户手册版权©2007--2011Eirn Catto翻译:潘学军第一章介绍---------------------------------------------2第二章Hello Box2D---------------------------------------8第三章common--------------------------------------------14第四章碰撞模块---------------------------------------16第五章动态模块---------------------------------------27第六章fixture-----------------------------------------28第七章Body---------------------------------------------32第八章关节---------------------------------------------39第九章触点(contact)---------------------------------48第十章世界级-------------------------------------------56第十一章零碎材料---------------------------------------62第十二章调试图纸(debug drawing)---------------------64第十三章局限-------------------------------------------65第十四章参考-------------------------------------------66第一章介绍1.1关于BOX2D是一个关于2D游戏的刚体仿真库。
程序员可以用此,使游戏中的角色灵活移动,并且可以使游戏世界更具有交互性。
使用Weex进行移动应用开发入门指南移动应用开发一直是互联网领域的热门话题之一。
随着智能手机的普及和移动互联网的发展,越来越多的开发者开始投身于移动应用的开发工作。
然而,传统的原生应用开发需要分别针对iOS和Android平台进行开发,不仅工作量大,而且会出现代码冗余的情况。
Weex作为跨平台的移动应用开发框架,为开发者提供了一种简单且高效的解决方案。
Weex是由阿里巴巴集团推出的开源项目,基于Vue.js开发,通过将Vue代码编译成iOS和Android平台识别的原生组件,实现一次编写,多平台运行的目标。
下面将为大家介绍使用Weex进行移动应用开发的入门指南。
一、环境搭建在开始使用Weex进行开发之前,首先需要搭建好相应的开发环境。
具体步骤如下:1. 安装Node.jsWeex依赖Node.js环境,因此需要先安装Node.js。
可以从官网下载对应操作系统版本的安装包,并按照指引完成安装。
2. 安装Weex ToolkitWeex Toolkit是Weex官方提供的开发工具,用于创建、编译和调试Weex项目。
可以通过npm全局安装Weex Toolkit。
```npm install -g weex-toolkit```3. 安装Android Studio和Xcode如果需要在Android和iOS平台上进行开发,还需要分别安装Android Studio 和Xcode,并且配置好模拟器或真机设备。
二、创建Weex项目环境搭建完成后,可以开始创建Weex项目。
1. 使用Weex Toolkit创建项目在命令行中进入项目目录,并执行以下命令:```weex create myapp```这会创建一个名为"myapp"的Weex项目,并在当前目录下生成相应的文件结构。
2. 运行项目进入项目目录,执行以下命令:```npm run serve```这会启动一个本地服务器,并将Weex项目通过该服务器渲染到浏览器中。