Hisense-vi系统
- 格式:pdf
- 大小:4.85 MB
- 文档页数:80
hisense 企业文化一、引言Hisense(海信)作为一家全球知名的电子科技公司,其企业文化是公司发展和员工成长的重要支撑。
本文将详细介绍Hisense企业文化的核心价值观、愿景使命、核心竞争力以及企业文化的具体体现和实践。
二、核心价值观1. 创新:Hisense鼓励员工不断创新,以推动公司的技术和产品创新,满足客户的需求。
2. 协作:Hisense倡导团队合作,鼓励员工之间的互助和协作,共同实现个人和公司的目标。
3. 诚信:Hisense注重诚信和道德,要求员工诚实守信,与客户、合作伙伴建立长期稳定的合作关系。
4. 持续改进:Hisense鼓励员工不断学习和提升自我,通过持续改进来推动公司的发展。
三、愿景使命1. 愿景:成为全球领先的电子科技公司,为全球消费者提供创新、高品质的产品和服务。
2. 使命:通过技术创新和卓越品质,提升人们的生活品质,为社会创造更大的价值。
四、核心竞争力1. 技术创新:Hisense在电子科技领域持续投入研发,不断推出具有创新技术的产品,提升市场竞争力。
2. 产品品质:Hisense注重产品质量控制,通过严格的质量管理体系确保产品的可靠性和稳定性。
3. 全球化布局:Hisense在全球范围内建立了广泛的销售网络和生产基地,实现了全球化的运营和服务能力。
五、企业文化的具体体现和实践1. 员工关怀:Hisense重视员工的发展和福利,提供良好的培训和晋升机会,关注员工的工作与生活平衡。
2. 创新氛围:Hisense营造鼓励创新的工作环境,鼓励员工提出新的想法和解决方案,推动公司的创新发展。
3. 社会责任:Hisense积极履行社会责任,关注环境保护和可持续发展,参与公益慈善活动,回馈社会。
六、结语Hisense企业文化以创新、协作、诚信和持续改进为核心价值观,以成为全球领先的电子科技公司为愿景,通过技术创新、产品品质和全球化布局构建核心竞争力。
同时,Hisense注重员工关怀、创新氛围和社会责任的实践,为员工和社会创造更大的价值。
商海导航商业管理系统简明安装及操作手册海信网络科技股份有限公司2006-03目录1 系统安装步骤 (1)1.1系统安装前的准备工作 (1)1.1.1 工作站安装准备 (1)1.1.2 打印机安装 (1)1.1.3 收款机安装准备 (2)1.1.4 其他安装准备 (3)1.2系统安装 (3)1.2.1 工作站系统安装步骤 (4)1.2.2 收款机系统安装 (13)1.3商海导航安装注意事项 (16)2 系统投入运行 (18)2.1运行前数据准备工作 (18)2.2系统投入运行 (31)3 日常业务处理 (34)4系统中常见问题的处理 (34)4.1前台收款机无法连网,处于单机状态。
(34)4.2数据库连接不成功。
(34)4.3报表或单据无法正确打印。
(35)4.4系统后台结账时,提示加密系统异常,无法结账。
(35)4.5系统安装后无法正常运行,提示系统内部错误。
(35)4.6后台各种销售报表账对不起来。
(35)4.7系统运行一段时间后,想启动会员管理功能,如何进行? (35)4.8W INDOWS NT4.0及MS SQL S ERVER7.0/2000的安装步骤是什么? (35)4.9商海导航系统工作站提示无法连接数据库。
(36)4.10如何关闭退出会员服务程序的运行 (36)1 系统安装步骤1.1 系统安装前的准备工作在安装商海导航商业管理系统(简称:商海导航)之前,要做好以下准备工作。
1.1.1 工作站安装准备(1)在各工作站上安装中文Win98(建议用Win98第二版),为各计算机分配一个名称,如:PC01、PC02、…等。
(2)配置各工作站网卡、网络用户以及网络协议等,使系统中各台计算机可以互相访问。
建议网络用户使用Windows 登录或Windows友好登录。
图1-1-1 设置网络登录方式图1-1-2 设置计算机名称(3)设置各工作站显示器屏幕分辩率,建议为1024*768或800*600,颜色为增强色(16位)或真彩色(24位/32位)。
Help Hisense improve the environment by reducing paper waste.For detailed instructions and feature descriptions,access the full User Manual for your TV online.Before using the TV, please read this guide carefully and keep it for future reference.© 2019 Hisense Company Ltd. All Rights Reserved.All material in this Quick Start Guide is the property of Hisense Com pany Ltd. and its subsidiaries, and is protected under the laws of US, CANADA, MEXICO and International copyright and/or other intellectual property laws. Reproduction or transmission of the materials, in whole or in part, in any manner, electronic, print, or otherwise, without the prior written consent of the Hisense Company Ltd. is a violation of Hisense Company Ltd. rights under the aforementioned laws.No part of this publication may be stored, reproduced, transmitted or distributed, in whole or in part, in any manner, electronic or otherwise, whether or not for a charge or other or no consideration, without the prior written permission of Hisense Company Ltd.Requests for permission to store, reproduce, transmit or distribute materials may be made to one of the following addresses:Hisense, and any and all other Hisense product names, logos, slogans or marks are registered trademarks of Hisense Company Ltd. and its subsidiaries. All other trademarks are the property of their respective holders.USA:Hisense USA Corporation 7310 McGinnis Ferry Road Suwanee, GA 30024MEXICO:Hisense Mexico S. de R.L. de C.V.Blvd. Miguel de Cervantes Saavedra No 301Torre Norte Piso 2, Col. Ampliación Granada Miguel Hidalgo, Ciudad de México, C.P. 11520CANADA:Hisense Canada Co., Ltd, 2283 Argentia Road, Unit 16Mississauga, ON, Canada, L5N 5Z2Subscriptions or other payments may be required to access content through some applications. Some or all of the included or downloaded application services in this Hisense device may not function depending on the Internet connection, local limitations of included applications or other reasons outside of Hisense’s control. HISENSE EXPRESSLY DISCLAIMS RESPONSIBILITY FOR ANY APPLICATION SERVICE FROM FUNCTIONING AT ANY TIME, FOR CONTENT IN ANY APPLICATION SERVICE, FOR DISRUPTIONS OF SERVICE, LOCAL OR REGIONAL LIMITATIONS, WARRANTIES OF TITLE, NO INFRINGEMENT, AND FOR IMPLIED WARRANTIES OF MERCHANTABILITY OR FITNESS FOR A PARTICULAR PURPOSE. By purchasing this device, you accept such Disclaimer without any claim on Hisense at any time.Copyright statementDisclaimerThis Quick Setup Guide supports the following models: 40H3F 40H3F1 40H3000F 40H3050F 40H3070F 40F300040F3030 40F3050 40F3070 40F3090 40H3509Table of ContentsRegister Your TV! (2)Packaged Contents (3)Buttons and Ports on the TV (4)Attach the TV Stand or Wall Mount Bracket (5)Connect Devices to your TV (7)Buttons on your TV Remote (9)Begin Using your Remote (10)Power on the TV (11)Complete the Setup Wizard (12)Begin to Enjoy your TV (12)Feature TV Text to Speech functionalities (13)Product Specifications (14)Quick Problem-Solving Tips (16)Certification and Compliance (17)Register Your TV!Congratulations on the purchase of your new TV! This Quick Setup Guide will walk you through a few easy steps to set up your TV. For detailed instructions, access the User Manual on the support pages listed below.Because we value your business, we want to keep you in the know of 'all things Hisense'. Using your mobile phone, scan the Registration page QR code to register your TV. Depending on the make and model of your phone, you may need to download a QR code scanning app.http://www.hisense-http://www.hisense-canada.Disclaimer: This Quick Setup Guide is intended as a general guideline to help you set up your TV. Images throughout this document are for illustrative purposes only and may differ from the actual product.Packaged ContentsYour package in which you purchased your new TV contains the following items:TV Quick Setup Guide (this document) Important Safety Information and Warranty Card Remote Control2 AAA batteries A left and right leg that forms the TV stand4 screws (M4x25)IMPORTANT:To prevent accidentally discarding items that came with your TV, be sure to check ALL of the foam in the carton box.Please check foam for accessories before discarding.Veuillez vérifier la mousse pour qu'il n'y ait pas d'accessoires avant de la jeter.Antes de desechar la espuma,asegúrese de retirar todos los accesorios.Required tools and devicesPhillips screwdriver (not included) to secure the TV standHDMI and other types of cables (not included) to connect external devices to the TVWall mount bracket (not included) if you prefer to mount the TV to the wallButtons and Ports on the TVTV Side View ArrayBack View of the TVSTEP 1. Attach the TV Stand or Wall Mount Bracket (not included)Attach the TV Stand (For steps to attach the wall mount see page 6)CAUTION:Be sure to disconnect the A/C power cord before installing a stand or Wall-Mount brackets.The LED display is very fragile and must be protected at all times when installing the legs that form the stand. Be sure to protect the TV screen from getting scratched or damaged by any hard objects. In addition, DO NOT exert pressure on the front of the TV at any time because it could crack.To attach the left and right leg that forms the stand:1.Carefully place your TV face down on a soft, flat surface to prevent damage to the TV or scratching to the screen.2.Remove the 2 legs from the foam and then insert the legs into the bottom slots of the TV.e the screws that came inside the carton with your TV to secure each leg tightly.Screws:M4x25Attach the Wall Mount Bracket (not included)Before you begin the third-party manufacturer instructions, be sure to do the following things:1. Place the TV face down on a clean, safe and cushioned surface.2. Remove the TV stand if you already attached it.3. Place the spacers (not included) in the corresponding bracket holes.CAUTION:• When you attach the mount, be sure to use the spacers (provided by the third-party manufacturer) between the TV and the bracket.• To prevent internal damage to the TV and ensure it is mounted securely, be sure to use fixing screws (not provided) that are 8.0 - 10.0 mm in length when measured from the attaching surface of the mounting hook.Rear cover of the TVWall mount bracketFollow instructions provided with the Wall mount bracket.To com plete the installation, please contact the wall-mount manufacturer or the retailer from which you purchased the TV. The selected screws are 8.0 - 10.0 mm in length when measured from the attaching surface of the rear cover. The diameter and length of the screws differ depending on the Wall mount bracket model.NOTE: The diameter and length of the screws differ depending on the wall mount bracket model.Buttons on your TV RemoteBUTTON DESCRIPTIONPower on / offINPUT Change TV input sourceMENU The button for the Settings menu Number Enter Channels / Input numbersDash button / Select a digital sub-channel CH LIST Display the channel listMUTE Mute and restore soundLAST Go to the previous channelVOL Volume (up/down)CH Channel (up/down)LIVE TV Enter the Live TV►/ ◄ / ▼ / ▲ D-pad (up/down/left/right navigation buttons) / Press Up display the Info menuOK Confirmation button/Display the channel list BACK Return to the previous place in the menu EXIT Exit the applicationMEDIA Enter the Media playerBUTTON DESCRIPTIONMTS Set the audio language (Multi Track Sound)CC Turn Closed Caption On/OffNRTChoose to leave the Video description featureOn or Off (Narration)FAV LIST /ADD/ERASE /FAV + / FAV -Favorite program controlling buttons/ / // /Media content control function buttons PICTURE Select picture mode buttonSOUND Select sound mode buttonASPECT Zoom buttonSLEEP Sleep timer button(Red / Green /Yellow / Blue)Special function buttons(Not available)NOTE: The buttons are only for reference, actual remote may vary in appearance.STEP 3. Begin Using your Remote1. Slide the back cover to open the battery com partment of the remote control.Insert the batteries Press and pull itPress the cover2. Insert two AAA size batteries. Make sure to match the (+) and (-) ends of the batteries with the (+) and ( - ) ends indicated in the battery compartment.3. Replace the battery compartment cover.Important Information about the remote and batteries:• Discard batteries in a designated disposal area. Do not throw them into a fire.• Remove old batteries immediately to prevent them from leaking into the battery compartment.• If you do not intend to use the remote control for a long time, then remove the batteries.• Battery chemicals can cause a rash. If the batteries leak, clean the battery compartment with a cloth. If chemicals touch your skin then wash it immediately.• Do not mix old and new batteries.• Do not mix alkaline, standard (carbon-zinc) or rechargeable (NiCd, NiMH, etc.) batteries.• Do not continue using the remote if it gets warm or hot.Call our Support Center immediately on the support website.Remote Control Range InformationThe remote control can work at a distance of up to 26 feet in front of the TV set.It can work at a 30 degree horizontal or vertical angle.Program Your Universal Cable or Satellite Remote Control to Operate Your New Television (only for USA)If you would like to program your other household remote controls to your new television, please refer to the User's Manual supplied by your Cable or Satellite provider. The Cable or Satellite providers' User's Manuals should include instructions on how to program their remote to your television.A list of codes for the most common Cable and Satellite providers are listed below. Use the code that is associated with your Cable or Satellite provider (if applicable).DIRECTV ......0178,10178, 10019, 10748, 11314, 11660, 11710, 11780, 12049, 10171, 11204, 11326, 11517, 11564, 11641, 11963, 12002, 12183Time Warner Cable ......386,0178, 10178, 400, 450, 461, 456, 0748, 1463, 0463, 10463Comcast ......0178,10178, 10463, 11463, 10748, 11314, 11660, 10171, 11204, 11326, 11517, 11641, 11780, 11785, 11892, 11963, 12002Cox Communications ......0178,10178, 1326, 1463Dish Network ......505,627, 538, 720, 659If the code associated with your Cable or Satellite provider is not listed, does not work or you cannot locate the instructions to program your remote, call your local Cable or Satellite provider's customer service center.Press the the Setup Wiz-ard begins by prompting you to choose your Language , Coun-try , and Use Mode .If your Cable or Satellite provider does not have a code available, please contact us at one of the phone numbers on Page 2.Using Your Cable Set-top Box or Satellite Receiver Remote as a ‘Universal’ RemoteIf you prefer to use your Cable Set-top Box or Satellite Receiver Remote as a ‘Universal Remote’, then visit the Support page to view a list of the codes.STEP 5. Complete the Setup WizardAfter the splash screen that shows the logo appears, begin theSetup WizardCONGRATULATIONS! You are done with setup.Press the OK confirmation button on your remote if you are fine with the selections that appear on the screen. Otherwise, navigate to the back arrow on the screen to change your selection.STEP 6. Begin to Enjoy your TVYour TV is easy to use and brag-worthy!Now that you’ve completed the Setup Wizard, the Home screen is your starting point for navigating the TV. Gone are the days where your TV only provides one way for you to be entertained. This showpiece provides you the convenience of watching a program on a live channel, accessing Video on Demand to watch a movie and many other entertainment options.Enjoy your new TV!Feature TV Text to Speech functionalitiesText-to-Speech (TTS) and Video Description can help you to navigate the menus on the screen and hear an audio description of rel-evant programs.Text-to-Speech can convert written text into voice text to help visually impaired people listen to the information they are unable to read. In addition,the Video Descri ption has an audio narration added to certain programs that will describe the main visual elements which visually impaired users may not be able to see.Follow the steps below to enable the functions:1.Press MENU to open the main menu.2.Next,select Accessibility to enter the Accessibility Menu.3.Select Menu Audio or Video Description to turn the Menu Audio or Video Description 'On'or 'Off'.When Menu Audio is turned On, then the contents of each menu displayed can be broadcasted out.When Video Description is turned On, then you can hear the introduction of relevant programs.https:///hisense-feature-tv-ttsProduct SpecificationsDisclaimer: All products, product specifications, and data are subject to change without notice to improve reliability, function, design or other aspects.Quick Problem-Solving TipsWhen you experience an issue with your TV, turn it off and on again. If this does not resolve the problem,then refer to the ti ps below. If the problem is still not resolved, then contact us at one of the phone numbers on Page 2.Certification and ComplianceFCC NoticeThis device has been tested and found to com ply with the limits for a Class B digital device pursuant to Part 15 of the FCC Rules. These limits are designed to provide reasonable protection against harmful interference in a residential installation. This device generates,uses,and can radiate radio frequency energy and, if not installed and used in accordance with instructions, may cause harmful interference to radio communications. However, there is no guarantee that interference will not occur in a particular installation. If this device does cause harmful interference to radio or television reception,which can be determined by turning the device off and on, the user is encouraged to try to correct the interference by one or more of the following measures:Reorient or relocate the receiving antenna.Increase the separation between the device and receiver.Connect the device into an outlet on a circuit different from that to which the receiver is connected.Consult the dealer or an experienced radio/TV technician for help.NOTE: The manufacturer is not responsible for any radio or TV interference caused by unauthorized modifications to this equipment. Such modifications could void the user’s authority to operate the equipment.Declaration of ConformityTrade Name: HISENSEModel: 40H3F/40H3F1/40H3000F/40H3050F/40H3070F/40F3000/ 40F3030/40F3050/40F3070/40F3090/40H3509Responsible Party: Hisense USA CorporationAddress: 7310 McGinnis Ferry Road,Suwanee,GA 30024Telephone Number: 678-318-9060This device com plies with Part 15 of the FCC Rules. Operation is subject to the following two conditions: (1) this device may not cause harmful interference,and (2) this device must accept any interference received,including interference that may cause undesired operation.18Manufactured under license from Dolby Laboratories. Dolby, Dolby Audio, and the double-D symbol are trademarks of Dolby Laboratories.©2019. All rights reserved. Hisense and the Hisense logo are registered trademarks of Hisense. Other brand and product names are registered trademarks of their respective owners.Environmental ProtectionThis mark indicates that this product should not be disposed together with other domestic garbage, to avoid damage to the environment or human health due to the disposal of uncontrolled waste. Recycle it responsibly for promoting the sustainable reuse of material resources. To return your used device, please use the return systems available in your location or contact the vendor where you purchased your product they could take this product for recycling and protection of the environment.The terms HDMI and HDMI High-Definition Multimedia Interface, and the HDMI Logo are trademarks or registered trademarks of HDMI Licensing Administrator, Inc. in the United States and other countries.For DTS patents, see . Manufactured under license from DTS Licensing Limited. DTS, the Symbol, DTS and the Symbol together, and DTS Studio Sound are registered trademarks and/or trademarks of DTS, Inc. in the United States and/or other countries. © DTS, Inc. All Rights Reserved.。
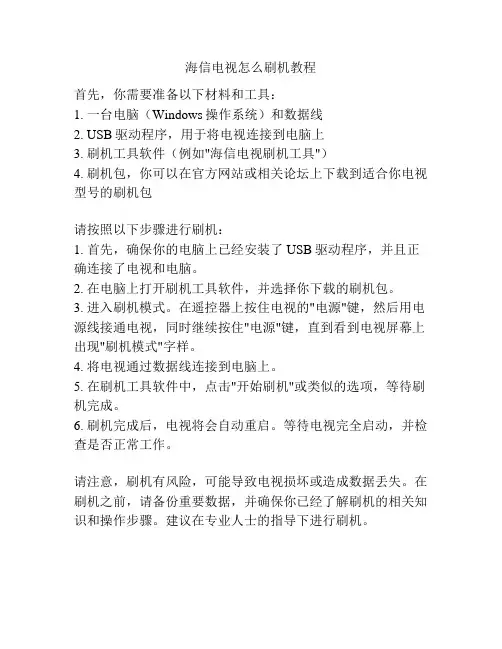
海信电视怎么刷机教程
首先,你需要准备以下材料和工具:
1. 一台电脑(Windows操作系统)和数据线
2. USB驱动程序,用于将电视连接到电脑上
3. 刷机工具软件(例如"海信电视刷机工具")
4. 刷机包,你可以在官方网站或相关论坛上下载到适合你电视型号的刷机包
请按照以下步骤进行刷机:
1. 首先,确保你的电脑上已经安装了USB驱动程序,并且正确连接了电视和电脑。
2. 在电脑上打开刷机工具软件,并选择你下载的刷机包。
3. 进入刷机模式。
在遥控器上按住电视的"电源"键,然后用电源线接通电视,同时继续按住"电源"键,直到看到电视屏幕上出现"刷机模式"字样。
4. 将电视通过数据线连接到电脑上。
5. 在刷机工具软件中,点击"开始刷机"或类似的选项,等待刷机完成。
6. 刷机完成后,电视将会自动重启。
等待电视完全启动,并检查是否正常工作。
请注意,刷机有风险,可能导致电视损坏或造成数据丢失。
在刷机之前,请备份重要数据,并确保你已经了解刷机的相关知识和操作步骤。
建议在专业人士的指导下进行刷机。
海信冰箱人工智慧系统设计方案设计方案:海信冰箱人工智能系统我们将设计一个基于人工智能技术的海信冰箱系统,该系统能够为用户提供智能化的冰箱控制和服务。
该系统将利用图像识别和语音识别技术,实现智能化的食物管理、环境监测和互联网服务等功能。
一、图像识别技术1. 食物管理:利用图像识别技术,冰箱将能够自动识别冰箱内食物的种类和数量。
用户只需将食物放入冰箱,系统即可自动识别并记录。
用户可以通过手机应用程序查看冰箱内的食物清单,并设置提醒功能,以便在食物即将过期时及时处理。
2. 食谱推荐:基于冰箱内的食物种类和数量,系统将自动推荐适合的健康食谱。
用户只需点击应用程序中的推荐菜谱,系统将自动显示所需食材和制作步骤。
二、语音识别技术1. 语音控制:冰箱将配备语音识别技术,用户可以通过语音控制冰箱的开关、温度调节和设置提醒。
例如,用户可以说出“冰箱温度调到7度”,冰箱将根据用户的指令自动调节温度。
2. 智能服务:冰箱将具备与用户交流的能力,可以回答用户关于食物保存时间、食谱推荐等问题。
用户可以通过语音提问,冰箱将即时提供相应的回答。
三、环境监测技术1. 温湿度监测:冰箱将装备温湿度传感器,实时监测冰箱内的温度和湿度情况。
如果温度或湿度超过设定的阈值,系统将自动发送警报通知用户进行处理。
2. 智能报警:冰箱将通过环境监测技术自动检测异常情况,如电源故障、漏水等,并发送报警信息给用户。
用户可以通过手机应用程序接收报警信息,并远程控制冰箱进行相应处理。
四、互联网服务1. 远程控制:用户通过手机应用程序可以随时远程控制冰箱,实时查看冰箱内的情况并进行相应操作。
用户可以在外出时远程开关冰箱、调节温度,以确保食物的安全性。
2. 购物服务:系统可以提供在线购物服务,用户可以通过手机应用程序订购所需的食物和厨房用品,系统将自动将购买的物品添加到冰箱清单中。
总结:海信冰箱人工智能系统基于图像识别和语音识别技术,实现了食物管理、环境监测和互联网服务等智能化功能。
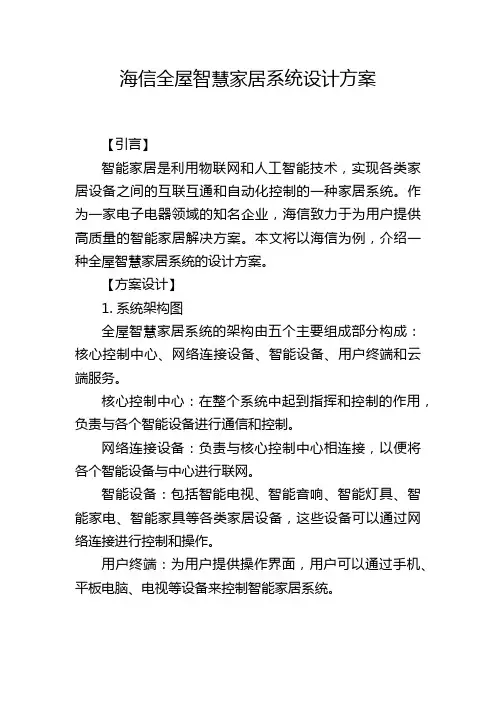
海信全屋智慧家居系统设计方案【引言】智能家居是利用物联网和人工智能技术,实现各类家居设备之间的互联互通和自动化控制的一种家居系统。
作为一家电子电器领域的知名企业,海信致力于为用户提供高质量的智能家居解决方案。
本文将以海信为例,介绍一种全屋智慧家居系统的设计方案。
【方案设计】1. 系统架构图全屋智慧家居系统的架构由五个主要组成部分构成:核心控制中心、网络连接设备、智能设备、用户终端和云端服务。
核心控制中心:在整个系统中起到指挥和控制的作用,负责与各个智能设备进行通信和控制。
网络连接设备:负责与核心控制中心相连接,以便将各个智能设备与中心进行联网。
智能设备:包括智能电视、智能音响、智能灯具、智能家电、智能家具等各类家居设备,这些设备可以通过网络连接进行控制和操作。
用户终端:为用户提供操作界面,用户可以通过手机、平板电脑、电视等设备来控制智能家居系统。
云端服务:将数据存储到云端,并为用户提供云端服务,例如远程操控、数据管理和智能分析。
2. 功能设计(1)智能家电控制:通过智能家电设备,用户可以随时随地使用手机等终端设备对灯光、空调、暖气、电视等智能设备进行控制。
用户可以通过语音或手机App的方式,设置定时开关、温度调节等功能,提高居住体验。
(2)安全监控系统:安全监控是智能家居中非常重要的一部分。
通过海信的智能摄像头,用户可以随时随地查看家中实时画面,还可以通过手机App对摄像头进行控制,实现远程旋转和对焦功能。
当有异常情况发生时,如入侵或火灾,系统会立即发送报警信息给用户。
(3)环境监测与控制:通过传感器和智能控制设备,海信的智能家居可以实现对室内温度、湿度、空气质量等环境参数的监测和控制。
用户可以根据自己的需求,通过手机App调节温度、湿度,确保室内环境的舒适性。
(4)智能家具控制:智能家具可以根据用户的需求进行智能调节。
例如,智能沙发可以通过手机App进行自动调节,根据用户的身体状态和喜好,自动调整座椅的角度和硬度。
海信怎样强制恢复系统
要强制恢复海信电视的系统,您可以按照以下步骤操作:
1. 首先,将电视插座拔下,并等待几分钟使其完全断电。
2. 然后,重新插上电视插座,并确保电源线完全插入电视背部。
3. 接下来,按下电视机背部(或侧面)的电源按钮,将电视打开。
4. 在电视开机的过程中,快速按下遥控器上的“Menu”或“菜单”按钮,直到出现设置菜单。
5. 在设置菜单中,使用遥控器方向键向下找到“工厂设置”或“恢复出厂设置”选项,然后按下“确认”或“OK”按钮。
6. 在确认恢复出厂设置的提示框中,选择“是”或“确认”,并按下“确认”或“OK”按钮。
7. 等待电视完成恢复出厂设置的过程,期间电视可能会重启一次或几次。
8. 最后,按照电视屏幕上的指示进行进一步设置和配置,如Wi-Fi连接、频道搜索等。
请注意,强制恢复系统会清除所有用户设置和数据,将电视恢复到出厂默认状态。
在执行此操作之前,请务必备份重要数据,并确保您明白此操作的后果。
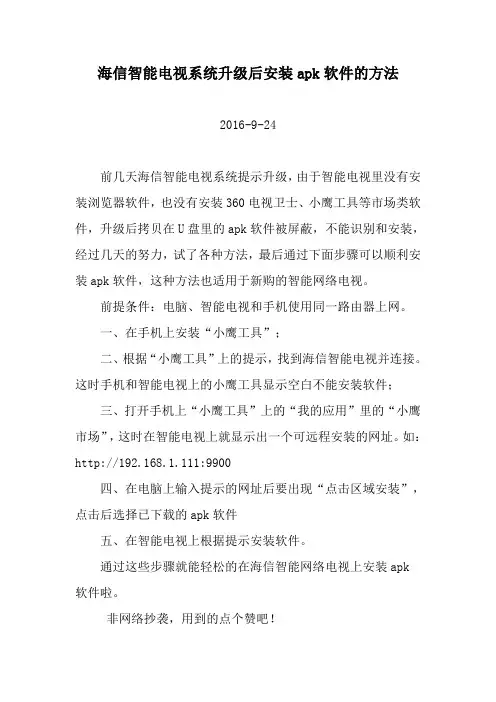
海信智能电视系统升级后安装apk软件的方法
2016-9-24
前几天海信智能电视系统提示升级,由于智能电视里没有安装浏览器软件,也没有安装360电视卫士、小鹰工具等市场类软件,升级后拷贝在U盘里的apk软件被屏蔽,不能识别和安装,经过几天的努力,试了各种方法,最后通过下面步骤可以顺利安装apk软件,这种方法也适用于新购的智能网络电视。
前提条件:电脑、智能电视和手机使用同一路由器上网。
一、在手机上安装“小鹰工具”;
二、根据“小鹰工具”上的提示,找到海信智能电视并连接。
这时手机和智能电视上的小鹰工具显示空白不能安装软件;
三、打开手机上“小鹰工具”上的“我的应用”里的“小鹰市场”,这时在智能电视上就显示出一个可远程安装的网址。
如:http://192.168.1.111:9900
四、在电脑上输入提示的网址后要出现“点击区域安装”,点击后选择已下载的apk软件
五、在智能电视上根据提示安装软件。
通过这些步骤就能轻松的在海信智能网络电视上安装apk
软件啦。
非网络抄袭,用到的点个赞吧!。
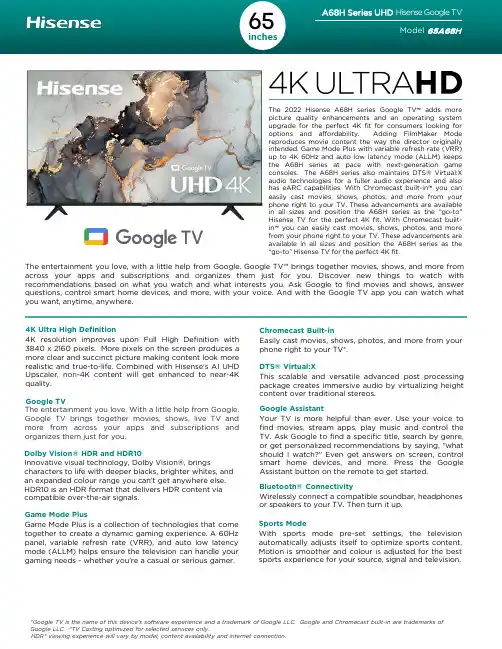
The entertainment you love,with a little help from Google.Google TV™brings together movies,shows,and more from across your apps and subscriptions and organizes them just for you.Discover new things to watch with recommendations based on what you watch and what interests you.Ask Google to find movies and shows,answer questions,control smart home devices,and more,with your voice.And with the Google TV app you can watch what you want,anytime,anywhere.The 2022Hisense A68H series Google TV ™adds more picture quality enhancements and an operating system upgrade for the perfect 4K fit for consumers looking for options and affordability.Adding FilmMaker Mode reproduces movie content the way the director originally intended.Game Mode Plus with variable refresh rate (VRR)up to 4K 60Hz and auto low latency mode (ALLM)keeps the A68H series at pace with next-generation game consoles.The A68H series also maintains DTS®Virtual:X audio technologies for a fuller audio experience and also has eARC capabilities.With Chromecast built-in ™you can easily cast movies,shows,photos,and more from your phone right to your TV.These advancements are available in all sizes and position the A68H series as the “go-to”Hisense TV for the perfect 4K fit.With Chromecast built-in ™you can easily cast movies,shows,photos,and more from your phone right to your TV.These advancements are available in all sizes and position the A68H series as the “go-to”Hisense TVfor the perfect 4Kfit.*Google TV is the name of this device's software experience and a trademark of Google LLC. Google and Chromecast built-in are trademarks of Google LLC. *TV Casting optimized for selected services only.HDR* viewing experience will vary by model, content availability and internet connection.4K Ultra High Definition4K resolution improves upon Full High Definition with 3840x 2160pixels.More pixels on the screen produces a more clear and succinct picture making content look more realistic and bined with Hisense’s AI UHD Upscaler,non-4K content will get enhanced to near-4K quality.Google TVThe entertainment you love.With a little help from Google.Google TV brings together movies,shows,live TV and more from across your apps and subscriptions and organizes them just for you.Dolby Vision® HDR and HDR10Innovative visual technology, Dolby Vision®, bringscharacters to life with deeper blacks, brighter whites, and an expanded colour range you can’t get anywhere else. HDR10 is an HDR format that delivers HDR content via compatible over-the-air signals.DTS®Virtual:XThis scalable and versatile advanced post processing package creates immersive audio by virtualizing height content over traditional stereos.Bluetooth® ConnectivityWirelessly connect a compatible soundbar, headphones or speakers to your TV. Then turn it up.Chromecast Built-inEasily cast movies,shows,photos,and more from your phone right to your TV*.Sports ModeWith sports mode pre-set settings,the television automatically adjusts itself to optimize sports content.Motion is smoother and colour is adjusted for the best sports experience for your source,signal and television.Google AssistantYour TV is more helpful than e your voice to find movies,stream apps,play music and control the TV.Ask Google to find a specific title,search by genre,or get personalized recommendations by saying,“what should I watch?”Even get answers on screen,control smart home devices,and more.Press the Google Assistant button on the remote to get started.Game Mode PlusGame Mode Plus is a collection of technologies that come together to create a dynamic gaming experience.A 60Hz panel,variable refresh rate (VRR),and auto low latency mode (ALLM)helps ensure the television can handle your gaming needs -whether you're a casual or serious gamer.DISPLAYActual Screen Size (Diagonal)64.5 inch Screen Class 65”Screen Type LED backlight LCD TV TYPE OF TV Smart TV YesApp StoreGoogle Play storePICTURE QUALITY Response Time (ms)8msTYPScreen Resolution 3840*2160 RGB Peak Brightness 300typ Motion Rate 120Aspect Ratio16:9HDR* compatibility types HDR & HDR 10 (Dolby Vision®)Colour Depth8 bit + FRC Backlight Type Source Full Array FilmMaker Mode YesAUDIOAudio Output Power (Watts)10W x 2Audio Enhancement DTS® Virtual:X LANGUAGES On-screen Display Eng/Fre/Spa POWERPower Consumption 150 W Standby Consumption0.5WPower Supply (Voltage/Hz)AC 120V,50/60Hz CONNECTIVITY Wi-Fi Built In 802.11 ac Dual band (2.4/5 GHz)Bluetooth® YesPORTSHDMI4 x HDMI 2.0HDMI ARC & CEC Yes Ethernet (LAN)YesUSB2 X (USB 2.0)RF Antenna1RCA Composite Video Input 1L/R Audio Input for Composite1Digital Audio Output 1 Optical Earphone/Audio Output1TECHNICAL SPECIFICATIONSAll product,product specifications,and data are subject to change without notice to improve reliability,function,design or otherwise.©2022Hisense Canada,All rights reserved.Hisense Canada Co., Ltd 2283 Argentia Rd, Suite 16Mississauga ON L5N 5Z2 1-855-344-7367OTHER FEATURES Noise Reduction Digital Noise Reduction Parental Control Yes Closed Caption Yes Sleep TimerYes Google Assistant Yes AlexaYes Chromecast Yes Web Browser Yes 4K Upscale YesWALL MOUNT VESAM6 (400 x 300)ACCESSORIESVoice Remote 1Remote BatteryYes x 2Quick Start Guide and/or User Manual English/Spanish/French Power Cable1DIMENSIONS/WEIGHTTV Dimensions (without the stand)57.2×32.8×2.9 inchTV Dimensions (with the stand)57.2×35.3×11.5inch TV Stand Width50.3×11.5 / 25.3 x 11.5 inchTV Weight (without the stand)36.4 lbs TV Weight (with the stand)36.8 lbsCarton Dimensions (WxHxD)63.1×39.2 ×7.0 inch Shipping Weight 56.9 lbWARRANTY/UPC Warranty 1 Year (at-home)UPC Code888143012896*Google TV is the name of this device's software experience and a trademark of Google LLC. Google and Chromecast built-in are trademarks of Google LLC. *TV Casting optimized for selected services only.HDR* viewing experience will vary by model, content availability and internet connection.。
海信·自助购物服务安装手册青岛海信智能商用系统股份有限公司目录服务安装手册 (1)1 系统概述 (3)2 系统组成 (3)3 系统安装 (4)3.1 系统要求 (4)3.2 数据库的安装和配置 (4)3.3 服务端配置 (7)3.4 MiniGo 服务配置 (7)3.5 编辑引用程序属性 (9)3.6 验证配置: (11)4 备注 (11)5 附 (11)Minigo、小程序、公众号、微信支付的关系 (11)1系统概述海信·自助购物是基于微信小程的轻量级应用,方便用户自助下单购买商品,无需安装和注册,只需要打开微信扫一扫即可使用,支持微信支付。
2系统组成本系统由微信端、服务器端和业务端三部分组织。
移动端为微信小程序,通过WebApi查询商品和上传流水。
●WebApi端为小程序提供数据和对接微信公众接口平台。
●业务系统为易收银HIPOSAPP服务,同时HIPOSAPP服务依赖POSANDROID服务对接CMP和纵横业务。
3系统安装3.1系统要求32位:Microsoft Visual C++ 2010 Redistributable Package(x86)下载地址:64位:Microsoft Visual C++ 2010 Redistributable Package (x64)3.2数据库的安装和配置Minigo服务需要安装MySql数据库,建议安装5.5以上版本。
下载地址:由于该数据库没有可视化操作界面,可以安装navicat工具,建议安装版本为11。
安装好后需要新建连接:连接名可以随便填写。
默认用户名为root,密码为数据库安装时设置的密码,点击【确定】:点击【连接】->【MySql】:输入连接名和数据库连接密码。
连接建立成功后执行建表脚本。
3.3服务端配置服务配置分为4个步骤,分别是:1.配置MiniGo服务。
2.配置MySql数据库的连接字符串。
3.配置易收银的的HIPOSAPP服务。
About HisenseHisense is a multinational consumer electronics manufacturer and one of the largest TV brands in the world. The company was established in 1969 in Qingdao, China and its US headquarters are located in Suwanee, GA.Holding the #3 TV share position globally* and #1 TV share position in China** for 13 consecutive years, Hisense offers an innovative range of technology products that provide significant value to consumers.Hisense products, including TVs, refrigerators, air conditioners, dehumidifiers, beverage coolers and freezers, are available globally in over 130 countries and regions.The company is committed to advancing the consumer technology industry across North America and has dedicated R&D centers in Atlanta, GA; San Jose, CA; and Toronto, Canada to enable localized product development and innovation.FHD 1080p RESOLUTION Up to FHD 1080p resolution will provide clearer images and make them POP.AUDIO RETURN CHANNEL (ARC) Reduce the number of cables you need to send sound to a receiver/sound bar from your TV and connected devices such as a Blu-ray player.The H3 Series LED FHD TV is an unconnected TV that’s practical and convenient. Features include Motion Rate, Audio Return Channel, a full array LED backlight, 2 USB ports, 2 HDMI ports and Dolby Audio. This must-have TV is also available in sizes that are ideal for smaller rooms—and budgets.I’m a perfect fit because I’m flat out awesomeSources: *IHS data, Q1-Q3 2015, **CMM 2016DOLBY AUDIO™The advanced audio technology powered by Dolby Audio isincluded to create rich, clear and powerful sound.EASY ACCESS TO MEDIA Enjoy your favorite content by plugging a USB into your TV in one simple step.NATURAL COLOR ENHANCER This TV maximizes colorreproduction to take your viewing experience to the next level.All product, product specifications, and data are subject to change without notice toimprove reliability, function, design or otherwise. ©2019 Hisense USA, All rights reservedHisense USA Corporation7310 McGinnis Ferry Road, Suwanee, GA, 30024 1-888-935-8880DIMENSIONS/WEIGHTTV Dimension (Without the stand)35.6”W x 20.4”H x 3.2”D (inches)(With the stand)35.6”W x 22.4”H x 8.0”D (inches)TV stand WidthTV Weight ( Without the stand)13 pounds(With the stand)14.3 poundsCarton Dimensions 40.1” x 24.8” x 5.7”Shipping Weight18.5 poundsDISPLAYActual screen size (diagonal)39.5”Screen class 40”Screen typeFlatTYPE OF TVSmart TV No Built-in Apps No Web BrowserNoPICTURE QUALITYScreen resolution 1920 x 1080Aspect Ratio16:9Backlight Type SourceAUDIOAudio output power (Watts)7W x 2LANGUAGESOn-Screen DisplayEnglish/French/SpanishPOWERPower Consumption 65W Standby Consumption <0.5W Power Supply (Voltage/Hz)AC 120VCONNECTIVITYWiFi Built in No Ethernet No Bluetooth ®NoPORTSHDMI 3 (1.4 inputs)USB 2.01RF Antenna1RCA Composite Video Input 1L/R Audio Input for Composite 1RCA Component Video Input 0L/R Audio Input for Component 0Digital Audio Output 1 Optical Earphone/Audio Output1OTHER FEATURESNoise ReductionYes Universal Control Capability for remote Yes Parental Control Yes Closed Caption Yes Sleep TimerYesWALL MOUNTVESA100x200/ M6ACCESSORIESRemoteYesQuick Start Guide and/or User Manual Quick Start Guide is in the box/User Manual is available online Power CableYesWARRANTY/UPCWarranty 1 yearUPC Code888143006994TECHNICAL SPECIFICATIONS。
海信说明书海信说明书1. 简介该说明书介绍了海信产品的基本信息、使用方法和常见问题解决方案。
本文档旨在帮助用户更好地了解和使用海信产品。
2. 产品特点海信产品具有以下特点:- 高品质:海信产品采用先进的技术和材料,确保产品质量稳定可靠。
- 多功能:海信产品具有丰富的功能,可以满足用户在不同场景下的需求。
- 省电省能:海信产品在设计中注重节能环保,能够最大程度地降低能源消耗。
3. 使用方法3.1 配置硬件在使用海信产品前,用户需先完成硬件配置。
具体步骤如下:1. 将海信产品连接至电源插座,确保电源供应稳定。
2. 使用提供的电源线将海信产品与电源插座连接。
3. 将所需外设(如键鼠、显示器等)与海信产品连接,确保连接稳定可靠。
3.2 系统开机完成硬件配置后,用户需按照以下步骤开机:1. 按下海信产品的电源按钮,启动电源。
2. 等待片刻,系统会自动加载操作系统。
3.3 系统设置海信产品在开机启动后,用户可以进行系统设置,以满足个性化需求。
1. 进入系统设置界面,通过系统菜单找到“设置”选项。
2. 在设置选项中,用户可根据需要更改语言、时区、网络设置等。
3. 用户还可以通过设置界面对屏幕亮度、音量等进行调整。
3.4 使用方法海信产品使用简单,用户只需按照以下步骤操作即可:1. 界面导航:通过鼠标或遥控器操作界面,实现菜单的选择和功能的操作。
2. 功能使用:海信产品提供了多种功能,包括浏览互联网、播放媒体、查看文件等。
用户可根据需要选择相应的功能进行使用。
3. 文件管理:海信产品支持文件管理,用户可通过文件管理功能对文件进行查看、复制、移动等操作。
4. 常见问题解决方案4.1 无法开机如果海信产品无法正常开机,用户可尝试以下解决方案:- 确保电源插座正常,电源线连接稳固。
- 检查电源开关是否处于开启状态。
- 如果依然无法解决问题,建议联系售后服务。
4.2 无法连接网络如果海信产品无法连接网络,用户可尝试以下解决方案:- 检查网络连接是否正常,可以尝试重新连接无线网络,或使用有线网络连接。
海信在最新版本Android系统基础上为电视深度定制,专属于电视的智能操作系统,确保应用程序的持续兼容性和无缝链接,使用清晰友好的UI界面,统一简易的交互控制方式,适合电视显示及操作,带给用户一致而良好的体验。
基于Android 4.0深度优化后定制于电视的操作交互界面,它不仅是海信智能电视的主页桌面,更是一种信息的集成和交互,在这个空间中,直播电视、网络视频、推荐应用和云服务信息一应俱全,一目了然,是百科全书式智能电视最好的封面和目录。
海信Hi-Point智能遥控系统,采用了人体工学设计,更适合人手握持。
体型更纤小、功能更完好、使用更方便。
你在看智能电视,智能电视也在“看”你,基于Android 4.0深度开发,通过电视上的高清摄像头捕捉用户的面部特征,通过人脸识别的方式让电视的使用更加个性化,同时也方便内容的个性化归类和管理。
厌倦了遥控器的繁琐,来尝试一下用手操控电视的乐趣吧。
采用手势识别引擎及实时图像运算处理,可将手势转化为指令,实现与电视产品的便捷交互。
挥一挥手掌实现翻页,握紧拳头实现抓取。
把智能电视掌控在手心,体验隔空取物般的自如。
绚丽丰富的智能交互方式,不是只在科幻电影中,随心所想,随手而动。
让电视听懂你的话不再是梦想,海信语音助手轻松帮您实现与电视机的对话。
无论是调整音量、转换频道,还是调节菜单、翻页或快进,只需一个简单的口令,电视机马上做出响应。
同时,语音助手还能进行模糊搜索,只要说出想看的内容,不论是节目名称、主演明星还是编剧导演,小聪都能以最快速度在互联网上搜索,并快速呈现在屏幕上。
打破终端的界限,让分享更简单。
用户可以将内容上传到云端并在各终端上共享,手机拍摄的照片可自动同步到云端并在电视上欣赏,实现一云多屏。
电视与平板电脑、手机等设备之间可以互相传屏,平板电脑和手机可作为电视的遥控器,实现多屏互动。
行业首家提供Easy-Link无线网络连接方案,支持PLC、内置wifi(2.4G/5G双频段)、wifi直连、支持DLNA 四大无线连接方式,更行业独家支持内置PLC电力载波装置和wifi双频段接收,摆脱网线快速稳定上网。
(16)..................................................................................................................... 14............................................................................................................. 12............................................................................................................... 11........................................................................................................................ 9................................................................................................ 8................................................................................................ 5 ...... 3..................................................................................................................... 2Brief introduction Important safety instructions Installing your new appliance Description of the appliance Display controls Cleaning and care Helpful hints and tips Troubleshooting Disposal of the appliance ............................................................................................of the fridge to the wall, at least 1"2"(50mm) of clearance from the back WARNINGBefore using the appliance for the first time, you should be informed of the following tips.For proper installation, this refrigerator must be placed on a level surface of hard material that is the same height as the rest of the flooring. This surface should be strong enough to support a fully loaded refrigerator.The rollers, which are not casters, should be only used for forward or backward movement. Moving the refrigerator sideways may damage your floor and the rollers.Suggestion:It is advisable for there to be at least (25mm) of clearance from its top, at least 1"(25mm) from its side to the wall and a clear space in front to allow the doors to open 125°. As shown in the following diagrams.In order to improve efficiency of the cooling system and save energy, it is necessary to maintain good ventilation around the appliance for the dissipation of heat. For this reason, sufficient clear space should be available around the refrigerator.Ventilation of applianceStand your appliance in a dry place to avoid high moisture.Keep the appliance out of direct sunlight, rain or frost. Stand the appliance away from heat sources such as stoves, fires or heaters.Note:Leveling of applianceAdjustable bottom feet0.4" - 0.6"(10 -15mm)CAdjustable bottomfeetFront roller Rear roller For sufficient leveling and air circulating in the lower rear section of theappliance, the bottom feet may need to be adjusted.You can adjust themmanually by hand or by using a suitable spanner.To allow the doors to self-close, tilt the top backwards by 0.4" - 0.6"(10 -15mm).Note:If required you may lay the refrigerator on its back in order to gain access to the base, you should rest it on soft foam packaging or similar material to avoid damaging the backboard of the refrigerator.In case your home access door is too narrow for the refrigerator to passthrough, remove the refrigerator doors and drawers.Door RemovalTools you will need(Not provided):With the door closed, remove the 3 screws holding the top cover (1) with Philips (+) screwdriver, and then remove the top cover with the entireharness attached.Remove the screws (2) fixed on the hingeswith a wrench (5/16", 8mm) and 1 groundscrew (3) attached to the hinge withPhilips (+) screwdriver. Remove the upper left and right door hinges (4).1.e both hands to open the door more than 90°. Lift it up and take it off.1324Disassembling the freezer DoorThere are two doors in freezer compartment,and it provide with an upper drawer with a tray and also a lower drawer with a tray.You can follow below same steps todisassemble the drawers, trays and doors. 1.Open the freezer door; Pull up the adjusting block (5) of the slide guides,and pull out the freezer door drawer (6)to the final position.2.Take out the tray (7) by lifting it up in the direction of the arrow.3.Remove the freezer drawer (8) by lifting it up .568Re-assembling the freezer DoorTo reattach the doors after you moved the appliance to its final location,assemble the parts in reverse order.974.Remove the 2 screws attached to the supporting frame (9).5.Pull out the freezer door and lift it up inthe direction of the arrow.9Refrigerator Gasket Refrigerator Door Control Panel Door BinsGlass shelvesAir ChanelCrisper coverFruit & Vegetable Crisper Freezer Door Freezer Upper DawerUpper Tray Part Freezer Lower Drawer Lower Tray Part 1 2 3 4567 8 9 10 14151112 13N Note: To get the best energy ef ciency of this product, please place all shelves, drawers on their original position as the illustration above.ote:Your model may look different from this and other images in this manual,depending on your model’s features.Vertical Baffle PartFreezer DoorAdjustable bottom feet16Use your appliance according to the following control regulations, your appliance has thecorresponding functions and modes as the display panels showed in the pictures below. When the appliance is powered on for the first time, the backlighting of the icons on display panel starts working. If no buttons have been pressed and the doors are closed, the backlighting will turn off.Power Icon A Power Control B Fridge Compartment Temp IconC Freezer Compartment Temp IconD Zone ChoiceE Celsius and FahrenheitF TemperatureG Temp ControlHI Super Cool IconJ Super Freeze Icon K Mode ControlL Press POWER 3 seconds to turn the power on, and press 3 seconds to turn the power off and will display “OF”.When you set a temperature, you aresetting an average temperature for the entire compartment. The actualcompartment temperatures may vary from the temperatures displayed depending on the amount and placement of stored food, and the surrounding room temperature.1.Press ZONE repeatedly until the Fridge icon appears.1.Press ZONE repeatedly until the Freezer Choice appears.2.When Freezer is on, is illuminated and then press TEMP. repeatedly to cyclethrough the available temperature settings,temperature type to Celsius.NOTE: Each press of the button, the temperature drops one degree.3.Release the TEMP. Control when the desired temperature setting appears.3.Release the TEMP. Control when the desired temperature setting appears.2. When Fridge is on, is illuminated and then press TEMP. repeatedly to cyclethrough the available temperature settings, from 8°C to 2°C if you have set temperature NOTE: Each press of the button, the temperature drops one degree.Recommended Temperature SettingFreezer Compartment TemperatureRefrigerator (Fridge) Compartment TemperatureSetting Compartment Temperature8°C7°C 6°C 5°C 4°C3°C2°C-24°C-23°C-14°C-15°C.........Energy saving icon IndicatorTEMP.Switching Celsius and Fahrenheiton the display, press and hold the button for three seconds.39°F (4°C)0°F (-18°C)type to Celsius.If you have set temperature type to Fahrenheit, the temperature settings cycle from 46 °F to 36 °F.36°F37°F46°F45°F.........from -14°C to -24°C if you have set If you have set temperature type to Fahrenheit, the temperature settings cycle from 7°F to -11 °F..........-10°F-11°F7°F 6°FTo toggle between Celsius and FahrenheitIf the fridge door is opened for longer than 2 minutes, the control panel will display “dr”,and it will return to the previous setting temperature after 8 minutes.completely.NOTE: Super Cool will automatically turn off after 3 hours, and the refrigerator will revert to its previous temperature setting.This funtion makes the freezer worked in an energy saving mode which is useful for reducing energy consumption when you 1.Press The appliance automatically sets the MODE until .s r a e p p a n o c i g n i v a s y g r e n E following temperatures:e d o m g n i v a s y g r e n Ef f o n r u t o t s s e r P .2and the refrigerator temperature will revert to its previous temperature setting.The Super Freeze feature helps to keep thefood stored in the freezer as the setting temperature during periods of high usage, large grocery loads, or temporarily warm room temperatures.1.Press Freeze icon appears.MODE repeatedly until the Super 2.Press temperature to turn off Super Freeze TEMP. or adjust freezer compartment manually and return to the previous temperature setting.When selecting the Super Freeze funtion,ensure there are no bottltedib the freerer compartment. Bottles and cans may explode.Super FreezeNOTE: temperature display.NOTE:off after 52 hours, and the freezer will revert to its previous temperature setting.NOTE: The Demo Mode stays on even if the accelerate food waste. are away.43°F(6°C)1°F(-17°C)Door Open AlarmEnergy SavingThe Super Cool feature helps to keep food stored in the refrigerator at the settingtemperature during periods of high usage, large grocery loads, or temporarily warm room temperatures. The Super Cool feature lowers the temperature in the fridge compartment to 36°F(2°C) to cool food.Super Cool1.Press MODE repeatedly until the Super Cool icon appears.NOTE: When Super Cool is on, istemperature display.2.Press MODE or adjust fridge compartment temperature to turn off Super Cool manually and return to the previous temperature setting.TEMP.Demo Mode1.Demo Mode is for store displaying only.2.In this mode, the light and the displayoperation is normal, but the refrigerator is not cooling. W hen the refrigerator is in the Demo Mode, if consumers open the door or no keys ,d e n e p o r o o d e h t h t i w s d n o c e s 03 r o f n o i t a r e p othe temperature control panel will show as follow from A to F.3.To exit this mode, you could press the key and the key at the same time for 3 seconds, then you can see the whole control panel light up for 1 second.NOTE: refrigerator powers off. If the consumers enter the mode with unintentional operation, you should exit as soon as possible, since the refrigerator will not cool in this mode, which will cause the food going bad.illuminated and 36°F(2°C) appears in the The Super Freeze feature lowers thetemperature in the freezer compartment to -11°F(-24°C) to freeze the food faster.illuminated and -11°F(-24°C) appears in the When is on, isSuper Freeze Super Freeze will automatically turn High temperature setting will To turn off the alarm, close the fridge door POWER MODETo maintain good appearance of your appliance, you should clean it regularly.Spray water onto a cleaning cloth instead of spraying directly on the surface of the appliance. This helps ensure an even distribution of moistureto the surface.Clean the doors, handles and cabinet surfaces with a mild detergent and then wipe dry with a soft cloth.Exterior cleaningYou should clean the appliance interior regularly. It will be easier to clean when food stocks are low. Wipe the inside of the fridge and freezer with a weak solution of backing soda and water, and then rinse with warm water using a wrung-out sponge or cloth. Wipe completely dry before replacing the shelves and baskets. Thoroughly dry all surfaces and removable parts before putting them back into place.Interior cleaningFor hygienic reasons the appliance (including exterior and interior accessories) should be cleaned at least every two months.CAUTION!1.Don’t use sharp objects to clean with, as they are likely to scratch the surface.2.Don’t use thinner, car cleaner,bleach, oil, abrasive cleansers or organic solvent such as benzene for cleaning. They may damage the surface of the appliance and may cause fire.WARNING!To avoid electrical shock, the appliance must not be connected to the main power supply during cleaning. Before cleaning, switch the appliance off and remove the plug from the main socket.Although this appliance automatically defrosts, a layer of frost may occur on the freezer compartment’s interior walls if the freezer door is opened frequently or kept open too long. If the frost is too thick, choose a time when the freezer is nearly empty and proceed as follows:Remove existing food and accessory baskets, unplug the appliance from the main power and leave the doors open. Ventilate the room thoroughly to accelerate the process.When defrosting is completed, clean your freezer as described above.1.2.WARNING!Do not use sharp objects to remove frost from the freezer compartment. Only after the interior is completely dry should the appliance be switched back on and plugged back into the main socket.Replacing the LED lightTake care to keep door seals clean. Sticky food and drinks can cause seals to stick to the cabinet and tear when you open the door. Wash seal with a mild detergent and warm water. Rinse and dry it thoroughly after cleaning.Door seals cleaning CAUTION! Only after the door seals are completely dry should the appliance be powered on.WARNING!The LED light must be replaced by a competent person. If the LED light is damaged, follow the steps below :1.Unplug your appliance.2.Remove the light cover by lifting up and pulling out.3.Hold the LED light with one hand and pull it while pressing the connector latch with the other hand.4.Replace the LED light and snap it correctly in place and replace the light cover.WARNINGIf you experience a problem with your appliance or are concerned that the appliance is not functioing correctly, you can carry out some easy checks before calling for service, please see below.1. Don’t try to repair the appliance yourself. If the problem persists after you have made the checks mentioned below, contact a qualified electrician, authorized service technician or the shop where you purchased the product.2. A child entrapment warning statement is included below.DANGERRisk of child entrapment. Before you throw away your old refrigerator or freezer:- Take off the doors.- Leave the shelves in place so that children may not easily climb inside.DANGERWARNINGPackaging materials with the recycle symbol are recyclable. Dispose of the packaging into a suitable waste collection container to recycle it.1. Pull out the main plug from the main socket.2. Cut off the power cord and discard with the main plug.Refrigerators contain refrigerant and gases in the insulation. Refrigerant and gases must be disposed of professionally as they may cause eye injuries or ignition. Ensure that tubing of the refrigerant circuit is not damaged prior to proper disposal.It is prohibited to dispose of this appliance as household waste.Packaging materialsBefore disposal of the applianceCopyright Statement© 2021 Hisense Company Ltd. All Rights Reserved.All material in this User Manual is the property of Hisense Company Ltd. and its subsidiaries, and is protected under US, CANADA, MEXICO and International copyright and/or other intellectual property laws. Reproduction or transmission of the materials, in whole or in part, in any manner, electronic, print, or otherwise, without the prior written consent of Hisense Company Ltd. is a violation of Hisense Company Ltd. rights under the aforementioned laws.No part of this publication may be stored, reproduced, transmitted or distributed, in whole or in part, in any manner, electronic or otherwise, whether or not for a charge or other or no consideration, without the prior written permission of Hisense Company Ltd.Requests for permission to store, reproduce, transmit or distribute materials may be made to one of the following addresses:USA: CANADA: MEXICO: Hisense, and any and all other Hisense product names, logo’s, slogans or marks are registered trademarks of Hisense Company Ltd. and its subsidiaries. All other trademarks are the property of their respective holders.© 2021. All rights reserved. Hisense and the Hisense logo are registered trademarks of Hisense. Other brand and product names are registered trademarks of their respective owners.Hisense USA Corporation7310 McGinnis Ferry RoadSuwanee, GA 30024Hisense Canada Co., Ltd2283 Argentia Road, Unit 16Mississauga, ON, CanadaLSN 5Z2Hisense Mexico S. de R.L. de C.V.Blvd. Miguel de Cervantes Saavedra No 301Torre Norte Piso 2, Col. Ampliación GranadaMiguel Hidalgo, Ciudad de México, C.P. 11520Disclaimer:Images throughout this document are for illustrative purposes only and may differ from the actual product.0.4" - 0.6"(10 -15mm).0.4" - 0.6"(10 -15mm)。
海信联通网络机顶盒Ip06h刷机教程
海信联通网络机顶盒Ip06h刷机教程:
一、准备材料:
1、海信联通网络机顶盒Ip06h
2、新版固件
3、U盘
二、进行机器的准备:
1、将固件下载至电脑,并将固件解压缩;
2、将解压后的固件拷贝到U盘中;
3、U盘插入机顶盒;
三、开始刷机:
1、打开海信机顶盒,进入设置 -->系统设置-->系统升级界面;
2、从USB外接介质搜索新的固件,会出现两个型号信息,选择要刷入的固件;
3、确认固件后,点击“升级”,就可以开始升级;
4、刷机过程需要一定的时间,当刷机完成后,会自动重启。
四、检查刷机是否成功:
1、当检查到机顶盒中的系统已更新至设定的版本号;
2、检查机顶盒中的功能是否能正常使用;
3、检查电视画面是否正常。
五、注意事项:
1、请务必保证电源不中断,以免刷机失败;
2、刷机过程中出现故障,请及时联系专业技术人员进行处理;
3、刷机完成后,可能需要重新设置电视画面及相关参数。
Mobile Shop Identity GuidelineContents 目录Overview 概述Object 目标Strategic Principle 战略方法 Design Approach 设计影响1. Identity Elements 品牌形象要素Overview概述1.A. Basic Element 基础要素Brand Logo企业标志Colors & Material 颜色&材料1.B. Brand Sign 企业标识Main Wall Sign主形象墙标识规范Header Sign主标识规范Fixture Sign 柜台标识规范Sign Type标识类型规范1.C. Wall System 形象墙系统Main Wall主形象墙Sub Wall备用形象墙Visual Guide宣传画面使用规范2. Shop Format专区规格Overview概述Wall Type靠墙型专区L-Type L型专区U-Type U型专区Full-column Type全围柱型专区Half-column Type半围柱型专区Linear墙体专区3. Shop Fixtures专区固定装置Overview概述Counter(Experience)开放型柜台(体验型)Counter(Counselling)开放型柜台(咨询型)Showcase 玻璃柜台Corner Counter角部柜台Showcase Counter角部玻璃柜台Highlight Counter特讯台Showcase Tray陈列支架Special Stand特别产品支架Basic Stand基础支架Leaflet Stand活页架Overview概述卖场的环境不但可以直接影响到消费者的购买意图,也是使企业露出,并和消费者直接接触的触点(touch point)。
因此,不但要确保卖场中海信企业形象对外传达的统一性,也要体现 Hisense Mobile的指向。
本指导手册是以海信形象视觉识别指导手册为依据,为海信手机终端提供一本既具有视觉识别统一性,又具有品牌独特性和差异化的指导方向手册。
因此,在本指导手册中指出海信企业形象的要素在专区中的使用是最具效果性的方法,并提供给访问海信专区的顾客们一个对Hisense Mobile品牌的价值了解和体验的空间。
本指手册针对不同环境下的专区制定了战略性的规范,核心设计要素与应用事例,并提供了可准确制作生产的图面,所以在制作,使用的过程中均应严格遵循本手册所规范的使用方法规范制作,以保持完整统一的形象。
Object设计概念Strategic Principle 战略方法创造一个视觉性的符号。
在反映.海信品牌形象与定位的同时创造一个具有差别性的环境. 创造使顾客难以忘记的购买环境,诱导顾客再次访问。
根据顾客的个别需要,推出焦点销售和服务方法。
以做工精良、简单易用为基础,创造具有产品特征的设计Create 创造使消费者更加直观的了解海信,并感受海信的魅力。
要预知消费者的需要并给予满足对于消费者的认知要开启新的可能性。
提供可以使消费者感动的体验和信息。
使消费者容易接近海信,并认可海信。
Inspire 启发为消费者提供一个与海信手机价值可共鸣的体验空间。
提供一个可以使消费者与海信手机在情感上连接的理由努力构建职员与客户之间私人的,热情的,平易近人的人性化关系。
职员在终端中发现的问题应及时向本公司进行汇报。
及时解决所发现的问题。
Interact 互动为了方便的管理和安装,需将手机终端的主要元素进行模块化。
为了方便可持续性的管理和维护,要构成空间与终端的要素。
为树立战略性的广告和宣传活动,提供有效并相互作用的空间。
在所有海信终端中,必须保持技术、合作伙伴关系、产品、服务的统一性。
有效的体现海信的IT技术。
Maintain 维持Design Approach 设计影响手机在交流的手段中占有最大比重,它是连接使用者与设备,服务之间的一个平台。
在这样平台上的 Network中,以扩大和交叉,融合为关键词,来体现‘在任何时间,任何地点都可以利用海信通信联系到对方( Connectinganytime, anywhere with Hisense Mobile )“的概念NetworkConnecting anytime, anywherewith Hisense Mobile交叉 扩大融合1. Identity Elements品牌形象要素1.A. Basic Element I基础要素1.B. Brand Sign I品牌标识1.C. Wall System I形象墙系统Overview概要通过对海信手机终端体系的应用,在表现品牌视觉差异化的同时,也确保海信企业形象对外传达的统一性,并提高卖场内的品牌认知度与印象度。
为了在多种环境下和销售渠道中保持产品与海信品牌的统一性,手册中制定了更加有效实施,更具战略性的专区指导方案。
标志,材料和固定装置作为视觉要素的核心部分,在制作中应严格遵守规范。
Basic Elements Brand SignWall System1. Identity Elements1.A. Basic Elements I基础要素Brand Logo 企业标志Colors & Material 颜色&材料品牌标识是海信公司所有视觉交流中最具核心性的代表物。
是造型、文字、色彩的具体结合表现,它不仅具有事物单纯性的指示功能,更是抽象的海信集团精神内涵,在使用的过程中,必须严格遵照图形比例和结构,使标志精准统一。
海信集团在导入和应用中应严格遵守,确保企业形象对外传达的权威性、统一性,有效建立社会公众的一致认同。
Brand Logo 1.A. Basic Element品牌标识Brand LogoGrid SystemClear SpaceNote颜色和材料是表现海信差异化的重要手段,为了保证品牌视觉的统一性, 在使用过程中,必须严格按照指定的颜色和材料执行。
根据选择材料的不同会出现一定的色差,既使用指定的颜色与材料是非常重要的。
卖场内使用的材料需严格对照下放标注进行执行,除此之外的颜色严禁使用。
Colors & Material 颜色&材料Specifications 规格- PMS : Pantone 3272C - RGB : R0 G170 B166- CMYK : C100 M0 Y44 K0- PMS : Pantone Cool Gray 8C - RGB : R136 G139 B141- CMYK : C23 M16 Y13 K46- RGB : R255 G255 B255- CMYK : C0 M0 Y0 K0- Transparency 0%- Matt Hairline Stainless SteelMaterials 适用材料- Steel 不锈钢- Wood 木质- Acrylic 亚克力- Glass 钢化玻璃- Steel 不锈钢- Wood 木质- Acrylic 亚克力- Glass 钢化玻璃- Steel 不锈钢- Wood 木质- Acrylic 亚克力- Glass 钢化玻璃- Acrylic 亚克力- Glass 钢化玻璃- Steel 不锈钢- SheetApplicables 适用对象- Sign 标识- Wall 形象墙- Fixture 固定装置- Furniture 附属品- Wall 形象墙- Fixture 固定装置- Furniture 附属品- Sign 标识- Wall 形象墙- Fixture 固定装置- Furniture 附属品- Wall 形象墙- Fixture 固定装置- Wall 形象墙- Fixture 固定装置Hisense JadeHisense Gray Hisense White Hisense TransparencyMetallic Accents1.B. Brand Sign I品牌标志Main Wall Sign 主形象墙标志规范Header Sign 招牌标志规范Fixture Sign 柜台标志规范Sign Type 标志类型规范Main Wall Sign为了确保主形象墙标志的识别度和统一性,对标志的大小和高度做了统一的规范,根据主形象墙的宽度的变化,只 可对标志左边的空间进行变化。
主形象墙标志是传达海信视觉统一形象的重要交流方式,在应用中应严格遵守,确保对外传达的权威性,统一性。
Note与主形象墙的高度无关,海信标志都应保持在1700mm的位置 形象墙为3000的情况,海信标志的左侧间距为300mm 形象墙为2000的情况,海信标志的左侧间距为150mm 标识使用照明型时,必须按照海信指定绿色进行制作。
主形象墙标志Primary TypeSecondary Type150300180180Basel i n eBasel i n e1,7001,7002,7002,7003,0002,000招牌标志适用于围柱专区和墙体专区。
为了确保海信卖场的统一性,招牌的高度进行2种 规范,LOGO的大小应统一按照规范制作。
标牌标志作为传达海信视觉统一形象的重要交流方式,在应用中应严格遵守,确保对外传达的权威性,统一性。
碰顶高度为2700mm以上的情况招牌的高度定为450mm 海信标志高度定位180mm,位置处于招牌的中间。
碰顶高度为达到2700mm的情况招牌的高度定为380mm 海信标志高度定位180mm,位置处于招牌的中间。
Header Sign의 잘못 적용된 예招牌标志的禁用部分 海信标志与标牌相比,过大或过小 都不符合规范。
450380招牌标志适用于围柱专区和墙体专区。
为了确保海信卖场的统一性,招牌的高度进行2种 规范,LOGO的大小应统一按照规范制作。
招牌标志作为传达海信视觉统一形象的重要交流方式, 在应用中应严格遵守,确保对外传达的权威性,统一性。
Note 招牌标志的长短与碰高无关,宽度应和下方固定装置 宽度统一。
XXX X展柜上的海信标志在使用时应严格按照下方规范进行使用。
如选用其他固定装置的情况 需经过本公司验收后使用。
Counter SignShowcase Sign展柜标志作为传达海信视觉统一形象的重要交流方式, 在应用中应严格遵守,确保对外传达的权威性,统一性。
1005060605050320856010580385385展柜上的海信标志在使用时应严格按照下方规范进行使用。
如选用其他固定装置的情况 需经过本公司验收后使用。
展柜标识作为传达海信视觉统一形象的重要交流方式,在应用中应严格遵守,确保对外传达的权威性,统一性。