希捷 硬盘维修常用指令29页PPT
- 格式:ppt
- 大小:2.67 MB
- 文档页数:15
希捷硬盘部分指令代码修盘参数说明-1
使用命令说明
^E 驱动器表面状态: 最大 C.H.S. / 读写多个块尺寸 / 当前传输转译模式设定等^F 读取段寄存器记录
^G 写队列堆栈(跳转)
^I 控制寄存器堆栈(跳转)
^K 保留选项
^Q 保留选项
^R 保留选项(这个指令只有在驱动器马达起转情况下才有效)
^S 当前执行地址段快照(记录logo)
^V Interface Command Echo and Activity Trace Toggle
^X Interface and Niwot Command History
^Y 逐行显示驱动器Smart参数
希捷硬盘部分指令代码修盘参数说明-2
T级别 - Factory tests工厂测试模式命令
--------------------
Dx Dsp cert elogs
Ex Dsp elog
Fx,y Set ftr bit x to y (0,1)
Nx Set drv age(设置驱动器Age)
Tx Run tst x(运行指定测试项目)
Yxx Set drv typ
# Enter ser #
Health bits
15 -Fat r/w err 12 -Hi r/w err rt
11 -Skp asgn err 10 -Hrdwr err
9 -Xecsv skps 8 -Xcesv alts
7 -Act fail 6 -Spn fail
5 -Srv dat fail 4 -Xfer rt warn
1 -Spn warn 0 -Srv warn。

希捷硬盘常见内部指令大全(版)目录希捷(Seagate)硬盘T级常见指令分析(2009-07-09 15:26:11)标签:众所周知,希捷硬盘修复与其它产品的硬盘修复方法有一个独特的地方,指令模式。
指令模式也即是诊断模式,可以直观的检测并监控硬盘的工作状态,通过反馈显示的信息来判断硬盘的故障。
希捷硬盘在设计指令时分为许多模块。
同时对指令又分不同的等级,以方便于工程师的记忆和管理。
本文将重点介绍一些T级模式下所使用的指令和反馈信息。
其他级别的将在后面的文章中介绍。
T级下的指令包括:CERT 进程测试、缺陷参看、日志查看,读取系统参数等。
Bx,设置波特率。
该指令是设置终端程序的接受信号频率,以适应硬盘的频率。
这样才能正常显示指令模式下的信息。
x 为0,表示设置为默认的波特率,默认都是9600。
x 为1,表示显示该硬盘能支持的波特率。
x 大于1时,将设置波特率为指定的x频率。
Vx,查看缺陷列表。
使用该指令前需要加载CERT 模块。
x 为1,表示查看P表缺陷;x 为2,表示查看T表缺陷;x 为4,表示查看G表缺陷。
该指令只在希捷酷鱼系列硬盘中有效,U系列不支持这个指令。
下图是P表的信息P表缺陷的格式为:柱面+磁头+扇区+连续缺陷的个数。
下图为G表的信息:G表的格式为:柱面+磁头+扇区+替换扇区+缺陷标记。
ix,y,z,初始化缺陷表。
使用该指令前需要加载CERT 模块。
x 为1 表示P表;x 为2表示T表;x 为4表示为G表。
y 参数如果不填,表示只在内存中清除,并不写到固件区;如果有输人数据,表示将把初始化后的数据保存到固件区。
z 参数是关键位,当为22的时候,i 指令才有效,否则忽略该指令。
Nx,y,z,设置AGE的值为x。
对于酷鱼系列的盘,在设置AGE的时候,z 参数一定要为22,而对于U系列的硬盘,Nx指令后面就不需要接其他参数。
R,从硬盘读取系统参数到对应的缓存中。
该指令能够从盘体读取系统参数,包括磁头参数,区段参数,SN信息等等,并把读取到的参数信息存放到响应的模块缓存中,以便于内存调用。

希捷硬盘维修基础教学作者:niotis特别说明:此处只讲基础知识,适合入门级,只讲一般性故障维修,一般性SF流程方法,如需提高,请自行研究,因水平有限,有错误处,请指正,硬盘维修交流群:14595914欢迎你!希捷硬盘分类识别方法:目前希捷硬盘维修中主要有两类:第一类:主要以指令模式下,进入T级的7200.7-7200.10代为主,笔记本硬盘如5400.2也是,此类维修方法基本上都差不多。
第二类:7200.11 7200.12及新式本盘属于此类,进入指令模式为F3T,波特率需设为38400.第一部份我们先看看7200.7-7200.10的基础维修知识。
下面用一张图片来详细介绍ST各种参数。
1标注处,是指ST的系列,这里是一个7200.10的盘2为SN号,这是一个重要的参数,可以利用修改SN号来砍头,SN号的第二跟第三位,决定这个硬盘有几个磁头。
这里的RA表示有两个磁头。
3是硬盘型号,即硬盘ID号,换固件时需要注意。
4是固件版本,换固件时,如不相同,可通过换ROM,换全套固件来维修。
指令下的家族分类:在T经下,按下Ctrl+A键,读出硬盘信息如下:其中3.06Master在TAGE=50Type=A1 A1 MxHd=1123COM介绍ST中一些名词:固件:固件是软件、不是存在电路板上的,是存在盘体上的0 道以前,又称负道、固件区、SA 区、FW 区、服务区等。
一个完整的固件包括APP、Cert、Cert table、ATA (9.10代包含ATA0和ATA1)、Vendor各个模块,固件对应电路板上还包括ROM。
下面介绍一下ST各个模块ROM 包含电路板,磁头等信息,匹配固件时需要找ROM相同的(ROM损坏,硬盘会表现为电机不转)希捷主要是5大模块:1:APP 代码模块(F级引导需要用到)2:CERT 自校准模块3:CERT TABLE 自校准流程模块4:ATA 接口协议模块(SF完成后,需要写ATA)5:VENDOR 信息模块(SF完成后,同样需要写VENDOR)ST各个级别:Seagate 硬盘既可以在Normal mode 常规模式下工作,这时启动时读取盘面固件与数并生成用户接口,也可以在Safe mode 安全模式下工作。

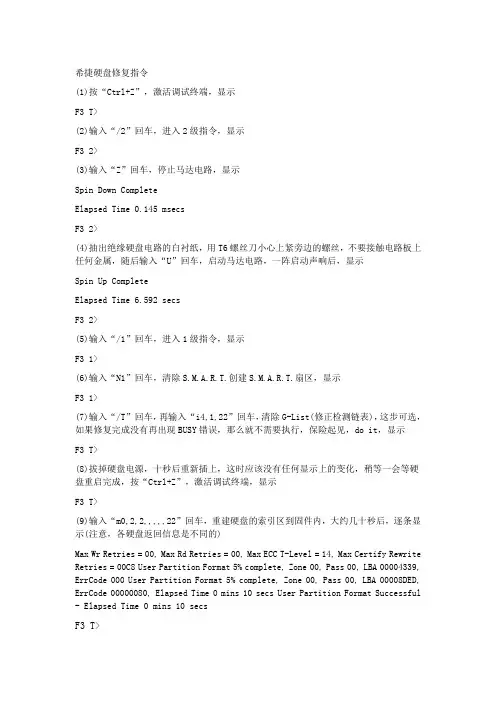
希捷硬盘修复指令(1)按“Ctrl+Z”,激活调试终端,显示F3 T>(2)输入“/2”回车,进入2级指令,显示F3 2>(3)输入“Z”回车,停止马达电路,显示Spin Down CompleteElapsed Time 0.145 msecsF3 2>(4)抽出绝缘硬盘电路的白衬纸,用T6螺丝刀小心上紧旁边的螺丝,不要接触电路板上任何金属,随后输入“U”回车,启动马达电路,一阵启动声响后,显示Spin Up CompleteElapsed Time 6.592 secsF3 2>(5)输入“/1”回车,进入1级指令,显示F3 1>(6)输入“N1”回车,清除S.M.A.R.T.创建S.M.A.R.T.扇区,显示F3 1>(7)输入“/T”回车,再输入“i4,1,22”回车,清除G-List(修正检测链表),这步可选,如果修复完成没有再出现BUSY错误,那么就不需要执行,保险起见,do it,显示F3 T>(8)拔掉硬盘电源,十秒后重新插上,这时应该没有任何显示上的变化,稍等一会等硬盘重启完成,按“Ctrl+Z”,激活调试终端,显示F3 T>(9)输入“m0,2,2,,,,,22”回车,重建硬盘的索引区到固件内,大约几十秒后,逐条显示(注意,各硬盘返回信息是不同的)Max Wr Retries = 00, Max Rd Retries = 00, Max ECC T-Level = 14, Max Certify Rewrite Retries = 00C8 User Partition Format 5% complete, Zone 00, Pass 00, LBA 00004339, ErrCode 000 User Partition Format 5% complete, Zone 00, Pass 00, LBA 00008DED, ErrCode 00000080, Elapsed Time 0 mins 10 secs User Partition Format Successful - Elapsed Time 0 mins 10 secsF3 T>。
希捷硬盘的通病指令维修做SC,1.N2,,22 从第二步做起,可修复50%的固件问题,因为ST硬盘在1面有备份。
做完后,大部分不认盘,回写ATA.fls.2.N31,,22只扫坏道。
3。
SC结束显age =50,3.不认。
硬盘不认,1.是age参数错误。
所以在ide中导致不认。
,然后在T级下,改正age值。
age=50,即可。
2有的是pssport出错,有的是CERT CODE 出错等等涉及到一些希捷硬盘的基本概念及原理,本人不做讲述。
4.固件可以代换的,例如3.75和8.75 是可以互用的,5.出现STRUFF UNREADABLE 的解决方法如下:所有的操作均在T级工厂模式下1:在T级工厂模式下输入F指令,出现了struff >的提示时,在其后输入ASCIFE(这个主要是将硬盘的信息恢复的出厂值,输完以后按回车键,2:再次输入F,这时也会出现STRUFF>的提示,在其后输入ASCI1E,并在其后输入硬盘的型号,用ASC码来表示比如ST340016A就输入535433343030313641同时要在所输入的数值后面加上31个203:在第二部完成以后,在输入F指令,然后在STRUFF>后输入ASCI83(...............)在输入F指令然后在STRUFF>后输入ASCI3C(.................)以上括号里面的是硬盘的容量,用的是十六进制的数字来表示的容量的表示方法如下:20G -----5AB8025440G --------B57004A860G---------CFB006FC80G---------6AE009516.以上技巧,可修复通病达到5成,或是更高,具体的使用方法,见说明书。
希捷硬盘常见故障及维修方法希捷是比较常见的硬盘、移动硬盘品牌,那么希捷硬盘在使用的过程中,会有哪些故障?导致希捷硬盘故障的原因有哪些?希捷硬盘出现故障怎么修?本文将从以上几个方面来谈谈希捷硬盘维修。
导致希捷硬盘资料丢失的常见故障1、硬盘中病毒、误删除文件、误格式化、变成RAW格式、显示0字节、分区丢失、文件丢失。
2、希捷资料硬盘,移动硬盘提示“未被格式化,现在要格式化吗”“文件或目录损坏且无法读取”、I/O错误等问题。
3、希捷硬盘、移动硬盘不认盘,插到电脑USB不能识别、灯不亮、没有任何反应。
4、希捷移动硬盘找不到盘符。
5、希捷移动硬盘能识别,也有盘符,但是不能打开,提示请插入磁盘。
希捷硬盘工具故障维修对于各种工具故障,可以采用专业工具进行资料恢复。
这些工具专门用于恢复误删除误格式化,分区丢失,误分区,PQ操作失败等情况下的资料丢失,操作简单,能够深度扫描文件片,恢复成功率高。
当然专业的资料恢复公司,安全性更有保障,恢复成功率也更高。
比如说,一般对于系统故障等一类的故障,资料恢复工程师会采用手工计算的方式,在计算之前,会对硬盘相应扇区进行备份,通过手工计算的方式,可以将硬盘恢复到故障前的状态。
希捷硬盘硬件故障维修硬盘的硬件故障一般主要是电路板故障和盘体故障。
由于电路板上的芯片大多数封装的十分严密,资料恢复中心大部分采用替换匹配电路元件的方法进行修复。
对盘体故障有些时候盘体故障表现的十分明显,硬盘通电后发出连续而有规律的异常声响,但有的时候它的故障又十分不明显,只是单纯的出现主板无法检测到硬盘的情况,很容易和电路故障混淆,一般需要在无尘超净室进行开盘诊断,才能制定方案。
资料恢复中心提醒大家:当希捷硬盘出现异常,而无法读取时。
千万不要尝试自己没有把握的方法(比如重新格式化、重建分区表等等),因为这样的操作,很可能让原本很简单的恢复任务,变得异常复杂,同时错误的操作也会大大降低资料被成功恢复的可能性。
希捷硬盘常见内部指令大全(2.0版)目录希捷(Seagate)硬盘T级常见指令分析 (3)希捷(Seagate)硬盘1级常见指令分析 (10)希捷(Seagate)硬盘2级常见指令分析 (14)希捷(Seagate)硬盘3级常见指令分析 (19)希捷(Seagate)硬盘4级下常见指令分析 (23)希捷(Seagate)硬盘6级下常见指令分析 (27)希捷(Seagate)硬盘T级常见指令分析(2009-07-09 15:26:11)标签:希捷硬盘希捷盘修复技巧希捷硬盘修复it众所周知,希捷硬盘修复与其它产品的硬盘修复方法有一个独特的地方,指令模式。
指令模式也即是诊断模式,可以直观的检测并监控硬盘的工作状态,通过反馈显示的信息来判断硬盘的故障。
希捷硬盘在设计指令时分为许多模块。
同时对指令又分不同的等级,以方便于工程师的记忆和管理。
本文将重点介绍一些T级模式下所使用的指令和反馈信息。
其他级别的将在后面的文章中介绍。
T级下的指令包括:CERT 进程测试、缺陷参看、日志查看,读取系统参数等。
Bx,设置波特率。
该指令是设置终端程序的接受信号频率,以适应硬盘的频率。
这样才能正常显示指令模式下的信息。
x 为0,表示设置为默认的波特率,默认都是9600。
x 为1,表示显示该硬盘能支持的波特率。
x 大于1时,将设置波特率为指定的x频率。
Vx,查看缺陷列表。
使用该指令前需要加载CERT 模块。
x 为1,表示查看P表缺陷;x 为2,表示查看T表缺陷;x 为4,表示查看G表缺陷。
该指令只在希捷酷鱼系列硬盘中有效,U系列不支持这个指令。
下图是P表的信息P表缺陷的格式为:柱面+磁头+扇区+连续缺陷的个数。
下图为G表的信息:G表的格式为:柱面+磁头+扇区+替换扇区+缺陷标记。
ix,y,z,初始化缺陷表。
使用该指令前需要加载CERT 模块。
x 为1 表示P表;x 为2表示T表;x 为4表示为G表。
y 参数如果不填,表示只在内存中清除,并不写到固件区;如果有输人数据,表示将把初始化后的数据保存到固件区。
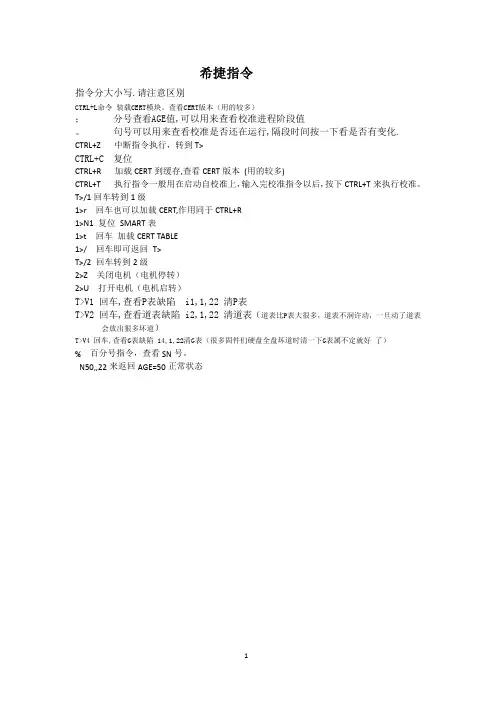
希捷指令指令分大小写.请注意区别CTRL+L命令装载CERT模块。
查看CERT版本(用的较多);分号查看AGE值,可以用来查看校准进程阶段值。
句号可以用来查看校准是否还在运行,隔段时间按一下看是否有变化. CTRL+Z中断指令执行,转到T>CTRL+C复位CTRL+R加载CERT到缓存,查看CERT版本(用的较多)CTRL+T执行指令一般用在启动自校准上,输入完校准指令以后,按下CTRL+T来执行校准。
T>/1回车转到1级1>r回车也可以加载CERT,作用同于CTRL+R1>N1复位SMART表1>t回车加载CERT TABLE1>/回车即可返回T>T>/2回车转到2级2>Z关闭电机(电机停转)2>U打开电机(电机启转)T>V1回车,查看P表缺陷i1,1,22清P表T>V2回车,查看道表缺陷i2,1,22清道表(道表比P表大很多,道表不润许动,一旦动了道表会放出狠多坏道)T>V4回车,查看G表缺陷i4,1,22清G表(很多固件们硬盘全盘坏道时清一下G表属不定就好了)%百分号指令,查看SN号。
N50,,22来返回AGE=50正常状态指令讲解1、CTRL+L命令装载CERT模块。
查看CERT版本(用的较多)出入CTRL+L命令后会提示T>VALID Cert Disk Code Detected-Revision#.245CERT的版本T>VALID Cert Disk Code Detected-Revision#.245CERT的版本CTRL+L命令用的较多第一写固件的时候要找他,第二在有些菜单操作的时候需要这个指令2、CTRL+Z中断指令执行,转到T>3、C TRL+T执行指令一般用在启动自校准上,输入完校准指令以后,按下CTRL+T来执行校准。
4、;分号指令,查看硬盘状态,AGE=50正常状态,AGE=4F出错状态,AGE=00进入F级,AGE=其它,自校准中,可以用N50,,22来返回AGE=50正常状态。
希捷常见指令集指令分大小写.请注意区别;分号查看AGE值,可以用来查看校准进程阶段值。
句号可以用来查看校准是否还在运行,隔段时间按一下看是否有变化. CTRL+Z转到T>CTRL+C复位CTRL+R加载CERT,并可以看到CERT版本T>/1 回车转到1级1>r回车也可以加载CERT,作用同于CTRL+R1>t回车加载CERT ABLBE1>/回车即可返回T>T>/2 回车转到2级2>Z关闭电机2>U打开电机T>V1 回车,查看P表缺陷T>V2 回车,查看道表缺陷T>V4 回车,查看G表缺陷T>#回车,修改硬盘SN号T级下校准指令N(X),,22回车之后按CTRL+T运行,此校准会从设定的那一级开始做完之后的流程.K7盘大致的校准流程,盘和固件版本不同就可能有所出入,用指令T>E4E回车即可看到所有校准流程以及每一级走的时间02 03 72 04 05 06 07 10 11 12 13 14 15 16 17 18 19 1A 1B 1C 1D 1E 2A 1F 2F 0B 09 58 21 08 0A 0C 0F 0E 0D 40 25 31 32 33 34 36 37 26 3A 38 3B 3C 3D 3E 3F 42 43 20 47 4B 48 41 27 49 4A 4D 39 22 61 28 62 29 63 59 35 56 6F 4EN2,,22也就是程序全面自校准.做完必须写ATAN2,AA,22扩展校准,效果比全面好,但是成功率低.做完必须写ATA比较常用的几个,不写ATAN4,,224级校准.N8,,228级校准.N31,,2231级校准.N26,,2226级校准.N50,,22返回到正常50,也就是停止自校准T>TX(X=2,3...)此为只对某一级进行测试,比如T8,就只在8级进行测试,不会做8级之后的.T>EX(X=2,3...)此为显示测试结果,比如,T>E5回车,就是显示5级下做的所有流程,通常做T> E4E看校准完成的结果.。
希捷硬盘修复进阶指南(Seagate hard disk repair Advanced Guide)"In the article, we introduced the processing method when the hard disk when the fault occurred, we believe that in after reading on how to repair the hard disk of a certain understanding. However, previous articles only gave you an outline of thinking and judgment, and in the process of hard disk repair, you must also master some other tools and techniques to complete the work smoothly. For example, when you got a faulty Seagate hard disk, what would you do to get it? / /Seagate hard disk has a considerable amount of possession in Chinese game player, but on its maintenance (including bad sectors, and other aspects of the firmware) is perplexed by the user. In the following, the author, based on his personal experience of Seagate hard disk maintenance, will show you how to save your strike hard disk with the proper steps and the proper hardware and software tools.A damage detection -- for repairs beforeWhen the hard disk failure, first do not panic with hands, it should be the first to use bad detection software check familiar about the number of bad sectors and bad position, I strongly recommend "efficient source of large capacity hard disk detection and repair program", the tool is more intuitive, with Chinese language habits.After detecting the end if the large number of bad sectors, bad sectors (generally 3000 to the bottom line), the first not to rush in with software entries to defect list (P-List andG-List).Table //G-List: growth defect list, the utility model has the advantages of fast repair bad sectors and retain data, is the number of bad sectors can be added to the disadvantages of too little, some of the old hard disk only hundreds of P-List;P-List: the factory is a list of defects, the number of entries to the advantage, how many have a relationship with the capacity of hard disk size. The disadvantage is that after adding, the data is lost, and some hard disk after the completion of the P table needs to be cleared before it can take effect, such as Fujitsu and Seagate most of the hard disk is like this./ /If after we detect bad sectors directly into the join list of defects, it is very easy to cause the G table overflow, before I repaired many Meizuan old hard disk has such defects; secondly, to false bad sectors also added in, but the real sectors remained, cannot be added. So before repair, we should use DM and MHDD software to the hard disk reset once (I recommend using Erase erase function in MHDD), can repair a large number of logical defects, the remaining small part of the bad sectors, and then added to the list of defects, can well solve the problem of bad sectors.Sometimes you will find some use in the disc may be more wiping more bad sectors, for example, ST and WD, is estimated to disk instability caused by aging, in the repair process should be paid attention to. Appropriate tools and repair techniques areimportant. The following author to "efficiency source Seagate hard disk repair tool" as an example, actually see how to repair a seemingly scrapped hard disk./ / Note: the following operation involves many professional knowledge and practical skills, suggested that the relevant operations are not familiar with the hard drive in under the guidance of experienced game player. / /Two, actual combat efficiency source - hard drive back to life1. efficiency source Seagate hard disk repair tool profileSeagate firmware program mainly for repair bad sectors and physical bad sectors are unable to identify the motherboard hard disk, can be repaired for some abnormal sound of the hard disk. In case of data recovery or hard disk drive, the disk will be restored to normal only in a flash, and the original hard disk data will be retained as well. This procedure to repair the physical bad sectors are fast, G-LIST writing can reach 3 per second, P-LIST added up to 2 per second, G-LIST to P-LIST can be completed within 30 seconds and the hard disk read and write firmware required time is only 30 seconds, remove hard disk password for about 1 seconds. According to the head caused problems with compliance rate of bad sectors can also directly to the head position of physical shielding. The whole firmware can be checked, and the specific error module can be found and re written, which is suitable for all kinds of hard disk maintenance professionals and high-level DIY enthusiasts to use. I personally have been for it is currently for Seagate hard disk repair, the most powerful, the most efficient software.Figure 1: source / efficiency2. efficiency source repair hard disk skills talk aboutAccording to the hard disk maintenance experience, I suggest that you first make a full reset (by DM, MHDD, Erase function will do) it can eliminate the hard disk ECC&CRC error (that is we often say that the logical bad sectors). Then the efficiency of the source Seagate hard drive repair tool will be added after the bad sectors G-LIST, G-LIST to P-LIST, and finally to do a hard disk reset (with format can be achieved).Trouble hard disk clearIn accordance with the above steps, first use the familiar MHDD to clear the whole. MHDD is a free hard disk entity scanner maintenance program developed by the Russians. Its cleared function can be used by the ERASE command line. Erase can set the start and end values of the clearing so that the ECC and CRC errors at the specified location are cleared. Very convenient! Unfortunately, there was an error in the middle of the execution, and the reset operation was interrupted.Figure 2:MHDD reset failed /Try to use DM to provide clear function, but also break out, and to repair the hard disk model don't recognize, had no choice but to use the hot swap method to bypass the BIOS to start the self check, access the hard drive into the efficiency of the source Seagate firmware maintenance procedures to repair badsectors.Figure 3: the same failure / / DM resetFigure 4: the utilization efficiency of the source / firmware maintenanceFirst, detect firmware. When the hard disk status window shows "REDAY", click "CK FW", and the program reads all the firmware from the hard disk to memory, compares it with the standard firmware, and gives the comparison results in the information window. Like the author after using DM to cause the hard disk to search the normal, but do not recognize the disk phenomenon, you can use CKFW to detect the bad module, and write with a good module.Figure 5: / / detect the hard disk firmwareThe program reads all the modules from the firmware area and performs regular tests. When you have finished, you will display the details on the left side of the interface. You can use the mouse to flip to see the verification status. The correct check will show that the check result is OK! The error will be displayed as ERR!.Figure 6: / / calibration resultsThe efficiency of the source Seagate firmware repair procedure added damage automatic repair function from the 2.1 version, if the firmware module detected a problem, the program will show "".At this point, click "Yes" will automatically repair the firmware, repair, continue to check, click "NO", ignore, continue to check, it is recommended after the repair test again to confirm the repair results.Figure 7: / / repair after the best testing againAfter the automatic repair module, you can easily recognize the disk. Next, you can use the maintenance tool to perform the clearing.writing of defect tablesFrom the previous article we know that in G-List scanning and form, can be directly effective without clear operation of the hard disk; and by means of P-LIST scanning and table, to cut off once, and then do a reset on the hard disk, P-List can take effect. So I suggest you first add G-List, and then doG-List->P-List conversion, and finally cleared together, so that you can save time.First, use the efficiency source Seagate tools to scan and add tables in G-List mode. After you start typing LBA, end LBA, and time parameters, click GL, the program will start scanning the bad sectors of the hard disk, and then the bad sectors will be added to the G table after the scan is complete. Press F5, not join G-List and exit, press F7 to join G-List and exit.Figure 8: / / scan with G-List and repair defectsAfter the GL scan is completed, the GL turns to the PL table. When the hard disk status window displays REDAY, click "GLtoPL", the program will transfer all G-List to P-List, and emptyG-List.Figure 9:G table P table / /Finally, LFORMAT (price) to do a clear operation, thus the maintenance basically ended. After the repair using the PQ partition is exceptionally smooth, repair bad sectors ended.Three, after the maintenanceSoftware is dead, people are alive, only the correct grasp of the use of software, and then according to the specific reasons for the damage of the hard disk flexible handling, in order to achieve the best repair success rate. Practice has proved that the repair disk to a variety of tools, combined with the use of, in order to achieve the best results, there is no tool is omnipotent.Due to the different manufacturers and products, the corresponding maintenance software and maintenance processes are not the same. At the same time, for business reasons, the hard disk manufacturers and maintenance software manufacturers to form a relationship between spear and shield, all of which invisibly make the repair disk to become a technical activity, while constantly testing your patience. Only diligently efforts, can we understand the essentials of hard disk repair. Only by adhering to the meticulous, serious and professional spirit can the repair work be carried out to the end. Althoughit involves hard fault surface repair mainly by professional maintenance personnel to complete, but with excellent tools such as the source of the efficiency of popularity, who can say that DIYer can not repair the master disc door juehuoer?。
希捷常用指令CTRL+Z 中断指令执行,转到T>CTRL+R 加载CERT到缓存,查看CERT版本CTRL+T 执行指令,一般用在启动自校准上,输入完校准指令以后,按下CTRL+T来执行校准。
T>/1 回车转到1级1>r 回车也可以加载CERT,作用同于CTRL+R1>N1 复位 SMART表1>t 回车加载CERT TABLE1>/ 回车即可返回 T>T>/2 回车转到2级2>Z 关闭电机(电机停转)2>U 打开电机(电机启转)T>V1 回车,查看P表T>V2 回车,查看道表T>V4 回车,查看G表T># 回车,修改硬盘SN号,SN号决定了硬盘的磁头数,磁头数决定了硬盘容量,所以,SN号很重要,SN号要用大写。
% 百分号指令,查看SN号。
;分号指令,查看硬盘状态,AGE=50正常状态,AGE=4F出错状态,AGE=00进入F级,AGE=其它,自校准中,可以用N50,,22来返回AGE=50正常状态。
句号指令,查看硬盘工作情况,多按几次句号,看看有没有变化,有变化,表示硬盘在工作,无变化表示硬盘没有工作。
T>/c 转到C级C>D 查看自校准流程,如果,CERT TABLE坏,则看不到流程,能看到流程说明CERT TABLE是好的。
N50,,22 停止自校准,返回AGE=50N2,,22 全面自校准,全面自校准过程中,首先会把APP CERTCERT TABLE三个模块读取到缓存,然后,低格固件区,修复固件区坏道,最后,找一片好的区域,把缓存中的固件写入到固件区。
跑完02以后,才可以断电,继续修复数据区坏道。
N3,,22 N4,,22 N8,,22..... N26,,22 等,都是部分自校准。
希捷主要是5大模块APP 代码模块CERT 自校准模块CERT TABLE 自校准流程模块ATA 接口协议模块VENDOR 信息模块判断模块好坏的方法APP 硬盘自动进F级,则APP坏。