飞利浦7310说明书
- 格式:doc
- 大小:22.50 KB
- 文档页数:2


MG7750/49All-in-One TrimmerUltimate Precision: our most advanced blades Enjoy best-in-class styling with our most advanced trimmer. DualCut blades deliver maximum precision for head-to-toe styling. The steel frame and rubber grips deliver superior control and the Lithium-ion battery yields 5 hours of runtime.Cutting performanceMaximum precision with 2x more bladesReinforced guards that won't bend or buckleVersatilityTrim and style your face, head and body with 23 piecesSelf-sharpening blades for a smooth resultKeep those lines straightGet the details rightKeeps nose and ear hair at bayExtra-wide hair trimmer to cover more areas faster14 reinforced guards to trim beard, stubble, head and bodyEasy to usePowerful Lithium-ion battery delivers 5hrs of runtimeEasy to maintainThe trimmer can be used cordless or while plugged inHighlights23 pieces for face, head, body23 pieces for all your trimming needs: a metal trimmer, a foil shaver, a detail metal trimmer, a nose and ear trimmer, an extra-wide hair trimmer, 6 hair trimming guards, 3 beardtrimming guards, 2 stubble trimming guards, 2body trimming guards, an eyebrow trimming guard, a storage bag and a cleaning brush.DualCut technologyThis all-in-one hair trimmer features advanced DualCut Technology for maximum precision. It comes with double blades, and is designed to stay as sharp as day 1.5 hour runtimeOur most powerful Lithium-ion rechargeable battery delivers up to 5 hours of runtime per charge.Fully washable trimmerPhilips Multigroom and all of its attachments are fully washable, so simply rinse them under the faucet for easy cleaning.Reinforced guardsGet an even trim every time, with uniquereinforced cutting guards designed to prevent bending and buckling that’s common with impact.Cordless and corded useThe trimmer can conveniently be used cordless for 5 hours, or while plugged in for continual use.Premium stainless steel frameIt’s comfortable and easy to grip your styling trimmer, thanks to the stainless steel frame and rubber grip that improves control.Steel trimmerCreate clean, straight lines and evenly trim through the thickest hair thanks to themultipurpose trimmer's precise steel blades.These non-corrosive blades won't rust, and they self-sharpen to last longer.Foil shaverThe foil shaver quickly and comfortably shavesclean lines around your style.iF DESIGN AWARD 2017Multigroom series 7000iF DESIGN AWARD 2017SpecificationsCreate the look you wantNumber of attachments/guards: 5 attachments, 14 guardsStyling tools: Metal trimmer, Foil shaver, Detail metal trimmer, Nose & ear trimmer, Extra-wide hair trimmer, 3 beard trimming guards, 2 stubble trimming guards, 6 hair trimming guards, 2 body trimming guards, Eyebrow trimming guardBodygroom/Hairclipping/Facial: Long beard, Short beard, Stubble look, Sharp lines, Detailed styling, Goatee Cutting systemDualCut technology: An even and preciseresult, Cut in two directionsSelf-sharpening bladesReinforced trimming guards: Prevent bendingand bucklingAccessoriesMaintenance: Cleaning brushPouch: Storage pouchPowerBattery type: Lithium-ionRun time: 5 hoursCharging: 2 hours charge, 5 min quick chargeAutomatic voltage: 100-240 VEase of useCleaning: Fully washableOperation: Corded & Cordless useDisplay: Battery low indicator, ChargingindicatorMaintenance free: No oil neededDesignHandle: Stainless steel handle, No-slip rubbergripService5-year warranty© 2022 Koninklijke Philips N.V.All Rights reserved.Specifications are subject to change without notice. Trademarks are the property of Koninklijke Philips N.V. or their respective owners.Issue date 2022‑02‑02 Version: 15.4.1。
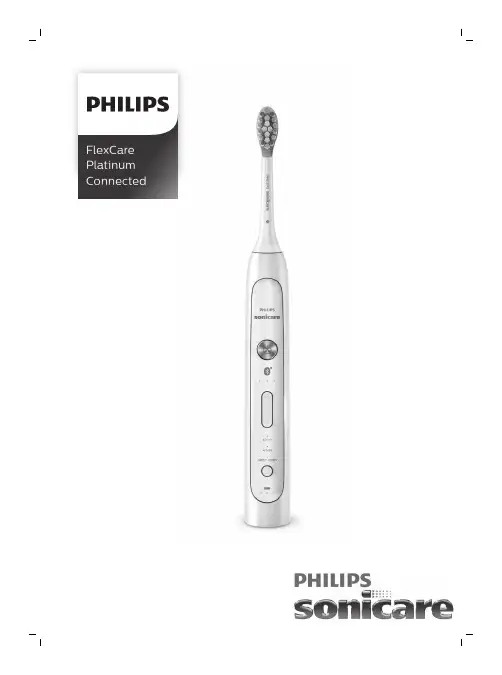
FlexCare Platinum ConnectedEnglish 6简体中文 17繁體中文 26IntroductionCongratulations on your purchase and welcome to Philips! To fully benefit from the support that Philips offers, register your product at /welcome .Important safety informationRead this important information carefully before you use the appliance and save it for future reference.Danger-Keep the charger away from water. Do not place or store it over or near water contained in a bathtub, washbasin, sink etc. Do not immerse the charger in water or any other liquid. After cleaning,make sure the charger is completely dry before you connect it to the wall socket.Warning-The mains cord cannot be replaced. If the mains cord is damaged,discard the charger.-Always have the charger replaced with one of the original type in order to avoid a hazard.-Do not use the charger outdoors or near heated surfaces.-If the appliance is damaged in any way (brush head, toothbrush handle or charger), stop using it. This appliance contains no serviceable parts. If the appliance is damaged, contact theConsumer Care Center in your country (see chapter 'Warranty and support').Caution-Do not clean the brush head, the handle and/or the charger in the dishwasher.-If you have had oral or gum surgery in the previous 2 months,consult your dentist before you use the toothbrush.-Consult your dentist if excessive bleeding occurs after using this toothbrush or if bleeding continues to occur after 1 week ofuse.Also consult your dentist if you experience discomfort or pain when you use the Philips Sonicare.6English-The Philips Sonicare toothbrush complies with the safetystandards for electromagnetic devices. If you have a pacemaker or other implanted device, contact your physician or the device manufacturer of the implanted device prior to use.-If you have medical concerns, consult your doctor before you use the Philips Sonicare.-This product has only been designed for cleaning teeth, gums and tongue. Do not use it for any other purpose. Stop using theproduct and contact your doctor if you experience any discomfort or pain.-The Philips Sonicare toothbrush is a personal care device and is not intended for use on multiple patients in a dental practice or institution.-Stop using a brush head with crushed or bent bristles. Replace the brush head every 3 months or sooner if signs of wear appear.-Do not use other brush heads than the ones recommended by the manufacturer.-If your toothpaste contains peroxide, baking soda or bicarbonate (common in whitening toothpastes), thoroughly clean the brush head with soap and water after each use.This prevents possible cracking of the plastic.Electromagnetic fields (EMF)This Philips appliance complies with all applicable standards and regulations regarding exposure to electromagnetic fields.Your Philips Sonicare (Fig. 1)1Hygienic travel cap2Brush head with unique identifier3Handle4Sensors5Power on/off button6Bluetooth7Intensity level indicator8Intensity level button (+ and -)9Brushing modes7English10Mode button11Battery level indicator12Travel charger-Not shown: Travel caseNote: The content of the box may vary based on the model purchased.Preparing for useAttaching the brush head1Align the brush head so the bristles point in the same direction as the front of the handle (Fig. 2).2Firmly press the brush head down onto the metal shaft until it stops.Note: Philips Sonicare brush heads are imprinted with icons to easily identify your brush head (Fig. 4).Charging your Philips Sonicare1Put the plug of the charger in a wall socket.2Place the handle on the charger.The flashing light of the battery level indicator indicates that the toothbrush is charging (Fig. 5).Note: It takes at least 24 hours to fully charge the battery.Using the applianceBluetooth connectivityBefore you start the connectivity procedure, make sure your mobile device runs on Bluetooth 4.0 or higher.Note: For the latest information on device compatibility, please visit the App Store or Google Play.8EnglishConnecting your toothbrush1When used in connected mode, the Philips Sonicare app gives you the opportunity to receive real-time feedback on brushing, store and share brushing data with your dentist (if you so choose), and receive personalized coaching. If you wish to use the toothbrush in unconnected mode, the toothbrush will still function. To use the toothbrush in connected mode, please follow the instructions below.2Download the Philips Sonicare app from the Apple App Store or Google Play Store.3Confirm Bluetooth is switched on on your mobile device before you open the app. Check the settings on your mobile device to switch on Bluetooth.4To connect the toothbrush to the app, switch onthe toothbrush by pressing either the power on/off button or the brushing mode button. Make sure the toothbrush is not on the charger when you switch it on.5Open the Sonicare app.6Follow the Sonicare app instructions displayed on your mobile device. The app automatically connects with the toothbrush. If the toothbrush does not connect, follow the troubleshooting steps provided in the app.Note: For optimal data capture, keep your mobile device close during brushing.Brushing instructions1Wet the bristles and apply a small amount of toothpaste.2Place the toothbrush bristles against the teeth at a slight angle (45degrees), pressing firmly to make the bristles reach the gumline or slightly beneath the gumline (Fig. 6).Note: Keep the center of the brush in contact with the teeth at all times.3Press the power on/off button to turn on the Philips Sonicare.9English4Apply light pressure to maximize Philips Sonicare’s effectiveness and let the Philips Sonicare toothbrush do the brushing for you.Do not scrub.5Gently move the brush head slowly across the teeth in a small back and forth motion so the longer bristles reach between your teeth. Continue this motion throughout the brushing cycle.6To clean the inside surfaces of the front teeth, tilt the brush handle semi-upright and make several vertical overlapping brushing strokes on each tooth (Fig. 7).Note: To make sure you brush evenly throughout the mouth,divide your mouth into 6 sections using the BrushPacer feature (see chapter ‘Features’).7Follow the Sonicare app's brushing guidance combined with the BrushPacer and begin brushing in section 1 (upper right teeth) and brush for 20 seconds before you move to section 2 (upper front teeth). Continue doing this for section 3 till 6 to ensure even brushing in all 6 segments of the mouth (Fig. 8).Note: When using the White mode, two additional 20 second intervals can be used for polishing your front teeth.8The Philips Sonicare app helps to address any missed spots by guiding you to spend 20 seconds in the areas you missed during brushing.Your Philips Sonicare toothbrush is safe to use on:-Braces (brush heads wear out sooner when used on braces)-Dental restorations (fillings, crowns, veneers)Note: Ensure that braces or dental restorations are properly adhered and not compromised. If not, braces or dental restorations may be damaged when they come into contact with the brush head.Note: When the Philips Sonicare toothbrush is used in clinical studies,the handle should be fully charged and the Easy-start feature deactivated.Brushing modesNote: When the toothbrush is switched on, you cannot toggle between modes.10English1Prior to turning on the Sonicare, press the mode button to toggle between modes.-The selected brushing mode illuminates.-Once a brushing mode has been selected, it remains active until another brushing mode is selected.Clean modeStandard mode for superior teeth cleaning.White mode2 minutes of alternating between White and Massage, with an additional 40 seconds to polish your visible front teeth.Deep CleanProvides an invigorating of deep massage to deliver an exceptionally clean experience.Intensity levels per mode-Low: 1 LED indicator light.-Medium: 2 LED indicator lights.-High: 3 LED indicator lights.Note: to adjust the intensity level to the next higher or lower level, you can press the + button to increase intensity or the - button to decrease intensity at any time during the brushing cycle.Pressure SensorA change in vibration (and a slight change in sound) alerts you when you apply too much pressure while brushing. See chapter ‘Features’.Battery status (when handle is not on charger)- 1 yellow LED indicates a low charge.- 3 green LEDs indicate a full charge.Note: If you hear two sets of five beeps and the yellow LED of the battery level indicator flashes, your Sonicare will turn off until placed on the charger, where it will start to recharge.Note: Your Sonicare will not be able to run a brushing routine until it is fully recharged.Note:To keep the battery fully charged at all times, you may keep your Sonicare on the charger when not in use.11EnglishFeaturesPressure SensorThis Philips Sonicare model comes with the Pressure Sensor feature activated. The Pressure Sensor works in all 3 modes and at all 3intensity levels.Activating or deactivating the Pressure Sensor feature 1Attach the brush head to the handle.2Place the handle in the plugged-in charger.-To deactivate Pressure Sensor:Press and hold the power on/off and mode button for 2 seconds.You hear 1 beep to indicate that the Pressure Sensor feature has been deactivated.-To activate Pressure Sensor:Press and hold the power on/off and mode button for 2 seconds.You hear 2 beeps to indicate that the Pressure Sensor feature has been activated.BrushPacer-The BrushPacer is an interval timer that has a short beep and pause to remind you to brush the 6 sections of your mouth.Depending on the brushing mode or brushing routine you have selected, the BrushPacer beeps at different intervals during the brushing cycle. See the ‘Brushing instructions’ sections (Fig. 8).To deactivate or reactivate the BrushPacer feature:1Place the handle with a brush head attached in the plugged-in charger.2Press and hold the mode button until:a You hear 1 beep to indicate the BrushPacer has beendeactivated.b You hear 2 beeps to indicate the BrushPacer has beenactivated.12EnglishSmartimerThe Smartimer indicates that your brushing cycle is complete by automatically turning off the toothbrush at the end of the brushing cycle.Dental professionals recommend brushing no less than 2 minutes twice a day.Easy-startThis Philips Sonicare comes with the Easy-start deactivated.The Easy-start feature gently increases the power over the first 14brushings to help you get used to the brushing with the Philips Sonicare.Note: Each of the first 14 brushings must be at least 1 minute in length to properly advance through the Easy-start ramp-up cycle.Activating or deactivating the Easy-start feature1Attach the brush head to the handle.2Place the handle in the plugged-in charger.-To activate Easy-start:Press and hold the power on/off and mode button for 2 seconds.You hear 2 beeps to indicate that the Easy-start feature has been activated.-To deactivate Easy-start:Press and hold the power on/off and mode button for 2 seconds.You hear 1 beep to indicate that the Easy-start feature has been deactivated.Note: Using the Easy-start feature beyond the initial ramp-up period is not recommended and reduces Philips Sonicare effectiveness in removing plaque.Note: Each of the first 14 brushings must be at least 1 minute in length to properly move through the Easy-start ramp-up cycle.Cleaning13EnglishToothbrush handle1Remove the brush head and rinse the metal shaft area with warmBrush head1Rinse the brush head and bristles after each use (Fig. 10).2Remove the brush head from the handle and rinse the brush head connection with warm water at least once a week. Rinse the travel cap as often as needed.Charger1Unplug the charger before you clean it.2Wipe the surface of the charger with a damp cloth. Make sure you remove any toothpaste or other residue from the charger surfaces.StorageIf you are not going to use the product for a long time, unplug it, clean it (see chapter 'Cleaning') and store it in a cool and dry place away from direct sunlight.Replacement Brush head-Replace Philips Sonicare brush heads every 3 months to achieve optimal results.Note: The Sonicare App will tell you when it is time to replace your brush head. (See in-app Help section)-Use only Philips Sonicare replacement brush heads.Recycling-Do not throw away the product with the normal household waste at the end of its life, but hand it in at an official collection point for recycling. By doing this, you help to preserve the environment.14English-This product contains a built-in rechargeable battery which shall not be disposed of with normal household waste. Please take your product to an official collection point or a Philips service center to have a professional remove the rechargeable battery.-Follow your country’s rules for the separate collection of electrical and electronic products and rechargeable batteries. Correct disposal helps prevent negative consequences for theenvironment and human health.Removing the rechargeable battery(standard) screwdriver. Observe basic safety precautions when you follow the procedure outlined below. Be sure to protect your eyes,hands, fingers, and the surface on which you work.1To deplete the rechargeable battery of any charge, remove the handle from the charger, turn on the Philips Sonicare and let it run until it stops. Repeat this step until you can no longer switch on the Philips Sonicare.2Insert a screwdriver into the slot located at the bottom of thehandle and turn counterclockwise to release the bottom cap (Fig.11).3Hold the handle upside down and push down on the shaft to release the internal components of the handle (Fig. 12).4Insert the screwdriver under the circuit board, next to the battery connections, and twist to break the connections. Remove the circuit board and pry the battery from the plastic carrier (Fig. 13).The rechargeable battery can now be recycled and the rest of the product discarded appropriately.Warranty and supportIf you need information or support, please visit/support or read the international warranty leaflet.15EnglishWarranty restrictionsThe terms of the international warranty do not cover the following:-Brush heads.-Damage caused by use of unauthorized replacement parts.-Damage caused by misuse, abuse, neglect, alterations or unauthorized repair.-Normal wear and tear, including chips, scratches, abrasions,discoloration or fading.Hereby, Philips Consumer Lifestyle BV declares that the radio equipment type Bluetooth LE is in compliance with Directive 2014/53/EU.The full text of the EU declaration of conformity is available at the following internet address: /support16English简介感谢您的惠顾,欢迎光临飞利浦! 为了让您能充分享受飞利浦提供的支持,请在 /welcome 上注册您的产品。


目录1 重要信息02安全警告旧产品和旧电池的处理2 安装您的智能锁03产品清单安装立体装配图安装前须知安装步骤3 了解您的智能锁08外面板内面板4 设置您的智能锁09设置前需知进入管理模式修改管理密码添加用户删除用户系统设置扩展功能系统查询蓝牙设置5 使用您的智能锁15室外/室内开锁室外/室内上锁室内反锁机械钥匙应急开锁6 其他功能18室内感应开锁功能布防功能一键静音功能恢复出厂设置7 提示灯说明20门锁状态提示灯低电量提示灯布防提示灯静音状态提示灯室内反锁提示灯系统锁定提示灯开/关门【OPEN/CLOSE】键提示灯室内感应开锁功能提示灯8 故障排除23报警功能的种类与报警方式如何使用紧急电源如何更换电池9 材料声明表251 重要信息安全◆在使用智能锁前,请阅读并理解所有说明,因未遵守说明而造成的损坏不在保修范围内◆建议使用制造商指定的附件/配件◆仅使用本产品配置的碱性电池,或同样规格类型的电池◆请勿强行拆卸本产品,以免触发警报或损坏产品◆请勿用尖锐物品擦指纹采集器,否则可能造成永久性损坏◆请勿将产品暴露在漏水或溅水环境下◆请勿将产品接触腐蚀性物质,以免破坏外壳保护层◆请勿在执手上悬挂物件,以免影响门锁的正常使用◆清洁产品,请用软布擦拭◆请勿在设置操作时拆卸电池◆请您选择专业人员安装门锁,并按照本公司提供的安装标准进行操作,切勿私自拆装门锁,并保护好相关固封标志◆门锁安装调试合格后,请在第一时间内修改出厂设置的默认管理密码,并妥善保管好机械钥匙,不要轻易泄露密码信息◆门锁触发低电量报警后,请及时更换掉全部电池,并确保电池正负极安装正确警告◆不要将电池靠近火源,以免发生爆炸◆请勿使用不符合安全规定的应急电源给产品供电◆请勿用金属物将电池引线的两极连接短路,以免引起爆炸◆确保由飞利浦、飞利浦授权的服务中心或专业的维修人员进行更换◆请勿使用由其它制造商生产的,或未经飞利浦特别推荐的附件或部件,如果使用此类附件和部件,您的保修可能失效产品清单本产品清单仅供参考,一切以实物包装内容为准。

飞利浦7310说明书注意事项只能使用产品随附的电源插头。
电源插头可将 100-240 伏的电压转换为 24 伏以下的安全低电压。
电源插头中含有一个变压器。
在自来水龙头下清洗剃须刀之前,务必拔掉其电源插头。
此产品符合国际认可的 IEC 安全标准,可放心在自来水龙头下清洗。
水洗设计不适合在淋浴时使用。
切勿将剃须刀浸入水中。
冲洗产品时,水可能从产品底部的插口漏出。
这是正常的,而且没有危险,因为所有的电子线路都密封在剃须刀内的一个密封内。
电磁场 (EMF)这款飞利浦产品符合关于电磁场 (EMF) 的相关标准。
如果正确使用并按照本用户手册中的说明进行操作,本产品是安全的。
充电开始充电之前确保产品电源已关闭。
充电需用时至少 8 小时。
您也可以不充电而将剃须刀插上电源后使用。
充电指示当开始为耗完电的剃须刀充电时,充电指示灯亮起。
电池已完全充满电池完全充满电时,充电指示灯开始闪烁。
当拔下剃须刀时,充电指示灯熄灭。
不接电源的剃须时间:充电后,剃须刀可在不接电源的情况下剃须最长达 35 分钟。
为产品充电当马达停转或转速开始下降时,为产品充电。
1 将产品插头插入剃须刀。
2 将电源插头插入壁装插座。
3 电池充满后,从壁装式插座中拔下电源插头,并从剃须刀上拔下产品插头。
剃须1 按一下开/关按钮打开剃须刀。
电源指示灯亮起即表示马达运转。
2 将剃须刀头在皮肤上快速移动,作直线和迂回动作。
在干爽的面部剃须效果最佳。
3 按一下开/关按钮关闭剃须刀电源。
电源指示灯熄灭。
4 清洁剃须刀(见“清洁和保养”一章)。
5 每次使用后,盖上剃须刀保护盖,以防剃须刀头受损。
修剪用于修剪鬓角和小胡子。
1 向下推动滑块,打开修发器。
当马达运转时,修发器便可以启动。
2 关闭修发器(可听到咔嗒声)。
清洁和保养为保证更好的剃须效果,剃须刀必须定期清洗。
注意:冲洗产品时,水可能从产品底部的插口漏出。
这是正常的,而且没有危险。
1 关闭剃须刀电源,从壁装式电源插座中拔下电源插头,并从剃须刀上拔下产品插头。

产品名称飞利浦HQ130飞利浦HQ902飞利浦HQ904飞利浦HQ912飞利浦HQ914产品图片产品价格87 元115 元148 元239 元329 元刀头型号HQ30HQ55HQ55HQ55HQ55刀头数量2个2个2个2个2个显示器-----操作时间-----自动选择:100-240V 自动选择:100-240V充电式环保镍氢电池充电式环保镍氢电池外接电源-----适配电池2节5号干电池2节5号干电池2节5号干电池--快速充电-----充电时间---8小时8小时充电显示灯---绿色绿色电池电量满/低显示灯---量满时绿色灯量满时绿色灯,不足时橙色特色功能-提须及切剃系统,弹性贴面系统,独立浮动刀头,防腐蚀刀头,胡茬储藏室,水洗设计提须及切剃系统,弹性贴面系统,独立浮动刀头,防腐蚀刀头,胡茬储藏室,水洗设计独立浮动刀头,防腐蚀刀头,胡茬储藏室,弹性贴面系统,精确切剃系统,水洗设计,替换刀头,升级双层刀片技术独立浮动刀头,防腐蚀刀头,胡茬储藏室,弹性贴面系统,精确切剃系统,水洗设计,替换刀头,升级双层刀片技术功率-----重量-----剃须刀颜色-蓝色银灰色黑色金色电源系统 2 节 AA 电池:60 分钟剃须时间 2 节 AA 电池:60 分钟剃须时间 2 节 AA 电池:60 分钟剃须时间飞利浦HQ7320飞利浦HQ7310飞利浦HQ7340飞利浦HQ30飞利浦HQ46飞利浦HQ5715 665 元629 元939 元停产136 元265 元HQ8HQ8HQ8HQ3HQ30HQ643个3个3个-------充电指示器-10天--60分钟30分钟(不接60小时电源线)电池自动选--干电式充电式择:100-240V220V-50Hz 充电式环保镍氢电池-220V220V220V-50HZ-----2节5号干电池-3分钟-----8小时8小时8小时8小时-8小时绿/红灯绿色支持支持---量满时绿色灯-----可水洗可水洗-双层刀片技术-独立浮动刀头,防腐蚀刀头,胡茬储藏室,弹性贴面系统,精确切剃系统,水洗设计,替换刀头,升级双层刀片技术---------100g-金属色黑色金属色深青绿色黑色灰色飞利浦QG3040飞利浦HQ851飞利浦HQ852飞利浦HQ5710飞利浦HQ5705飞利浦HQ801停产205 元199 元185 元155 元129 元-HQ 40HQ 40HQ64HQ54HQ40------------最多35 分钟30 分钟30 分钟60小时60小时60分钟充电式充电式/电池式充电式/电池式电池电池电池-100-240V100-240V220V-50Hz220V-50Hz220V-50Hz -----2节5号干电池---3分钟3分钟-10小时8小时8小时8小时8小时-LED 指示灯(在适配器上)支持充电指示灯支持充电指示灯绿/红灯绿/红灯绿/红灯------------------540g10201010---黑色白色蓝色灰色灰色黑色飞利浦HQ804飞利浦HQ803飞利浦HQ802飞利浦HQ7160飞利浦HQ9080飞利浦HQ7140121 元119 元119 元859 元825 元停产HQ40HQ40HQ40HQ8HQ9HQ8------------60分钟60分钟60分钟35小时最多30 天35小时电池电池电池充电/电源充电式/电池充电/电源式220V-50Hz220V-50Hz220V-50Hz220V-50Hz100-240V220V-50Hz-2节5号干电池2节5号干电池2节5号干电池-充电式环保锂电池---3分钟支持快速充电3分钟---8小时1小时8小时绿/红灯绿/红灯绿/红灯绿/红灯LCD 多功能显绿/红灯示 : 双色红绿---红绿支持电量不足指示灯, 电量已满指示灯----------------550g-黄绿色黑红色白色绿色灰色绿色飞利浦HQ7120飞利浦HQ6675飞利浦HQ6095飞利浦HQ6090飞利浦HQ6075飞利浦HQ6070655 元停产585 元558 元465 元315 元HQ8HQ8HQ8HQ8HQ8HQ8------------35小时35小时35小时35小时35小时35小时充电/电源充电/电源充电/电源充电/电源充电/电源充电/电源220V-50Hz220V-50Hz220V-50Hz220V-50Hz220V-50Hz220V-50Hz ------3分钟3分钟3分钟3分钟3分钟3分钟8小时8小时8小时8小时8小时8小时绿/红灯绿/红灯绿/红灯绿/红灯绿/红灯绿/红灯红绿红绿红绿红绿红绿红绿------------------绿色绿色绿色绿色绿色银色飞利浦HQ6073飞利浦HQ8160飞利浦HQ8240飞利浦HQ7390飞利浦HQ8140飞利浦HQ7240395 元停产1350 元1390 元停产1159 元HQ8HQ9HQ9HQ8HQ9HQ8--3个3个----镜面涂料的显示屏镜面涂料的显示屏--35小时18天-10天18天35小时充电/电源充电/电源充电式充电式充电/电源充电/电源220V-50Hz220V-50Hz100-240V100-240V220V-50Hz220V-50Hz ---充电式环保镍氢电池--3分钟----3分钟8小时1小时 1 小时 1 小时1小时8小时绿/红灯绿/红灯支持充电显示灯支持绿/红灯绿/红灯红绿暗蓝色-绿色/红色蓝色红绿------有SmartTouch面部轮廓跟踪系统有弹性贴面系统有防敏感保护盖水洗设计弹性贴面系统有防敏感保护盖水洗设计------绿色蓝色银色黑灰色金属色绿色银色绿色飞利浦HQ7380飞利浦HQ7290飞利浦HQ7360飞利浦HQ7180飞利浦HQ9090飞利浦RQ10951150 元停产930 元990 元965 元3500 元HQ8HQ8HQ8HQ8HQ9RQ103个-3个--3个镜面涂料的显示屏-镜面涂料的显示屏--数字液晶10天35小时10天35 分钟80天最多21天充电式充电/电源充电式充电式充电/电源充电式/电源式100-240V220V-50Hz100-240V100-240V220V-50Hz220V-50Hz充电式环保镍氢电池-充电式环保镍氢电池充电式环保镍氢电池---3分钟-支持3分钟快速充电--1 小时8小时 1 小时 1 小时1小时1小时绿色绿/红灯绿色支持充电显示灯绿/红灯绿/红灯绿色/红色红绿绿色/红色-红绿-----弹性贴面系统有防敏感保护盖水洗设计独立浮动刀头-弹性贴面系统有防敏感保护盖水洗设计独立浮动刀头-------172g金属色绿色金属色-亮银色冰银色飞利浦HQ9190飞利浦RQ1085飞利浦HQ9170飞利浦HQ8170飞利浦HQ9160飞利浦HQ8270CC停产3000 元停产停产停产2136 元HQ9RQ10HQ9HQ9HQ9HQ9-3个---3个-数字液晶---LED指示灯多功能显示器最长80天最多21天最长80天18天最长80天-充电/电源充电式/电源充电/电源充电/电源充电/电源充电式式220V-50Hz220V-50Hz220V-50Hz220V-50Hz220V-50Hz100-240V --------3分钟-3分钟-1小时1小时1小时1小时1小时 1 小时绿/红灯绿/红灯绿/红灯绿/红灯绿/红灯支持充电显示灯红绿-红绿蓝色红绿-----------有SmartTouch面部轮廓跟踪系统有弹性贴面系统有旅行锁有Jet Clean高效能清洁系统有防敏感保护盖-172g----亮银色冰银色外壳亮银色绿色银色亮银色黑色飞利浦RQ1050飞利浦HQ8170CC飞利浦HQ8260飞利浦HQ9199飞利浦RQ10752085 元停产1580 元6299 元停产RQ10HQ8HQ9HQ9RQ10--3个-3个数字液晶-镜面涂料的显示屏-数字液晶最多21天55分钟-最多30 天最多21天充电式/电源式充电式/电池式充电式充电式/电池式充电式/电源式220V-50Hz-100-240V100-240V220V-50Hz-充电式环保锂电-充电式环保锂电池--支持快速充电-支持快速充电-1小时1小时 1 小时1小时1小时绿/红灯LED指示灯支持充电显示灯LCD 多功能显示 : 双色绿/红灯-支持电池电量低、满显示灯-支持电量不足指示灯, 电量已满指示灯-----有SmartTouch面部轮廓跟踪系统有弹性贴面系统有旅行锁有防敏感保护盖水洗设计--172g-550172g冰银色外壳黑色黑色冰银色外壳。

Philipswidescreen flat TV with Pixel Plus107cm (42")LCDHD Ready42PFL7312Turn up your viewing experiencewith Pixel PlusExperience the superior picture quality of this excellent Flat TV with the latest LCD technology and Pixel Plus. It's packed into a stunning design that will complement your interior.Breathtaking natural pictures•HD LCD WXGA display, with a 1366 x 768p resolution •HD Ready for the highest quality display of HD signals •Pixel Plus for detail, depth and clarity•3D combfilter separates colors for a razor-sharp image Superb sound reproduction•Virtual Dolby Surround for a cinema-like audio experience Slim, stylish design to complement your interior •Compact and slim design that fits in every room Designed for your convenience•PC input lets you also use your TV as a PC monitor •Auto Picture to personalize your viewingFor advanced performance•HDMI input for full digital HD connection in one cableHighlightsHD ReadyEnjoy the exceptional picture quality of High Definition pictures and be fully prepared for HD sources like HDTV settop box or Blu-ray disc. HD Ready is a protected label that offers picture quality beyond that of progressive scan. It conforms to strict standards laid out by EICTA to offer a HD screen that displays the benefits of resolution and picture quality of a High Definition signal. It has a universal connection for both analog YPbPr and uncompressed Digital connection of DVI or HDMI, supporting HDCP. It can display 720p, and 1080i signals at 50 and 60Hz.Pixel PlusPixel Plus is a digital picture processing technology that increases the number of lines and the number of pixels. The result is razor sharp pictures with incredible detail and depth, every time from any source.3D CombfilterThe 3D comb filter separates brightness andcolor signals better in 3D domain to eliminatecross-color, cross-luminance and dot-crawldistortion - all of which detract from yourviewing pleasure. The 3D digital comb filterperforms field-by-field comparisons of thetelevision image to accurately separate thecolor from the black-and-white informationand remove both horizontally and verticallyhanging dots, as well as dot crawl. The result isa razor sharp image.Virtual Dolby SurroundVirtual Dolby Surround is a processingtechnology for enhancing surround soundeffects. It will create the sensation of DolbyPro Logic without the necessity of additionalrear speakers. You become totally immersedin your television experience.PC inputWith PC input you can connect your TV to acomputer and use the TV as a PC monitor.Auto PictureAuto Picture button on the remote controlenables one-touch selection of various presetoptimized image settings to suit different TVprogram.HDMI inputHDMI makes an uncompressed digital RGBconnection from the source to the screen. Byeliminating conversion to an analog signal, itdelivers an unblemished image. The non-degraded signal reduces flicker and leads to aclearer picture. HDMI intelligentlycommunicates the highest output resolutionwith the source device. The HDMI input is fullybackward compatible with DVI sources butincludes digital audio. HDMI uses HDCP copyprotection.Issue date 2019-06-28 Version: 3.0.912 NC: 8670 000 26423 EAN: 87 12581 30870 4© 2019 Koninklijke Philips N.V.All Rights reserved.Specifications are subject to change without notice. Trademarks are the property of Koninklijke Philips N.V. or their respective owners.SpecificationsPicture/Display•Aspect ratio: 16:9, Widescreen •Brightness: 500 cd/m²•Dynamic screen contrast: 4000:1•Response time (typical): 8 ms•Viewing angle (H / V): 176 / 176 degree •Diagonal screen size: 42 inch / 107 cm •Display screen type: LCD WXGA Active Matrix TFT•Panel resolution: 1366 x 768p•Picture enhancement: Pixel Plus, Luminance Transient Improver, Contrast Plus, 3/2 - 2/2 motion pull down, 3D Combfilter, Active Control + Light sensor, Color Temperature Adjustment, Digital Noise Reduction, Jagged Line Suppression, Progressive scan, Sharpness Adjustment •Screen enhancement: Anti-Reflection coated screenSupported Display Resolution •Computer formatsResolution Refresh rate640 x 480 60, 67, 72, 75Hz800 x 600 56, 60, 72, 75Hz1024 x 768 60, 70, 75Hz1280 x 768 60Hz•Video FormatsResolution Refresh rate640 x 480i 1Fh640 x 480p 2Fh720 x 576i 1Fh720 x 576p 2Fh1280 x 720p 3Fh1920 x 1080i 2FhSound•Equalizer: 5-bands•Output power (RMS): 2 x 15W RMS•Sound Enhancement: Dynamic Bass Enhancement •Sound System: Stereo, Virtual Dolby Surround, SAPLoudspeakers•Built-in speakers: 2Convenience•Child Protection: Child Lock+Parental Control •Clock: Sleep Timer, Wake up Clock•Ease of Installation: Autostore, Fine Tuning •Ease of Use: 8 channel smart surf list, AutoPicture,AutoSound, Graphical User Interface, ProgramList, Side Control•On-Screen Display languages: English, French,Portuguese, Spanish•Remote Control: TV, Amp, DVD, Multi-functional•Remote control type: RCFN05SPS00•Screen Format Adjustments: 4:3, Movie expand14:9, Movie expand 16:9, Subtitle Zoom, SuperZoom, Widescreen•Picture in Picture: Picture in graphicsTuner/Reception/Transmission•Aerial Input: 75 ohm F-type•TV system: NTSC, PAL N, PAL M•Video Playback: NTSC, PAL (all versions)•Tuner bands: Hyperband, S-Channel, UHF, VHF•Number of Preset Channels: 125•Tuner Display:PLLConnectivity•AV 1: Audio L/R in, CVI, YPbPr (2fh)•AV 2: Audio L/R in, CVBS, S-Video•Number of AV connections: 5•Front/Side connections: Audio L/R in, CVBS in,Headphone Out, S-video in•Other connections: HDMI, Monitor out L/R(Cinch), PC-in VGA + Audio L/R in, HD input viaVGAPower•Ambient temperature: 5 °C to 40 °C•Mains power: 100-240V, 50-60Hz•Power consumption: 230 W•Standby power consumption: < 1WAccessories•Included accessories: Table top stand, Wallmounting bracket, VGA to YPbPr-Cinch cable,Power cord, Quick start guide, User Manual,Remote Control, Batteries for remote controlDimensions•Set dimensions(W x H x D):1249 x 697 x 111 mm•Set dimensions with stand (W x H x D):1249 x 760 x 305 mm•Product weight: 32 (with stand), 30 (withoutstand) kg•Box dimensions(W x H x D):1328 x 939 x 330 mm•Weight incl. Packaging: 40 kg•VESA wall mount compatible: 800 x 400 mm*For a maximum picture quality without distortion it is necessary ahigh quality digital signal in widescreen format or to use a signalconversor/decoder.*Avoid extensive use of the set in a volume higher than 85 decibelbecause this may damage your hearing.。

Daily Collection700 W16 functions2-in-1 discIn-bowl storageHR7310/10Enjoy effortless homemade meals every day with essential accessories and space-saving designIf you enjoy healthy homemade meals but have a busy schedule, you’ll love our Philips Daily Compact Food Processor. We’ve designed this compact collection especially for hectic lives. You can quickly and effortlessly prepare great dishes.Designed for your busy lifestylePowerful 700W motor for effortless processingConvenient all-in-one appliance: knead, whisk, shred, sliceFast preparation with large feeding tube for minimal pre-cutColor-coded speed and accessories guide for easy matchingQuick and easy assembly of all partsCompact design takes less space, not performanceSmaller footprint and in bowl storage for all accessories2 –in-1 double-sided stainless steel discs: shred & sliceMake up to 5 portions at same time with 1.5L bowl capacityAll accessories are dishwasher safeCompact Food ProcessorHR7310/10HighlightsSpecificationsPowerful 700W motorOur powerful motor can easily handle a variety of ingredients from bread dough to hard vegetables, cheese and chocolate. It also slices and shreds with ease.Over 16+ functionsWith more than 16 functions, there is no limt to what you can make: meals, bread, sauces and more. Use the high quality and multi-functional accessories to chop, puree and mince ingredients with the S-blade, or slice and shred with the 2-in-1 disc. Whatever you’re in the mood for, whip, whisk, knead and more.Large feeding tubeFast preparation with large feeding tube for minimal pre-cut.Color-coded speed guidanceFor perfect results every time, just match the accessory color to the same speed color. Use speed 1 to whip cream, beat eggs, makepastries and bread doughs. Speed 2 is ideal to chop onions, mince meat, make smoothies and more.Quick and easy assemblyQuick and easy assembly of all parts.Space-saver designThe compact Daily Food Processor takes up less countertop space, yet is fully equipped with all of the kitchen essentials that you can easily store inside of the bowl.Stainless steel 2-in-1 discErgonomic, double-sided disc makes it easy to slice with one side and shred with the other side!Up to 5 portions in one goThe generous 2.1L bowl (1.5 L working capacity)lets you blend up to 5 portions of soup in one go.Dishwasher-safe accessoriesAll accessory parts can be put on the top rack of your dishwasher for easy cleaning.AccessoriesIncluded: Blade unit S-blade, Emulsifying tool, Kneading tool, Reversible discGeneral specificationsNumber of slicing disks: 1 (reversible)Number of speed settings: 2 + pulseProduct features: Cord storage, Dishwasher safe, Integrated cord storage, Non-slip feet,PulseCable holder DesignColor: Black FinishingMaterial of main body: ABSMaterial pulp container/pusher: SAN Material blade: Stainless steelMaterial accessories: Metal (2-in1 disc) and plastic (Kneading tool & emulsifying disk)T echnical specifications Capacity bowl: 2.1 LWorking capacity bowl: 1.5 (or 500g flour) L Frequency: 50-60 Hz Power: 700 WVoltage: 220-240 VMaximum power: 700 W maximum speed: 2 + pulse Turbo button: PulseWeight and dimensionsDimensions of product (LxWxH):244x244x377 mm Country of origin Made in: ChinaService2-year worldwide guarantee© 2020 Koninklijke Philips N.V .All Rights reserved.Specifications are subject to change without notice. Trademarks are the property of Koninklijke Philips N.V . or their respective owners.Issue date 2020‑12‑07Version: 5.1.1。
S7980English 6简体中文 35IntroductionCongratulations on your purchase and welcome to Philips! To fully benefit from the support that Philips offers, register your product at/welcome or via the SkinAnalyst app.Introducing Philips’ first ever complete shaving and skincare system. Assess and measure thecondition of your skin, personalize your FaceSmart shaving and cleansing settings, and best of all,receive daily skincare advice tailored to you.General description (Fig. 1)1Protection cap for cleansing brush2Cleansing brush3Cleansing brush base4Shaving unit5On/off button6Handle7Socket for small plug8SkinAnalyst sensor9Notification symbol10Shaving unit detector11Cleansing brush detector12Cleaning reminder13Bluetooth® symbol14Travel lock symbol15Battery charge indicator16Pouch17Supply unit (adapter)6EnglishRead this important information carefully before you use the shaver, the Skinanalyst sensor and save it for future reference. The accessories supplied may vary for different products.Danger-Keep the supply unit dry.Warning -To charge the battery, only use the detachable supply unit (type HQ8505) provided with the shaver.-The supply unit contains a transformer. Do not cut off the supply unit to replace it with another plug, as this causes a hazardous situation.-The shaver and SkinAnalyst sensor can be used by children aged from 8 years and above and persons with reduced physical, sensory or mental capabilities or lack of experience and knowledge if they have been given supervision or instruction concerning use of bothappliances in a safe way and understand the hazards involved. Children shall not play with the shaver. Cleaning and user maintenance shall not be made by children without supervision.-Always unplug the shaver before you clean it under the tap.-Always check the shaver and SkinAnalyst sensor before you use it. Do not use it if it is damaged, as this may cause injury. Always replace a damaged part with one of the original type.7English-Do not open the shaver to replace the rechargeable battery.Caution -Never use water hotter than 80°C to rinse the shaver.-Never rinse the SkinAnalyst sensor under the tap.-Only use the shaver and the SkinAnalyst sensor for its intended purpose as shown in the user manual.-For hygienic reasons, the shaver should only be used by one person.-Never use compressed air, scouring pads,abrasive cleaning agents or aggressive liquids such as petrol or acetone to clean the shaver.-Water may drip from the socket at the bottom of the shaver when you rinse it. This is normal and not dangerous because all electronics are enclosed in a sealed power unit inside the shaver.-Do not use the supply unit in or near wallsockets that contain an electric air freshener to prevent irreparable damage to the supply unit.-Keep your iPhone away from water and moist environments.-The shortwave radio frequency signals of a Bluetooth shaver may impair the operation of other electronic and medical devices.8English-Do not use the shaver in medical facilities,aircraft, refuelling points, close to automatic doors, automatic fire alarms or otherautomatically controlled devices.-Switch off Bluetooth where it is prohibited.-Keep this shaver at least 20 cm frompacemakers and other medical devices. Radio waves may impair the operation of pacemakers and other medical devices.Electromagnetic fields (EMF)-This Philips shaver complies with all shaver standards and regulations regarding exposure to electromagnetic fields.General-This shaver is waterproof. It is suitable for use in the bath or shower and for cleaning under the tap. For safety reasons, the shaver cantherefore only be used without cord.-The shaver is suitable for mains voltages ranging from 100 to 240 volts.-The supply unit transforms 100-240 volts to a safe low voltage of less than 24 volts.-The frequency band in which the shaver operates is 2.4 GHz.-The maximum radio frequency power radiated in the frequency band in which the shaver operates is <10dBm.9EnglishThe displayThe shaver is equipped with a notification symbol.This symbol lights up when important advice isavailable in the app. Go to the app to obtain thisadvice. It reminds you to unplug the shaver beforeyou switch it on and to clean it for optimalperformance. It also reminds you to replace theshaving heads every two years or the cleansingbrush every three months.Attachment detection featureWhen you have paired your iPhone with theshaver, the attachment detection feature isactivated. Every time you switch on the shaver, thisfeature automatically recognizes the attachment(shaving unit/cleansing brush) that is attached tothe shaver handle and adapts the settingsaccordingly. Unpairing of your iPhone and theshaver deactivates this feature.Make sure your shaver is connected to youriPhone. The SkinAnalyst app also offers thepossibility to (de)activate the Attachmentdetection feature. You can do this by going to Myprofile, My shaver and switching off the Autoattachment detection. You can then manuallyselect the brush attachment, by switching on theshaver and press and hold the on/off button forone second.10EnglishShaving unit detectorThe shaving unit detector lights up to indicate thatthe shaving unit has been attached to the handle.Cleansing brush detectorThe cleansing brush detector lights up to indicatethat the cleansing brush has been detected.When you switch off the shaver, the cleaningreminder flashes to remind you to clean theshaver. Clean the shaver and the attachments aftereach use for optimal performance.The shaver is equipped with Bluetooth 4.0 toconnect your shaver to the app on your iPhone.Bluetooth is automatically activated when youswitch on the shaver for the first time. You can onlydeactivate it by switching on the travel lock. Travel lockYou can lock the shaver when you are going totravel. The travel lock prevents the shaver frombeing switched on by accident. The travel lock alsodeactivates Bluetooth.Activating the travel lock1Press the on/off button for 3 seconds to enterthe travel lock mode.While you activate the travel lock, the travel locksymbol flashes. When the travel lock is activated,the travel lock symbol lights up continuously.Deactivating the travel lock1Press the on/off button for 3 seconds.The travel lock symbol flashes and then goes out.The shaver is now ready for use and Bluetooth isactivated again.ChargingBattery charge indicatorCharging takes approx. 1 hour.Quick charge: When the battery is empty and youconnect the shaver to the wall socket, the batterycharge indicator flashes quickly. When the shavercontains enough energy for one shaving orcleansing session, the battery charge indicatorstarts flashing slowly..While the shaver continues to charge, the battery charge indicator flashes slowly until the battery is fully charged.When the battery is fully charged, the batterycharge indicator lights up blue continuously.Note: The shaver can only be used without cord.Note: When the battery is full, the display switchesoff automatically after 30 minutes. If you press theon/off button during charging, the notificationsymbol lights up blue to remind you that you haveto disconnect the shaver from the wall socket.When the battery is almost empty, the batterycharge indicator flashes orange.When the battery is completely empty, the batterycharge indicator flashes orange quickly. ChargingCharging takes approx. 1 hour.Charge the shaver before first use and when thedisplay indicates that the battery is almost empty.Note: You can charge the shaver after every use.This will not harm the battery.Charging with the supply unit1Make sure the shaver is switched off.2Insert the small plug into the shaver and put the supply unit in the wall socket.3After charging, remove the supply unit from the wall socket and pull the small plug out of theshaver.Preparing for usePairing the shaver and your iPhoneFor this shaver a special app is available. You candownload the SkinAnalyst app from the App store.By using the app, your skincare and shavingroutine will be personalized. The app gives youexpert advice based on your skin, shaving method,local weather conditions, etc. to support your dailyskincare and shaving routine.Note: The app is available for iPhone 6, iPhone 6Plus, iPhone 6S and iPhone 6S Plus equipped withiOS9 or higher.To create a secure and safe connection, first theshaver and your iPhone need to be paired once.1Download the SkinAnalyst app from the Appstore.2Make sure Bluetooth on your iPhone isswitched on.Open the app on your iPhone.Follow the instructions in the app. After youhave filled in the skin assessment, the app asksyou to pair your iPhone with the shaver.Switch on the shaver. Bluetooth is activatedautomatically.6In the app, the pop-up message 'press pair'appears. When your iPhone and the shaverhave been paired successfully, the Bluetoothsymbol flashes briefly and then goes out. If thisdoes not happen, please see 'Troubleshooting'.7Once the shaver and the app have been paired,the shaver automatically selects the rightpersonal settings depending on the attachmentyou have clicked on. During shaving orcleansing, you can open the app to see thesettings you are using and the duration of theshaving or cleansing session.Note: When you use the shaver, keep youriPhone and shaver within transmission range(no more than 5 meters from each other, in thesame room).Using the shaverUsing the SkinAnalyst sensor1Open the app before measuring your skin.2If you have an iPhone case, first remove the case from your iPhone.3Pull the clamp of the SkinAnalyst sensor outwards and gently place your iPhone into the holder with its camera pointing towards theopening on the inside of the holder. Be careful when you attach or remove the SkinAnalystsensor to prevent scratches on your iPhone.Note: The SkinAnalyst sensor can only be used on iPhone 6, iPhone 6 Plus, iPhone 6S andiPhone 6S Plus equipped with iOS9 or higher.4Insert the jack plug of the SkinAnalyst sensorinto your iPhone.Note: Keep the SkinAnalyst sensor placed onthe skin during measurement to avoid flashinginto your eyes.-Do not look into the sensor before and afterskin measurement.-When you take a picture of the skin, pleaseposition the sensor flat onto your skin so toensure it can take a clear picture of your skin. Connecting with the shaver1Make sure Bluetooth on your iPhone isswitched on.5Keep your iPhone and shaver close to each other in order to stay connected.Caution: Do not use your iPhone in moistsurroundings. Moisture and water can damage your iPhone.1To switch on the shaver, press the on/off button once.2To switch off the shaver, press the on/off button once.In order to benefit optimally from the treatments, you have to synchronize your treatments regularly. The shaver can store up to 15 shaves and/or cleansing treatments, so make sure you synchronize the shaver at least once after every 15 treatments. As an extra reminder, the notification symbol flashes every 9 treatments, without a connection between the shaver and the app, to tell you to connect with the app.1Open the app and make sure you are close to the shaver.2The app connects with the shaver automaticallyand synchronizes your last shaves or cleansing treatments.Using the attachmentsNote: Attach the cleansing brush on the cleansingbrush base first, before you place it on the shaver.Removing or attaching the attachments1Make sure the shaver is switched off.directly after shaving to prevent skin irritation. Forbetter shaving results, use the cleansing brushTracker and change the cleansing brush settings. You can adjust the settings and choose between four settings depending on your personal cleansing needs: sensitive, dry, normal or oily. Using the shaving unitNote: This shaver can only be used without cord. Skin adaptation periodYour first shaves may not bring you the result you expect and your skin may even become slightly irritated. This is normal. Your skin and beard need time to adapt to any new shaving system. We advise you to follow the advice provided by the app and shave regularly (at least 3 times a week) with this shaver for a period of 4 weeks to allow your skin to adapt to the new shaver.Dry shaving1Switch on the shaver.2Move the shaving heads over your skin in circular movements to catch all hairs growing in different directions. Make sure each shavinghead is fully in contact with the skin. Exertgentle pressure for a close, comfortable shave.Note: Do not press too hard, this can cause skin irritation.3Clean the shaver after use.Wet shavingYou can also use this shaver on a wet face with shaving foam or shaving gel.To shave with shaving foam or shaving gel, follow the steps below:1Apply some water to your skin.2Apply shaving foam or shaving gel to your skin.3Rinse the shaving unit under the tap to ensure that the shaving unit glides smoothly over your skin.4Switch on the shaver.5Move the shaving heads over your skin in circular movements to catch all hairs growing in different directions. Make sure each shavinghead is fully in contact with the skin. Exertgentle pressure for a close, comfortable shave.Note: Do not press too hard, this can cause skin irritation.Note: Rinse the shaving unit regularly to ensure that it continues to glide smoothly over yourskin.6Dry your face.7Clean the shaver after use.Note: Make sure you rinse all foam or shavinggel off the shaver.Shave settingsThe app has a feature that allows you topersonalize your shave settings. Go to the UsageTracker and change the shaving settings. You canadjust the settings and choose between threesettings depending on your personal shavingneeds: extra sensitive (xs), sensitive (s) and normal(n).Unpairing your shaver and iPhonePairing allows a connection between 1 shaver and 1iPhone. To remove this connection (e.g. when youhave a new iPhone 6, 6 Plus, 6S or 6S Plusequipped with iOS9 or higher), follow the stepsbelow:1Remove pairing from the app: open the app ->Go to the menu in the app -> Select 'Appsettings' and press 'Remove pairing from app'.2Unpair the shaver: press and hold the on/offbutton on the handle for approx. 10 seconds toremove the bond between shaver and app.Note: The unpairing of the shaver is successfulwhen the Bluetooth and notification symbolflash simultaneously (approx. 4 seconds).3Unpair your iPhone: choose Settings -> General-> Bluetooth -> Select the device by pressing (i)-> and press 'forget devices'.Cleaning and maintenanceIf the shaver and the app are paired, the cleaningreminder on the shaver lights up after each shaveas an extra reminder to tell you to clean theshaver.Cleaning the shaving unit under the tapClean the shaving unit after every shave for7Attach the shaving head holder to the bottom part of the shaving unit (‘click’).Clean the cleansing brush every time you have used it.1Switch off the shaver.2Detach the brush head from the attachment holder.3Clean the parts thoroughly with warm water and soap.4Dry the cleansing brush with a towel.Detach your iPhone from the SkinAnalystsensor.-Put the protection cap on the cleansing brushPut the protection cap on the SkinAnalystsensor to protect it from dirt accumulation.Replacement Replacing the shaving headsAs an extra reminder, the notification symbol also lights up when the shaving heads should be replaced. This advice is also available in the app. For maximum shaving performance, we advise you to replace the shaving heads every two years. Replace damaged shaving heads immediately. Always replace the shaving heads with original Philips shaving heads (see 'Ordering accessories'). 1Switch off the shaver.2Pull the shaving head holder off the bottompart of the shaving unit.3Turn the retaining rings anticlockwise and remove them. Place them aside in a safe place. 4Remove the shaving heads from the shavinghead holder.Discard the used shaving heads immediately to avoid mixing them with the new shaving heads.The brush head should be replaced every 3months or earlier if the brush hairs are deformed or damaged. As an extra reminder, the notification symbol also lights up when the brush head should be replaced. This advice is also available in theapp.Ordering accessoriesTo buy accessories or spare parts, visit/service or go to yourPhilips dealer. You can also contact the PhilipsConsumer Care Center in your country (see theinternational warranty leaflet for contact details).The following accessories and spare parts areavailable:-SH70 Philips shaving heads-HQ110 Philips shaving head cleaning spray-RQ560/RQ563 Philips cleansing brush-HQ8505 supply unitNote: The availability of the accessories may differby country.Recycling-Do not throw away the product with the normalhousehold waste at the end of its life, but handit in at an official collection point for recycling.By doing this, you help to preserve theenvironment.-This product contains a built-in rechargeablebattery which shall not be disposed of withnormal household waste. Please take yourproduct to an official collection point or aPhilips service center to have a professionalremove the rechargeable battery.-Follow your country’s rules for the separatecollection of electrical and electronic productsand rechargeable batteries. Correct disposalhelps prevent negative consequences for theenvironment and human health. Removing the rechargeable batteryBend the hooks aside and remove the powerunit.Warranty and supportIf you need information or support, please visit/support or read theinternational warranty leaflet. TroubleshootingThis chapter summarizes the most commonproblems you could encounter with the shaver,SkinAnalyst sensor and its accessories. If you areunable to solve the problem with the informationbelow, visit /support for a list offrequently asked questions or contact theConsumer Care Center in your country. Problem Possible cause SolutionI cannot connect the shaver to the app.You have notdownloaded the app.Download theSkinAnalyst app.The app is availablefor iPhone 6, iPhone6 Plus, iPhone 6Sand iPhone 6S Plusequipped with iOS9or higher.Your shaver is notswitched on.Make sure the shaveris switched on.You have not openedthe app.Make sure you openthe app.your iPhone cannotfind the shaver.The shaver isavailable for iPhone6, iPhone 6 Plus,iPhone 6S andiPhone 6S Plusequipped with iOS9or higher.Problem Possible cause SolutionBluetooth is not switched on.Make sure Bluetooth is enabled on the shaver and your iPhone.The shaver is not charged.Make sure the shaver is charged.I want to use the shaver without the app.You can also use the shaver without the app. However, only when you use the app together with the shaver, the app is able to provide tips and advice based on your usage. With the app you can set your shave settings. The app also reminds you when you need to replace the shaving heads, to clean the shaver, etc.I cannot change the shavesettings/cleansing brush settings on the shaver.Make sure there is a good connection between the shaver and your iPhone.You can select the attachment (shaving unit/cleansing brush) on the shaver. In the app, you can change the settings per attachment (shaving unit:normal/sensitive/extra sensitive, cleansing brush: dry skin/normal skin/oily skin/sensitive skin).31EnglishProblem Possible cause Solution The shaver does not shave as well as it used to.The shaving headsare damaged or worn.Replace the shaving heads (see 'Replacing the shaving heads').Hairs or dirt obstruct the shaving heads.Clean the shaving heads in the regular way or clean them thoroughly.To clean the shaving heads thoroughly,remove the shaving heads from the shaving head holder one by one (see 'Replacing the shaving heads'). Then separate the cutter from its guard and rinse each matching set under the tap.After rinsing, place the cutter back into its corresponding guard. Finally, put the shaving heads back into the shaving head holder (see 'Replacing the shaving heads').The cleansing brush does not clean as well as it used to.The cleansing brush is damaged or worn.Replace the cleansing brush (see 'Replacing the cleansing brush').32EnglishProblem Possible cause SolutionThe shaver doesn't detect the right attachment.The attachment isheavily polluted ordamaged.Try to clean theattachment (see'Cleaning andmaintenance'); if theissue persists, switchoff the detectionfeature from the appand select theattachment manuallyby pressing theon/off button for onesecond while theshaver is switchedon.The shaver does not work when I press the on/off button.The shaver is stillattached to the wallsocket. For safetyreasons, the shavercan only be usedwithout cord.Unplug the shaverand press the on/offbutton to switch onthe shaver.The rechargeablebattery is empty.Recharge the battery.The travel lock isactivated.Press the on/offbutton for 3 secondsto deactivate thetravel lock.The shaving unit issoiled or damaged tosuch an extent thatthe motor cannot run.Clean the shavingheads thoroughly orreplace them. Alsosee 'Hairs or dirtobstruct the shavingheads' for a detaileddescription of how toclean the shavingheads thoroughly.The shaver switches off when I select a different brush program.You cannot changethe brush programduring cleansing.Switch off the shaverbefore you select adifferent brushprogram.33EnglishProblem Possible cause Solution I get an error in the app during skin measurement.You did not place the SkinAnalyst sensor flat on your skin.Place the SkinAnalyst sensor flat on your skin.You did not insert the plug of the SkinAnalyst sensor into your phone properly.Remove the plug ofthe SkinAnalystsensor from yourphone and insert the plug into your phone again.Your phone did not recognize the SkinAnalyst sensor.Make sure that:-the cover/case of your iPhone is detached.-the camera lens of your iPhone is clean-the SkinAnalyst sensor is correctly attached to your iPhoneYour phone did not recognize the SkinAnalyst sensor.Make sure that yourvolume limit settings are reset to default settings (go to Settings > Music >Volume limit > slide to the max).Water is leaking from the bottom of the shaver.During cleaning,water may collect between the inner body and the outer shell of the shaver.This is normal and not dangerousbecause allelectronics are enclosed in a sealed power unit inside the shaver.34English说明感谢您的惠顾,欢迎光临飞利浦! 为了让您能充分享受飞利浦提供的支持,请在 /welcome 上或通过 SkinAnalyst 应用程序注册您的产品。
PhilipsHandheld garment steamer1000 W, up to 20 g/min Vertical Steaming60 ml non-detachable water tank GC299Compact solution for easy de-wrinkling Ideal companion for your iron, no board requiredThis handheld garment steamer is perfect for delicate fabrics and difficult-to-iron areas, and to refresh any clothing or upholstery - no burns guaranteed. Lightweight and compact design makes it easy to use anytime, anywhere. Just steam and go!Quick de-wrinkling•Automatic continuous steam for easy de-wrinkling•Brush accessory for thicker fabricsEasy to use and safe•Safe on all ironable fabrics, no burns guaranteed•No ironing board needed•Compact design for convenient use, storage and travel•2 m cord for longer reachRefreshes clothes without washing or dry cleaning•Continuous steam removes odours and kills 99.9%* of bacteriaHighlightsContinuous steamAn electric pump automatically provides continuous steam for easy and quick de-wrinkling.Brush accessory The brush attachment opens the fabric fibres and enables better steam penetration. It is especially good for thicker garments like jackets and coats. It can also help to remove dirt and pills.Safe on all ironable fabrics The steamer is safe to use on all ironable fabrics and garments. The steam plate can be safely pressed against any clothing with no risk of burning – a great solution for delicate fabrics, like silk.No ironing board neededUsing a clothes steamer on hanging garments eliminates the need for an ironing board, so de-wrinkling is easy and hassle free.Ergonomic designThe handheld garment steamer isergonomically designed to be light, compact and comfortable to use. Just press the trigger and watch wrinkles and creases disappear.2 m cordFor longer reach99.9% bacteria-free*Hot steam refreshes your clothes and kills up to 99.9% of bacteria*. Less-frequent washing and dry cleaning saves time and money, and helps clothes last longer.Issue date 2022-03-08 Version: 1.1.1EAN: 08 71010 39363 67© 2022 Koninklijke Philips N.V.All Rights reserved.Specifications are subject to change without notice. Trademarks are the property of Koninklijke Philips N.V. or their respective owners.SpecificationsEasy to use•Water tank capacity: 60 ml•Safe on all ironable fabrics: Even delicates like silk •non-detachable water tank•Refill anytime during use•Power cord length:2 m•Ready to use: Light indicatorAccessories included•BrushFast crease removal•Power: 1000 W•Continuous steam: Up to 20 g/min •Voltage: 220-240 V•Ready to use: < 1 minSize and weight•Packaging dimensions (W x H x D): 38 x 12.8 x15 cmGreen efficiency•Product packaging: 100% recyclable•User manual: 100% recycled paperGuarantee•2 year worldwide guarantee*Tested by external body for bacteria types Escherichia coli 8099,Staphylicoccus aureus ATCC 6538, Canidia albicans ATCC 10231with 1 minute steaming time.。
Register your product Register your product and get support at //and get support at /welcomeIntroduction Congratulations on your purchase and welcome to Philips! T o fully benefit from the support that Philips offers,register your product at/ welcome.Important Read this user manual carefully before you use the appliance and save it for future reference.Warning-If the appliance is damaged in anyway (brush heador handle),stopusing it.-This appliance isnot intended foruse by persons(includingchildren) withreduced physical,sensory or mentalcapabilities,or lackof experience andknowledge,unlessthey have beengiven supervisionor instructionconcerning use ofthe appliance by aperson responsi-ble for their safety.-Children shouldbe supervised toensure that theydo not play withthe appliance.Caution-If you havemedical concerns,consult yourdoctor beforeyou use theSonicare.-Consult yourdentist if youexperiencesignificantbleeding ordiscomfort whenyou use theSonicare.-Only use thisappliance asintended.-Only use genuinePhilips Sonicarereplacementbrush heads thatare suitable forthis model.-Only use 1.5V AAalkaline batteries.Always replaceboth batteries;never mix old andnew batteries.-Remove thebatteries from theappliance if you arenot going to use itfor some time.Electro-magneticfields (EMF)This Philips appliancecomplies with all ap-plicable standards andregulations regardingexposure to electro-magnetic fields.Using theappliance1 Pull the batterycompartment capoff the handle.Insert two 1.5VAA alkalinebatteries in thehandle and reat-tach the batterycompartment cap.Note:Make sure the +and - poles point in theright direction.2 T o avoidsplattering, placethe toothbrushin your mouthbefore youswitch it on.3 Press the on/offbutton to switchon the appliance.4 Brush normallywith lightpressure for2 minutes.5 The applianceswitches offautomaticallyafter 2 minutes.6 Replace thebrush head every3 months orsooner if needed.The toothbrush is safeto use on:-Braces (brushheads wear outmore quicklywhen used onbraces)-Dentalrestorations(fillings,crowns,veneers)Cleaning andstorageClean the brush headwith water after everyuse.Wipe the handlewith a damp clothregularly.Store theappliance in a cool,dry place when it isnot in use.OrderingaccessoriesT o buy accessoriesor spare parts,visitwww.shop.philips.com/service or goto your Philips dealer.Y ou can also contactthe Philips ConsumerCare Centre in yourcountry (see theworldwide guaranteeleaflet for contactdetails).RecyclingDo not throw awaythe appliance withthe normal householdwaste at the end ofits life,but hand it inat an official collectionpoint for recycling.By doing this,you helpto preserve theenvironment.Guaranteeand supportIf you need informationor support,please visit/support or read theseparate worldwideguarantee leaflet.GuaranteerestrictionsThe terms ofthe internationalguarantee do notcover the following:-Brush heads.-Replacementbatteries.-Damage causedby use ofunauthorisedreplacementparts.-Damage causedby misuse,abuse,neglect,alterations orunauthorisedrepair.-Normal wearand tear,includingchips,scratches,abrasions,discolourationor fading.。
飞利浦7310说明书
注意事项
只能使用产品随附的电源插头。
电源插头可将 100-240 伏的电压转换为 24 伏以下的安全低电压。
电源插头中含有一个变压器。
在自来水龙头下清洗剃须刀之前,务必拔掉其电源插头。
此产品符合国际认可的 IEC 安全标准,可放心在自
来水龙头下清洗。
水洗设计不适合在淋浴时使用。
切勿将剃须刀浸入水中。
冲洗产品时,水可能从产品底部
的插口漏出。
这是正常的,而且没有危险,因为所有的电子线路都密封在剃须刀内的一个密封内。
电磁场 (EMF)这款飞利浦产品符合关于电磁场 (EMF) 的相关标准。
如果正确使用并按照本用户手册中的说
明进行操作,本产品是安全的。
充电
开始充电之前确保产品电源已关闭。
充电需用时至少 8 小时。
您也可以不充电而将剃须刀插上电源后使用。
充电指示
当开始为耗完电的剃须刀充电时,充电指示灯亮起。
电池已完全充满电池完全充满电时,充电指示灯开始闪烁。
当拔下剃须刀时,充电指示灯熄灭。
不接电源的剃须时间:充电后,剃须刀可在不接电源的情况下剃须最长达 35 分钟。
为产品充电
当马达停转或转速开始下降时,为产品充电。
1 将产品插头插入剃须刀。
2 将电源插头插入壁装插座。
3 电池充满后,从壁装式插座中拔下电源插头,并从剃须刀上拔下产品插头。
剃须
1 按一下开/关按钮打开剃须刀。
电源指示灯亮起即表示马达运转。
2 将剃须刀头在皮肤上快速移动,作直线和迂回动作。
在干爽的面部剃须效果最佳。
3 按一下开/关按钮关闭剃须刀电源。
电源指示灯熄灭。
4 清洁剃须刀(见“清洁和保养”一章)。
5 每次使用后,盖上剃须刀保护盖,以防剃须刀头受损。
修剪
用于修剪鬓角和小胡子。
1 向下推动滑块,打开修发器。
当马达运转时,修发器便可以启动。
2 关闭修发器(可听到咔嗒声)。
清洁和保养
为保证更好的剃须效果,剃须刀必须定期清洗。
注意:冲洗产品时,水可能从产品底部的插口漏出。
这是正常的,而且没有危险。
1 关闭剃须刀电源,从壁装式电源插座中拔下电源插头,并从剃须刀上拔下产品插头。
2 按下释放按钮,打开剃须刀头部件。
3 在热水龙头下,冲洗剃须刀头部件和胡茬储藏室一段时间。
确保剃须刀头部件的内部和外部都要清洗。
4 关闭剃须刀头部件并甩掉多余的水份。
不要用毛巾或纸巾擦拭剃须刀头部件,因为这样可能会损坏剃须刀头。
5 再次打开剃须刀头部件,使它保持打开状态,让产品完全晾干。
除了冲洗方式外,您还可以使用随附的刷子清洁胡茬储藏室。
剃须刀头
1 打开剃须刀头部件,逆时针转动锁 (1),取下固定架 (2)。
2 用随附的刷子清洁刀片和网罩。
3 将剃须刀头放回剃须刀头部件。
将固定架放回剃须刀头部件,顺时针转动并锁住。
4 关闭剃须刀头部件。
修发器每次使用后都要清洁修发器。
1 关闭剃须刀电源,从壁装式电源插座中拔下电源插头,并从剃须刀上拔下产品插头。
2 用随附的刷子清洁修发器。
3 每六个月用一滴缝纫机油润滑修发器齿。
存放用保护盖盖好剃须刀,以防剃须刀刀头受损.
刀头更换。
附件
可选配以下附件:
HQ8500/HQ8000 电源插头。
HQ8 飞利浦剃须刀头。
HQ8010 车载充电线。