【无限互联】IOS开发之瀑布流的实现(UICollectionView与UIScrollView)
- 格式:doc
- 大小:566.60 KB
- 文档页数:9

uicollectionview 简单使用UICollectionView是iOS开发中的一个强大工具,可以用于展示多种类型的信息,比如图片、文字、视频等等。
使用UICollectionView 可以轻松的创建自定义的界面,并且支持非常灵活的布局方式。
下面是 UICollectionView 的简单使用方法:1. 创建 UICollectionView 实例使用 UICollectionView 可以通过代码或者 storyboard 进行创建,通常使用 storyboard 更加方便。
创建一个 UICollectionView 实例需要指定一个 UICollectionViewLayout 对象来控制其布局方式。
可以使用系统提供的 UICollectionViewFlowLayout,或者自定义一个 UICollectionViewLayout。
2. 实现 UICollectionViewDataSource 协议UICollectionViewDataSource 协议定义了 UICollectionView 的基本数据源方法,它们用于向 UICollectionView 提供数据。
实现UICollectionViewDataSource 协议需要实现以下方法:a. numberOfSectionsInCollectionView:返回UICollectionView 中需要展示的 section 数量。
b. collectionView:numberOfItemsInSection:返回每个section 中需要展示的 item 数量。
c. collectionView:cellForItemAtIndexPath:返回每个 item 对应的 UICollectionViewCell 对象。
3. 设置 UICollectionViewDelegate 协议UICollectionViewDelegate 协议定义了 UICollectionView 的一些交互方法,比如 item 的选中、滚动、布局等。

swift uicollectionviewflowlayout 参数说明Swift UICollectionViewFlowLayout 参数说明UICollectionViewFlowLayout是UICollectionView的布局对象之一,它的作用是实现UICollectionView中子视图(cell)的排列方式及样式等布局视觉效果,可以自定义UICollectionView的布局,在不同的场景适配不同的布局,如瀑布流、网格布局、流式布局等。
在实现自定义UICollectionViewFlowLayout的时候,需要使用到一些属性配置,下面就来介绍一下Swift UICollectionViewFlowLayout 的参数说明。
步骤一:创建Swift UICollectionViewFlowLayout首先需要创建一个Swift UICollectionViewFlowLayout 和UICollectionView 对象,Swift UICollectionViewFlowLayout 是UICollectionView的布局属性之一,通过它可以实现UICollectionView中子视图(cell)的排列方式及样式等布局视觉效果。
```swiftlet layout = UICollectionViewFlowLayout()let collectionView = UICollectionView(frame: CGRect.zero, collectionViewLayout: layout)```步骤二:UICollectionViewFlowLayout 的属性介绍在创建Swift UICollectionViewFlowLayout 后需要对其属性进行配置,下面是一些Swift UICollectionViewFlowLayout 常用的属性。
1、itemSize它表示每个cell的大小,即宽度和高度。
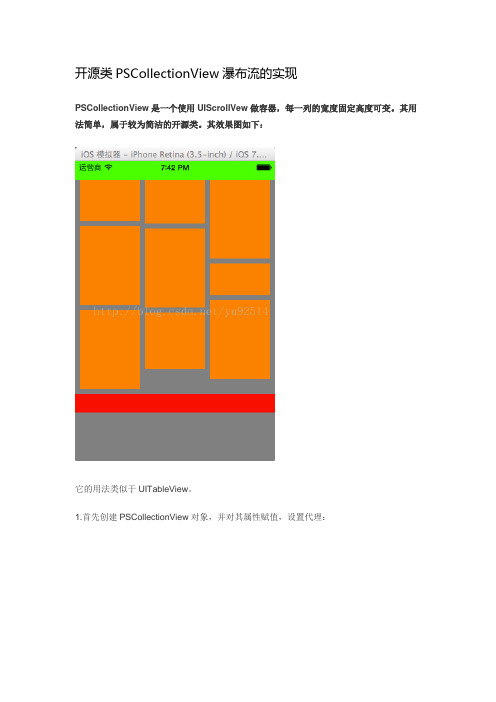
开源类PSCollectionView瀑布流的实现PSCollectionView是一个使用UIScrollVew做容器,每一列的宽度固定高度可变。
其用法简单,属于较为简洁的开源类。
其效果图如下:它的用法类似于UITableView。
1.首先创建PSCollectionView对象,并对其属性赋值,设置代理:2.添加header,footer,empty,loader等视图3. 实现其代理的协议方法,设置单元格的个数,单元格的点击事件,单元格的创建等:PSCollectionView实现的基本原理● 根据列数固定,为每列数存储一个当前列的高度值●插入数据块时在当前列原有的高度上插入。
然后更新当前列的高度为原有高度加上插入的高度。
重复至所有数据都插入完毕●调整容器的高度为各列的最大高度PSCollectionView的点击事件此类是在其内部定义了一个UITapGestureRecognizer的子类PSCollectionViewTapGestureRecognizer来检测单元格数据块的点击操作。
手势检测点击时会向他的协议方法询问此点击是否可以接受,如果手势对象是PSCollectionViewTapGestureRecognizer类型,则我们添加进去,设置为单元格可见,若不可见,则忽略掉。
如果手势对象不是PSCollectionViewTapGestureRecognizer类型,则一直返回YES。
当检测到点击操作时调用协议方collectionView:didSelectView:atIndex 将方法传递出去。
传递的参数设为选择的单元格以及索引。
此类型还设有重用单元格视图机制。
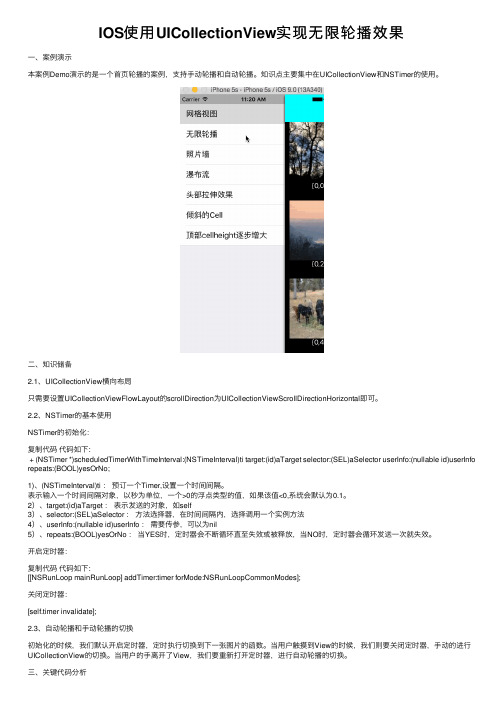
IOS使⽤UICollectionView实现⽆限轮播效果⼀、案例演⽰本案例Demo演⽰的是⼀个⾸页轮播的案例,⽀持⼿动轮播和⾃动轮播。
知识点主要集中在UICollectionView和NSTimer的使⽤。
⼆、知识储备2.1、UICollectionView横向布局只需要设置UICollectionViewFlowLayout的scrollDirection为UICollectionViewScrollDirectionHorizontal即可。
2.2、NSTimer的基本使⽤NSTimer的初始化:复制代码代码如下:+ (NSTimer *)scheduledTimerWithTimeInterval:(NSTimeInterval)ti target:(id)aTarget selector:(SEL)aSelector userInfo:(nullable id)userInfo repeats:(BOOL)yesOrNo;1)、(NSTimeInterval)ti :预订⼀个Timer,设置⼀个时间间隔。
表⽰输⼊⼀个时间间隔对象,以秒为单位,⼀个>0的浮点类型的值,如果该值<0,系统会默认为0.1。
2)、target:(id)aTarget :表⽰发送的对象,如self3)、selector:(SEL)aSelector :⽅法选择器,在时间间隔内,选择调⽤⼀个实例⽅法4)、userInfo:(nullable id)userInfo :需要传参,可以为nil5)、repeats:(BOOL)yesOrNo :当YES时,定时器会不断循环直⾄失效或被释放,当NO时,定时器会循环发送⼀次就失效。
开启定时器:复制代码代码如下:[[NSRunLoop mainRunLoop] addTimer:timer forMode:NSRunLoopCommonModes];关闭定时器:[self.timer invalidate];2.3、⾃动轮播和⼿动轮播的切换初始化的时候,我们默认开启定时器,定时执⾏切换到下⼀张图⽚的函数。

swift uicollectionview瀑布流写法Swift UICollectionView 瀑布流写法UICollectionView 是一个非常常用的界面组件,用于展示数据的列表视图。
瀑布流是一种常见的布局方式,可以让不同大小的视图以类似瀑布流的方式呈现在界面上。
下面将一步一步地介绍如何使用Swift 实现UICollectionView 的瀑布流布局。
1. 创建UICollectionView首先,我们需要创建一个UICollectionView,并设置其布局属性为自定义的瀑布流布局对象。
swiftimport UIKitclass ViewController: UIViewController {var collectionView: UICollectionView!var flowLayout: UICollectionViewFlowLayout!override func viewDidLoad() {super.viewDidLoad()设置自定义布局flowLayout = WaterfallFlowLayout()创建UICollectionViewcollectionView = UICollectionView(frame: view.frame, collectionViewLayout: flowLayout)view.addSubview(collectionView)}}2. 实现瀑布流布局下一步是创建一个自定义的UICollectionViewFlowLayout,该类主要负责计算每个视图的位置和大小。
swiftclass WaterfallFlowLayout: UICollectionViewFlowLayout { let columnCount = 2 瀑布流列数let spacing: CGFloat = 10 间距override func prepare() {super.prepare()guard let collectionView = collectionView else { return }计算每个视图的宽度let columnWidth = (collectionView.bounds.width - CGFloat(columnCount - 1) * spacing) / CGFloat(columnCount) self.itemSize = CGSize(width: columnWidth, height: 0) }override func layoutAttributesForElements(in rect: CGRect) -> [UICollectionViewLayoutAttributes]? {let attributes = youtAttributesForElements(in: rect)guard let collectionView = collectionView else { return attributes }var columnHeights = [CGFloat](repeating: 0, count: columnCount) 每列的最大高度for attribute in attributes! {if attribute.representedElementCategory == .cell {let columnIndex = columnHeights.firstIndex(of: columnHeights.min()!) ?? 0let columnHeight = columnHeights[columnIndex]let xOffset = CGFloat(columnIndex) * (itemSize.width + spacing)let yOffset = columnHeight + spacingattribute.frame = CGRect(x: xOffset, y: yOffset, width: itemSize.width, height: attribute.frame.height)columnHeights[columnIndex] =attribute.frame.maxY}}return attributes}}在上述代码中,我们可以通过设置columnCount 和spacing 来调整瀑布流的列数和间距。
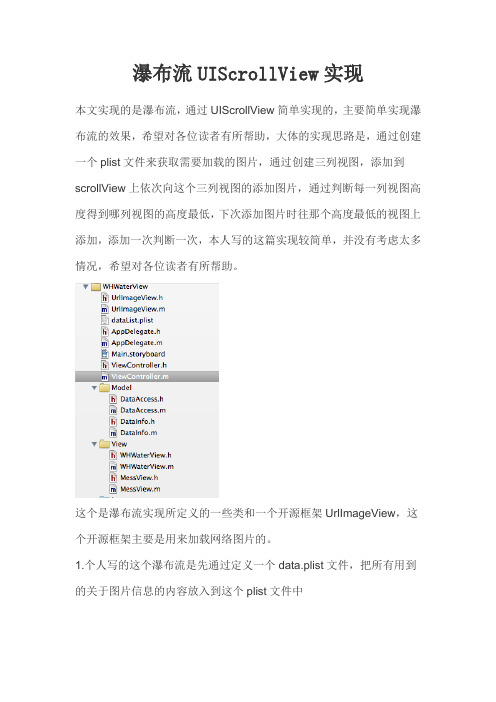
瀑布流UIScrollView实现本文实现的是瀑布流,通过UIScrollView简单实现的,主要简单实现瀑布流的效果,希望对各位读者有所帮助,大体的实现思路是,通过创建一个plist文件来获取需要加载的图片,通过创建三列视图,添加到scrollView上依次向这个三列视图的添加图片,通过判断每一列视图高度得到哪列视图的高度最低,下次添加图片时往那个高度最低的视图上添加,添加一次判断一次,本人写的这篇实现较简单,并没有考虑太多情况,希望对各位读者有所帮助。
这个是瀑布流实现所定义的一些类和一个开源框架UrlImageView,这个开源框架主要是用来加载网络图片的。
1.个人写的这个瀑布流是先通过定义一个data.plist文件,把所有用到的关于图片信息的内容放入到这个plist文件中这个每个item中添加的内容2.通过定义两个model对象,一个是DataAccess和DataInfo<1.>在DataAccess中主要定一个一个方法,通过这个方法读取plist 文件[objc]view plaincopyprint?1.#import "DataAccess.h"2.#import "DataInfo.h"3.@implementation DataAccess4.- (NSMutableArray *)getDataArray{5.6.NSString * filePath = [[NSBundle mainBundle] pathForResource:@"dataList"ofType:@"plist"];7.NSDictionary * dic = [NSDictionary dictionaryWithContentsOfFile:filePath];8.NSArray * imageList = [dic objectForKey:@"imageList"];9.NSMutableArray * dataInfoArray = [NSMutableArray array];10.for (NSDictionary * item in imageList) {11.DataInfo * dataInfo = [[DataInfo alloc] init];12.dataInfo.width = [item[@"width"] floatValue];13.dataInfo.height = [item[@"height"] floatValue];14.dataInfo.url = item[@"url"];15.dataInfo.mess = item[@"mess"];16.dataInfo.title = item[@"title"];17.[dataInfoArray addObject:dataInfo];18.}19.20.return dataInfoArray;21.}22.@end<2.>在dataInfo中定义的都是一个model属性[objc]view plaincopyprint?1.#import <Foundation/Foundation.h>2.3.@interface DataInfo : NSObject4.//源图片的宽度5.@property (nonatomic,assign)float width;6.//源图片的高度7.@property (nonatomic,assign)float height;8.//图片的url地址9.@property (nonatomic,copy)NSString * url;10.//图片的名字11.@property (nonatomic,copy)NSString * title;12.@property (nonatomic,copy)NSString * mess;13.@end3.在ViewController中主要实现数据的获取,瀑布流视图的创建[objc]view plaincopyprint?1.- (void)viewDidLoad2.{3.[super viewDidLoad];4.//获取图片的数据5.DataAccess * dataAccess = [[DataAccess alloc] init];6.NSMutableArray * array = [dataAccess getDataArray];7.//创建瀑布流视图,并通过自定init方法将图片数据传个瀑布流视图8.self.whView = [[WHWaterView alloc] initWithData:array];9.//将瀑布流视图添加到self.view10.[self.view addSubview:self.whView];11.12.13.}14.15.16.@end4.MessView这个类主要是对瀑布流视图中的每一个图片的显示和大小的布局主要是通过复写init方法<1.>MessView.h[objc]view plaincopyprint?1.#import <UIKit/UIKit.h>2.#import "DataInfo.h"3.@interface MessView : UIView4.- (id)initWithData:(DataInfo *)dataInfo yPoint:(float)y;5.@end<2.>MessView.m[objc]view plaincopyprint?1.#import "MessView.h"2.#define WIDTH 320/33.#import "UrlImageView.h"4.@implementation MessView5.6.//复写init方法传入数据并且传入y坐标7.- (id)initWithData:(DataInfo *)dataInfo yPoint:(float)y{8.//获得缩略图的高度和宽度9.float imgWidth = dataInfo.width;10.float imgHeight = dataInfo.height;11.float sImgWidth = WIDTH -4;12.float sImgHeight = sImgWidth * imgHeight/imgWidth;13.14.self = [super initWithFrame:CGRectMake(0, y, sImgWidth, sImgHeight)];15.if (self) {16.//通过开源框架UrlImageView直接创建imgView并且在网上加载图片17.UrlImageView * imgView = [[UrlImageView alloc] initWithFrame:CGRectMake(2,2, sImgWidth, sImgHeight)];18.[imgView setImageWithURL:[NSURL URLWithString:dataInfo.url]];19.[self addSubview:imgView];20.//创建label21.UILabel * label = [[UILabel alloc] initWithFrame:CGRectMake(2,self.frame.size.height - 28, WIDTH-4, 30)];bel.backgroundColor = [UIColor colorWithWhite:0 alpha:.8];bel.alpha = .5;bel.text = dataInfo.title;bel.textColor = [UIColor whiteColor];26.[self addSubview:label];27.}28.29.return self;30.}5.WHWaterView这个视图继承于UIScrollView通过这个视图来创建完成瀑布流视图的实现<1,>WHWaterView.h[objc]view plaincopyprint?1.#import <UIKit/UIKit.h>2.#define WIDTH 320/33.@interface WHWaterView : UIScrollView{4.//第1.2.3列视图5.UIView * _view1;6.UIView * _view2;7.UIView * _view3;8.int _highColume;//高度最高的那一列9.int _lowColume;//高度最低的那一列10.float _highColumeHeight;//最高列的高度11.12.int _row;//行数13.14.}15.//复写初始化方法创建瀑布流视图对象并且传入数据16.- (id)initWithData:(NSMutableArray *)arrayData;17.@end<2,>WHWaterView.m[objc]view plaincopyprint?1.#import "WHWaterView.h"2.#import "DataInfo.h"3.#import "MessView.h"4.5.@implementation WHWaterView6.7.8.- (id)initWithData:(NSMutableArray *)arrayData{9.10.self = [super initWithFrame:CGRectMake(0, 0, 320, 480)];11.if (self) {12.//初始化参数13.[self initParams];14.for (int i =0; i<arrayData.count;i++) {15.if (i/3>0 && i%3==0) {16._row ++;17.}18.DataInfo * dataInfo =(DataInfo *)[arrayData objectAtIndex:i];19.//如果为第一行的话添加messView20.if (_row ==1) {21.switch (i%3) {22.case 0:23.[self addMessView:_lowColume dataInfo:dataInfo];24.break;25.case 1:26.[self addMessView:_lowColume dataInfo:dataInfo];27.break;28.case 2:29.[self addMessView:_lowColume dataInfo:dataInfo];30.break;31.}32.}else{33.[self addMessView:_lowColume dataInfo:dataInfo];34.}35.//重新获得最低高度的列和最高高度的列36.[self getHighColumeAndLowColume];37.}38.//并且设置当前视图的内容的size39.[self setContentSize:CGSizeMake(320, _highColumeHeight)];40.//将三个视图添加到当前视图41.[self addSubview:_view1];42.[self addSubview:_view2];43.[self addSubview:_view3];44.45.}46.47.return self;48.}49.- (void)initParams{50.//初始化三列视图51._view1 =[[UIView alloc] initWithFrame:CGRectMake(0, 0, WIDTH, 0)];52._view2 =[[UIView alloc] initWithFrame:CGRectMake(WIDTH, 0, WIDTH, 0)];53._view3 =[[UIView alloc] initWithFrame:CGRectMake(WIDTH*2, 0, WIDTH, 0)];54.55.//初始化一系列参数56._highColume = 1;57._lowColume = 1;58._highColumeHeight = 1;59._row = 1;60.61.}62.//添加messView在高度最低的列63.//将messView添加到高度最低的列64.- (void)addMessView:(int)lowColume dataInfo:(DataInfo *)data{65.MessView * messView = nil;66.float hValue = 0;67.switch (lowColume) {68.case 1:69.//创建messView,并且传入数据和messView的y坐标,_view1视图的高度就是messView的y坐标70.messView = [[MessView alloc] initWithData:data yPoint:_view1.frame.size.height];71.hValue = messView.frame.size.height;72.//重新定义_view1的Frame (_view2,_view3与_view1雷同)73._view1.frame =CGRectMake(_view1.frame.origin.x, _view1.frame.origin.y,WIDTH, _view1.frame.size.height+hValue);74.[_view1 addSubview:messView];75.76.break;77.case 2:78.messView = [[MessView alloc] initWithData:data yPoint:_view2.frame.size.height];79.hValue = messView.frame.size.height;80._view2.frame =CGRectMake(_view2.frame.origin.x, _view2.frame.origin.y,WIDTH, _view2.frame.size.height+hValue);81.[_view2 addSubview:messView];82.83.break;84.case 3:85.messView = [[MessView alloc] initWithData:data yPoint:_view3.frame.size.height];86.hValue = messView.frame.size.height;87._view3.frame =CGRectMake(_view3.frame.origin.x, _view3.frame.origin.y,WIDTH, _view3.frame.size.height+hValue);88.[_view3 addSubview:messView];89.90.break;91.}92.93.}94.//重新获得高度最高的列和高度最低的列和高度最高列的高度95.- (void)getHighColumeAndLowColume{96.//这个判断是获得高度最高的列,并且设置97.if (_view1.frame.size.height > _highColumeHeight) {98._highColumeHeight = _view1.frame.size.height;99._highColume = 1;100.}else if (_view2.frame.size.height > _highColumeHeight){101._highColumeHeight = _view2.frame.size.height;102._highColume = 2;103.}else if (_view3.frame.size.height > _highColumeHeight){104._highColumeHeight = _view3.frame.size.height;105._highColume = 3;106.}107.//这个判断是获得高度最低的列108.float view1Height = _view1.frame.size.height;109.float view2Height = _view2.frame.size.height;110.float view3Height = _view3.frame.size.height;111.if (view1Height < view2Height) {112.if (view1Height < view3Height) {113._lowColume = 1;114.}else{115._lowColume = 3;116.}117.}else{118.if (view2Height < view3Height) {119._lowColume = 2;120.}else{121._lowColume = 3; 122.}123.124.}125.}126.@end。
swift uicollectionview用法Swift UICollectionView用法UICollectionView是iOS开发中常用的控件之一,它可以展示大量数据,并且可以自定义布局。
Swift作为苹果公司推出的一种新型编程语言,也被广泛应用于iOS开发中。
本文将详细介绍Swift中UICollectionView的用法。
1. UICollectionView基础概念UICollectionView是一个高度可定制的视图控件,它可以展示一组数据项,并支持滚动。
每个数据项都由一个单独的UICollectionViewCell对象表示。
与UITableView类似,UICollectionView也有一个代理(delegate)和数据源(dataSource)协议来管理其内容和行为。
2. UICollectionView的使用步骤使用UICollectionView需要以下步骤:(1)创建UICollectionView实例;(2)设置其布局方式;(3)设置数据源和代理;(4)实现数据源和代理方法。
下面我们将逐一讲解这些步骤。
3. 创建UICollectionView实例在Storyboard或xib文件中拖拽一个UICollectionView控件到界面上即可创建一个实例。
如果想在代码中创建,则需要使用以下代码:let collectionView = UICollectionView(frame: CGRect.zero, collectionViewLayout: UICollectionViewFlowLayout())其中,第二个参数是布局对象,我们将在下一节详细介绍。
4. 设置布局方式在创建UICollectionView时需要指定其布局方式,常用的有以下几种:(1)流式布局(流水布局)流式布局是UICollectionView的默认布局方式,它会按照一定的规则排列每个单元格。
iOS瀑布流实现(Swift)这段时间突然想到一个很久之前用到的知识-瀑布流,本来想用一个简单的方法,发现自己走入了歧途,最终只能狠下心来重写UICollectionViewFlowLayout.下面我将用两种方法实现瀑布流,以及会介绍第一种实现的bug.<1>第一种1)首先调用随机函数,产生随机高度,并把它保存到数组中复制代码- (CGSize)collectionView:(UICollectionView *)collectionView layout:(UICollectionViewLayout *)collectionViewLayout sizeForItemAtIndexPath:(NSIndexPath *)indexPath { CGFloat cellW = 100;CGFloat cellH = 100 + (arc4random() % 80);[self.heightArrayM addObject:@(cellH)];return CGSizeMake(cellW, cellH);}复制代码2)在设置cell的frame的地方,通过取余,取整确定cell的高度,并设定cell的frame复制代码- (UICollectionViewCell *)collectionView:(UICollectionView *)collectionView cellForItemAtIndexPath:(NSIndexPath *)indexPath {UICollectionViewCell *cell = [self.collectionView dequeueReusableCellWithReuseIdentifier:ID forIndexPath:indexPath];//当前处于多少行NSInteger num1 = indexPath.row / count;//当前处于多少列int num2 = indexPath.row % count;CGFloat cellX = num2 * 100 + (num2 + 1) * margin;CGFloat cellY = 0;for (int i = 0; i < num1; i++) {NSInteger position = num2 + i * 3;cellY += [self.heightArrayM[position] floatValue] + margin;}CGFloat cellW = 100;CGFloat cellH = cellHeight;cell.frame = CGRectMake(cellX, cellY, cellW, cellH);// cell.backgroundColor = [UIColor redColor];cell.backgroundColor = [UIColor colorWithRed:(arc4random() % 250) / 250.0 green:(arc4random() % 250) / 250.0 blue:(arc4random() % 250) / 250.0 alpha:1.0];// NSLog(@"%@", NSStringFromCGRect(cell.frame));return cell;复制代码弊端: 其实这种方法的弊端,相信从上面的动态图中可以看出来,当往上面滑的时候,由于cell的循环机制,下面的cell的会消失,但是由于高度不一致,同时撤销的是最后一行的cell,所以下面的cell在屏幕上就会消失.下面附上第一种方法的源代码:复制代码#import "ViewController.h"#define margin 10#define count 3#define cellHeight [self.heightArrayM[indexPath.row] floatValue]static NSString * const ID = @"cell";@interface ViewController ()<UICollectionViewDelegate, UICollectionViewDataSource, UICollectionViewDelegateFlowLayout>@property (weak, nonatomic) IBOutlet UICollectionView *collectionView;@property (nonatomic, strong) NSMutableArray *heightArrayM;@end@implementation ViewController- (NSMutableArray *)heightArrayM {if (_heightArrayM == nil) {_heightArrayM = [NSMutableArray array];}return _heightArrayM;}- (void)viewDidLoad {[super viewDidLoad];[self.collectionView registerClass:[UICollectionViewCell class] forCellWithReuseIdentifier:ID];self.collectionView.dataSource = self;self.collectionView.delegate = self;//设置collectionView[self setupCollectionView];}//设置collectionView的布局- (UICollectionViewFlowLayout *)setupCollectionLayout {UICollectionViewFlowLayout *flowLayout = [[UICollectionViewFlowLayout alloc] init];flowLayout.minimumInteritemSpacing = margin;umLineSpacing = margin;return flowLayout;}//设置collectionView- (void)setupCollectionView {self.collectionView.collectionViewLayout =[self setupCollectionLayout];}#pragma mark - UICollectionViewDataSouce- (NSInteger)collectionView:(UICollectionView *)collectionView numberOfItemsInSection:(NSInteger)section {return 60;}- (UICollectionViewCell *)collectionView:(UICollectionView *)collectionView cellForItemAtIndexPath:(NSIndexPath *)indexPath {UICollectionViewCell *cell = [self.collectionView dequeueReusableCellWithReuseIdentifier:ID forIndexPath:indexPath];//当前处于多少行NSInteger num1 = indexPath.row / count;//当前处于多少列int num2 = indexPath.row % count;CGFloat cellX = num2 * 100 + (num2 + 1) * margin;CGFloat cellY = 0;for (int i = 0; i < num1; i++) {NSInteger position = num2 + i * 3;cellY += [self.heightArrayM[position] floatValue] + margin;}CGFloat cellW = 100;CGFloat cellH = cellHeight;cell.frame = CGRectMake(cellX, cellY, cellW, cellH);// cell.backgroundColor = [UIColor redColor];cell.backgroundColor = [UIColor colorWithRed:(arc4random() % 250) / 250.0 green:(arc4random() % 250) / 250.0 blue:(arc4random() % 250) / 250.0 alpha:1.0];// NSLog(@"%@", NSStringFromCGRect(cell.frame));return cell;}- (CGSize)collectionView:(UICollectionView *)collectionView layout:(UICollectionViewLayout *)collectionViewLayout sizeForItemAtIndexPath:(NSIndexPath *)indexPath { CGFloat cellW = 100;CGFloat cellH = 100 + (arc4random() % 80);[self.heightArrayM addObject:@(cellH)];return CGSizeMake(cellW, cellH);@end复制代码<2>下面介绍第二种(Swift实现)效果图如下所示:这种实现方法就是比较成熟的了,我把它封装成一个类.其实主要是实现三个函数1)重写父类的prepare方法,准备所有cell的样式复制代码extension WaterfallLayout {// prepare准备所有Cell的布局样式override func prepare() {super.prepare()// 0.获取item的个数let itemCount = collectionView!.numberOfItems(inSection: 0)// 1.获取列数let cols = dataSource?.numberOfColsInWaterfallLayout?(self) ?? 2// 2.计算Item的宽度let itemW = (collectionView!.bounds.width - self.sectionInset.left - self.sectionInset.right - self.minimumInteritemSpacing * CGFloat((cols - 1))) / CGFloat(cols)// 3.计算所有的item的属性for i in startIndex..<itemCount {// 1.设置每一个Item位置相关的属性let indexPath = IndexPath(item: i, section: 0)// 2.根据位置创建Attributes属性let attrs = UICollectionViewLayoutAttributes(forCellWith: indexPath)// 3.随机一个高度guard let height = dataSource?.waterfallLayout(self, indexPath: indexPath) else {fatalError("请设置数据源,并且实现对应的数据源方法")}// 4.取出最小列的位置var minH = colHeights.min()!let index = colHeights.index(of: minH)!minH = minH + height + minimumLineSpacing// 5.设置item的属性attrs.frame = CGRect(x: self.sectionInset.left + (self.minimumInteritemSpacing + itemW) * CGFloat(index), y: minH - height - self.minimumLineSpacing, width: itemW, height: height)attrsArray.append(attrs)}// 4.记录最大值maxH = colHeights.max()!// 5.给startIndex重新复制startIndex = itemCount}}复制代码2)返回设置cell样式的数组override func layoutAttributesForElements(in rect: CGRect) -> [UICollectionViewLayoutAttributes]? {return attrsArray}3)返回当前的contentSizeoverride var collectionViewContentSize: CGSize {return CGSize(width: 0, height: maxH + sectionInset.bottom - minimumLineSpacing)}总结:在下面我封装的这个类中,只需要遵守我的数据代理源协议并且实现我的协议中的两个方法,传给我对应得高度(我这里是传的随机的),可选的方法,若是不实现,会有一个默认值,就可以实现该功能.协议如下:@objc protocol WaterfallLayoutDataSource : class {func waterfallLayout(_ layout : WaterfallLayout, indexPath : IndexPath) -> CGFloat@objc optional func numberOfColsInWaterfallLayout(_ layout : WaterfallLayout) -> Int}完成代码如下所示:ViewController.swift中的代码:复制代码import UIKitextension UIColor {return UIColor(colorLiteralRed: Float(arc4random_uniform(256)) / 255.0, green: Float(arc4random_uniform(256)) / 255.0, blue: Float(arc4random_uniform(256)) / 255.0, alpha: 1.0)}}private let kWaterCellID = "kWaterCellID"class ViewController: UIViewController {var count : Int = 20override func viewDidLoad() {super.viewDidLoad()// 1.设置布局let layout = WaterfallLayout()layout.minimumLineSpacing = 10layout.minimumInteritemSpacing = 10layout.sectionInset = UIEdgeInsets(top: 10, left: 10, bottom: 10, right: 10)layout.dataSource = self// 2.创建UICollectionViewlet collectionView = UICollectionView(frame: view.bounds, collectionViewLayout: layout)dataSource = selfcollectionView.register(UICollectionViewCell.self, forCellWithReuseIdentifier: kWaterCellID)view.addSubview(collectionView)}}extension ViewController : UICollectionViewDataSource {func collectionView(_ collectionView: UICollectionView, numberOfItemsInSection section: Int) -> Int {return count}func collectionView(_ collectionView: UICollectionView, cellForItemAt indexPath: IndexPath) -> UICollectionViewCell {let cell = collectionView.dequeueReusableCell(withReuseIdentifier: kWaterCellID, for: indexPath)cell.backgroundColor = UIColor.randomColor()if indexPath.item == count - 1 {count += 20collectionView.reloadData()return cell}}extension ViewController : WaterfallLayoutDataSource {func waterfallLayout(_ layout: WaterfallLayout, indexPath: IndexPath) -> CGFloat {return CGFloat(arc4random_uniform(80) + 100)}func numberOfColsInWaterfallLayout(_ layout: WaterfallLayout) -> Int {return 3}}复制代码封装自定义布局中的WaterfallLayout.swift代码如下:复制代码import UIKit@objc protocol WaterfallLayoutDataSource : class {func waterfallLayout(_ layout : WaterfallLayout, indexPath : IndexPath) -> CGFloat@objc optional func numberOfColsInWaterfallLayout(_ layout : WaterfallLayout) -> Int}class WaterfallLayout: UICollectionViewFlowLayout {// MARK: 对外提供属性weak var dataSource : WaterfallLayoutDataSource?// MARK: 私有属性fileprivate lazy var attrsArray : [UICollectionViewLayoutAttributes] = [UICollectionViewLayoutAttributes]()fileprivate var totalHeight : CGFloat = 0fileprivate lazy var colHeights : [CGFloat] = {let cols = self.dataSource?.numberOfColsInWaterfallLayout?(self) ?? 2var colHeights = Array(repeating: self.sectionInset.top, count: cols)return colHeights}()fileprivate var maxH : CGFloat = 0fileprivate var startIndex = 0}extension WaterfallLayout {// prepare准备所有Cell的布局样式override func prepare() {super.prepare()// 0.获取item的个数let itemCount = collectionView!.numberOfItems(inSection: 0)// 1.获取列数let cols = dataSource?.numberOfColsInWaterfallLayout?(self) ?? 2// 2.计算Item的宽度let itemW = (collectionView!.bounds.width - self.sectionInset.left - self.sectionInset.right - self.minimumInteritemSpacing * CGFloat((cols - 1))) / CGFloat(cols)// 3.计算所有的item的属性for i in startIndex..<itemCount {// 1.设置每一个Item位置相关的属性let indexPath = IndexPath(item: i, section: 0)// 2.根据位置创建Attributes属性let attrs = UICollectionViewLayoutAttributes(forCellWith: indexPath)// 3.随机一个高度guard let height = dataSource?.waterfallLayout(self, indexPath: indexPath) else {fatalError("请设置数据源,并且实现对应的数据源方法")}// 4.取出最小列的位置var minH = colHeights.min()!let index = colHeights.index(of: minH)!minH = minH + height + minimumLineSpacingcolHeights[index] = minH// 5.设置item的属性attrs.frame = CGRect(x: self.sectionInset.left + (self.minimumInteritemSpacing + itemW) * CGFloat(index), y: minH - height - self.minimumLineSpacing, width: itemW, height: height)attrsArray.append(attrs)}// 4.记录最大值maxH = colHeights.max()!// 5.给startIndex重新复制startIndex = itemCount}extension WaterfallLayout {override func layoutAttributesForElements(in rect: CGRect) -> [UICollectionViewLayoutAttributes]? { return attrsArray}override var collectionViewContentSize: CGSize {return CGSize(width: 0, height: maxH + sectionInset.bottom - minimumLineSpacing) }}。
swift uicollectionview 高级用法-回复Swift UICollectionView高级用法UICollectionView是一款非常强大和灵活的控件,它能够在iOS应用程序中实现类似于UITableView的布局和显示。
UICollectionView使开发者能够更加自由地自定义单元格和布局,以及处理交互手势和动画效果。
在本文中,我们将探索一些Swift UICollectionView的高级用法,并为每个步骤提供详细的解释。
第一步:创建UICollectionView首先,我们需要创建一个UICollectionView。
可以通过在Storyboard或XIB文件中拖放一个UICollectionView来实现它,也可以在代码中编程方式创建它。
无论您使用哪种方法,确保设置正确的代理和数据源。
在我们进一步探索高级用法之前,先让我们回顾一下UICollectionView 的基本设置和用法。
第二步:数据源和代理协议UICollectionView使用数据源和代理模式来处理数据和UI交互。
确保遵循UICollectionViewDataSource和UICollectionViewDelegate协议,并实现这些方法:1. numberOfSections(in collectionView: UICollectionView) -> Int:返回集合视图的段数。
2. collectionView(_ collectionView: UICollectionView, numberOfItemsInSection section: Int) -> Int:返回指定段的项目数。
3. collectionView(_ collectionView: UICollectionView, cellForItemAt indexPath: IndexPath) -> UICollectionViewCell:返回指定索引路径的单元格。
iOS开发UICollectionView学习使用UITableview 和UIcollectionView 都是继承 UIScrollview的,很多的属性都是相关的,因此学习起来也是很容易的,现在对UIcollectionView做一个基本的总结。
首先是在头文件中表明使用UICollectionViewDataSource,UICollectionViewDelegate,UICollec tionViewDelegateFlowLayout这三个协议.h文件#import <UIKit/UIKit.h>@interface CollectionViewController : UIViewController<UICollectionViewDataSource,UICollectionVie wDelegate>@property (strong,nonatomic) UICollectionView *collectionV;@end++++++++++++.m文件++++++++++++#import "CollectionViewController.h"@interface CollectionViewController ()@endstatic NSString *identifierCell = @"identify";@implementation CollectionViewController@synthesize collectionV = _collectionV;- (void)viewDidLoad {[super viewDidLoad];// Do any additional setup after loading the view.[self buildStage];[self setTitle:@"CollectionView"];[self.view setBackgroundColor:[UIColor whiteColor]];}- (void)buildStage{UICollectionViewFlowLayout *flowLayout = [[UICollectionViewFlowLayout alloc]init];_collectionV = [[UICollectionView alloc]initWithFrame:self.view.frame collectionViewLayout:flowLayout];[_collectionV registerClass:[UICollectionViewCell class] forCellWithReuseIdentifier:identifierCell];_collectionV.delegate = self;_collectionV.dataSource = self;_collectionV.backgroundColor = [UIColor whiteColor];_collectionV.allowsMultipleSelection = YES;//默认为NO,是否可以多选[self.view addSubview:_collectionV];}#pragma mark -CollectionView datasource//section-(NSInteger)numberOfSectionsInCollectionView:(UICollectionVie w *)collectionView{return 3;}//item个数- (NSInteger)collectionView:(UICollectionView *)collectionView numberOfItemsInSection:(NSInteger)section {return 5;}// item大小-(CGSize)collectionView:(UICollectionView *)collectionView layout:(UICollectionViewLayout *)collectionViewLayout sizeForItemAtIndexPath:(NSIndexPath *)indexPath{return CGSizeMake(100,120);}//定义每个item 的 margin 边缘-(UIEdgeInsets)collectionView:(UICollectionView*)collectionView layout:(UICollectionViewLayout *)collectionViewLayoutinsetForSectionAtIndex:(NSInteger)sectionreturn UIEdgeInsetsMake(10, 10, 15, 10);//分别为上、左、下、右}//每个section中不同的行之间的行间距- (CGFloat)collectionView:(UICollectionView *)collectionView layout:(UICollectionViewLayout*)collectionViewLayout minimumLineSpacingForSectionAtIndex:(NSInteger)section {return 15;}- (UICollectionViewCell *)collectionView:(UICollectionView *)collectionView cellForItemAtIndexPath:(NSIndexPath *)indexPath{//重用UICollectionViewCell *cell = [collectionView dequeueReusableCellWithReuseIdentifier:identifierCell forIndexPath:indexPath];//设置内容cell.backgroundColor = [UIColor colorWithRed:((15 * indexPath.row) / 255.0) green:((19 * indexPath.row)/255.0) blue:((30 * indexPath.row)/255.0) alpha:1.0f];UILabel *titleLabel = [[UILabel alloc]initWithFrame:CGRectMake(0, 90, 100, 30)];titleLabel.text = [NSStringstringWithFormat:@"(%ld,%ld)",(long)indexPath.row,(long)index Path.section];titleLabel.textAlignment = NSTextAlignmentCenter;titleLabel.backgroundColor = [UIColor redColor];[cell.contentView addSubview:titleLabel];return cell;// 此处能看处虽然都是继承于UIScrollview但是,还是有细微的不同的。
【无限互联】IOS开发之瀑布流的实现(UICollectionView与UIScrollView)瀑布流可以在保证图片原始比例的情况下,灵活的展现内容,相对于传统的使用相同大小的网格展现大量图片,要好上很多,而实现瀑布流的方式有很多种,网上比较流行的有三种实现方式。
1,使用UIScrollView,主要技术点在于视图的重用。
2,使用UITableView,这种方式应该是最易想到的,因为需要展现几列就用几个tabelview 就ok了,而且不需要考虑重用,应为苹果已经做好了,只需要考虑如何在几列tabelView 滑动的时候,保持同步不出现BUG。
3,使用UICollectionView,UICollectionView在iOS6中第一次被介绍,它与UITableView 有许多相似点,但它多了一个布局类,而实现瀑布流,就与这个布局类有关。
此种方式实现,也不需要考虑视图重用。
以上三种方式实现瀑布流,使用UICollectionView应该算是最简单的了,so,就重最简单的开始吧。
由于网络太差,所以展现的并不是网络上的图片,而是将用户相册中的图片读取出,并用瀑布流展现。
首先,遍历用户相册,将照片放到准备好的数组中。
访问用户相册需要导入<AssetsLibrary/AssetsLibrary.h>框架[objc]view plaincopy1.<span style="font-size:14px;"> _images = [NSMutableArray array];2.//创建相册库3. library = [[ALAssetsLibrary alloc] init];4.5. [library enumerateGroupsWithTypes:ALAssetsGroupSavedPhotos usingBlock:^(ALAssetsGroup *group, BOOLBOOL *stop) {6.if (group) {7. [group enumerateAssetsUsingBlock:^(ALAsset *result, NSUInteger index, BOOLBOOL *stop) {8.if (result) {9.ALAssetRepresentation *resentation = [result defaultRepresentation];10. CGImageRef imageRef = resentation.fullResolutionImage;11.UIImage *image = [UIImage imageWithCGImage:imageRef];12.13.//将相片加入到数组中14. [self.images addObject:image];15. [_collectionView reloadData];16. }17.18. }];19. }20.21. } failureBlock:^(NSError *error) {22.23. }];24.</span>然后创建UICollectionView,注意这里放置UICollectionView的控制器要实现,UICollectionViewDelegateFlowLayout和UICollectionViewDatasource两个协议。
UICollectionView创建时需要传入一个布局对象,布局类继承自UICollectionViewLayout这个抽象基类,我们需要自定义布局对象,继承UICollectionViewLayout的子类,UICollectionViewFlowLayout类,命名为WaterFlowLayout。
[objc]view plaincopy1.<span style="font-size:14px;">@interface WaterFlowLayout : UICollectionViewFlowLayout2.@property (nonatomic,assign)id<UICollectionViewDelegateFlowLayout> delegate;3.4.@end5.</span>[objc]view plaincopy1.<span style="font-size:14px;"> WaterFlowLayout *layout = [[WaterFlowLayout alloc] init];2.3. _collectionView = [[UICollectionView alloc] initWithFrame:[UIScreen mainScreen].bounds collectionViewLayout:layout];4.5. _collectionView.dataSource = self;6. _collectionView.delegate = self;7. [self.view addSubview:_collectionView];8.9.//注册单元格10. [_collectionView registerClass:[WaterfallCell class] forCellWithReuseIdentifier:indf];11.</span>设置好代理,下面实现代理协议就行了,在这里同样子类化了UICollectionViewCell,命名为WaterfallCell,并设置一个image属性,便于在协议方法中将照片传入。
[objc]view plaincopy1.<span style="font-size:14px;">@interface WaterfallCell : UICollectionViewCell2.@property (nonatomic,retain)UIImage *image;3.@end</span>实现UICollectionViewDatasource协议。
[objc]view plaincopy1.<span style="font-size:14px;">- (NSInteger)collectionView:(UICollectionView*)collectionView numberOfItemsInSection:(NSInteger)section{2.return _images.count;3.}4.5.// The cell that is returned must be retrieved from a call to -dequeueReusableCellWithReuseIdentifier:forIndexPath:6.- (UICollectionViewCell *)collectionView:(UICollectionView *)collectionViewcellForItemAtIndexPath:(NSIndexPath *)indexPath{7.WaterfallCell *cell = [collectionView dequeueReusableCellWithReuseIdentifier:indf forIndexPath:indexPath];8.9.UIImage *image = _images[indexPath.item];10. cell.image = image;11.return cell;12.13.}14.</span>实现UICollectionViewDelegateFlowLayout协议,将单元格的尺寸传入,这里让每张图片的宽度保持相同,高度等比例缩放。
[objc]view plaincopy1.<span style="font-size:14px;">- (CGSize)collectionView:(UICollectionView *)collectionView layout:(UICollectionViewLayout*)collectionViewLayout sizeForItemAtInd exPath:(NSIndexPath *)indexPath {2.3.UIImage *image = _images[indexPath.item];4.5.6.float height = [self imgHeight:image.size.height Width:image.size.width];7.8.return CGSizeMake(100,height);9.}10.11.//单元格中的间隙12.- (UIEdgeInsets)collectionView:(UICollectionView *)collectionView layout:(UICollectionViewLayout*)collectionViewLayout insetForSectionAtIndex:(NSInteger)sectio n{13. UIEdgeInsets edgeInsets = {5,5,5,5};14.15.return edgeInsets;16.}17.- (float)imgHeight:(float)height Width:(float)width{18.19.//单元格固定宽度为100 高度/宽度 = 压缩后高/10020.float newHeigth = height/width*100;21.return newHeigth;22.}23.</span>以上完成以后,控制器中的逻辑基本处理完毕,下面重写cell的setter方法,简单起见,我并没有创建Imageview显示图片,而是将图片直接绘制在了单元格上。
[objc]view plaincopy1.- (void)setImage:(UIImage *)image{2.if (_image != image) {3. _image = image;4. }5. [self setNeedsDisplay];6.}7.8.9.// Only override drawRect: if you perform custom drawing.10.// An empty implementation adversely affects performance during animation.11.- (void)drawRect:(CGRect)rect12.{13.// Drawing code14.float newHeigth = _image.size.height/_image.size.width*100;15. [_image drawInRect:CGRectMake(0, 0, 100, newHeigth)];17.18.}cell处理完毕后,下面就是最重要的布局类了,瀑布流就是依靠此类来展现的首先在- (void)prepareLayout方法中得到cell的总个数,为每个cell确定自己的位置,此处用三列展现图片,当然列数可以随意设置,这取决与图片的宽度。