Vistor VTL+TSM_ISC_AC 安装配置测试
- 格式:docx
- 大小:9.74 MB
- 文档页数:47

TSM的基本安装配置TSM的基本安装配置(DB备份)学习笔记TSM研究实验-安装、配置、服务器备份实验机器:192.168.11.20、192.168.11.23操作系统:windows2003安装顺序:1、安装isc6012、安装AC5323、安装TSMserver4、安装Client安装过程:1、在192.168.11.20上安装ISC过程中需要设置密码,即ISCADMIN的登录密码:zenith。
管理端口按默认http为8421,https 为8422.2、安装AC532,在安装过程中注意ISC安装路径,如提示需要安装ISC时检查一下路径,修改后再行安装。
3、在192.168.11.23上安装Client。
安装时选择自定义,因为默认安装没有选择安装管理客户机命令行文件,若不安装此项,将无法在客户机上通过dsmadmc连接管理服务器。
安装完成后客户机需要重启。
配置过程:1、服务器端配置:1.1运行配置向导...在过程中设置server名字为:tsmtest,接受推荐无密码。
在存储设备中选择文件库,在本地硬盘设置虚拟文件带库。
过程中未注册节点,准备在命令行中统一配置。
1.2服务器配置:在向导配置完成后,服务器已经开始运行,此时在AC中可以对此服务器进行注册后进行管理,而且也能看到我们在向导中配置的虚拟带库:filediv2。
此时我们需要进行存储规划:目前我们有两个设备类:磁盘与磁带库(虚拟的文件库)。
设想结构为磁盘存储池(缓存)首先使用-->装满以后迁移到带库。
再用磁带建一个副本存储池,备份前面的磁盘与磁带存储池中的数据。
若前面的磁盘存储或磁带存储池数据损坏以后,可以通过副本存储池恢复。
(此设计思想也可以做为项目实施过程中存储规划参考)服务器配置步骤(基本步骤):定义带库和路径定义驱动器和路径定义设备类定义存储池创建策略域创建策略集创建管理类创建备份副本组激活策略集#此例中我们的带库和路径、驱动器和路径、设备类等都在向导中配置完毕,也可以在命令行中完成。
IsServer安装调试操作说明此操作说明涉及工具有:IsServer、第三方OPC-client、M odScan32、orcale开发工具、西门子OPCServer系统(只限龙华)。
1IsServer安装说明1.1安装步骤1.1.1安装软件1. 安装MS ODBC for Oracle Driver.2. 安装IsServer软件,双击eShareOPCClient4ISServer.msi进行安装.3. 安装OPCClient,双击OPC Core Components 2.00 Redistributable 2.20.msi进行安装.4. 将eShareOPCClient4ISServer.exe,eShareOPCClient4ISServer-Tools.exe,IS_Gateway.chm三个文件copy到IsServer安装目录下,直接覆盖原安装文件.5. 安装10201_client_win32.zip,配置oracle客户端连接。
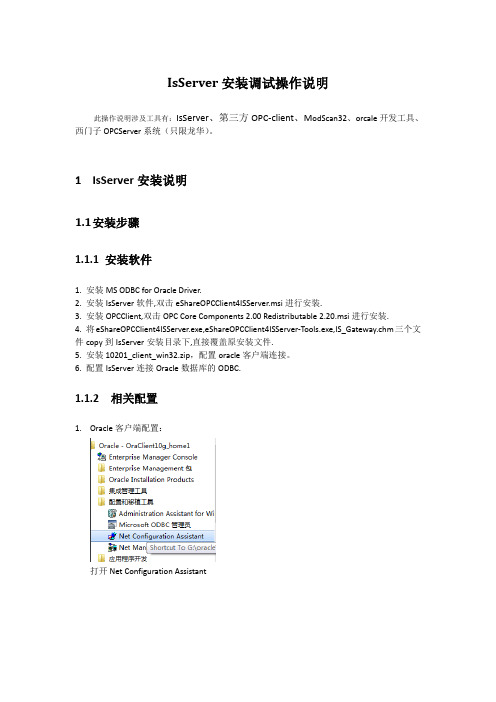
6. 配置IsServer连接Oracle数据库的ODBC.1.1.2相关配置1.Oracle客户端配置:打开Net Configuration Assistant进行测试,修改登陆用户名密码,进行测试显示下图,说明连接数据库成功,否则失败,重新检查具体原因。
可能原因有:1. 连接网络没通。
2.数据库监听未启动。
3. 数据库安装问题。
继续下一步,完成操作。
2.ODBC配置:3.配置ODBC数据源;<DSN=ISServer>见下图:确认数据库的通讯正常。
2IsServer调试配置说明注意:eShareOPCClient4ISServer;<含跟数据库的通讯和交互>eShareOPCClient4ISServer-Tools;<不含跟数据库的通讯和交互>2.1使用ModScan检测末梢通讯是否正常打开ModScan工具2.1.1设置连接设备获取通讯数据源点击Connection,修改Connect,连接通讯设备。

VIOS服务器安装手册目录一.VIOS 操作系统安装 (2)二.安装虚拟IO服务器升级包 (24)三.IVM配置划分区 (29)四.在VIO Client分区上安装AIX OS (36)一.VIOS 操作系统安装1.安装VIOS在P 6 520上因为P6 520上没有安装显卡,所以用console的方式安装.笔记本通过串口线连接到P6 520的串口1上。
出现如下提示:输入用户名与密码User ID:adminPassword:admin输入数字“1”回车输入数字“1”回车输入数字“8”回车输入数字“8”回车按回车继续,出现如下界面:当出现如下”Memory”“Keyboard”“Networ”“SCSI”“Speaker”提示时,按键盘数字“1”在下面界面输入2:进入如下界面:输入admin的密码:admin进入如下界面:输入数字“5”回车,VIOS安装光盘放入光驱中进入如下界面:输入数字“1”回车进入如下界面:输入数字“3”回车进入如下界面:选择安装设备,输入数字“4”回车进入如下界面:输入数字“2”回车进入如下界面:输入数字“1”回车进入如下界面等待安装当进入如下界面时:按提示输入数字“2”回车,选择当前terminal作为系统console进入如下界面:回车进入如下界面:输入数字“2”回车,更改安装设置进入如下界面:输入数字“1”进入如下界面:>>>表示选中hdis1作为安装的硬盘.,一般选择other vg,然后回车进入如下界面:回车,开始安装过程当出现如下界面时表示已经安装完成,系统开始重启:输入用户名:padmin然后修改密码:padmin进入如下界面:按提示输入字母“a”回车安装完成后输入如下命令接受虚拟IO服务器软件应用许可$ license –accept$ ioslevel (2.2.0.0)检查当前虚拟IO服务器的时间,日期及时区信息:$ date如果需要,请设置虚拟IO服务器的时间,日期及时区信息:输入如下命令获得虚拟IO服务器的root权限:$ oem_setup_env设置时间与时区,注意一定不要选择夏令时在命令行下输入“cfgassist”回车进入如下界面设置时间与时区:时区为BEIST -8 按如下界面进行操作,回车时间与时区设置完成虚拟化设置在命令行下输入如下命令:$ lsdev |grep ^ent $mkgencfg –o init$lsdev |grep ^ent界面如下所示:(请注意此时只能选择下图中的Logical Host Ethernet Port (lp-hea) )初始化网络设置:首先需要查看一下目前VIOS上的网卡情况,使用如下命令:lsdev|grep ^ent通过上面的界面我们可以看到可以使用的物理网卡是ent4,ent5 在命令行下输入“cfgassist”回车进入如下界面:输入“主机名”“IP地址”“子网掩码”等,回车网络配置完成。

VeritasClusterServer 安装置置指导(针对 SYBASE应用)说明:以下全部截取图形中全部名称、 IP 地址等均为截图时状态,请参如实质状况更正。
一. 安装前准备工作1.心跳网卡配置安装 VCS需要服务器有两块网卡直接连接作心跳侦测用。
两块网卡不使用任何WINDOWS 系统自带的协议,因此要将网卡属性中全部已勾选的选项去掉:为便于安装和保护,最好将两网络连接名称更换为易于识其余名称(如priv1和priv2)。
2.域配置安装 VCS需要在两台服务器配置成域控制器(一主一备,或一台为主域控制器,另一台直接加入到该域)。
同时安装 DNS(域名分析系统)。
同时最好配置一下WINS地址打开运转,填入dcpromo:安装域完成后重新启动。
配置增加上网方法4.磁盘阵列配置第一在磁列柜上建RAID5,同置一个。
完成后将磁分两个区,同做两个主机通道( HOST LUN)。
在每台服器上行以下配置:入SCSI 卡配置窗口,通道,入配置的Advanced 置,将 SCAN SCSI DISABLE或 SCAN ⋯ONLY。
目的是服器启不行SCSI ,省得出二. 软件安装安装第一插入安装介质,出现安装导游:我们选择“”;在此,我们选择“ Complete/Custom”选项;接着,点击“ Next ”;认真阅读软件同意协议后选择“Iacceptthetermsofthelicenseagreement”连续;输入 license key,点“ ADD”,尔后 NEXT;选中“”,点击“ Next ”;此处,是选择需要安装的Agent,选择后点“ Next ”;选择需要安装 VCS的服务器,点击“ ADD”,尔后选择安装目录,默认为:,点“ Next”连续;屏幕显示安装选项报告。
确认无误的话点击“Install”开始安装;安装结束后需重新启动远端服务器:同时安装结束,重新启动本端服务器。
配置进入 VCS配置导游 :出现以下界面:点击“ NEXT”:点击“ NEXT”:在此选择需要安装VCS的计算机所属域的域名,尔后点击“Next ”;在上边选择或输入服务器名称,点击“Next ”;点击“ Next”;在此,输入集群名称( xxzx ),选择所安装的操作系统(WIN2000),并勾选要安装集群的服务器,点击“ Next ”;选择作为心跳的两块网卡,点击“Next”;选择登录取户帐号及密码,点击“Next”;在上图中选择“ CreateNon-SecureCluster”,输入登录的管理员名称和密码;点击“ Configure ”后,配置完成。

TSM在windows环境下的安装、配置及服务器自身的备份TSM安装、配置、服务器备份实验机器:192.168.11.20、192.168.11.23操作系统:windows2003安装顺序:1、安装isc6012、安装AC5323、安装TSMserver4、安装Client安装过程:1、在192.168.11.20上安装ISC过程中需要设置密码,即ISCADMIN的登录密码:zenith。
管理端口按默认http为8421,https为8422.2、安装AC532,在安装过程中注意ISC安装路径,如提示需要安装ISC时检查一下路径,修改后再行安装。
3、在192.168.11.23上安装Client。
安装时选择自定义,因为默认安装没有选择安装管理客户机命令行文件,若不安装此项,将无法在客户机上通过dsmadmc连接管理服务器。
安装完成后客户机需要重启。
配置过程:1、服务器端配置:1.1运行配置向导...在过程中设置server名字为:tsmtest,接受推荐无密码。
在存储设备中选择文件库,在本地硬盘设置虚拟文件带库。
过程中未注册节点,准备在命令行中统一配置。
1.2服务器配置:在向导配置完成后,服务器已经开始运行,此时在AC中可以对此服务器进行注册后进行管理,而且也能看到我们在向导中配置的虚拟带库:filediv2。
此时我们需要进行存储规划:目前我们有两个设备类:磁盘与磁带库(虚拟的文件库)。
设想结构为磁盘存储池(缓存)首先使用-->装满以后迁移到带库。
再用磁带建一个副本存储池,备份前面的磁盘与磁带存储池中的数据。
若前面的磁盘存储或磁带存储池数据损坏以后,可以通过副本存储池恢复。
(此设计思想也可以做为项目实施过程中存储规划参考)服务器配置步骤(基本步骤):定义带库和路径定义驱动器和路径定义设备类定义存储池创建策略域创建策略集创建管理类创建备份副本组激活策略集#此例中我们的带库和路径、驱动器和路径、设备类等都在向导中配置完毕,也可以在命令行中完成。

VTL-S 安装配置文档一.VTL-S安装1.硬件基本要求a. 229 with 12GB RAMb. 2.5TB total storage capacityc. Recommend RAID set configure with 7 physical luns: (example below, 750GB*6, R5)7 luns will be used for OS(50GB), VTL (1TB),SIR_index (300GB) and SIR_Data_repository(600GB * 4 luns)2.安装Redhat AS 4 U2 x86-643.安装VTL-Sa. ./vtlinstall (或者sh vtlinstall)按提示确认b. options scsi_mod max_luns=10这里要注意!要大些的值c.2200) QLogic 22xx (ISP2200) host adapter family2300) QLogic 2300 (ISP2300 and ISP2312) host adapter family2322) QLogic 2322 (ISP2322) host adapter family2400) QLogic 2400 (ISP2422 and ISP2432) host adapter familyq) No Fibre Channel target mode supportSelect HBA class:这里选择光纤卡,注意VTL只支持QLogic的光纤卡d. Do you want to configure NTP (Network Time Protocol) service on this appliance (Y or N)?多台复制需要配置时间服务器e.Configuration Summary---------------------Server Installation Type: Upgrade options scsi_mod max_luns=20options sd_mod max_scsi_disks_fs=10Target Mode HBA Support: DisabledNTP Service: EnableEnter 'Y' to accept configuration or enter 'N' to change configuration:选择Y,完成安装4.配置VTL-S (基本配置)a. 右击服务器图标→选择license输入注册码b. 选择Physical Resources → Storage devices → SCSI devices → enlist(需要enlist 才能被VTL使用)c. 选择VirtualTape Library Systemnew →创建虚拟带库,驱动器和磁带d. 右击服务器图标→选择options →起用iscsi 和fce. 创建SAN Client 或者使用everyone_Iscsi,指派已经创建的带库到Client5.配置VTL-S (启用De-duplication)a. 右击服务器图标→选择options → enable local SIR按提示完成操作,SIR_index (300GB) and SIR_Data_repository(600GB * 4 luns)系统会建立对应的SAN Resources6.配置VTL-S (配置远程复制)a. 右击服务器图标→选择SIR → Replication → Add VTL Target根据提示完成操作b.选择磁带→右击选择Replication → Add根据提示完成操作c.复制完成后,另一方的Replication Resources 会出现一个标记的记录,同时Virtual Vault会出现一个复制过来的磁带7. callhome 功能a. 右击服务器图标→选择options → enable callhomeb. 根据需要指定不同的callhome策略8. 控制台结构a. VirtualTape Library System objecta.1 Virtual Tape LibrariesThis object lists the virtual tape libraries that are currently available. Each virtual tape library consists of one or more virtual tape drives and one or more virtual tapes.Each virtual tape library and drive can be assigned to one or more backup servers Each library’s virtual tapes are sorted in barcode order.注意:barcode 是一个重要的概念,他用来标识不同的磁带a.2 Virtual VaultList the virtual tapes that are currently in the virtual vault.The virtual vault is a tape storage area for tapes that are not inside a virtual tape library.a.3 Import/ExportThis object lists the import and export jobs that have been submitted.If needed, youcan cancel a pending job from here. You can have up to 32 concurrent import/export jobs running, depending on the number of physical tape drives attached to your VTL.a.4 Physical Tape LibrariesThis object lists the physical tape libraries that are available to VTL.a.5 Replica ResourcesThis object lists the Replica Resources that are on this VTL server.a.6 DatabaseThis object contains configuration information for the VTL.b. SAN Resources objectSAN resources are the virtualized disks that have been configured as the SIR index resource, SIR scratch resource, and SIR configuration repository resource on the VTL server.c. SAN Clients objectSAN clients are the backup servers that use the VTL. VTL supports Fibre Channel and iSCSI backup servers. For client configuration information, refer to theappropriate sections in this guide.d. Reports objectVTL provides reports that offer a wide variety of information:• Throughput• Physical resources - allocation and configuration• Disk space usage• F ibre Channel adapters configuration• Replication status• Virtual tape/library information• Job statuse. Export datafrom a report, you can save the data from the server and device throughput and usage reports.The data can be saved in a comma delimited (.csv) or tab delimited (.txt) text file. Toexport information, right-click on a report that is generated and select Export.f. Physical Resources objectPhysical resources are all of your adapters/FC HBAs and storage devices. Harddisks are used for creating virtual tape libraries/drives and virtual tapes.详细配置文档请参考光碟自带的PDF。
TSM 6.1 安装配置手册2010年3月1项目清单 (3)2备份策略说明 (3)2.1 Policy Set (3)2.2 Schedule (3)2.3 脚本内容 (4)3TSM安装步骤 (5)3.1 服务器安装 (5)3.2 存储划分 (5)3.3 带库安装 (5)3.3.1 物理安装 (5)3.3.2 带库初始化 (5)3.3.3 带库加带 (5)3.3.4 在光纤交换机上划分zone (5)3.3.5 安装光纤卡驱动 (5)3.3.6 安装带库驱动 (6)3.4 TSM Server安装 (7)3.4.1 备份服务器硬件要求 (7)3.4.2 磁盘空间分配 (7)3.4.3 建立目录 (8)3.4.4 建立用户和组 (8)3.4.5 开始安装软件 (8)3.4.6 TSM Server升级 (13)3.5 TSM Server配置 (13)3.5.1 初始化TSM实例 (13)3.5.2配置过程 (17)3.5.3 备份策略说明 (19)3.6 Erpdb安装 (24)3.6.1 TSM CLIENT安装 (24)3.6.2 TSM for SAN安装 (25)3.6.3 TDP for Oracle安装 (25)3.6.4 Erpdb配置 (26)3.7 APS系统备份 (28)3.7.1 客户端备份软件安装 (28)3.7.2 调度配置 (28)3.8 SRM系统备份 (29)3.8.1 客户端备份软件安装 (29)3.8.2 调度配置 (29)1项目清单服务器:2台IBM P6 550,3台X3650存储:1台DS4700带库:TS3200光纤交换机:BR-310-0004-ATSM软件2备份策略说明本次备份节点包括2台小机(双机互备),2台Pc服务器,共四个节点。
2.1 Policy Set2.2 Schedule2.3 脚本内容Oracle备份采用RMAN脚本,由于涉及到用户的一些详细信息,这里省略,大家可以参考Oracle相关文档。
Benchmarking GuideMay 2021Setting Up the Login VSI Benchmark Using Citrix with VMware ESXiCompare benchmark results for VDI systems powered by Intel® Xeon® processors with DRAM only versus DRAM and Intel® Optane™ persistent memory.AbstractThis document provides guidance for setting up and running the Login VSI benchmark usingCitrix on VMware. Follow these step-by-step instructions to adhere to the same methodologyIntel used to achieve the benchmark and performance test results. Note that this guide is notdefinitive for benchmarking or configuring this environment, but is instead a reference of bestpractices to follow.The Login VSI benchmark simulates users signing into a virtual desktop infrastructure (VDI) andperforming typical user tasks such as viewing websites, emails, and PDFs. The Power Workerprofile is the most demanding workload in the Login VSI suite, which includes Freemind/Java,a photo viewer, and simulated installation.Benchmarking Guide | Setting Up the Login VSI Benchmark Using Citrix with VMware ESXiContents1Server Configuration (3)1.1Server Hardware Configuration (3)1.2Workload Configuration (4)2Software Configuration (5)3Server Layout (6)4Recipe Details (6)4.1Prepare the Cluster Servers (6)4.2Install Citrix (6)4.3Install VMware vSphere and ESXi (6)4.4Install the VDI Environment (7)5Installing a VDI Cluster (7)5.1Additional Information (9)6Setting Up a Golden VM Image (10)7Installing Citrix Virtual Desktop 1903.1 (15)8Creating the Site (15)9Creating a Machine Catalog (18)10Creating a Delivery Group (21)11Setting Up Login VSI Launchers (24)12Installing and Setting Up Login VSI Management Software (24)13Revision History (30)1Server ConfigurationThis section provides the hardware and workload configuration details necessary to set up the benchmarking.1.1Server Hardware ConfigurationTo perform the benchmarking, configure the server using two DRAM-only configurations as the baseline. Compare results to a server configured using two DRAM-plus-Intel® Optane™ persistent memory (PMem) configurations, as shown in Tables 1 and 2.Table 1. Server Hardware Configuration Details for DRAM-only ConfigurationsPlatform Intel® Server Board S2600WFT Intel Server Board S2600WFT# of nodes 1 1# of sockets 2 2CPU Intel® Xeon® Gold 6238R processor@ 2.2 GHz Intel Xeon Gold 6238R processor @ 2.2 GHzCores per socket/threads per socket 28/56 28/56Microcode 0x0500002C 0x0500002CIntel® Hyper-Threading Technology ON ONIntel® Turbo Boost Technology ON ONBIOS version SE5C620.86B.02.01.0012.070720200218 SE5C620.86B.02.01.0012.070720200218 Intel® Optane™ PMem firmware version N/A N/ASystem DDR memory configuration:slots/capacity/speed24 slots/32 GB/2666 MT/s 24 slots/64 GB/2666 MT/sSystem Intel Optane PMem configuration:slots/capacity/speedN/A N/ATotal memory per node (DRAM, PMem)768 GB 1536 GBStorage •1x Intel® SSD DC D3-S4510 240 GB(boot)•2x Intel® SSD DC D3-S4610 3.8 TB(application drives)•1x Intel® SSD P4510 4 TB PCIe/NVMe(test storage – esxtop and emon data) •1x Intel SSD DC D3-S4510 240 GB (boot)•2x Intel SSD DC D3-S4610 3.8 TB (application drives)•1x Intel SSD P4510 4 TB PCIe/NVMe (test storage – esxtop and emon data)Network Interface Card 1x Intel® Ethernet Adapter X710 1x Intel Ethernet Adapter X710Table 2. Server Hardware Configuration Details for DRAM-plus-PMem ConfigurationsPlatform Intel® Server Board S2600WFT Intel Server Board S2600WFT # of nodes 1 1# of sockets 2 2CPU Intel® Xeon® Gold 6238R processor@ 2.2 GHz Intel Xeon Gold 6238R processor @ 2.2 GHzCores per socket/threads per socket 28/56 28/56Microcode 0x0500002C 0x0500002CIntel® Hyper-Threading Technology ON ONIntel® Turbo Boost Technology ON ONBIOS version SE5C620.86B.02.01.0012.070720200218 SE5C620.86B.02.01.0012.070720200218 Intel® Optane™ PMem firmware version 5435 5435System DDR memory configuration:slots/capacity/speed12 slots/32 GB/2666 MT/s 12 slots/32 GB/2666 MT/sSystem PMem configuration:slots/capacity/speed8 slots/128 GB/2666 MT/s 12 slots/128 GB/2666 MT/sTotal memory per node (DRAM, PMem)1024 GB (384, 1024) 1536 GB (384, 1536)Storage •1x Intel® SSD DC D3-S4510 240 GB (boot)•2x Intel SSD DC D3-S4610 3.8 TB(application drives)•1x Intel® SSD P4510 4 TB PCIe/NVMe(test storage – esxtop and emon data) •1x Intel SSD DC D3-S4510 240 GB (boot) •2x Intel SSD DC D3-S4610 3.8 TB (application drives)•1x Intel SSD P4510 4 TB PCIe/NVMe (test storage – esxtop and emon data)Network Interface Card 1x Intel® Ethernet Adapter X710 1x Intel Ethernet Adapter X7101.2Workload ConfigurationThe workload configuration details for the DRAM-only can be seen in Table 3; the DRAM-plus-PMem configurations are provided in Table 4.Table 3. Workload Configuration Details for DRAM-only ConfigurationsHypervisor OS VMware ESXi VMware ESXiKernel 7.0 GA, 15843807 7.0 GA, 15843807Workload and version Power Worker Login VSI 4.1.40 Power Worker Login VSI 4.1.40Citrix Studio 1912.0.1000 1912.0.1000Citrix Virtual Apps and Desktops 1912 LTSR 1912 LTSRLogin VSI benchmark 4.1.40.1 4.1.40.1Intel® Optane™ PMem mode N/A N/ARun method Cold (1 iteration) Cold (1 iteration)Iterations and results choice 3 iterations, average 3 iterations, averageDataset size Dependent on # of VMs Dependent on # of VMsMaximum # of VDI sessions supported 120 170Table 4. Workload Configuration Details for DRAM-plus-PMem ConfigurationsHypervisor OS VMware ESXi VMware ESXiKernel 7.0 GA, 15843807 7.0 GA, 15843807Workload and version Power Worker Login VSI 4.1.40 Power Worker Login VSI 4.1.40Citrix Virtual Apps and Desktops 1912 LTSR 1912 LTSRLogin VSI benchmark 1912 LTSR 1912 LTSRTest mode 4.1.40.1 4.1.40.1Intel® Optane™ PMem mode 2LM 2LMRun method Cold (1 iteration) Cold (1 iteration)Iterations and results choice 3 iterations, average 3 iterations, averageDataset size Dependent on # of VMs Dependent on # of VMsMaximum number of VDI sessions 150 1702Software ConfigurationTables 5 and 6 provide configuration details for the Knowledge Worker and Power Worker guest virtual machines (VMs). Configuration details for the launcher are provided in Table 7.Table 5. Guest VM Configuration – Knowledge WorkerMicrosoft Windows 10 Enterprise (version 1909)OS Build: 18363.62824 GB2 GBMicrosoft Office Pro Plus 2019 (Word, Outlook, PowerPoint, Excel) Version: 1808, Build: 10361.20002Internet Explorer: 11.592.18362.0Adobe Reader XI: Version 11.0.0Doro PDF Writer: 1.82VMware OS Optimization Tool (OSOT): VMware Windows-10-2004-EnterpriseCitrix Optimizer: using Citrix_Windows_10_1903 TemplateLogin VSI 4.1.40Knowledge Worker profileLaunch Windows: 48 minutesTime test runs after last user launched: 20 minutesLaunchers: 8 total (one launcher for every 25 VMs)Table 6. Guest VM Configuration – Power WorkerMicrosoft Windows 10 Enterprise (version 1909)OS Build: 18363.62848 GB4 GBMicrosoft Office Pro Plus 2019 (Word, Outlook, PowerPoint, Excel) Version: 1808, Build: 10361.20002Internet Explorer: 11.592.18362.0Adobe Reader XI: Version 11.0.0Doro PDF Writer: 1.82VMware OS Optimization Tool (OSOT): VMware Windows-10-2004-EnterpriseCitrix Optimizer: using Citrix_Windows_10_1903 TemplateLogin VSI 4.1.40Knowledge Worker profileLaunch Windows: 48 minutesTime test runs after last user launched: 20 minutesLaunchers: 8 total (one launcher for every 25 VMs)Table 7. Launcher ConfigurationMicrosoft Windows 10 Enterprise (version 1909)OS Build: 18363.62846 GB0 GBOS: Windows-10-2004-EnterpriseSoftware: Citrix Workspace and/or VMware Horizon Client (same launchers are used for either VDItests in this environment)3Server LayoutFigure 1. The benchmarking test uses an ESXi client connected to a VDI golden VM.4Recipe DetailsThis section provides an overview of the benchmarking process.4.1Prepare the Cluster Servers1.Populate servers with any of the memory configurations mentioned above.2.Connect IPMI to a network to be used for the cluster.3.Connect a 10 GbE NIC to the cluster network.4.Configure IPMI usernames, passwords, and static IP addresses.5.Ensure that you can ping IPMI addresses (additionally test by logging into the web interface, if available).6.Download the Login VSI Pro Library: https:///downloads/login-vsi4.2Install CitrixIf running the Citrix VDI, install Citrix Virtual Apps and Desktops on the ESXi client, as shown here:https:///downloads/citrix-virtual-apps-and-desktops/.4.3Install VMware vSphere and ESXiDownload the ESXi and vSphere installers and install them on the ESXi client, using the instructions here: https:///en/web/vmware/downloads/info/slug/datacenter_cloud_infrastructure/vmware_vsphere/7_0.4.4Install the VDI EnvironmentDownload the ESXi installer and install it on the VDI host machine(s) and add it to the vSphere cluster. For this test, each VDI cluster will have a single host added to each defined cluster. See the next section for details for this step.5Installing a VDI Cluster1.Attach the ESXi media to the cluster. Using the KVM, attach the ISO to the host as a USB host or physically viaa USB cable, depending on your setup.2.Install the OS onto the VDI client system. Follow the ESXi installation prompts.uz3.Define a static IP. This static IP is on the management network. The 1 GbE network is used during this step.From the KVM or local keyboard, log into the VDI client user interface with the root user and password you specified in Step 2, and modify the static IP settings.4.Add the VDI client to the vSphere system. From the vSphere user interface, define a new cluster to be usedfor the VDI client. For this test, the defaults are selected.5.Add the VDI client to the cluster by selecting the Add hosts option on the vSphere interface. Complete thesteps and wait for the host to be added.5.1Additional InformationThe VDI client installation is now complete. The test environment that was employed in this test uses multiple images running on the single control server, shown below. Short descriptions are provided here:•CentOS Jumpbox. This machine is used as a network gateway. It hastwo virtual switches defined on the image, which provide internet accessfrom the 1 GbE management network to the 10 GbE internal network.•Citrix Software. This is the VDI controller, which will be covered in fulldetail later.•Domain Controller. This machine is used to provide DNS and DHCPfunctionality to the 10 GbE internal network. All VDI clients in this testenvironment are connected to this host via a physical 10 GbE switch,which is then connected to this machine.•Horizon 7 Controller. This machine is used to provide the VDIenvironment for the test case which uses Horizon rather than Citrix. Thisis not covered in this test documentation version.•Launcher00x. These are the launchers that are connected to Login VSIfor the purpose of running the VDI workload.•LoginVSi_... . This machine is used to deploy the Login VSI workload; itwill be covered in later sections.•SQL DB. This machine is used to deploy a SQL Server environment thatis used in the installation of the Citrix server.6Setting Up a Golden VM ImageSet up a VM as a golden image for Login VSI on Citrix. Power on the VM and access it.1.Install Login VSI target software.u2.Install Microsoft Office Pro Plus 2019.3.Connect to Active Directory. Ensure the golden image is part of the Active Directory.4.Install Citrix Virtual Desktop Virtual Delivery Agent (VDA).NOTE: Skip this section if Citrix Studio Delivery Controller is not configured.a)Mount the Citrix Install ISO. Launch the executable, AutoSelect.b)Install the VDA for Windows. Select Virtual Apps and Desktops, then select Prepare Machines and Imagesto install the VDA.c)Set up the environment and the core components. Create an MCS image and make sure Citrix WorkspaceApp is not selected.d)Set up additional components and the delivery controller. Launch the executable, AutoSelect. Ensurethe following are selected: “Citrix Supportability Tools,” “Citrix User Profile Manager,” and “Citrix User Profile Manager WMI Plugin.” Also select “Do it manually” then add and test the FQDN for the Citrix Studio host.e)Set up features and the firewall. Select “Optimize performance” and specify “Automatically” for howfirewalls rules are to be configured.f)View the summary and install.g)Turn off Smart Tools and select Finish. Select “I do not want to participate in Call Home,” then restart themachine and finish the install.5.Disable Windows tamper protection. Disabling tamper protection will allow for optimization tools to disableWindows Defender. Go to Windows Settings and find Virus and Threat protection settings and select Manage Settings. Change Tamper Protection to Off.6.Install Citrix Optimizer and apply Windows 10 1903 Template. Select the “Windows 10 Build 1903 fromCitrix” template then click Select All, and then Optimize. For more information, read the article athttps:///article/CTX224676.e VMware OS Optimization Tool 2020. Download this tool at https:///vmware-os-optimization-toola)Select or download the Windows 10 1809-2004-Server template.b)Analyze and optimize. After selecting the template, click Analyze then select Optimize.c)Finalize. Go to the Finalize section and select the same options show in the screenshot and click Execute.8.Create a snapshot.Important: The golden image must have only one vCPU (one core per vCPU), along with a vdisk of type SCSI, before the snapshot is created.Select the VM to be used as the golden image.Go to the options below the VM table and select Take Snapshot and name it with the prefix “XD_” (for example, XD_gold).7Installing Citrix Virtual Desktop 1903.1Instructions for installing the Citrix Delivery Controller can be found here: https:///en-us/citrix-virtual-apps-desktops/install-configure.html.8Creating the Site1.Begin the Delivery Controller installation. Launch the AutoSelect executable then select Get Started àDelivery Controller.2.Accept default databases. Leave automatically generated Database names at their default locations and go tonext screen.3.Set up licensing. For initial installation, select the 30-day trial or connect to your local Citrix License serverdirectly and download the license file.4.Set up the connection. Choose the vSphere connection and follow the remaining prompts to connect.5.Set up the network and additional features. For the Name Resource, select “VLAN created in Prism.” Do notselect any additional features.6.Review the summary and select Finish.9Creating a Machine CatalogNow that site setup is complete you must create the machine catalog.1.Choose the operating system. Select “Desktop OS.”2.Choose the machine management settings, as shown here.3.Choose the desktop experience settings, as shown here.4.Choose the default container, as shown here.5.Set up the master image. Select the snapshot created earlier (for example, “XD_gold”). For the minimumfunctional level of the catalog, select “1811 (or newer).”6.Set up the VMs, as shown here.7.Set up computer accounts. Create Active Directory computer accounts in the Login VSI organizational unit(OU) or in the Computers OU.8.View the summary and select Finish.10Creating a Delivery GroupOnce site setup and machine catalog creation are complete, you can create a Delivery Group.1.Choose the size of the Delivery Group. Choose number of VMs for the Delivery Group (for example, 325).2.Specify who can use the Delivery Group. Select “Allow any authenticated users…”3.Add applications. Use the Add button to add your applications.4.Set up the desktops. Add assignments. Provide a display name and leave other options with their defaultvalues.uvw5.View the summary and select Finish.6.Set the Delivery Group’s power management settings. Once the Delivery Group is created, edit the DeliveryGroup and change its Power Management settings. Adjust the number of VMs powered to the maximum amount during the times they are in use.11Setting Up Login VSI Launchers1.Download Citrix Receiver 4.12: https:///downloads/citrix-receiver/windows/receiver-for-windows-latest.html.2.Install Citrix Receiver 4.12.3.Ensure that the launcher is connected to the domain.4.Sign into the domain\Launcher-V4 user with default password “Password!”5.Ensure that the launcher agent is on screen. The Login VSI launcher agent should automatically launch due tothe profile script for the user Launcher-V4. The launcher agent will open a command prompt window,indicating that the launcher is waiting for a Login VSI workload to start.12Installing and Setting Up Login VSI Management Software1.Perform power management. Launch the Setup executable within the Login VSI Dataserver Setup directory.2.Set up Active Directory. Ensure there is an Active Directory with administrative rights on the network SetupActive Directory script. (Active Directory on the cluster network used is vpremote.local.)3.Save and execute. Click “save to PS1” and execute on the Active Directory as administrator.4.Add the Login VSI Pro Library. Use the instructions found here:https:///documentation/index.php?title=Login_VSI_Pro_Library_Setup 5.Add launchers.6.Set workload settings.7.Set workload options.8.Choose a scenario.9.Set up the connection.a)Choose the connection type and settings.b)Specify user information and session appearance.c)Choose session mappings and insert a new command line.d)Enter the connection command line.10.Start the test.a)Specify the test configuration and name.b)Set up the launcher workflow and scripts.c)Ensure the Session Monitor is running.d)Perform a launcher check and finish.The launcher check will wait for all launchers to acknowledge they areready via the launcher agent.11. View the dashboard. The dashboard will start showing launcher and active sessions and display importantinformation such as the number of errors found in the workload.12. View the results of the test.a) Launch the analyzer. C lick the Analyzer button on the bottom of the Login VSI Management console.b)Browse to VSIshare. Ensure that your VSIshare directory is set correctly, and select the tests you wouldlike to view and click Open. Two sample results (Summary and VSImax v4) are provided as examples.u13Revision HistoryDescription Date1.0 Citrix on ESXi Benchmarking Guide, formatted and edited by3/31/2021Kaia Communications, Inc. (agency)1.5 Draft updated by Todd Clausen to replace various screen captures 4/29/2021Intel technologies may require enabled hardware, software or service activation.No product or component can be absolutely secure.Your costs and results may vary.© Intel Corporation. Intel, the Intel logo, and other Intel marks are trademarks of Intel Corporation or its subsidiaries.Other names and brands may be claimed as the property of others. 0521/SMIU/KC/PDF。
TSM安装配置一,安装ISC 二,安装AC 三,安装TSM服务端四,服务端做配置五.配置存储设备六,Aix下客户端的安装与配置七,Oracle rman备份脚本八,Brocade 交换机zone 一,安装ISC二,安装AC三,安装TSM服务端TSM 服务器安装安装服务器许可证安装语言包安装设备驱动程序四,在服务端做配置Cd C:\Program Files\Tivoli\TSM\server\diag\Dsmadmc 输入用户名/密码 admin/admin注册节点REGISTER NODE lyjj1 adminREGISTER NODE oradata1 admin设置serverpassword密码Set serverpassword admindefine server stange1 serverpassword=admin hladdress=10.58.100.6 lladdress=1502validate lanfree lyjj1 stange1 验证代理五.配置存储设备Cd C:\Program Files\Tivoli\TSM\server\diag\Dsmadmc输入用户名/密码 admin/adminDEFINE LIBRARY 3583LIB LIBTYPE=SCSI SERIAL="IBM1753350" SHARED=YES AUTOLABEL=YES RESETDRIVE=NO (定义库)DEFINE PATH TSMSERVER 3583LIB SRCTYPE=SERVER DESTTYPE=LIBRARY DEVICE=lb0.0.0.6 ONLINE=YES 定义库路径DEFINE DRIVE 3583LIB MT0.1.0.6 定义第一个设备名DEFINE DRIVE 3583LIB MT0.2.0.6 定义第二个设备名DEFINE PATH TSMSERVER MT0.1.0.6 SRCTYPE=SERVER DESTTYPE=DRIVE LIBRARY=3583LIB DEVICE=mt0.1.0.6 ONLINE=YES 定义第一个设备的路径DEFINE PATH TSMSERVER MT0.2.0.6 SRCTYPE=SERVER DESTTYPE=DRIVE LIBRARY=3583LIB DEVICE=mt0.2.0.6 ONLINE=YES 定义第二个设备的路径DEFINE PATH STANGE1 MT0.1.0.6 SRCTYPE=SERVER DESTTYPE=DRIVE LIBRARY=3583LIB DEVICE=/dev/rmt0 ONLINE=YES 定义代理服务的第一个设备路径DEFINE PATH STANGE1 MT0.2.0.6 SRCTYPE=SERVER DESTTYPE=DRIVE LIBRARY=3583LIB DEVICE=/dev/rmt1 ONLINE=YES 定义代理服务的第二个设备路径DEFINE DEVCLASS LTO3 DEVTYPE=LTO FORMAT=DRIVE MOUNTLIMIT=DRIVES MOUNTWAIT=60 MOUNTRETENTION=2 PREFIX=ADSM LIBRARY=3583LIB WORM=NO DRIVEENCRYPTION=ALLOW 定义设备类label libv 3583lib search=yes labelsource=barcode overwrite=no checkin =scratch 加入磁带六,Aix下客户端的安装与配置一,软件的安装与配置步骤一.Smit安装TSM client所需要安装的软件包Tivoli.tsm.client.ba.aix43.32bit下的:Tivoli.tsm.client.booksTivoli.tsm.client.web.aix43.32bittivoli.tsm.client.image.aix43.32bit步骤二TDP for Oracle客户端安装smit安装以下软件包:tivoli.tsm.client.api.aix43.64bittivoli.tsm.client.oracle.64bittivoli.tsm.client.oracle.tools.64bit步骤三安装TSM客户端及SAN AGENT软件tivoli.tsm.StorageAgent.rtetivoli.tsm.devices.aix5.rte64tivoli.tsm.client.bativoli.tsm.client.hsm.jfs2tivoli.tsm.client.jbbtivoli.tsm.client.api.32bittivoli.tsm.client.api.64bitxlC.aix50.rtexlC.rtexlsmp.aix50.rtexlsmp.rte步骤四1.修改client的配置文件vi /usr/tivoli/tsm/client/ba/bin/dms.opt SERvername tsmservervi /usr/tivoli/tsm/client/ba/bin/dms.sys SErvername tsmserverCOMMMethod TCPipTCPPort 1500TCPServeraddress 10.58.100.19nodename lyjj1enablelanfree yes LANFREECommmethod TCPip LANFREEtcpport 1502passwordaccess generate2.配置tdpo的配置文件关闭oracle重新连接库文件:#rm $ORACLE_HOME/lib/libobk.a#ln -s /usr/lib/libobk.a $ORACLE_HOME/lib/libobk.avi /usr/tivoli/tsm/client/api/bin64/dsm.optSErvername TSMSERVERvi /usr/tivoli/tsm/client/api/bin64/dsm.sysSErvername tsmserverCOMMMethod TCPipTCPPort 1500TCPServeraddress 10.58.100.19NodeName oradata1enablelanfree yesLANFREECommmethod TCPipLANFREEtcpport 1502password generatevi /usr/tivoli/tsm/client/oracle/bin64/tdpo.optDSMI_ORC_CONFIG /usr/tivoli/tsm/client/api/bin64/dsm.optDSMI_LOG /usr/tivoli/TDPO_FS adsmorcTDPO_NODE oradata1Cd /usr/tivoli/tsm/client/oracle/bin64/./tdpoconf password (输入客户端的密码这里为admin 3次)./tdpoconf showenv3.修改存储带库服务器的配置文件Vi /usr/tivoli/tsm/Storageagent/bin/dsmsta.optdevconfig devconfig.outtcpport 1502cd /usr/tivoli/tsm/Storageagent/bin/dsmsta setstorageserver myname=stange1 mypassword=admin myhladdress=10.58.100.6 servername=tsmserver serverpassword=admin hladdress=10.58.100.19 lladdress=1500./dsmsta(启动带来程序,也可等待配置都完成后重启机器)七,Oracle rman备份脚本Rman target / <<EOFrun {allocate channel d1 type 'sbt_tape' parmsENV=(TDPO_OPTFILE=/usr/tivoli/tsm/client/oracle/bin64/tdpo.opt)'connect 'internal/manager@scdb1';sql 'alter system archive log current';backupformat 'arch_t%t_s%s_p%p'delete input);release channel d1;}EOF八,Brocade 交换机zone 缺省IP访问方式是:IP地址:10.77.77.77用户名:admin密码:password时区:Pacific time交换机名称:switch。
目录一、数据备份环境规划 (2)1.硬件环境 (2)2.软件环境 (2)3.客户环境数据 (2)二、数据备份系统服务器安装 (3)1. 安装前检查 (3)2. 安装TSM Server和client代码 (3)3. 创建TSM所需要的数据库、日志和硬盘存储卷 (4)4. 启动TSM SERVER并配置 (6)5. 配置TSM SERVER上的客户端 (6)6. 在TSM SERVER中配置3584磁带库 (8)7. 在TSM SERVER中配置服务器日常管理任务 (9)三、数据备份系统节点安装和设置 (10)1. 节点备份策略 (10)2. 在TSM SERVER上定义节点 (10)3. 安装TSM客户端节点 (11)四、TSM for SAN软件的安装(LAN-Free) (12)五、TSM for Oracle软件的安装 (14)六、安装IBM Tivoli Storage Manager for System Backup and Recovery (16)一、数据备份环境规划1.硬件环境2.软件环境TSM Server最新PTFftp:// /storage/tivoli-storage-management/patches/TSM for SAN最新PTFftp:// /storage/tivoli-storage-management/patches/TSM Client最新PTFftp:// /storage/tivoli-storage-management/patches/client/3.客户环境数据本部分将列出与客户的环境相关的数据。
后面将利用这些数据来确定TSM客户端需求(产品级)和TSM服务器需求。
说明:客户端这个术语指的是TSM服务器的客户系统。
在大多数情况下,客户端指的是一个应用或文件服务器。
客户端分为两种类型:✧AIX文件服务器✧AIX平台Oracle数据库从TSM的角度来看,上述客户端类型可以归为两组:✧文件服务器✧数据库服务器二、数据备份系统服务器安装TSM服务器的安装必须在SAN硬件环境完成后进行。
1.安装redhat5.12.上传安装vistor_2_1_1.tgz3.解压tar xvfz vistor_2_1_1.tgz后产生vs-dist和vs-install;4.运行./vs-install[root@localhost vistorvtl]# ./vs-installViStor Virtual Tape Library Installation. Copyright Cofio Software Inc. 2006Checking for correct installation platform and packages ...Checking target platform Linux localhost 2.6.18-53.el5xen #1 SMP Wed Oct 10 17:06:12 EDT 2007 i686 i686 i386 GNU/LinuxViStor is supported on this platform, checking installed packages ...The kernel-devel package must be installed prior to installation5.安装kernel-devel package:进入光盘目录下/media/RHEL_5.1 i386 DVD/Server安装:#rpm -ivh kernel-devel-2.6.18-53.el5.i686.rpm6.[root@localhost vistorvtl]# ./vs-installViStor Virtual Tape Library Installation. Copyright Cofio Software Inc. 2006Checking for correct installation platform and packages ...Checking target platform Linux localhost 2.6.18-53.el5xen #1 SMP Wed Oct 10 17:06:12 EDT 2007 i686 i686 i386 GNU/LinuxViStor is supported on this platform, checking installed packages ...There is a mismatch between the kernel and kernel-devel packages[root@localhost Server]# rpm -ihv kernel-2.6.18-53.el5.i686.rpm[root@localhost vistorvtl]# ./vs-installViStor Virtual Tape Library Installation. Copyright Cofio Software Inc. 2006Checking for correct installation platform and packages ...Checking target platform Linux localhost 2.6.18-53.el5xen #1 SMP Wed Oct 10 17:06:12 EDT 2007 i686 i686 i386 GNU/LinuxViStor is supported on this platform, checking installed packages ...Packages required for installation were foundThis product contains copyright and patented material licensed byBridgeworks Ltd (UK)Enter library name [Library1]: libTAPE LIBRARIES: 磁带库的类型1.EXABYTE 1102.EXABYTE 2213.EXABYTE X804.EXABYTE X2005.STK 97106.STK 97147.STK 97308.STK 97409.OVERLAND PowerLoader10.OVERLAND LoaderXpress11.OVERLAND NEO SERIES 200012.OVERLAND NEO SERIES 410013.OVERLAND NEO SERIES 420014.SPECTRA PYTHON SERIES T5015.SPECTRA PYTHON SERIES T12016.QUANTUM PX50217.QUANTUM PX72018.QUANTUM Scalar i500Select tape Library [1-18]: 18Enter number of slots [1-2000]: 24 磁带库中有多少个放磁带的插糟TAPE DRIVES:1.IBM UL T3580-TD2, 3580 LTO 22.IBM UL T3580-TD3, 3580 LTO 33.IBM UL TRIUM-TD1, L TO Ultrium 14.IBM UL TRIUM-TD2, L TO Ultrium 25.IBM UL TRIUM-TD3, L TO Ultrium 36.CERTANCE ULTRIUM06242-XXX, Ultrium 17.CERTANCE ULTRIUM 2, CL 400 - Ultrium 28.CERTANCE ULTRIUM 3, CL 800 - Ultrium 39.HP Ultrium 1-SCSI, Ultrium 215e LTO10.HP Ultrium 2-SCSI, Ultrium 215e LTO11.STK 9840Select tape drive type [1-11]: 10 磁带库上磁带机(驱动)的类型Enter number of tape drives [1-15]: 2 磁带机(驱动)的个数Enter number of media cartridges [1-24]: 2 向磁带库里放的磁带个数Enter media size [1-10000 GB]: 1 磁带的容量Barcode prefix format is [0 - 2] characters 磁带条形码的前辍Enter media barcode prefix : taEnter media location [/usr/cofio/vistor/media]: 磁带的位置LANGUAGES1.English2.Korean3.ChineseSelect GUI language : 3CONNECTION METHOD1. Direct SCSI Device2. iSCSI3. Fibre ChannelSelect connection method : 2LIBRARY: STK 9740TAPE DRIVE: IBM UL TRIUM-TD3, L TO Ultrium 3DRIVE Count: 2SLOT Count: 1MEDIA Count: 1MEDIA Size: 1 GBMEDIA Home: /usr/cofio/vistor/mediaGui language: ChineseConnection: ISCSIIs this information correct ? [y or n]: yrunning script /usr/cofio/vistor/src/MakeScriptInstalling SCSI driver module ...Installing ViStor Virtual Tape Library module ...Created group 'cofio'Created user 'cofio'ViStor Software installation has completed successfullyThe ViStor web server has been started and to run theViStor user interface, direct a web browser to <this machine ip address>:5050安装后自动启动,可以直接用WEB登录:把防火墙和SELinux关闭。
用ps –ef可看到多了好多COFIO的进程:cofio 11504 10908 0 14:07 ? 00:00:00 /usr/cofio/httpd/bin/httpd -e emerg -f /usr/cofio 如果手动启动WEB可用:/usr/cofio/visto/vs-httpd start|stop配置vistor命令:vistor start|stop|status|ver配置library命令:vs-library 介质管理:vs-media把防火墙配置一下或关闭了:service iptables stop刚开始没有设置密码可以直接LOGIN,这后点SETTINGS设定WEB密码,激活密钥匙等:激活码的获得:首先要登录网站使用系统ID新获得一下激活码:User Login: yanpb01@Password: ugemysutaLogin URL: /ViStor (VTL)-Downloads/进入网站后点PRODUCT LICENSES-》点最下面的Trial License:输入随便一个gjltest:点击上面的DETAILS进入下面的页面:输入系统ID后获得相应的激活码:A9IAUAB39MUWNERWIWDSQNVDLUDOJSSC 此时系统时间一定要是真实时间,因为申请激活码时有起始时间。
管理磁带库:配置磁带库:察看详细:添加带库:删除带库:TSM下载地址:ftp:///storage/tivoli-storage-management/maintenanceISC下载:ftp:///storage/tivoli-storage-management/maintenance/admincenter/v5r5/5.5.0.0/ISCAC下载:ftp:///storage/tivoli-storage-management/maintenance/admincenter/v5r5/5.5.0.0/TSM SERVER5.5 FOR LINUX安装文档:/view/ce047f75a417866fb84a8e2c.html安装TSM server及client:安装:i686中的所有RPM 和noarch中的三个ZH语言包及客户端中的TIVsm-API.i386.rpm TIVsm-BA.i386.rpm TIVsm-msg.zh_CN.i386.rpm 运行/opt/tivoli/tsm/devices/bin/autoconf查看TSM是否能识别到VISTOR虚拟出来的驱动。