巨普激光扫描枪(Z-3051HS)说明书
- 格式:pdf
- 大小:205.32 KB
- 文档页数:10

半导体激光打标机使用说明书深圳市华天世纪激光科技有限公司前言欢迎您选用我公司生产的HT-DP50系列激光打标机,如果您是首次使用此款型号的激光打标机,在通电前请务必仔细阅读本使用手册。
DP50系列激光设备已采用了尽可能全面的安全防范措施,以确保拥护人身安全及设备的自身安全,虽然如此,对本机的不正确使用、维护、改制等仍可能对操作者或机器造成各种损害。
防止激光辐射的泄漏:DP50系列激光设备采用封闭的激光光路设计,可以有效地防止激光辐射的泄漏。
对本机电器设备进行的维护、调整必须由经过培训的对本机各部分均较为熟悉的专业技术人员进行,且需特别注意以下几点:1、若某部件在维护调整时不需要运行,请勿接通该部分的电源。
2、在更换激光器模块时,切勿接通设备电源。
3、机器应有良好的接地,并应对此作定期检查。
4、尽可能只用一只手操作电气设备,以防止在人体上构成回路。
5、在高压电路上操作时,应使用合格的,绝缘良好的工具。
设备的测试,有些需采用一些特殊的测量技术或设备。
测试参数的选择应由熟悉本机操作和相关设备使用的技术人员决定。
敬告用户:1、除本手册所规定的操作外,对机器的任何其他操作,都可能使操作者遭受危险的激光辐射!2、若激光束照射到易燃材料上时,将会引起火灾甚至爆炸,应注意不得把该类材料放置到光路上或激光束有可能照到的地方!3、激光器正常工作期间,设备内部不得增设任何零件及物品。
除非经过特别授权,否则不得在密封罩打开的状态下使用本机。
欢迎用户提出建议,请与下列地址联系:中华人民共和国深圳市华天世纪激光科技有限公司邮政编码:518001电话:国内业务部:0国际业务部:+86-售后服务部:0传真:(FAX):1主页:H地址:深圳市罗湖区人民北路物资大院综合楼1-2层需要采购或技术支持时,请与就近的销售服务商联系目录第一部分半导体激光打标机各部件原理与使用说明............................................................................. - 1 -1.激光原理....................................................................................................................................... - 1 -2.光学系统....................................................................................................................................... - 1 -3.各主要部件原理与技术说明....................................................................................................... - 2 -扩束镜........................................................................................................................................... - 4 -激光电源....................................................................................................................................... - 4 -声光Q开关.................................................................................................................................. - 8 -声光Q开光驱动电源.................................................................................................................. - 8 -1.电气安装连线....................................................................................................... - 8 -1、数码窗................................................................................................................. - 10 -2、RUN/STOP(运行)指示灯................................................................................. - 10 -3、ALARM(报警)指示灯....................................................................................... - 10 -4、TEST(测试)指示灯......................................................................................... - 10 -5、M1、M2、M3指示灯............................................................................................ - 10 -6、按键说明............................................................................................................. - 10 -7、电源开关............................................................................................................. - 11 -“F-θ”镜组 ............................................................................................................................. - 11 -光学扫描振镜............................................................................................................................. - 11 -冷水机使用说明......................................................................................................................... - 12 -第二部分打标控制软件使用说明....................................................................................................... - 18 -第一章概述............................................................................................................................................... - 18 -EzCad2软件简介....................................................................................................................................... - 18 -1.1.1 软件安装........................................................................................................................... - 18 -1.1.2 软件功能........................................................................................................................... - 18 -1.1.3 界面说明........................................................................................................................... - 18 -第二章文件菜单....................................................................................................................................... - 20 -新建(N) ............................................................................................................................................... - 20 -打开(O) ............................................................................................................................................... - 20 -保存(S),另存为(A) .......................................................................................................................... - 21 -打印..................................................................................................................................................... - 22 -获取扫描图像(m) ............................................................................................................................... - 22 -系统参数(P) ........................................................................................................................................ - 23 -2.6.1 常规................................................................................................................................... - 23 -2.6.2 颜色................................................................................................................................... - 24 -2.6.3 工作空间........................................................................................................................... - 24 -2.6.4 自动备份........................................................................................................................... - 24 -2.6.5 移动旋转........................................................................................................................... - 25 -2.6.6 插件管理器....................................................................................................................... - 25 -2.6.7 语言/Language .................................................................................................................. - 25 -最近文件............................................................................................................................................. - 26 -退出(X) ............................................................................................................................................... - 26 -对象列表............................................................................................................................................. - 26 -对象属性栏......................................................................................................................................... - 26 -第三章编辑............................................................................................................................................... - 28 -撤消(U)/恢复(R) ................................................................................................................................. - 28 -剪切(T)/复制(C)/粘贴(P) ................................................................................................................... - 28 -组合/分离组合.................................................................................................................................... - 28 -群组/分离群组.................................................................................................................................... - 29 -填充..................................................................................................................................................... - 29 -第四章绘制菜单....................................................................................................................................... - 33 -点(D) ................................................................................................................................................... - 33 -曲线..................................................................................................................................................... - 34 -矩形..................................................................................................................................................... - 34 -圆- 35 -椭圆..................................................................................................................................................... - 35 -多边形................................................................................................................................................. - 36 -文字..................................................................................................................................................... - 36 -4.7.1文字字体参数.................................................................................................................... - 36 -4.7.2曲线排文本参数................................................................................................................ - 38 -4.7.3条形码字体参数................................................................................................................ - 40 -一维条形码......................................................................................................................... - 42 -二维条形码......................................................................................................................... - 43 -1.PDF417条码......................................................................................................... - 43 -2.DataMatrix条码 ................................................................................................... - 43 -4.7.4变量文本............................................................................................................................ - 44 -键盘............................................................................................................................. - 44 -日期............................................................................................................................. - 45 -显示为:序列号......................................................................................................... - 47 -列表文件..................................................................................................................... - 50 -动态文件..................................................................................................................... - 51 -位图..................................................................................................................................................... - 52 -矢量文件............................................................................................................................................. - 56 -延时器................................................................................................................................................. - 57 -输入口................................................................................................................................................. - 57 -输出口................................................................................................................................................. - 57 -直线..................................................................................................................................................... - 58 -图形选取............................................................................................................................................. - 58 -节点编辑............................................................................................................................................. - 59 -第五章修改菜单....................................................................................................................................... - 62 -变换..................................................................................................................................................... - 62 -5.1.1移动.................................................................................................................................... - 62 -5.1.2 旋转................................................................................................................................... - 63 -5.1.3镜像.................................................................................................................................... - 63 -5.1.4缩放.................................................................................................................................... - 64 -5.1.5倾斜.................................................................................................................................... - 64 -造形..................................................................................................................................................... - 65 -曲线编辑............................................................................................................................................. - 66 -对齐..................................................................................................................................................... - 66 -jsf字体................................................................................................................................................ - 67 -第六章查看菜单....................................................................................................................................... - 69 -观察..................................................................................................................................................... - 69 -标尺,网格点,辅助线..................................................................................................................... - 70 -捕捉网格............................................................................................................................................. - 70 -捕捉辅助线......................................................................................................................................... - 70 -捕捉对象............................................................................................................................................. - 70 -系统工具栏、视图工具栏、绘制工具栏、状态栏、对象列表栏、对象属性栏 ......................... - 70 -第七章帮助............................................................................................................................................... - 71 -关于EzCad(A) ................................................................................................................................... - 71 -第八章加工............................................................................................................................................... - 72 -笔列表................................................................................................................................................. - 72 -加工参数库......................................................................................................................................... - 73 -软件参数设置..................................................................................................................................... - 79 -8.4.1配置参数设置.................................................................................................................... - 79 -8.4.2区域尺寸参数.................................................................................................................... - 79 -8.4.3激光控制............................................................................................................................ - 80 -.端口参数.................................................................................................................................... - 84 -加工参数设置步骤............................................................................................................................. - 85 -8.5.1 调节开始段延时............................................................................................................... - 85 -8.5.2 调节结束段延时............................................................................................................... - 88 -8.5.3 调节拐角延时................................................................................................................... - 89 -扩展轴分割标刻模块......................................................................................................................... - 91 -8.6.1模块功能说明.................................................................................................................... - 91 -8.6.2 扩展轴参数....................................................................................................................... - 92 -8.6.3单扩展轴功能参数............................................................................................................ - 95 -1)单轴功能的开启设置.............................................................................................................. - 95 -2)各参数的功能定义................................................................................................................. - 96 -3)单扩展轴参数调试说明......................................................................................................... - 99 -8.6.4 双扩展轴功能参数......................................................................................................... - 100 -附件:电流映射参数....................................................................................................................... - 101 -第一部分半导体激光打标机各部件原理与使用说明HT-DP50系列激光打标设备由半导体激光器泵浦模块、Q驱动器、冷水机组、光学聚焦镜头、激光电源、半自动对焦控制器、计算机控制系统(包括计算机和专用接口板)、光学扫描振镜及其驱动器、X-Y工作平台、等部件组成。
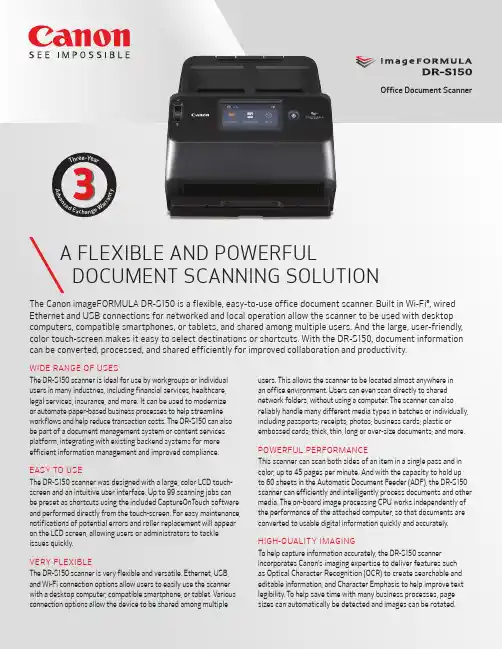
ROBUST SUITE OF SOFTWARE APPLICATIONSWith users requiring flexibility in their business technology, theDR-S150 scanner is bundled with a suite of convenient softwareapplications to help widen the scope of capture and outputcapabilities. Canon’s CaptureOnTouch Pro is powerful yet easy-to-use scanning software. It performs OCR, converts documents tosearchable PDF or JPG, and scans directly to the cloud (Dropbox,Google Drive, OneDrive, Box, QuickBooks Online, Evernote,SharePoint, and more)† to improve sharing and collaboration. KofaxVirtual ReScan (VRS) helps to automatically enhance the overallquality of scanned images and reduce the time involved in manualdocument preparation. Settings to automatically adjust outputresolution for improved file quality and reduce size are just some ofthe features available with these software applications.The CaptureOnTouch Job Tool App—available for iOS, Android, andWindows—allows users to scan to and from their smart devices.ENVIRONMENT IN MINDThe DR-S150 scanner meets ENERGY STAR® guidelines for energyefficiency and complies with both the EU RoHS and WEEE directivesfor the reduction of hazardous substances and waste products.♦The scanner also has an EPEAT environmental rating of Silver.CUSTOMER CAREeCarePAK options protect your investment and extend servicebeyond the initial three-year advanced exchange warranty period.This saves on costs associated with post-purchase maintenanceand helps maximize uptime throughout the scanner’s life.As an ENERGY STAR® Partner, Canon U.S.A., Inc. has qualified this model as meeting the ENERGYSTAR energy efficiency criteria through an EPA recognized certification body. ENERGY STAR andthe ENERGY STAR mark are registered U.S. marks. Canon is a registered trademark of CanonInc. in the United States and may also be a registered trademark or trademark in other countries.imageFORMULA is a registered trademark of Canon Electronics, Inc. All other referenced productnames and marks are trademarks of their respective owners. Specifications and availability subject tochange without notice. Not responsible for typographical errors.© 2019 Canon U.S.A., Inc. All rights reserved.1219-DRS150-PDF-SPSPECIFICATIONSType: Office Document ScannerDocument Feeding: Automatic or ManualDocument SizeWidth: 2.0" – 8.5"Length: 2.1" – 14.0"Long Document Mode: Up to 118"Document Weight: 7 – 56 lb. Bond Plain PaperFeeder Capacity: Up to 60 SheetsGrayscale: 8-bitColor: 24-bitLight Source: RGB LEDScanning Element: Contact Image Sensor (CMOS)Scanning Modes: Color, Grayscale, Black and WhiteOptical Resolution: Up to 600 dpiOutput Resolution: 100/150/200/240/300/400/600 dpiScanning Speeds*Simplex DuplexBlack and White: Up to 45 ppm Up to 90 ipmGrayscale: Up to 45 ppm Up to 90 ipmColor: Up to 45 ppm Up to 90 ipmInterface: U SB 3.2 Gen 1, 10Base-T/100Base-TX/1000Base-T Ethernet, Wi-Fi®Dimensions (H x W x D): 9.5" x 11.5" x 9.8" (with trays closed)Weight: 7.44 lb.Power Consumption: 22.5W or Less (Sleep Mode: 3.1W or less)Suggested Daily Volume: 4,000 Scans**Bundled Software: I SIS/TWAIN Driver, CaptureOnTouch Pro V4, KofaxVirtualReScan BasicSupported OS: W indows 7 Service Pack 1 or newer version(32 bit / 64 bit), Windows 8.1 (32-bit/64-bit), Windows10 (32-bit/64-bit), Windows Server 2008 R2 ServicePack 1 or newer version, Windows Server 2012 R2,Windows Server 2016, Windows Server 2019Options: F latbed Scanner Unit 102, Exchange Roller Kit(feed roller and retard roller), Passport Carrier Sheet,A4 Carrier SheetOther Features: A utomatic Color Detection, Automatic Page SizeDetection, Automatic Resolution Setting, BackgroundSmoothing, Character Emphasis, Color Dropout/Enhance Color, Deskew, Double-Feed Release, FeedingRetry, Folio Mode, Image Rotation, Long DocumentMode, MultiStream™, Pre-Scan, Prevent Bleed-Through/Remove Background, Separation Retry,Shadow Cropping, Skip Blank Page, Text Enhancement,Text Orientation Recognition, Ultrasonic Double-FeedDetection, User PreferencesItem Number: 4044C002†S ubscription to a third-party cloud service required. Subject to third-party cloud serviceprovider’s Terms and Conditions.♦T he facts and product statistics about EU RoHS and WEEE were obtained from CanonElectronics Inc. as of 2019.*E xamples based on typical settings, rated in pages/images per minute with letter-sizeddocuments at 200 dpi, landscape feeding direction. Actual processing speeds may varybased on PC performance and application software.**C alculations based on scanning speed and assumed daily time of use.。
目录1. LCD显示功能概述 (1)2. 按键功能 (2)2.1. 按键功能码速查表 (2)2.2. 按键模式说明 (2)2.3. 数据设置方法 (2)3. 按键操作说明 (3)3.1. 主变量调零(清零)功能 (3)3.2. 组态功能 (3)3.2.1. 功能概述 (3)3.2.2. 设置单位 (4)3.2.3. 设置量程和阻尼 (4)3.3. 组态数据浏览 (4)H3051S / H3051T 按键使用说明书1. LCD 显示功能概述用户可以通过组态软件设置LCD 显示的变量及显示的小数位数。
参见组态软件设置部分的“仪表组态”→“输出特性”。
LCD 支持双变量显示,可以设置的显示变量包括电流、主变量百分比和主变量;每个变量的均可以独立设置显示小数点位置:0、1、2、3、4。
如果两个显示变量相同,则LCD 只显示一种变量;否则,LCD 将以3秒的时间间隔,交替显示所设置的显示变量。
其它显示说明: ¾若在通讯状态,闪烁显示LCD 左上角的。
¾若为开方输出,LCD 显示。
¾若固定输出电流,LCD 显示。
¾若启动写保护,LCD 显示。
¾若启动温度显示,在实时正常显示是,LCD 左下角“88”字符显示温度,温度小于-19℃或大于99℃显示。
2.按键功能通过按键可以调零;零点迁移、量程迁移;设置单位、量程、阻尼。
也可以通过按键查看单位、量程、阻尼等组态数据。
2.1. 按键功能码速查表现场使用按键组态时,LCD左下角“88”字符用于表示当前设置变量类型,也就是当前按键所执行的设置功能。
其对应关系为:左下角“88”字符显示设置变量0或空正常显示1 输入操作码(可以直接输入和下面功能对应的数字,以直接进行相应功能的设置)2 设置单位3 设置量程下限4 设置量程上限5 设置阻尼6 主变量调零7 零点迁移与量程迁移注:通过输入各个功能对应的操作码,可以快速进入对应功能。
Thanks you for choosing our company’s product. To have a better operating experience, please read this manual carefully.Reading Angle1. Maintain a bevel between the scanner and the bar code to make a bestreading.2. Do not keep the scanner in 90° with the bar code, otherwise the scannercan’t read.3. The scanner must aim at the bar code and the beam must cover the wholebar code. If not, error may occur.correct way of reading correct way of readingincorrect way of reading incorrect way of readingPacking list:1*barcode scanner 1*cable (USB/KB/COM)1*user manual 1*Stand (optional)Product IntroductionThis barcode scanner has USB/KB/COM interface for user’s choice. With advantages of quick decoding speed and easy operation, it should be a good solution for bar code identification.If you have any questions about the functions and settings, please contact us for more details.Our company reserves all rights of modifying and final explanation for the manual.keyboardport of devicekeyboard cable123Connect the USB cable to the USB interface in the computer. Connecting the ScannerUSB:1. Shut off the power supply of the host.2. Pull out the keyboard of the host.3. Confirm the PS/2 cable is suitable for the connection of the host.4. Connect the scanner to the host.5. Connect the keyboard port to the PS/2 cable.6. Open the host.PS/2:1. Shut off the power supply of the host.2. Confirm the connection is correct from the RS232 to the host.3. Connect the AC adaptor to thepower port of the scanner or connect the keyboard port of the host to the keyboard port of the scanner.4. Open the host.5. Scan the setup barcode to set the output mode as RS232 (serial mode).RS232:Show Version Info (user-defined) Show Serial NO.(user-defined)Reset FactoryDefaultsDefault Interface PS2 Keyboard Wedge Serial USB Keyboard Wedge USB SerialDefault Mode Single Scan No Trigger MultiscanMultiscan No Trigger Continuous Scan PulseInterface Reading ModeBuzzer OFFONAdd Code IDNo Code ID Send Code ID as PrefixSend Code ID as SuffixAmerica English Canada French DutchSpanish Argentina(Latin)Brazil PortugueseDanish England English ItalianFrance French German NorwaySwedish, Finnish Slovak Portugal PortugueseCzech Belgium Dutch Turkish-FTurkish-Q Polish 214Switzerland German,FrenchCroatianHungarianLanguage Settings600bps 1200bps 2400bps4800bps9600bps19200bps38400bps57600bps115200bpsSerial Mode Parameter Settings (Baud Rate)Serial No Check DigitSerial XON/OFF Serial RTS/CTSSerial ACK/NA Hand Shake Timeout-2secs Hand Shake Timeout-5secsSerial Protocol78Data BitsStop Bits12Check DigitsNone ODD EvenSpace Check DigitMark Check DigitTransmit UPCA check code disableUPCA hide system character-disableImageRevise Image Disable Revise Image EnableCode39redundancy disableReplace “2” with “TWO” -disableReplace “2” with “TWO”-enableCovert code39 into code32 (DF)-disableCovert code39 into code32-enableCode39 TAB ModeUPC-A onUPC-A offUPCA ID as ‘e’Convert UPCA into EAN13 enableConvert UPCA into EAN13 disableTransmit UPCA check codeUPCA hide system character-enableUPC-EUPC-E on UPC-E off UPC-E ID as ‘f’Convert UPCE into UPCA -enableConvert UPCE into UPCA-disableCode 39 onCode 39 offCode 39 ID as ‘m’Code 39 Full ASCLL-onCode 39 Full ASCLL-offCode39 MOD43Verify OffCode39 MOD43Verify OnCode39 transmitverify-On Code39 transmit CHARS-OffCode39 transmit CHARS-OnCode39redundancy enableCode 39UPC-AHighestHigherLowerLowestBrazil bank barcodeOn OffRemark: It need customized before production for the function in the frameCode93Supplements disableCode93 /on Code93/ off Code 93 ID as ‘I’Code93redundancy enableCode93redundancy disableCode 93 MOD47/on Code 93 MOD47/offCode128Code128/on Code128/off Code 128 ID ‘a’Code128redundancy disableCode128redundancy enableCodabarCodabar/on Codabar/offCodabar ID as ‘v’Codabar Send start/stopCHARS-enableCodabar Send start/stopCHARS-disableCodabarredundancy enableCodabarredundancy disableSupplements-2&5 digitsSupplements-5 digitsSupplements-2 digitsEAN8 /on EAN8 /offEAN8 ID as ‘c’EAN13 on EAN13 off EAN13 ID as ‘d’Transmit EAN13check code-enableTransmit EAN13check code-disableConvert EAN13into ISBN-enableConvert EAN13into ISBN-disableConvert EAN13into ISSN-disableConvert EAN13into ISSN-enableEAN13redundancy enableEAN13redundancy disableEAN13EAN 8Supplements SettingsCode11Code11/on Code11/offCode 11 ID as ‘u’Code11redundancy disableCode11redundancy enableCode11 auto CK verifyCode11 C verify Code11 CK verifyMatrix 25Matrix 25/on Matrix 25/off Matrix 25 ID as ‘q’Postage Code 25/on Postage Code 25/offPostageCode 25 ID as ‘r’Aviation 25/onAviation 25/offAviation 25 ID as ‘p’Interleaved 25Interleaved/ITF25-on Interleaved/ITF25-off ITF25 ID as ‘n’ITF25redundancy disableITF25redundancy enableIndustrial 25/ on Industrial 25/ off Industrial 25 ID as ‘o’Industrial 25redundancy enableIndustrial 25redundancy disableIndustrial 25Code MSICode MSI/on Code MSI/off MSI ID as ‘s’Code MSIredundancy disableCode MSIredundancy enableCode PlesseyCode Plessey Code Plessey/off Code Plessey ID as ‘t’Code Plesseyredundancy disableCode Plesseyredundancy enableUSB UploadUSB quick upload/on USB quick upload/offIR Auto-sensingIR Auto-sensing/onIR Auto-sensing/offFront/Behind CHARS SettingsHide CHARS-disable Hide CHARS ‘-’Replace ‘0’with ‘A’-disableReplace ‘0’with ‘A’-enableReplace ‘1’with ‘ONE’-disableReplace ‘1’with ‘ONE’-enableDelete CHARSin front of ‘12345’-disableDelete CHARSin front of ‘12345’Replace ‘FUNC3’ with ‘3’GS1GS1 Omnidirectional/on GS1 Omnidirectional/offGS1 Omni ID as ‘j’GS1 Limited/onGS1 Limited/off GS1 Limited ID as ‘k’FUNCCancel FUNC Mapping Replace ‘FUNC1’ with ‘0’Replace ‘FUNC2’ with ‘2’Replace ‘FUNC4’ with ‘6’Kindly remind:High speed transmission can't be accepted by somedevice(computer),please try to scan the barcode (decrease speedtransmission) as following if some characters was missing.Prefix & Suffix SettingAll codes add suffix CRAll codes add suffix CR+CRLF all codes add suffix ETXAll codes add suffix format CHARS-disableAll codes add prefix STX All codes add prefix disableMultiscan Settings3 sec 5 secConversion of EAN, ISBN & ISSNConvert all EAN into ISBN-enableConvert all EAN into ISSN-enableEnter into checkingmode (used with caution)Convert all EAN into ISBN-disableConvert all EAN into ISSN-disable1 secHide CharactersHide the behindCHARS-disableHide the last N CHARHide the front CHARS-disableHide the first N CHARHide the middle characters-disableHide the middle N CHARHide from the Nth CHARAll codes add prefix F2All codes add suffix F2Set to add prefix Set to add suffixQuit out prefix and suffix adding modeClear all prefix CHARSClear all suffix CHARSETX ACK TABFFSI DC2SOH STX EOT ENQ BEL Backspace LF VT CR SO DLE DC1NAK DC3DC4CAN SYN ETB ESCEM SUB RSFS GS !US SPACE $“#‘%&*()-+,0./312645978<:;?=>B@A EC D HF GKI JNL MQO PTR SWU VZX Y][\`^_ca bfd eIg hljkmpsuy|DeleteF3F6onrqutxw{z~}F2F1F5F4F8F7F9F11F10F12HOMEINSERTPage up ENDDelete1920Left arrow21。

掃描器使用手冊目錄使用控制面板上的掃描按鍵 (3)掃描器硬體按鍵設定 (3)SCAN 掃描鍵 (5)COPY 影印鍵 (5)FAX 傳真鍵 (6)E-MAIL 電子郵件鍵 (7)掃描器軟體面板 (8)軟體面板設定 (8)掃描 (9)影印 (10)傳真 (11)電子郵件 (12)OCR文字辨識 (12)個性化功能 (12)附屬軟體連結 (14)其他設定 (15)擷取TWAIN對話框 (16)使用TWAIN對話框 (17)使用控制面板上的掃描按鍵請確認是否已開啟直接掃描直接掃描直接掃描的功能(顯示在 Windows ® 工作列右下角的位置)。
若您未開啟直接掃描的功能,請依照下列步驟將它開啟::1.點選工作列的「開始」「開始」。
2.選擇「程式集」「程式集」「程式集」後再選擇B e a r P a w 。
3.按一下「直接掃描」。
掃描器硬體按鍵設定在直接掃描的圖示上按一下右鍵會出現下方的選單:點選掃描器設定掃描器設定掃描器設定後會出現以下的對話框,您可以在此對話框中更改掃描器的各項預設值。
本掃描器配備多樣功能先進的直接控制按鍵,您只要運用手指輕觸,即可快速使用掃描器的各項功能。
直接掃描掃描器設定對話框掃描器的出廠設定值音效控制鍵按下此鍵即可開啟或關閉BearPaw 面板的音效功能。
SCAN 掃描鍵欲使用掃描鍵掃描文件,請如下列方式操作:1.將您要掃描的文件或圖像正面朝下,輕貼在掃描器的玻璃面板上。
掃描鍵,掃描器即開始進行掃描,2.按下掃描鍵掃描鍵掃描時螢幕上會出現工作進度顯示,告訴您目前掃描工作完成度,當掃描結束,系統會自動開啟Photo Express TM將您剛剛所掃描的圖像載入。
COPY 影印鍵欲使用影印鍵複製文件,請如下列方式操作:1.將您要掃描的文件或圖像正面朝下,輕貼在掃描器的玻璃面板上。
影印鍵,掃描器即開始進行掃描,2.按下影印鍵影印鍵掃描時螢幕上會出現工作進度顯示,告訴您目前掃描工作完成度,當掃描結束,系統會自動將您剛剛所掃描的圖像從印表機輸出。
目录一、PDA键位说明 (3)二、操作说明 (4)(一)PDA【开机】 (4)(二)【登录】软件 (5)(三)下载【巡检线路】 (5)(四)进行【巡检】 (7)(五)多人巡检 (10)(六)【上传】巡检单 (11)(七)【充电】及【关机】 (13)(八)PDA驱动设置 (13)三、PDA运行报告 (16)1. 充电量分析 (16)2. 下载巡检单所用时间 (17)3. 电量消耗分析 (17)四、常见问题 (17)1.PDA在使用过程中,出现卡屏,死机等现象 (17)2.上传失败 (18)3.下载时提示没有巡检单 (18)4.遇到丢点怎么办? (21)5.怎样去更换巡检点? (21)6.PDA在巡检过程中,报扫描码不匹配? (22)7.修复USB接口 (23)五、应急预案 (24)1.丢点 (24)3.PDA无法开机。
(25)4.PDA损坏 (25)5.PDA丢失 (25)一、 PDA 键位说明【上】、【下】、【左】、【右】选择键【——】 删除键【红色按钮】 开/关机键【F4】选择下载 巡检日期【黄色按钮】 扫描确认键【——】确认键/快速选择键【数字】 数字键【F2】 照相键【F1】 小数点【F3】 跳点键二、操作说明(一)PDA【开机】可用PDA自带手写笔长按PDA右下角【红色按钮】(3-5秒),即可完成【开机】操作,如图1所示;图2、图3为PDA【开机】显示界面。
图1——【开机】图2——【开机】读取数据图3——【开机】界面(二)【登录】软件1、PDA开机后双击屏幕上方【物业通】快捷方式,如图4所示:图4——【登陆】软件2、输入用户名和密码,点击【登录】/【离线登陆】(连接电脑时选择【登陆】,巡检时选择【离线登陆】),如图5所示:图5——输入用户名、密码(三)下载【巡检线路】1、打开已安装【PDA同步软件】及【极致软件】的电脑,用数据线连接电脑后,操作PDA 。
2、PDA开机后,进入【物业通】,点击【登录】,进入系统即可看见PDA【物业通】操作界面,如图4、图5所示:图6——PDA【物业通】界面3、点击【巡检】,如图6所示,进入到下载巡检单界面,按【F4】,选择日期,如图7、图8所示,选择下载日期,点击右上角刷新,刷新下载新的巡检任务,如图9所示。

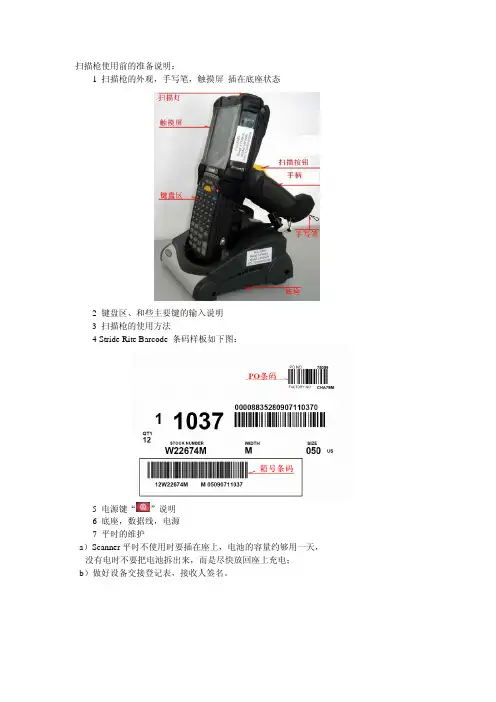
扫描枪使用前的准备说明:1 扫描枪的外观,手写笔,触摸屏插在底座状态2 键盘区、和些主要键的输入说明3 扫描枪的使用方法4 Stride Rite Barcode 条码样板如下图:5 电源键“”说明6 底座,数据线,电源7 平时的维护a)Scanner平时不使用时要插在座上,电池的容量约够用一天,没有电时不要把电池拆出来,而是尽快放回座上充电;b)做好设备交接登记表,接收人签名。
现在我们尝试开机后扫描枪电源,所看到的界面如下图:(Click on the button “New Balance”/Or Press “1” on the keypad /OrPress , , , on the keypad to highlight the button, and then press “Enter”)用手写笔双击“2)Stride Rite”按钮,打开Stride Rite的标签扫描系统,如下图:Input Data:用来扫描标签时用的功能块;View Data:可以检查之前所扫描的Carton No资料,核对资料;Upload Data:用来放到底座,抽取数据;Amend Data:主要用来修改箱数;Rollback Data:恢复数据,不过做这一步前要先Upload备份好枪现有的数据;因为数据只能恢复一次。
下面我们具体说明下上面所提到的5个功能的使用:Input Data:(扫描数据)进入“Input Data”界面,如下图:输入 HAWB No 和 Carton 数,点击“OK”到了这里就可以对这箱子的Barcode进行扫描啦,先扫PO条码,再扫Stock No 条码。
每张条形码的这两个条码都要扫描,当你扫描完所有箱子的条形后,系统提示你扫描完毕,提示如下界面:通常这里会遇到的问题:1、扫描完了箱子,但没有又提示Completed的界面,是因为有漏扫,可以看统计,检查出漏扫的或全部重新扫描。

掃描器使用手冊目錄TWAIN對話框 (3)預覽視窗及控制設定鍵 (4)掃描設定鍵及掃描/預掃鍵 (5)主要設定頁 (6)影像調整頁 (10)影像處理頁 (14)關於驅動程式 (15)使用批次掃描 (16)疑難排除 (18)TWAIN 對話框T W A I N 為掃描器軟體介面的標準。
T W A I N 提供一種介於應用軟體及掃描器之間的溝通管道。
經由T W A I N ,您可進行硬體及軟體間的通訊,例如在使用應用軟體(Photo Express 或FINEREADER 等)來掃描影像或文件時,您可透過T W A I N 叫出掃描器,並執行掃描。
掃描後的影像或文件則會自動出現在應用軟體的主要螢幕上。
此時,您便可開始進行影像或文字編輯。
掃描框選工具鍵可框選一掃描區域批次掃描鍵最多可建立十個掃描區以供掃描放大縮小鍵在預覽視窗中可放大或縮小影像示顯縮放比例語言鍵可選擇使用的語言離開掃描框選區可檢視預掃的影像及選擇最後的掃描範圍覽預視窗掃描設定預掃鍵掃描鍵說明批次掃描鍵此功能可讓您在不同的掃描控制之下多次掃描文件的任何部份。
離開離開此程式。
掃描框選工具鍵可在預覽視窗中框選一個掃描區域。
利用滑鼠移動此框線的任何一邊或是四個角落並拖曳出您想要的長度及寬度。
若想移動整個框線,只要將滑鼠的游標定位在框內,再按住滑鼠左鍵來拖曳到想要的位置即可。
放大縮小鍵使用此放大工具可將預掃影像放大或縮小。
您可從放大或縮小之後的影像正確的框選想要掃描的範圍。
預覽視窗及控制設定鍵預覽視窗可供顯示預掃影像。
在第一次掃描前最好能先預掃一次,如此可利用預掃後影像,正確的框選出欲掃描的範圍,並可藉以觀察各項調整影像功能對影像的影響效果。
說明在線上提供有關掃描器及軟體的輔助說明。
語言選擇在螢幕上所顯示的語言。
掃描設定鍵及掃描/預掃鍵先前鍵將最後一組儲存的掃描設定值重新載入。
還原鍵將影像設定還原成原始的內定值。
設定值鍵將所有的控制設定值同時顯現出來。
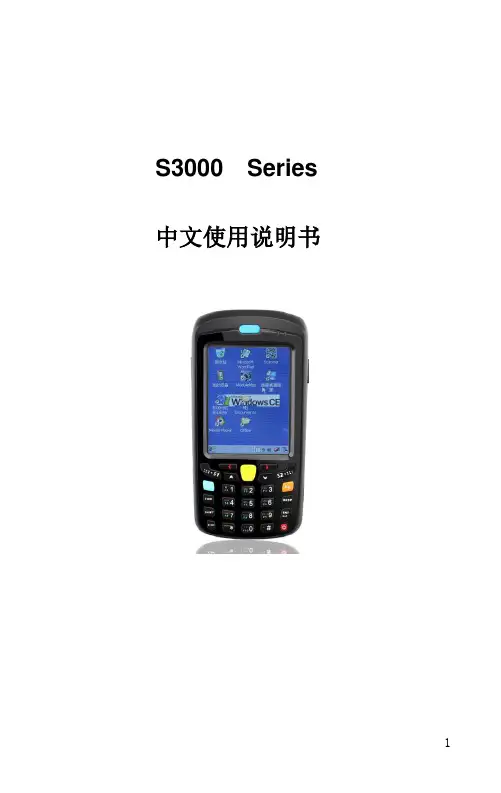
S3000 Series 中文使用说明书版权声明本文内所收录信息为说明产品目前状况,不具保证之意涵,包括但不限于任何暗示性或可销售性保证、或适用于某一特殊目的之保证;本公司保留调整有关产品功能、规格、保修信息及本文内容等的权利,恕不另行通知。
本文内包含有受版权法保护的独家专利信息,版权所有。
除版权法允许部分,否则未得深圳速比邻有限公司书面同意,不得影印、重制作、修改或翻译部份或全部内容。
控制本产品的程序部分亦受版权法保护,版权所有,不得侵犯。
Microsoft、ActiveSync、Pocket IE、Pocket Word、Windows、Windows 98、Windows Me、Windows NT、Windows 2000、Windows XP、Windows 标志、Windows CE标志或为注册商标,或为Microsoft Corporation 在美国及/或其它国家之注册商标。
Microsoft产品为Microsoft Licensing, Inc.授权之OEM产品,Microsoft Licensing, Inc.为Microsoft完全拥有。
本文内所提及的所有其它品牌名称及产品名称皆为各该公司合法的商标名、服务标志或注册商标。
在使用本产品之前,请认真阅读本说明书第一章包装确认 (4)第二章S3000简介 (5)第三章开始使用 (17)第四章其它选购配备的操作 (42)第五章售后服务 (81)第一章 包装确认确认包装内容请于使用前先检查是否含有下列物品:˙下列硬体固件注意:单独配了三联充和多个电池的客户, 设备使用一段时间后,请将设充电器和USB 线底座S3000主机 电池 手腕绳和触摸笔备放在底座上来给主电池充电。
因为这样主电池还可以给备用电池充电。
(如果长时间不给备用电池充电,备用电池电量为0 的情况下,机器将出现无法开机的现象。
)第二章 S3000简介S3000产品资料介绍S3000系列产品是速比邻科技自主研发、设计、生产的针对各行业特点打造的系列工业级手持终端,外型采用人体工程学设计,轻巧灵活,防震防摔,待机时间长,采用双电源模式。
激光切割机使用说明书BYL-3015-B北京万通博瑞金属加工有限公司设备型号:BYL-3015-B前言很荣幸您购买我公司的产品,成为我公司的用户。
本说明所描述的是我公司生产的型号为BYL-3015-B 的金属激光切割机。
本说明书详细介绍了切割机的安装,使用方法及相关维护步骤。
在您使用本机器前请注意以下事项:建议每一位与本机器有关的工作人员(维修、操作、日常维护、定点检查人员)都要阅读这本说明书;操作者应具备相关的技术培训,或有专人指导;如果您能遵循说明书中的提示,不仅可以避免危险事故,降低维修费用,减少停机检修时间,还可以提高机器的工作效率和使用寿命;说明书应保存好以供随时查阅。
注意:使用激光切割机前请详细阅读本说明,用户错误操作可能引起设备运行不良、设备损坏甚至造成人身伤害。
警告:本切割机所用激光为不可见光,不可直视,否则可能造成眼睛伤害,使用时请佩戴护目镜。
-1-²博瑞激光²设备型号:BYL-3015-B目前言2 第一章简介录1.1 主要用途及特点..........................................(4) 1.2 适用范围................................................(4) 1.3 产品型号及意义..........................................(5)第二章主要规格与技术参数......................................(5)第三章产品的主要结构与原理....................................(6)第四章产品的工作条件..........................................(6)第五章产品的系统说明 5.1 机械与传动系统..........................................(7) 5.2 电气系统................................................(9) 5.3 气动系统...............................................(10) 5.4 光学系统...............................................(10) 5.5 水冷系统...............................................(11) 5.6 切割头.................................................(11)第六章吊运与保管 6.1 开箱...................................................(11) 6.2 机床的吊运与保管.......................................(11)第七章安装与调试7.1 安装...................................................(13)7.2 调试 (13)-2-²博瑞激光²设备型号:BYL-3015-B第八章使用与说明8.1 安全使用 (14)8.2 操作使用步骤...........................................(15)第九章维护与保养9.1 综述...................................................(16)9.2 日常维护与保养.........................................(16)9.3 运行时的维护与保养.....................................(17)9.4 长期停放的维护与保养...................................(17)第十章常见故障及其排除方法...................................(18)第十一章随机附件及备件.......................................(18)第十二章耗损件及易损件.......................................(19)附:维修服务报告单.. (20)-3-²博瑞激光²设备型号:BYL-3015-B第一章:简介1.1 主要特点及用途BYL-3015-B 金属切割机是固体激光机,激光工作物质Nd_YAG 晶体棒,在氙灯的作用下,在谐振腔内激励产生高能量激光束。
Symbol 2208AP 扫描枪使用说明书
一:简介
LS 2208 扫描器组合了高性能扫描和高级的人机工程学优点, 为轻便型扫描器增添了价值。
无论手持或放在支架上作免提扫描器使用, LS 2208保证使用简便和轻巧舒适。
二:扫描器部件
三:安装接口电缆
1. 将接口电缆方型连接器插入扫描器柄底部的电缆接口端口
2. 将接口电缆的另一端连接到主机。
3. 将电缆接至电源( 如有必要)。
4. 从第65页开始对相应条码进行扫描,以与主机通讯。
四:扫描姿势
1. 请确保所有连接的牢固。
2. 将扫描器对准条码。
3. 请确保扫描线扫过符号的所有条形及空格。
4. 成功解码后,扫描器会发出蜂鸣声且发光管发出绿光。
五:疑难解答
问题可能的原因可能的解决方法
如果遵循操作说明,扫描器无
任何反应。
扫描器未接通电源。
检查系统电源。
如果扫描器
配置需要电源,则应确保已
连接完毕。
六:扫描枪重新设置步骤
1:参照symbol使用说明书第29页,用扫描枪对着条码扫一下。
直到发出嘀嗒的响声,条码如下:
2:第二步是对着symbol使用说明书30页的条码扫一下。
直到发出嘀嗒的响声,条码如下:
3:第三步是对着symbol使用说明书37页的条码扫一下。
直到发出嘀嗒的响声,条码如下:
直到听到扫描枪有滴滴响两声。
说明扫描枪重新设置成功。
您就可以正常使用了。
Symbol扫描枪使用说明书之老阳三干创作一:简介Symbol扫描器组合了高性能扫描和高级的人机工程学优点, 为轻便型扫描器增添了价值.无论手持或放在支架上作免提扫描器使用, 保证使用简便和轻巧舒适.二:扫描器部件三:装置接口电缆1. 将接口电缆方型连接器拔出扫描器柄底部的电缆接口端口2. 将接口电缆的另一端连接到主机.3. 将电缆接至电源( 如有需要).四:扫描姿势1. 请确保所有连接的牢固.2. 将扫描器瞄准条码.3. 请确保扫描线扫过符号的所有条形及空格.4. 胜利解码后, 扫描器会发出蜂鸣声且发光管发出绿光.五:蜂鸣器的界说扫描器通过发出分歧的蜂鸣器顺序和模式来指示状态.如下表所示六:LED指示器的界说扫描器通过LED双色指示器显示与用户通讯.如下表所示七:疑难解答八:扫描枪重新设置步伐1:SYMBOL条码扫描器设置默认值:请扫描下面设置默认值(也叫恢复出厂设置), 将所有参数都设为默认值.2: SYMBOL LS4208扫描器的扫描模式:请扫描下面适当的条码, 确定扫描模式.1)仅限单线→不进行上下扫描线移动(非光栅扫描).2)多线智能光栅扫描→扫描线开始为单线, 但在检测到部份条码扫描或在拉动触发开关后500毫秒内未对条码解码时上下移动(光栅扫描).3)多线始终光栅扫描(默认)→立即开始光栅扫描(进行上下扫描线移动).3:增加回车换行功能.依次扫描如下条码直到发出嘀嗒的响声, 条码如下:直到听到扫描枪有滴滴响两声.说明扫描枪重新设置胜利.您就可以正常使用了.4:设置条码枪为串口输入模式.(此时默认一般没有回车功能)检查系统中有没有多出来的虚拟串口(就是COM口)在我的电脑—属性—硬件—设备管理器—人体学输入下检查如果主机是WIN 7系统, 请扫描下面的条码.九:123SCAN 软件的使用123SCAN是一款修改记录SYMBOL设置的软件, 当扫描枪与主机连接上时, 翻开该软件选择“Clone/Modify my connected scanner settings”选项, 进入扫描枪参数设置界面进入设置界面后, 在软件的左鸿沟面有修改扫描枪参数的界面, 依照实际所需的情况修改和设置扫描枪的参数, 然后将数据文件保管在电脑中.当需要设置新扫描枪时, 如果和替换下来的扫描枪设置是相同时, 可以将保管在电脑上的配置文件直接装载在新的扫描枪上即可.。
ZF30-WSM 系列无线扫描枪使用说明书上海兆富通信技术有限公司 Shanghai Zhaofu Communication Technology Co.,LTDZF30-WSM系列无线扫描枪说明书图(一) 无线扫描枪● 产品特点:无线扫描枪是为了解决有线扫描枪的一些缺陷而设计的一款新型扫描枪,采用了433M无线数传技术,具有无线发送、自动重送和数据检验等功能,保证了数据传输的方便性和准确性。
图(二)串口接收端 图(三)键盘口接收端 图(四)USB口接收端● 系统介绍:1.系统采用ID号区分的方式,支持一对多的通信,最多能支持256点对一点2.无线扫描枪与无线接收端自动建立通信连接,若通信连接成功,则自动将录入的数据无线发送到无线接收端,无线接收端收到数据后,进行校验,当校验正确后把数据上传并且给无线扫描枪以应答,无线扫描枪收到应答后,发出声光提示,即可扫描下一数据3.当无线扫描枪发出数据后在1秒中之内没有应答,就认为数据发送失败,无线扫描枪认为通信中断,并蜂鸣器连续短鸣6下,指示灯也连续短闪6下,提示数据发送失败4.电池低电压保护,在电池电压到3.4V而高于3.3V时时,蜂鸣器每隔一段时间就短鸣3次,指示灯也跟着闪烁3次,提示充电,在电池电压低于3.3V时,系统自动关闭扫描枪和无线模块,整个系统进入省电状态,必须马上充电● 主要功能:1.组网功能:无线扫描枪和无线接收端采用自动组网方式2.ID号识别功能:每一个无线扫描枪都有唯一的ID号,ID号通过无线的方式设置(出厂默认ID号为0XFF) 3.数据校验:对每一条数据进行校验,以确保传输数据的准确性4.多发一收:一个系统只能有一个无线接收端,能支持的最多的无线扫描枪为256个,发送端的数据的长度可以由用户自己定义,当有换行符(默认结束符可以由客户预订)时会自动认为一个数据包结束 5.无线接收端分三种接口的:串口形式(RS232), 键盘口(PS2)形式,UBS口形式6.多信道选择:可以通过扫描特定的条形码来改变无线模块的信道,一次设定,可以长期使用,也可以随时改 变,共可提供8个或32个信道7.休眠功能:扫描枪具有自动进入省电模式的功能,当时间T内没有扫描操作就自动省电模式,时间T可以通过扫描条码来设定8.电池安全:无线扫描枪采用锂电池供电,可反复充电,且电池配有充电保护电路,可确保电池充电时的安全 9. ID号输出功能:扫描枪具有ID输出功,ID号输出的计算方法:ID_1=ID/100+48,ID_2=(ID-ID_1*100)/10+48,ID_3=ID%10+48;就是将ID号的百位、十位和个位分开输出;例如扫描枪的ID号为89(十六进制),那输出的ID号字符为:1 3 7(用十六进制表示为:0X31 0X33 0X37)ID号在每一个条码的前面,用“—”与条码分开,如果是PS2接收端,则在文档中显示的是:137—******。
脉冲光纤激光器使用说明书安全信息在使用该产品之前,请先阅读和了解这份用户手册并熟悉我们为您提供的信息。
这份用户手册提供了重要的产品操作,安全以及其他信息给您以及所有将来的用户作参考。
为了确保操作安全和产品的最佳性能,请遵循以下注意和警告事项以及该手册的其他信息去操作。
●锐科公司脉冲光纤激光器是IV级的激光产品。
在打开24VDC电源前,要确保连接是正确的24VDC的电源并确认正负极,错误连接电源,将会损坏激光器。
●该激光器在1064nm波长范围内发出超过5W、10W、15W、20W、25W、30W(根据不同激光器型号)的激光辐射。
避免眼睛和皮肤接触到光输出端直接发出或散射出来的辐射。
●不要打开机器,因为没有可供用户使用的产品零件或配件。
所有保养或维修只能在锐科公司内进行。
●不要直接观看输出头,在操作该机器时要确保长期配戴激光安全眼镜。
安全标识及位置上面二个安全标识符号表示有激光辐射,我们把这符号标在产品光纤盒体盖顶上。
目录1.产品描述 ............................................................................................ 错误!未定义书签。
1.1 产品描述........................................................................................ 错误!未定义书签。
1.2实际配置清单................................................................................. 错误!未定义书签。
1.3使用环境要求及注意事项............................................................. 错误!未定义书签。