Spring源代码解析
- 格式:pdf
- 大小:419.60 KB
- 文档页数:90
Spring源码解析之BeanFactoryPostProcessor(⼀)BeanFactoryPostProcessor在前⾯⼏个章节,笔者有介绍过BeanFactoryPostProcessor接⼝,在spring在解析BeanDefinition之后,根据BeanDefinition初始化bean之前,会回调我们编写的BeanFactoryPostProcessor实现类并调⽤postProcessBeanFactory(ConfigurableListableBeanFactory beanFactory)⽅法,spring会通过这个⽅法传⼊⼀个ConfigurableListableBeanFactory对象,我们可以对这个bean⼯⼚对象新增或修改BeanDefinition。
spring初始化bean⼀个典型的流程,就是根据我们标记在类上的@Component⽣成⼀个BeanDefinition,BeanDefinition中包含这个类的class对象,然后根据class对象⽣成实例。
如果我们编写两个Service:UserService和OrderService,并在类上标注@Component,再编写⼀个BeanFactoryPostProcessor接⼝,在接⼝中我们拿到UserService的BeanDefinition,并修改class为OrderService,那么我们从spring容器中获取userService这个bean,它的类型是UserService呢还是OrderService呢?来看下⾯的⽰例:package org.example.service;import ponent;@Componentpublic class OrderService {}package org.example.service;import ponent;@Componentpublic class UserService {}在Test1BeanFactoryPostProcessor类中,我们获取userService的BeanDefinition,并打印它的class对象,这⾥应该是UserService,然后我们再设置BeanDefinition的class为OrderServiceTest1BeanFactoryPostProcessor.javapackage org.example.service;import org.springframework.beans.BeansException;import org.springframework.beans.factory.config.BeanFactoryPostProcessor;import org.springframework.beans.factory.config.ConfigurableListableBeanFactory;import org.springframework.context.annotation.ScannedGenericBeanDefinition;import ponent;@Componentpublic class Test1BeanFactoryPostProcessor implements BeanFactoryPostProcessor {@Overridepublic void postProcessBeanFactory(ConfigurableListableBeanFactory beanFactory) throws BeansException {ScannedGenericBeanDefinition beanDefinition = (ScannedGenericBeanDefinition) beanFactory.getBeanDefinition("userService");System.out.println("UserService beanDefinition class:" + beanDefinition.getBeanClass());beanDefinition.setBeanClass(OrderService.class);}}MyConfig.javapackage org.example.config;import ponentScan;import org.springframework.context.annotation.Configuration;@Configuration@ComponentScan("org.example.service")public class MyConfig {}测试⽤例:@Testpublic void test01() {ApplicationContext ac = new AnnotationConfigApplicationContext(MyConfig.class);System.out.println("userService class:" + ac.getBean("userService").getClass());}运⾏结果:UserService beanDefinition class:class erServiceuserService class:class org.example.service.OrderService可以看到,spring容器会回调我们编写的bean⼯⼚后置处理器BeanFactoryPostProcessor实现类Test1BeanFactoryPostProcessor ,在回调⽅法中,我们可以从bean⼯⼚获取spring容器已经解析的UserService对应的BeanDefinition对象,打印这个BeanDefinition对象的class对象也确实是UserService的class对象,之后我们修改UserService对应的BeanDefinition的class对象为OrderService的class对象,之后我们从spring容器获取beanName为userService的bean可以看到bean的实现类已经被替换成OrderService对象。
spring源码解析(⼀)---占位符解析替换⼀、结构类图①、PropertyResolver : Environment的顶层接⼝,主要提供属性检索和解析带占位符的⽂本。
bean.xml配置中的所有占位符例如${}都由它解析②、ConfigurablePropertyResolver : 该接⼝定义了如何对组件本⾝进⾏配置。
如:刚刚提到获取value时可以指定任意类型,这依赖于ConversionService进⾏类型转换,当前接⼝就提供了对ConversionService的设置和获取。
另外,可以配置属性占位符的格式,包括:占位符前缀(默认为"${")、占位符后缀(默认为"}")、占位符值分隔符(默认为":",⽤于分隔propertyName和defaultValue)。
组件还可以设置哪些属性是必须存在的,还可以校验必须存在的属性是否真的存在(不存在的话会抛出异常)③、AbstractPropertyResolver : 实现了ConfigurablePropertyResolver接⼝的所有⽅法④、PropertySourcesPropertyResolver : 以PropertySources属性源集合(内部持有属性源列表List<PropertySource>)为属性值的来源,按序遍历每个PropertySource,获取到⼀个⾮null的属性值则返回⼆、demo⽰例public static void main(String[] args) {Properties properties = System.getProperties();properties.setProperty("prefixName", "read-code");ApplicationContext ac = new ClassPathXmlApplicationContext("classpath:${prefixName}-spring.xml");ReadCodeService readCodeService = (ReadCodeService) ac.getBean("readCodeService");readCodeService.say();}View Code三、源码剖析1、⼊⼝ :ClassPathXmlApplicationContext构造函数setConfigLocationspublic ClassPathXmlApplicationContext(String[] configLocations, boolean refresh, ApplicationContext parent)throws BeansException {super(parent);setConfigLocations(configLocations);if (refresh) {refresh();}}2、AbstractRefreshableConfigApplicationContext①、ClassPathXmlApplicationContext构造函数调⽤它的基类AbstractRefreshableConfigApplicationContext.setConfigLocations/*** Set the config locations for this application context.* <p>If not set, the implementation may use a default as appropriate.*/public void setConfigLocations(String... locations) {if (locations != null) {Assert.noNullElements(locations, "Config locations must not be null");this.configLocations = new String[locations.length];for (int i = 0; i < locations.length; i++) {this.configLocations[i] = resolvePath(locations[i]).trim(); // 解析路劲}}else {this.configLocations = null;}}②、解析路劲/*** Resolve the given path, replacing placeholders with corresponding* environment property values if necessary. Applied to config locations.* @param path the original file path* @return the resolved file path* @see org.springframework.core.env.Environment#resolveRequiredPlaceholders(String)*/protected String resolvePath(String path) {return getEnvironment().resolveRequiredPlaceholders(path);}3、AbstractPropertyResolverpublic String resolveRequiredPlaceholders(String text) throws IllegalArgumentException {if (this.strictHelper == null) {this.strictHelper = createPlaceholderHelper(false);}return doResolvePlaceholders(text, this.strictHelper);}上述⽅法主要做了两件事 :①、初始化占位符解析器createPlaceholderHelper : 主要是初始化占位符的常量,eg : 前缀 ${ 后缀} and so on②、调⽤私有⽅法---替换占位符具体值private String doResolvePlaceholders(String text, PropertyPlaceholderHelper helper) {return helper.replacePlaceholders(text, new PropertyPlaceholderHelper.PlaceholderResolver() {@Overridepublic String resolvePlaceholder(String placeholderName) {return getPropertyAsRawString(placeholderName);}});}4、占位符 key - > value ,实现PropertyPlaceholderHelper内部接⼝PlaceholderResolver⽅法resolvePlaceholder。
Spring源代码解析(十):Spring Acegi框架授权的实现我们从FilterSecurityInterceptor我们从入手看看怎样进行授权的:Java代码1.//这里是拦截器拦截HTTP请求的入口2. public void doFilter(ServletRequest request, ServletResponse response, FilterChain chain)3. throws IOException, ServletException {4. FilterInvocation fi = new FilterInvocation(request, response, chain);5. invoke(fi);6. }7.//这是具体的拦截调用8. public void invoke(FilterInvocation fi) throws IOException,ServletException {9. if ((fi.getRequest() != null) && (fi.getRequest().getAttribute(FILTER_APPLIED) != null)10. && observeOncePerRequest) {11. //在第一次进行过安全检查之后就不会再做了12. fi.getChain().doFilter(fi.getRequest(), fi.getResponse());13. } else {14. //这是第一次收到相应的请求,需要做安全检测,同时把标志为设置好 - FILTER_APPLIED,下次就再有请求就不会作相同的安全检查了15. if (fi.getRequest() != null) {16. fi.getRequest().setAttribute(FILTER_APPLIED, Boolean.TRUE);17. }18. //这里是做安全检查的地方19. InterceptorStatusToken token = super.beforeInvocation(fi);20. //接着向拦截器链执行21. try {22. fi.getChain().doFilter(fi.getRequest(), fi.getResponse());23. } finally {24. super.afterInvocation(token, null);25. }26. }27. }我们看看在AbstractSecurityInterceptor是怎样对HTTP请求作安全检测的:Java代码1.protected InterceptorStatusToken beforeInvocation(Object object) {2. Assert.notNull(object, "Object was null");3.4. if (!getSecureObjectClass().isAssignableFrom(object.getClass())) {5. throw new IllegalArgumentException("Security invocationattempted for object "6. + object.getClass().getName()7. + " but AbstractSecurityInterceptor only configuredto support secure objects of type: "8. + getSecureObjectClass());9. }10. //这里读取配置FilterSecurityInterceptor的ObjectDefinitionSource属性,这些属性配置了资源的安全设置11. ConfigAttributeDefinition attr = this.obtainObjectDefinitionSource().getAttributes(object);12.13. if (attr == null) {14. if(rejectPublicInvocations) {15. throw new IllegalArgumentException(16. "No public invocations are allowed via this AbstractSecurityInterceptor. "17. + "This indicates a configuration error becausethe "18. + "AbstractSecurityInterceptor.rejectPublicInvocations property is set to 'true'");19. }20.21. if (logger.isDebugEnabled()) {22. logger.debug("Public object - authentication not attempted");23. }24.25. publishEvent(new PublicInvocationEvent(object));26.27. return null; // no further work post-invocation28. }29.30.31. if (logger.isDebugEnabled()) {32. logger.debug("Secure object: " + object.toString() + ";ConfigAttributes: " + attr.toString());33. }34. //这里从SecurityContextHolder中去取Authentication对象,一般在登录时会放到SecurityContextHolder中去35. if (SecurityContextHolder.getContext().getAuthentication()== null) {36. credentialsNotFound(messages.getMessage("AbstractSecurityInterceptor.authenticationNotFound",37. "An Authentication object was not found in theSecurityContext"), object, attr);38. }39.40. // 如果前面没有处理鉴权,这里需要对鉴权进行处理41. Authentication authenticated;42.43. if (!SecurityContextHolder.getContext().getAuthentication().isAuthenticated() || alwaysReauthenticate) {44. try {//调用配置好的AuthenticationManager处理鉴权,如果鉴权不成功,抛出异常结束处理45. authenticated = this.authenticationManager.authenticate(SecurityContextHolder.getContext()46..getAuthentication());47. } catch (AuthenticationException authenticationException) {48. throw authenticationException;49. }50.51. // We don't authenticated.setAuthentication(true), because each provider should do that52. if (logger.isDebugEnabled()) {53. logger.debug("Successfully Authenticated: " + authenticated.toString());54. }55. //这里把鉴权成功后得到的Authentication保存到SecurityContextHolder中供下次使用56. SecurityContextHolder.getContext().setAuthentication(authenticated);57. } else {//这里处理前面已经通过鉴权的请求,先从SecurityContextHolder中去取得Authentication58. authenticated = SecurityContextHolder.getContext().getAuthentication();59.60. if (logger.isDebugEnabled()) {61. logger.debug("Previously Authenticated: " + authenticated.toString());62. }63. }64.65. // 这是处理授权的过程66. try {67. //调用配置好的AccessDecisionManager来进行授权68. this.accessDecisionManager.decide(authenticated, object, attr);69. } catch (AccessDeniedException accessDeniedException) {70. //授权不成功向外发布事件71. AuthorizationFailureEvent event = new AuthorizationFailureEvent(object, attr, authenticated,72. accessDeniedException);73. publishEvent(event);74.75. throw accessDeniedException;76. }77.78. if (logger.isDebugEnabled()) {79. logger.debug("Authorization successful");80. }81.82. AuthorizedEvent event = new AuthorizedEvent(object, attr, authenticated);83. publishEvent(event);84.85. // 这里构建一个RunAsManager来替代当前的Authentication对象,默认情况下使用的是NullRunAsManager会把SecurityContextHolder中的Authentication对象清空86. Authentication runAs = this.runAsManager.buildRunAs(authenticated, object, attr);87.88. if (runAs == null) {89. if (logger.isDebugEnabled()) {90. logger.debug("RunAsManager did not change Authentication object");91. }92.93. // no further work post-invocation94. return new InterceptorStatusToken(authenticated, false,attr, object);95. } else {96. if (logger.isDebugEnabled()) {97. logger.debug("Switching to RunAs Authentication: "+ runAs.toString());98. }99.100. SecurityContextHolder.getContext().setAuthenticati on(runAs);101.102. // revert to token.Authenticated post-invocation103. return new InterceptorStatusToken(authenticated, t rue, attr, object);104. }105.}到这里我们假设配置AffirmativeBased作为AccessDecisionManager:Java代码1.//这里定义了决策机制,需要全票才能通过2. public void decide(Authentication authentication, Object object, ConfigAttributeDefinition config)3. throws AccessDeniedException {4. //这里取得配置好的迭代器集合5. Iterator iter = this.getDecisionVoters().iterator();6. int deny = 0;7. //依次使用各个投票器进行投票,并对投票结果进行计票8. while (iter.hasNext()) {9. AccessDecisionVoter voter = (AccessDecisionVoter) iter.next();10. int result = voter.vote(authentication, object, config);11. //这是对投票结果进行处理,如果遇到其中一票通过,那就授权通过,如果是弃权或者反对,那就继续投票12. switch (result) {13. case AccessDecisionVoter.ACCESS_GRANTED:14. return;15.16. case AccessDecisionVoter.ACCESS_DENIED:17. //这里对反对票进行计数18. deny++;19.20. break;21.22. default:23. break;24. }25. }26. //如果有反对票,抛出异常,整个授权不通过27. if (deny > 0) {28. throw new AccessDeniedException(messages.getMessage("AbstractAccessDecisionManager.accessDenied",29. "Access is denied"));30. }31.32. // 这里对弃权票进行处理,看看是全是弃权票的决定情况,默认是不通过,由allowIfAllAbstainDecisions变量控制33. checkAllowIfAllAbstainDecisions();34. }35.具体的投票由投票器进行,我们这里配置了RoleVoter来进行投票:36. public int vote(Authentication authentication, Object object, ConfigAttributeDefinition config) {37. int result = ACCESS_ABSTAIN;38. //这里取得资源的安全配置39. Iterator iter = config.getConfigAttributes();40.41. while (iter.hasNext()) {42. ConfigAttribute attribute = (ConfigAttribute) iter.next();43.44. if (this.supports(attribute)) {45. result = ACCESS_DENIED;46.47. // 这里对资源配置的安全授权级别进行判断,也就是匹配ROLE为前缀的角色配置48. // 遍历每个配置属性,如果其中一个匹配该主体持有的GrantedAuthority,则访问被允许。
Spring源码分析基本介绍摘要:本⽂结合《Spring源码深度解析》来分析Spring 5.0.6版本的源代码。
若有描述错误之处,欢迎指正。
前⾔作为⼀名开发⼈员,阅读源码是⼀个很好的学习⽅式。
本⽂将结合《Spring源码深度解析》来分析Spring 5.0.6版本的源代码,若有描述错误之处,欢迎指正。
Spring是2003年兴起的⼀个轻量级Java开源框架,旨在解决企业应⽤开发的复杂性。
Spring发展⾄今,衍⽣出⾮常丰富的模块,并应⽤在多种场景,⽐如:桌⾯应⽤,Web应⽤等。
Spring的模块化可以允许你只使⽤需要的模块,⽽不必全部引⼊。
⽬录⼀、整体架构1. 核⼼容器2. 数据访问/集成3. Web4. AOP5. Test⼆、设计理念三、使⽤场景1. 典型的Spring web应⽤程序2. Spring中间层使⽤第三⽅web框架3. 远程调⽤4. EJBs-包装现存POJOs⼀、整体架构Spring框架是⼀个分层架构,他包含⼀系列的功能要素,并被分为⼤约20个模块,如下图所⽰(很遗憾,并没有找到Spring5的架构图,下图是Spring4的,但结合Spring5的源码来看,该图还是能够体现Spring5的核⼼模块)这些模块被总结为以下⼏部分。
1. 核⼼容器Core Container(核⼼容器)包含有Core、Beans、Context和Expression Language模块。
Core和Beans模块是框架的基础部分,提供IoC(控制反转)和DI(依赖注⼊)特性。
这⾥的基础概念是BeanFactory,它提供对Factory模式的经典实现来消除对程序性单例模式的需要,并真正地允许你从程序逻辑中分离出依赖关系和配置。
Core模块主要包含Spring框架基本的核⼼⼯具类,Spring的其他组件都要使⽤到这个包⾥的类,Core模块是其他组件的基本核⼼。
当然你也可以在⾃⼰的应⽤系统中使⽤这些⼯具类。
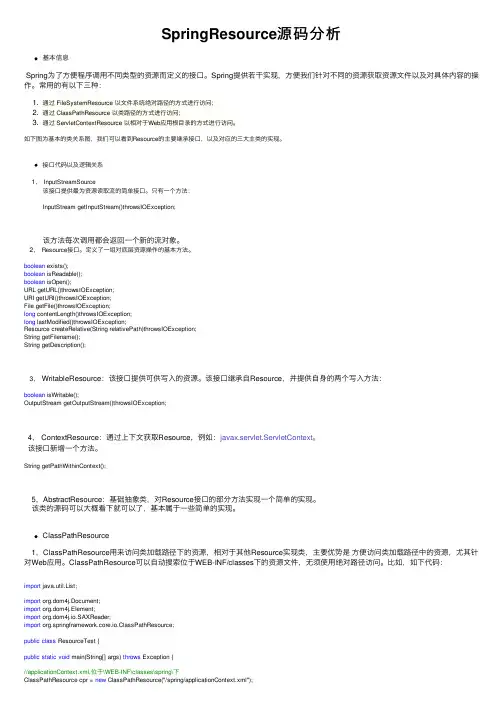
SpringResource源码分析基本信息Spring为了⽅便程序调⽤不同类型的资源⽽定义的接⼝。
Spring提供若⼲实现,⽅便我们针对不同的资源获取资源⽂件以及对具体内容的操作。
常⽤的有以下三种:1. 通过 FileSystemResource 以⽂件系统绝对路径的⽅式进⾏访问;2. 通过 ClassPathResource 以类路径的⽅式进⾏访问;3. 通过 ServletContextResource 以相对于Web应⽤根⽬录的⽅式进⾏访问。
如下图为基本的类关系图,我们可以看到Resource的主要继承接⼝,以及对应的三⼤主类的实现。
接⼝代码以及逻辑关系1, InputStreamSource该接⼝提供最为资源读取流的简单接⼝。
只有⼀个⽅法:InputStream getInputStream()throwsIOException;该⽅法每次调⽤都会返回⼀个新的流对象。
2,Resource接⼝。
定义了⼀组对底层资源操作的基本⽅法。
boolean exists();boolean isReadable();boolean isOpen();URL getURL()throwsIOException;URI getURI()throwsIOException;File getFile()throwsIOException;long contentLength()throwsIOException;long lastModified()throwsIOException;Resource createRelative(String relativePath)throwsIOException;String getFilename();String getDescription();3,WritableResource:该接⼝提供可供写⼊的资源。
该接⼝继承⾃Resource,并提供⾃⾝的两个写⼊⽅法:boolean isWritable();OutputStream getOutputStream()throwsIOException;4, ContextResource:通过上下⽂获取Resource,例如:javax.servlet.ServletContext。
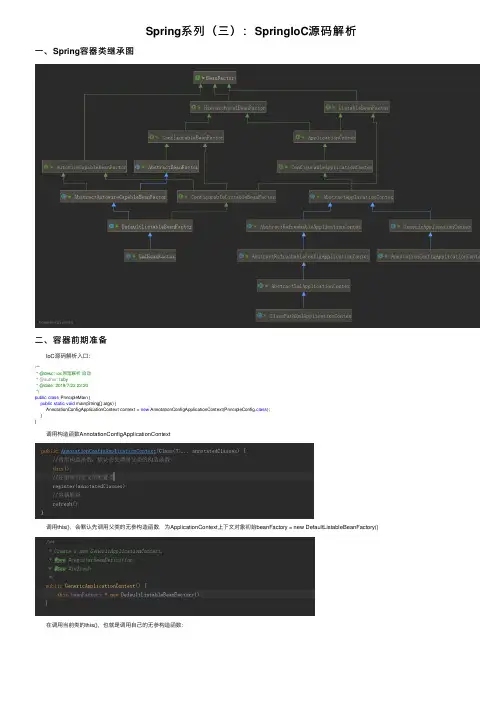
Spring系列(三):SpringIoC源码解析⼀、Spring容器类继承图⼆、容器前期准备 IoC源码解析⼊⼝:/*** @desc: ioc原理解析启动* @author: toby* @date: 2019/7/22 22:20*/public class PrincipleMain {public static void main(String[] args) {AnnotationConfigApplicationContext context = new AnnotationConfigApplicationContext(PrincipleConfig.class);}} 调⽤构造函数AnnotationConfigApplicationContext 调⽤this(),会默认先调⽤⽗类的⽆参构造函数,为ApplicationContext上下⽂对象初始beanFactory = new DefaultListableBeanFactory() 在调⽤当前类的this(),也就是调⽤⾃⼰的⽆参构造函数: 进到创建注解模式下的Bean定义读取器: org.springframework.context.annotation.AnnotationConfigUtils#registerAnnotationConfigProcessors(org.springframework.beans.factory.support.BeanDefinitionRegistry, ng.Object) 主要是注册Spring⾃⾝的⼀些后置处理器public static Set<BeanDefinitionHolder> registerAnnotationConfigProcessors(BeanDefinitionRegistry registry, @Nullable Object source) {DefaultListableBeanFactory beanFactory = unwrapDefaultListableBeanFactory(registry);if (beanFactory != null) {if (!(beanFactory.getDependencyComparator() instanceof AnnotationAwareOrderComparator)) {beanFactory.setDependencyComparator(AnnotationAwareOrderComparator.INSTANCE);}if (!(beanFactory.getAutowireCandidateResolver() instanceof ContextAnnotationAutowireCandidateResolver)) {beanFactory.setAutowireCandidateResolver(new ContextAnnotationAutowireCandidateResolver());}}Set<BeanDefinitionHolder> beanDefs = new LinkedHashSet<>(8);/*** 为我们容器中注册解析主配置类的后置处理器ConfigurationClassPostProcessor* beanName = org.springframework.context.annotation.internalConfigurationAnnotationProcessor*/if (!registry.containsBeanDefinition(CONFIGURATION_ANNOTATION_PROCESSOR_BEAN_NAME)) {RootBeanDefinition def = new RootBeanDefinition(ConfigurationClassPostProcessor.class);def.setSource(source);beanDefs.add(registerPostProcessor(registry, def, CONFIGURATION_ANNOTATION_PROCESSOR_BEAN_NAME));}/*** 为我们容器中注册处理@Autowired注解的Bean的后置处理器AutowiredAnnotationBeanPostProcessor* beanName = org.springframework.context.annotation.internalAutowiredAnnotationProcessor*/if (!registry.containsBeanDefinition(AUTOWIRED_ANNOTATION_PROCESSOR_BEAN_NAME)) {RootBeanDefinition def = new RootBeanDefinition(AutowiredAnnotationBeanPostProcessor.class);def.setSource(source);beanDefs.add(registerPostProcessor(registry, def, AUTOWIRED_ANNOTATION_PROCESSOR_BEAN_NAME));}/*** 为我们容器中注册处理@Required属性注解的Bean后置处理器RequiredAnnotationBeanPostProcessor* beanName = org.springframework.context.annotation.internalRequiredAnnotationProcessor*/if (!registry.containsBeanDefinition(REQUIRED_ANNOTATION_PROCESSOR_BEAN_NAME)) {RootBeanDefinition def = new RootBeanDefinition(RequiredAnnotationBeanPostProcessor.class);def.setSource(source);beanDefs.add(registerPostProcessor(registry, def, REQUIRED_ANNOTATION_PROCESSOR_BEAN_NAME));}/*** 为我们容器注册处理JSR规范注解的Bean后置处理器CommonAnnotationBeanPostProcessor* beanName = org.springframework.context.annotation.internalCommonAnnotationProcessor*/if (jsr250Present && !registry.containsBeanDefinition(COMMON_ANNOTATION_PROCESSOR_BEAN_NAME)) {RootBeanDefinition def = new RootBeanDefinition(CommonAnnotationBeanPostProcessor.class);def.setSource(source);beanDefs.add(registerPostProcessor(registry, def, COMMON_ANNOTATION_PROCESSOR_BEAN_NAME));}/*** 为我们容器注册处理jpa的Bean的后置处理器org.springframework.orm.jpa.support.PersistenceAnnotationBeanPostProcessor*/if (jpaPresent && !registry.containsBeanDefinition(PERSISTENCE_ANNOTATION_PROCESSOR_BEAN_NAME)) {RootBeanDefinition def = new RootBeanDefinition();try {def.setBeanClass(ClassUtils.forName(PERSISTENCE_ANNOTATION_PROCESSOR_CLASS_NAME,AnnotationConfigUtils.class.getClassLoader()));}catch (ClassNotFoundException ex) {throw new IllegalStateException("Cannot load optional framework class: " + PERSISTENCE_ANNOTATION_PROCESSOR_CLASS_NAME, ex);beanDefs.add(registerPostProcessor(registry, def, PERSISTENCE_ANNOTATION_PROCESSOR_BEAN_NAME));}/*** 处理监听⽅法的注解解析器EventListenerMethodProcessor*/if (!registry.containsBeanDefinition(EVENT_LISTENER_PROCESSOR_BEAN_NAME)) {RootBeanDefinition def = new RootBeanDefinition(EventListenerMethodProcessor.class);def.setSource(source);beanDefs.add(registerPostProcessor(registry, def, EVENT_LISTENER_PROCESSOR_BEAN_NAME));}/*** 注册事件监听器⼯⼚*/if (!registry.containsBeanDefinition(EVENT_LISTENER_FACTORY_BEAN_NAME)) {RootBeanDefinition def = new RootBeanDefinition(DefaultEventListenerFactory.class);def.setSource(source);beanDefs.add(registerPostProcessor(registry, def, EVENT_LISTENER_FACTORY_BEAN_NAME));}return beanDefs;} 读取器初始化完成后,Spring的容器的Bean的定义信息就有Spring⾃⾝的⼀些后置处理器了,Debug如下: 读取器初始化完成后,接下来初始化ClassPath下的Bean定义扫描器:org.springframework.context.annotation.ClassPathBeanDefinitionScanner#ClassPathBeanDefinitionScanner(org.springframework.beans.factory.support.BeanDefinitionRegistry, boolean, org.springframework.core.env.Environment, org.springframework.core.io.ResourceLoader) 类路径下的Bean定义扫描 org.springframework.context.annotation.ClassPathScanningCandidateComponentProvider#registerDefaultFilters 注⼊默认的Filterprotected void registerDefaultFilters() {this.includeFilters.add(new AnnotationTypeFilter(Component.class));ClassLoader cl = ClassPathScanningCandidateComponentProvider.class.getClassLoader();this.includeFilters.add(new AnnotationTypeFilter(((Class<? extends Annotation>) ClassUtils.forName("javax.annotation.ManagedBean", cl)), false));logger.debug("JSR-250 'javax.annotation.ManagedBean' found and supported for component scanning");}catch (ClassNotFoundException ex) {// JSR-250 1.1 API (as included in Java EE 6) not available - simply skip.}try {this.includeFilters.add(new AnnotationTypeFilter(((Class<? extends Annotation>) ClassUtils.forName("d", cl)), false));logger.debug("JSR-330 'd' annotation found and supported for component scanning");}catch (ClassNotFoundException ex) {// JSR-330 API not available - simply skip.}} 这⾥需要注意的是为什么new AnnotationTypeFilter(Component.class)就可以处理@Repository,@Service,@Controller这3个注解,原因如下: ⾃此前期准备⼯作完成三、org.springframework.context.support.AbstractApplicationContext#refresh 12⼤步public void refresh() throws BeansException, IllegalStateException {synchronized (this.startupShutdownMonitor) {//1:准备刷新上下⽂环境prepareRefresh();//2:获取初始化Bean⼯⼚ConfigurableListableBeanFactory beanFactory = obtainFreshBeanFactory();//3:对bean⼯⼚进⾏填充属性prepareBeanFactory(beanFactory);try {//4:Spring开放接⼝留给⼦类去实现该接⼝postProcessBeanFactory(beanFactory);//5:调⽤我们的bean⼯⼚的后置处理器invokeBeanFactoryPostProcessors(beanFactory);//6:注册我们bean后置处理器registerBeanPostProcessors(beanFactory);//7:初始化国际化资源处理器initMessageSource();//8:初始化事件多播器initApplicationEventMulticaster();//9:这个⽅法同样也是留个⼦类实现,其中springboot也是从这个⽅法进⾏tomcat的启动onRefresh();//10:把我们的事件监听器注册到多播器上registerListeners();//11:实例化所有的⾮懒加载的单实例beanfinishBeanFactoryInitialization(beanFactory);//12:最后刷新容器发布刷新事件(Spring cloud eureka也是从这⾥启动的)finishRefresh();}catch (BeansException ex) {if (logger.isWarnEnabled()) {logger.warn("Exception encountered during context initialization - " +"cancelling refresh attempt: " + ex);}// Destroy already created singletons to avoid dangling resources.destroyBeans();// Reset 'active' flag.cancelRefresh(ex);// Propagate exception to caller.throw ex;}finally {// Reset common introspection caches in Spring's core, since we// might not ever need metadata for singleton beans anymore...resetCommonCaches();}} 第⼀步:prepareRefresh() 准备刷新上下⽂环境:protected void prepareRefresh() {// Switch to active.this.startupDate = System.currentTimeMillis();this.closed.set(false);this.active.set(true);if (logger.isInfoEnabled()) {("Refreshing " + this);}/*** 初始化上下⽂环境*/initPropertySources();/*** ⽤来校验我们容器启动必须依赖的环境变量的值*/getEnvironment().validateRequiredProperties();/*** 创建⼀个早期事件监听器对象*/if (this.earlyApplicationListeners == null) {this.earlyApplicationListeners = new LinkedHashSet<>(this.applicationListeners);}else {// Reset local application listeners to pre-refresh state.this.applicationListeners.clear();this.applicationListeners.addAll(this.earlyApplicationListeners);}/*** 创建⼀个容器⽤于保存早期待发布的事件集合什么是早期事件了?* 就是我们的事件监听器还没有注册到事件多播器上的时候都称为早期事件*/this.earlyApplicationEvents = new LinkedHashSet<>();} 第⼆步:ConfigurableListableBeanFactory beanFactory = obtainFreshBeanFactory() 获取初始化的Bean的⼯⼚:protected ConfigurableListableBeanFactory obtainFreshBeanFactory() {//刷新bean⼯⼚()refreshBeanFactory();//返回之前容器准备⼯作的时候创建的的bean⼯⼚也就是DefaultListableBeanFactory(很重要)ConfigurableListableBeanFactory beanFactory = getBeanFactory();if (logger.isDebugEnabled()) {logger.debug("Bean factory for " + getDisplayName() + ": " + beanFactory);}return beanFactory;} org.springframework.context.support.GenericApplicationContext#refreshBeanFactory,注意只能刷⼀次protected final void refreshBeanFactory() throws IllegalStateException {//由于BeanFactory只能刷新⼀次,多线程情况下可能导致线程安全问题,所有使⽤cas原⼦操作来保证if (!pareAndSet(false, true)) {throw new IllegalStateException("GenericApplicationContext does not support multiple refresh attempts: just call 'refresh' once");}//指定Bean⼯⼚的序列化Idthis.beanFactory.setSerializationId(getId());} 第三步:prepareBeanFactory(beanFactory) 对bean⼯⼚进⾏填充属性:protected void prepareBeanFactory(ConfigurableListableBeanFactory beanFactory) {//设置bean⼯⼚的类加载器为当前application应⽤上下⽂的加载器beanFactory.setBeanClassLoader(getClassLoader());//为bean⼯⼚设置SPEL表达式解析器对象StandardBeanExpressionResolverbeanFactory.setBeanExpressionResolver(new StandardBeanExpressionResolver(beanFactory.getBeanClassLoader()));//为我们的bean⼯⼚设置了⼀个propertyEditor属性资源编辑器对象(⽤于后⾯的给bean对象赋值使⽤)beanFactory.addPropertyEditorRegistrar(new ResourceEditorRegistrar(this, getEnvironment()));//注册ApplicationContextAwareProcessor后置处理器⽤来处理ApplicationContextAware接⼝的回调⽅法beanFactory.addBeanPostProcessor(new ApplicationContextAwareProcessor(this));/*** 当Spring将ApplicationContextAwareProcessor注册后,那么在invokeAwarelnterfaces⽅法中调⽤的Aware类已经不是普通的bean了,* 如ResourceLoaderAware、ApplicationEventPublisherAware、ApplicationContextAware等,那么当然需要在Spring做bean的依赖注⼊的时候忽略它们。
Spring源码解析-beanfactory Demopublic class MyBeanTest {public static void main(String[] args) {BeanFactory ctx = new XmlBeanFactory(new ClassPathResource("spring.xml"));MyBean testBean = (MyBean)ctx.getBean("testBean");System.out.println(testBean.getTestStr());}}package qbb.spring.bean;public class MyBean {private String testStr = "testStr";public MyBean(){}public MyBean(String testStr){this.testStr = testStr;}public String getTestStr() {return testStr;}public void setTestStr(String testStr) {this.testStr = testStr;}}<?xml version="1.0" encoding="UTF-8"?><beans xmlns="/schema/beans"xmlns:xsi="/2001/XMLSchema-instance"xmlns:context="/schema/context"xsi:schemaLocation="/schema/beans<bean name="testBean" class="qbb.spring.bean.MyBean" ></bean></beans>uml类图上次看的时候就画过这个图,这次做了细化和调整。
Spring源码剖析9:Spring事务源码剖析本系列⽂章将整理到我在GitHub上的《Java⾯试指南》仓库,更多精彩内容请到我的仓库⾥查看喜欢的话⿇烦点下Star哈⽂章将同步到我的个⼈博客:本⽂是微信公众号【Java技术江湖】的《Spring和SpringMVC源码分析》其中⼀篇,本⽂部分内容来源于⽹络,为了把本⽂主题讲得清晰透彻,也整合了很多我认为不错的技术博客内容,引⽤其中了⼀些⽐较好的博客⽂章,如有侵权,请联系作者。
该系列博⽂会告诉你如何从spring基础⼊⼿,⼀步步地学习spring基础和springmvc的框架知识,并上⼿进⾏项⽬实战,spring框架是每⼀个Java⼯程师必须要学习和理解的知识点,进⼀步来说,你还需要掌握spring甚⾄是springmvc的源码以及实现原理,才能更完整地了解整个spring技术体系,形成⾃⼰的知识框架。
后续还会有springboot和springcloud的技术专题,陆续为⼤家带来,敬请期待。
为了更好地总结和检验你的学习成果,本系列⽂章也会提供部分知识点对应的⾯试题以及参考答案。
如果对本系列⽂章有什么建议,或者是有什么疑问的话,也可以关注公众号【Java技术江湖】联系作者,欢迎你参与本系列博⽂的创作和修订。
声明式事务使⽤Spring事务是我们⽇常⼯作中经常使⽤的⼀项技术,Spring提供了编程、注解、aop切⾯三种⽅式供我们使⽤Spring事务,其中编程式事务因为对代码⼊侵较⼤所以不被推荐使⽤,注解和aop切⾯的⽅式可以基于需求⾃⾏选择,我们以注解的⽅式为例来分析Spring事务的原理和源码实现。
⾸先我们简单看⼀下Spring事务的使⽤⽅式,配置:<tx:annotation-driven transaction-manager="transactionManager"/><bean id="transactionManager"class="org.springframework.jdbc.datasource.DataSourceTransactionManager"><property name="dataSource" ref="dataSource"/></bean>在需要开启事务的⽅法上加上@Transactional注解即可,这⾥需要注意的是,当标签在不指定transaction-manager属性的时候,会默认寻找id固定名为transactionManager的bean作为事务管理器,如果没有id为transactionManager的bean并且在使⽤@Transactional注解时也没有指定value(事务管理器),程序就会报错。
Spring:源码解读SpringIOC原理Spring IOC设计原理解析:本⽂乃学习整理参考⽽来(1) BeanFactory(2) BeanDefinition1、 XmlBeanFactory(屌丝IOC)的整个流程2、 FileSystemXmlApplicationContext 的IOC容器流程1、⾼富帅IOC解剖2、设置资源加载器和资源定位3、AbstractApplicationContext的refresh函数载⼊Bean定义过程:4、AbstractApplicationContext⼦类的refreshBeanFactory()⽅法:5、AbstractRefreshableApplicationContext⼦类的loadBeanDefinitions⽅法:6、AbstractBeanDefinitionReader读取Bean定义资源:7、资源加载器获取要读⼊的资源:8、XmlBeanDefinitionReader加载Bean定义资源:9、DocumentLoader将Bean定义资源转换为Document对象:10、XmlBeanDefinitionReader解析载⼊的Bean定义资源⽂件:11、DefaultBeanDefinitionDocumentReader对Bean定义的Document对象解析:12、BeanDefinitionParserDelegate解析Bean定义资源⽂件中的<Bean>元素:13、BeanDefinitionParserDelegate解析<property>元素:14、解析<property>元素的⼦元素:15、解析<list>⼦元素:16、解析过后的BeanDefinition在IoC容器中的注册:17、DefaultListableBeanFactory向IoC容器注册解析后的BeanDefinition:总结:1、依赖注⼊发⽣的时间2、AbstractBeanFactory通过getBean向IoC容器获取被管理的Bean:3、AbstractAutowireCapableBeanFactory创建Bean实例对象:4、createBeanInstance⽅法创建Bean的java实例对象:5、SimpleInstantiationStrategy类使⽤默认的⽆参构造⽅法创建Bean实例化对象:6、populateBean⽅法对Bean属性的依赖注⼊:7、BeanDefinitionValueResolver解析属性值:8、BeanWrapperImpl对Bean属性的依赖注⼊:1、介绍2、Spring IoC容器的lazy-init属性实现预实例化:(1) .refresh()(2).finishBeanFactoryInitialization处理预实例化Bean:(3) .DefaultListableBeanFactory对配置lazy-init属性单态Bean的预实例化:3、FactoryBean的实现:(1).FactoryBean的源码如下:(2). AbstractBeanFactory的getBean⽅法调⽤FactoryBean:(3)、AbstractBeanFactory⽣产Bean实例对象:(4).⼯⼚Bean的实现类getObject⽅法创建Bean实例对象:4.BeanPostProcessor后置处理器的实现:(1).BeanPostProcessor的源码如下:(2).AbstractAutowireCapableBeanFactory类对容器⽣成的Bean添加后置处理器:(3).initializeBean⽅法为容器产⽣的Bean实例对象添加BeanPostProcessor后置处理器:(4).AdvisorAdapterRegistrationManager在Bean对象初始化后注册通知适配器:5.Spring IoC容器autowiring实现原理:(1). AbstractAutoWireCapableBeanFactory对Bean实例进⾏属性依赖注⼊:(2).Spring IoC容器根据Bean名称或者类型进⾏autowiring⾃动依赖注⼊:(3).DefaultSingletonBeanRegistry的registerDependentBean⽅法对属性注⼊:⼀、什么是Ioc/DI?IoC 容器:最主要是完成了完成对象的创建和依赖的管理注⼊等等。
SpringJDBC源码解析读完本篇⽂章需要很长很长时间。
传统JDBC相信⼤家对传统的jdbc已经很熟悉了,⽆⾮就是下⾯这个流程1 2 3 4 5 6 7 8 9 10 11//1.加载驱动程序Class.forName("com.mysql.jdbc.Driver");//2. 获得数据库连接Connection conn = DriverManager.getConnection(URL, USER, PASSWORD); //3.操作数据库Statement stmt = conn.createStatement();ResultSet rs = stmt.executeQuery("SELECT name, age from user");//4.处理返回值while(rs.next()){System.out.println("名字:"+rs.getString("name")+" 年龄:"+rs.getInt("age")); }使⽤SpringJDBC 引⼊maven依赖1 2 3 4 5 6 7 8 9 10 11 12 13 14 15<dependency><groupId>org.springframework</groupId><artifactId>spring-jdbc</artifactId><version>5.0.0.RELEASE</version></dependency><dependency><groupId>mysql</groupId><artifactId>mysql-connector-java</artifactId> <version>5.1.45</version></dependency><dependency><groupId>com.alibaba</groupId><artifactId>druid</artifactId><version>1.1.18</version></dependency>实体类1 2 3 4 5 6public class User {private int id;private String name; private int age;//getter、setter省略}返回值处理类1 2 3 4 5 6 7 8 9 10public class UserRowMapper implements RowMapper {@Nullablepublic Object mapRow(ResultSet resultSet, int i) throws SQLException { User user=new User();user.setId(resultSet.getInt("id"));user.setName(resultSet.getString("name"));user.setAge(resultSet.getInt("age"));return user;}}业务处理类1 2 3 4 5 6 7 8 9 10 11 12 13 14 15public interface JDBCService {public void queryById(int id);public void updateNameById(int id,String name);}public class JDBCServiceImpl implements JDBCService {private JdbcTemplate jdbcTemplate;public JDBCServiceImpl(JdbcTemplate jdbcTemplate) {this.jdbcTemplate = jdbcTemplate;}public void queryById(int id) {List<User> list = jdbcTemplate.query("select id,name,age from user where id=?", new Object[]{id}, new UserRowMapper()); if (list.size() > 0) {15 16 17 18 19 20 21 22 23 if (list.size() > 0) {System.out.println("id 为" + id + "的⽤户名为:" + list.get(0).getName());}}public void updateNameById(int id, String name) {jdbcTemplate.update("update user set name=? where id=?", new Object[]{name, id}, new UserRowMapper()); }}配置类1 2 3 4 5 6 7 8 9 10 11 12 13 14 15 16 17 18@Configurationpublic class JDBCConfig {@Beanpublic DruidDataSource druidDataSource(){DruidDataSource druidDataSource=new DruidDataSource();druidDataSource.setUsername("root");druidDataSource.setPassword("123456");druidDataSource.setDriverClassName("com.mysql.jdbc.Driver");druidDataSource.setUrl("jdbc:mysql://172.16.40.159:3306/cfkk?characterEncoding=utf-8&useSSL=false"); return druidDataSource;}@Beanpublic JDBCService jdbcService(DruidDataSource druidDataSource){JdbcTemplate jdbcTemplate=new JdbcTemplate(druidDataSource);JDBCService jdbcService=new JDBCServiceImpl(jdbcTemplate);return jdbcService;}}启动类1 2 3 4 5 6 7 8public class JDBCDemo {public static void main (String args[]){ApplicationContext context = new AnnotationConfigApplicationContext("cn.shiyujun.config"); JDBCService jdbcService= context.getBean(JDBCService.class);jdbcService.updateNameById(1,"李四");jdbcService.queryById(1);}}⾄此Deno⼯程搭建完毕,有需要源码的同学可以从下⽅地址获取update我们⾸先来分析⼀下update⽅法的实现参数封装1 2 3 4 5 6 7public int update(String sql, @Nullable Object... args) throws DataAccessException {return update(sql, newArgPreparedStatementSetter(args));}public int update(String sql, @Nullable PreparedStatementSetter pss) throws DataAccessException { return update(new SimplePreparedStatementCreator(sql), pss);}可以看到,⾸先使⽤了ArgPreparedStatementSetter对参数进⾏了⼀层封装,然后⼜使⽤了SimplePreparedStatementCreator对SQL进⾏了封装核⼼逻辑1 2 3 4 5 6 7 8 9 10 11 12 13 14 15 16 17protected int update(final PreparedStatementCreator psc, @Nullable final PreparedStatementSetter pss) throws DataAccessException {logger.debug("Executing prepared SQL update");return updateCount(execute(psc, ps -> {try {if (pss != null) {//设置所需的全部参数pss.setValues(ps);}//调⽤jdbc的更新⽅法int rows = ps.executeUpdate();if (logger.isDebugEnabled()) {logger.debug("SQL update affected " + rows + " rows");}return rows;17 18 19 20 21 22 23 24 25 return rows;}finally {if (pss instanceof ParameterDisposer) {((ParameterDisposer) pss).cleanupParameters(); }}}));}上⽅这个⽅法是update的核⼼逻辑了,这⾥⾯的代码不是太多,主要涉及⼏个核⼼的逻辑获取更新条数updateCount进⼊⽅法以后可以看到这个⽅法是对execute⽅法的integer返回值的⼀个封装,也就是此次修改的⾏数1 2 3 4private static int updateCount(@Nullable Integer result) { Assert.state(result != null, "No update count");return result;}前置⽅法execute这⾥完成了传统JDBC的前两步加载驱动和获取连接,1 2 3 4 5 6 7 8 9 10 11 12 13 14 15 16 17 18 19 20 21 22 23 24 25 26 27 28 29 30 31 32 33 34 35 36 37 38 39 40 41 42public <T> T execute(PreparedStatementCreator psc, PreparedStatementCallback<T> action)throws DataAccessException {Assert.notNull(psc, "PreparedStatementCreator must not be null");Assert.notNull(action, "Callback object must not be null");if (logger.isDebugEnabled()) {String sql = getSql(psc);logger.debug("Executing prepared SQL statement" + (sql != null ? " [" + sql + "]" : ""));}//根据具体的连接池组件获取数据库连接,这⾥就不深⼊研究了,放到以后的连接池源码解析⾥ Connection con = DataSourceUtils.getConnection(obtainDataSource());PreparedStatement ps = null;try {//应该对这个PreparedStatement印象很深刻了ps = psc.createPreparedStatement(con);applyStatementSettings(ps);//调⽤回调函数也就是update⽅法中execute的lambda表达式⾥的逻辑T result = action.doInPreparedStatement(ps);//警告处理handleWarnings(ps);return result;}catch (SQLException ex) {if (psc instanceof ParameterDisposer) {((ParameterDisposer) psc).cleanupParameters();}String sql = getSql(psc);// 释放资源JdbcUtils.closeStatement(ps);ps = null;DataSourceUtils.releaseConnection(con, getDataSource());con = null;throw translateException("PreparedStatementCallback", sql, ex);}finally {if (psc instanceof ParameterDisposer) {((ParameterDisposer) psc).cleanupParameters();}JdbcUtils.closeStatement(ps);DataSourceUtils.releaseConnection(con, getDataSource());}}执⾏更新现在就进⼊了最后的逻辑了1 2 3 4 5 6 7 8 9protected int update(final PreparedStatementCreator psc, @Nullable final PreparedStatementSetter pss) throws DataAccessException {logger.debug("Executing prepared SQL update");return updateCount(execute(psc, ps -> {try {if (pss != null) {// 往下看9 10 11 12 13 14 15 16 17 18 19 20 21 22 23 24 25 // 往下看pss.setValues(ps);}//调⽤jdbc的⽅法执⾏更新int rows = ps.executeUpdate();if (logger.isDebugEnabled()) {logger.debug("SQL update affected " + rows + " rows"); }return rows;}finally {if (pss instanceof ParameterDisposer) {((ParameterDisposer) pss).cleanupParameters();}}}));}请求参数设置1 2 3 4 5 6 7 8 9 10 11 12 13 14 15 16 17 18 19 20 21 22 23 24 25 26 27 28 29 30 31 32 33 34 35 36 37 38 39 40 41 42 43 44 45 46 47 48 49 50 51 52 53 54 55 56 57 58 59 60 61 62 63public void setValues(PreparedStatement ps) throws SQLException {int parameterPosition = 1;if (this.args != null && this.argTypes != null) {//遍历参数for (int i = 0; i < this.args.length; i++) {Object arg = this.args[i];//如果是集合的话则递归处理if (arg instanceof Collection && this.argTypes[i] != Types.ARRAY) {Collection<?> entries = (Collection<?>) arg;for (Object entry : entries) {if (entry instanceof Object[]) {Object[] valueArray = ((Object[]) entry);for (Object argValue : valueArray) {doSetValue(ps, parameterPosition, this.argTypes[i], argValue);parameterPosition++;}}else {doSetValue(ps, parameterPosition, this.argTypes[i], entry);parameterPosition++;}}}else {//核⼼⽅法doSetValue(ps, parameterPosition, this.argTypes[i], arg);parameterPosition++;}}}}protected void doSetValue(PreparedStatement ps, int parameterPosition, int argType, Object argValue)throws SQLException {StatementCreatorUtils.setParameterValue(ps, parameterPosition, argType, argValue);}public static void setParameterValue(PreparedStatement ps, int paramIndex, int sqlType,@Nullable Object inValue) throws SQLException {setParameterValueInternal(ps, paramIndex, sqlType, null, null, inValue);}private static void setParameterValueInternal(PreparedStatement ps, int paramIndex, int sqlType,@Nullable String typeName, @Nullable Integer scale, @Nullable Object inValue) throws SQLException {String typeNameToUse = typeName;int sqlTypeToUse = sqlType;Object inValueToUse = inValue;// override type info?if (inValue instanceof SqlParameterValue) {SqlParameterValue parameterValue = (SqlParameterValue) inValue;if (logger.isDebugEnabled()) {logger.debug("Overriding type info with runtime info from SqlParameterValue: column index " + paramIndex + ", SQL type " + parameterValue.getSqlType() + ", type name " + parameterValue.getTypeName());}if (parameterValue.getSqlType() != SqlTypeValue.TYPE_UNKNOWN) {sqlTypeToUse = parameterValue.getSqlType();}if (parameterValue.getTypeName() != null) {typeNameToUse = parameterValue.getTypeName();}inValueToUse = parameterValue.getValue();63 64 65 66 67 68 69 70 71 72 73 74 75 76 77 78 79 80 81 82 83 84 85 86 87 88 89 90 91 92 93 94 95 96 97 98 99 100 101 102 103 104 105 106 107 108 109 110 111 112 113 114 115 116 117 118 119 120 121 122 123 124 125 126 127 128 129 130 131 132 133 134 135 136 137 138 139 140 141 142 143 144 145 146 147 inValueToUse = parameterValue.getValue();}if (logger.isTraceEnabled()) {logger.trace("Setting SQL statement parameter value: column index " + paramIndex +", parameter value [" + inValueToUse +"], value class [" + (inValueToUse != null ? inValueToUse.getClass().getName() : "null") +"], SQL type " + (sqlTypeToUse == SqlTypeValue.TYPE_UNKNOWN ? "unknown" : Integer.toString(sqlTypeToUse))); }if (inValueToUse == null) {setNull(ps, paramIndex, sqlTypeToUse, typeNameToUse);}else {//往下看setValue(ps, paramIndex, sqlTypeToUse, typeNameToUse, scale, inValueToUse);}}private static void setValue(PreparedStatement ps, int paramIndex, int sqlType,@Nullable String typeName, @Nullable Integer scale, Object inValue) throws SQLException {if (inValue instanceof SqlTypeValue) {((SqlTypeValue) inValue).setTypeValue(ps, paramIndex, sqlType, typeName);}else if (inValue instanceof SqlValue) {((SqlValue) inValue).setValue(ps, paramIndex);}else if (sqlType == Types.VARCHAR || sqlType == Types.NVARCHAR ||sqlType == Types.LONGVARCHAR || sqlType == Types.LONGNVARCHAR) {ps.setString(paramIndex, inValue.toString());}else if ((sqlType == Types.CLOB || sqlType == Types.NCLOB) && isStringValue(inValue.getClass())) {String strVal = inValue.toString();if (strVal.length() > 4000) {// Necessary for older Oracle drivers, in particular when running against an Oracle 10 database.// Should also work fine against other drivers/databases since it uses standard JDBC 4.0 API.if (sqlType == Types.NCLOB) {ps.setNClob(paramIndex, new StringReader(strVal), strVal.length());}else {ps.setClob(paramIndex, new StringReader(strVal), strVal.length());}return;}// Fallback: regular setString bindingps.setString(paramIndex, strVal);}else if (sqlType == Types.DECIMAL || sqlType == Types.NUMERIC) {if (inValue instanceof BigDecimal) {ps.setBigDecimal(paramIndex, (BigDecimal) inValue);}else if (scale != null) {ps.setObject(paramIndex, inValue, sqlType, scale);}else {ps.setObject(paramIndex, inValue, sqlType);}}else if (sqlType == Types.BOOLEAN) {if (inValue instanceof Boolean) {ps.setBoolean(paramIndex, (Boolean) inValue);}else {ps.setObject(paramIndex, inValue, Types.BOOLEAN);}}else if (sqlType == Types.DATE) {if (inValue instanceof java.util.Date) {if (inValue instanceof java.sql.Date) {ps.setDate(paramIndex, (java.sql.Date) inValue);}else {ps.setDate(paramIndex, new java.sql.Date(((java.util.Date) inValue).getTime()));}}else if (inValue instanceof Calendar) {Calendar cal = (Calendar) inValue;ps.setDate(paramIndex, new java.sql.Date(cal.getTime().getTime()), cal);}else {ps.setObject(paramIndex, inValue, Types.DATE);}}else if (sqlType == Types.TIME) {147 148 149 150 151 152 153 154 155 156 157 158 159 160 161 162 163 164 165 166 167 168 169 170 171 172 173 174 175 176 177 178 179 180 181 182 183 184 185 186 187 188 189 190 191 192 193 194 195 196 197 198 199 200 201 202 else if (sqlType == Types.TIME) {if (inValue instanceof java.util.Date) {if (inValue instanceof java.sql.Time) {ps.setTime(paramIndex, (java.sql.Time) inValue);}else {ps.setTime(paramIndex, new java.sql.Time(((java.util.Date) inValue).getTime()));}}else if (inValue instanceof Calendar) {Calendar cal = (Calendar) inValue;ps.setTime(paramIndex, new java.sql.Time(cal.getTime().getTime()), cal);}else {ps.setObject(paramIndex, inValue, Types.TIME);}}else if (sqlType == Types.TIMESTAMP) {if (inValue instanceof java.util.Date) {if (inValue instanceof java.sql.Timestamp) {ps.setTimestamp(paramIndex, (java.sql.Timestamp) inValue);}else {ps.setTimestamp(paramIndex, new java.sql.Timestamp(((java.util.Date) inValue).getTime())); }}else if (inValue instanceof Calendar) {Calendar cal = (Calendar) inValue;ps.setTimestamp(paramIndex, new java.sql.Timestamp(cal.getTime().getTime()), cal);}else {ps.setObject(paramIndex, inValue, Types.TIMESTAMP);}}else if (sqlType == SqlTypeValue.TYPE_UNKNOWN || (sqlType == Types.OTHER &&"Oracle".equals(ps.getConnection().getMetaData().getDatabaseProductName()))) {if (isStringValue(inValue.getClass())) {ps.setString(paramIndex, inValue.toString());}else if (isDateValue(inValue.getClass())) {ps.setTimestamp(paramIndex, new java.sql.Timestamp(((java.util.Date) inValue).getTime())); }else if (inValue instanceof Calendar) {Calendar cal = (Calendar) inValue;ps.setTimestamp(paramIndex, new java.sql.Timestamp(cal.getTime().getTime()), cal);}else {// Fall back to generic setObject call without SQL type specified.ps.setObject(paramIndex, inValue);}}else {// Fall back to generic setObject call with SQL type specified.ps.setObject(paramIndex, inValue, sqlType);}}⾄此update⽅法更新分析完毕query1 2 3 4 5public <T> List<T> query(String sql, @Nullable Object[] args, RowMapper<T> rowMapper) throws DataAccessException { return result(query(sql, args, new RowMapperResultSetExtractor<>(rowMapper)));}⾸先最外层的result⽅法没有什么特别的,就是对返回值的处理1 2 3 4private static <T> T result(@Nullable T result) { Assert.state(result != null, "No result");return result;}参数封装接着同样是封装请求参数1 2 3public <T> T query(String sql, @Nullable Object[] args, ResultSetExtractor<T> rse) throws DataAccessException { return query(sql, newArgPreparedStatementSetter(args), rse);}3 4 5 6 }public <T> T query(String sql, @Nullable PreparedStatementSetter pss, ResultSetExtractor<T> rse) throws DataAccessException { return query(new SimplePreparedStatementCreator(sql), pss, rse);}核⼼查询1 2 3 4 5 6 7 8 9 10 11 12 13 14 15 16 17 18 19 20 21 22 23 24 25 26 27 28 29 30public <T> T query(PreparedStatementCreator psc, @Nullable final PreparedStatementSetter pss, final ResultSetExtractor<T> rse) throws DataAccessException {Assert.notNull(rse, "ResultSetExtractor must not be null");logger.debug("Executing prepared SQL query");//这⾥的execute的逻辑与update是⼀样的return execute(psc, new PreparedStatementCallback<T>() {@Override@Nullablepublic T doInPreparedStatement(PreparedStatement ps) throws SQLException {ResultSet rs = null;try {if (pss != null) {// 同上pss.setValues(ps);}rs = ps.executeQuery();//这⾥是重点return rse.extractData(rs);}finally {JdbcUtils.closeResultSet(rs);if (pss instanceof ParameterDisposer) {((ParameterDisposer) pss).cleanupParameters();}}}});}处理返回值因为修改的时候只需要返回⼀个int值修改的条数就ok了,但是查询的时候各种查询的类型什么的就不⼀样了。
在认真学习Rod.Johnson的三部曲之一:<<Professional Java Development with the spring framework>>,顺便也看了看源代码想知道个究竟,抛砖引玉,有兴趣的同志一起讨论研究吧!在Spring中,IOC容器的重要地位我们就不多说了,对于Spring的使用者而言,IOC容器实际上是什么呢?我们可以说BeanFactory就是我们看到的IoC容器,当然了Spring为我们准备了许多种IoC容器来使用,这样可以方便我们从不同的层面,不同的资源位置,不同的形式的定义信息来建立我们需要的IoC 容器。
在Spring中,最基本的IOC容器接口是BeanFactory –这个接口为具体的IOC容器的实现作了最基本的功能规定–不管怎么着,作为IOC容器,这些接口你必须要满足应用程序的最基本要求:Java代码1. public interface BeanFactory {2.3. //这里是对FactoryBean的转义定义,因为如果使用bean的名字检索FactoryBean得到的对象是工厂生成的对象,4. //如果需要得到工厂本身,需要转义5. String FACTORY_BEAN_PREFIX = "&";6.7.8. //这里根据bean的名字,在IOC容器中得到bean实例,这个IOC容器就是一个大的抽象工厂。
9. Object getBean(String name) throws BeansException;10.11. //这里根据bean的名字和Class类型来得到bean实例,和上面的方法不同在于它会抛出异常:如果根据名字取得的bean实例的Class类型和需要的不同的话。
12. Object getBean(String name, Class requiredType) throws BeansException;13.14. //这里提供对bean的检索,看看是否在IOC容器有这个名字的bean15. boolean containsBean(String name);16.17. //这里根据bean名字得到bean实例,并同时判断这个bean是不是单件18. boolean isSingleton(String name) throws NoSuchBeanDefinitionException;19.20. //这里对得到bean实例的Class类型21. Class getType(String name) throws NoSuchBeanDefinitionException;22.23. //这里得到bean的别名,如果根据别名检索,那么其原名也会被检索出来24. String[] getAliases(String name);25.26. }在BeanFactory里只对IOC容器的基本行为作了定义,根本不关心你的bean是怎样定义怎样加载的–就像我们只关心从这个工厂里我们得到到什么产品对象,至于工厂是怎么生产这些对象的,这个基本的接口不关心这些。
spring源码分析(⼀)IoC、DI参考书籍:《spring源码深度解析》、《spring技术内幕》⼀、搭建⼯程,运⾏简单⽰例:[java]1. @Test2. public void testSimpleLoad() {3. BeanFactory bf = new XmlBeanFactory(new ClassPathResource ("beans.xml"));4. Person bean = (Person) bf.getBean("person");5. ();6. }其余代码我就不贴了,很基本。
要说明⼀点,要看spring源码的话,需要在导⼊的spring jar包附上额外的源码包,eclipse可以配置:⼆、这个⼯程的test程序只有短短⼏⾏,但背后的spring代码却是繁多复杂的。
BeanFactory bf = new XmlBeanFactory(new ClassPathResource ("beans.xml"));Person bean = (Person) bf.getBean("person");这两句的逻辑看起来很简单,⾸先依据xml⽂件创建⼯⼚类,再通过⼯⼚类从容器获取bean。
在这个过程中⽤ClassPathResource类来对配置⽂件作⼀个包装,然后作为XmlBeanFactory构造函数的参数。
BeanFactory是⼀个接⼝。
先来看ClassPathResource类。
经过代码阅读,可以总结UML图:可以清晰看得出来,spring的设计者在这⾥应⽤了⼀个著名设计模式:策略模式。
简单些讲,就是⾯向接⼝编程的⼀种思路。
在这⾥UrlResource和ClassPathResource都实现了Resource接⼝,是Resource接⼝的两种实现策略。
我们⾸先看Resource接⼝,这是最基础的定义:[java]1. public interface Resource extends InputStreamSource {2. boolean exists();3. boolean isReadable();4. boolean isOpen();5.6.7. URL getURL() throws IOException;8. URI getURI() throws IOException;9. File getFile() throws IOException;10. long contentLength() throws IOException;11. long lastModified() throws IOException;12. Resource createRelative(String relativePath) throws IOException;13. String getFilename();14. String getDescription();15. }该接⼝定义了⼀些很基本的⽅法。
(3)spring源码解析-refresh()⽅法之前本⽂是作者原创,版权归作者所有.若要转载,请注明出处.本⽂源码版本5.1.x.话不多说,开始⾸先是配置类@Configuration@ComponentScan("com.day01")public class SpringConfig {}IndexService@Servicepublic class IndexService {public IndexService(){System.out.println("IndexService 构造⽅法");}@PostConstructpublic void init(){System.out.println("IndexService init⽅法");}public void hello(){System.out.println("IndexService hello");}}测试类public static void main(String[] args) {AnnotationConfigApplicationContext applicationContext=new AnnotationConfigApplicationContext(SpringConfig.class);//AnnotationConfigApplicationContext applicationContext=new AnnotationConfigApplicationContext(IndexService.class);IndexService indexService = (IndexService) applicationContext.getBean("indexService");indexService.hello();System.out.println(indexService);}第⼀⾏点进去public AnnotationConfigApplicationContext(Class<?>... annotatedClasses) {//annotatedClasses ---> 配置类的class对象this();register(annotatedClasses);refresh();}今天我们先看refresh()⽅法之前的源码this()调的构造器如下public AnnotationConfigApplicationContext() {/*** ⽗类的构造⽅法* 创建⼀个读取注解的Bean定义读取器* 什么是BeanDefinition*/super();this.reader = new AnnotatedBeanDefinitionReader(this);//可以⽤来扫描包或者类,继⽽转换成BeanDefinition//但是实际上我们扫描包⼯作不是scanner这个对象来完成的//是spring⾃⼰new的⼀个ClassPathBeanDefinitionScanner//这⾥的scanner仅仅是为了程序员能够在外部调⽤AnnotationConfigApplicationContext对象的scan⽅法this.scanner = new ClassPathBeanDefinitionScanner(this);}/*** 这个类顾名思义是⼀个reader,⼀个读取器* 读取什么呢?还是顾名思义:AnnotatedBeanDefinition意思是读取⼀个被加了注解的BeanDefinition* 这个类在构造⽅法中实例化的*/private final AnnotatedBeanDefinitionReader reader;/*** 同意顾名思义,这是⼀个扫描器,扫描所有加了注解的bean* 同样是在构造⽅法中被实例化的*/private final ClassPathBeanDefinitionScanner scanner;先看super()⽗类构造器public GenericApplicationContext() {this.beanFactory = new DefaultListableBeanFactory();}可以看出初始化beanFactory 为默认实现DefaultListableBeanFactory我们看⼀下些DefaultListableBeanFactory的属性和⽅法public class DefaultListableBeanFactory extends AbstractAutowireCapableBeanFactoryimplements ConfigurableListableBeanFactory, BeanDefinitionRegistry, Serializable {/** Map of bean definition objects, keyed by bean name. */private final Map<String, BeanDefinition> beanDefinitionMap = new ConcurrentHashMap<>(256);/** List of bean definition names, in registration order. */private volatile List<String> beanDefinitionNames = new ArrayList<>(256);//⼿动注册的单例对象的名称列表,按注册顺序排列/** List of names of manually registered singletons, in registration order. */private volatile Set<String> manualSingletonNames = new LinkedHashSet<>(16);@Overridepublic <T> T getBean(Class<T> requiredType) throws BeansException {return getBean(requiredType, (Object[]) null);}@SuppressWarnings("unchecked")@Overridepublic <T> T getBean(Class<T> requiredType, @Nullable Object... args) throws BeansException {Assert.notNull(requiredType, "Required type must not be null");Object resolved = resolveBean(ResolvableType.forRawClass(requiredType), args, false);if (resolved == null) {throw new NoSuchBeanDefinitionException(requiredType);}return (T) resolved;}}可以看出,这是bean⼯⼚的实现类,⾥⾯有存BeanDefinition和beanDefinitionNames 的map和getBean等⽅法⽗类构造器结束,就是实例了⼀个默认的bean⼯⼚,继续下⼀⾏this.reader = new AnnotatedBeanDefinitionReader(this);点进去看源码public AnnotatedBeanDefinitionReader(BeanDefinitionRegistry registry) {this(registry, getOrCreateEnvironment(registry));}这⾥BeanDefinitionRegistry是⼀个BeanDefinition注册器public AnnotatedBeanDefinitionReader(BeanDefinitionRegistry registry, Environment environment) {Assert.notNull(registry, "BeanDefinitionRegistry must not be null");Assert.notNull(environment, "Environment must not be null");this.registry = registry;this.conditionEvaluator = new ConditionEvaluator(registry, environment, null);AnnotationConfigUtils.registerAnnotationConfigProcessors(this.registry);}继续看最后⼀⾏public static void registerAnnotationConfigProcessors(BeanDefinitionRegistry registry) {registerAnnotationConfigProcessors(registry, null);}继续跟进去public static Set<BeanDefinitionHolder> registerAnnotationConfigProcessors(BeanDefinitionRegistry registry, @Nullable Object source) {DefaultListableBeanFactory beanFactory = unwrapDefaultListableBeanFactory(registry);if (beanFactory != null) {if (!(beanFactory.getDependencyComparator() instanceof AnnotationAwareOrderComparator)) {beanFactory.setDependencyComparator(AnnotationAwareOrderComparator.INSTANCE);//AnnotationAwareOrderComparator主要能解析@Order注解和@Priority}if (!(beanFactory.getAutowireCandidateResolver() instanceof ContextAnnotationAutowireCandidateResolver)) {beanFactory.setAutowireCandidateResolver(new ContextAnnotationAutowireCandidateResolver());//ContextAnnotationAutowireCandidateResolver提供处理延迟加载的功能}}//a Set of BeanDefinitionHolders, containing all bean definitions//BeanDefinitionHolder是存储BeanDefinitionName和BeanDefinition的⼀个数据结构Set<BeanDefinitionHolder> beanDefs = new LinkedHashSet<>(8);//BeanDefinitio的注册,这⾥很重要,需要理解注册每个bean的类型,CONFIGURATION_ANNOTATION_PROCESSOR_BEAN_NAME=internalConfigurationAnnotationProcessorif (!registry.containsBeanDefinition(CONFIGURATION_ANNOTATION_PROCESSOR_BEAN_NAME)) {//ConfigurationClassPostProcessor是⼀个BeanFactory的后置处理器,主要功能是解析加了@Configuration的配置类,还会解析@ComponentScan、@ComponentScans注解扫描的包,以及解析@Import等注解 //需要注意的是ConfigurationClassPostProcessor的类型是BeanDefinitionRegistryPostProcessor//⽽ BeanDefinitionRegistryPostProcessor 最终实现BeanFactoryPostProcessor这个接⼝RootBeanDefinition def = new RootBeanDefinition(ConfigurationClassPostProcessor.class);def.setSource(source);beanDefs.add(registerPostProcessor(registry, def, CONFIGURATION_ANNOTATION_PROCESSOR_BEAN_NAME));}//AUTOWIRED_ANNOTATION_PROCESSOR_BEAN_NAME=internalAutowiredAnnotationProcessorif (!registry.containsBeanDefinition(AUTOWIRED_ANNOTATION_PROCESSOR_BEAN_NAME)) {//AutowiredAnnotationBeanPostProcessor是解析AutoWired注解的BeanPostProcessor//AutowiredAnnotationBeanPostProcessor 实现了 MergedBeanDefinitionPostProcessor//MergedBeanDefinitionPostProcessor 最终实现了 BeanPostProcessorRootBeanDefinition def = new RootBeanDefinition(AutowiredAnnotationBeanPostProcessor.class);def.setSource(source);beanDefs.add(registerPostProcessor(registry, def, AUTOWIRED_ANNOTATION_PROCESSOR_BEAN_NAME));}//COMMON_ANNOTATION_PROCESSOR_BEAN_NAME=internalCommonAnnotationProcessor// Check for JSR-250 support, and if present add the CommonAnnotationBeanPostProcessor.if (jsr250Present && !registry.containsBeanDefinition(COMMON_ANNOTATION_PROCESSOR_BEAN_NAME)) {//CommonAnnotationBeanPostProcessor⽀持对@PostConstruct和@PreDestroy注解,以及对@Resource注解的处理RootBeanDefinition def = new RootBeanDefinition(CommonAnnotationBeanPostProcessor.class);def.setSource(source);beanDefs.add(registerPostProcessor(registry, def, COMMON_ANNOTATION_PROCESSOR_BEAN_NAME));}//PERSISTENCE_ANNOTATION_PROCESSOR_BEAN_NAME=internalPersistenceAnnotationProcessor,跳过,不重要// Check for JPA support, and if present add the PersistenceAnnotationBeanPostProcessor.if (jpaPresent && !registry.containsBeanDefinition(PERSISTENCE_ANNOTATION_PROCESSOR_BEAN_NAME)) {RootBeanDefinition def = new RootBeanDefinition();try {def.setBeanClass(ClassUtils.forName(PERSISTENCE_ANNOTATION_PROCESSOR_CLASS_NAME,AnnotationConfigUtils.class.getClassLoader()));}catch (ClassNotFoundException ex) {throw new IllegalStateException("Cannot load optional framework class: " + PERSISTENCE_ANNOTATION_PROCESSOR_CLASS_NAME, ex); }def.setSource(source);beanDefs.add(registerPostProcessor(registry, def, PERSISTENCE_ANNOTATION_PROCESSOR_BEAN_NAME)); }//EVENT_LISTENER_PROCESSOR_BEAN_NAME=internalEventListenerProcessorif (!registry.containsBeanDefinition(EVENT_LISTENER_PROCESSOR_BEAN_NAME)) {//EventListenerMethodProcessor⽀持事件监听,不太熟RootBeanDefinition def = new RootBeanDefinition(EventListenerMethodProcessor.class);def.setSource(source);beanDefs.add(registerPostProcessor(registry, def, EVENT_LISTENER_PROCESSOR_BEAN_NAME));}//EVENT_LISTENER_FACTORY_BEAN_NAME=internalEventListenerFactoryif (!registry.containsBeanDefinition(EVENT_LISTENER_FACTORY_BEAN_NAME)) {//DefaultEventListenerFactory不太了解,事件监听相关RootBeanDefinition def = new RootBeanDefinition(DefaultEventListenerFactory.class);def.setSource(source);beanDefs.add(registerPostProcessor(registry, def, EVENT_LISTENER_FACTORY_BEAN_NAME));}return beanDefs;}这⾥的BeanDefinitionHolder看下public class BeanDefinitionHolder implements BeanMetadataElement {private final BeanDefinition beanDefinition;private final String beanName;@Nullableprivate final String[] aliases; //省略}可以认为:BeanDefinitionHolder是存储BeanDefinitionName和BeanDefinition的⼀个数据结构debug看下最后⼀⾏的结果可以看出,bean⼯⼚已经存在5个BeanDefinition,我们继续看下⾯的源码读取器看完了,扫描器先不看了,我们看register(annotatedClasses);⽅法public void register(Class<?>... annotatedClasses) {Assert.notEmpty(annotatedClasses, "At least one annotated class must be specified");this.reader.register(annotatedClasses);//被注解的类}继续跟下去public void register(Class<?>... annotatedClasses) {for (Class<?> annotatedClass : annotatedClasses) {registerBean(annotatedClass);}}这⾥循环处理所有要处理的annotated类。
SpringIOC源码分析Spring 最重要的概念是 IOC 和 AOP,本篇⽂章其实就是要带领⼤家来分析下 Spring 的 IOC 容器。
既然⼤家平时都要⽤到 Spring,怎么可以不好好了解 Spring 呢?阅读本⽂并不能让你成为 Spring 专家,不过⼀定有助于⼤家理解 Spring 的很多概念,帮助⼤家排查应⽤中和Spring 相关的⼀些问题。
阅读建议:读者⾄少需要知道怎么配置 Spring,了解 Spring 中的各种概念,少部分内容我还假设读者使⽤过 SpringMVC。
本⽂要说的 IOC 总体来说有两处地⽅最重要,⼀个是创建 Bean 容器,⼀个是初始化 Bean,如果读者觉得⼀次性看完本⽂压⼒有点⼤,那么可以按这个思路分两次消化。
读者不⼀定对 Spring 容器的源码感兴趣,也许附录部分介绍的知识对读者有些许作⽤。
我采⽤的源码版本是 4.3.11.RELEASE,算是 5.0.x 前⽐较新的版本了。
为了降低难度,本⽂所说的所有的内容都是基于 xml 的配置的⽅式,实际使⽤已经很少⼈这么做了,⾄少不是纯 xml 配置,不过从理解源码的⾓度来看⽤这种⽅式来说⽆疑是最合适的。
如果读者对注解⽅式的源码感兴趣,也许等我有时间的时候可以写篇⽂章介绍介绍。
我希望能将此⽂写成⼀篇 Spring IOC 源码分析的好⽂章,希望通过本⽂可以让读者不惧怕阅读 Spring 源码。
为了保持⽂章的严谨性,如果读者发现我哪⾥说错了请⼀定不吝指出,⾮常希望可以听到读者的声⾳。
引⾔先看下最基本的启动 Spring 容器的例⼦:1 2 3public static void main(String[] args) {ApplicationContext context = new ClassPathXmlApplicationContext("classpath:applicationfile.xml"); }以上代码就可以利⽤配置⽂件来启动⼀个 Spring 容器了,请使⽤ maven 的⼩伙伴直接在 dependencies 中加上以下依赖即可,我⽐较反对那些不知道要添加什么依赖,然后把 Spring 的所有相关的东西都加进来的⽅式。
Spring5源码分析(第2版)第一章从现实生活理解Spring中常用的设计模式一、Spring中常用的设计模式1、我们通常说的23种经典设计模式可以通过下表一目了然:通常来说,设计模式都是混合使用,不会独立应用。
利用穷举法充分理解设计模式的应用场景。
在平时的应用中,不是用设计模式去生搬硬套,而是根据具体业务问题需要时借鉴。
2、设计模式在应用中遵循六大原则:a、开闭原则(OpenClosePrinciple)开闭原则就是说对扩展开放,对修改关闭。
在程序需要进行拓展的时候,不能去修改原有的代码,实现一个热插拔的效果。
所以一句话概括就是:为了使程序的扩展性好,易于维护和升级。
想要达到这样的效果,我们需要使用接口和抽象类,后面的具体设计中我们会提到这点。
b、里氏代换原则(LiskovSubstitutionPrinciple)里氏代换原则(LiskovSubstitutionPrincipleLSP)面向对象设计的基本原则之一。
里氏代换原则中说,任何基类可以出现的地方,子类一定可以出现。
LSP是继承复用的基石,只有当衍生类可以替换掉基类,软件单位的功能不受到影响时,基类才能真正被复用,而衍生类也能够在基类的基础上增加新的行为。
里氏代换原则是对“开-闭”原则的补充。
实现“开-闭”原则的关键步骤就是抽象化。
而基类与子类的继承关系就是抽象化的具体实现,所以里氏代换原则是对实现抽象化的具体步骤的规范。
c、依赖倒转原则(DependenceInversionPrinciple)这个是开闭原则的基础,具体内容:针对接口编程,依赖于抽象而不依赖于具体。
d、接口隔离原则(InterfaceSegregationPrinciple)这个原则的意思是:使用多个隔离的接口,比使用单个接口要好。
还是一个降低类之间的耦合度的意思,从这儿我们看出,其实设计模式就是一个软件的设计思想,从大型软件架构出发,为了升级和维护方便。
所以上文中多次出现:降低依赖,降低耦合。
Spring源码解析-AntPathMatcher最近在看SpringMVC的源码,发现request分发时,路径匹配最后是委托给AntPathMatcher实现的.索性看看吧.⽂章摘要: 1. ant匹配规则 2. PathMatcher接⼝ 3. 通过测试⽤例看AntPathMatcher的使⽤ant匹配规则AntPathMatcher如名使⽤的ant 的匹配规则,我们先看看吧. 字符wildcard 描述 ? 匹配⼀个字符 * 匹配0个及以上字符 ** 匹配0个及以上⽬录directories看⼏个官⽅的例⼦吧: com/t?st.jsp - 匹配: com/test.jsp , com/tast.jsp , com/txst.jsp com/*.jsp - 匹配: com⽂件夹下的全部.jsp⽂件 com/**/test.jsp - 匹配: com⽂件夹和⼦⽂件夹下的全部.jsp⽂件, org/springframework/**/*.jsp - 匹配: org/springframework⽂件夹和⼦⽂件夹下的全部.jsp⽂件 org/**/servlet/bla.jsp - 匹配: org/springframework/servlet/bla.jsp , org/springframework/testing/servlet/bla.jsp , org/servlet/bla.jspPathMatcher接⼝主要是判断是否匹配pattern,并解析出path中的参数1package org.springframework.util;23public interface PathMatcher {45/**6 * 判断传⼊的path是否可以作为pattern使⽤7*/8boolean isPattern(String path);910/**11 * 使⽤pattern匹配path12*/13boolean match(String pattern, String path);1415/**16 * 如名,是否开始部分匹配17*/18boolean matchStart(String pattern, String path);1920/**21 * 提取path中匹配到的部分,如pattern(myroot/*.html),path(myroot/myfile.html),返回myfile.html22*/23 String extractPathWithinPattern(String pattern, String path);2425/**26 * 提取path中匹配到的部分,只是这边还需跟占位符配对为map,27 * 如pattern(/hotels/{hotel}),path(/hotels/1),解析出"hotel"->"1"28*/29 Map<String, String> extractUriTemplateVariables(String pattern, String path);3031/**32 * 提供⽐较器33*/34 Comparator<String> getPatternComparator(String path);3536/**37 * 合并pattern,pattern1然后pattern238*/39 String combine(String pattern1, String pattern2);4041 }通过测试⽤例看AntPathMatcher的使⽤⼀看测试⽤例,瞬间服了,⼈家开发真是规范.⼈家整这么规范,还是有空直接看源码好了.这边挑⼏个简单的例⼦看看就好1. match 跟 matchStart 的差异,这个我们在测试⽤例看下⾯的情况会⽐较明确 这边的代码,我截取了⼀⼩部分1package org.springframework.util;2public class AntPathMatcherTests {3 @Test4public void match() {5// ...6assertFalse(pathMatcher.match("/x/x/**/bla", "/x/x/x/"));7// ...8 }9 @Test10public void withMatchStart() {11// ...12assertTrue(pathMatcher.matchStart("/x/x/**/bla", "/x/x/x/"));13// ...14 }15 }2. extractPathWithinPattern,代码很清楚,不废话1package org.springframework.util;2public class AntPathMatcherTests {3 @Test4public void extractPathWithinPattern() throws Exception {5// ...6 assertEquals("", pathMatcher.extractPathWithinPattern("/docs/commit.html", "/docs/commit.html"));7 assertEquals("cvs/commit", pathMatcher.extractPathWithinPattern("/docs/*", "/docs/cvs/commit"));8 assertEquals("docs/cvs/commit", pathMatcher.extractPathWithinPattern("/d?cs/*", "/docs/cvs/commit")); 9// ...10 }11 }3. extractUriTemplateVariables1package org.springframework.util;2public class AntPathMatcherTests {3 @Test4public void extractUriTemplateVariables() throws Exception {5 Map<String, String> result = pathMatcher.extractUriTemplateVariables("/hotels/{hotel}", "/hotels/1");6 assertEquals(Collections.singletonMap("hotel", "1"), result);7// ...8 result = pathMatcher.extractUriTemplateVariables("/{page}.*", "/42.html");9 assertEquals(Collections.singletonMap("page", "42"), result);10// ...11 }12/**13 * SPR-778714*/15 @Test16public void extractUriTemplateVarsRegexQualifiers() {17 Map<String, String> result = pathMatcher.extractUriTemplateVariables(18 "{symbolicName:[\\p{L}\\.]+}-sources-{version:[\\p{N}\\.]+}.jar",19 "com.example-sources-1.0.0.jar");20 assertEquals("com.example", result.get("symbolicName"));21 assertEquals("1.0.0", result.get("version"));22// ...23 }24 }4. combine1package org.springframework.util;2public class AntPathMatcherTests {3 @Test4public void combine() {5// ...6 assertEquals("/hotels", bine("/hotels", null));7 assertEquals("/hotels/booking", bine("/hotels/*", "/booking"));8 assertEquals("/hotels/**/booking", bine("/hotels/**", "booking"));9 assertEquals("/hotels/**/booking", bine("/hotels/**", "/booking"));10 assertEquals("/hotels/booking", bine("/hotels", "/booking"));11 assertEquals("/hotels/{hotel}", bine("/hotels/*", "{hotel}"));12 assertEquals("/hotels/**/{hotel}", bine("/hotels/**", "{hotel}"));13 assertEquals("/hotels/*/booking/{booking}", bine("/hotels/*/booking", "{booking}"));14 }15 }。
Mybatis-Spring源码分析图解Mybatis-Spring当我们使⽤mybatis和spring整合后为什么下⾯的代码可以运⾏?⼀个问题:我就写了个mapper接⼝为什么能⽤?⾸先来看,在spring的配置xml中有⼀段<bean id="configurer" class="org.mybatis.spring.mapper.MapperScannerConfigurer"><property name="sqlSessionFactoryBeanName" value="sqlSessionFactory"/><property name="basePackage" value="com.jame.dao"/></bean>这段xml的作⽤是将⼀个类添加到spring容器中,点进这个类看看它实现了⼀个BeanDefinitionRegistryPostProcessor接⼝,,这⾥就不再赘述那么它必然实现postProcessBeanDefinitionRegistry⽅法,点击这个⽅法查看@Overridepublic void postProcessBeanDefinitionRegistry(BeanDefinitionRegistry registry) {if (this.processPropertyPlaceHolders) {processPropertyPlaceHolders();}ClassPathMapperScanner scanner = new ClassPathMapperScanner(registry);..........scanner.registerFilters();scanner.scan(StringUtils.tokenizeToStringArray(this.basePackage, ConfigurableApplicationContext.CONFIG_LOCATION_DELIMITERS));}其中将接⼝注册到spring容器中在最后⼀⾏,先来看ClassPathMapperScanner这个类,它继承了ClassPathBeanDefinitionScanner这个扫描器scan的具体代码public int scan(String... basePackages) {int beanCountAtScanStart = this.registry.getBeanDefinitionCount();doScan(basePackages);// Register annotation config processors, if necessary.if (this.includeAnnotationConfig) {AnnotationConfigUtils.registerAnnotationConfigProcessors(this.registry);}return (this.registry.getBeanDefinitionCount() - beanCountAtScanStart);}这个是spring内部的扫描⽅法,当它⾛到doScan的时候,因为ClassPathMapperScanner这个类重写了doScan⽅法,所以会调⽤⼦类重写的⽅法@Overridepublic Set<BeanDefinitionHolder> doScan(String... basePackages) {Set<BeanDefinitionHolder> beanDefinitions = super.doScan(basePackages);if (beanDefinitions.isEmpty()) {LOGGER.warn(() -> "No MyBatis mapper was found in '" + Arrays.toString(basePackages)+ "' package. Please check your configuration.");} else {processBeanDefinitions(beanDefinitions);}return beanDefinitions;}通过包名获取BeanDefinitionHolder,现在它获取到了User接⼝的BeanDefinitionHolder,然后判断如果BeanDefinitionHolder的集合为空,也就是没有找到mapper的情况则不做任何处理,⽽现在有⼀个UserMapper的,进⼊elseprivate void processBeanDefinitions(Set<BeanDefinitionHolder> beanDefinitions) {AbstractBeanDefinition definition;BeanDefinitionRegistry registry = getRegistry();for (BeanDefinitionHolder holder : beanDefinitions) {definition = (AbstractBeanDefinition) holder.getBeanDefinition();.........//主要看这⾏definition.setBeanClass(this.mapperFactoryBeanClass);.........if (!definition.isSingleton()) {BeanDefinitionHolder proxyHolder = ScopedProxyUtils.createScopedProxy(holder, registry, true);if (registry.containsBeanDefinition(proxyHolder.getBeanName())) {registry.removeBeanDefinition(proxyHolder.getBeanName());}registry.registerBeanDefinition(proxyHolder.getBeanName(), proxyHolder.getBeanDefinition());}}}将MapperFactoryBean类设置为了UserMapperBeanDefinition的classspring在创建这个userMapper这个Bean的时候会使⽤这个有参构造将当前这个UserMapper类型设置到mapperInterface属性上(为啥使⽤有参构造⽽不是⽆参来初始化对象我也不知道.....这和spring推断构造⽅法有关,以后学会了在来写)这个MapperFactoryBean实现了⼀个FactoryBean接⼝,这个接⼝可以让我们⾃定义获取bean的操作回到spring的代码,例如当我们使⽤context.getBean(xxx.class)的时候spring将xxx.class类型解析为bean名称,通过名称去获取protected <T> T doGetBean(String name, @Nullable Class<T> requiredType, @Nullable Object[] args, boolean typeCheckOnly)throws BeansException {//获取对应的beanNameString beanName = transformedBeanName(name);Object bean;Object sharedInstance = getSingleton(beanName);if (sharedInstance != null && args == null) {bean = getObjectForBeanInstance(sharedInstance, name, beanName, null);}.......// Create bean instance.if (mbd.isSingleton()) {sharedInstance = getSingleton(beanName, () -> {try {//真正创建对象的地⽅return createBean(beanName, mbd, args);}catch (BeansException ex) {// Explicitly remove instance from singleton cache: It might have been put there// eagerly by the creation process, to allow for circular reference resolution.// Also remove any beans that received a temporary reference to the bean.destroySingleton(beanName);throw ex;}});bean = getObjectForBeanInstance(sharedInstance, name, beanName, mbd);}}⾸先是调⽤getSingleton⽅法,尝试获取存在缓存中的bean(其实就是三个Map,key为bean名称,value是对象),那现在是⾸次获取map中没有然后执⾏到下⾯的createBean,当创建完这个bean后spring需要判断这个bean是⼀个普通bean还是⼀个FactoryBean,程序员是想要获取普通bean还是FactoryBean,还是FactoryBean的getObject⽅法返回的从⼯⼚⽣成的对象咱们⼀段⼀段看protected Object getObjectForBeanInstance(Object beanInstance, String name, String beanName, @Nullable RootBeanDefinition mbd) {if (BeanFactoryUtils.isFactoryDereference(name)) {if (beanInstance instanceof NullBean) {return beanInstance;}if (!(beanInstance instanceof FactoryBean)) {throw new BeanIsNotAFactoryException(beanName, beanInstance.getClass());}}.....}BeanFactoryUtils.isFactoryDereference(name)的作⽤是⼀个字符串判断,当返回传⼊名称是否为⼯⼚,如果name不为空,并且以&开头返回true这个⽅法在下⾯的判断也使⽤到了,记⼀下它的作⽤即可来看例⼦在我们使⽤FactoryBean通过context.getBean("⼯⼚Bean名称")的时候获取的是FactoryBean的getObject⽣成的对象,如果我们想获取FactoryBean的引⽤则需要在名称前⾯加⼀个&符号回来看代码,如果这个bean的引⽤是⼀个NullBean类型则直接返回引⽤,下⾯有做了⼀个判断if (!(beanInstance instanceof FactoryBean))再次判断这个bean是不是⼀个FactoryBean,如果为true则抛出异常,这个好理解,因为我们在getBean的时候完全可以将⼀个普通的bean名称前⾯加上&符号主要的判断在下⾯的这个ifif (!(beanInstance instanceof FactoryBean) || BeanFactoryUtils.isFactoryDereference(name)) {return beanInstance;}现在有3中情况1.当前的bean是⼀个普通的bean第⼀个条件false 取反 true 第⼆个条件false 结果true,直接返回bean实例2.当前是⼀个FactoryBean,想通过⼯⼚获取Bean第⼀个条件 true 取反false 第⼆个条件false 结果false,进⾏下⾯的操作3.当前是⼀个FactoryBean,想获取⼯⼚的引⽤第⼀个条件 true 取反 false 第⼆个条件 true 结果 true 直接返回factoryBean实例当前我们是想通过FactoryBean获取对象,那么不进if,继续下⾯的代码Object object = null;// 如果beanDefinition为null,则尝试从缓存中获取给定的FactoryBean公开的对象if (mbd == null) {//尝试从缓存中加载beanobject = getCachedObjectForFactoryBean(beanName);}// 未能从缓存中获得FactoryBean公开的对象,则说明该bean是⼀个新创建的beanif (object == null) {FactoryBean<?> factory = (FactoryBean<?>) beanInstance;if (mbd == null && containsBeanDefinition(beanName)) {mbd = getMergedLocalBeanDefinition(beanName);}boolean synthetic = (mbd != null && mbd.isSynthetic());// 从给定的FactoryBean中获取指定的beanName对象object = getObjectFromFactoryBean(factory, beanName, !synthetic);}return object;主要来看getObjectFromFactoryBeanprotected Object getObjectFromFactoryBean(FactoryBean<?> factory, String beanName, boolean shouldPostProcess) {if (factory.isSingleton() && containsSingleton(beanName)) {synchronized (getSingletonMutex()) {Object object = this.factoryBeanObjectCache.get(beanName);if (object == null) {//调⽤factoryBean的getObject⽅法object = doGetObjectFromFactoryBean(factory, beanName);Object alreadyThere = this.factoryBeanObjectCache.get(beanName);if (alreadyThere != null) {object = alreadyThere;}}..........}}}doGetObjectFromFactoryBean⽅法private Object doGetObjectFromFactoryBean(FactoryBean<?> factory, String beanName) throws BeanCreationException {Object object;try {if (System.getSecurityManager() != null) {AccessControlContext acc = getAccessControlContext();try {object = AccessController.doPrivileged((PrivilegedExceptionAction<Object>) factory::getObject, acc);}catch (PrivilegedActionException pae) {throw pae.getException();}}else {//调⽤重写的getObject⽅法object = factory.getObject();}}.......return object;}也就是说当我们getBean("userMapper")的时候其实是调⽤FactoryBean的getObject⽅法,代码回到mybatis-spring项⽬的MapperFactoryBean类中的getObject⽅法@Overridepublic T getObject() throws Exception {return getSqlSession().getMapper(this.mapperInterface);}@Overridepublic <T> T getMapper(Class<T> type) {return configuration.getMapper(type, this);}public <T> T getMapper(Class<T> type, SqlSession sqlSession) {final MapperProxyFactory<T> mapperProxyFactory = (MapperProxyFactory<T>) knownMappers.get(type);if (mapperProxyFactory == null) {throw new BindingException("Type " + type + " is not known to the MapperRegistry.");}try {return mapperProxyFactory.newInstance(sqlSession);} catch (Exception e) {throw new BindingException("Error getting mapper instance. Cause: " + e, e);}}public T newInstance(SqlSession sqlSession) {final MapperProxy<T> mapperProxy = new MapperProxy<>(sqlSession, mapperInterface, methodCache);return newInstance(mapperProxy);}protected T newInstance(MapperProxy<T> mapperProxy) {return (T) Proxy.newProxyInstance(mapperInterface.getClassLoader(), new Class[] { mapperInterface }, mapperProxy);}到最后发现是通过jdk的动态代理来⽣成的对象,那么回答开始的问题我就写了个接⼝为什么能⽤?因为mybatis在spring加载bean之前修改了beanDefinition,通过MapperScannerConfigurer类实现的BeanDefinitionRegistryPostProcessor接⼝中将我们定义的⼀些mapper接⼝的BeanDefinition的BeanClass属性修改为了MapperFactoryBean,⽽这个类实现了FactoryBean,我们获取接⼝实际上是通过FactoryBean的getObject⽅法到此这篇关于Mybatis-Spring源码分析的⽂章就介绍到这了,更多相关Mybatis-Spring源码分析内容请搜索以前的⽂章或继续浏览下⾯的相关⽂章希望⼤家以后多多⽀持!。