Zerto 4.0安装部署测试文档-Hyper-v到VMware v1.docx
- 格式:docx
- 大小:4.89 MB
- 文档页数:30
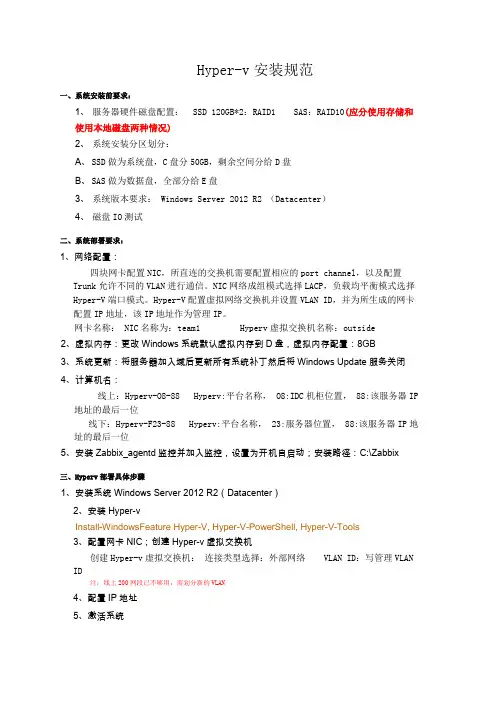
Hyper-v安装规范一、系统安装前要求:1、服务器硬件磁盘配置: SSD 120GB*2:RAID1 SAS:RAID10(应分使用存储和使用本地磁盘两种情况)2、系统安装分区划分:A、SSD做为系统盘,C盘分50GB,剩余空间分给D盘B、SAS做为数据盘,全部分给E盘3、系统版本要求: Windows Server 2012 R2 (Datacenter)4、磁盘IO测试二、系统部署要求:1、网络配置:四块网卡配置NIC,所直连的交换机需要配置相应的port channel,以及配置Trunk 允许不同的VLAN进行通信。
NIC网络成组模式选择LACP,负载均平衡模式选择Hyper-V端口模式。
Hyper-V配置虚拟网络交换机并设置VLAN ID,并为所生成的网卡配置IP地址,该IP地址作为管理IP。
网卡名称: NIC名称为:team1 Hyperv虚拟交换机名称:outside2、虚拟内存:更改Windows系统默认虚拟内存到D盘,虚拟内存配置:8GB3、系统更新:将服务器加入域后更新所有系统补丁然后将Windows Update服务关闭4、计算机名:线上:Hyperv-O8-88 Hyperv:平台名称, O8:IDC机柜位置, 88:该服务器IP地址的最后一位线下:Hyperv-F23-88 Hyperv:平台名称, 23:服务器位置, 88:该服务器IP地址的最后一位5、安装Zabbix_agentd监控并加入监控,设置为开机自启动;安装路径:C:\Zabbix三、Hyperv部署具体步骤1、安装系统Windows Server 2012 R2(Datacenter)2、安装Hyper-vInstall-WindowsFeature Hyper-V, Hyper-V-PowerShell, Hyper-V-Tools3、配置网卡NIC;创建Hyper-v虚拟交换机创建Hyper-v虚拟交换机:连接类型选择:外部网络 VLAN ID:写管理VLAN ID注:线上200网段已不够用,需划分新的VLAN4、配置IP地址5、激活系统6、配置虚拟内存,需重启7、修改服务器远程端口为:【13149】;需重启修改注册表:开始-->运行-->输入 regedit 回车[HKEY_LOCAL_MACHINE\SYSTEM\CurrentControlSet\Control\TerminalServer\Wds\rdpwd\Tds\tcp] 双击右边 PortNumber—点十进制—更改值为:13149—点确定。
Hyper-V实验手册实验前准备Lab 01:配置iSCSI目标服务器实验目的:通过配置iSCSI目标服务器,可以让学员了解Windows Server 2012的存储管理功能,为之后的群集实验做准备。
实验内容在本实验中,学员将在虚拟机:Windows Server 2012域控制器(VDC1)上,安装并配置iSCSI目标服务器。
在‘添加角色与功能向导’中,添加角色8)在‘服务器管理器’窗口,单击‘管理’,在下拉菜单中单击‘添加角色和功能’。
9)在‘选择安装类型’页面,选择‘基于角色和功能的安装’,然后单击‘下一步’。
10)在‘选择目标服务器’页面,单击‘下一步’。
11)在‘选择服务器角色’页面,勾选‘文件和存储服务(已安装)-文件和iSCSI服务(已安装– iSCSI目标服务器)’,单机‘下一步’。
Lab 02:配置实时迁移虚拟机存储实验目的:通过配置实时迁移虚拟机存储,可以让学员了解Windows Server 2012 Hyper-V对虚拟机存储调用的灵活性。
实验内容在本实验中,学员将在物理机Windows Server 2012 Hyper-V(Host11)上,在不中断虚拟机运行的情况下迁移其存储。
Lab 03:配置实时迁移虚拟机(无共享存储)实验目的:通过配置实时迁移虚拟机及其存储,可以让学员了解Windows Server 2012Hyper-V 在虚拟机迁移方面的新特性。
实验内容在本实验中,学员将在无共享存储情况下,将域成员Hyper-V服务器(Host11)上的虚拟机(XP)实时迁移到另一台域成员Hyper-V服务器(Host12)。
Lab 04:Hyper-V复制实验目的:通过配置Hyper-V复制,可以让学员了解Windows Server 2012 在Hyper-V服务器高可用性方面的新特性。
实验内容在本实验中,学员将在两台Windows Server 2012 Hyper-V服务器上,实现虚拟机复制功能。
VMware SD-WAN 管理指南VMware SD-WAN 4.0您可以从 VMware 网站下载最新的技术文档:https:///cn/。
VMware, Inc.3401 Hillview Ave. Palo Alto, CA 94304 威睿信息技术(中国)有限公司北京办公室北京市朝阳区新源南路 8 号启皓北京东塔 8 层 801/cn上海办公室上海市淮海中路 333 号瑞安大厦 804-809 室/cn广州办公室广州市天河路 385 号太古汇一座 3502 室/cn版权所有© 2020 VMware, Inc. 保留所有权利。
版权和商标信息VMware SD-WAN 管理指南目录1关于 VMware SD-WAN 管理指南122新增功能133概览15解决方案组件16SD-WAN Edge 性能和规模数据17功能23隧道开销和 MTU26网络拓扑29分支站点拓扑30角色和特权级别34用户角色列表36重要概念38支持的浏览器42支持的调制解调器424用户协议435使用 SSO 以企业用户身份登录到 VMware SD-WAN Orchestrator446监控企业45监控导航面板45网络概览45监控 Edge48“概览”选项卡49QoE 选项卡50“传输”选项卡53“应用程序”选项卡55“源”选项卡56“目标”选项卡57“业务优先级”选项卡59“系统”选项卡59VMware SD-WAN Orchestrator 数据保留60监控网络服务64监控路由65PIM 邻居视图66监控警示66监控事件67自动回滚到上一个已知正常的配置68监控报告687使用新的 Orchestrator UI 监控企业70监控网络概览71监控 Edge72监控 Edge 概览74监控 Edge 的链路75监控路径可见性77监控 Edge 应用程序78监控 Edge 源80监控 Edge 目标82监控 Edge 的业务优先级83监控 Edge 的系统信息84监控连接到 Edge 的网关85监控网络服务86监控通过网关的非 SD-WAN 目标86监控云安全服务站点87监控 Edge 集群88监控 Edge VNF89监控路由详细信息89监控多播组90监控 PIM 邻居90监控 BGP Edge 邻居状态91监控 BFD92监控 BGP 网关邻居状态93监控警示93监控事件94企业报告96创建新的企业报告96创建自定义的报告98选择时间范围98选择数据100选择 Edge101提交报告102监控企业报告1038配置分段1079配置网络服务109关于 Edge 集群111Edge 集群的工作方式111配置 Edge 集群117Edge 集群故障排除119创建 Non VMware SD-WAN Site119VPN 工作流120配置通过网关的非 SD-WAN 目标124配置 Check Point125配置 Cisco ASA 类型的 Non VMware SD-WAN Site128配置 Cisco ISR 类型的 Non VMware SD-WAN Site130配置通过网关的通用 IKEv2 路由器类型的 Non VMware SD-WAN Site 132配置 Microsoft Azure Non VMware SD-WAN Site135配置 Palo Alto 类型的 Non VMware SD-WAN Site137配置 SonicWALL 类型的 Non VMware SD-WAN Site139配置 Zscaler141配置通过网关的通用 IKEv1 路由器类型的 Non VMware SD-WAN Site148配置通用防火墙(基于策略的 VPN)类型的 Non VMware SD-WAN Site150配置 Amazon Web Services152配置通过 Edge 的非 SD-WAN 目标153配置通过 Edge 的通用 IKEv1 路由器类型的 Non-VMware SD-WAN Site154配置通过 Edge 的“通用 IKEv2 路由器”类型的 Non-VMware SD-WAN Site156配置分支和通过 Edge 的非 SD-WAN 目标之间的隧道159在 Edge 级别配置云 VPN 和隧道参数159云安全服务161配置云安全提供程序161为配置文件配置云安全服务164为 Edge 配置云安全服务165为云安全服务配置业务策略167监控云安全服务168监控云安全服务事件169配置 DNS 服务170配置 Netflow 设置170IPFIX 模板173非 NAT 模板173NAT 模板180流量链路统计信息模板181隧道统计信息模板181应用程序选项模板183接口选项模板184VMware分段 ID 到分段的映射模板185链路选项模板185Netflow 源地址和分段186IPFIX 信息元素定义187专用网络名称191配置专用网络191删除专用网络名称191配置身份验证服务19110配置配置文件19311设置配置文件设备196配置设备196在配置文件中分配分段197配置身份验证设置199配置 DNS 设置199为配置文件配置 Netflow 设置200为配置文件配置 Syslog 设置201防火墙日志的 Syslog 消息格式204为配置文件配置云 VPN206云 VPN 概览207配置分支和通过网关的非 SD-WAN 目标之间的隧道211配置分支和 SD-WAN Hubs VPN 之间的隧道212配置分支和分支 VPN 之间的隧道221配置分支和通过 Edge 的非 SD-WAN 目标之间的隧道222配置多播设置222在接口级别配置多播设置224为配置文件配置 VLAN226配置管理 IP 地址228配置设备设置229配置接口设置242配置 Wi-Fi 无线设置249为配置文件配置第 2 层设置249为配置文件配置 SNMP 设置251为配置文件配置 NTP 设置252配置可见性模式254分配合作伙伴网关254分配控制器25712配置业务策略260为配置文件配置业务策略260配置 Edge 的业务策略261创建业务策略规则262为业务策略规则配置网络服务267配置链路转向模式268配置基于策略的 NAT273覆盖网络 QoS CoS 映射274具有合作伙伴网关的服务提供商的隧道调整程序27513配置防火墙277为配置文件配置防火墙279为 Edge 配置防火墙281配置防火墙规则287配置有状态防火墙设置290配置网络和泛洪保护设置291配置 Edge 访问294防火墙故障排除29514置备 Edge297置备新的 Edge297激活 Edge299使用零接触置备激活 Edge(技术预览版)300使用电子邮件激活 Edge300发送激活电子邮件300激活 Edge 设备302管理 Edge306分配软件映像308将 Edge 重置为出厂设置30915配置 Edge 信息31116配置 Edge 设备316配置 DSL 设置318为 Edge 配置 Netflow 设置320Edge 级别的 LAN 端 NAT 规则321为 Edge 配置 Syslog 设置329配置静态路由设置331配置 ICMP 探测/响应程序331配置 VRRP 设置332监控 VRRP 事件334在 Edge 级别配置云 VPN 和隧道参数335为 Edge 配置 VLAN337高可用性 (HA)339配置设备设置339在路由接口上配置 DHCP 服务器340在路由接口上启用 RADIUS 341配置 Edge LAN 替代项342配置 Edge WAN 替代项342配置 Edge WAN 覆盖网络设置343通过 MPLS 的 SD-WAN 服务可访问性353配置 MPLS CoS357配置热备用链路359监控热备用链路360配置 Wi-Fi 无线覆盖362安全 VNF363配置 VNF 管理服务366配置没有 HA 的安全 VNF370配置具有 HA 的安全 VNF374定义分段和服务 VLAN 之间的映射376为 VLAN 配置 VNF 插入377监控 Edge 的 VNF379监控 VNF 事件380配置 VNF 警示382为 Edge 配置第 2 层设置383为 Edge 配置 SNMP 设置384为 Edge 配置 NTP 设置386配置 Edge 激活38717Edge 软件映像管理389Edge 软件映像管理概述389启用 Edge 软件映像管理389Edge 映像分配和访问390升级 SD-WAN Edge39118对象组392配置地址组392配置端口组394使用对象组配置业务策略394使用对象组配置防火墙规则39619站点配置399数据中心配置399配置分支和 Hub40020为动态路由配置 OSPF 或 BGP411启用 OSPF411路由筛选器414配置 BGP415OSPF/BGP 重新分发423BFD 设置424配置 BFD424为 BGP 配置 BFD426为 OSPF 配置 BFD427监控 BFD 会话431监控 BFD 事件432BFD 故障排除433覆盖网络流量控制434配置全局路由首选项436配置子网43721配置警示44022测试和故障排除445远程诊断445执行远程诊断测试447远程操作467诊断包468请求数据包捕获包469请求诊断包470下载诊断包471删除诊断包47123企业管理472系统设置472配置企业信息472配置企业身份验证476单点登录概览477为企业用户配置单点登录477针对单点登录配置 IDP480管理管理员用户499创建新的管理员用户500配置管理员用户501角色自定义503创建新的自定义包504上载自定义的包507Edge 许可507Edge 许可示例50924配置 SD-WAN Edge 高可用性511SD-WAN Edge HA 概览511必备条件512高可用性选项512标准 HA512增强 HA516裂脑条件517脑裂检测和防御517故障场景518支持通过 HA 链接的 BGP519用于确定活动状态和备用状态的选择条件519通过 HA 链接的带 VLAN 标记的流量519配置 HA520启用高可用性520等待 SD-WAN Edge 担任活动设备角色521将备用 SD-WAN Edge 连接到活动 Edge521连接备用 SD-WAN Edge 上的 LAN 和 WAN 接口521 HA 事件详细信息522在 VMware ESXi 上部署 HA52225VMware 虚拟 Edge 部署527VMware 虚拟 Edge 的部署必备条件527VMware 虚拟 Edge 部署的特殊注意事项529创建 cloud-init530安装 VMware 虚拟 Edge531在 KVM 上启用 SR-IOV532在 KVM 上安装虚拟 Edge534在 VMware 上启用 SR-IOV538在 VMware ESXi 上安装虚拟 Edge53926Azure 虚拟 WAN SD-WAN Gateway 自动化545 Azure 虚拟 WAN SD-WAN Gateway 自动化概览545Azure 配置必备条件546注册 SD-WAN Orchestrator 应用程序546为 SD-WAN Orchestrator 应用程序分配参与者角色548注册资源提供程序549创建客户端密码550VMware SD-WAN 管理指南配置 Azure 虚拟 WAN 以启用分支到 Azure 的 VPN 连接551创建资源组552创建虚拟 WAN554创建虚拟 Hub555创建虚拟网络557在 VNet 和 Hub 之间创建虚拟连接559配置 SD-WAN Orchestrator 以启用分支到 Azure 的 VPN 连接560配置 IaaS 订阅网络服务560配置 Microsoft Azure 类型的 Non VMware SD-WAN Site561将 Non VMware SD-WAN Site 与配置文件相关联563编辑 VPN 站点564同步 VPN 配置565删除 Non VMware SD-WAN Site56627附录567企业级 Orchestrator 警示和事件567syslog 支持的 VMware SD-WAN Edge 事件588关于 VMware SD-WAN 管理指南1VMware SD-WAN™(以前称为 VMware SD-WAN™ by VeloCloud®)管理指南提供了有关 VMware SD-WAN Orchestrator 和核心 VMware 配置设置的信息,包括如何配置和管理网络、网络服务、Edge、配置文件以及使用 SD-WAN Orchestrator 的客户。
XX客户Zerto 4.0安装部署测试报告2016.1目录1.Zerto虚拟复制技术 (33)2.Zerto系统架构 (33)3.测试准备工作 (55)3.1.环境要求 (55)3.2.测试影响评估 (66)4.ZVR软件安装 (66)4.1.安装 .Net framework 4.0 (66)4.2.安装ZVR 4.0 (88)5.ZVR部署 (1313)5.1.部署VRA (1313)5.2.站点配对 (1616)5.3.建立VPG保护组 (1818)6.容灾测试 (2424)6.1.灾难恢复测试 Failover Test (2424)6.2.故障切换-Failover (2727)7.测试结果 (3030)1.Z erto虚拟复制技术Zerto是一家专注于虚拟化容灾/业务连续性的软件公司,其旗舰产品Zerto Virtual Replication (ZVR)是一个基于虚拟机复制的软件解决方案,通过帮助组织机构达到分钟级的恢复时间目标(RTO)和秒级的恢复点目标(RPO),而使企业的灾难恢复和业务连续性成为可能,同时只需要较低的成本费用。
有了Zerto,用户可以得到可靠的,接近实时的服务器复制,而花费仅仅是SAN阵列式复制成本的一小部分。
Zerto虚拟复制技术具有以下功能和特性:基于Hypervisor的复制——无关存储的复制跨Hypervisor的复制——实现微软Hyper-V到VMware的跨平台复制企业级的复制技术——实现秒级的RPO及分钟级的RTO连续数据保护——恢复到任意时间点的类 DVR 保护保护应用程序——跨虚拟机的统一恢复点,保护跨多虚拟机的应用离线备份——支持容灾数据的长期保留完整业务连续性及灾难恢复业务流程——自动化的故障转移、故障恢复和非破坏性隔离测试亚马逊网络服务复制——支持容灾到AWS公有云2.Zerto系统架构Zerto完整的软件构架图如下:Zerto虚拟复制技术由以下2个关键组件组成:Zerto Virtual Manager—— Zerto虚拟管理器(ZVM) –ZVM可直接以插件形式嵌入到虚拟化管理控制台(例如VMware’s vCenter) ,并以可视化的形式嵌入整个虚拟化基础架构中。
VMware服务器虚拟化环境搭建手册一、安装前的准备......................................................................................... 错误!未定义书签。
1.1准备vSphere .................................................................................... 错误!未定义书签。
1.2准备DNS........................................................................................... 错误!未定义书签。
二、安装ESXi server...................................................................................... 错误!未定义书签。
三、安装Vcenter server ................................................................................ 错误!未定义书签。
3.1软硬件需求:................................................................................... 错误!未定义书签。
3.2安装前数据库准备:....................................................................... 错误!未定义书签。
3.3vCenter Server4.0安装:................................................................. 错误!未定义书签。

目录1.概述22.启用HYPER-V23.使用HYPER-V73.1.创建虚拟机9 3.2.修改虚拟机19 3.2.1.添加硬件20 3.2.2.固件23 3.2.3.安全25 3.2.4.处理器28 3.2.5.SCSI控制器29 3.2.6.网络适配器294.安装操作系统354.1.概述35 4.2.下载ISO文件36 4.3.加载ISO文件36 4.4.开始安装395.体验WINDOWS ADMIN CENTER595.1.概述59 5.2.下载59 5.3.安装60 5.4.运行661.概述做为微软的忠实开发者,有一台高大上的装有Windows 10操作系统的电脑,是作战的必备工具。
一般的微软.NET开发者,首先在自己的电脑上安装Windows 10操作系统,体验流畅漂亮的界面。
然后再在Windows 10操作系统上安装Hyper-V虚拟机管理工具,并在虚拟机里安装Windows Server或Liunx操作系统,进而进行相应的代码编写和测试工作。
当然,如果只是进行一些简单的代码开发,也可以直接在Windows 10操作系统上安装Visual Studio和SQL Server进行代码的编写和测试。
Hyper-V是微软的虚拟化解决方案,能够让用户在Windows系统上部署并使用虚拟机,每个虚拟机里可以安装其它的操作系统,这样我们可以在同一台Windows系统上安装多个其它的操作系统,省去了购买物理机的费用。
2.启用Hyper-V默认情况下,Windows 10操作系统是自带有Hyper-V管理工具的,只是安装Windows 10操作系统之后并没有启用Hyper-V功能。
我们只需要将Hyper-V功能启用即可,这是Windows 10操作系统的一种非常实用的功能项。
在Windows 10操作系统中右击“开始”菜单图标,图1在图1的菜单中选择“应用和功能”,如图2所示:图2在图2的最右侧点击“程序和功能”,如图3所示:图3在图3的左侧点击“启用或关闭Windows功能”,如图4所示:图4在图4中将“Hyper-V”文件夹前面的复选框选中,将子文件夹也全部选中,点击“确定”按钮,如图5所示:图5图6图7所有更改完成之后,提示需要重新启动一下电脑。
HyperV实施方案标题:HyperV实施方案引言概述:HyperV是一种虚拟化技术,可以帮助企业提高服务器资源利用率,降低成本,提高灵活性和可靠性。
本文将介绍HyperV的实施方案及其优势。
一、硬件要求1.1 硬件配置:HyperV需要64位处理器、至少4GB内存、硬件虚拟化技术支持等。
1.2 存储:建议使用RAID阵列,提高数据冗余和性能。
1.3 网络:至少需要两个网络接口,一个用于管理,一个用于虚拟机通信。
二、网络规划2.1 VLAN划分:根据不同的虚拟机需求划分不同的VLAN,提高网络安全性。
2.2 子网规划:为不同的虚拟机分配不同的IP地址,避免冲突。
2.3 负载均衡:使用负载均衡器分担虚拟机的网络流量,提高性能和稳定性。
三、存储规划3.1 存储池:建立存储池,将物理硬盘汇总为一个逻辑卷,提高存储效率。
3.2 虚拟硬盘:为虚拟机创建虚拟硬盘,可以选择动态扩展或固定大小。
3.3 快照:定期为虚拟机创建快照,以便在出现问题时快速恢复。
四、备份与恢复4.1 定期备份:定期备份虚拟机的配置和数据,保证数据安全。
4.2 灾难恢复:建立灾难恢复计划,包括数据备份、灾难恢复测试等。
4.3 自动化恢复:使用自动化工具进行虚拟机的快速恢复,减少停机时间。
五、性能监控与优化5.1 资源监控:定期监控虚拟机的资源利用率,及时调整资源分配。
5.2 性能优化:根据监控数据进行性能优化,提高虚拟机性能。
5.3 安全加固:定期对HyperV进行安全加固,保证系统安全性。
结论:HyperV实施方案可以帮助企业提高IT资源的利用率和灵活性,降低成本,提高系统的可靠性和安全性。
企业在实施HyperV时应该根据具体需求和情况进行规划和优化,以实现最佳效果。

ZERTO虚拟化复制管理软件简明操作手册2018/11/271目录1、软件概览界面..................................................................................................................... 32、ZERTO在虚拟化群集中如何部署................................................................................ 33、如何创建一个虚拟机复制组/容灾关系...................................................................... 44、如何监视一个VPG ............................................................................................................ 85、如何容灾演练..................................................................................................................... 96、如何把一个VPG调整复制方向................................................................................ 167、如何接管一个VPG ........................................................................................................ 198、如何恢复单个文件........................................................................................................ 2121、软件概览界面主界面显示当前受保护的虚拟机数量、复制组数量、数量受保护容量、I/O延时状态等。

Hyper-v 集群搭建的步骤首先我们都明白Hyper-v是微软推出的一个虚拟化的平台,我们可以将他理解成和vmware一样的产品。
/*(其实不同:Microsoft Hyper-V 和VMware ESX Server都是基于硬件支持的Bare-Metal虚拟化产品,他们最大的区别在于,Microsoft Hyper-V采用了微内核的结构,而ESX Server是一个单内核的产品。
)ESX Server :单内核的主要特点是硬件的驱动程序集中在Hypervisor一层,被Hypervisor 上的所有的虚机所共同使用。
当一个虚机的OS需要访问硬件时,它通过Hypervisor中的driver model来访问,这种单内核的Hypervisor能够提供很好的性能,但是它在安全性和兼容性上存在缺陷。
由于驱动程序和一些第三方代码跑在一个很敏感的区域内,这种模式有了一个很大的被攻击面。
Hyper-v: Hyper-V采用了微内核的结构,它是一个瘦Hypervisor。
因为它里面没有驱动程序,所以在体积上Hyper-V更有优势,另外,由于微内核体积较小,所以运行的效率很高。
驱动程序是跑在每一个分区里面的,每一个分区内的虚机OS都能够通过Hypervisor直接访问硬件,还使得每一个分区都相互独立,这样就拥有更好的安全性和稳定性。
*/ 其实对于他们各自具有的优势有时候并不是说明那个更好一点,现在多小的产品,多大的公司,合适才是最好的。
1.Hyper-v 安装对于计算机和环境的要求:1.基于X64:windows Server 2008 虚拟化的功能只在x64的版本中提供。
2.硬件辅助虚拟化:需要有虚拟化选项的特定CPU,包含Inter VT或者AMD-V 。
3.硬件数据执行保护(DEP),并且开启。
如何开启(计算机->属性->高级系统设置->性能下面的设置)。
(如何查看是否支持,可使用Everest软件检测,运行Everest--主板--CPUID--CPUID 特性--Virtual Machine Extensions)如果支持则表示支持虚拟化。
VMware ESX Server 4.0安装一,安装前的准备;1,确认你的硬件设备支持虚拟化。
2,确认启用了硬件服务器的虚拟化功能。
例如CPU的VT功能。
3,进行合理网络拓扑规划。
二,系统的安装;1,将VMware ESX Server 4.0光盘放入驱,设置从光盘启动。
直接回车,进入下一步。
2,进入VMware欢迎界面,单击“netxt”。
4,选择键盘语言类型,单击“netxt”。
加载定制硬件驱动,选择“是”,进入下一步。
6,开始加载VMware ESX Server所需的默认驱动,单击“next”。
“netxt”。
8,配置网络接口,如需要加入vlan,则勾先加入vlan并输入要加入的vlan ID,然后单击“next”。
自动获取,多个ESX Server则必须在同一个域内。
10,选择安装类型,如果只有单个硬盘,可以选择(Standard setup)默认分区,如果有多个硬盘,则选择(Advancedsetup)自定义分区。
然后单击“next”。
11,系统自动检测到的存储设备,选择要将ESX Server安装到的存储设备,单击“next”弹出警告信息,提示选中的存储设备里的数据将被清除,选择“是”。
12,设置时区,然后单击“next”。
13,手动配置系统日期及时间,也可以输入NTP时间同步服务器地址自动同步。
然后单击“next”。
14,配置根用户(root)密码,单击“next”。
15,确认安装配置,然后单击“next”进行安装。
16,安装完成,单击“netxt”。
17,提示安装完成,单击“Finish”重新引导系统。
安装条件Hyper-V是微软伴随Windows Server 2008推出的重量级虚拟化工具平台,很多网友都在问,为什么安装了Windows Server 2008之后找不到这个功能?或者即时重新安装了这个组件,Hyper-V虚拟化也不能使用呢?其实,要完全实现正常安装并使用Hyper-V,除了需要软件条件,还需要硬件条件才行。
安装 "Hyper-V"虚拟化的先决条件:Windows Server 虚拟化需要特定的CPU:-基于 x64: Windows Server 虚拟化功能只在 x64 版本的 Windows Server 2008 标准版、企业版和数据中心版中提供。
-硬件辅助虚拟化:需要具有虚拟化选项的特定CPU,即包含 IntelVT(Vanderpool Technology)或 AMD Virtualization (AMD-V,代号 "Pacifica")功能的CPU。
-硬件数据执行保护(DEP),而且被开启(如果CPU支持 Server 2008 默认开启)。
下面提供两种快速检测方法:(一)使用 EVEREST Ultimate Edition 软件(下载),可以方便的辨别你的CPU是否符合要求:在"主板"下的"CPUID"一项中,查看是否支持以下三种特性:1、指令集:64位x86扩展2、 CPUID特征:对于AMD处理器:Secure Virtual Machine Extensions (Pacifica) ;对于Intel处理器:Virtual Machine Extensions (Vanderpool)3、安全特征:数据执行保护(DEP) (DEP, NX, EDB)(图1)(二)在这里,给大家介绍另外一个简单便捷的小工具-securable(下载)。
(图2)如果机器显示如上图,代表不支持Hyper-V,因为三个条件均不满足,呵呵(记住,只要有一项不满足就不支持!)。
安装和配置Hyper V详细步骤VPS天堂Hyper-V的功能不管是同微软的其它虚拟化产品如Virtual PC、Virtual Server等相比,还是同竞争对手VMware的虚拟化产品相比,Hyper-V在构架上都已有了明显的变化,而且在功能上也更加强大。
Hyper-V具有以下功能:支持64位硬件平台:Hyper-V采用64位微内核Hypervisor架构,必须在64位硬件平台上运行,而同为服务器虚拟化产品的Virtual Server目录只能运行在32硬件平台上。
多用户操作系统支持:在Hyper-V上可以安装和管理基于32位和64位平台的不同类型的操作系统,例如Windows XP SP3、Windows Server 2003 SP2、Windows Vista SP1、Novell SUSE Linux Enterprise Server 10 SP1、Redhat Linux Enterprise 5等。
对称多处理器支持:Hyper-V支持4 CPU的Windows Server 2008虚拟机和2 CPU的Windows Server 2003虚拟机,当需要耗掉大量的处理器资源时,多处理器虚拟机就是必须的,且优势明显。
虚拟机执行效率高:Hyper-V的基本架构可以分为硬件、Hyper-V和虚拟机三部分,用于连接硬件和虚机的Hyper-V程序小、代码少、不含任何第三方的驱动,非常精简,执行时错误概率小,这种架构使得虚拟机和硬件之间无须经过多层转换,可以更加充分的利用硬件资源,执行效率高,虚机性能接近于真实操作系统性能。
高级网络功能支持:Hyper-V提供了对各种高级网络功能的支持,如NAT、防火墙以及VLAN配置等,可以更好地满足网络安全需求。
网络负载均衡:Hyper-V支持对Windows网络负载均衡服务的配置,从而让负载可以由不同服务器上的多个虚拟机分担。
快速迁移:Hyper-V可以快速将运行中的虚拟机从一台物理主机迁移到另一台物理主机,同时还可以做到将停机时间做到最小。
Hyper-V规划与部署指南微软公司发布日期:2008年7月摘要本指南描述了在规划与部署Hyper-V™技术时需要注意的事项,并提供了可以帮助您部署Hyper-V 的安装与配置细节信息。
版权信息本文中所包含的信息,包括链接及其它网站参考,可能在未经提示的情况下更改。
除非另经说明,本文所描述的示例公司、组织、产品、域名、电子邮件地址、标志、人名、地理位置与事件均为虚构,并不与任何真实公司、组织、产品、域名、电子邮件地址、标志、人名、地理位置与事件相关联,如有雷同,纯属巧合。
遵循所有现行的版权法律是用户的责任。
包括但不限于版权,本文的任何部分都不可复制、存储或引入到资源系统中,也不可以在未经微软公司书面授权的情况下以任何形式任何方法(电子、机械、影印、录制及其它)任何目的进行传播。
微软公司在本文中拥有专利、专利应用程序、商标、版权,或其它智慧财产。
除非拥有来自微软公司的书面许可证明,本文并不为您提供对于这些专利、商标、版权或其它智慧财产的许可。
© 2008 微软公司保留所有权利Active Directory、Microsoft、MS-DOS、Visual Basic、Visual Studio、Windows、Windows NT、Windows Server及Windows Vista是微软公司在美国和/或其它国家的注册商标或商标。
本文所涉及的其它真实公司与产品归其所有人所有。
目录Hyper-V规划与部署指南 (5)关于本指南 (5)Hyper-V概述 (5)Hyper-V是做什么的? (5)谁会对这一角色感兴趣? (5)Hyper-V的关键功能包括什么? (6)在您安装Hyper-V之前 (6)硬件因素 (6)硬件需求 (6)内存 (7)处理器 (7)网络 (7)存储 (8)其它硬件组件 (9)关于虚拟机与客户操作系统 (9)运行多个虚拟机 (9)支持的客户操作系统 (10)集成服务 (11)其它因素 (12)安装Hyper-V (12)关于Hyper-V更新包 (12)Hyper-V角色包 (12)管理工具包 (13)Windows Server 2008的Hyper-V语言包 (13)其它因素 (14)在安装Server Core的Windows Server 2008上安装Hyper-V角色 (14)其它参考信息 (17)在完整安装的Windows Server 2008上安装Hyper-V角色 (18)其它因素 (18)为远程管理而安装和配置Hyper-V工具 (19)安装管理工具 (19)配置管理工具 (19)配置服务器来运行Hyper-V (20)配置Windows Vista SP1 (23)配置虚拟网络 (24)虚拟网络类型 (24)虚拟网络基础知识 (24)网络与虚拟机 (25)配置虚拟网络 (25)Hyper-V规划与部署指南关于本指南Hyper-V规划与部署指南旨在帮助您理解规划与部署Hyper-V™的因素,并为帮助您部署Hyper-V 提供安装与配置的详细信息。
E-GuideThe do’s and don’ts of a successful Hyper-V deploymentMicrosoft’s latest release of Hyper-V delivers a number of new improvements and features that are exciting for new and old adoptersof this platform ali ke. If you’ve been waiting for the “right time” to jointhe Hyper-V party, R2 is it! However, like any virtualization platform, maximizing the benefits you can get from this technology is contingentupon a successful deployment. In this expert e-guide from , gain expert insight into the “dos anddon’ts” of a Hyper-V deployment. Learn what common mistakes ITshops often fall victim to and find out which key considerations cannotbe overlooked.E-GuideThe do’s and don’ts of a successful Hyper-V deploymentTable of ContentsFive mistakes to avoid when deploying Hyper-V virtual machinesKey considerations for Hyper-V virtual machine deployments Resources from Dell and MicrosoftFive mistakes to avoid when deploying Hyper-V virtual machinesBy Eric Beehler, Contributor, Microsoft has made working with Hyper-V so easy that it no longer takes a specialized skill set to get a virtual machine (VM) up and running. The downside, however, is that there is plenty of room for mistakes. Even though the wizards and setup verbiage try to move you in the right direction for best practices, I still see plenty of people introducing risk into their virtual environments without even realizing it.Here are the five most common mistakes I see with Microsoft Hyper-V deployments and how you can avoid them.#1. Ignoring the management networkWhen you first add the Hyper-V virtualization role, you should dedicate a single network interface card (NIC) for management. Many people skip this because it wastes a network port. After all, without a dedicated management interface you are still able to manage the host, so why waste the port?Well, consider the security implications. The host, otherwise known as the parent partition, is hosting several virtual machines, all with their own workloads and data. When you have access to the host, you also have direct console access to those virtual machines and the virtual hard disks. Would you allow your DMZ and internal network to operate in the same subnet? Of course not -- there would be too many risks.Consider the host to be of a different security level than your virtual machines. The parent partition should only be manageable from a separate network interface on a network dedicated to administrative access. Without it, you open yourself up to security risks.#2. Using the wrong kind of diskWhen you setup a new virtual machine, you also setup a virtual hard disk. This dynamically expanding disk is a file on the hard drive of the host, which you have the option to make any size. This is a great option because it starts you off with a smaller file that grows only as you need it. Even if you specify a 250 GB hard disk, it will only use the space it needs. This means you will end up with a true VHD file size that is usually much smaller.With this convenience there is a trade-off, as the performance of a dynamically expanding disk takes a hit. It not only has to expand the file as you need it, it also requires additional maintenance if you add and remove large amounts of data using the compact function.It can also pose a problem if you do not keep track of your configuration and run out of disk space. With fixed disks, which reserve the space by creating a right-sized VHD file up front, your performance is roughly consistent with the hardware and you avoid the possibility of running out of disk space. If you already have dynamic disks you can use the Convert operation to transform them into physical disks.#3. Incorrect configurations of snapshotsOne of the best reasons for systems administrators to use Microsoft Hyper-V for virtualization is the snapshot feature. It's an easy way to revert and get yourself out of a jam, allowing you to avoid a career limiting move. Still, there are a few problems with using snapshots.First, a snapshot is not a backup It seems counter-intuitive because the magic of snapshots makes it seem like a perfect backup, but it doesn't give you file-level restores nor does it protect you against issues on the Hyper-V host. It's a system state backup, so certain applications like Microsoft Exchange Server will have problems with in-flight data or connections. Next, snapshots are stored by default in the same location as the VHD file, so the snapshot files can build up and choke the storage of a disk with limited available space. Your first inclination may be to delete those snapshot files if you don't need them using the Hyper-V Manager. This won't actually get rid of those snapshot files; it will merely mark them for a merge into your main VHD. The next time you shut down the virtual machine the merge will occur, so if you have many snapshots this can take a bit of time. Thus, therearen't any quick ways to relieve disk space issues with snapshots without a complete shutdown of a virtual machine, so be sure to plan your snapshots appropriately and make time for maintenance to avoid future issues.#4. Too many CPUsMulti-core processors are commonplace now, with a typical server having eight CPU cores as a starting point. Most people equate more cores to better performance, and Microsoft Hyper-V does allow you to assign up to four processors (or 32 processors in Hyper-V R2) to a virtual machine.Although flexible, there is a cost to using multiple processors on a single virtual machine. You shouldn't exceed a 2:1 ratio for virtual processors to physical cores. In the case of a quad-core server, this means you shouldn't allocate more than eight virtual processors for performance reasons. Additionally, you should not assign four processors to a virtual machine because a virtual processor doesn't map to a single physical core. Instead, that work is distributed to all of the physical cores. Therefore, you should have a good reason for taking your virtual machine to multiple cores, like a CPU-intensive server such as a database server. If you are working with something like a WSUS server that sits idle most of the time and doesn't stress the processor, you'd be wasting resources by assigning too many virtual CPUs.#5. Not taking advantage of virtual switchesVirtual switches are an extension of your network topology. Network administrators set up virtual LANs, or VLANs, and use 802.1Q trunking to make the network more efficient and easier to manage.When we plug into the switch port, we still consider the host as the endpoint of that network connection, but that's no longer the case. If you use VLANs and trunking in your network, you can extend that functionality to your virtual machine host. Have your network administrator give you the rundown of the switch configurations and how they are set up. Instead of configuring a dedicated NIC for each subnet, you may find that you can host a variety of virtual machines all bound for different networks while conserving network ports.This is especially helpful when you have limited NIC ports from space-saving designs such as blade servers.Microsoft Hyper-V has helped move virtualization under the wing of the Windows administrator without the need for extensive specialized training. Just because it's easy to setup doesn't mean there aren't more complex options to consider. The option to virtualize comes with so many positives that it's easy to forget about the drawbacks until they occur in a production emergency. To avoid this scenario, make the right decisions up front and you'll be well on your way to a fully functional Hyper-V environment.Key considerations for Hyper-V virtual machine deploymentsBy Eric Beehler, Contributor, Microsoft Hyper-V holds the promise of consolidation and better utilization, but how do you know if certain servers belong on a Hyper-V host? In many companies, Hyper-V starts in the lab, so it's hard to get a real-world understanding of how production systems will react when running on a shared host.There are plenty of opinions out there, largely from database administrators and developers concerned about available resources to their applications. There are also several stories involving substandard performance of virtualized applications, but that is usually because the process wasn't fully assessed.Previously, we looked at some of the most common mistakes involved with deploying virtual machines, but that mainly covered what you shouldn't do. So what about what you need to do? Here are some of the key considerations to keep in mind regarding Hyper-V virtual machine deployments.Processor needsIf you are coming from the physical world, the mantra is "more is better." When attempting to share resources across several machines, however, be sure to take a closer look at your needs. Servers that are reported to have intensive CPU requirements should be looked at with scrutiny. While you can expect a 2% to 12% performance sacrifice when migrating to a Hyper-V virtual machine, this is not normally a breaking point for many systems, especially if you are moving to better processors on a virtual host.The simple fact is that many physical systems are over-engineered. For instance, take the PerfMon readings from the physical server and determine how much utilization the server really sees. You'll have up to four processors to assign to the virtual machine, but you'll need to balance that with the overall utilization on the host.When judging the performance of the virtual machine, you'll want to use the performance counters to determine how the machine is performing for that application. To determine its impact on the host, load up PerfMon on the host machine and look at the following counters:Hyper-V Hypervisor Virtual Processor\% Guest Run Time and the Hyper-V Hypervisor Virtual Processor\% Hypervisor Run TimeThese counters show how much of the processor the guest is actually using and how much is going toward hypervisor management.When assigning processors to virtual machines, a 1:1 processor assignment of available physical core to virtual processors will provide the absolute best performance, but will usually leave processors sitting idle. A 2:1 virtual CPU to physical core ratio is more common for better utilization of resources, but can affect performance for those systems that require intensive CPU. If you cannot give a machine the right CPU resources or find them too expensive to dedicate to a single machine, this may be a reason to eliminate that machine from your virtual environment.Memory requirementsWhile some might consider virtual memory management both a blessing and a curse, remember that Hyper-V doesn't have the same decision points about memory compared to VMware and its ability to over-commit memory. When looking at it from a performance standpoint, the assigned memory is also the available memory. It is important to allow the host operating system at least 512 MB, but 2 GB is recommended since you need to add 32 MB per virtual machine for the first 1 GB of RAM assigned as overhead, and 8 MB for each additional 1 GB.The next step is to assign memory as you would a physical machine based on a simple calculation. If the physical server requires 8 GB of RAM, assign 8 GB to the virtual server. The option to assign additional memory will not be available until the release of Windows Server 2008 R2 Service Pack 1, which allows more memory management flexibility. Fornow, the decision to virtualize comes down to available memory in your virtual environment.Storage I/O considerationsWhen deploying your Hyper-V virtual machines, storage I/O may cause an objection to the engine because Hyper-V puts its hard drive inside of a file by default. While convenient for management, this can translate to a loss of performance control. Just remember that storage requirements for performance don't change just because you are on a virtual machine. When it comes to high-performance applications such as Online Transaction Processing (OLTP) databases, it is still important to give that machine the I/O bandwidth it deserves.Implementing the right I/O means presenting the right kind of storage to the application. In the SQL Server example, it is ideal to have a separate RAID1 set for the transaction log files and a separate RAID5 equivalent set for the data files. Using storage that is reserved for the Hyper-V server without considering the ramifications of its configuration is bound to cause problems, so plan storage for each virtual machine just as you would for each physical machine.For high-performance I/O, use a dedicated volume that holds a single fixed-size virtual hard disk (VHD) file. Otherwise, use a pass-through disk for direct access to the storage system. The performance differences between these two options are minor. By using a pass-through disk you will lose the ability to create snapshots or perform host-based backups, but the upside is that you are accessing existing volumes and using existing logical unit numbers (LUNs).A larger LUN can be presented to a Hyper-V host by using striped metaLUNs to push the load across multiple RAID groups on the storage area network (SAN). Avoid using dynamically expanding disks when performance is of the utmost concern. With these considerations addressed, there is little standing in the way of virtualizing a server, even when high-performing disk I/O is required.Other concerns with Hyper-V virtual machine deploymentsOn some servers, migrating to Hyper-V virtual machines will not be so easy, as specific hardware connections don't play well with Hyper-V. For example, accessing a SCSI interface for a directly connected tape library is generally not supported. Although it can be configured through some trickery with an iSCSI initiator, don't expect support from Microsoft or your backup software support line.Legacy machines -- those with Windows 2000 or earlier -- may also be cause for concern. If you are employing a legacy operating system during virtual machine deployment, use a legacy network adapter. Note this adapter can be quite expensive to your host depending on the other virtual machines sharing that host. Also consider leaving Integration Services disabled to avoid known stability problems with some Windows updates on older operating systems. If you are managing a larger number of virtual machines, however, this may be more trouble than it's worth. Instead of using Hyper-V to extend the life of legacy software, take the opportunity to move to software that will run on a supported operating system.This also applies to non-Microsoft operating systems. For instance, be aware of driver issues with video, network and clock sync, as well as other concerns that may arise when running a flavor of Linux that is not on the Microsoft supported list. Managing a basic Linux installation that isn't fully compatible may not be a big deal due to the command-line nature of many installations and the light-weight quality of some Linux software, but test the system thoroughly before committing to hosting a Linux virtual machine that does not support Integration Services.Some servers don't belong on a Hyper-V machine due to their function. For example, best practices dictate at least one Active Directory domain controller should be a physical server, as the potential for mistakes are all too real when you have the ability to take snapshots and move VHD files. There is also the possibility of hosting all of your DCs on a single host. It's not necessarily the performance that's the problem, but the ability to cause site-wide corruption of the Active Directory database through VHD mistakes or single points of failure.Also consider security requirements when performing Hyper-V virtual machine deployments. If you have an at-risk server, in the demilitarized zone (DMZ) for example, you'll want to avoid hosting that server on the same host as your database server. If you don't have a host to dedicate to servers that belong to a lower security level, leave them physically dedicated to avoid potential security issues from sharing the same host.The bottom lineAlthough many people take a contrarian look at virtualizing their servers because of fear of the unknown, it is important to understand the performance and visibility-based opportunities virtualization provides. By addressing systems uniquely and discussing server concerns with the proper respect and information, you can sell admins on the possibilities that don't exist with the systems they have today.Resources from Dell and MicrosoftLeveraging Windows 7, Dell Desktops for Virtualization, Cloud Infrastructures and BeyondPower Management in Microsoft Windows Server 2008 R2 and 11th-Generation Dell PowerEdge ServersPresentation Transcript: The Real Deal About Windows Server 2008 R2, Part 2 - Best New Features for SMBsAbout Dell and MicrosoftDell™ and Microsoft® work together to attain one primary goal - simplify IT.The ongoing partnership has led to a showcase of jointly developed products that are:•Easy to manage•Integrate seamlessly into existing environments•Deliver immediate business valueAccess to key Microsoft architecture enables Dell to develop and deliver solutions that are business-ready. Dell can be your single point of contact for everything you need - from software and hardware to infrastructure consulting and lifecycle systems support.。
前言本篇对hyper-v虚拟机迁移到vmware平台有一些参考,自己也琢磨一段时间,看文档能节省大家一些时间和精力,谢谢大家Hyper-v平台迁移Vmware平台1.迁移软件下载和注意事项 (1)2.迁移思路一(第三方迁移工具直接转化法) (2)2.1.一键安装转换工具 (2)2.2.本地选择hyper-v (2)2.3.冷迁移,hyper-v服务器上虚拟机必须关机迁移 (3)2.4.远端ESXi服务器,输入账号和密码 (4)2.5.远端ESXi服务器存储路径、网卡、迁移系统类型 (5)2.6.迁移完成状态 (5)2.7.登录ESXi平台,打开迁移后的虚拟机 (6)2.8.登录完成 (6)3.迁移思路二(第三方迁移工具系统盘转化法) (8)3.1.登陆hyper-v右键导出虚拟机 (8)3.2.选择本地文件迁移虚拟机 (9)3.3.找到导出虚拟机磁盘文件 (9)3.4.远端ESXi服务器,输入账号和密码 (10)3.5.必须新创建虚拟机参数 (11)3.6.一直选择默认参数即可 (14)3.7.迁移完成登陆ESXi平台查看 (16)4.迁移思路三(vmware官方迁移软件) (16)4.1.安装VMware-converter-en-6.2.0-8466193 (16)4.2.关机状态下,填写hyper-v服务器参数 (16)4.3.选择迁移的虚拟机 (17)4.4.选择磁盘文件类型 (17)4.5.默认点击下一步即可,也可以自定义迁移后参数 (18)4.6.迁移完成后状态 (18)1.迁移软件下载和注意事项备注一、VMware-converter-en-6.2.0-8466193和starwindconverter链接:https:///s/1W7ZpiUZFKXjElet9HRd6FQ提取码:dbxu二、admin$共享即\\10.100.12.6\admin$能正常(在安装迁移软件上能正常打开待迁移操作系统windows宿主机即可)2.迁移思路一(第三方迁移工具直接转化法)2.1. 一键安装转换工具2.2. 本地选择hyper-v备注:实验中是windows11安装hyper虚拟化软件2.3. 冷迁移,hyper-v服务器上虚拟机必须关机迁移2.4. 远端ESXi服务器,输入账号和密码2.5. 远端ESXi服务器存储路径、网卡、迁移系统类型2.6. 迁移完成状态2.7. 登录ESXi平台,打开迁移后的虚拟机2.8. 登录完成备注:从hyper-v迁移到VMware平台,可能鼠标无法操作,须在VMware添加USB控制器3.迁移思路二(第三方迁移工具系统盘转化法)3.1. 登陆hyper-v右键导出虚拟机3.2. 选择本地文件迁移虚拟机3.3. 找到导出虚拟机磁盘文件3.4. 远端ESXi服务器,输入账号和密码3.5. 必须新创建虚拟机参数备注:因hyper-v导出的是磁盘系统文件3.6. 一直选择默认参数即可3.7. 迁移完成登陆ESXi平台查看4.迁移思路三(vmware官方迁移软件)4.1. 安装VMware-converter-en-6.2.0-84661934.2. 关机状态下,填写hyper-v服务器参数4.3. 选择迁移的虚拟机4.4. 选择磁盘文件类型备注:thin就是一种按需分配的格式,创建时虚拟磁盘不会分配给所有需要的空间,而是根据需要自动扩展大小(实验推荐)thick格式,在创建时分配给所有空间,vmdk文件大小等于创建的虚拟磁盘大小,虚拟磁盘中的空闲空间被预占(生产推荐)4.5. 默认点击下一步即可,也可以自定义迁移后参数4.6. 迁移完成后状态。
结合星外的Hyper-V群集部署图文流程硬件规划:计算节点4台:DellR620,至少含双端口万兆网卡(内网)、双端口千兆网卡(公网)各一张。
(千兆网卡的传输会让你欲哭无泪。
),Cpu型号保持一致。
存储:DELLR720XD 资金有限的情况下建议使用Ssd硬盘和SATa通过windows2012R2分级存储的新功能来实现既保证高容量又有相当高的IOPS,万兆网卡一张Dc:兼容机即可(强烈建议要做好高可用或定期备份)主控服务器:推荐稳定性较高的服务器并对磁盘做好RAID。
万兆交换机一台Ip规划:计算节点: 公网Ip X.X.X.X、内网IP 10.10.10.X 、心跳卡IP 172.1.1.X存储:内网IP 10.10.10.XDC :内网ip 10.10.10.x主控:公网 ip X.X.X.X操作系统:此套环境下全部使用Windows2012R2的操作系统开始部署:首先部署Dc详细步骤不在此赘述可以百度一下,如下图将 4台计算节点 1台存储服务器全部加入到域中,值得注意的地方是要重新建立一个Ou将加入到域的计算机移动到新的Ou下这一步必须做否则会产生无法通过群集验证。
并且加入域后除心跳卡外,其他2张网卡的DNS首选项都要设置为Dc的Ip地址哦!然后对计算节点的每一台服务器都做信任委派如下图:这样Dc的工作就到此为止了解下来我们开始部署计算节点计算节点需要安装的角色功能组件为 IIs、Hyper-V、故障转移群集,部署IIs的时候需要把所有的功能组件全部勾选安装否则和星外主控对接会产生问题。
每一台计算节点都需要完成以上3个角色功能的安装。
需要注意的是在你部署的心跳网卡上需要按照以图片设置(每一台计算节点的心跳网卡都需要如下设置):接下来我们来配置存储,由于我这里的配置是多块Ssd组成的RAID5 和多块SAS组成的RAID5 在存储里我需要先将2个RAID组的资源先池化,由于我这里已经把存储池配完毕无法呈现如何使用分级存储,这里口述一下默认做好2个阵列的物理磁盘在存储池中介质为未知所以这也就会出现很多朋友在建立好存储池以后无法建立分解存储,这里需要用PowerShell命令来强制对2个阵列组里的物理磁盘定义介质类型,具体命令如下:分级存储建立完毕后我们可以发现2个阵列组里的磁盘资源已经整合到一起:接下来我们安装SMB3.0,添加文件和存储角色新建SMB共享,模式一定要用应用程序此模式针对虚拟化建立完毕后我们将网络路径映射到计算节点的上的磁盘驱动上,每一台节点都要映射上去,至此存储基本配置完毕。
XX客户
Zerto 4.0安装部署测试报告
2016.1
目录
1.Zerto虚拟复制技术 (3)
2.Zerto系统架构 (3)
3.测试准备工作 (5)
3.1.环境要求 (5)
3.2.测试影响评估 (6)
4.ZVR软件安装 (6)
4.1.安装 .Net framework 4.0 (6)
4.2.安装ZVR 4.0 (8)
5.ZVR部署 (13)
5.1.部署VRA (13)
5.2.站点配对 (16)
5.3.建立VPG保护组 (18)
6.容灾测试 (24)
6.1.灾难恢复测试 Failover Test (24)
6.2.故障切换-Failover (27)
7.测试结果 (30)
1.Z erto虚拟复制技术
Zerto是一家专注于虚拟化容灾/业务连续性的软件公司,其旗舰产品Zerto Virtual Replication (ZVR)是一个基于虚拟机复制的软件解决方案,通过帮助组织机构达到分钟级的恢复时间目标(RTO)和秒级的恢复点目标(RPO),而使企业的灾难恢复和业务连续性成为可能,同时只需要较低的成本费用。
有了Zerto,用户可以得到可靠的,接近实时的服务器复制,而花费仅仅是SAN阵列式复制成本的一小部分。
Zerto虚拟复制技术具有以下功能和特性:
基于Hypervisor的复制——无关存储的复制
跨Hypervisor的复制——实现微软Hyper-V到VMware的跨平台复制
企业级的复制技术——实现秒级的RPO及分钟级的RTO
连续数据保护——恢复到任意时间点的类 DVR 保护
保护应用程序——跨虚拟机的统一恢复点,保护跨多虚拟机的应用
离线备份——支持容灾数据的长期保留
完整业务连续性及灾难恢复业务流程——自动化的故障转移、故障恢复和非破坏性隔离测试
亚马逊网络服务复制——支持容灾到AWS公有云
2.Zerto系统架构
Zerto完整的软件构架图如下:
Zerto虚拟复制技术由以下2个关键组件组成:
Zerto Virtual Manager—— Zerto虚拟管理器(ZVM) –ZVM可直接以插件形式
嵌入到虚拟化管理控制台(例如VMware’s vCenter) ,并以可视化的形式嵌入整个虚拟化基础架构中。
ZVM相当于整个解决方案的中枢,管理整个vSphere域中的复制,并实时记录应用程序和数据的变化。
Virtual Replication Appliance——虚拟复制设备(VRA) –VRA是自动部署到物
理主机上的软件模块。
VRA对用户选定的虚拟机,进行持续数据复制,通过WAN网络,压缩并发送数据到远程站点。
因为VRA直接安装于虚拟化架构中,以独立的VM存在,VRA可高效处理IO流向。
当虚拟机有数据写入到虚拟磁盘时,写入命令被捕捉,克隆并发送到远程站点。
VRA的处理效率、精确性和响应快速,均优于其他方法。
Zerto基于Hypervisor层的复制,和源端以及目标的存储设备无关,原生支持所有的存储平台和架构,具有虚拟化平台的全面功能兼容性,包括HA, 集群等VMware vSphere先进功能。
3.测试准备工作
3.1.环境要求
本文档旨在为客户安装部署提供指导,并通过测试Zerto软件了解Zerto产品的基
本功能及特性。
针对广东XX客户股份有限公司的情况,本文档采用Hyper-V容灾到vSphere的
环境。
XX客户进行的测试环境如下:
生产端,运行MSHyper-V 2012R2及SCVMM 2012R2,包含4台Hyper-V主机,需要准备一台WindowsServerVM(推荐windowsserver 2012R2英文版)用于安装ZVM软件。
容灾端,运行VMwareVsphere 5.5及VCenter 5.5,包含有3台ESXi主机,同样需要准备一台WindowsServerVM(推荐windowsserver 2012R2英文版)用于安装ZVM软件。
容灾测试虚拟机:
NC-Sale-test
NC6-ERP-test
ZVMVM的推荐配置:
低于500台虚拟机:2 CPUs and 4GB RAM,30G磁盘空间
3.2.测试影响评估
Zerto容灾解决方案,不需在容灾的应用虚拟机上部署任何代理软件,不会对应用
虚拟机做任何修改。
不会影响生产系统的正常运行。
在初始化数据传输完成以后,正常情况下,Zerto仅复制写IO的数据到容灾站点,对生产的磁盘IO没有影响。
而且VRA仅占用极少的CPU及内存资源。
初始化数据传输包含大量的磁盘读IO操作,Zerto在设计时就已经考虑了这个问题,我们会根据磁盘系统性能情况自动调整初始化数据传输操作,确保生产系统的磁盘IO性能不受影响。
同时,在初始化数据传输时,也可能占用较大的网络带宽,我们也提供了预拷贝,压缩及带宽控制等手段减少我们对网络带宽的占用。
Hyper-V与Vmware环境的ZVM拥有统一的管理界面及功能。
4.ZVR软件安装
4.1.安装 .Net framework 4.0
重启系统
4.2.安装ZVR 4.0
如果是Hyper-V环境,请输入SCVMM的信息,如下图:
检测通过,下一步Hyper-v环境
VMware环境:
结束生产站点的安装。
重复以上步骤在容灾站点安装ZVR。
5.Z VR部署
5.1.部署VRA
使用浏览器登录ZVM Web管理界面,请使用最新版的浏览器,建议MozillaFirefox或GoogleChrome。
使用ZVM IP地址及9669端口登录ZVM管理界面。
Hyper-V环境:https://10.11.11.164:9669
VMware环境:https://10.11.11.165:9669
选择Hyper-Vhost/ESXi host,部署VRA:
VMware:
Hyper-V:
VRA将自动部署。
5.2.站点配对
在登录容灾站点时,可进行站点配对。
或者在ZVM管理界面,Site页面也可以。
5.3.建立VPG保护组
在ZVM管理界面选择:ACTIONS>CREATE VPG
指定VPG组名,选择优先级
选择需保护的虚拟机
选择RecoverySite,指定Host主机及DataStore
如有需要,可选择VMSETTINGS,针对每个VM进行设置:
预览STORAGE设置
如有需要,可选择Preseededvolume,指定预先拷贝到容灾站点的目录,减少站点间数据传输占用的带宽。
配置恢复选项
配置网卡选项:
配置backup选项,
完成VPG建立,数据传输开始初始化,Sync,直到两方数据一致,连续数据保护持续工作。
6.容灾测试
6.1.灾难恢复测试Failover Test
Zerto Failover Test灾难恢复测试是针对受保护的关键任务应用而设计的。
测试既可完全自动,也可人为设置,运行的频率则根据需要设定,每月、每周、甚至每天一次均可。
相关人员会接到测试状态通知,而其他活动,如运行验证数据快照或备份,则可在测试成功后予以安排。
容灾验证是容灾方案中的一个关键步骤,它使管理层加强了机构已真正对灾难作好了准备的信心。
FailoverTest的过程中不会影响原有的数据复制关系。
确认操作选项在TEST,选择FAILOVER。
选择Failover Test的VPG组。
FailoverTest时,可选择需要的Checkpoint恢复点进行测试。
校验测试VM成功恢复后,可选择TASKS任务选择StopTest完成测试任务。
6.2.故障切换-Failover
Zerto的Failover功能是在Replication平台的基础上构建的,该平台保留了完整的虚拟机的全面容灾功能。
综合CDP技术,当生产站点因为某种原因不可用时,如:虚拟化服务器故障,存储磁盘阵列故障,或虚拟机上的SQL数据库服务不可用等,故障切换Failover被触发,容灾站点上的虚拟机被激活保证服务的不间断,实现系统最高的业务连续性。
故障切换包括IP 切换(支持相同IP, VMware NIC DHCP动态分配IP和静态IP地址更改),所有这些对于用户来说都是透明的。
将操作选项切换到LIVE:
选择FailoverVPG组:
设置failover选项,可更加生产站点的情况在“EXECUTION PARA METERS”页选择恢复点,设置反向保护,保护VM关机策略,Commit策略(auto-commit、手动commit、rollback)、作为测试请选择默认选项:
在RecoverySite验证保护的VM已正常运行并提供服务。
7.测试结果
功能支持/不支持
无需停机的快速安装部署支持
与Hypervisor集成,按需保护虚拟机支持
在VMware vSphere和Microsoft Hyper-V之间,实现跨Hypervisor
支持
复制
自定义启动顺序,自动和手动IP/MAC设置,确保应用程序恢复后正常
支持
运行
任意时间点恢复支持
同时恢复多个VM和应用程序支持
可选时间点进行灾难恢复测试支持
Zerto Virtual Replication可以为虚拟化环境提供企业级的灾难恢复,无需停机的快速安装部署,简单点击操作即可实现整个灾难恢复流程的自动化。