2、前星DevOps平台(云端版)【使用说明书】
- 格式:pdf
- 大小:2.60 MB
- 文档页数:38


beyonddevops devops操作手册DevOps操作手册1. 简介DevOps是一种软件开发和运维方法论,旨在实现研发团队和运维团队之间的协作与合作,以实现更快、更稳定的软件交付。
本操作手册将为您介绍DevOps的基本概念、原则和最佳实践,帮助您更好地理解和应用DevOps。
2. DevOps的基本概念2.1 持续集成(CI)持续集成指的是将开发团队的代码频繁地合并到主干代码库中,并通过自动化构建、测试和部署来验证代码的质量。
2.2 持续交付(CD)持续交付是指将经过持续集成验证的代码自动化部署到测试环境和生产环境中,以便能够实现更快速、更频繁的软件交付。
2.3 基础设施即代码(IaC)基础设施即代码是将服务器、网络和其他基础设施的配置作为代码进行管理,以实现基础设施的可伸缩性、可重复性和自动化。
2.4 全栈开发(Full Stack)全栈开发指的是开发团队具备处理整个软件开发生命周期的能力,包括前端开发、后端开发和基础设施管理等。
3. DevOps的原则3.1 自动化通过自动化工具和流程来替代传统的手动操作,以提高效率、降低错误率。
3.2 持续改进不断反思和改进工作流程和方法,以寻求更好的解决方案和更高的效率。
3.3 跨团队协作消除开发团队和运维团队之间的壁垒,促使各个团队之间更好地合作和沟通。
3.4 测试驱动开发在编码之前编写测试用例,并通过测试用例来驱动开发工作,以确保代码的质量和稳定性。
3.5 实时监控利用监控工具对系统性能和运行状态进行实时监控,及时发现和解决问题,确保系统的稳定性和可靠性。
4. DevOps的最佳实践4.1 使用版本控制使用版本控制工具(如Git)管理代码的版本,确保团队成员能够共享和协作开发。
4.2 自动化构建和部署使用自动化构建工具(如Jenkins)和自动化部署工具(如Ansible、Docker)加快软件的交付速度和质量。
4.3 持续集成和持续交付将持续集成和持续交付的概念贯穿整个开发和运维流程,保证代码的质量和稳定性。

平台使用手册2020年7月目录1.文档概述 (1)1.1.编写目的 (1)1.2.浏览器推荐 (1)2.操作说明 (1)2.1.平台注册 (2)2.2.平台登录 (3)2.3.选课——课程中心 (4)2.4.选班——网络班级 (8)2.5.个人中心——学习 (11)2.5.1.我的课程 (11)2.5.2.我的网络班级 (13)2.5.3.课程在线学习 (15)2.5.4.我的证书 (26)2.5.5.调查问卷 (27)2.6.个人中心——动态 (28)2.7.个人中心——消息 (29)2.7.1.通知公告 (29)2.8.个人设置 (30)2.8.1.个人基本信息修改 (30)2.8.2.更换头像 (31)2.8.3.密码修改 (32)1.文档概述1.1.编写目的本手册旨在为国家卫生健康委干部培训中心远程教育培训平台学员提供关于系统的使用说明和注意事项,以使各位学员可以更高效、安全的在平台中进行操作及查询等。
1.2.浏览器推荐为了能更好的访问平台,建议您使用谷歌浏览器、360浏览器极速模式、极速浏览器极速模板等谷歌内核浏览器。
2.操作说明学员在浏览器下输入地址:/cms/,即可打开网站门户页面。
通过该门户系统可以查看管理员发布的新闻公告、培训通知等内容。
同时还可以通过门户系统查看报名管理员推荐的课程资源以及培训班级资源等。
除此之外,还可以在该门户页面中登录到学员工作室,进行在线课程学习,交流互动,如果没有相应账号可以通过点击“注册”按钮,在线立即完成账号注册,账号注册无须管理员审核。
2.1.平台注册点击门户页面的上方的注册按钮,进入到以下注册页面。
根据页面提示输入相应内容,点击注册。
注册成功后,无须管理员审核直接生效。
点击登录,输入用户名密码进行登录操作即可。
2.2.平台登录在用户登录区内输入用户名、密码、验证码,点击登录按钮,即可完成登录操作,登录后显示该学员报名的课程、班级数据,点击“进入个人中心”可跳转到个人工作室。
![ICP DAS IoTstar 物联网云端管理软件使用者手册 [Version 1.2.0]说明书](https://img.taocdn.com/s1/m/53aaee53e97101f69e3143323968011ca200f715.png)
ICP DAS IoTstar物聯網雲端管理軟體使用者手冊[Version 1.2.0]免責聲明Warning泓格科技股份有限公司對於因為應用本產品所造成的損害並不負任何法律上的責任。
本公司保留有任何時間未經通知即可變更與修改本文件內容之權利。
本文所含資訊如有變更,恕不予另行通知。
本公司盡可能地提供正確與可靠的資訊,但不保證此資訊的使用或其他團體在違反專利或權利下使用。
此處包涵的技術或編輯錯誤、遺漏,概不負其法律責任。
版權Copyright© 2019泓格科技股份有限公司保留所有權利。
商標識別Trademark本文件提到的所有公司商標、商標名稱及產品名稱分別屬於該商標或名稱的擁有者所有。
授權宣告License使用者僅被授權可以在單一電腦上與有限條件下使用、備份軟體與相關資料,不得同時於該單一電腦外使用本軟體。
本公司仍保有此軟體與相關資料的著作權及其他智慧財產權。
除非事先經過本公司的書面授權,否則禁止重製、傳送及散佈等方式取得部份或全部軟體或相關的複製品。
目錄1系統簡介 (1)2安裝程序 (9)2.1.IIS網頁伺服器的設置與啟用 (9)2.1.1Windows 10 (9)2.1.2Windows Server 2012 (11)2.2.安裝Web Platform Installer並安裝相關軟體 (18)2.2.1錯誤排除 (19)2.3.PHP Manager 設定 (23)2.3.1錯誤排除 (27)2.4.MS SQL Server設定 (28)2.5.IoTstar下載 (36)2.6.安裝IoTstar 與初始化設定 (37)2.7.IoTstar設置 (39)2.8.完成在IIS中站台新增 (43)2.9.防火牆(Firewall)設定調整 (44)2.10.帳號管理 (46)2.11.系統執行效能查詢 (49)2.12.WISE/PMC/PMD控制器與IoTstar的網路連線與資料上傳設定 (49)3IoTstar(正式版)軟體使用授權(License)設定 (51)4IoTstar方案升級 (55)5IoTstar系統登入 (56)6IoTstar系統網頁介面 (60)6.1.系統功能區 (60)6.2.資料瀏覽/設定區 (61)7遠端裝置維護 (62)8即時資訊顯示 (65)8.1.I/O通道資訊 (65)8.2.電力資訊 (67)9歷史資訊分析 (69)9.1.I/O通道資訊 (69)9.2.電力資訊 (70)9.2.1單一電錶迴路電力資訊分析 (71)9.2.2電錶迴路群組電力資訊分析 (72)9.3.電力報表 (73)9.3.1單一電錶迴路歷史電力報表 (74)9.3.2電錶迴路群組歷史電力報表 (74)10分群設定 (76)10.1.I/O通道 (76)10.2.電錶迴路分群設定 (79)11系統資訊與設定 (82)11.1.帳號設定 (82)11.2.資料庫&事件設定 (84)11.3.事件列表 (87)11.4.資料庫表格對照表 (88)附錄一:啟動WISE與IoTstar的網路連線功能 (91)附錄二:啟動WISE與IoTstar的資料上傳功能 (94)附錄三:啟動PMC/PMD與IoTstar的網路連線功能 (98)附錄四:啟動PMC/PMD與IoTstar的資料上傳功能 (101)附錄五:歷史資料的資料庫儲存格式 (105)附錄六:即時資料的資料庫儲存格式 (110)附錄七:控制器即時連線狀態的資料庫儲存格式 (114)圖片目錄圖1-1:IoTstar系統架構圖 (2)圖2-1:IoTstar試用版軟體下載(1) (36)圖2-2:IoTstar試用版軟體下載(2) (37)圖2-3:使用者帳號建立 (47)圖2-4:使用者帳號設定變更 (48)圖2-5:刪除使用者帳號 (48)圖3-1:IoTstar正式版軟體註冊(1) (51)圖3-2:IoTstar正式版軟體註冊(2) (52)圖5-1:系統登入頁面 (56)圖6-1:IoTstar系統首頁 (60)圖6-2:資料瀏覽/設定區 (61)圖7-1:遠端裝置維護頁面 (62)圖8-1:即時資訊顯示-I/O通道列表頁面 (65)圖8-2:即時資訊顯示-I/O通道即時資料趨勢圖顯示 (66)圖8-3:即時資訊顯示-內部暫存器、DO通道或AO通道的數值設定 (66)圖8-4:即時資訊顯示-電錶迴路列表頁面 (67)圖8-5:即時資訊顯示-電錶迴路即時資料趨勢圖顯示 (68)圖9-1:歷史資訊分析-I/O通道列表頁面 (69)圖9-2:歷史資訊分析-I/O通道歷史資料趨勢圖顯示 (70)圖9-3:歷史資訊分析-電錶迴路列表頁面 (71)圖9-4:歷史資訊分析-單一電錶迴路用電量分析 (72)圖9-5:歷史資訊分析-單一電錶迴路電力資料分析 (72)圖9-6:歷史資訊分析-電錶迴路群組總用電量分析 (73)圖9-7:歷史資訊分析-電錶迴路列表頁面 (73)圖9-8:歷史資訊分析-單一電錶迴路歷史電力報表(單相電錶) (74)圖9-9:歷史資訊分析-單一電錶迴路歷史電力報表(三相電錶) (74)圖9-10:歷史資訊分析-電錶迴路群組歷史電力報表 (75)圖10-1:I/O通道分群設定頁面 (76)圖10-2:新增I/O通道群組 (77)圖10-3:新增I/O通道 (77)圖10-4:I/O通道群組的I/O通道列表 (78)圖10-5:移除I/O通道群組的I/O通道 (78)圖10-6:電錶迴路分群設定頁面 (79)圖10-7:新增電錶迴路群組 (79)圖10-8:新增電錶迴路 (80)圖10-9:電錶迴路群組的迴路列表 (81)圖10-10:移除電錶迴路群組的迴路 (81)圖11-1:帳號設定頁面 (82)圖11-2:密碼修改設定 (83)圖11-3:資訊修改設定 (83)圖11-4:資料庫&事件設定頁面 (85)圖11-5:事件列表頁面 (87)圖11-6:資料庫表格對照表頁面 (88)1 系統簡介IoTstar 是由泓格科技所創新研發的物聯網雲端管理軟體,IoTstar 可安裝於PC 平台幫助使用者建立專屬的私有雲系統,亦可安裝於公有雲系統的VM (Virtual Machine) 平台( 如:Microsoft Azure、IBM Bluemix、Amazon AWS、中華電信hicloud 等),IoTstar 除可對泓格科技WISE/PMC/PMD 物聯網控制器提供遠端監控管理、設定調整及韌體更新等維運管理服務外,更可收集WISE/PMC/PMD 所連接I/O 模組、感測器與數位電錶的數據資料並進行雲端化資訊庫儲存,以提供監控系統雲端化的狀態監控、資訊查詢檢視及資訊加值應用等服務。

DMS Cloud使用手冊著作權i著作權著作權所有©2022 BenQ Corporation。
所有權利均予保留。
未經過 BenQCorporation 書面同意之前,不得將本出版品的任何部份以電子、機械、電磁、光學、化學、人工或其它任何方式重製、傳送、改寫、儲存於檢索系統,或翻譯成任何語言或電腦語言。
本手冊中所有其它的標誌、產品或公司名稱可能為個別公司的註冊商標或商標,並且均做為參考資訊之用。
免責聲明對於本文之任何明示或暗示內容,BenQ Corporation 不做任何保證,亦拒絕對任何特殊目的之商用性或適用性目的予以保證。
此外,BenQ Corporation 保留修改或變更本文之權利,並且修改或變更內容將不另行通知。
本手冊旨在為客戶提供最新且最正確的資訊,因此所有內容可能隨時修改,恕不另行通知。
如需本手冊最新版本,請造訪http://www. 。
本指南中顯示的插圖和畫面僅供參考。
實際內容和可用功能可能會因連線的裝置和您所在地區提供的產品而異。
目錄著作權 (i)介紹 (1)系統需求 (1)初始設定 (2)配置設定(僅適用於投影機) (2)使用 DMS Cloud (3)登入 DMS Cloud (3)DMS Cloud 主頁 (3)切換公司 (5)新增裝置 (6)上傳裝置資訊 (6)在 DMS Cloud 中新增裝置 (6)透過 BenQ DMS Tool 應用程式新增裝置 (8)管理裝置 (9)建立群組 (9)重新命名裝置 (10)刪除裝置 (11)裝置樹狀結構圖示 (11)狀態圖示 (12)監控裝置 (12)裝置面板 (12)資訊標籤 (14)控制裝置 (16)控制標籤(單一 BenQ 顯示器) (17)控制標籤(單一 BenQ 投影機) (18)控制標籤(單一非 BenQ 投影機) (18)控制標籤(多個裝置) (19)快速設定 (19)直接指令輸入(僅適用於顯示器) (20)排定裝置自動開啟/關閉電源 (24)編輯排程的電源開啟/關閉 (25)重設(刪除)排程的電源開啟/關閉 (25)應用程式清單標籤 (26)檢視安裝的應用程式 (26)安裝應用程式 (27)解除安裝應用程式 (29)更新應用程式 (30)更新裝置上的 Android 作業系統 (31)變更 DMS Cloud 密碼 (35)其它功能 (36)檢視 DMS Cloud 活動記錄 (36)檢視裝置的使用資料 (36)軟體管理 (38)對 DMS 雲端資料庫新增或更新應用程式 (39)從 DMS 雲端資料庫刪除應用程式 (40)從應用程式清單將應用程式安裝到裝置上 (41)編輯應用程式說明 (42)存取舊版應用程式 (42)關於 DMS Cloud (43)疑難排解 (44)網路白名單 (45)3/24/22介紹1介紹DMS Cloud 是電腦版雲端型工具,這可以由 IT 管理員/技術人員透過雲端對多個數位投影機和/或顯示器進行遠端集中管理。

SentinelOne Endpoint SecuritySingularity TM Platform Product BundlesGlobal SaaS implementation. Highly available. Choice of locality (US, EU, APAC).Flexible administrative authentication and authorization: SSO, MFA, RBAC Administration customizable to match your organizational structure 365 days threat incident historyIntegrated SentinelOne ThreatIntelligence and MITRE ATT&CKThreat IndicatorsData-driven dashboard securityanalyticsConfigurable notifications by emailand syslogSingularity Marketplace ecosystem ofbite-sized, 1-click appsSingle API with 340+ functionsCore is the bedrock of all SentinelOne endpoint security offerings. It is our entry-level endpoint security product for organizations that want to replace legacy AV or NGAV with an EPP that is more effective and easy to manage. Core also offers basic EDR functions demonstrating the true merging of EPP+EDR capabilities. Threat Intelligence is part of our standard offering and integrated through our AI functions and SentinelOne Cloud. Singularity Core features include:• Built-in Static AI and Behavioral AI analysis prevent anddetect a wide range of attacks in real time before they causedamage. Core protects against known and unknown malware,Trojans, hacking tools, ransomware, memory exploits, scriptmisuse, bad macros, and more.• Sentinels are autonomous which means they apply prevention and detection technology with or without cloud connectivity and will trigger protective responses in real time.• Recovery is fast and gets users back and working in minuteswithout re-imaging and without writing scripts. Any unautho-rized changes that occur during an attack can be reversed with 1-Click Remediation and 1-Click Rollback for Windows.• Secure SaaS management access. Choose from US, EU, APAC localities. Data-driven dashboards, policy management by site and group, incident analysis with MITRE ATT&CK integration,and more.Control is made for organizations seeking the best-of-breed security found in Singularity Core with the addition of “security suite” features for endpoint management. Control includes all Core features plus:• Firewall Control for control of network connectivity to and from devices including location awareness• Device Control for control of USB devices and Bluetooth/BLEperipherals• Rogue visibility to uncover devices on the network that needSentinel agent protection• Vulnerability Management, in addition to ApplicationInventory, for insight into 3rd party apps that have knownvulnerabilities mapped to the MITRE CVE databaseSingularity Platform Features & Offerings All SentinelOne customers have access to these SaaS management console features:Complete is made for enterprises that need modern endpoint protec-tion and control plus advanced EDR features that we call ActiveEDR®. Complete also has patented Storyline™ tech that automatically contex-tualizes all OS process relationships [even across reboots] every second of every day and stores them for your future investigations. Storyline™ saves analysts from tedious event correlation tasks and gets them to the root cause fast. Singularity Complete is designed to lighten the load on security administrators, SOC analysts, threat hunters, and incident responders by automatically correlating telemetry and mapping it into the MITRE ATT&CK® framework. The most discerning global enterpris-es run Singularity Complete for their unyielding cybersecurity demands. Complete includes all Core and Control features plus:• Patented Storyline™ for fast RCA and easy pivots• Integrated ActiveEDR® visibility to both benignand malicious data•D ata retention options to suit every need,from 14 to 365+ days• Hunt by MITRE ATT&CK ® Technique• Mark benign Storylines as threats for enforcement bythe EPP functions•C ustom detections and automated hunting rules withStoryline Active Response (STAR™)•T imelines, remote shell, file fetch, sandbox integrations,and moreVigilance MDR Services SubscriptionSentinelOne Vigilance Managed Detection & Response (MDR) is a ser-vice subscription designed to augment customer security organizations. Vigilance MDR adds value by ensuring that every threat is reviewed, acted upon, documented, and escalated as needed. In most cases we interpret and resolve threats in about 20 minutes and only contact you for urgent matters. Vigilance MDR empowers customers to focus only on the incidents that matter making it the perfect endpoint add-on solution for overstretched IT/SOC Teams.More info:/global-services/services-overview/SentinelOne Readiness Services SubscriptionSentinelOne Readiness is an advisory subscription service designed to guide your Team before, during, and after product installation with a structured methodology that gets you up and running fast and keeps your installation healthy over time. Readiness customers are guided through deployment best practices, provided periodic agent upgrade assistance, and receive quarterly ONEscore TM health check-ups to en-sure your SentinelOne estate is optimized.More info:/global-services/readiness/Impressive capabilities. Easy to deployand use EDR.Director of Cybersecurity - Heathcare1B - 3B USD“Single platform the SOC can rely on.Security & Risk Management - Finance50M - 250M USD“Increased efficiency. We’ve absolutelyseen an ROI.Global InfoSec Director - Manufacturing10B - 25B USD“Global Support & Service OfferingsSentinelOne Readiness Deployment & Ongoing Health SubscriptionAvailableGLOBAL DA T A CENTERS US, Frankfurt, T okyo, A WS GovCloud Highly AvailableSENTINELONE LOCA TIONS Mountain View, CA (HQ) T el Aviv , Boston, Amsterdam, T okyo, Oregon USInnovative. Trusted. Recognized.Record Breaking ATT&CK Evaluation • No missed detections. 100% visibility • Most Analytic Detections 2 years running • Zero Delays. Zero Config ChangesA Leader in the 2021 Magic Quadrant for Endpoint Protection Platforms Highest Ranked in all Critical Capabilities Report Use Cases4.998% of Gartner Peer Insights TM Voice of the Customer Reviewers recommend SentinelOneAbout SentinelOne。
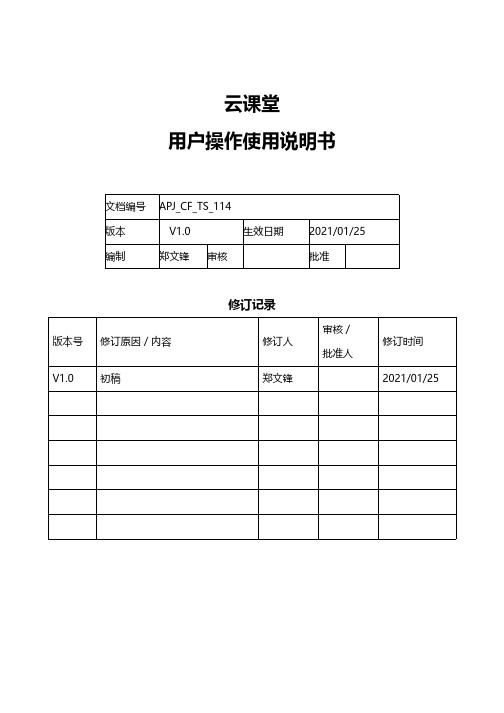
云课堂用户操作使用说明书文档编号APJ_CF_TS_114版本V1.0生效日期2021/01/25编制郑文锋审核批准修订记录版本号修订原因/内容修订人审核/批准人修订时间V1.0初稿郑文锋2021/01/25目录一、引言 (5)1.系统概述 (5)2.定义 (5)3.总体流程 (6)二、功能模块 (7)1.管理端 (7)2.移动学习端 (8)三、功能使用说明 (9)1.管理端 (9)1.1.功能列表 (9)1.2.首页装修(1-1) (10)1.3.课程分类(1-2) (13)1.4.店铺设置(1-3) (15)1.5.素材管理(2-1) (15)1.6.图文课程(2-2) (17)1.7.视频课程(2-3) (18)1.8.音频课程(2-4) (20)1.9.电子书(2-5) (22)1.10.品牌课程(2-6) (24)1.11.专栏课程(2-7) (26)1.12.直播课程管理(3-1) (29)1.13.在线直播上课(3-2) (30)1.14.培训计划(4-1) (31)1.15.组织活动(4-2) (35)1.16.训练营(4-3) (37)1.17.本月课表(5-1) (37)1.18.试卷管理(5-2) (38)1.19.题库管理(5-3) (40)1.20.问卷管理(5-4) (41)1.21.证书管理(5-5) (42)1.22.作业管理(5-6) (42)1.23.课程分析(6-1) (43)1.24.学习分析(6-2) (43)1.25.学员分析(6-3) (43)1.26.学员管理(7-1) (43)1.27.角色管理(7-2) (43)1.28.账户管理(7-3) (43)1.29.系统消息(7-4) (44)2.移动学习端 (44)2.1.功能列表 (44)2.2.专属首页(1-1~1-4) (46)2.3.在学(2-1~2-5) (47)2.4.交流(3-1~3-3) (48)2.5.发起交流(3-4) (49)2.6.图文课程(4-1) (49)2.7.视频课程(4-2) (52)2.8.音频课程(4-3) (55)2.9.电子书(4-4) (56)2.10.品牌课程(4-5) (58)2.11.专栏课程(4-6) (59)2.12.直播课程(4-7) (63)2.13.计划课程(5-1) (65)2.14.报名参与(6-1) (66)2.15.签到(6-2) (67)2.16.参加考试(7-1) (68)2.17.填写问卷(7-2) (76)2.18.提交作业(7-3)...............................................................................错误!未定义书签。

CDP使用指南2021年05月12日目录1.文档说明 (8)2.CDP平台介绍 (8)2.1.CDP平台简介 (9)2.2.C LOUDERA M ANAGER概览 (10)2.3.C LOUDERA R UNTIME (11)2.4.工具 (11)2.5.设置对基于阿里云部署的CDP的访问权限 (12)2.5.1.配置SOCKS代理 (12)2.5.2.启动SOCKS代理 (12)2.5.3.配置Google Chrome浏览器以使用代理 (13)2.5.4.网络安全组 (14)3.CLOUDERA MANAGER (15)3.1.术语 (15)3.1.1.部署 (16)3.1.2.动态资源池 (16)3.1.3.集群 (16)3.1.4.主机 (16)3.1.5.机架 (16)3.1.6.服务 (16)3.1.7.服务实例 (17)3.1.8.角色 (17)3.1.9.角色实例 (17)3.1.10.角色组 (17)3.1.11.主机模板 (17)3.1.12.网关(Gateway) (17)3.1.13.Parcel (18)3.1.14.静态服务池 (18)3.2.C LOUDERA M ANAGER架构 (18)3.2.1.心跳 (19)3.3.状态管理 (19)3.4.C LOUDERA M ANAGER 管理控制台 (20)3.4.1.Cloudera Manager管理控制台主页 (24)3.4.2.自动登出 (28)3.5.进程管理 (30)3.6.主机管理 (30)3.7.C LOUDERA M ANAGER A GENT (31)3.7.1.cm_processes (31)3.8.资源管理 (32)3.9.用户管理 (33)3.10.安全管理 (33)3.11.使用C LOUDERA M ANAGER监控集群 (33)3.12.C LOUDERA M ANAGEMENT S ERVICE (35)3.12.1.健康测试 (35)3.12.2.指标收集和显示 (36)3.12.3.事件、警报和触发器 (36)3.13.集群配置概述 (37)3.14.服务器和客户端配置 (38)3.15.C LOUDERA M ANAGER API (39)3.16.虚拟专用集群和C LOUDERA SDX (39)3.16.1.分离计算和数据资源的优势 (40)3.16.2.架构 (40)3.16.3.权衡性能 (42)3.16.4.虚拟专用集群的兼容性注意事项 (42)3.16.5.虚拟专用集群的网络注意事项 (47)4.CDP核心组件 (53)4.1.C LOUDERA R UNTIME组件版本 (53)4.2.分布式文件系统HDFS (57)4.3.实时数据库HB ASE (58)4.4.列式存储引擎K UDU (60)4.5.统一资源管理和调度框架 (61)4.6.分布式计算框架–T EZ (66)4.7.数据仓库组件–H IVE (68)4.8.SQL分析引擎I MPALA (69)4.9.HB ASE SQL查询引擎P HOENIX (71)4.10.C LOUDERA整合全文检索引擎 (73)4.11.分布式内存计算框架–S PARK (76)4.12.数据库接入工具S QOOP (78)4.13.C LOUDERA一站式安全管理 (83)4.14.分布式消息队列K AFKA (93)4.15.A PACHE A TLAS (95)5.CLOUDERA安全概述 (98)5.1.概述 (98)5.1.1.安全要求 (99)5.1.2.安全等级 (99)5.1.3.Hadoop安全架构 (100)5.2.认证概述 (101)5.2.1.Kerberos概述 (102)5.2.2.Kerberos部署模型 (103)5.2.3.使用TLS/SSL进行安全的Keytab分发 (109)5.2.4.使用向导或手动过程来配置Kerberos身份验证 (110)5.2.5.集群组件使用的身份验证机制 (110)5.3.加密概述 (111)5.3.1.保护静态数据 (111)5.3.2.保护传输中的数据 (114)5.3.3.Hadoop项目中的数据保护 (115)5.3.4.加密机制概述 (117)5.4.授权概述 (117)5.4.1.Hadoop中的授权机制 (118)5.4.2.与身份验证机制的身份验证机制集成 (119)5.4.3.Hadoop项目中的授权 (120)5.5.治理概述 (121)5.5.1.什么是Apache Atlas? (121)5.5.2.Apache Atlas使用元数据创建血统关系 (121)5.5.3.添加到实体元数据使搜索更加容易 (121)5.5.4.Apache Atlas体系结构 (122)6.CLOUDERA最佳实践 (123)6.1.I MPALA分区 (123)6.1.1.文件计数和文件大小 (123)6.1.2.分区注意事项 (124)6.1.3.指南总结 (126)6.2.I MPALA性能 (126)6.2.1.Kudu RPC (126)6.2.2.设立专门的协调员 (127)6.2.3.按需元数据和元数据管理 (130)6.3.加速S PARK ML应用 (153)6.3.1.Spark ML的原生数学库 (153)6.3.2.启用libgfortran库 (154)6.3.3.启用英特尔MKL库 (156)6.3.4.性能比较 (157)7.故障排查 (159)7.1.安全故障排查 (159)7.1.1.错误信息和各种故障 (159)7.1.2.身份验证和Kerberos问题 (167)7.1.3.HDFS加密问题 (179)7.1.4.Key Trustee KMS加密问题 (181)7.1.5.对Cloudera Manager中的TLS/SSL问题进行故障排除 (182)7.2.YARN、MR V1和L INUX OS安全性 (185)7.2.1.MRv1和YARN:jsvc程序 (185)7.2.2.仅限MRv1:Linux TaskController (186)7.2.3.仅限YARN:Linux容器执行器 (186)7.3.对I MPALA进行故障排除 (187)7.3.1.使用Breakpad Minidumps进行崩溃报告 (188)7.4.对A PACHE Y ARN进行故障排查 (190)7.4.1.在YARN上对Docker进行故障排除 (190)7.4.2.对Linux Container Executor进行故障排除 (200)7.5.对HB ASE进行故障排除 (202)7.5.1.使用HBCK2工具修复HBase集群 (203)7.5.2.Thrift Server在收到无效数据后崩溃 (203)7.5.3.HBase正在使用比预期更多的磁盘空间 (204)7.5.4.对RegionServer分组进行故障排除 (205)7.6.对APACHE KUDU进行故障排除 (206)7.6.1.启动或重启主服务器或者Tablet服务器时出现问题 (206)7.6.2.磁盘空间使用问题 (207)7.6.3.性能问题 (208)7.6.4.可用性问题 (214)7.6.5.象征堆栈跟踪 (216)7.6.6.在多主服务器部署中从死掉的Kudu主服务器中恢复 (218)7.7.对C LOUDERA S EARCH进行故障排除 (218)7.7.1.故障排除 (218)7.7.2.动态Solr分析 (219)7.7.3.其他故障排除信息 (220)7.7.4.找出Cloudera Search部署中的问题 (220)7.7.5.Cloudera Search配置和日志文件 (223)7.8.对H UE进行故障排查 (226)7.8.1.Hue负载平衡器无法在各个Hue服务器之间平均分配用户 (226)7.8.2.无法使用SAML对Hue中的用户进行身份验证 (227)7.8.3.清理旧数据以提高性能 (227)7.8.4.无法使用提供的凭据连接到数据库 (229)7.8.5.在Hue UI上激活Hive查询编辑器 (230)7.8.6.查询执行在Hue中完成,但显示为在Cloudera Manager Impala查询页面上执行 (231)7.8.7.查找Hue超级用户列表 (232)7.8.8.通过Knox访问Hue时,用户名或密码不正确 (233)7.8.9.从Knox访问Hue UI时出现HTTP 403错误 (234)7.8.10.无法从Knox Gateway UI访问Hue (236)7.8.11.引荐检查失败,因为域与任何受信任的来源都不匹配 (239)7.8.12.无法查看Snappy压缩文件 (239)7.8.13.启用SAML时出现“未知属性名称”异常 (241)7.8.14.Impala查询因无效的查询句柄错误而失败 (242)7.8.15.PostgreSQL支持的服务失败或挂起 (243)7.8.16.验证Hue中的LDAP用户时出错 (244)7.8.17.从负载均衡器访问Hue时出现502代理错误 (245)7.8.18.提交Hive查询后,无效的方法名称:“ GetLog”错误 (246)7.8.19.在Hue中提交查询时出现“授权异常”错误 (246)7.8.20.无法更改Hue中的压缩表 (248)7.8.21.从Hue访问“搜索”应用程序(Solr)时出现连接失败错误 (249)7.8.22.从顺化下载查询结果需要时间 (250)7.8.23.启用TLS后,Hue Load Balancer无法启动 (250)7.8.24.无法终止以Kerberized集群运行的Hue作业浏览器中的Hive查询 (251)7.8.25.无法在受Knox保护的集群上的Hue中查看或创建Oozie工作流 (252)7.8.26.1040,“连接太多”异常 (253)8.参考资料 (254)1.文档说明本文档主要是基于阿里云部署的CDP的操作使用和介绍,关于CDP平台的操作和使用信息来源Cloudera官网,大家可以访问https:///cdp-private-cloud-bas e/latest/index.html来获取对应的信息。

VICP星河可视化智控平台(标准版)用户手册西安诺瓦星云科技股份有限公司目录1 概述 (1)平台简介 (1)平台获取 (1)设备要求 (1)平台安装 (1)平台授权 (1)2 设备连接 (2)3 配置设备信息 (3)配置拼接器设备信息 (3)配置媒体服务器信息 (6)添加音频控制器 (9)进入系统 (12)4 多媒体控制 (12)主界面介绍 (12)添加图层 (13)修改图层属性 (14)删除图层 (15)切换图层媒体 (15)播放节目 (16)播放控制 (16)切换媒体服务器 (16)5 大屏控制 (17)主界面介绍 (18)图层操作 (19)5.2.1 添加图层 (19)5.2.2 调整图层属性 (20)5.2.3 删除图层 (20)5.2.4 切换图层输入源 (20)5.2.5 图层反控 (21)场景操作 (23)5.3.1 加载场景 (23)5.3.2 场景轮巡 (24)屏幕控制 (25)切换视频拼接器 (26)6 环境控制 (26)7 IPC管理 (27)添加IPC摄像头 (28)控制IPC摄像头 (28)编辑IPC摄像头 (29)西安诺瓦星云科技股份有限公司8 音频控制 (29)调整音量 (30)配置音频矩阵 (30)9 信息发布 (31)10 FAQ (33)如何查询媒体服务器的IP信息? (33)如何获取媒体服务器的端口信息? (34)西安诺瓦星云科技股份有限公司1 概述平台简介VICP 星河可视化智控平台(标准版)是诺瓦针对工程固装展览展厅、会议室、会议中心、媒体中心、指挥控制中心和智慧城市数据中心等多媒体、音视频和环境控制综合应用场景下设计研发的一款可视化集中管控平台,可以对大屏拼接显示系统、多媒体播控系统、音频系统、外设环境系统统一管理和控制。
它不仅具备不同设备的集中管控,同时能够实现全面可视化操作,所见即所得,提升现场控制的准确性和针对性,还具备良好的界面设计和用户体验,使用简单、操作流畅,其人性化的交互设计及灵活的操控体验可为用户提供一个更加智能高效的操控环境。


techsure devops platform使用流程-回复TechSure DevOps平台使用流程TechSure DevOps平台是一种用于软件开发和交付的全面解决方案,旨在帮助开发团队和运维团队协同合作,实现持续交付和持续集成。
本文将详细介绍TechSure DevOps平台的使用流程,并以一步一步的方式回答相关问题。
第一步:安装和配置平台首先,你需要安装和配置TechSure DevOps平台。
这个过程可能因为不同的操作系统和环境而有所差异,但大致步骤如下:1. 安装服务器:选择一个能够支持TechSure DevOps平台的服务器,并确保它具有足够的资源来运行平台。
你可以选择在云上部署服务器,也可以使用自己的硬件设备。
2. 配置环境:根据TechSure DevOps平台的要求,安装所需的操作系统和其他依赖项。
这可能包括Java运行时环境、数据库和其他必要的软件。
3. 配置网络:配置服务器和其他系统之间的网络连接,确保平台能够与其他服务和工具进行通信。
4. 配置安全性:根据需要,配置平台的安全性设置,如访问控制、身份验证和授权等。
第二步:创建项目和团队一旦平台正确安装和配置,你就可以开始创建项目和团队。
以下是这个步骤的详细说明:1. 创建项目:在平台上创建一个新项目,为之分配一个唯一的标识符。
你还可以添加项目的描述、版本号和其他详细信息。
2. 创建团队:为项目创建一个团队,并将开发人员、运维人员和其他相关成员加入团队。
这将帮助你确保项目的协同工作和资源共享。
3. 配置权限:根据开发和运维人员的角色和职责,配置项目的权限和访问控制。
你可以设置不同层次的访问权限,以确保谁可以进行开发、测试、部署和监控等操作。
第三步:版本控制和代码管理在TechSure DevOps平台中,版本控制和代码管理是重要的组成部分。
以下是这个步骤的详细说明:1. 选择版本控制系统:选择适合你项目的版本控制系统,如Git或Subversion等。

Scholastic Oracle Cloud Supplier Portal User GuideTable of ContentsIntroduction to the Supplier Portal (3)What is the Supplier Portal? (3)Navigating the Supplier portal (3)Logging in (3)Homepage Navigation (4)Notifications (5)Overview Menu (6)Summary Tab (6)Orders Tab (7)Schedules (8)Negotiations Tab (9)Request for Quote (RFQ) (10)Receiving an Invite for a Negotiation (10)Viewing the RFQ (10)Creating a Response (12)Award Decision (18)Purchase Orders (PO) (20)PO Notification (20)Review PO Details (21)Acknowledge a PO (22)Enter/Revise a Promised Ship Date for a Schedule (24)Manage Schedules (26)Order Life Cycle (27)Invoices (29)Create and Submit an Invoice (29)Miscellaneous Charges (33)Create Invoice without PO (34)View Invoices (36)View Payments (37)Supplier Preferences (39)Introduction to the Supplier PortalWhat is the Supplier Portal?The Scholastic Supplier Portal is a secure, web-based workspace that provides our vendors with full visibility to Scholastic transactions, including request for quotations (RFQ), purchase orders, and invoices.The Supplier Portal plays a key role in Scholastic’s Or acle ERP transformation, as this tool helps improve communication with our suppliers by automating and streamlining the source-to settleprocess.Navigating the Supplier portalLogging inOnce your password has been set, click on the “Oracle Fusion Prod” icon to reach the Supplier Portal home page.Once your password has been set, log in on the home pageHomepage NavigationOn the home page, click on the Supplier Portal icon to open the “Overview” page.NotificationsAt the top right corner of the home page, a bell icon will display your pending notifications. This includes new purchase orders pending acknowledgement as well as invitations to a negotiation.Note: Clicking on the notification brings you to the PO or Negotiation in questionOverview MenuThe overview page provides a snapshot into Scholastic’s most recent transact ions as well as anything requiring attention.Summary TabWorklist: A list of all pending notifications sent to the current supplier user. These are the same notifications found in the bell at the top of the page. Please note that most notifications willalso be sent via email.Watch list: Contains a set of saved searches which display counts of urgent or recenttransactions, possibly requiring action, such as Orders Pending Acknowledgment. Clicking awatch list entry navigates direct to the screen so that user can begin working on the transactions immediately.Contains the header detail of our purchase orders. The header contains the PO issued date andthe total $ amount ordered. The item level detail, quantity, and ship-to locations can be foundin “Schedules”.Orders with Recent Activity: A list of orders that have been Opened, Changed, or Canceledwithin the last week. This date can be manually changed to display more or less orders. Indicates an orderhas been cancelledA purchase order “Schedule” contains the quantity, ship-to location, and promised ship date.An order with a ship date in the past is highlighted with an alert. Schedules must be kept up todate. The promised ship dates that you provide are visible for everyone at Scholastic.At the bottom, “Recent Receipts” will list all purchase order schedules received within the lastweek.Indicates a promisedship date is past dueNegotiations TabRequest for Quotation (RFQ) transactions that the supplier is involved in or is invited to by Scholastic. It provides a quick summary to easily monitor the status and responses.Request for Quote (RFQ)Receiving an Invite for a NegotiationThe Scholastic Sourcing group has the ability to invite vendors to bid on projects through theSupplier Portal. If your organization is invited to a negotiation, you will receive an email as well as a notification in the Supplier Portal.The email invitation will include a PDF overview of the project. There is also a link that will take you directly to the RFQ in the Supplier Portal.Viewing the RFQYou can view the RFQ by clicking on the link the email notification. Another option is to go to the Supplier Portal and navigate to the Negotiations tab. Click on the negotiation number inquestion.This will bring up the RFQ cover page with the time remaining to respond displayed. On the left hand side of the RFQ, you will see links to the different components of the RFQ.Click on the Overview link. This will bring up the Overview page, which has key dates tied to the RFQ. On the right hand side, you will find attachments to the RFQ. The attachment will have the requirements for the RFQ along with instructions, quantities, and any other relevant information.Click on the Lines link. This will bring up the line items tied to the RFQ. In some cases, due to complex requirements, there will be one placeholder line visible with the advanced requirements included in an attachment.Creating a ResponseWhen you decide to bid on an RFQ, you must first acknowledge that you will participate. You can do this from the Negotiations dashboard by scrolling to the “Open Invitations” section. Highlight the negotiation, and click on the Acknowledge Participation button.This will bring up the Acknowledge Participation popup. You can select Yes or No, and enter a comment to the Scholastic buyer.At this point, if you refresh the Negotiations dashboard, you will see YES listed in the ‘Will Participate’ column. You can create your response by highlighting the Negotiation and clicking on the Create Response button.Another way to create a response is to open the RFQ and click on the Create Response button on the upper right hand sideThis will bring up the response page. Enter the quote expiration date, an internal quote number if you have one, and any notes to the buyer. You can also attach any correspondence by clicking on the + sign next to Attachments.You can attach more than one file by clicking on the + sign.Once you attach a file, it will show up on the main screen. You can remove the attachment by clicking on the X next to the file name. Hit Save and then Next.This will bring you to the “Lines” screen. Enter unit costs for the lines along with a Promised Ship Date.For most negotiations, the Scholastic buyer will give the supplier an option to create your own line by clicking on the + sign under Create Alternate. This is especially useful if you want to incorporate a unique idea or proposal.On the Alternate Line screen, you are required to enter a description, response price, and response quantity. You can enter a note to the buyer and also attach files to the alternate line.After hitting Save and Close, the alternate line will be added to the RFQ response.Hit Save and Next. This will bring you to the Review screen, where you can view the response as a whole. There are tabs for the Overview and Lines. When you are ready to submit the response to Scholastic, hit Submit.You will receive confirmation that the response was submitted.Award DecisionAfter the Scholastic buyer receives all bids, they will award either the whole job, or part of the job.If you are selected, you will receive an email notification as well as an Oracle notification confirming which lines of the negation were awarded to you. If you are not selected, it’s up to the Scholastic buyer if they want to inform the suppliers systematically that were not selected. You would receive a similar alert, but t he awarded lines amount will be “0”.Clicking on the notification will bring up the award decision. In the screenshot below, one line was awarded.Here is a screenshot of an award decision where nothing was awarded:Another way to view the outcome of the RFQ is to go to the Negotiations home screen. Scroll down to Completed Negotiations. The little green circle with a check mark indicates that the bid was awarded, while the note “No award” in the amount signifies that your bid was not accepted.Purchase Orders (PO)PO NotificationWhen a Scholastic purchase order is issued, you will receive an email notification with a PDFattachmentIf an acknowledgment is required, the email subject will include “Requires Acknowledgment”. A notification alert will also be displayed at the top of Supplier Portal to note an action is required.When a “R evised” PO is received, the email subject will include the “Revision #”Review PO DetailsOpen the attachment in the email to view a PDF of the purchase order. Additionally, on the “Orders” overview tab in the Supplier Portal, all recent PO’s will be listed under “Opened”. You will have the option of viewing a PDF, opening the order for acknowledgment, as well as updating the order with a confirmed promised ship date.Acknowledge a POSome Scholastic POs will require a supplier acknowledgment within the Portal. The PO will not be considered “open” until the Supplier completes the acknowledgment process. If a PO requires acknowl edgment, the email subject will note “Requires Acknowledgement”. You can acknowledge the PO from the link in the email or log into the supplier portal and click on the “Pending Acknowledgment” link in the Watch list.Note: A notification alert will pop-up as well as a task in the “Work list”. While both of these serve as links to the PO, it is suggested to acknowledge an order by using the link in the “Watch List”, as this method is most efficient.A “Manage Orders” screen will be displayed with all orders pending acknowledgement. Click on an order #.The PO header and details will be displayed. At the top right of the screen, select the “Acknowledge PO” button.You may need to acknowledge both the order (under “Terms”) and each Schedule line. You are given the option to “Accept” or “Reject”. Please only “Accept” the PO using this process. If there is something wrong with the order, please reach out to your Scholastic buyer via email or phone.In the top right hand corner, hit “Submit”Then hit “OK” and “Done” to close out of the order.The acknowledgment has been sent back to Scholastic and the order status is now “Open”.Enter/Revise a Promised Ship Date for a ScheduleOn every order, we send a “Requested Ship Date”. We expect that every supplier will respond with a “Promised Ship Date” confirming when you can ship. These dates are loaded into the Scholastic system for reporting purposes, so it’s i mportant that they are populated for every order and kept up to date.From the “Orders” or “Schedules” tab, select an order to edit:This brings you to the PO screen. The top part contains the PO header information with your supplier information. The “Lines” and Schedules” tabs at the bottom contain the PO detail.In the previous screenshot, the requested ship date is 4/26/18. However, the promised ship date is blank. In order to enter a new promised ship date or revise an existing promised ship date, click the “Actions” button on the top right of the screen and select “Edit”.A warning message pops up to confirm that any action will create a change order. Click “Yes”.In the “Schedules” tab, enter a new promised ship date and a change reason if applicable.Enter a description of the change order you made at the top o f the PO and then hit “Submit”.Note: Hitting “Save” will save your work, but will not send the updated date back to Scholastic. You must select “Submit”.After hitting “submit”, a popup message confirms that your changes have been sent to Scholastic. We will reach out to you with any questions.Manage SchedulesTo search and view all orders and schedules, select the task button while in the Overview screen in the supplier portalIt opens up a tab on the right side with a number of options. Under “Orders”, select “Manage Schedules”.The Manage Orders screen allows you to search all PO Schedules, open or closed. The default search is “All”, but you can search using a number of parameters, as well as setup custom searches. You can also easily tell which schedules don’t have a “Promised Ship Date” by sorting the field. In fact, all of the fields are sortable.Order Life CycleWhen you select a PO to view or edit, the “Order Life Cycle” graph can be found on the top right of the screen. It is a graphical view of the dollar amount ordered, received, delivered, and invoiced. Select “View Details” for additional information.The Order Life Cycle now displays a complete order summary including in-transit shipment information (pulled in from our OTM module), receipt dates, and invoice status.InvoicesCreate and Submit an InvoiceThe Scholastic Supplier Portal allows you to submit invoices directly to Scholastic. Processing your invoices through the supplier portal will increase the speed that your payment isprocessed. In the task list, select “Create Invoice”.In the “Create Invoice” section, s elect an order from the “Identifying PO” drop down list. This will populate most of the fields. Then enter y our internal “Invoice Number” and today’s date.In the “Items” section, hit the “Select and add” button to choose the PO lines you’d like to add to the invoice.Select the line(s) and hit “Apply”.Then hit “OK”. The item(s) has been added to the invoice.In the quantity field, enter the shipped quantity.Note: This version of Oracle Cloud does not allow overage to be invoiced. Theinvoiced quantity cannot exceed the order quantity. We are working with Oracle to correct this in a future release. For now, please work with the buyer to revise the PO when the shipped quantity exceeds the ordered amount, or add the overage amount as a miscellaneous cost under “Shipping and Handling” at the bottom of the invoice.In the Location of Final Discharge, enter the tax Province to capture the correct tax code.Once all the line items have been added to the Invoice, click on the Calculate Tax Button. Your taxes should now be calculated on the Invoice.Note: if you calculate tax after only one line item is picked, it will not work on anysubsequent line items.Miscellaneous ChargesHit the “Add” button under “Shipping and Handling” and select “Miscellaneous”. Enter an amount and descriptionNote: Freight is not a viable option as all of our shipments should route through the Scholastic Logistics group via the OTM system.Hit “Submit” to send the invoice to ScholasticA pop-up message will confirm that the invoice has been submittedCreate Invoice without POFor services completed where a Scholastic PO wasn’t issued, please submit an invoice using the “Create Invoice without PO”.On the invoice header, enter your invoice number, today’s date, and attach any pertinent documents. You must also enter the email address of the buyer at Scholastic who will receive and approve the invoice.Must be TODAYS DATEFor the invoice details, hit the + icon to add a line. Select a ship to and Location of Final Discharge, enter an amount and a description of the services provided.To add taxes, hit the “Calculate Tax” button.Note: Location of Final Discharge much be populated in order to calculate taxes on the invoice.Add miscellaneous charges at the bottom under “Shipping and Handling”.Hit “Submit” at the top of the screen and you’ll receive a confirmation message that your invoice has been submitted.To search for all submitted invoices, o n the Task Menu, select “View Invoices”Select your “Supplier” name, and hit search. You can use the fields to narrow your search as well as create custom searches. You can see the Invoice Status, as well as a Payment Number to confirm that a payment has been made against your invoice. Please note that all of these columns can be sorted.To search for invoice payment status, on the Task Menu, select “View Payments”Select your “Supplier” name, and hit search. You can use the fields to narrow your search as well as create custom searches. You can also see the payment status to confirm that a payment has been made. Select a “Payment Number” to see the complete detai ls of the payment.Complete payment detail will be displayedSupplier PreferencesOn the home page, select “Set Preferences”Select “Regional” in the General Preferences list to review the option to update your date and time format, preferred number format, primary currency, and time zone.Select “Save and Close” when finished.Select “Language” to change the primary language of the website. The default is “American English”。

标签操作指南产品文档【版权声明】©2013-2023 腾讯云版权所有本文档(含所有文字、数据、图片等内容)完整的著作权归腾讯云计算(北京)有限责任公司单独所有,未经腾讯云事先明确书面许可,任何主体不得以任何形式复制、修改、使用、抄袭、传播本文档全部或部分内容。
前述行为构成对腾讯云著作权的侵犯,腾讯云将依法采取措施追究法律责任。
【商标声明】及其它腾讯云服务相关的商标均为腾讯云计算(北京)有限责任公司及其关联公司所有。
本文档涉及的第三方主体的商标,依法由权利人所有。
未经腾讯云及有关权利人书面许可,任何主体不得以任何方式对前述商标进行使用、复制、修改、传播、抄录等行为,否则将构成对腾讯云及有关权利人商标权的侵犯,腾讯云将依法采取措施追究法律责任。
【服务声明】本文档意在向您介绍腾讯云全部或部分产品、服务的当时的相关概况,部分产品、服务的内容可能不时有所调整。
您所购买的腾讯云产品、服务的种类、服务标准等应由您与腾讯云之间的商业合同约定,除非双方另有约定,否则,腾讯云对本文档内容不做任何明示或默示的承诺或保证。
【联系我们】我们致力于为您提供个性化的售前购买咨询服务,及相应的技术售后服务,任何问题请联系 4009100100。
文档目录操作指南创建标签绑定资源解绑标签批量解绑标签删除标签查看绑定资源查询资源标签使用标签管理资源配额资源标签导出查询标签修改记录标签策略标签策略概述标签策略语法基本操作启用标签策略禁用标签策略创建标签策略绑定标签策略解绑标签策略修复任务有效策略操作指南创建标签最近更新时间:2023-08-04 17:49:41操作场景当您的腾讯云账号下拥有多种云产品资源,例如云服务器实例、云硬盘实例、对象存储桶等资源,您可以在标签规划阶段创建标签,然后在标签应用阶段绑定具体的云资源来实现分类管理。
操作步骤1. 登录 标签控制台。
2. 在左侧导航栏中,单击标签列表,进入标签列表页面。
3. 单击新建标签。

DIPLOMADO EN EDUCACIÓN FINANCIERA INICIAR SESIÓN:Para entrar a sesión haga clic en el banner ACCESO A PARTICIPANTES.Ingrese en el recuadro correspondiente el USUARIO(correo electrónico)y CONTRASEÑA generados en el proceso de inscripción.En caso de olvido o extravío de su USUARIO y CONTRASEÑA,podrárecuperarla en el apartado:¿Olvidaste tu contraseña?Para recuperar su CONTRASEÑA,ingrese el correo registrado y Grupo en el cual efectúo su inscripción.El sistema arrojaráuna pantalla con la información de su registro y datos de su Coordinador(a)de grupo en caso de requerir apoyo.DIPLOMADO EN EDUCACIÓN FINANCIERA INICIAR SESIÓN:Al contestar el ESTUDIO DIAGNÓSTICO se habilitaráel acceso al Módulo I.Para ingresar a los contenidos del Módulo I se deberárealizar el ESTUDIO DIAGNÓSTICO que tiene como objetivo conocer sus conocimientos previos en Educación Financiera.Una vez iniciado el Diplomado,la plataforma estarádisponible de lunes a domingo las 24horas al día,sólo deberáapegarse al calendario para apertura de módulos y evaluaciones correspondientes.Una vez en el MENU PRINCIPAL de su sesión,podrávisualizar en el apartado:AVANCES Y CALIFICACIONES el puntaje obtenido en cada una de sus actividades y las respectivas calificaciones obtenidas en los diferentes módulos.DIPLOMADO EN EDUCACIÓN FINANCIERA INGRESO A LOS MÓDULOS:Los módulos se irán habilitando conforme a las fechas establecidas en el calendario.MÓDULOS:El Diplomado en Educación Financiera se encuentra estructurado de lasiguiente manera:•MÓDULO I: 5TEMAS Y 4 ACTIVIDADES DE REFORZAMIENTO.•MÓDULO II: 8 TEMAS Y 4 ACTIVIDADES DE REFORZAMIENTO.•MÓDULO III. 7TEMAS Y 4 ACTIVIDADES DE REFORZAMIENTO.Para tener acceso a todo elcontenido del módulo, hagaclic en el signo de + decada subtema, de estamanera se irán habilitandotodos los contenidos.DIPLOMADO EN EDUCACIÓN FINANCIERA ACTIVIDADES:Es importante puntualizar que las actividades NO SON EVALUACIONES, sin embargo,es necesario llevarlas a cabo ya que acumulan puntaje a su calificación final del módulo.Puntaje de las actividades:Cada actividad tiene un valor del 10 %, que se integra a la calificación final del Módulo, si se realizan las 4 actividades, obtendrá el 40%.Para poder obtener el porcentaje total de la actividad TODAS LAS RESPUESTAS DEBEN SER CORRECTAS,si es necesario vuelva a leer la información e intente nuevamente su validación las veces que sea necesario.Al realizar de manera correcta la actividad,apareceráen la parte inferior un recuadro donde le indicaráque ha obtenido el10%que seráacumulado a la calificación final del Módulo.Su progreso en el Diplomado lo podrávisualizar en el apartado:AVANCES Y CALIFICACIONES donde se acumularán los resultadosobtenidos tanto en las actividades de reforzamiento como en lasevaluaciones.DIPLOMADO EN EDUCACIÓN FINANCIERA ACTIVIDADES:EVALUACIONES:Durante el desarrollo del Diplomado se contemplan 3periodos de evaluaciones o exámenes,con duración de una semana y que equivale al 60%que se acumula al porcentaje obtenido en las actividades de reforzamiento para obtener un total del 100%.Al iniciar el periodo de evaluación se habilitaráen la sección correspondiente del módulo en la parte inferior un banner para acceder al examen.La evaluación consiste en contestar 15preguntas de opción múltiple ,si por alguna razón se abandona la sesión por una falla técnica que presente el internet,equipo o cualquier contratiempo,podrávolver a ingresar al examen,en el entendido que las respuestas emitidas se borrarán y tendráque comenzar nuevamente desde el inicio.Al concluir con una actividad de manera exitosa,apareceráen el Módulo de estudio,un banner en color verde indicando que ya fue realizada,por lo tanto ya fue integrada al apartado AVANCES.Sólo cuenta con UNA OPORTUNIDAD PARA CONTESTAR SU EVALUACIÓN,si tarda mucho tiempo en emitir sus respuestas,su sesión prescribiráy deberácomenzar su examen desde el principio.Las preguntas no siempre son las mismas y van cambiando de manera ALEATORIA,por lo que se recomienda que una vez que inicie con su examen lo concluya y no dejar abierta su sesión por un tiempo prolongado.DIPLOMADO EN EDUCACIÓN FINANCIERA EVALUACIONES:Una vez presentada la evaluación,el sistema emitiráde manera automática la calificación obtenida,indicando los aciertos en color verde y los errores en color rojo,el obtener15respuestas correctas equivale al 60%de calificación,que al sumarse al40%obtenido en las actividades de reforzamiento,seráel valor total del100%que es igual a10de promedio.CALIFICACIONES:Para consulta de calificaciones,ingresar a la sección:AVANCES Y CALIFICACIONES,contarácon un pequeño informe detallado sobre el puntaje obtenido durante el desarrollo del módulo.Si por alguna razón se omite alguna evaluación se le permitirácontinuar con el estudio de los siguientes módulos,en el entendido que habráque esforzarse más para obtener el promedio requerido en la convocatoria.DIPLOMA:Si al sumar las3calificaciones de los módulos se obtiene un promedio mayor o igual a7.0,seráacreedor o acreedora al Diploma que sustenta los estudios realizados.El diploma podráser descargado desde su sesión de forma automática una vez que concluya la generación y solo estarávigente por un tiempo determinado,posteriormente las sesiones se deshabilitan y el diploma ya no podrárecuperarse.En caso de extravío o robo,se tendráque cursar nuevamente el diplomado.DUDAS Y ATENCIÓN:Para atención y dudas,comunícate con tu Coordinadora o Coordinador de grupo o escríbenos al correo de **********************.mx .También puedes comunicarte al teléfono (55)54487000ext.6269en un horario de atención de lunes a viernes de 9:00a 18:00horas.¡BIENVENIDO PARTICIPANTE!Ahora ya cuentas con la información necesaria para cursar el Diplomado en Educación Financiera, recuerda que: “ El éxito en la vida no se mide por lo que logras, sino por los obstáculos que superas”.DIPLOMADO EN EDUCACIÓN FINANCIERA DIPLOMA:El diploma cuenta con elementos que permiten validar su autenticidad:Firma autógrafa del Presidente de la Condusef,Código QR,Línea de validación y calificación final.。

beyonddevops devops操作手册(实用版)目录1.DevOps 简介2.DevOps 操作手册的目的和结构3.DevOps 的关键概念和工具4.DevOps 的实施步骤和最佳实践5.DevOps 对软件开发和运维的影响正文【DevOps 简介】DevOps 是一种软件开发和运维的实践方法,旨在加强软件开发人员(Dev)和运维人员(Ops)之间的协作与沟通。
这种方法通过自动化和简化基础设施和应用程序部署、监控和维护流程,从而提高了软件开发的速度和质量。
【DevOps 操作手册的目的和结构】本操作手册旨在为软件开发人员和运维人员提供一套实用、全面的DevOps 实践指南,帮助他们更好地实施 DevOps,提高软件开发的效率和质量。
手册分为五个部分,分别是:DevOps 简介、DevOps 的关键概念和工具、DevOps 的实施步骤和最佳实践、DevOps 的实际应用案例以及DevOps 对软件开发和运维的影响。
【DevOps 的关键概念和工具】在实施 DevOps 过程中,需要了解一些关键概念和工具,例如:持续集成(CI)、持续部署(CD)、自动化基础设施(IA)、配置管理、监控和日志等。
持续集成是指通过自动化构建、测试和部署流程,使得软件开发人员能够频繁地将代码合并到主分支。
持续部署是指将代码自动部署到生产环境的过程,通常与持续集成结合使用。
自动化基础设施是指使用自动化工具(如 Puppet、Chef 等)来部署、配置和管理基础架构。
配置管理和监控是确保系统稳定性和可靠性的重要手段,而日志则有助于追踪和分析系统运行状况。
【DevOps 的实施步骤和最佳实践】实施 DevOps 的过程可以分为以下几个步骤:1.建立跨职能团队:将软件开发人员和运维人员组织在一起,加强沟通与协作。
2.实施持续集成和持续部署:确保代码频繁合并到主分支,并自动部署到生产环境。
3.使用自动化基础设施:通过 Puppet、Chef 等工具自动化部署、配置和管理基础架构。

目录1.首页相关操作流程 (6)1.1部门人员情况 (7)1.2项目信息 (9)1.3项目掙值 (15)1.4我的任务 (17)1.5我的日历 (22)1.6我的文档 (26)1.7我的仪表盘 (26)1.8快捷列表 (32)1.9计划工作列表 (33)2首页关于新建操作流程 (36)2.1新建人力资源 (37)2.2新建项目 (37)2.3新建预算 (38)2.4新建计划 (41)2.5实施计划编制 (42)3常用信息维护 (43)3.1企业信息管理 (43)3.2设备资源管理 (44)3.3模板维护-实施计划类别管理 (45)3.4模板维护-实施计划管理 (45)3.5模板维护-费用科目管理 (46)3.6模板维护-项目类型管理 (47)4资源管理 (48)4.1材料资源管理-材料类型维护 (48)4.2材料资源管理-生产厂家信息维护 (49)4.3材料资源管理-材料资源维护 (50)4.4人力资源管理-岗位专业类型维护 (51)4.5人力资源管理-人力资源信息 (51)4.6人力资源管理-岗位信息表 (52)5项目管理 (53)5.1项目准备-项目立项-立项申请 (53)5.2项目准备-项目跟踪-项目跟踪 (54)5.3项目维护-项目维护 (54)5.4项目准备-项目预算-项目预算上报 (56)5.5项目准备-项目投标-合同成本预算上报 (60)5.6项目执行-项目实施-项目实施计划编制 (61)5.7项目执行-项目实施-项目变更计划编制 (69)5.8项目执行-项目实施-项目实施费用确认 (70)5.9项目执行-项目实施-项目实施费用审核 (70)5.10项目执行-项目实施-现场管理计划编制 (71)5.11项目执行-项目实施-现场管理现场工作 (73)5.12项目执行-项目跟踪-项目周报 (74)5.13项目执行-项目验收-项目验收文档上传 (76)5.14项目执行-项目维保-维保进度确认 (76)5.15项目执行-项目维保-维保进度审核 (77)5.16项目监控-成本核算-项目成本核算编制 (77)5.17项目监控-成本核算-项目成本核算审核 (79)5.18项目监控-数据分析-工作填报统计 (79)5.19项目监控-数据分析-实施进度分析 (79)5.20项目监控-数据分析-项目文档查看 (81)5.21数据分析-资源甘特图 (82)6合同管理 (83)6.1基础数据-合同类别维护 (83)6.2基础数据-合同变更类型维护 (83)6.3基础数据-合同扣款类型维护 (84)6.4基础数据-合同付款类型维护 (85)6.5合同准备-合同立项 (86)6.6合同准备-文档起草 (87)6.7合同准备-招标信息 (88)6.8合同准备-投标结束 (88)6.9合同签订-合同谈判 (89)6.10合同签订-合同签订 (90)6.11合同执行-合同执行 (92)6.12合同执行-合同变更 (92)6.13合同执行-合同付款 (93)7我的工作台 (94)7.1个人文件夹-文件夹浏览 (94)7.2个人文件夹-目录设置 (99)7.3工作内容 (100)8系统管理 (101)8.1用户管理 (101)8.2企业权限管理 (103)8.3角色管理 (103)8.4部门管理 (104)8.5流程审批人员设置 (105)9物资管理 (107)9.1基础数据-供应商信息维护 (107)9.2基础数据-仓库信息维护 (107)9.3物料采购-物料采购申请 (108)9.4物料采购-物料采购审核 (110)9.5物料申请-物料申请 (110)9.6物料申请-物料审核 (111)9.7入库管理-物资入库 (111)9.8库存管理-物资出库 (112)9.9库存管理-物料库存 (113)9.10管理-库存盘点 (113)10文件夹管理 (114)10.1文件管理-文件管理 (114)1.首页相关操作流程首页显示如下图所示:(注意:可以折叠对应的功能)右上角点击中可以拖动模板让您想看到的模块显示到第一位,不想显示就关闭即可,如下图所示:(注意:鼠标停留在菜单功能可显示文字说明)1.1部门人员情况点击部门人员情况的设置,如下图:1.只显示所在部门:指的是您当前登陆的用户所在项目的部门,只需要选中只显示所在部门的按钮后点击保存即可在首页的部门人员情况查看。

用户操作说明书云终端管理系统CCM 6.0.000.000文档版本:01发布日期:2015-12-29升腾资讯有限公司版权所有© 升腾资讯有限公司2002- 2016。
保留一切权利。
本文档包含的所有权信息受版权法保护,未经本公司事先书面许可,任何单位和个人不得影印、摘抄、复制本文档的任何部分或将其翻译成其他语言,并不得以任何形式传播。
福建升腾资讯有限公司享有本说明书的最终解释权和修改权。
商标声明和其他升腾资讯商标均为升腾资讯有限公司的商标。
本文档提及的其他所有商标或注册商标,由其各自所有人拥有。
注意您购买的产品、服务或特性等应受升腾资讯有限公司商业合同和条款的约束,本文档中描述的全部或部分产品、服务或特性可能不在您的购买或使用范围之内。
除非合同中另有约定,升腾资讯公司不对本文档内容做任何明示或默示的声明或保证,不构成额外的保修条款。
由于产品版本升级或其他原因,本文档内容会不定期进行更新,恕不另行通知。
除非另有约定,本文档仅作为使用指导,本文档中的所有陈述、信息和建议不构成任何明示或暗示的担保。
升腾资讯有限公司地址:福建省福州市金山大道618号橘园洲星网锐捷科技园22#2层电话:400-158-1515传真:86-邮编:350002网址:客户服务邮箱:前言非常感谢您选用升腾云终端管理软件。
本产品由福建升腾资讯有限公司自主设计开发,在您使用本产品前,请仔细阅读本说明书。
内容约定说明“说明”的内容表示补充说明、解释、指示操作等补充信息。
是正文的附加信息,是对正文的强调和补充。
注意“注意”的内容表示如果不按照指示操作,将无法正常安装、使用,或出现操作错误,可能导致设备损坏、数据丢失、性能降低或其他不可预知的结果。
●本文档中提到的云终端、终端、客户端,在不做特别说明的情况下均表示安装了升腾云终端管理软件Agent的云终端设备。
●本文档中如无特别说明,所有功能模块中对文件或记录的删除操作均不可撤销。
1 系统简介1.1 前星DevOps平台简介前星DevOps平台,全称是前星开发与运维管理平台系统,是由广州前星科技有限公司(简称前星科技)进行自主研发与销售,拥有独立知识产权的软件平台。
系统可以对集群、节点、服务等进行管理,包括安装、配置、健康度监控、日志查阅、阀值预警等功能。
前星DevOps平台(云端版),也叫前星DevOps平台云端版,全称是前星开发与运维管理平台云端版系统,是前星DevOps平台的其中一个版本,依托云计算技术,部署在云端,集成其他各个版本全部功能,无需安装与升级,按需进行收费。
1.2 名词术语解析节点,也叫节点服务器,是真实存在的主机或者虚拟机,具有独立的IP地址、CPU、内存、硬盘等资源。
集群,是节点的集合,方便进行统一的管理,是抽象的概念,非真实存在的事物。
服务,是可以在节点上面安装的各种软件服务的代称,一种软件称为一种服务。
例如常见的开发相关的软件JDK、Tomcat、Maven等。
1.3 系统特色1、自动化一键部署:一键部署主流开发环境(JDK+Maven+SVN+Tomcat+Nexus+MySQL等),30分钟内部署完毕。
2、配置重置:每一次对配置文件的修改,都是会自动进行备份记录的。
如果发生配置失误可以及时进行恢复。
如果确实恢复不了,还可以重置为系统默认值。
(基础版不提供自动备份功能)3、智能监控:对集群、主机、服务的健康状况进行监控。
4、阀值告警:对监控指标进行阀值设置,一旦达到阀值,就可以发送邮件/短信进行告警。
5、操作简单:专业的功能,可视化的界面,让入门级技术人员也会操作。
6、安全稳定:系统基于J2EE架构,可以使用HTTPS协议来启动,一定程度上保证了系统的安全稳定。
1.4 核心功能1.4.1 集群管理新增、修改、删除集群,集群的启动、停止、重启,集群节点的加入与移除,集群资源汇总,集群健康度监控,集群日志等。
1.4.2 节点管理新增、修改、删除节点,节点的启动、停止、重启,集群节点的加入与移除,节点资源汇总,节点健康度监控,节点日志管理。
1.4.3 服务管理服务的自动化安装、部署、可选的调优方案,手动配置参数等功能,服务的启动、停止、重启,服务资源汇总,服务健康度监控,服务日志管理等。
1.4.4 日志管理集群、节点、服务产生的日志的汇总、查看、过滤、搜索、全文搜索等功能。
1.4.5 权限管理分角色分权限,进行不同服务、节点、集群的管理。
1.4.6 版本信息前星DevOps平台主要有3个版本:基本版、专业版、旗舰版,还可以衍生出功能定制版、企业定制版等版本。
表1-1版本对比表前星DevOps平台云端版依托云计算及相关技术,把前星DevOps平台的所有版本集成到云端,无需安装与升级,即可享有最新最全的前星DevOps平台服务。
前星DevOps平台云端版的服务采取按需进行收费。
2 注册登录2.1 注册目前版本不提供注册功能,由具有账号分配权限的管理员/会员进行配置。
2.2 登录使用账号与密码进行登录。
如图所示。
图2-1登录页面3 主界面(首页)登录后就进入系统的主界面,即首页。
首页包括导航菜单栏、快捷按钮栏、用户信息面板等栏目。
如图所示。
图3-1前星DevOps平台首页3.1 导航菜单栏导航菜单栏位于页面的顶部,如图所示。
图3-2导航菜单栏导航菜单栏的主要功能如下表所示。
表3-1导航菜单栏的主要功能列表3.2 快捷按钮栏快捷按钮栏位于页面的顶部,导航菜单栏的下面,如图所示。
图3-3快捷按钮栏快捷按钮栏的主要功能如表所示。
表3-2快捷按钮栏的主要功能列表3.3 用户信息面板用户信息面板位于页面的顶部右边,与导航菜单栏处在同一行,如图所示。
图3-4用户信息面板用户信息面板的主要功能如表所示。
表3-3用户信息面板的主要功能列表3.4 集群状态列表集群状态列表位于页面的左边,快捷按钮栏的下面。
集群状态列表主要列出当前系统存在的全部集群名称,集群中包含的节点数量、服务数量,可以对某一个集群进行停止、重启等操作。
如图所示。
图3-5集群状态列表停止或者重启集群,点击集群列表项中右侧的下拉框箭头,弹出下拉框,点击“停止”按钮,可以停止集群;点击“重启”按钮,可以重启集群。
4 常用操作4.1 新增集群点击【新增集群】按钮,进入新增集群页面,如图所示。
图4-1新增集群页填写集群名称和集群描述,点击提交按钮即可完成。
4.2 新增节点导航中的“新增节点”按钮与节点列表页的“新增节点”按钮,功能是相同的。
点击“新增节点”按钮,进入新增节点页面。
详细内容请参考节点的新增节点部分。
4.3 新增服务导航中的“新增服务”按钮与服务列表页的“新增服务”按钮,功能是相同的。
点击“新增服务”按钮,进入新增服务页面。
详细内容请参考服务的新增服务部分。
5 集群5.1 集群简介集群,是节点的集合,方便进行统一的管理,是抽象的概念,非真实存在的事物。
集群的基本操作,如下表所示。
表5-1集群的基本操作表5.2 列表页进入首页,点击导航菜单栏的【集群】按钮,进入集群列表页。
如图所示。
可以查看已经存在的所有集群。
可以打开新增集群页、加入节点页、集群详情页、修改集群页,可以进行删除集群操作。
默认集群是系统自动创建,不能删除。
图5-1集群列表页5.2.1 修改页修改集群的功能是修改已经存在的集群。
在修改集群页面中,输入集群的名称与描述,然后点击“提交”按钮,系统弹框提示,确认无误后,系统会进行相关的处理。
如图所示。
图5-2修改集群页面5.2.2 删除操作删除集群的功能是删除已经存在的集群。
在集群列表页的“操作”列,有一个打叉的圆形图标,即删除集群按钮。
点击可删除所选集群,如图所示。
注意:默认集群是不能删除的。
图5-3集群列表页5.3 新增页在集群列表页,点击【新增集群】按钮,进入新增集群页面。
输入集群名称、集群描述后,点击【提交】按钮,弹出提交确认弹窗,确认无误后点击【确认】按钮即可。
如图所示。
图5-4新增集群页5.4 加入节点加入节点的功能是,加入一个或多个节点到一个或多个集群中。
如图所示。
图5-5集群列表页加入节点的操作,一共分为3步:选择集群、选择节点、确认信息。
●集群加入节点-选择集群页面进入集群加入节点-选择集群页面,如图所示。
图5-6集群加入节点-选择集群页面如果集群中不存在需要的集群,可以新建集群。
点击【新增节点】按钮,进入新增集群页面,如图所示。
创建完成后返回当前页面。
图5-7集群加入节点-选择集群页面-点击新建集群按钮在集群列表中,勾选需要的已存在的集群,然后点击【下一步】按钮,进入集群加入节点-选择节点页面。
●集群加入节点-选择节点页面进入集群加入节点-选择节点页面,可以勾选已存在的节点。
如图所示。
图5-8集群加入节点-选择节点页面勾选需要加入集群的节点,点击“下一步”按钮,进入集群加入节点-确认信息页面。
集群加入节点-确认信息页面在集群加入节点-确认信息页面中,确认集群列表的信息与节点列表的信息是否正确。
如果信息确认无误,可以点击“确认”按钮,否则可以点击“返回”按钮,重新选择。
如图所示。
图5-9集群加入节点-确认信息页面点击【确认】按钮后,系统会进行一系列的处理。
5.5 详情页在集群列表页面中的“操作”列,有一个小眼睛的图标,即查看集群详情按钮,点击该按钮,进入集群详情页面。
如图所示。
图5-10集群列表页集群详情页面,包含集群状态图、详情列表、集群中的节点列表、集群中的服务列表等。
如图所示。
图5-11集群详情页1图5-12集群详情页26 节点节点,也叫节点服务器,是真实存在的主机或者虚拟机,具有独立的IP地址、CPU、内存、硬盘等资源。
6.1 基本操作节点的基本操作,如表所示。
表6-1集群的基本操作表6.2 列表页点击导航菜单栏的【节点】按钮,打开【节点列表】页面。
如图所示。
图6-1节点列表页面节点列表页,可以查看已经存在的所有节点。
节点列表页,可以打开新增节点页、加入集群页、节点详情页、修改节点页,可以进行节点的删除操作。
6.2.1 详情页在节点列表页面中,选定一个节点,在“操作”这一列中,有一个小眼睛图标,即节点详情按钮,点击可进入节点详情页面。
如图所示。
图6-2节点列表页面图6-3节点详情页面6.2.1.1 重新初始化点击【重新初始化】按钮,弹出确认弹窗,点击【确定】按钮,开始初始化。
初始化后,节点的所有数据将恢复到预设状态,最后自动刷新节点详情页面。
还可以点击【取消】按钮,取消初始化。
6.2.1.2 监控数据在节点详情页,点击【监控数据】按钮,进入节点详情-监控信息详情页面。
详情页面包含显示网络状态列表、服务列表的详细信息。
网络状态列表,显示该节点端口、PID、程序名称、程序状态、协议、发送、接收、本地地址、远程地址、操作的详细信息。
服务列表,显示该节点安装的所有服务的名称、版本号、状态、操作的详细信息。
图6-4节点详情-监控信息详情页6.2.1.3 马上刷新Netstat在节点详情页,点击【马上刷新Netstat】按钮,会更新网络状态列表,最后显示刷新后的节点详情-监控数据详情页。
要求节点用户为root。
如图所示。
图6-5节点详情页-编辑-管理参数列表图6-6节点详情-监控信息详情页6.2.1.4 kill在节点详情页的“操作”这一列中,有一个【kill】按钮,点击可结束对应的进程。
例如,启动tomcat服务后,点击【马上刷新Netstat】按钮,更新网络状态列表,如图所示。
图6-7节点详情-监控信息详情页面先点击端口为8080对应的【kill】按钮,会弹出确认杀死程序确认弹窗,点击【确认】按钮,会进入刷新后的监控信息详情页面。
此时端口8080这一列不再显示,如图所示。
6.2.1.5 执行命令在节点详情页,点击【执行命令】按钮,进入命令执行器页面。
如图所示。
图6-8节点详情-命令执行器页面点击下拉框,选择集群和节点后,输入交互命令,点击【执行】按钮,就可以在执行结果文本框中看到执行结果。
执行命令“java -version”,如图所示。
图6-9命令执行器页面6.2.1.6 编辑/重启/停止在节点详情页,点击【编辑】按钮,可以修改节点详情信息。
点击【重启】按钮,节点会重启。
点击【停止】按钮,节点会关机停止运行。
如图所示。
图6-10节点详情页6.2.2 删除操作在节点列表页面中,选定一个节点,在“操作”这一列中,有一个打叉的圆形图标,就是删除节点按钮,点击后弹出确认弹窗,点击【确定】按钮,即可删除该节点,最后会自动刷新节点列表页面。
如图所示。
图6-11节点列表页6.3 新增页新增节点分为4个步骤:搜索节点、配置参数、确认清单、安装服务。
6.3.1 步骤一:搜索节点点击【新增节点】按钮,进入搜索节点页面,如图所示。
图6-12搜索节点页面在文本框输入节点ip地址,例如192.168.3.33,点击【搜索】按钮,查看提示结果。