RMX1800操作使用说明
- 格式:pptx
- 大小:2.74 MB
- 文档页数:30
MCU操作指导手册V1.0目录一、MCU单机操作 (3)1.物理连接 (3)1.1 物理连接 (3)2.配置RMX1800网络信息,用户名/密码 (4)2.1 WEB登陆 (4)2.2 RMX manager登陆 (4)2.3 网络配置 (6)2.4 用户名密码设置 (7)3.在MCU里添加终端 (9)4.配置AVC会议模板 (11)5.使用会议模板新建会议 (18)6管理地址薄 (20)7.虚拟会议室 (23)8.演讲者模式和讨论模式区别 (24)9.会议分屏、个人分屏、自动分屏、语音激励、定制轮巡 (25)10.字幕功能 (26)11.会议迁移终端 (28)二、MCU级联操作 (30)1.MCU级联的意义 (30)2.MCU基本级联 (30)3.在级联会议中切换分屏、包括全屏广播2级分会场,一个分屏轮巡所有2级分会场 (31)三、内部系统集成相关 (32)1.跟DMA集成 (32)1.1 MCU操作 (32)1.2 DMA操作 (33)2.跟录播融合 (34)1.1在RSS上创建虚拟录制室 (34)1.2在RMX上完成配置录制连接 (35)1.3在RMX上启用录制过程 (36)四、MCU版本升级 (37)1.MCU版本升级 (37)1.1 备份配置 (37)1.2 产品激活和升级 (38)一、MCU单机操作1.物理连接1.1 物理连接RMX1800、RMX2000和RMX4000的物理连接不同,下面分别展开叙述:(1) RMX1800,有两个网口,LAN1和LAN2,LAN1口是管理网口,LAN2口是媒体/信令网口,需要两个IP地址,并且两根网线分别连接1800和交换机,配置时选择LAN1的管理网口。
(2) RMX2000,背面有三个网口,但配置时只用第二个网口,因为支持内部交换板卡,所以配置时只需要一根网线连接网口2进行配置,IP地址需要三个,分别是管理地址、媒体地址和信令地址。
(3) RMX4000,可以支持四块媒体板,有四个媒体地址,另外RTM板卡还需要配置一个管理IP、信令IP和机箱IP。
超高清、超流畅视频协作平台在当今瞬息万变的年代,高效的政府、现代化的企业需要内部与合作伙伴快速便捷的沟通。
视频协作技术使您能够远隔千里随时随地进行面对面地沟通交流。
无论您的团队是在北京、伦敦、纽约或世界其他的任何一个地方,Polycom的视频协作系统使您能够协同工作、快速决策,工作效率成倍提高。
大规模的视频协作应用对系统的可靠性、扩展性以及应用体验提出了越来越高的要求。
Polycom云视频协作平台的RMX1800集业界领先的技术及客户化的视频应用于一体,为您提供业界无以伦比的超流畅高清视频、高清内容以及水晶般高保真音频。
超强的扩展性和灵活性RMX1800具有全编全解和动态资源分配的先进架构和强大的处理能力。
能够全方位兼容符合国际电联标准的不同协议、不同速率、不同分辨率、不同帧速率的任何终端;全面满足政府、企业大型会议、讨论型工作组会议、方便快捷的移动性会议以及高端极致远真会议的超强扩展性和灵活性的应用。
超凡的用户体验RMX1800是一款配置简单、易于使用、功能强大的云视频协作平台。
为最终用户提供了各种模式应用的高质量会议;为系统管理员提供了无与伦比的操控性和系统管理能力。
另外,RMX1800云视频协作平台支持对称1080p 60,能够以超流畅逼真效果实现视频及内容共享。
对于IT部门来说,Polycom RMX 1800 具有出色的灵活性,管理员可以轻松定制虚拟会议室和各种个性化分屏模式。
简单直观的管理员工作界面,可以有效提高您的视频协作使用率和公司生产效率。
最低的总拥有成本—使用H.264 HighProfile 可节省高达50%的带宽资源,通过动态资源分配支持更多方同时呼叫加入视频和音频会议。
卓越的音频体验--支持22K Hz宽频技术,展现环绕立体声。
最高的灵活性—充分利用Polycom®RealPresence®虚拟化管理解决方案,实现高可靠性和扩展性,同时确保100%自动冗余备份。

M C U指导手册V1.0【PolycomSE】—2014年12月—目录一、MCU单机操作 ............................................................................................... 错误!未指定书签。
1.物理连接................................................................................................................ 错误!未指定书签。
1.1物理连接............................................................................................................. 错误!未指定书签。
2.配置RMX1800网络信息,用户名/密码 ............................................................ 错误!未指定书签。
2.1WEB登陆 ............................................................................................................ 错误!未指定书签。
2.2RMXmanager登陆 .............................................................................................. 错误!未指定书签。
2.3网络配置............................................................................................................. 错误!未指定书签。
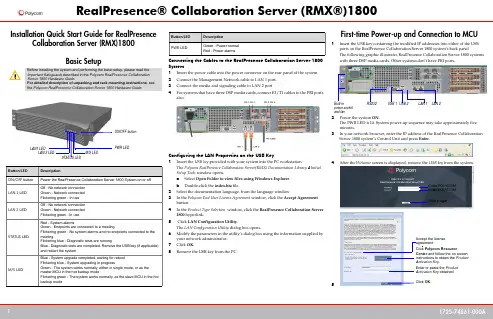
Polycom RMX 1800 安装快速入门指南基本设置将电缆连接到 Polycom RMX 1800 系统1将电源线插入系统后面板的电源接头。
2将管理网络电缆连接到 LAN 1 端口。
3将媒体和信令电缆连接到 LAN 2 端口。
在 USB 密钥上配置 LAN 属性1将系统随附的 USB 密钥插入PC 工作站。
打开Polycom RMX 1800 文档库和首次设置工具窗口。
a选择打开文件夹并使用 Windows Explorer 查看文件。
b双击index.hta文件。
语言菜单打开。
2选择文档语言。
3在Polycom 最终用户许可协议窗口中,单击接受协议按钮。
4在产品类型选择窗口中,单击Polycom RMX 1800 超链接。
5单击LAN 配置实用程序。
此时会打开局域网配置实用程序对话框。
6使用您的网络管理员提供的信息在此实用程序的对话框中修改参数。
7单击OK。
8从 PC 移除 USB 密钥。
首次启动和连接 MCU1将含修改后 IP 地址的USB 密钥插入 Polycom RMX 1800 系统后面板上的任一个USB 端口。
2打开系统。
PWR LED 亮起。
系统启动程序可能需要约 5 分钟的时间。
等待上传完成。
如果在管理网络配置期间未发生错误,则状态 LED 变为绿色。
3在网络浏览器中,输入Polycom RMX 1800 系统控制单元的 IP 地址,并按Enter。
4显示欢迎界面后,从系统移除USB 密钥。
5在安装系统并执行基本设置之前,请阅读Polycom RMX 1800硬件指南中所述的“一般安全注意事项”。
有关打开包装和机架安装说明的详细信息,请参阅Polycom RMX 1800硬件指南。
按钮/ LED描述ON/OFF 按钮打开或关闭Polycom RMX 1800 系统LAN 1 LED熄灭-无网络连接绿色-网络已连接闪烁绿色-使用中LAN 2 LED熄灭-无网络连接绿色-网络已连接闪烁绿色-使用中状态 LED红色-系统警报绿色-终端已连接到会议闪烁绿色-无系统警报且无连接到会议的终端闪烁蓝色-正在运行诊断测试蓝色-诊断测试已完成。


1800电牵引采煤机使用说明书电气部分型号:MGTY750/1800—3.3D请将此使用说明书交给最终用户的手中太原矿山机械集团电气发展公司电气所第一部分电气系统简介1.机型:MGTY 750/1800—3.3DMG—滚筒式采煤机TY—太原750—单向截割功率1800—装机总功率3.3—供电电压3300VD—电牵引2.机组的供电:2.1 双电缆供电2.2 供电电缆的型号:MCP 3×95+1×35+4×6(实际采用3*1502)3.特点:3.1 多电机横向布置,抽屉式结构,安装维护方便。
3.2 机载式交流变频调速,一拖一牵引方式,可实现功率平衡。
3.3 关键的电气部件全部采用进口件,提高了系统的可靠性。
3.4 低功耗的遥控系统,免充电式无线发射,可离机操作,既增加了安全性,而且待机时间长。
3.5 带故障记录的中文人机界面,缩短了故障查询时间。
3.6 保护齐全,增加了系统的使用寿命。
3.7 双电缆供电,分步启动控制,降低了起动大电流对供电网络的冲击。
4.电气系统的基本配置:表一:5.电气系统的保护5.1 在采煤机上完成截割电机的温度监测及热保护5.2 破碎电机的温度监测及热保护5.3 油泵电机的温度监测及热保护5.4 牵引变压器的温度监测及热保护5.5 对截割电机和牵引电机恒功率控制过载保护5.6 电机的漏电闭锁控制5.7 完成对运输机的闭锁控制第二部分电控箱1.功能结构电控箱位于主机架的中央,它可以在采空侧方便的推入和抽出,主要功能是完成采煤机的电源引入和分配,以及整机的控制和监测。
电控箱分为三个腔体,两个接线腔和一个隔爆腔,其中一个接线腔供3300V高压电源的引入和分配,另一个为牵引驱动的电源分配。
隔爆腔和接线腔之间用高压接线柱和过线组来连接。
高压接线柱连接主回路,过线组连接控制信号回路。
电控箱前面有两个大喇叭口用于3300V双电源引入,后面的大喇叭口作为各个电机供电电缆的通道,小喇叭口用来接收和发送控制信号电缆通道。
v1.0 可编辑可修改MCU指导手册【Polycom SE】— 2014年12月—目录一、MCU单机操作 (3)1.物理连接 (3)物理连接 (3)2.配置RMX1800网络信息,用户名/密码 (4)WEB登陆 (4)RMX manager登陆 (4)网络配置 (6)用户名密码设置 (7)3.在MCU里添加终端 (9)4.配置AVC会议模板 (11)5.使用会议模板新建会议 (18)6管理地址薄 (21)7.虚拟会议室 (24)8.演讲者模式和讨论模式区别 (25)9.会议分屏、个人分屏、自动分屏、语音激励、定制轮巡 (27)10.字幕功能 (27)11.会议迁移终端 (30)二、MCU级联操作 (32)级联的意义 (32)基本级联 (32)3.在级联会议中切换分屏、包括全屏广播2级分会场,一个分屏轮巡所有2级分会场 (33)三、内部系统集成相关 (34)1.跟DMA集成 (34)操作 (34)DMA操作 (35)2.跟录播融合 (36)在RSS上创建虚拟录制室 (36)在RMX上完成配置录制连接 (37)在RMX上启用录制过程 (38)四、MCU版本升级 (39)版本升级 (39)备份配置 (39)产品激活和升级 (40)一、MCU单机操作1.物理连接物理连接RMX1800、RMX2000和RMX4000的物理连接不同,下面分别展开叙述:(1)RMX1800,有两个网口,LAN1和LAN2,LAN1口是管理网口,LAN2口是媒体/信令网口,需要两个IP地址,并且两根网线分别连接1800和交换机,配置时选择LAN1的管理网口。
(2)RMX2000,背面有三个网口,但配置时只用第二个网口,因为支持内部交换板卡,所以配置时只需要一根网线连接网口2进行配置,IP地址需要三个,分别是管理地址、媒体地址和信令地址。
(3)RMX4000,可以支持四块媒体板,有四个媒体地址,另外RTM板卡还需要配置一个管理IP、信令IP和机箱IP。
Installation Quick Start Guide for RealPresenceCollaboration Server (RMX)1800Basic Setup Connecting the Cables to the RealPresence Collaboration Server 1800System1Insert the power cable into the power connector on the rear panel of the system.2Connect the Management Network cable to LAN 1 port.3Connect the media and signaling cable to LAN 2 port4For systems that have three DSP media cards, connect E1/T1 cables to the PRI portsalso.Configuring the LAN Properties on the USB Key1Insertthe USB key provided with your system into the PC workstation.The Polycom RealPresence Collaboration Server(RMX) Documentation Library & InitialSetup Tools window opens.a Select Open Folder to view files using Windows Explorer.b Double-click the index.hta file.2Select the documentation language. from the language window.3In the Polycom End User License Agreement window, click theAccept Agreementbutton.4In the Product Type Selection window, click the RealPresence Collaboration Server1800 hyperlink.5 Click LAN Configuration Utility.The LAN Configuration Utility dialog box opens.6Modify the parameters in the utility’s dialog box using the information supplied byyour network administrator.7Click OK.8Remove the USB key from the PC.First-time Power-up and Connection to MCU1Insert the USB key containing the modified IP addresses into either of the USBports on the RealPresence Collaboration Server 1800 system’s back panelThe following graphic illustrates RealPresence Collaboration Server 1800 systemswith three DSP media cards. Other systems don’t have PRI ports..2Power the system ON.The PWR LED is lit. System power-up sequence may take approximately fiveminutes.3In your network browser, enter the IP address of the RealPresence CollaborationServer 1800 system’s Control Unit and press Enter.4After the Welcome screen is displayed, remove the USB key from the system.5.Before installing the system and performing the basic setup, please read theImportant Safeguards described in the Polycom RealPresence CollaborationServer 1800 Hardware Guide.For detailed description of unpacking and rack mounting instructions, seethe Polycom RealPresence Collaboration Server 1800 Hardware Guide.Button/LED DescriptionON/OFF button Power the RealPresence Collaboration Server 1800 System on or offLAN 1 LEDOff - No network connectionGreen - Network connectedFlickering green - In useLAN 2 LEDOff - No network connectionGreen - Network connectedFlickering green - In useSTATUS LEDRed - System alarmsGreen - Endpoints are connected to a meetingFlickering green - No system alarms and no endpoints connected to themeetingFlickering blue - Diagnostic tests are runningBlue - Diagnostic tests are completed. Remove the USB key (if applicable)and restart the systemM/S LEDBlue - System upgrade completed, waiting for rebootFlickering blue - System upgrading in progressGreen - The system works normally, either in single mode, or as themaster MCU in the hot backup modeFlickering green - The system works normally, as the slave MCU in the hotbackup modeM/S LEDPWR LEDON/OFF buttonLAN 2 LEDLAN1 LEDSTATUS LEDPWR LED Green - Power normalRed - Power alarmsButton/LED DescriptionLAN 2Built-inpower socketand fanRS232USB 2USB 1LAN 1Click Login.Enter POLYCOM.Enter POLYCOM.Click Polycom ResourceCenter and follow the on screeninstructions to obtain the ProductActivation Key.Enter or paste the ProductActivation Ke y obtained.Click OK.Accept the licenseagreementInitial System ConfigurationThis section describes the definition of H.323 Network Service, setting the RMX time, modifying the default Administrator user and setting basic system flags. For detailed description of H.323, SIP and ISDN Network Service definitions, see the RealPresence Collaboration Server (RMX) 1800/2000/4000 Getting Started Guide , “First Time Installation and Configuration”.>>In the Fast Configuration Wizard , select Next to move from one window to another.1Configure signaling and media network IP address.2Configure the router for signaling and media network.3Configure DNS settings.4In the Network Type tab, IP Network Type field, select H.323 and click Next .567Click the Save & Continue button. In the IP Network Service creation confirmation window, click OK .891011ClickSave & Close .12In the Success Message box confirming successful configuration, click OK.13In the Reset Confirmation dialog box, click Yes.14In the Please wait for system reset message box, click OK.System restart may take up to 10 minutes.15Refresh the browser periodically until the Login screen is displayed and Login.In the Main Screen an MCU State indicator displays the time remaining until the system start-up is complete.When the default system User is replaced and the system Time is set and if there are no System Errors , the green STATUS LED on the system’s front panel turns ON.Connecting to a Conference Directly or via EntryQueueThe RMX is shipped with pre-configured default conferencing entities that can be used to dial in and start conferences. Default (Transit) Entry Queue ID: 1000, default Meeting Room IDs: 1001, 1002, 1003, and 1004.H.323 ParticipantsDial: [MCU Prefix in Gatekeeper][Conference or Entry Queue ID/Name] For example, if the MCU prefix in the gatekeeper is 925, enter 925 or 9251000 to connect to the EQ or 9251001/2/3/4 to connect directly to the conference. When connected to the EQ, enter the destination Meeting Room ID (i.e. 1001, 1002, 1003 or 1004).Alternatively, use the EQ or conference name. For example, if the conference name is Maple_Room, the participant can dial: 925Maple_Room.SIP ParticipantsDial: conference_routing _name@domain_name. Conference routing name must be registered with the SIP server. For example, enter 1001@ if conference routing name is 1001 and the domain name is .Conference Control Using DTMF CodesIPv4 is the default protocol for setting the IP Network Service in the Fast Configuration Wizard.Change the default service name if required.Signalling host IP address is the same as the media IP address. Enter the media network IP addressEnter the subnet mask for thesignaling and media network.Enter the router address of the signaling and media network.Enter the name of the MCU onthe network.Select whether to enable DNS service.Optional. Define the DNS server properties:•Registration mode•The name of the MCU domain•The static IP address of the primary DNS serverEnter the name of the MCU on the network service.Select Specify to configure the gatekeeper parameters. Enter gatekeeper’s host name or IP address.Enter the string with which the MCU registers itself with the gatekeeper.Enter the alias that identifies the RMX’s Signaling Host within the network. Up to five aliases can be defined for each RMX.Select this check box only if the authentication is enabled on the gatekeeper, to enable theCollaboration Server to register with the gatekeeper. Otherwise, skip this tab.Enter the user name and password the Collaboration Server will use to authenticate itself with the gatekeeper. Thename and password must be defined in the gatekeeper.Option 1: Using the arrows, set the GMT Time on the ing the arrows, set the time zone difference between Greenwich and the RMX’s physical location.Option 2: Click to automatically update the RMX's GMT Date, Time and Offset to match that of the workstation.Option 3: Select this check box to synchronize RMX time with up to three external NTP servers and enter their IP addresses.Enter the new user name of the new administrator user.Enter the password for the new administrator user.Enter the new password again to confirm the new password.Optional. Modify the default settings of the system flags that define the generalsystem behavior such as the number of digits in theconference ID assigned by the MCU.These flags can be modified later, if required, by clicking Setup menu > System Configuration .Operation DTMF String Mute My Line*6 Unmute My Line #6Play Help Menu *83Change To Chairperson *78Request private assistance *0Request assistance for conference00。
MCU指导手册V1。
0【Polycom SE】— 2014年12月—目录一、MCU单机操作 (3)1。
物理连接 (3)1。
1 物理连接 (3)2.配置RMX1800网络信息,用户名/密码 (4)2。
1 WEB登陆 (4)2。
2 RMX manager登陆 (4)2。
3 网络配置 (5)2。
4 用户名密码设置 (7)3。
在MCU里添加终端 (9)4.配置AVC会议模板 (11)5.使用会议模板新建会议 (18)6管理地址薄 (20)7。
虚拟会议室 (23)8。
演讲者模式和讨论模式区别 (24)9。
会议分屏、个人分屏、自动分屏、语音激励、定制轮巡 (25)10。
字幕功能 (26)11。
会议迁移终端 (28)二、MCU级联操作 (30)1.MCU级联的意义 (30)2.MCU基本级联 (30)3.在级联会议中切换分屏、包括全屏广播2级分会场,一个分屏轮巡所有2级分会场 (31)三、内部系统集成相关 (32)1。
跟DMA集成 (32)1.1 MCU操作 (32)1.2 DMA操作 (33)2。
跟录播融合 (34)1。
1在RSS上创建虚拟录制室 (34)1.2在RMX上完成配置录制连接 (35)1.3在RMX上启用录制过程 (36)四、MCU版本升级 (37)1。
MCU版本升级 (37)1。
1 备份配置 (37)1。
2 产品激活和升级 (38)一、MCU单机操作1.物理连接1。
1 物理连接RMX1800、RMX2000和RMX4000的物理连接不同,下面分别展开叙述:(1) RMX1800,有两个网口,LAN1和LAN2,LAN1口是管理网口,LAN2口是媒体/信令网口,需要两个IP地址,并且两根网线分别连接1800和交换机,配置时选择LAN1的管理网口。
(2) RMX2000,背面有三个网口,但配置时只用第二个网口,因为支持内部交换板卡,所以配置时只需要一根网线连接网口2进行配置,IP地址需要三个,分别是管理地址、媒体地址和信令地址。
Offer of Source for Open Source SoftwareVersion 8.5|December 2014 |3725-74700-000 RealPresence® Collaboration Server (RMX)1500 / 1800 / 2000 / 4000 / VECopyright© 2014, Polycom, Inc. All rights reserved. No part of this document may be reproduced, translated into another language or format, or transmitted in any form or by any means, electronic or mechanical, for any purpose, without the express written permission of Polycom, Inc.6001 America Center DriveSan Jose, CA 95002USAPolycom®, the Polycom logo and the names and marks associated with Polycom products are trademarks and/or service marks of Polycom, Inc. and are registered and/or common law marks in the United States and various other countries. All other trademarks are property of their respective owners. No portion hereof may be reproduced or transmitted in any form or by any means, for any purpose other than the recipient's personal use, without the express written permission of Polycom.Java is a registered trademark of Oracle America, Inc.,and/or its affiliates.End User License Agreement By installing, copying, or otherwise using this product, you acknowledge that you have read, understand and agree to be bound by the terms and conditions of the End User License Agreement for this product. The EULA for this product is available on the Polycom Support page for the product.Patent Information The accompanying product may be protected by one or more U.S. and foreign patents and/or pending patent applications held by Polycom, Inc.Open Source Software Used in this Product This product may contain open source software. You may receive the open source software from Polycom up to three (3) years after the distribution date of the applicable product or software at a charge not greater than the cost to Polycom of shipping or distributing the software to you.Disclaimer While Polycom uses reasonable efforts to include accurate and up-to-date information in this document, Polycom makes no warranties or representations as to its accuracy. Polycom assumes no liability or responsibility for any typographical or other errors or omissions in the content of this document.Limitation of Liability Polycom and/or its respective suppliers make no representations about the suitability of the information contained in this document for any purpose. Information is provided "as is" without warranty of any kind and is subject to change without notice. The entire risk arising out of its use remains with the recipient. In no event shall Polycom and/or its respective suppliers be liable for any direct, consequential, incidental, special, punitive or other damages whatsoever (including without limitation, damages for loss of business profits, business interruption, or loss of business information), even if Polycom has been advised of the possibility of such damages.Customer Feedback We are striving to improve our documentation quality and we appreciate your feedback. Email your opinions and comments to *********************************.Polycom Support Visit the Polycom Support Center for End User License Agreements, software downloads, product documents, product licenses, troubleshooting tips, service requests, and more.RealPresence® Collaboration Server® (RMX) Offer of Source for Open Source Software ContentsOffer of Source for Open Source Software . . . . . . . . . . . . . . . . . . . . . . . . . . . . . . 1 Open Source Software . . . . . . . . . . . . . . . . . . . . . . . . . . . . . . . . . . . . . . . . . . . . . . . . . . . . . . . 1 License Information . . . . . . . . . . . . . . . . . . . . . . . . . . . . . . . . . . . . . . . . . . . . . . . . . . . . . . . . . . 2Offer of Source for Open Source SoftwareYou may have a Polycom® RealPresence® Collaboration Server® (RMX) 1500 / 1800 / 2000 / VE from Polycom that contains software from the open source community that must be licensed under the specific license terms applicable to the software.For at least three years from the date of distribution of the applicable product or software, we will give to anyone who contacts us using the contact information provided below, for a charge of no more than our cost of physically distributing, one of the following items (a) A copy of the complete correspondingmachine-readable source code for programs listed in this document or (b) A copy of the corresponding machine-readable source code for the libraries listed in this document, as well as the executable object code of the Polycom work with which that the library links.The software included or distributed for the RealPresence® Collaboration Server (RMX) 1500 / 1800 / 2000 / VE, including any software that may be downloaded electronically via the internet or otherwise (the "Software") is licensed, not sold.Open Source SoftwareThe RealPresence® Collaboration Server (RMX) 1500 / 1800 / 2000 / VE uses several open source software packages, each containing multiple open-source components. The packages containing the source code and the licenses for all of the open-source software are available upon request.Contact information for requesting source code:Email: ***********************License InformationThe following table contains license information for the open source software packages used in the Polycom® RealPresence® Collaboration Server (RMX) 1500 / 1800 / 2000 / 4000 / Virtual Edition.Note that the source code and the licenses for all the open-source software, including CentOS and its components, are available upon request. This list is provided as a convenient reference.Application Version License type License URLBash 4.1.2GPLv3/copyleft/gpl.htmlhttps:///downloads/Bind9.3.2ISC License(BSD like)binutils 2.16.1/2.18/GPL /wiki/GNU_Binutils2.20.51.20100809GPLv2 /license.htmlbusybox 1.1.3/1.10.4/1.17.3coreutils 5.2.1/8.4-19GPLv3/wiki/GNU_Core_UtilitiesCurl7.19.5MIT /licenses/mit-license.phpcyrus-sasl 2.1.22BSD /licenses/bsd-license.phpdhclient 4.1.1ISC /wiki/BSD_licenses#2-clausediffutils 2.8.1GPLv2dropbear2012.55MIT like /get/System/System-Administration/Dropbear-SSH-8298.shtmle2fsprogs 1.39/1.41.1BSD /projects/e2fsprogs/postdownload?source=dlpethtool5/6/8.4-19GPLv2/m/ethtool-5-i486-1.tgz.53151-0.html expat 1.95.8/2.0.1MIT /expat/expat-1.95.8.tar.gz/m/figlet222.tar.gz.166727-2.html figlet222The AcademicFree LicenseGdb 6.4/6.8/7.4GPL /wiki/GNU_General_Public_LicenseGlib 2.8.6LGPLv2/wiki/GNU_Lesser_General_Public_LicenseGrub0.97GPLv2 /m/grub-0.97.tar.gz.971783-0.html hotplug2004_03_29GPLv2 /Htop0.8.1GPLv2 /m/htop-0.8.1.tar.gz.414870-0.html httpd 2.4.3Apache /licenses/iproute2-2.6.35/2-2.6.37/2-2.6.32GPLv2 /anonymous/iproute2/NEW-OSDL/iprout e2-2.6.35.tar.bz2iptables 1.4.1.1/1.4.7-5/1GPLv2 /downloads/documents/html_product_m anuals/MobilityRFS_SRG_5300/wwhelp/wwhimpl/common/html/wwhelp.htm#context=53_1002621_01_AP_SRG_v5300_HTML&file=0B_Appendix_B_Open_Source_Declaration.16.2.htmllibcap-ng0.6.4LGPLv2+/licenses/old-licenses/lgpl-2.1.htmllibfreebl3.so 3.13.5-8MPLv2.0/linux/RPM/centos/6.5/x86_64/Packages/nss-softokn-freebl-3.14.3-9.el6.i686.html/MPL/2.0/libgcc_s.so. 14.1.2-52GPLv3 withlink exception/copyleft/gpl.htmllibICE 1.0.4BSD like /m/libICE-1.0.4.tar.gz.365664-0.html libiconv 1.11LGPLv2.1libpcap0.95BSD ftp:///vol/2/metalab/distributions/pdaxrom/src/libpcap-0.9.5.tar.gzlibstdc++ 4.1.2-52GPLv3withlink exception/copyleft/gpl.htmlLinux 2.6.18/2.6.24/2.6.24.7/2.6.33.4/2.6.37/3.4.7ltrace0.5GPLv2/copyleft/gpl.htmlltt-control0.47-25012008GPLv2 https://www.google.co.il/url?sa=t&rct=j&q=&esrc=s&source=web &cd=1&ved=0CCUQFjAA&url=http%3A%2F%2Fwww.findthatzip%2Fsearch-45104713-hZIP%2Fwinrar-winzip-download-ltt-control-0.47-25012008.tar.gz.htm&ei=AcbnUvzWO-_gsAT09YLAAg&usg=AFQjCNFI8cR5UNd-izGX7cZw8Lc5pLVvDg&sig2=W5W7etipJTlXn2_MG6ghkg&cad=rjamksquashfs 4.1GPL /copyleft/gpl.html mod_mono 2.2Apache /Mod_monomodule-init-t ools 3.3-pre1/3.4/3.9GPLv2 /pub/linux/utils/kernel/module-init-tools/module-init-tools-3.3-pre1.tar.gzmono 2.4.2GPLv2 /sources/mod_mono/mod_mono-2.4.2.tar.bz2mtd-utils 1.0.0GPL ftp:///pub/mtd-utils/mtd-utils-1.0.0.tar.gzNano 1.3.10GPLv2 /dist/v1.3/nano-1.3.10.tar.gzncurses 5.5/5.6/5.7MIT /software/ncurses/Application Version License type License URLnet-snmp 5.4NET-SNMP(BSD like)/about/license.htmlnetkit-ftp0.17Regents of theUniversity ofCaliforniaBSD-like /pub/linux/system/network/netkit/netkit-ftp-0.17.ta r.gznfs-utils 1.0.8/1.1.1GPLv2 /projects/nfs/files/nfs-utils/1.0.8/nfs-utils-1.0.8.tar.gz/downloadNtp 4.2.2p3/4.2.6p2BSD like /ntp/ntp_spool/ntp4/ntp-4.2/ntp-4.2.2p3.tar.g zopenldap 2.4.23OpenLDAP(non viral)ftp:///pub/OpenLDAP/openldap-release/openlda p-2.4.23.tgzopenssh 4.3p2BSD like /files/download/47643/openssh-4.3p2.tar.gzopenssl 1.0.c OpenSSL /source/license.htmlopenssl-fips 2.0.1OpenSSL /source/license.htmloprofile0.9.7GPLv2 /projects/oprofile/files/oprofile/oprofile-0.9.7/oprofile-0.9.7.tar.gz/downloadPcre5BSD like ftp:///pub2/openpkg1/sources/DST/pcre/pcre-5.0.tar.gzPopt 1.10.7MIT like https:///poptportmap5beta BSD /blfs/view/5.1/basicnet/portmap.htmlprocps 3.2.8LGPLv2/projects/procps/readline5/6.04GPLv3/php/chet/readline/rltop.html sdparm 1.03BSD like http://sg.danny.cz/sg/sdparm.html#mozTocId197336smartctl(smartmontools)5.42GPLv2/copyleft/gpl.htmlstrace 4.5.18/4.7BSD like /m/strace-4.5.14-20061101.tar.bz2.491461-0.htmlsysfsutils 2.0.0GPLv2 /projects/linux-diag/files/sysfsutils/sysfsutils-2.0.0/Tar 1.21/1.23-7GPLv3/software/tar/tcpdump 3.9.5BSD /repo/pkgs/tcpdump/tcpdump-3.9.5.tar.gz/2135e7b1f09af0eaf66d2af822bed44a/termcap 1.31GPLv2 /gnu/termcap/Application Version License type License URLuboot GPLv2http://www.denx.de/wiki/U-Boot/Licensingudev135/147-2.42GPLv2 /repo/pkgs/udev/udev-135.tar.bz2/66 1b9df34e1304dad10f595d95b472bb/util-linux-ng 2.4.1-rc2/2.17.2-12.7GPLv2 /pub//pub/linux/utils/util -linux/v2.14/valgrind 3.4.0GPLv2 /wget 1.9.1GPLv2 /gnu/wget/wpa_supplicant1BSD http://hostap.epitest.fi/wpa_supplicant/ Zlib 1.2.3Zlib /zlib_license.html Application Version License type License URL。
[Type the document title]8.1版|2013 年 5 月|3725-69957-001/APolycom® RMX™ 1800 硬件指南© 2013 Polycom, Inc. 保留所有权利。
Polycom, Inc.6001 America Center Drive San Jose CA 95002美国未经 Polycom, Inc. 明确书面许可,不得以任何形式或通过任何电子或机械方式,复制或传播本文档的任何部分用于任何用途。
按照法律规定,复制包括译为其他语言或形式。
就缔约方之间而言,Polycom, Inc. 保留对产品所含软件全部专有权利的产权和所有权。
本软件受美国版权法和国际条约规定的保护。
因此,必须如同对待任何其他版权材料(例如书籍或录音)一样对待该软件。
我们已尽最大努力来保证本手册信息的正确性。
Polycom, Inc. 不对其中的印刷或书写错误负责。
本文信息如有更改,恕不另行通知。
ii商标信息Polycom® 以及与 Polycom 产品相关的名称和标志均为 Polycom, Inc. 的商标及/或服务标志,且均已在美国及其他国家注册并/或成为了普通法所认可的标志。
其他所有商标均为其各自所有者的资产。
专利信息随附产品可能受美国和其他国家/地区的一项或多项专利和/或 Polycom,Inc.正在申请的专利所保护。
目录目录硬件描述 . . . . . . . . . . . . . . . . . . . . . . . . . . . . . . . . . . . . . . . . . . . . . . . . . . . . . . . 1主要功能 (1)RMX 1800 规格 (2)RMX 1800系统容量 (3)资源容量 (4)场地要求 (5)安全要求 (5)机架安装安全事项 (5)安装注意事项 (6)安装 RMX 1800 (6)打开 RMX 1800 包装 (6)将 RMX 1800 安装在机箱上 (7)将 RMX 1800 连接到电源 (7)将 RMX 1800 连接到交流电源 (7)将电缆连接到 RMX 1800 (8)首次启动 (8)RMX 1800前面板 (9)RMX 1800 后面板 (10)附录 A 管制通告. . . . . . . . . . . . . . . . . . . . . . . . . . . . . . . . . . . . . . . . . . . . . . . . 11重要安全措施 (11)管制通告 (11)美国及加拿大管制通告 (11)欧盟管制通告 (12)Japan (12)Chinese (12)Korea (12)硬件描述本《硬件指南》介绍了 RMX 1800 及其组件的相关信息。