In the previous articles we discussed about Nagios 3.0 Jumpstart guide and How to monitor remote Linux host using Nagios 3.0. In this article, l’ll explain how to monitor remote windows machine and the various service running on the windows server using nagios monitoring server. Following three sections are covered in this article.
I. Overview
II. 4 steps to install nagios on remote windows host
1.Install NSClient++ on the remote windows server
2.Modify the NSClient++ Service
3.Modify the NSC.ini
4.Start the NSClient++ Service
III. 6 configuration steps on nagios monitoring server
1.Verify check_nt command and windows-server template
2.Uncomment windows.cfg in /usr/local/nagios/etc/nagios.cfg
3.Modify /usr/local/nagios/etc/objects/windows.cfg
4.Define windows services that should be monitored.
5.Enable Password Protection
6.Verify Configuration and Restart Nagios.
I. Overview
.
Following three steps will happen on a very high level when Nagios (installed on the nagios-server) monitors a service (for e.g. disk space usage) on the remote Windows host.
1.Nagios will execute check_nt command on nagios-server and request
it to monitor disk usage on remote windows host.
2.The check_nt on the nagios-server will contact the NSClient++
service on remote windows host and request it to execute the
USEDDISKSPACE on the remote host.
3.The results of the USEDDISKSPACE command will be returned back by
NSClient++ daemon to the check_nt on nagios-server.
Following flow summarizes the above explanation:
Nagios Server (check_nt) —–> Remote host (NSClient++) —–> USEDDISKSPACE
Nagios Server (check_nt) <—– Remote host (NSClient++) <—–USEDDISKSPACE (returns disk space usage)
II. 4 steps to setup nagios on remote windows host
.
1. Install NSClient++ on the remote windows server
Download NSCP 0.3.1 (NSClient++-Win32-0.3.1.msi) from NSClient++ Project.NSClient++ is an open source windows service that allows performance metrics to be gathered by Nagios for windows services. Go through the following five NSClient++ installation steps to get the installation completed.
(1) NSClient++ Welcome Screen
(2) License Agreement Screen
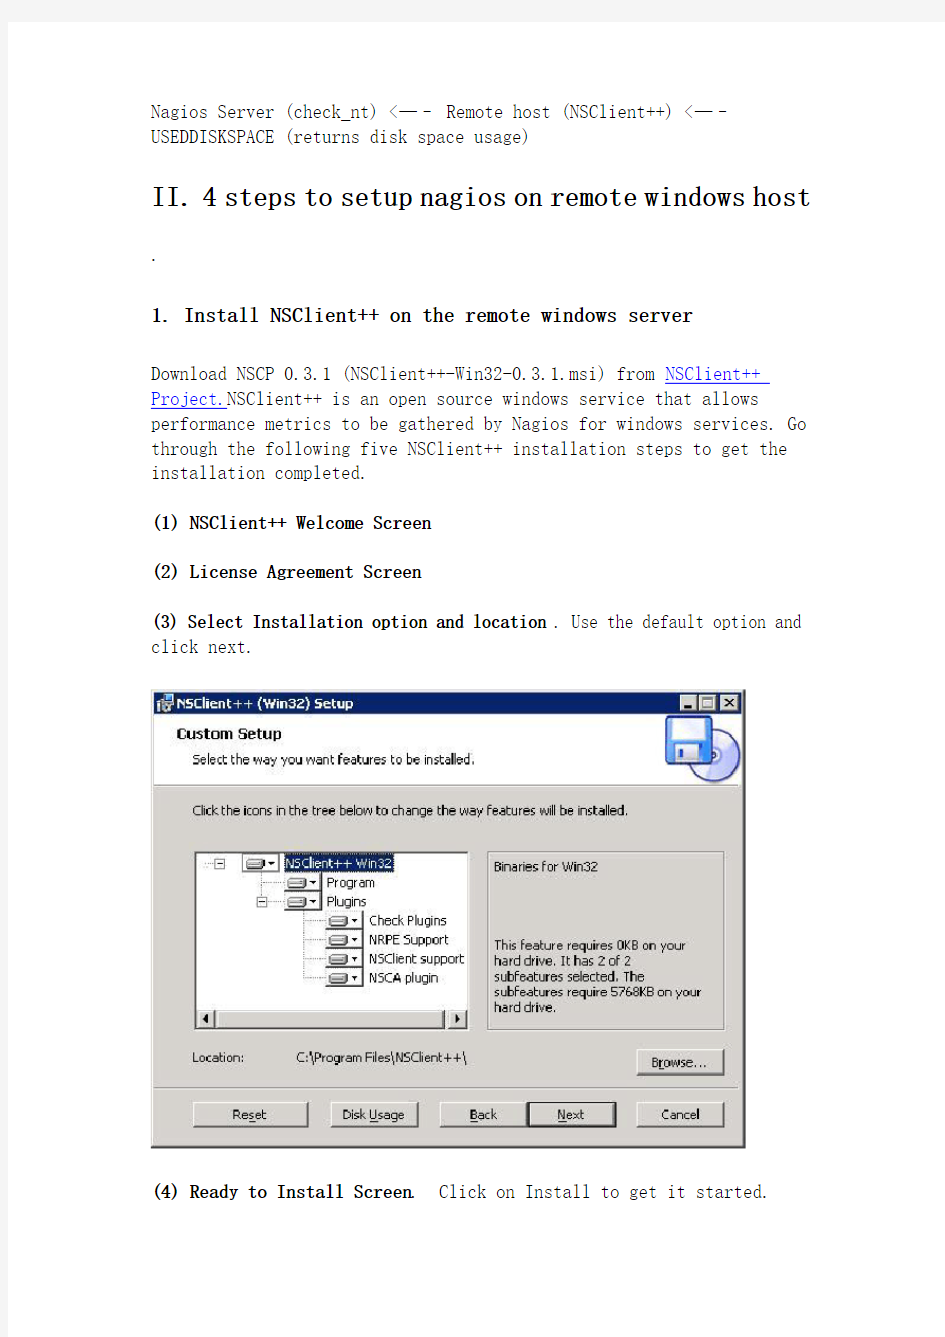
(3) Select Installation option and location. Use the default option and click next.
(4) Ready to Install Screen. Click on Install to get it started.
(5) Installation completed Screen.
2. Modify the NSClient++ Service
Go to Control Panel -> Administrative Tools -> Services. Double click on the “NSClientpp (Nagios) 0.3.1.14 2008-03-12 w32″ service and select the check-box that says “Allow service to interact with desktop” as shown below.
3. Modify the NSC.ini
(1) Modify NSC.ini and uncomment *.dll: Edit the C:\Program
Files\NSClient++\NSC.ini file and uncomment everything under [modules] except RemoteConfiguration.dll and CheckWMI.dll
[modules]
;# NSCLIENT++ MODULES
;# A list with DLLs to load at startup.
; You will need to enable some of these for NSClient++ to work.
; ! ! ! ! ! ! ! ! ! ! ! ! ! ! ! ! ! ! ! ! ! ! ! ! ! ! ! ! ! ! ! ! ! ; * * ; * N O T I C E ! ! ! - Y O U H A V E T O E D I T T H I S * ; * * ; ! ! ! ! ! ! ! ! ! ! ! ! ! ! ! ! ! ! ! ! ! ! ! ! ! ! ! ! ! ! ! ! ! FileLogger.dll
CheckSystem.dll
CheckDisk.dll
NSClientListener.dll
NRPEListener.dll
SysTray.dll
CheckEventLog.dll
CheckHelpers.dll
;CheckWMI.dll
;
; RemoteConfiguration IS AN EXTREM EARLY IDEA SO DONT USE FOR PRODUCTION ENVIROMNEMTS!
;RemoteConfiguration.dll
; NSCA Agent is a new beta module use with care!
NSCAAgent.dll
; LUA script module used to write your own "check deamon" (sort of) early beta.
LUAScript.dll
; Script to check external scripts and/or internal aliases, early beta. CheckExternalScripts.dll
; Check other hosts through NRPE extreme beta and probably a bit dangerous!
NRPEClient.dll
(2) Modify NSC.ini and uncomment allowed_hosts. Edit the C:\Program Files\NSClient++\NSC.ini file and Uncomment allowed_host under settings and add the ip-address of the nagios-server.
;# ALLOWED HOST ADDRESSES
; This is a comma-delimited list of IP address of hosts that are allowed to talk to the all daemons.
; If leave this blank anyone can access the deamonremotly (NSClient still requires a valid password).
; The syntax is host or ip/mask so 192.168.0.0/24 will allow anyone on that subnet access
allowed_hosts=192.168.1.2/255.255.255.0
Note:allowed_host is located under [Settings], [NSClient] and [NRPE] section. Make sure to change allowed_host under [Settings] for this purpose.
(3) Modify NSC.ini and uncomment port. Edit the C:\Program
Files\NSClient++\NSC.ini file and uncomment the port# under [NSClient] section
;# NSCLIENT PORT NUMBER
; This is the port the NSClientListener.dll will listen to.
port=12489
(4) Modify NSC.ini and specify password.You can also specify a password the nagios server needs to use to remotely access the NSClient++ agent.
[Settings]
;# OBFUSCATED PASSWORD
; This is the same as the password option but here you can store the password in an obfuscated manner.
; *NOTICE* obfuscation is *NOT* the same as encryption, someone with access to this file can still figure out the
; password. Its just a bit harder to do it at first glance.
;obfuscated_password=Jw0KAUUdXlAAUwASDAAB
;
;# PASSWORD
; This is the password (-s) that is required to access NSClient remotely. If you leave this blank everyone will be able to access the daemon remotly. password=My2Secure$Password
4. Start the NSClient++ Service
Start the NSClient++ service either from the Control Panel -> Administrative tools -> Services -> Select “NSClientpp (Nagios) 0.3.1.14 2008-03-12 w32″ and click on start (or) Click on “Start -> All Programs ->NSClient++ -> Start NSClient++ (Win32) . Please note that this will start the NSClient++ as a windows service.
Later if you modify anything in the NSC.ini file, you should restart the “NSClientpp (Nagios) 0.3.1.14 2008-03-12 w32″ from the windows service.
III. 6 configuration steps on nagios monitoring server
.
1. Verify check_nt command and windows-server template
Verify that the check_nt is enabled under
/usr/local/nagios/etc/objects/commands.cfg
# 'check_nt' command definition
define command{
command_namecheck_nt
command_line $USER1$/check_nt -H $HOSTADDRESS$ -p 12489 -v
$ARG1$ $ARG2$
}
Verify that the windows-server template is enabled under
/usr/local/nagios/etc/objects/templates.cfg
# Windows host definition template - This is NOT a real host, just a template!
define host{
name windows-server ; The name of this host template use generic-host ; Inherit default values from the generic-host template
check_period 24x7 ; By default, Windows servers are monitored round the clock
check_interval 5 ; Actively check the server every 5 minutes
retry_interval 1 ; Schedule host check retries at 1 minute intervals
max_check_attempts 10 ; Check each server 10 times (max)
check_command check-host-alive ; Default command to check if servers are "alive"
notification_period 24x7 ; Send notification out at any time - day or night
notification_interval 30 ; Resend notifications every 30 minutes
notification_optionsd,r ; Only send notifications for specific host states
contact_groups admins ; Notifications get sent to the admins by default
hostgroups windows-servers ; Host groups that Windows servers should be a member of
register 0 ; DONT REGISTER THIS - ITS JUST A TEMPLATE
}
2. Uncomment windows.cfg in /usr/local/nagios/etc/nagios.cfg
# Definitions for monitoring a Windows machine
cfg_file=/usr/local/nagios/etc/objects/windows.cfg
3. Modify /usr/local/nagios/etc/objects/windows.cfg
By default a sample host definition for a windows server is given under windows.cfg, modify this to reflect the appropriate windows server that needs to be monitored through nagios.
# Define a host for the Windows machine we'll be monitoring
# Change the host_name, alias, and address to fit your situation
define host{
use windows-server ; Inherit default values from a template
host_name remote-windows-host ; The name we're giving to this host
alias Remote Windows Host ; A longer name associated with the host
address 192.168.1.4 ; IP address of the remote windows host
}
4. Define windows services that should be monitored.
Following are the default windows services that are already enabled in the sample windows.cfg. Make sure to update the host_name on these services to reflect the host_name defined in the above step.
define service{
use generic-service
host_name remote-windows-host
service_description NSClient++ Version
check_command check_nt!CLIENTVERSION
}
define service{
use generic-service
host_name remote-windows-host
service_description Uptime
check_command check_nt!UPTIME
}
define service{
use generic-service
host_name remote-windows-host
service_description CPU Load
check_command check_nt!CPULOAD!-l 5,80,90
}
define service{
use generic-service
host_name remote-windows-host
service_description Memory Usage
check_command check_nt!MEMUSE!-w 80 -c 90
}
define service{
use generic-service
host_name remote-windows-host
service_description C:\ Drive Space
check_command check_nt!USEDDISKSPACE!-l c -w 80 -c 90
}
define service{
use generic-service
host_name remote-windows-host
service_description W3SVC
check_command check_nt!SERVICESTATE!-d SHOWALL -l W3SVC
}
define service{
use generic-service
host_name remote-windows-host
service_description Explorer
check_command check_nt!PROCSTATE!-d SHOWALL -l Explorer.exe }
5. Enable Password Protection
If you specified a password in the NSC.ini file of the NSClient++ configuration file on the Windows machine, you’ll need to modify the check_nt command definition to include the password. Modify the
/usr/local/nagios/etc/commands.cfg file and add password as shown below.
define command{
command_name check_nt
command_line $USER1$/check_nt -H $HOSTADDRESS$ -p 12489 -s
My2Secure$Password -v $ARG1$ $ARG2$
}
6. Verify Configuration and Restart Nagios.
Verify the nagios configuration files as shown below.
[nagios-server]# /usr/local/nagios/bin/nagios -v
/usr/local/nagios/etc/nagios.cfg
Total Warnings: 0
Total Errors: 0
Things look okay - No serious problems were detected during the pre-flight check
Restart nagios as shown below.
[nagios-server]# /etc/rc.d/init.d/nagios stop
Stopping nagios: .done.
[nagios-server]# /etc/rc.d/init.d/nagios start
Starting nagios: done.
Verify the status of the various services running on the remote windows host from the Nagios web UI (http://nagios-server/nagios) as shown below.
Best Nagios Book
Nagios Core 3 eBook–I’ve been using Nagios for
several years, and I can sleep peacefully at night knowing that Nagios is monitoring all my systems and will warn me about any potential issue, before it becomes critical. I strongly recommend that you read Nagios Core 3 ebook to gain detailed understanding on Nagios. Since Nagios is free software, spending few dollars on the book can be the best investment you can make.